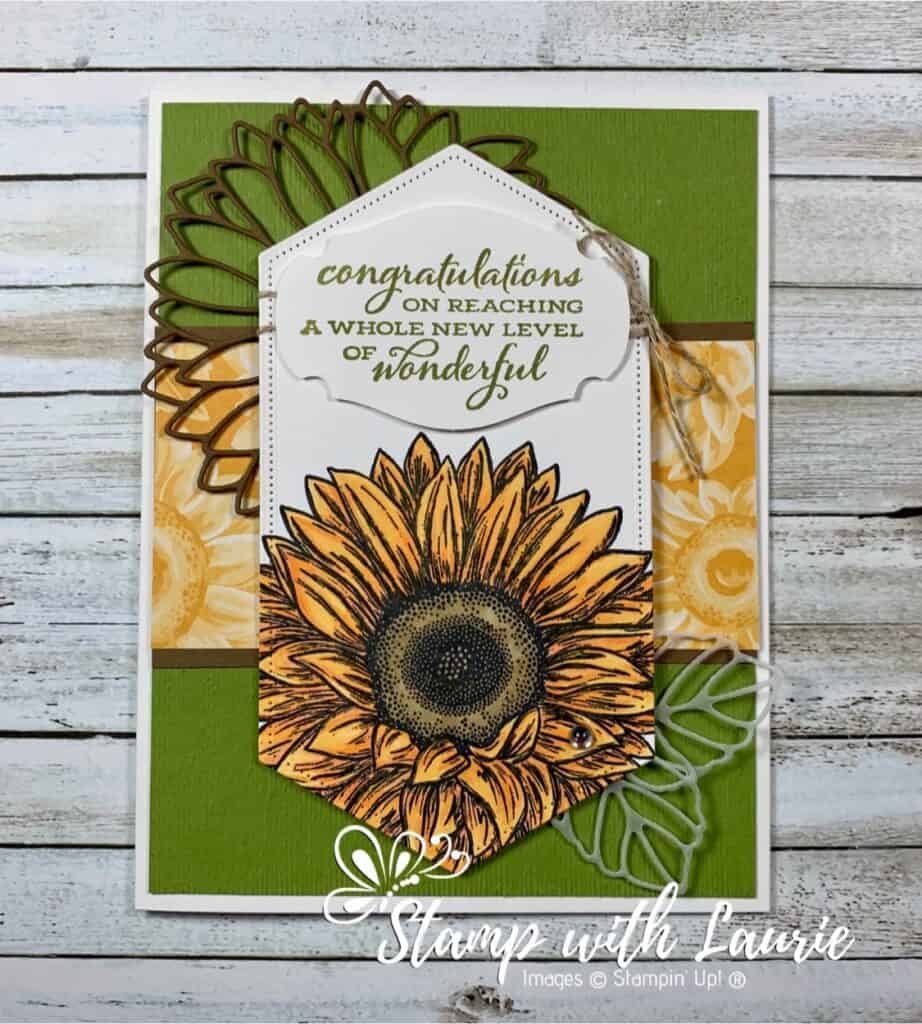
Today I am sharing a Congratulations Card that I created for a swap that used products from the new Annual Catalogue. This card with its sentiment would be perfect for all those recent graduates! I love the new Celebrate Sunflowers Stamp Set, especially the large sunflower!

For the sunflower, I used three markers, Mango Melody Light and Dark and Calypso Coral Light, for the petals. By adding a third colour, it creates more dimension and texture to what you are colouring. I used the Calypso Coral in the darkest of shadows that are indicated by the artist drawn lines. For the flower centre, I use Soft Suede Light and Dark, but for the Dark Suede, I dotted the marker to create texture that the artist has indicated with their dots. Let’s get started!
Supplies:
Stamps: Celebrate Sunflowers Bundle (154065)
Inks: Tuxedo Black Memento Ink Pad (132708), Pear Pizzazz Classic Stampin’ Pad (147104)
Paper: Whisper White Thick (140272 ), Pear Pizzazz (131201), Soft Suede (115318), Whisper White (100730), Vellum (101856), Flowers For Every Season 6″ X 6″ Designer Series Paper (152486)
Accessories: Stitched Nested Labels Dies (149638), Subtle 3D Embossing Folder (151775), Story Label Punch (150076), Mango Melody Stampin’ Blends Combo Pack (154888), Calypso Coral Stampin’ Blends Markers Combo Pack (144045), Linen Thread (104199), Frosted & Clear Epoxy Droplets (147801), Bone Folder (102300), Paper Snips (103579), Mini Glue Dots (103683), Stampin’ Seal (152813), Stampin’ Dimensionals (104430)
Measurements:
- Whisper White Thick: 8 ½” x 5 ½”; scored at 4 ¼”
- Pear Pizzazz: 4 x 5 ¼”
- Soft Suede – 2 pieces:
- 2 ¼” x 4” (behind the DSP)
- 3 ¼” x 3 ¼” (for the outline of sunflower die)
- Whisper White – 2 pieces:
- 5 ¼” x 3”
- 3” x 2” (sentiment)
- Flowers For Every Season Designer Series Paper: 2” x 4”
- Vellum – 2 pieces: scraps
Instructions for Congratulations Card:
- Fold the Whisper White Thick card stock in half to create the card base.
- Emboss the Pear Pizzazz card stock with the Subtle 3D Embossing Folder.
- Stamp the large sunflower image from the bundle in the bottom-centre of the Whisper White piece.
- Colour the sunflower using the Blends using the technique that I mentioned in the text above.
- Die cut the sunflower out using the largest die from the Stitched Nested Labels Dies.
- Stamp the sentiment in Pear Pizzazz on the other piece of Whisper White and punch it out using the Story Label Punch.
- Die cut the square Soft Suede Card Stock with the outline of the sunflower die from the Celebrate Sunflowers Bundle.
- Die cut 2 leaves in vellum from the same bundle.
- Adhere the embossed Pear Pizzazz piece to the card base.
- Adhere the Soft Suede strip to the Flowers For Every Season Designer Series Paper and centre on the card base.
- Wrap the Linen Thread around the Stitched Nested piece and tie in a bow on the right side.
- Using glue dots, adhere the leaves to the bottom right corner of the Stitched Nested piece.
- Using glue dots, adhere the Soft Suede sunflower piece to the Stitched Nested piece.
- Attach the sunflower piece using dimensionals to the card base.
- Attached the sentiment using dimensionals.
- Take one Frosted & Clear Epoxy Droplets and add it to a petal of the sunflower to make it look like dew.
For Further Info:
Hope you like my Congratulations Card!
You will find the items listed above in my online store at: https://www.stampinup.com/ecweb/products/1010001/flowers-for-every-season?dbwsdemoid=2103981.
