My Painted Poppies Birthday Card

My Painted Poppies Birthday Card

One thing I love about going to Stampin’ Up! Events is that you get to play with new products! My Painted Poppies Birthday Card is one of the cards that we made at OnStage in November. Love the new Peaceful Poppies Suite! For this card I even coloured the Whisper White Crinkled Seam Binding Ribbon with a Dark Old Olive Blend to match my project! The Designer Series Paper is gorgeous and features handpainted blooms and watercolor washes that make beautiful backgrounds or focal points for cards, scrapbook pages, and other paper crafts. Patterns include floral prints, stripes, polka dots, and more.

Supplies:

Stamps:  Peaceful Moments Cling Stamp Set (151595), Painted Poppies Cling Stamp Set (151599)

Inks: Poppy Parade Classic Stampin’ Pad (147050), Tuxedo Black Memento Ink Pad (132708)

Paper: Poppy Parade (119793), Whisper White (100730), Peaceful Poppies Designer Series Paper (151324)

Accessories: Whisper White 1/4″ (6.4 Mm) Crinkled Seam Binding Ribbon (151326), Old Olive Dark Stampin’ Blends Marker (144573), Bone Folder (102300), Paper Snips (103579 ), SNAIL Adhesive (104332), Stampin’ Dimensionals (104430

Measurements: 

  • Poppy Parade: 8 ½” x 5 ½”; scored at 4 ¼”
  • Peaceful Poppies Designer Series Paper: 2 ¼” x 3 ¾” and 2” x 3 ½”
  • Whisper White: 1 ½” x 3”
  • Whisper White Crinkled Seam Binding Ribbon: 10”

Instructions:

  1. Fold the Poppy Parade card stock in half to create the card base
  2. Stamp in Poppy Parade randomly the larger poppy and leaf from the Painted Poppies Stamp Set on the front of the card base.
  3. Stamp the sentiment in Tuxedo Black Memento Ink on the piece of Whisper White towards the bottom leaving enough room to rip the bottom edge of the card stock.
  4. Next, adhere towards the top of the card front the larger piece of DSP with adhesive.
  5. Adhere the other piece of DSP on top of the other piece with adhesive, but at a slight angle.
  6. Using the Dark Old Olive Blend, colour the Whisper White Crinkled Seam Binding Ribbon.
  7. Once dry, wrap the ribbon around the sentiment piece twice and tie in a bow.
  8. Using dimensionals, adhere the sentiment piece to the card front.

For Further Info:

Hope you like my Painted Poppies Birthday Card!

You will find the items listed above in my online store at:
https://www.stampinup.com/ecweb/default.aspx?dbwsdemoid=2103981

My Winter Reindeer Card

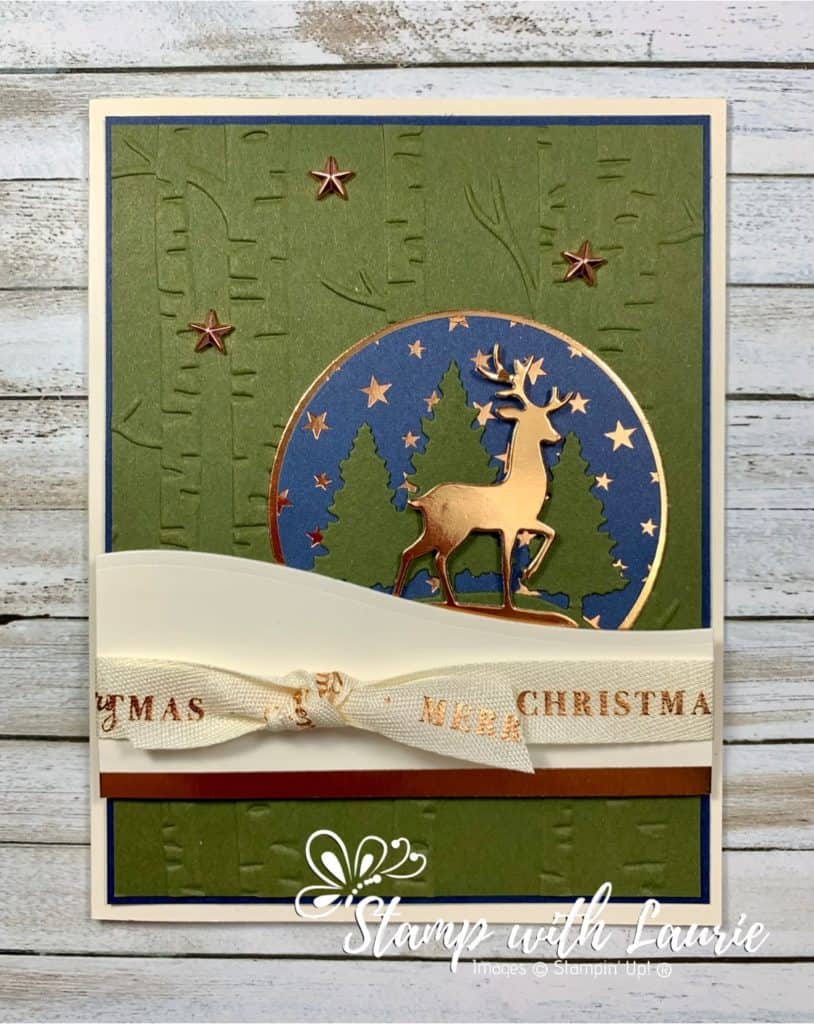
Winter Reindeer Card Using the Snow Globe Scenes Dies

Today I am sharing with you my Winter Reindeer Card that has a unique twist on the Snow Globe Scene Dies. It is using the dies not to create a snow globe, but a vignette of a winter scene. I love the Brightly Gleaming Specialty Designer Series Paper and how the Star Designer Elements continue the starry night into the Mossy Meadow Woodlands. This particular card has no stamping involved, but it is very striking with all its copper accents!

Supplies:

Dies:  Snow Globe Scenes Dies (150655), In The Woods Dies (147919)

Paper: Very Vanilla Thick (144237), Night Of Navy (100867), Mossy Meadow (133676), Very Vanilla (101650), Brightly Gleaming Specialty Designer Series Paper (150429), Copper Foil Sheets (142020)

Accessories:  Woodland Embossing Folder (152881), Very Vanilla/Copper Classic Weave Ribbon (150394), Star Designer Elements (150430), Bone Folder (102300), Paper Snips (103579 ), SNAIL Adhesive (104332), Stampin’ Dimensionals (104430), Mini Glue Dots (103683)

Measurements: 

  • Very Vanilla Thick: 8 ½” x 5 ½”; scored at 4 ¼” 
  • Night of Navy: 5 ¼” x 4”
  • Mossy Meadow: 5 1/8” x 3 7/8” and 2” x 2 1/8
  • Copper Foil: 2¼” x 2 9/16” and 4” x ½” 
  • Brightly Gleaming Specialty Designer Series Paper: 2¼” x 2 9/16
  • Very Vanilla: 4’ x 1 ½” 
  • Very Vanilla/Copper Classic Weave Ribbon: 2 pieces – 4 ½” and 3” 

Instructions:

  1. Fold the Very Vanilla Thick card stock in half.
  2. Emboss the Mossy Meadow with the Woodland Embossing Folder.
  3. Die cut the Copper Foil with the dome die from the Snow Globe Scenes Dies.
  4. Take the reindeer die and place in the center of the Copper Foil that you just cut and die cut it out. This is a great trick to save paper.
  5. Die cut the Brightly Gleaming Specialty DSP with the dome die from the Snow Globe Scenes Dies.
  6. Die cut the Mossy Meadow with the Tree die from the Snow Globe Scenes Dies.
  7. Next, die cut the Very Vanilla with the In The Woods Dies to create a snowbank.
  8. Add the strip of Copper Foil to the base of the Very Vanilla snowbank.
  9. Using snail adhesive, adhere the Night of Navy card stock to the Thick Very Vanilla card base and the Embossed Mossy Meadow to the Night of Navy.
  10. Adhere with snail the Brightly Gleaming Specialty DSP to the copper foil leaving a small border at the top and sides.
  11. Using glue dots, adhere the Mossy Meadow trees to the Brightly Gleaming Specialty DSP.
  12. The reindeer is popped up with dimensionals in front of the Mossy Meadow trees.
  13. Attach the scene to the Mossy Meadow with snail adhesive.
  14. Attach the larger Very Vanilla/Copper Classic Weave Ribbon to the snowbank wrapping around the back and securing with snail adhesive.
  15. Tie the smaller Very Vanilla/Copper Classic Weave Ribbon in a knot to the larger ribbon on the left side of the snowbank. Trim the tails.
  16. Add the Very Vanilla snowbank with dimensionals overlapping the winter scene to make it look like the reindeer is walking through snow.
  17. Add three Star Designer Elements.

For Further Info:

Hope you like my Winter Reindeer Card!

You will find the items listed above in my online store at:
https://www.stampinup.com/ecweb/default.aspx?dbwsdemoid=2103981.

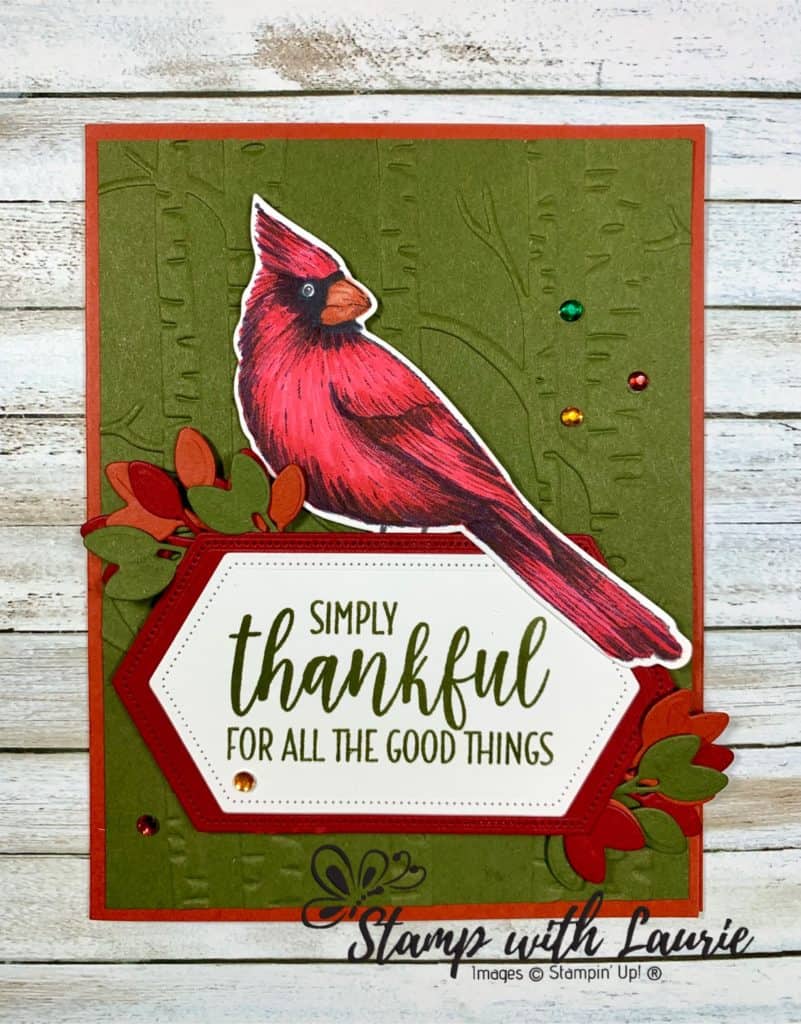
Thankful Cardinal Card

Cardinal Thankful Card using the Stampin' Up! Toile Christmas Bundle
Cardinal Thankful Card using the
Stampin’ Up! Toile Christmas Bundle

Happy Thanksgiving to all my Canadian Carding Buddies! Thought I would share a card using the Cardinal from the Toile Christmas Bundle for a Thankful Cardinal Card. I had a lot of fun colouring him with my Blends!

Supplies:

Stamps:  Toile Christmas (cling 150469), Country Home (Photopolymer 147678)

Inks:  Tuxedo Black Memento Ink Pad (132708), Mossy Meadow Classic Stampin’ Pad (147111)

Paper: Mossy Meadow (133676), Whisper White (100730), Cajun Craze (119684), Real Red (102482)

Accessories:  Big Shot (143263), Toile Christmas Bundle (cling 152367), Woodland Embossing Folder (139673 ), Bone Folder (102300), Stitched Nested Labels Dies (149638), Real Red Combo Pack Stampin’ Blends (147935), Basic Black Combo Pack Stampin’ Blends (147942), Cajun Craze Combo Pack Stampin’ Blends (147931), Holiday Rhinestone Basic Jewels (150457), SNAIL Adhesive (104332), Stampin’ Dimensionals (104430), Mini Glue Dots (103683)

Measurements: 

  • Cajun Craze: 8 ½” x 5 ½”; scored at 4 ¼” 
  • Mossy Meadow: 5 ¼” x 4”
  • Perennial Essence Designer Series Paper: 2 pieces at 3” x 4”
  • Whisper White: 2 pieces at 2 ¼” x 3 ¾” (sentiment) and 2 ¼” x 4 ½” (cardinal)
  • Real Red: 2 ½” x 4 ¼”
  • Scraps of Real Red, Mossy Meadow and Cajun Craze

Instructions:

  1. Stamp the cardinal in Tuxedo Black Memento on Whisper White.
  2. Using the Blends colour the cardinal.
  3. On the Big Shot, cut out the cardinal using the matching cardinal die from the Toile Christmas Bundle.
  4. Run the Mossy Meadow CS with the Woodland Embossing Folder through the Big Shot.
  5. Use the third largest nested die to cut the Real Red CS.
  6. Stamp the sentiment in Mossy Meadow on the Whisper White CS and die cut it using the fourth largest nested die.
  7. Using the scraps, die cut 2 branches of each colour.
  8. Fold the piece of Cajun Craze card stock in half to form the card base.
  9. Attach the embossed Mossy Meadow piece to the front of the card base.
  10. Use glue dots to attach the branches to the back of the Real Red CS.
  11. Attach the sentiment to the Real Red piece.
  12. Attach the sentiment piece with dimensionals to the front of the card.
  13. Tuck in cardinal and adhere with dimensionals.
  14. Add 5 Holiday Rhinestone Basic Jewels in various colours scattered on the front.

For Further Info:

You will find the items listed above in my online store at:
https://www.stampinup.com/ecweb/default.aspx?dbwsdemoid=2103981.

Introducing the Magnolia Lane Suite

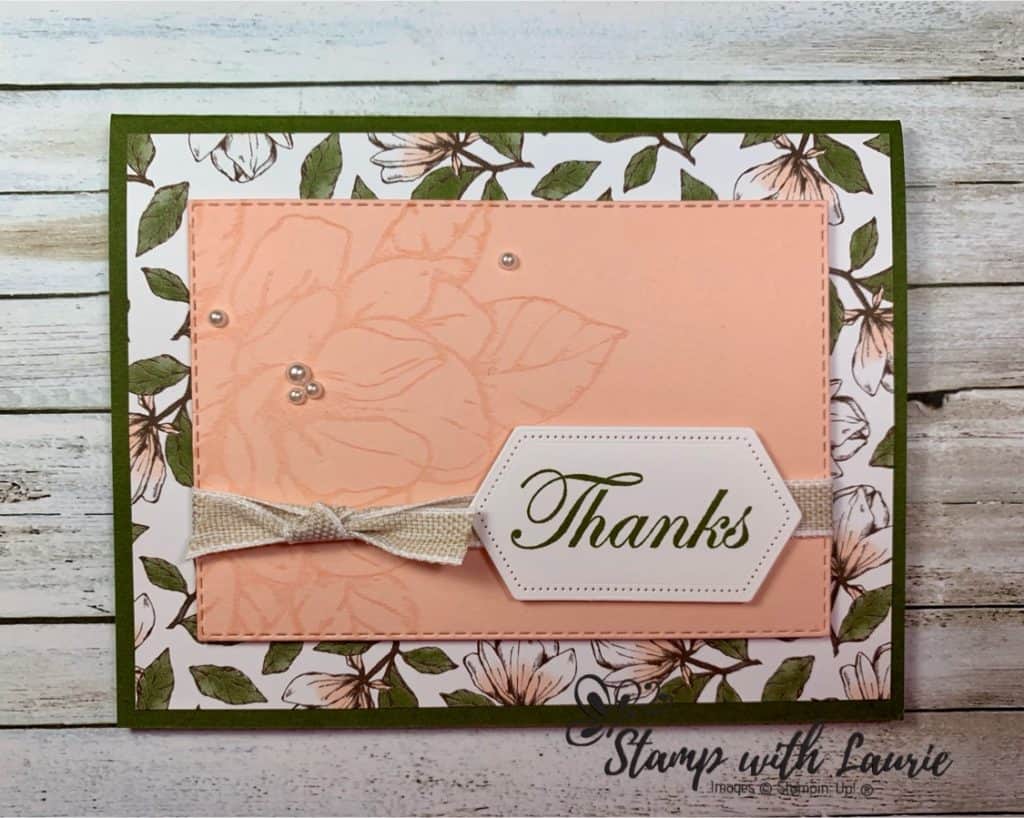
Count Down to the new Catty! Recently I presented a card to some fellow demonstrators using the Magnolia Lane Suite in the new upcoming catalogue that starts on June 4th. You are going to love this beautiful suite! I created 3 different versions of the card to show how you can create a beginner, a casual and an avid stamper card. Here is the beginner card using the large floral image from Magnolia Lane Suite.

Magnolia Lane Suite Beginner Card

Supplies for Magnolia Lane Suite Card:

Stamps:  Good Morning Magnolia (cling 149298)

Inks:  Versamark Pad (102283), Mossy Meadow (147111), Petal Pink (147108)

Paper: Mossy Meadow (133676), Whisper White (100730), Petal Pink (146985), Magnolia Lane Designer Series Paper (149484)

Accessories:  Big Shot (143263), Rectangle Stitched Framelits Dies (148551), Bone Folder (102300), Stitched Nested Labels Dies (149638), Pearl Basic Jewels (144219), Magnolia Lane Ribbon Combo Pack (149485), Stampin’ Trimmer (126889), Paper Snips (103579), Stamparatus (146276), SNAIL Adhesive (104332), Stampin’ Dimensionals (104430)

Measurements: 

  • Mossy Meadow: 8 ½” x 5 ½”; scored at 4 ¼” 
  • Magnolia Lane Designer Series Paper: 5 ¼” x 4”
  • Petal Pink: 4 ½” x 3¼”
  • Whisper White: 2” x 3”
  • Whisper White: 5 ¼” x 4”
  • Ribbon 5” and 4”

Instructions: 

On the Big Shot, cut out the third largest rectangle from the Petal Pink card stock using the Rectangle Stitched Framelits Dies

Stamp the large magnolia image in Versamark onto the Petal Pink card stock using the Stamparatus. You may need to stamp multiple times to get a good impression.

On the small piece of white card stock, stamp the saying with Mossy Meadow ink.

On the Big Shot, cut out the stamped saying using the Stitched Nested Labels Dies.  You can centre the die over top of the stamped saying.

Fold the piece of Mossy Meadow card stock in half to form the card base.

Attach the piece of Magnolia Lane Designer Series Paper to the Mossy Meadow card stock with SNAIL adhesive.

Wrap the ribbon around the Petal Pink card stock and tie the smaller piece of ribbon in a knot on right side of ribbon.

Attach the saying to the front of the card with dimensionals.

Attach the Pearl Basic Jewels to the Petal Pink card stock

Stamp in Petal Pink the small magnolia blossom in lower right hand corner of large piece of Whisper White card stock

Attach the stamped Whisper White card stock to the inside of card base

You are going to love the Magnolia Lane Suite found in the new catalogue!

Stampin’ Up! Retiring In-Colors Swap Card

My Stampin' Up! Retiring In-Colors Swap Card
Stampin’ Up! Retiring In-Colors Swap Card

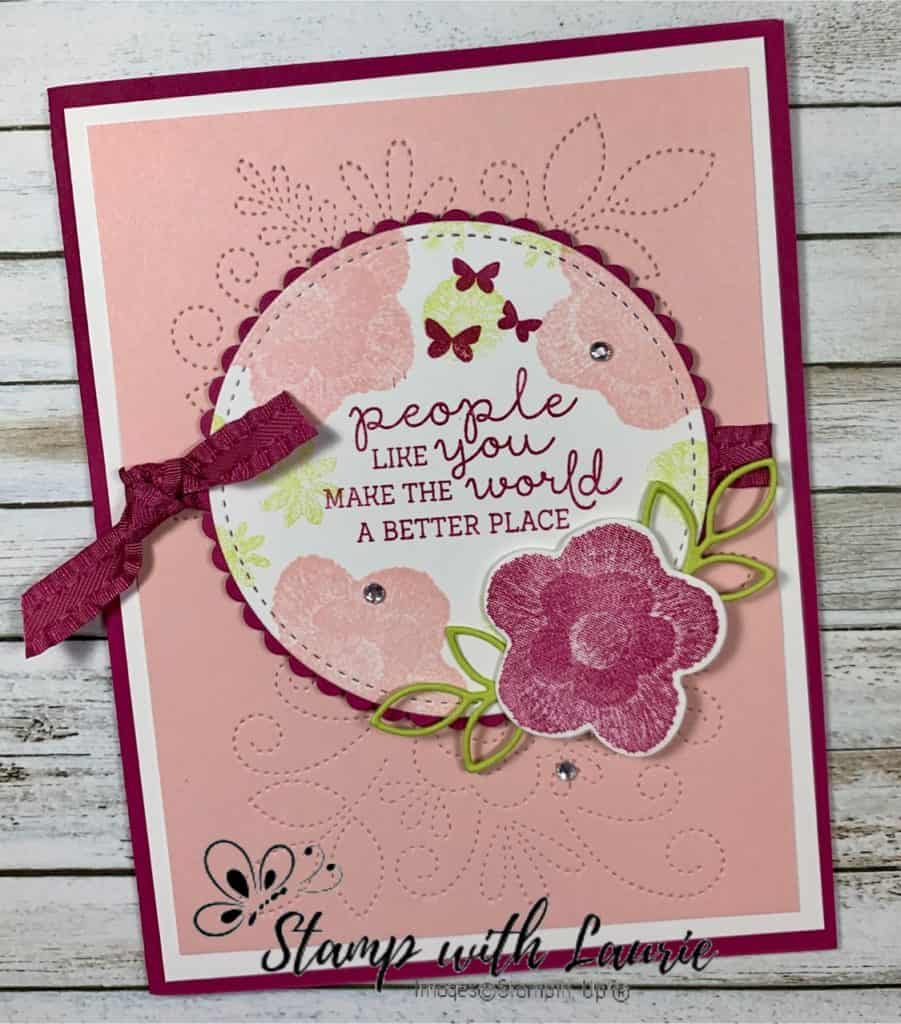
I would like to share with you a swap card I made recently using Stampin’ Up!’s retiring In-Colors Berry Burst, Powder Pink and Lemon Lime Twist. I will be sad to see these colours retire! I also used the Needle & Thread Photopolymer Bundle to create this beautiful card. As a result, this card is a creative master piece.

First of all, this card features a base in Berry Burst measuring 8 1/2″ x 5 1/2″ folded in half to create a card 4 1/4″ x 5 1/2″. Next, I used a layer of Whisper White 4″ x 5 1/4″. Powder Pink measuring 3 3/4″ x 5″ creates the next layer which is die cut twice with the floral pin hole die.

The largest circle is die cut from the Stitched Shapes Framelits Dies on a piece of Whisper White card stock. I also stamped the largest flower in Powder Pink, the trio of flowers in Lemon Lime Twist and the butterflies in Berry Burst. The corresponding Berry Burst scallop die was layered under the stamped circle.

In addition, the large flower was stamped on a separate piece of whisper White and die cut with the Needlepoint Elements Framelits Dies. The Lemon Lime Twist leaves were also die cut from the Framelits.

Finally, the Berry Burst 3/8″ (1 Cm) Mini Ruffled Ribbon and some Rhinestone Basic Jewels add some elegant to this card.

Hope you liked my Retiring In-Colors Swap Card!

Which retiring 2017-19 retiring colour will you miss the most? Leave your answer in the comments below.