My Cardinal Anniversary Card

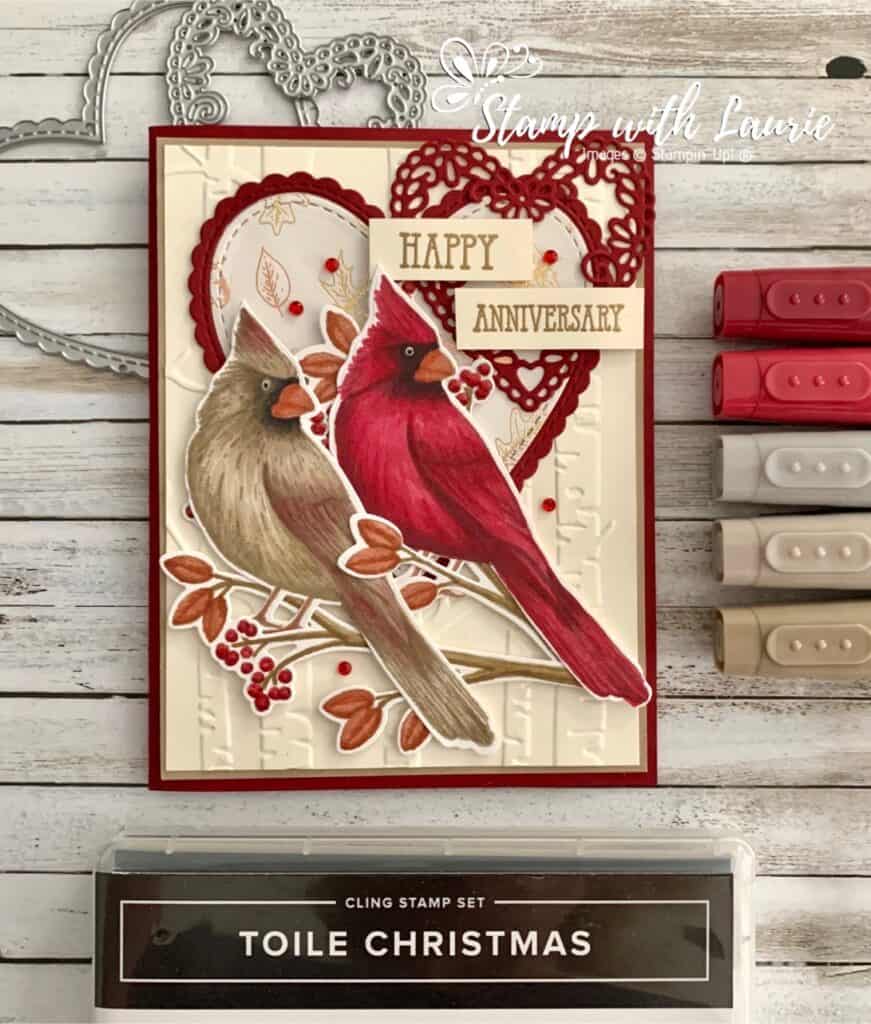
My Cardinal Anniversary Card

Today I am sharing with you my Cardinal Anniversary Card using the Toile Christmas Stamp Set and matching Christmas Cardinal Dies by Stampin’ Up! I was asked by a good friend to create a custom anniversary card for her to give to her husband. She mentioned that he loves cardinals and she would like one on the card. So, I decided to that two cardinals, a male and female, would be perfect for an anniversary card. Did you know that cardinals mate for life!

I decided to create a Fall scene with the Woodland Embossing Folder and the Gilded Autumn Specialty Designer Series Paper since they were married in October. I love the copper and gold gilded leaves on the paper! To tie in the gold accents, I embossed the sentiment from the Well Said Stamp Set in gold. For an anniversary card, I had to pull in the hearts with the Stitched Be Mine Dies! Some Red Rhinestone Basic Jewels and Shimmery Crystal Effects on the berries add a bit of sparkle to the card.

I used a number of techniques to colour my birds such as the No-Lines, Flicking and Tip-to-Tip. I included more information below, as well as some colouring videos at the end of this post.

For the male cardinal, I used Cherry Cobbler Light/Dark Blends and the Dark Smokey Slate Blend to darken the shadows in strategic locations, such as his tail, his breast and wing, giving the bird depth. For the female cardinal, I used Crumb Cake Light/Dark Blends and Light Crumb Cake/Dark Cherry Cobbler Blends.
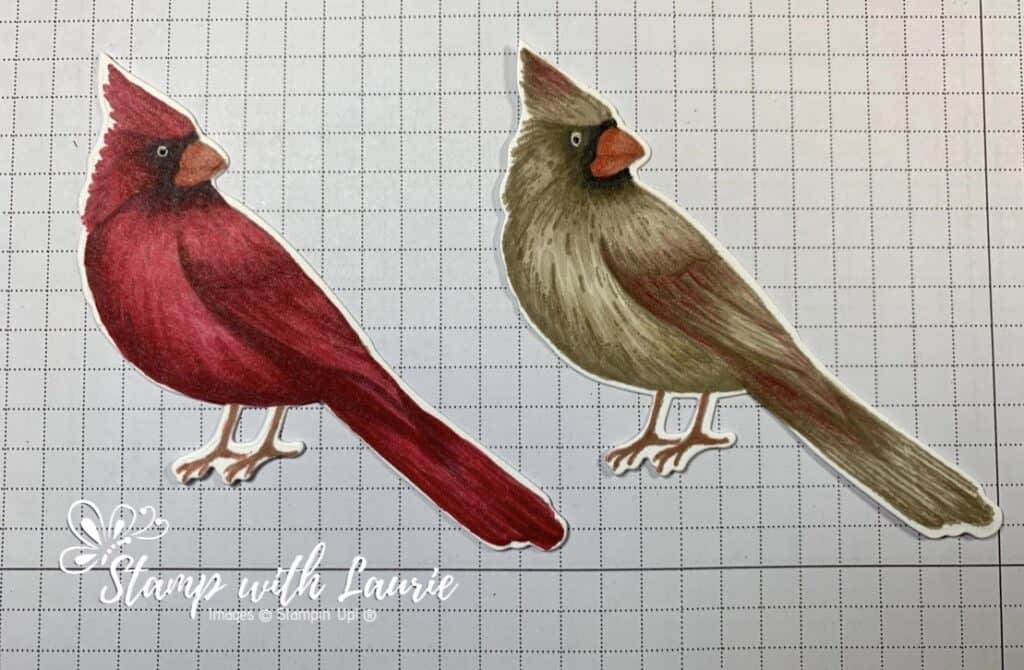
My Cardinals Coloured with Stampin' Blends
My Cardinals Coloured with Stampin’ Blends

No-Lines Technique

I coloured these beautiful cardinals with the no-lines technique. This technique uses a light colour to stamp the image. For the cardinals, I used the Sahara Sand Classic Stampin’ Pad. The lighter colour gives you a guideline for your colouring without the harsh black lines and makes the image more real and vibrant.

Flicking Technique

Once stamped, I used a flicking technique with my Blends to create a lot of texture. This technique is achieved by applying ink in quick, single strokes. The key to this inking technique is to flick the marker tip across the page to create a single stroke that goes from dark to light.

  1. Holding the marker loosely, start a downward movement towards the paper
  2. As the marker tip touches the paper, quickly move across the paper, bringing your hand up and away from the paper. This will apply more ink at the beginning of the stroke and less at the end.
  3. You may need to turn the paper to accommodate the angle that is most comfortable for you.

Flicks can be left unblended to create texture such as for hair or feathers (like this card). Or, they can be blended out to create smooth shading.

The Tip-to-Tip Technique

To combine two different coloured blends on the female cardinal, I used the Tip to Tip Blending Technique. This gives you a smooth transition of colors and doesn’t end up looking all blotchy where the colors meet. I’ve chosen the Light Crumb Cake Blend and the Dark Cherry Cobbler Blend for the female cardinal.

  1. Brush the tip of the Light Crumb Cake Blend over the tip of the Dark Cherry Cobbler Blend to pick up some color. The Crumb Cake Blend then acts as your brush to apply a mix of both colors.
  2. As you apply the Crumb Cake Blend, the Cherry Cobbler will eventually run out and only Crumb Cake is left. This creates a smooth transition between the two colours. I kept working these blends together until I was happy with the amount of Cherry Cobber I had on the bird.
  3. Don’t worry about your markers being contaminated—all you need to do is run them over some scrap paper a few times and the nibs will clean themselves.
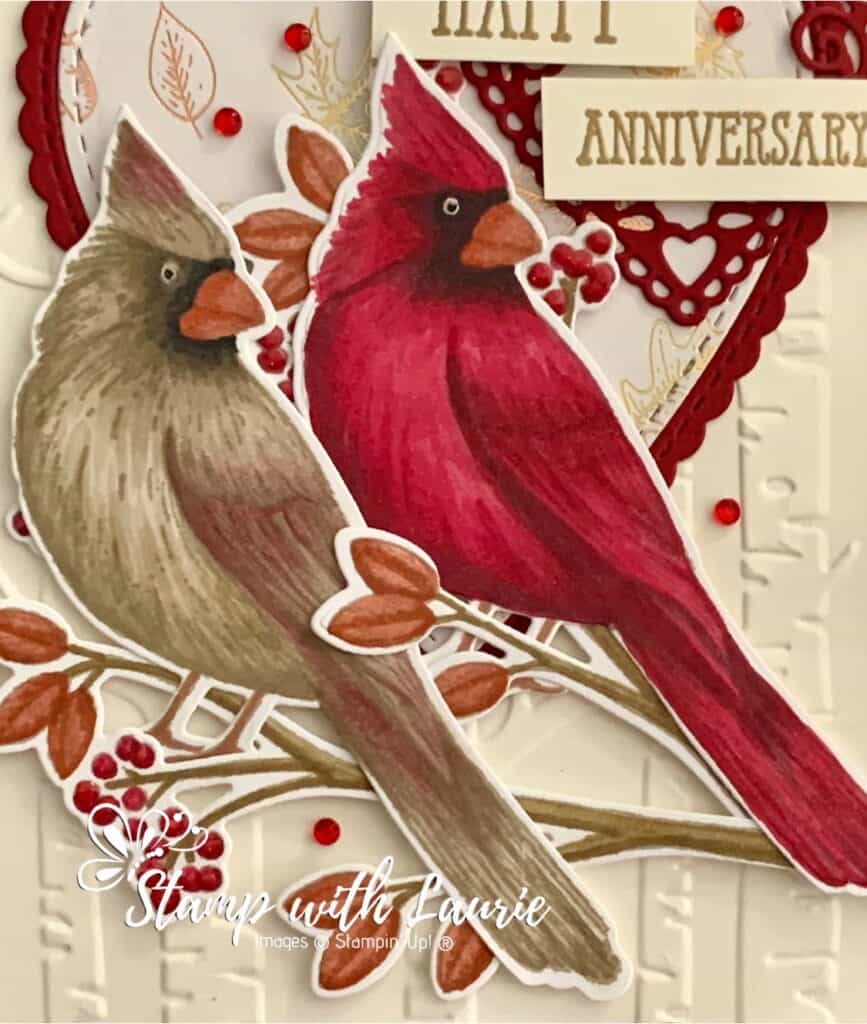
Close Up of my Cardinal Anniversary Card

Supplies:

Stamps: Toile Christmas Cling Stamp Set (150469), Well Said Stamp Set (148796)

Dies:  Christmas Cardinal Dies (150640), Stitched Be Mine Dies (151814)

Inks: Tuxedo Black Memento Ink Pad (132708), Sahara Sand Classic Stampin’ Pad (147117), VersaMark (102283)

Paper: Cherry Cobbler (119685), Crumb Cake (120953), Very Vanilla (101650), Whisper White (100730), Gilded Autumn Specialty Designer Series Paper (153520)

Accessories: Woodland Embossing Folder (152881), Cherry Cobbler Stampin’ Blends Combo Pack (154880), Smoky Slate Stampin’ Blends Combo Pack (154904), Cajun Craze Stampin’ Blends Combo Pack (154879), Crumb Cake Stampin’ Blends Combo Pack (154882), Soft Suede Stampin’ Blends Combo Pack (154906), Gold Stampin’ Emboss Powder (109129), Red Rhinestone Basic Jewels (146924), Shimmery Crystal Effects (150892), Bone Folder (102300), Stampin’ Seal (152813), Stampin’ Dimensionals (104430), Mini Stampin’ Dimensionals (144108), Mini Glue Dots (103683)

Measurements: 

  • Cherry Cobbler:
    • 8 ½” x 5 ½”; scored at 4 ¼”
    • 3 ½” x 3 ¾” (large heart)
    • 2 ¼” x 2 3/8” (small heart)
  • Crumb Cake: 5 ¼ x 4”
  • Very Vanilla: 5 1/8” x 3 7/8” and scraps for sentiment
  • Gilded Autumn Specialty Designer Series Paper: 3” x 3¼”
  • Whisper White: 2 pieces of each
    • 2 x 4 ½” (cardinal)
    • 2 ½” x 4 ¼” (branch)

Instructions:

  1. Fold the Cherry Cobbler card stock in half.
  2. Stamp the cardinals and branches in Sahara Sand on Whisper White card stock.
  3. Colour the cardinal using the flicking technique described above in Cherry Cobbler Light/Dark and Dark Smokey Slate for the male.
  4. For the female, use Crumb Cake Light/Dark and the Tip-to-Tip Technique with Crumb Cake/Cherry Cobbler.
  5. Use Basic Black Light/Dark for the masks on their faces and Cajun Craze Light/Dark for their beaks and feet.
  6. Colour the branches in Cajun Craze Light/Dark for the leaves, Cherry Cobbler Light/Dark for the berries and Soft Suede Light/Dark for the branch part.
  7. Using the Christmas Cardinal Dies, die cut the cardinal and branches.
  8. Add Shimmery Crystal Effects to the berries on the branches and set aside to dry.
  9. Emboss the Very Vanilla piece with the Woodland Embossing Folder.
  10. Stamp the sentiment in VersaMark on the scraps of Very Vanilla and heat emboss with Gold Stampin’ Emboss Powder. Trim to fit.
  11. Die cut in Cherry Cobbler the large scallop heart and the small filigree heart from the Stitched Be Mine Dies.
  12. Die cut the Gilded Autumn Specialty Designer Series Paper with the heart that layers into the scallop heart.
  13. Using Stampin’ Seal adhere the Crumb Cake piece to the card base.
  14. .Adhere the embossed Very Vanilla piece with Stampin’ Seal to the Crumb Cake.
  15. Attached the Cherry Cobbler scallop heart to the Very Vanilla piece towards the top and aahere the DSP to the centre of it.
  16. Using Multipurpose Liquid Glue, adhere the filigree heart to the scallop heart in the top right-hand corner overlapping the card base.
  17. Using glue dots, adhere the branches to the cardinals.
  18. Pop the cardinals and branches up with dimensionals.
  19. Pop up the sentiment with dimensionals.
  20. Scatter 5 Red Rhinestone Basic Jewels on the card.

For Further Info for My Cardinal Anniversary Card:

Hope you like my Cardinal Anniversary Card!

My Colouring Notes from my Colouring presentation:
https://stampwithlaurie.com/wp-content/uploads/2020/08/Stampin-Up-Blends-2020.pdf

Part 1Whiskey Business Card using Blending Different Colours Technique
Video Tutorial: Blending Different Colours Together

Part 2Country Harvest Card using Light to Dark Technique
Video Tutorial: Light to Dark/Dark to Light Colouring

Part 3Beautiful Poppy Birthday Card using Smooth Colouring Technique
Video Tutorial: Smooth Colouring

Part 4Let’s Gather Together Card using Tip to Tip Blending Technique
Video Tutorial: Tip to Tip Colouring

Part 5So Grateful Cardinal Card using Flicking Colouring Technique
Video Tutorial: Flicking Colouring

Part 6Let’s Celebrate You Card using Flicking of Different Colours Technique
Video Tutorial: Flicking of Different Colours Technique

You will find the items listed above in my online store.

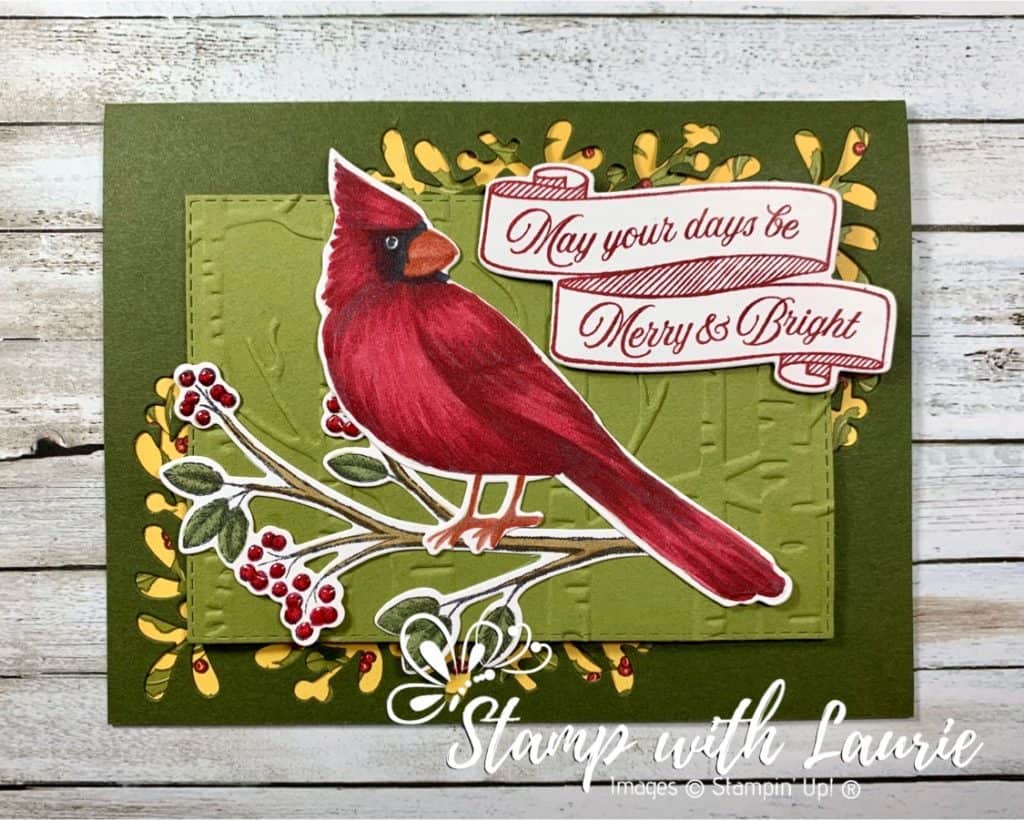
My Cardinal Card

My Cardinal Card using the Toile Christmas Bundle

Today I am sharing with you my Cardinal Card using the Toile Christmas Bundle. I was asked to present my colouring techniques at Stamp-a-Rama, a local event for 100 participants, in October and this is one of the cards that I made for it. If you are interested, I have included a PDF of my notes from the event at the bottom of this post.

I coloured this beautiful cardinal with the no-lines technique. This technique uses a light colour, like Sahara Sand, to stamp the image. The lighter colour gives you a guideline for your colouring without the harsh black lines and makes the image more real and vibrant. Once stamped, I used a flicking technique with my Cherry Cobbler Light and Dark Blends to create a lot of texture. This technique is achieved by applying ink in quick, single strokes. The key to this inking technique is to flick the marker tip across the page to create a single stroke that goes from dark to light.

  1. Holding the marker loosely, start a downward movement towards the paper
  2. As the marker tip touches the paper, quickly move across the paper, bringing your hand up and away from the paper. This will apply more ink at the beginning of the stroke and less at the end.
  3. You may need to turn the paper to accommodate the angle that is most comfortable for you.
Close-Up of my colouring of the cardinal in My Cardinal Card

This technique allows the individual feathers to stand out such as on the tail. Next, I used the Dark Smokey Slate to darken the shadows in strategic locations, such as his tail, his breast and wing, giving the bird depth.

Supplies:

Stamps: Toile Christmas Cling Stamp Set (150469)

Dies:  Christmas Cardinal Dies (150640), Christmas Layers Dies (150654), Stitched Rectangle Dies (148551)

Inks: Tuxedo Black Memento Ink Pad (132708), Cherry Cobbler Classic Stampin’ Pad (147083), Sahara Sand Classic Stampin’ Pad (147117)

Paper: Whisper White (100730), Mossy Meadow (133676), Old Olive (100702), Night Before Christmas Designer Series Paper (150437)

Accessories:  Woodland Embossing Folder (152881), Cherry Cobbler Stampin’ Blends Markers Combo Pack (144598), Basic Black Combo Pack Stampin’ Blends (147942), Pumpkin Pie Stampin’ Blends Markers Combo Pack (144599), 

Mossy Meadow Stampin’ Blends Combo Pack (148547), Crumb Cake Stampin’ Blends Markers Combo Pack (144601), Shimmery Crystal Effects (150892), Bone Folder (102300), SNAIL Adhesive (104332), Stampin’ Dimensionals (104430), Mini Glue Dots (103683)

Measurements: 

  • Mossy Meadow: 8 ½” x 5 ½”; scored at 4 ¼” 
  • Old Olive: 4 ½” x 3 ¼”
  • Mossy Meadow: 5 1/8” x 3 7/8” and 2” x 2 1/8
  • Night Before Christmas Designer Series Paper: 5¼” x 4”
  • Whisper White: 2 x 4 ½” (cardinal), 2” x 3” (sentiment), 2 ½” x 4 ¼” (branch)

Instructions:

  1. Fold the Mossy Meadow card stock in half.
  2. Die cut the branch from the Christmas Layers Dies twice in opposite corners on the front of the Mossy Meadow card base.
  3. Adhere the Night Before Christmas Designer Series Paper with snail to the back of the card front allowing the berries to peek through the die cut branches. This also allows the back of the DSP to show on the inside of the card creating visual interest.
  4. Die cut the Old Olive card stock using the third largest Stitched Rectangle Die.
  5. Emboss the Stitched Old Olive piece with the Woodland Embossing Folder.
  6. Stamp the cardinal in Sahara Sand on Whisper White card stock.
  7. Colour the cardinal using the flicking technique described above in Cherry Cobbler and Light Basic Black.
  8. Use the Pumpkin Pie Blends for his beak and feet.
  9. Use the Basic Black Blends for his mask on his face.
  10. Using the cardinal from the Christmas Cardinal Dies, die cut the cardinal out.
  11. Stamp in Memento Tuxedo Black Ink the branches on Whisper White card stock.
  12. Colour the leaves, branches and berries with Mossy Meadow, Crumb Cake and Cherry Cobbler Light and Dark Blends
  13. Using the branch die from the Christmas Cardinal Dies, die cut the branch out.
  14. Add Shimmery Crystal Effects to the berries on the branch and set aside to dry.
  15. Stamp the sentiment in Cherry Cobbler on Whisper White card stock and die cut it with the matching die from the Christmas Cardinal Dies.
  16. The Stitched Old Olive piece is popped up with dimensionals.
  17. Using snail adhere the branch to the Old Olive piece.
  18. Layer the cardinal on top of the branch making it appear as if he is standing on the branch.
  19. The sentiment is popped up with dimensionals. 

For Further Info:

Hope you like my Cardinal Card!

To download my notes on how I like to colour using Stampin’ Blends from Stamp-a-Rama, please click here. I hope you find this useful!

You will find the items listed above in my online store at:
https://www.stampinup.com/ecweb/default.aspx?dbwsdemoid=2103981.

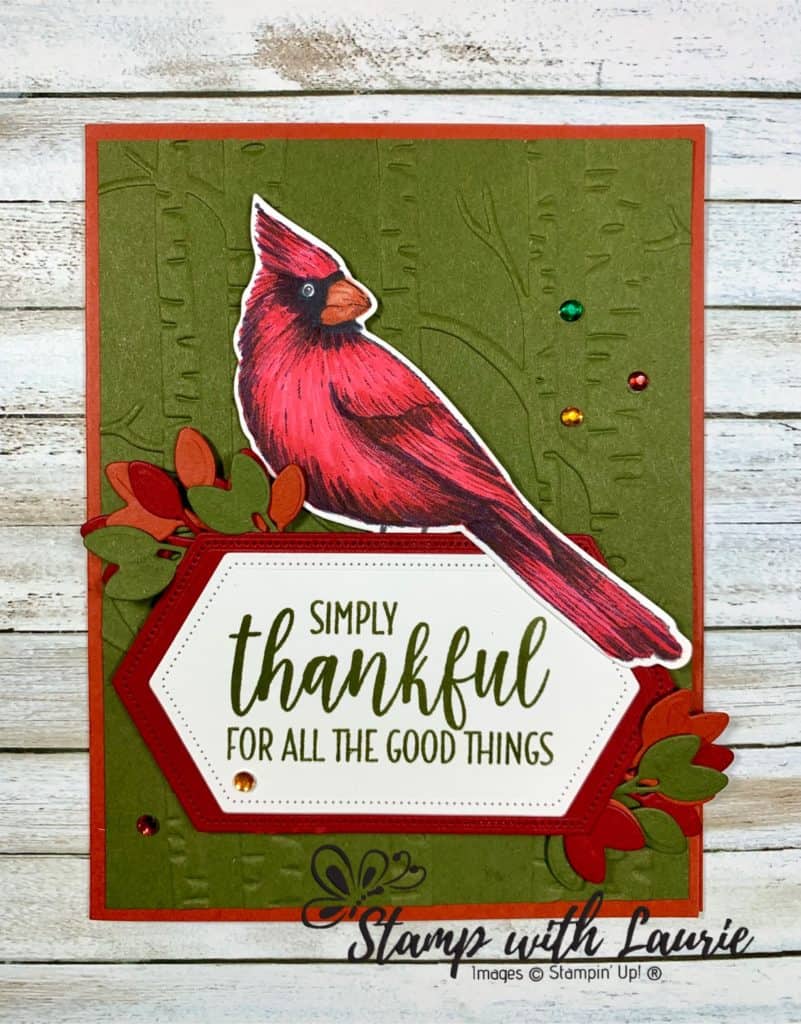
Thankful Cardinal Card

Cardinal Thankful Card using the Stampin' Up! Toile Christmas Bundle
Cardinal Thankful Card using the
Stampin’ Up! Toile Christmas Bundle

Happy Thanksgiving to all my Canadian Carding Buddies! Thought I would share a card using the Cardinal from the Toile Christmas Bundle for a Thankful Cardinal Card. I had a lot of fun colouring him with my Blends!

Supplies:

Stamps:  Toile Christmas (cling 150469), Country Home (Photopolymer 147678)

Inks:  Tuxedo Black Memento Ink Pad (132708), Mossy Meadow Classic Stampin’ Pad (147111)

Paper: Mossy Meadow (133676), Whisper White (100730), Cajun Craze (119684), Real Red (102482)

Accessories:  Big Shot (143263), Toile Christmas Bundle (cling 152367), Woodland Embossing Folder (139673 ), Bone Folder (102300), Stitched Nested Labels Dies (149638), Real Red Combo Pack Stampin’ Blends (147935), Basic Black Combo Pack Stampin’ Blends (147942), Cajun Craze Combo Pack Stampin’ Blends (147931), Holiday Rhinestone Basic Jewels (150457), SNAIL Adhesive (104332), Stampin’ Dimensionals (104430), Mini Glue Dots (103683)

Measurements: 

  • Cajun Craze: 8 ½” x 5 ½”; scored at 4 ¼” 
  • Mossy Meadow: 5 ¼” x 4”
  • Perennial Essence Designer Series Paper: 2 pieces at 3” x 4”
  • Whisper White: 2 pieces at 2 ¼” x 3 ¾” (sentiment) and 2 ¼” x 4 ½” (cardinal)
  • Real Red: 2 ½” x 4 ¼”
  • Scraps of Real Red, Mossy Meadow and Cajun Craze

Instructions:

  1. Stamp the cardinal in Tuxedo Black Memento on Whisper White.
  2. Using the Blends colour the cardinal.
  3. On the Big Shot, cut out the cardinal using the matching cardinal die from the Toile Christmas Bundle.
  4. Run the Mossy Meadow CS with the Woodland Embossing Folder through the Big Shot.
  5. Use the third largest nested die to cut the Real Red CS.
  6. Stamp the sentiment in Mossy Meadow on the Whisper White CS and die cut it using the fourth largest nested die.
  7. Using the scraps, die cut 2 branches of each colour.
  8. Fold the piece of Cajun Craze card stock in half to form the card base.
  9. Attach the embossed Mossy Meadow piece to the front of the card base.
  10. Use glue dots to attach the branches to the back of the Real Red CS.
  11. Attach the sentiment to the Real Red piece.
  12. Attach the sentiment piece with dimensionals to the front of the card.
  13. Tuck in cardinal and adhere with dimensionals.
  14. Add 5 Holiday Rhinestone Basic Jewels in various colours scattered on the front.

For Further Info:

You will find the items listed above in my online store at:
https://www.stampinup.com/ecweb/default.aspx?dbwsdemoid=2103981.