Paris Sketch Challenge Card

My Paris Sketch Challenge Card

Today I am sharing my Paris Sketch Challenge Card. My Demonstrator Group has been giving us Sketch Challenges each week that we can join in during this difficult time to keep us busy and to explore our creative side.

Sketch Challenge Image
Card Sketch Challenge

I decided to use the Parisian Beauty Bundle for this sketch challenge as a last hurrah since it is retiring. I’m very sad to see this set go, but it will be added to my stash for future projects. I had so much fun with this sketch that you get two cards for the price of one, as well as a bonus one that I will share next week. For these two cards that I am highlighting today, I just switched the coloured card stock. The Pool Party card was the one that I decided to use for my swap.

Here is the second card using a Petal Pink base and Pool Party scalloped frame and different ink colours.

My Second Card using the Sketch

Supplies:

Stamps: Parisian Beauty Bundle (153778), Forever Blossoms Cling Stamp Set (151457)

Inks: Tuxedo Black Memento Ink Pad (132708), Pool Party Classic Stampin’ Pad (147107), Petal Pink Classic Stampin’ Pad (147108)

Paper: Whisper White Thick (140272 ), Pool Party (122924), Petal Pink (146985), Whisper White (100730), Parisian Blossoms Specialty Designer Series Paper (151192), Champagne Foil Sheets (144748)

Accessories: Stitched Shapes Dies (152323), Layering Squares Dies (151772), Parisian Flourish 3D Embossing Folder (151474), Champagne Rhinestone Basic Jewels (151193), Bone Folder (102300), Paper Snips (103579), Multipurpose Liquid Glue (110755), Mini Glue Dots (103683), SNAIL Adhesive (104332), Stampin’ Dimensionals (104430)

Measurements: 

  • Whisper White Thick: 8 ½” x 5 ½”; scored at 4 ¼” 
  • Pool Party: 4 x 5 ¼”
  • Petal Pink: 2 ½” x 2 ½”
  • Whisper White: 2 ¼” x 2 ¼” 
  • Parisian Blossoms Specialty Designer Series Paper: 5” x 2”
  • Champagne Foil Sheets: 5” x 3”
The Two Card using the Sketch

Instructions:

  1. Fold the Whisper White Thick card stock in half to create the card base.
  2. Die cut the Whisper White piece with the second largest square from the Stitched Shapes Dies.
  3. Stamp the Sentiment from the Parisian Beauty Cling Stamp Set in Tuxedo Black Memento Ink Pad on the stitched Whisper White piece.
  4. Using the single blossom from the Forever Blossoms Cling Stamp Set, stamp it in Petal Pink.
  5. Stamp the Fleur De Lys border in Pool Party at the top and bottom.
  6. Die cut the Petal Pink card stock with the fourth largest scalloped square from the Layering Squares Dies.
  7. Emboss the Pool Part card stock with the Parisian Flourish 3D Embossing Folder.
  8. Die cut the Eiffel Tower from the Champagne Foil Sheets.
  9. Attached with Multipurpose Liquid Glue the Parisian Blossoms Specialty Designer Series Paper to the embossed Pool Party piece at an angle.
  10. Turn over the Pool Party piece and trim the corners from the DSP with Paper Snips.
  11. Attach the Pool Party piece to the Whisper White card base with Multipurpose Liquid Glue.
  12. Using Glue Dots, attached the Eiffel Tower on the left side.
  13. Adhere the sentiment piece to the scalloped Petal Pink piece with SNAIL.
  14. Using dimensionals add the sentiment piece to the card.
  15. Scatter three Champagne Rhinestone Basic Jewels on the card.

For Further Info:

Hope you liked my Paris Sketch Challenge Card!

Here’s is a Stampin’ Up! video of the Parisian Blossoms Specialty Designer Series Paper:
https://www.youtube.com/watch?v=POFPLitOa5g&feature=emb_logo

You will find the items listed above in my online store at:  https://www.stampinup.com/ecweb/product/153934/parisian-blossoms-suite-bundle-english?dbwsdemoid=2103981

Parisian Beauty Sepia Card

Parisian Beauty Night of Navy Sepia Card

Today I am sharing my Parisian Beauty Sepia Card using Night of Navy. I learned the Sepia Watercolouring Technique recently from fellow Demonstrator, Frances Elizabeth Kerr, who learned it from Gail Ellis at Blue Rose Paper Treasures. I love that there are so many resources out there to learn new things! For this neat card, I did a twist on the technique by using Night of Navy instead of Soft Suede. The key to a successful card is to allow enough drying time between the watercolour steps. Even though you use only a small amount of bleach, it really adds to the effect. Let’s get started!

Supplies:

Stamps:  Parisian Beauty Cling Stamp Set (151466), Very Versailles Cling Stamp Set (149275)

Inks: Night Of Navy Stampin’ Pad (147110), Tuxedo Black Memento Ink Pad (132708), Jet Black Stāzon Ink Pad (101406), Versamark Pad (102283)

Paper: Night Of Navy (100867), Whisper White (100730), Fluid 100 Watercolor Paper (149612)

Accessories: White Stampin’ Emboss Powder (109132), Embossing Buddy (103083), Heat Tool (129053), Aqua Painters (103954), Stamparatus (146276), Stampin’ Spritzer (126185 ), Stamping Sponges (141337), Bone Folder (102300), SNAIL Adhesive (104332), Multipurpose Liquid Glue (110755 ), Small amount of Household Bleach, Fine Paint brush from dollar store, paper towels

Measurements: 

  • Night Of Navy: 8 ½” x 5 ½”; scored at 4 ¼”
  • Whisper White: 5 ¼” x 4”
  • Watercolor Paper: 5 ¼” x 4” cut down to finished size of 5 1/8” x 3 7/8

Instructions: 

  1. Fold the Night Of Navy card stock in half to create the card base.
  2. Spritz the Watercolor Paper with water to get it nice and wet.
  3. Create a pool of ink in the lid of the Night of Navy Ink Pad.
  4. Using the thick Aqua Painter, pick up some ink and create a wash on the Watercolor Paper starting at the top and working your way down until the paper is covered.
  5. Set aside and let dry. You could use a heat gun at this point to speed up the drying time. I let mine dry overnight.
  6. Place the Watercolor Paper in the Stamparatus.
  7. Since the watercolor paper is rough in texture, you will need to stamp the Eiffel Tower in Jet Black Stāzon multiple time to get a good impression.
  8. Taking the thin Aqua Painter, paint the Eiffel Tower with the pool of Night of Navy Ink that you created from before. 
  9. Once that is dry, use the fine paint brush from the dollar store (or an old one that you don’t care if it gets ruined) and “paint” the bleach onto the Eiffel Tower where you think highlights would be. Let it dry.
  10. Next, rub the Embossing Buddy over the watercolor paper and stamp the script from the Parisian Beauty Stamp Set in Versamark. Cover in White Embossing Powder and heat set it with a heat tool. I stamped it 3 times.
  11. Using the Tuxedo Black Memento Ink, stamp off on a scrap paper the Fleur de Ly, postage stamp from the Parisian Beauty Stamp Set and the filigree stamp from the Very Versailles Cling Stamp Set and then stamp randomly on the Watercolor Paper.
  12. Using a sponge, sponge Night of Navy ink along the edges and over the embossed script. Wipe the embossed scripted with paper towel to make it stand out.
  13. Adhere with Multipurpose Liquid Glue the Watercolor Paper to the Whisper White card stock.
  14. Adhere the Whisper White piece with SNAIL Adhesive to the Night of Navy card base.

For Further Info:

Hope you like my Parisian Beauty Sepia Card using the Sepia Watercoloring Technique!

You will find the items listed above in my online store at:
https://www.stampinup.com/ecweb/default.aspx?dbwsdemoid=2103981

Paris in Springtime

Paris in Springtime Card

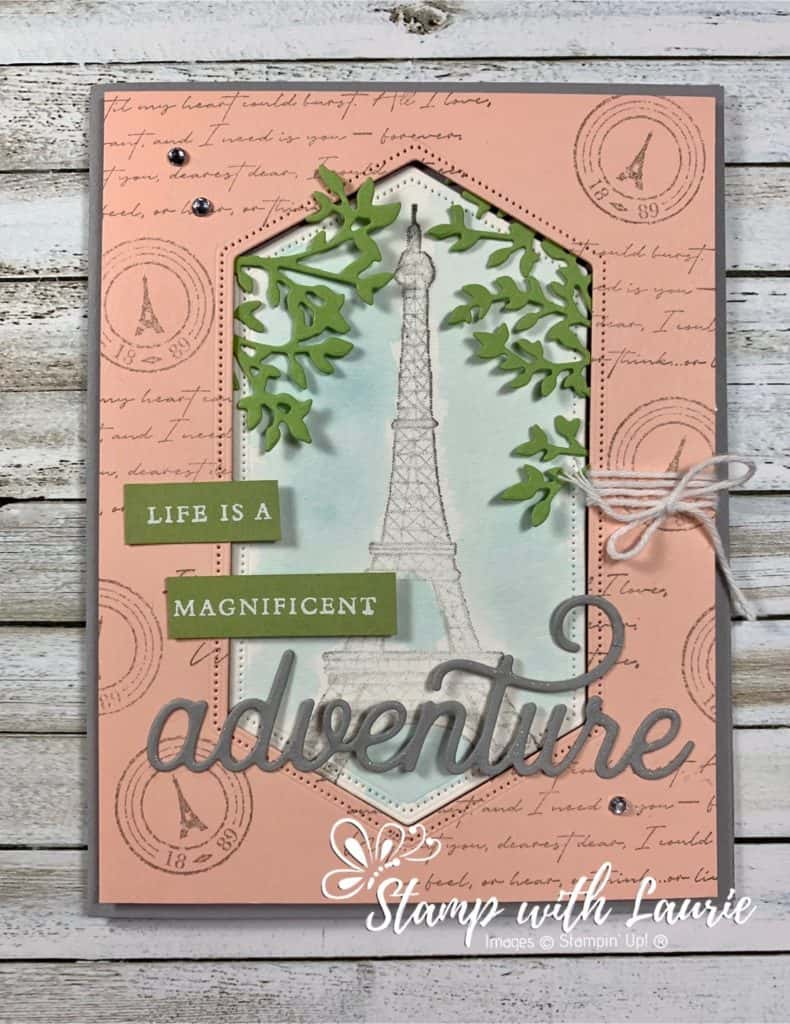
When I went to OnStage in November, I received the Parisian Beauty Cling Stamp Set for Prize Patrol. I couldn’t wait to play with it! So, I made my Paris in Springtime card for a swap. I love Paris any time of year, but Paris is the Springtime is magical. The inspiration for this card is this postcard (© Phenicia / Fabrice Moireau) that I bought on one of my trips to Paris.

Paris Postcard
Paris Postcard © Phenicia / Fabrice Moireau

For this card, I wanted to create a window of leaves with the Eiffel Tower poking through like on my postcard. I accomplished this by using the Stitched Nested Labels Dies and the branch from the Sweet Silhouettes Dies. I stamped the Eiffel Tower in Smoky Slate on Watercolor Paper. By squishing my closed Pool Party ink pad, I created a pool of ink in the lid to use for my wash of sky. I love how I mixed the sentiments from the Parisian Beauty Cling Stamp Set and the die cut from the Sweet Silhouettes Dies. A couple of rhinestones and Baker’s Twine are added for embellishments.

This card would be perfect for Valentine’s Day, an anniversary or even a retirement card! The softness of this card definitely reminds me of Paris in the Springtime! 

Supplies:

Stamps: Parisian Beauty Cling Stamp Set (151466)

Dies: Sweet Silhouettes Dies (149541), Stitched Nested Labels Dies (149638)

Inks: Smoky Slate Classic Stampin’ Pad (147113), Pool Party Classic Stampin’ Pad 147107) Versamark Pad (102283)

Paper:  Fluid 100 Watercolor Paper (149612), Petal Pink (146985), Smoky Slate (131202), Pear Pizzazz (131201)

Accessories: Aqua Painters (103954), White Stampin’ Emboss Powder (109132), Heat Tool (129053), Embossing Buddy (103083 ), Whisper White Solid Baker’s Twine (124262), Rhinestone Basic Jewels (144220), Bone Folder (102300), Paper Snips (103579 ), SNAIL Adhesive (104332), Stampin’ Dimensionals (104430), Mini Stampin’ Dimensionals (144108 ), Multipurpose Liquid Glue (110755), Mini Glue Dots (103683)

Measurements: 

  • Smoky Slate: 2 pieces – 8 ½” x 5 ½”; scored at 4 ¼” and 1 ¼” x 3 ½” (for “adventure”)
  • Petal Pink: 5 ¼” x 4”
  • Fluid 100 Watercolor Paper: 2 ½” 4 ½”
  • Pear Pizzazz: 2 pieces – 4 ½” x 3 ½” and scraps (for sentiment)
  • Whisper White Solid Baker’s Twine: 7”

Instructions:

  1. Fold the Smoky Slate card stock in half to create the card base.
  2. Stamp randomly the postal stamp and script from the Parisian Beauty Stamp Set in Smoky Slate on the Petal Pink piece.
  3. Centre the second largest Stitched Nested Labels Die on the Petal Pink piece. Die cut it out.
  4. Stamp the Eiffel Tower in Smoky Slate from the Parisian Beauty Stamp Set on the Watercolor Paper.
  5. Using the same Stitched Nested Labels Die, die cut it out.
  6. Squish the Pool Party Ink Pad lid while closed to create a pool of ink to use for water colouring the sky with the aqua painter.
  7. Rub the Embossing Buddy on the Pear Pizzazz card stock. Stamp the sentiment in Versamark.
  8. Sprinkle White Embossing Powder over the sentiment and heat set with the heat gun. Cut the sentiment apart.
  9. Die cut the Smoky Slate with the “adventure” die from the Sweet Silhouettes Dies.
  10. Die cut the branch from the Sweet Silhouettes Dies in Pear Pizzazz and trim it into pieces to fit in the “window”.
  11. Wrap the Baker’s Twine 3 time around the right side of frame and tie in a bow.
  12. Use dimensionals to pop up the Petal Pink frame on the Smokey Slate card base.
  13. Adhere the watercolor paper with Multipurpose Liquid Glue to the Smokey Slate card base by positioning it through the Stitched Nested “window”. 
  14. Using glue dots, adhere the cut branches to the underside of the Pink Petal frame positioning them so the they frame the Eiffel Tower.
  15. Adhere the Pear Pizzazz sentiments with snail on the left side and mini dimensionals on the right side.
  16. Adhere “adventure” with Multipurpose Liquid Glue being careful to only cover the part that will be laid on the Petal Pink frame.
  17. Add a couple of rhinestones.

For Further Info:

Hope you like my Paris in Springtime Card!

You will find the items listed above in my online store at:
https://www.stampinup.com/ecweb/default.aspx?dbwsdemoid=2103981.