Lazy Days of Summer Card

My Design Team Card
My Lazy Days of Summer Card

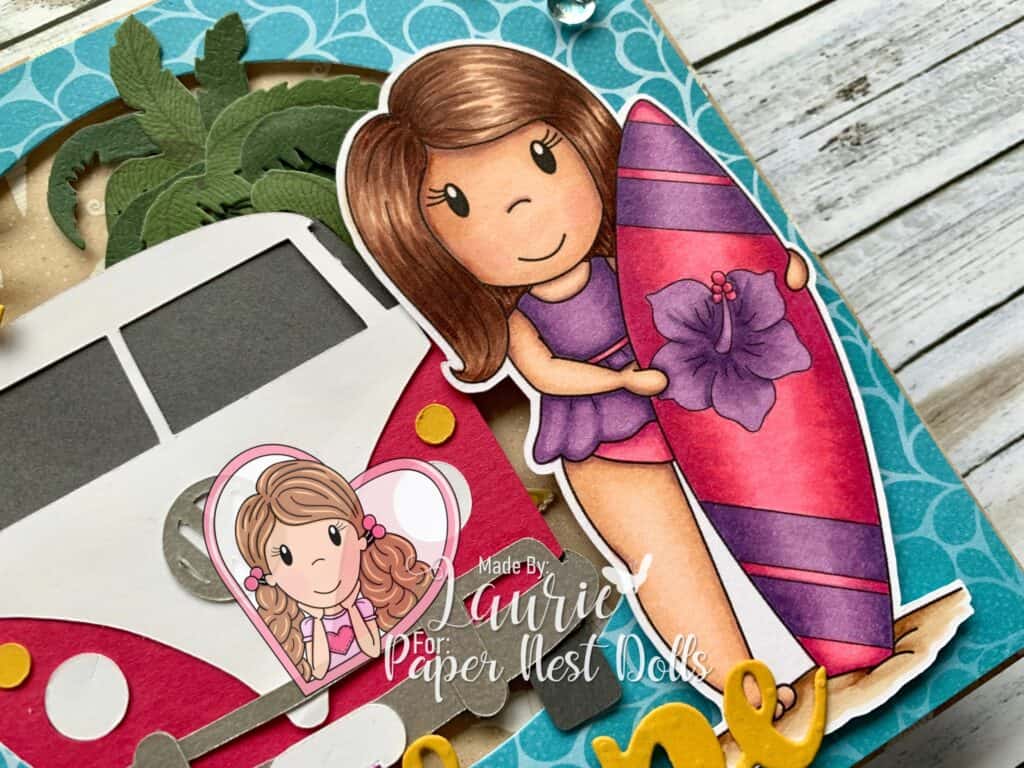
Hello Crafty Friends! It’s Laurie here! I am sharing my Lazy Days of Summer Card as my Design Team Inspiration Card for Paper Nest Dolls using the digital stamp Surfer Emma. When you buy her, you get 2 digital stamps for the price of 1! Surfer Emma with and without sunglasses.

I can’t believe that summer is almost over! Emma and I are going to miss those lazy days of summer sunshine!

For my card, I had fun colouring Emma with my Copic markers. I created a summer vignette for my cutie with the surfer van and a palm tree sticker poking out from the circle. The surfer van was a svg file that I downloaded and cut out on my Silhouette Cameo machine. The svg file comes as a box card, but I only wanted the van. Easy enough to separate the file into the pieces that I needed. It was so fun creating the van to match my coloured image with the hot pink. Who wouldn’t love to drive a hot pink surfer van!

Since it’s a beach card, of course, I needed water, sand, and sun! So, my paper was perfect for two of those elements! The sun and sunshine die cuts completed the other element. I love the sentiment “The lazy days of summer” which sum up my card perfectly and matches the purple colour of her bathing suit!

————————–

Copic Markers:

Skin: E04/E11/E21/E00/E000/R20
Hair: E29/E27/E25/E21
Pinks: RV13/RV14/RV17
Purples: V12/V15/V17
Sand: E31/E33/E35

Close Up of my Card
Close Up of My Design Team Card

Card Recipe for My Lazy Days of Summer Card:

Surfer Emma, Paper Nest Dolls
Paper Basics – Stamper’s Select White Cardstock, Papertrey Ink
Make a Splash 6” x 6” Paper Pad, Bo Bunny
Galvanized Metallic Sheet, Stampin’ Up!
Box Card Surfing Van SVG, Silhouette Design Store
Silhouette Cameo Machine
4” Circle Die, In my Stash
Spring Showers Dies, Lawn Fawn
Sunshine Wishes Thinlits Dies, Stampin’ Up!
Coconut Palms, Jolee’s Boutique, Michael’s Arts & Crafts
Lunar, Shimmerz Embellishments, Buttons Galore & More
Wishes You Way Stamp Set, Stampin’ Up!
Melon Mambo, Basic Gray and
Crushed Curry Card Stock, Stampin’ Up!

Finished card size: 5.5” x 5.5”

————————–

To view my other Paper Nest Dolls cards, please click here.

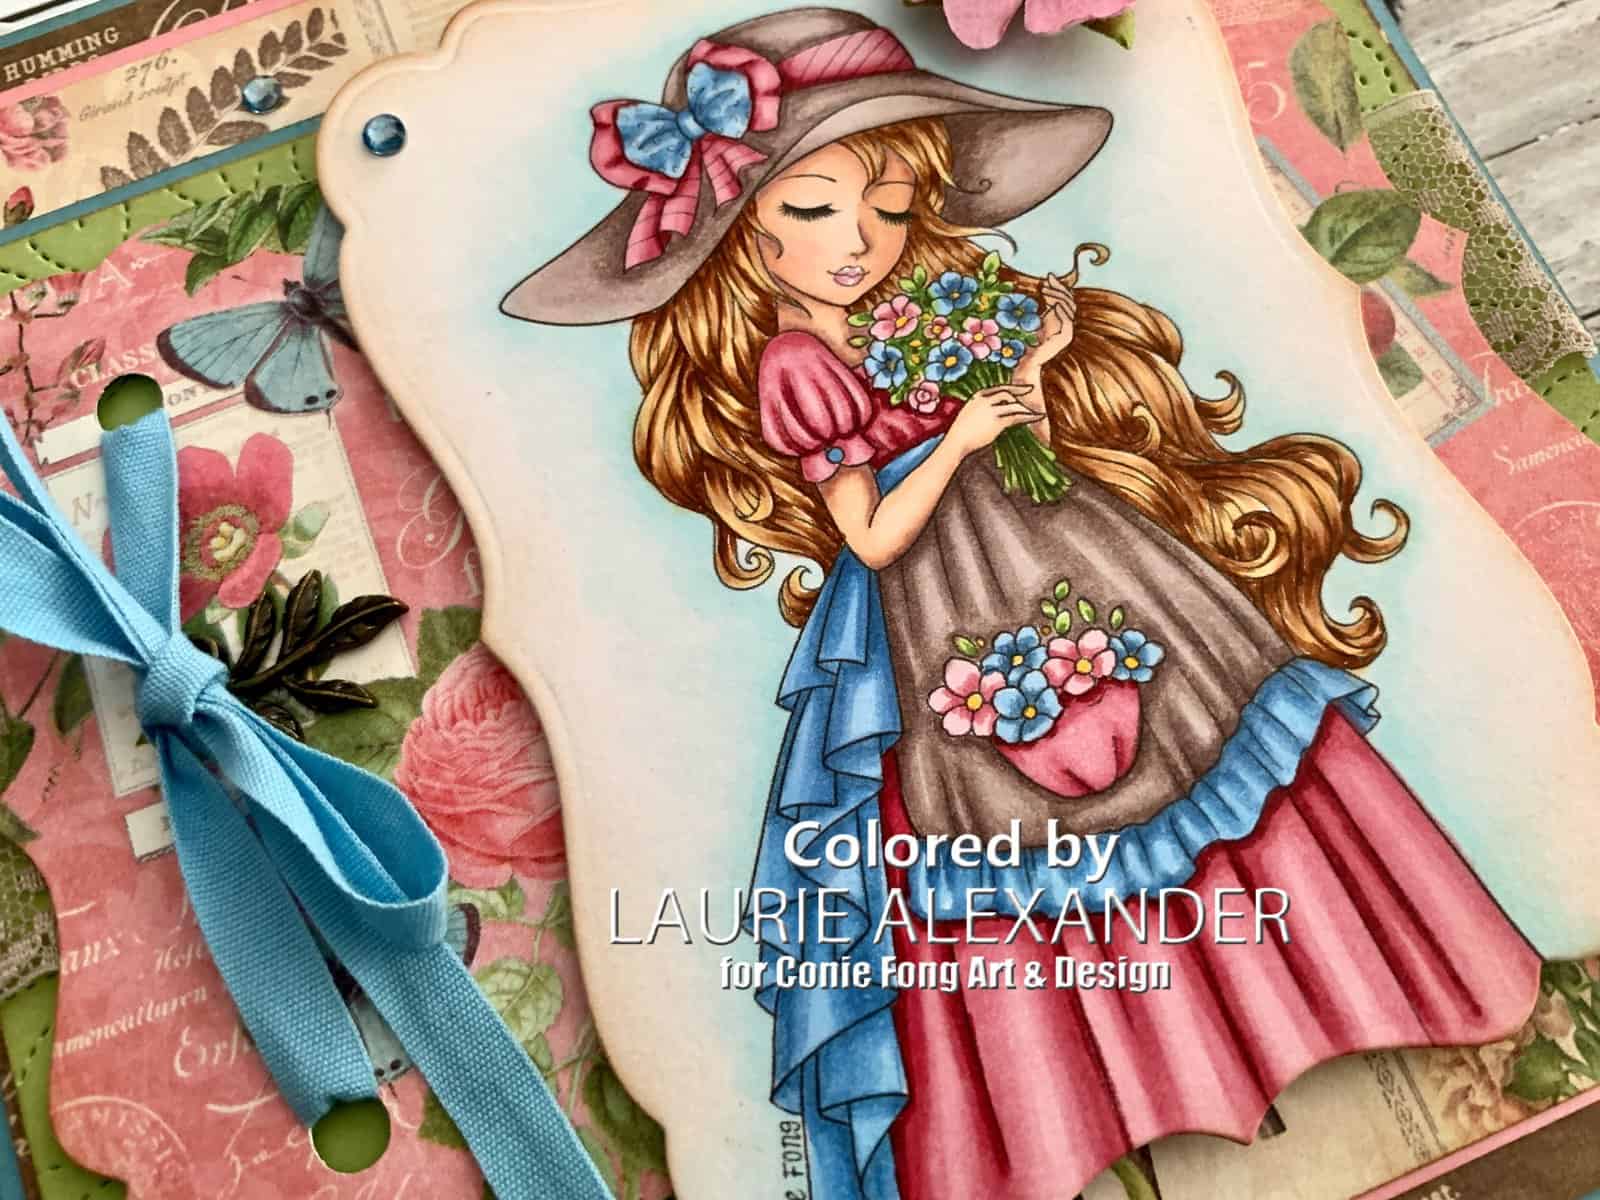
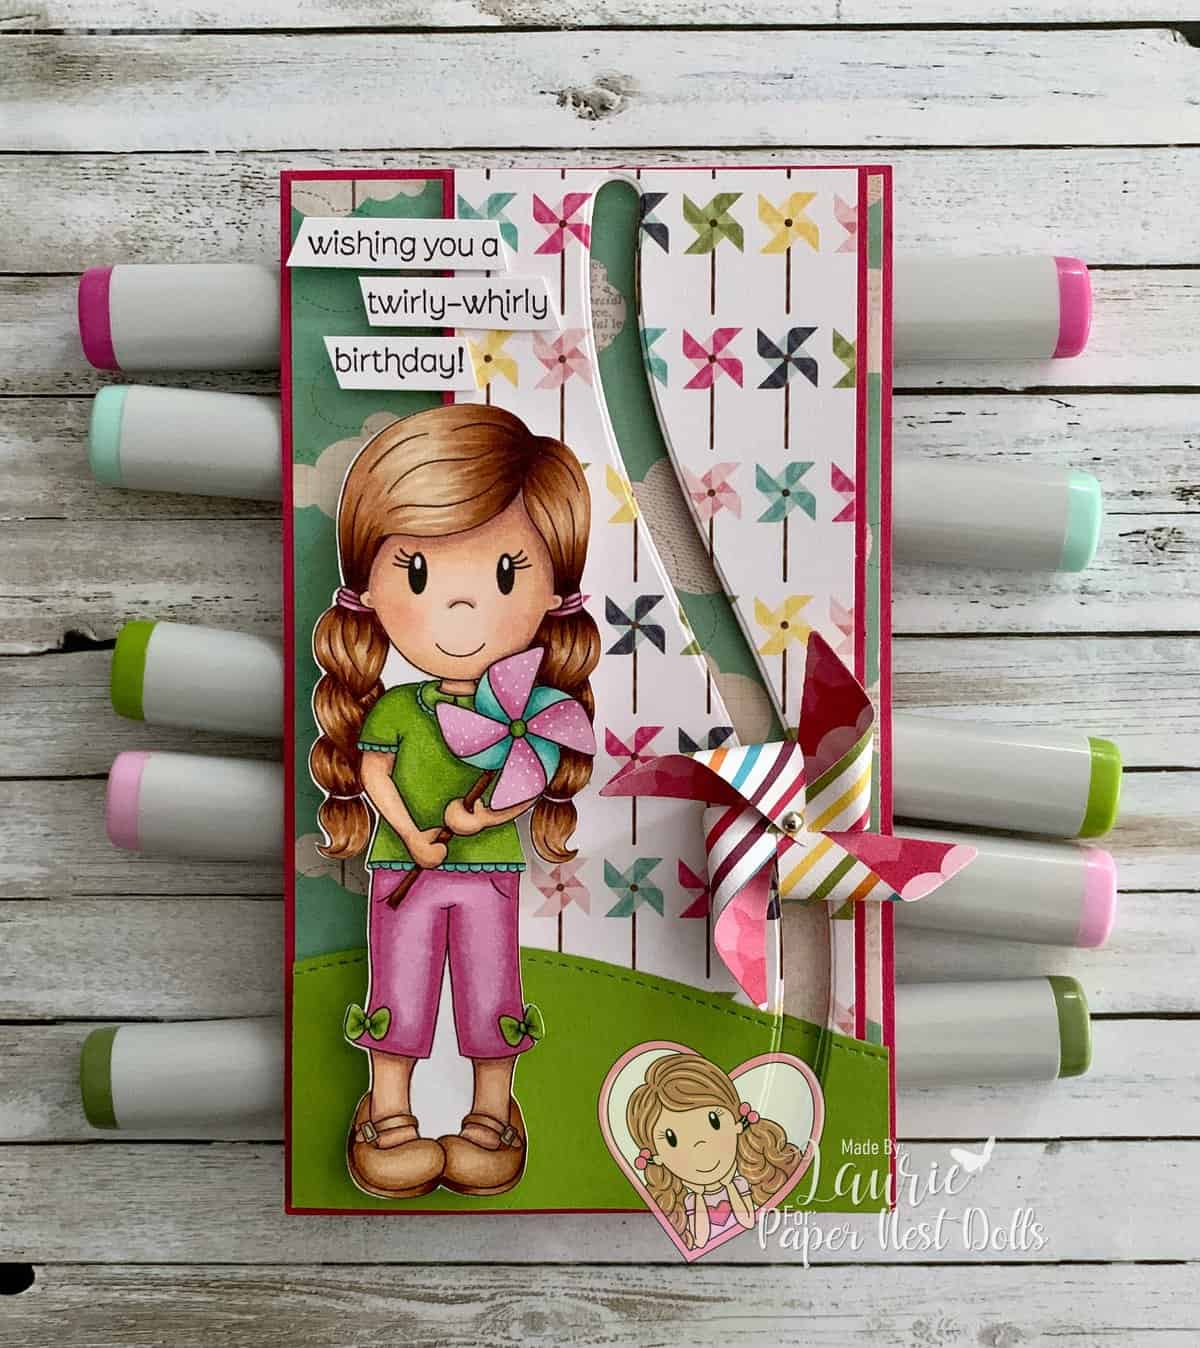
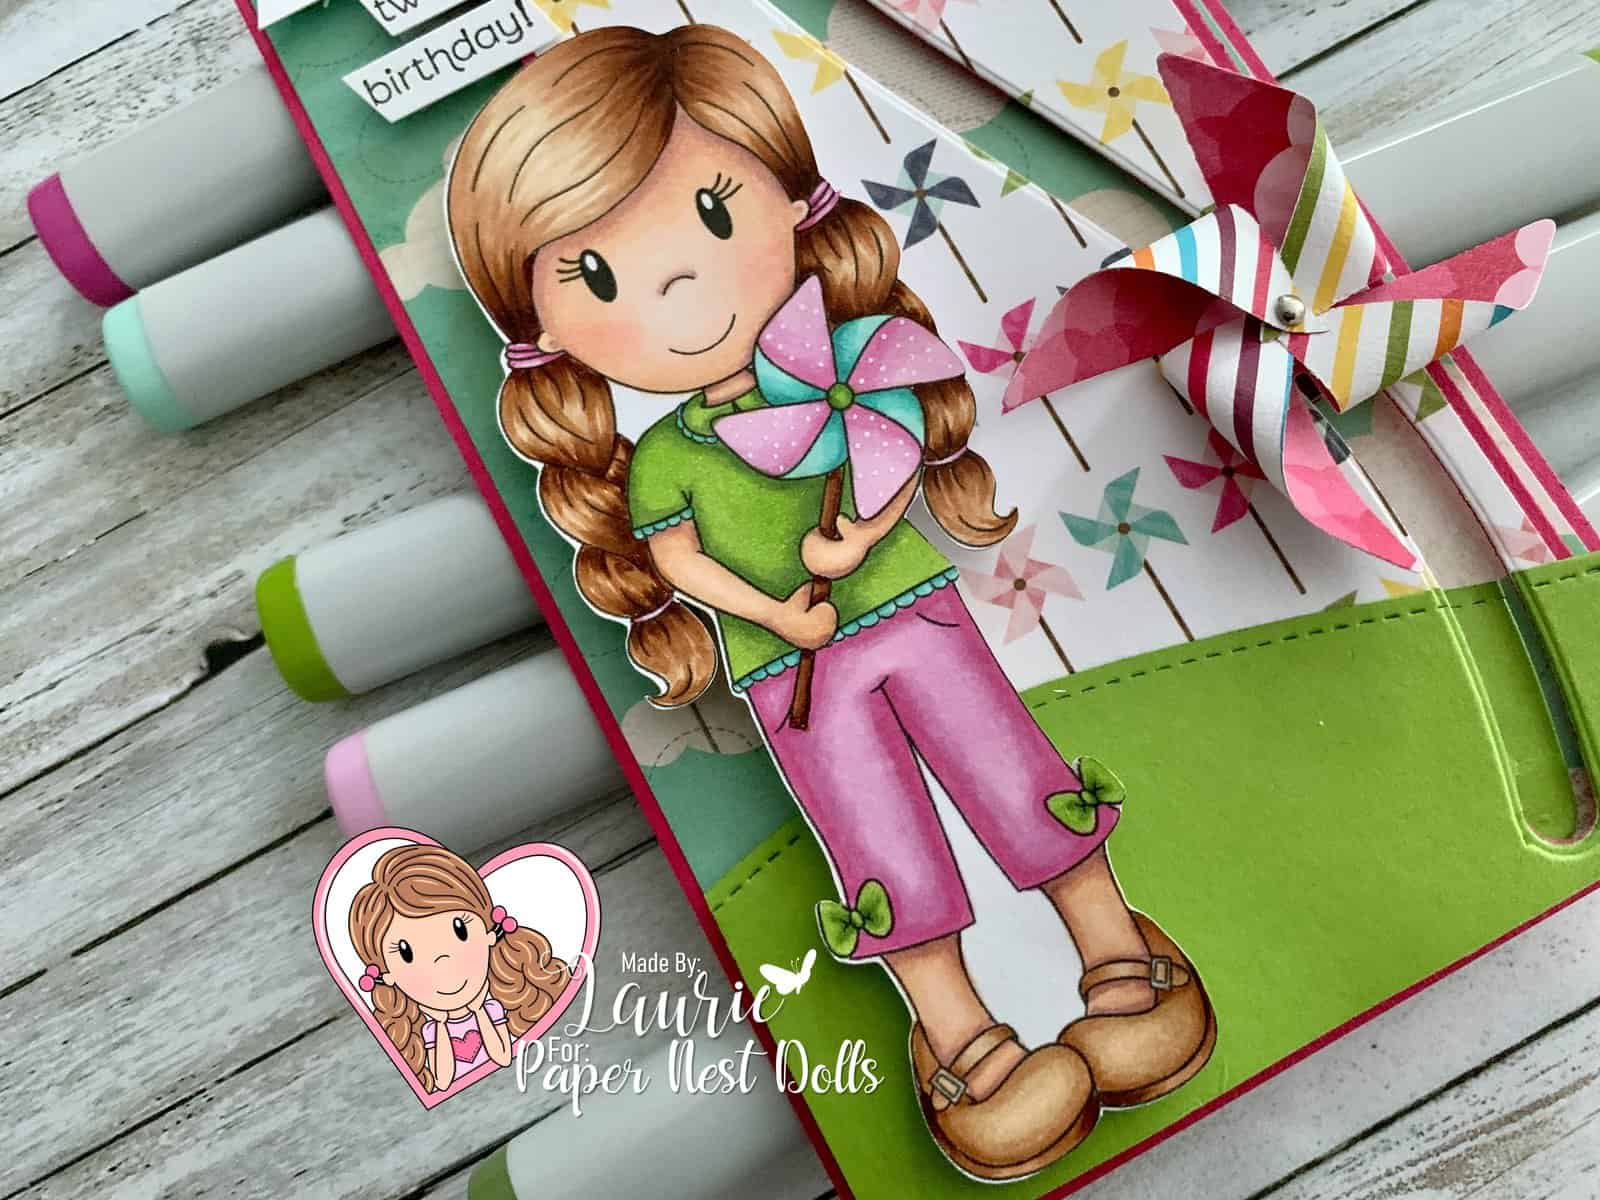
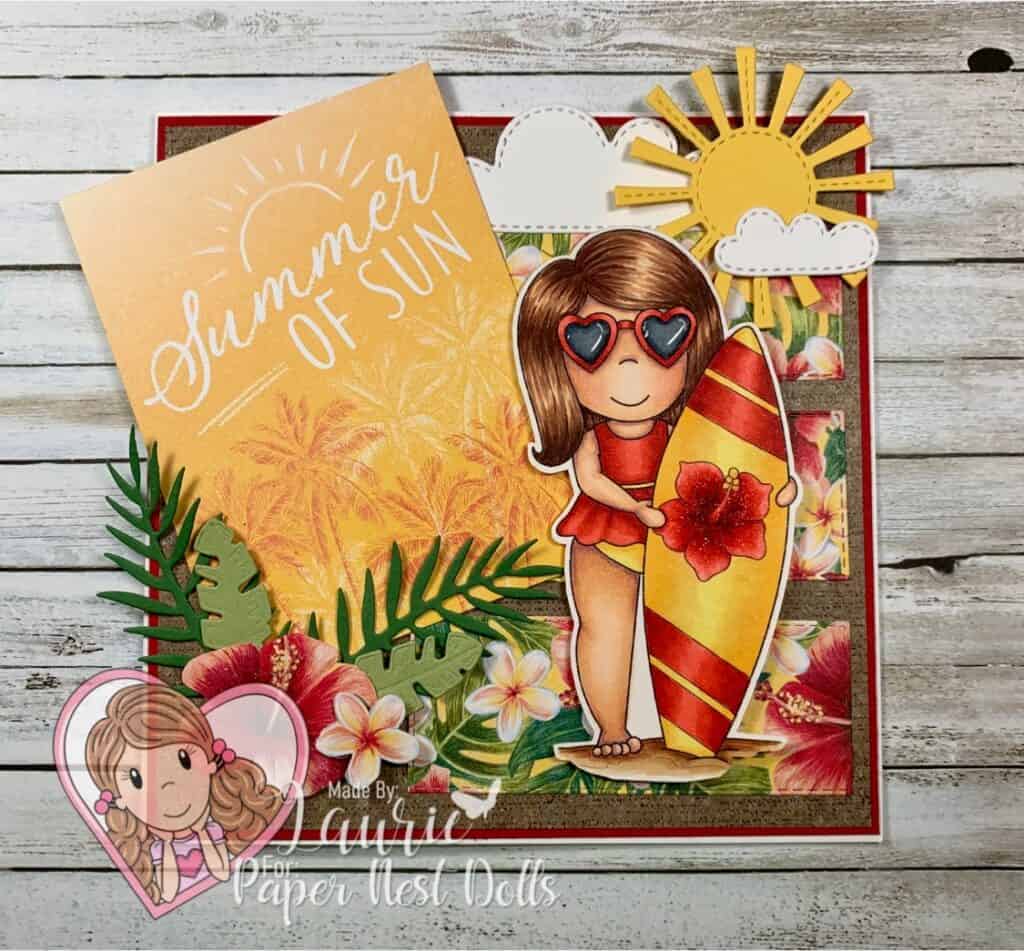
Here are two other cards that I created using this same digital stamp.
For more information on these cards, please click the photos. 

My Design Team Card
My Fun in the Sun Card
My Summer of Sun Card

Hope you like my Design Team card using Surfer Emma by Paper Nest Dolls!

Thank you for stopping by!

Hugs,
Laurie

My Great Escape Card

My Stampin' Up! Card
My Great Escape Card

Hello Crafty Friends! Laurie here again! I am sharing My Great Escape Card using the Counting Sheep Stamp Set and matching Sheep Dies by Stampin’ Up! You can get both for free with a qualifying order during Sale-A-Bration. I am a big fan of Shaun the Sheep and love watching all the antic that he gets up to with the other sheep at the farm! The ewe on the right reminds me of him as she orchestrates a breakout from the farmer’s field. Lol!

Close up sheep on of my card
Close Up of Ewe Orchestrating Escape

My Colouring Techniques

For my card, I used several techniques to colour my sheep so that they looked fluffy. I stamped the sheep in Smokey Slate Classic Ink on Basic White card stock. This allowed me to colour with the no-line technique which created a softer finished image without the harsh black lines with Memento Ink. Once the colouring was finished, the lines would fade in with the dots.

The second techniques I used was dots for their wool. I used the Dark Smokey Slate Stampin’ Blend in the shadows. So, along the edges where the stamped Smokey Slate ink was, where the artist indicated fluffiness in the wool and anywhere I thought a shadow would show up.

Next, I used the Light Smokey Slate Stampin’ Blend to add to the shadow areas and extend my dots further into the image from the shadows. I added a few random dots to break up the white areas in the centre of the wool.

Finally, I used my Stampin’ Blends Color Lifter and lightly brushed over all the dots to soften them a little bit. For the face and legs, I used the Smooth colouring technique. For more information on these techniques and others, I have included links on how to use your Stampin’ Blends at the end of this post.

Close Up of Sheep on Left Side

The Details of my Card

I decided that I needed a slimline card to fit my scene so that I could include all three sheep in the great escape. Since the Basic Border Dies that I used were not long enough for a slimline card, I had to create layers to fill my scene. With lots of dimensionals, I was able to create a hilly pastureland with a cloud filled sky. For my pastureland I used two different card stocks, Pear Pizzaz and Old Olive, to add dimension to my scene. I added an 8 ½” strip of Old Olive at the base of my card on top of all the hills to hide all the uneven pieces. The In Good Taste DSP was perfect for my wooden fences.

Supplies:

Stamps/Bundles/Dies: Counting Sheep Stamp Set (156591), Sheep Dies (156600), Basic Borders Dies (155558)

Inks: Smoky Slate Classic Stampin’ Pad (147113)

Paper: Smoky Slate (131202), Balmy Blue (146982), Pear Pizzazz (131201), Old Olive (100702), Basic White (159276), So Saffron (105118), In Good Taste Designer Series Paper (152494)

Accessories: Smoky Slate Stampin’ Blends Combo Pack (154904), Basic Black Stampin’ Blends Combo Pack (154843), Petal Pink Stampin’ Blends Combo Pack (154893), Stampin’ Blends Color Lifter (144608), Bone Folder (102300), Stampin’ Dimensionals (104430), Stampin’ Seal (152813)

Close Up of Jumping Sheep
Close Up of Escaping Sheep

Measurements: 

  • Smoky Slate: 7” x 8 ½” scored at 3 ½” – finished card 3 ½” x 8 ½”
  • Balmy Blue: 8 ¼” x 3 ¼”
  • Old Olive: 1 ½” x 5” (hill in distance)
    • 1” x 8 ¼” (flat band at bottom of hills)
  • Pear Pizzazz: 1 ½” x 5” (left hill)
    • 1 ½” x 3” (right hill)
  • Basic White: 5 ¾” x 1 1/8” (right cloud)
    • 3 ¼” 1 ¼” (left cloud)
    • 2 ¼” x1 ½” (Sheep – 3 pieces)
  • So Saffron: scraps
  • In Good Taste Designer Series Paper: 3” x 1 ½” (3 pieces)

More Information on My Great Escape Card:

Hope you like My Great Escape Card!

How to Use Stampin’ Blends
https://stampwithlaurie.com/wp-content/uploads/2020/08/Stampin-Up-Blends-2020.pdf

Part 1Whiskey Business Card using Blending Different Colours Technique
Video Tutorial: Blending Different Colours Together

Part 2Country Harvest Card using Light to Dark Technique
Video Tutorial: Light to Dark/Dark to Light Colouring

Part 3Beautiful Poppy Birthday Card using Smooth Colouring Technique
Video Tutorial: Smooth Colouring

Part 4Let’s Gather Together Card using Tip to Tip Blending Technique
Video Tutorial: Tip to Tip Colouring

Part 5So Grateful Cardinal Card using Flicking Colouring Technique
Video Tutorial: Flicking Colouring

Part 6Let’s Celebrate You Card using Flicking of Different Colours Technique
Video Tutorial: Flicking of Different Colours Technique

No-Lines Technique CardsMy Cardinal Anniversary Card and My Cardinal Card

For more of my Stampin’ Blends cards, please click here.

For more of my Stampin’ Up! cards, please click here.

You will find the items listed above in my online store.

My Summer Dreams Card

Hello Crafty Friends! It’s Laurie here! I can’t believe that Summer is almost over! So, in the hopes of making the summer last a little bit longer, I am sharing My Summer Dreams Card as my Design Team Card for Conie Fong Art & Design. My card is using the sweet Summer Dreams. This image would be perfect for so many occasions like Birthday, Mother’s Day, Thinking of You, Wedding to name just a few!

Details of My Card

For my card, I coloured this sweet image with my Copic markers to match the beautiful Botanical Tea paper by Graphic 45. I had a lot of fun colouring all those waves and curls in her hair and look at those pleats! Omgoodness! Such colouring fun!

I have been wanting for a while to use the Stitched Greenery Dies by Stampin’ Up! and thought that they would make a perfect subtle mat for my focal point. I die cut the Botanical Tea paper and my coloured image with the Labels Seventeen in two consecutive layering dies. I used my Blending Brush to add some Vintage Photo ink to the edges of all my paper and die cuts. Next, I turn the larger one on its side and punched two holes in it at one end and threaded ribbon through the holes for an unexpected touch.

To add to the botanical theme, I added a leaf trinket so that it looks like it is attached to the ribbon. I found a paper flower that matched my colouring perfectly. To add some matching blue embellishments, I coloured rhinestones with my B34 Copic markers and scattered them here and there.

————————–

Copic Markers:

Skin: E000/E00/E21/E11/E04/R20
Hair: YR31/E33/E35/E37
Pinks: R81/R83/R85/R89
Blues: B34/B23/B32
Browns: E70/E71/E74/E77
Flowers: B34/B32/R85/R81/Y17
Stems: YG03/YG63/YG67/G99
Sky: BG000/BG0000
Rhinestones: B34

Close Up of my Design Team Card

————————–

Card Recipe for My Summer Dreams Card:

Summer Dreams, Conie Fong Art & Design
Paper Basics – Stamper’s Select White Cardstock, Papertrey Ink
Botanical Tea Paper Pad, Graphic 45
Pink Buttons 6” x 6.5” Card Stock Paper, Recollections, Michaels Arts & Crafts
Nestabilities Labels Seventeen, Spellbinders
Stitched Greenery Dies, Stampin’ Up!
¼” Handheld Hole Punch, In my Stash
Marina Mist ¼” Cotton Ribbon, Stampin’ Up!
Tip Top Taupe Dotted Lace Trim, Stampin’ Up!
Bird Ballad Trinkets, Stampin’ Up!
Paper Flowers, Recollections, Michaels Arts & Crafts
Vintage Photo Distress Inks, Ranger
Blending Brushes, Stampin’ Up!
Basic Rhinestone Jewels, Stampin’ Up!
White Gelly Roll Pen
Marina Mist Card Stock, Stampin’ Up!

Finished card size: 5.75” x 5.75”

————————–

To view my other Conie Fong Art & Design cards, please click here.

Hope you like my Design Team Inspiration Card using
Summer Dreams for Conie Fong Art & Design!

Thank you for stopping by!

Hugs,
Laurie

Fun in the Sun Card

Happy Summer Crafty Friends! It’s Laurie here! I am sharing my Fun in the Sun Card as my Design Team Inspiration Card for Paper Nest Dolls using the digital stamp Surfer Emma.

First day of Summer was yesterday which inspired my card! This card came about because I just bought the Slimline Waves Die by Whimsy Stamps and couldn’t wait to play with it. I debated about a shaker card but decided that a scene using the waves as separators between the sand, water and sky would be fun.

I had this cool birthday paper in my stash that looks like waterdrops. Perfect for the fun colours of my image which I coloured with my Copic markers! I added a couple of “water drops” with my acrylic dew drops on some of the Bermuda Bay swirls around my stamp. For my sand and sky, I used a couple of embossing folders to add texture. Then I lightly brushed ink over the raised parts and edges to give those areas more dimension. Another fun accent was that the cloud and “sunshine” word were die cut from white felt to make them seem fluffy. Some shells from the dollar store add to my beachy theme.

————————–

Copic Markers:

Skin: E04/E11/E21/E00/E000/R20
Hair: E29/E27/E25/E21
Bathing Suit: YR02/YR04/YR07/YR09/Y19/Y17/Y15
Surfboard: BG53/BG45/BG57/C3/C1/C0/0
YR02/YR04/YR07/YR09/Y19/Y17/Y15/Clear Wink of Stella on the flower
Sand: E31/E33/E35

Close up of My Fun in the Sun card
Close Up of My Design Team Card for Paper Nest Dolls

————————–

Card Recipe for Fun in the Sun Card:

Surfer Emma, Paper Nest Dolls
Paper Basics – Stamper’s Select White Cardstock, Papertrey Ink
Birthday Bash Designer Series Paper, Stampin’ Up!
Festive Felt Sheet Combo Pack, Stampin’ Up!
Large Slimline with Sliders Dies, Lawn Fawn
Slimline Waves Die, Whimsy Stamps
Spring Showers Dies, Lawn Fawn
Sunshine Wishes Thinlits Dies, Stampin’ Up!
Wishes You Way Stamp Set, Stampin’ Up!
Subtle Dynamic Textured Impressions Embossing Folder, Stampin’ Up!
Cloudy Day Textured Impressions Embossing Folder, Stampin’ Up!
Spring Bloom Dew Drops by The Robin’s Nest
Shells from Dollar Store
Crumb Cake Classic Stampin’ Pad
Whisper White Craft Stampin’ Pad 
Sponge, Stampin’ Up!
Clear Wink of Stella, Stampin’ Up!
Tangerine Tango, Bermuda Bay, Crumb Cake
and Crushed Curry Card Stock, Stampin’ Up!

Finished card size: 3.5” x 8.5”

————————–

To view my other Paper Nest Dolls cards, please click here.

Here is another card that I created using this same digital stamp but with sunglasses. You get both digital stamps with your order. To read about how I made this card, please click here.

My Design Team Card Using Surfer Emma
My Summer of Sun Card Using Surfer Emma

Hope you like my Design Team card using
Surfer Emma by Paper Nest Dolls!

Thank you for stopping by!

Hugs,
Laurie

Twirly-Whirly Birthday Card

My Design Team Card
Twirly-Whirly Birthday Card

Hello Crafty Friends! It’s Laurie here! I am sharing my Twirly-Whirly Birthday Card as my Design Team Inspiration Card for Paper Nest Dolls using the digital stamp Emma with Pinwheel.

I coloured this cutie with my Copic markers to match my pinwheel paper. This paper was perfect for my card! I love the pinwheel Sizzlits that I had in my stash. If you have a pinwheel, you need to have a slider to make it move! And, since you need room to twirl your pinwheel, I made a mini slimline card! The sentiment was too long for my card. So, I snipped it on wonky angles and adhered them haphazardly to mirror my fun card.

Did you know that you can currently (until June 6/21) get this digital stamp for free over at the Kit and Clowder Facebook Group:
https://www.facebook.com/groups/kitandclowder/permalink/3808697382591836/

————————–

Copic Markers:

Skin: E04/E11/E21/E00/E000/R20
Hair: E37/E35/E33/E31/E30
Top: YG03/YG63/YG67-BG23
Pants: RV52/RV63/RV55
Shoes: E37/E35/E33/E31/E30
Pinwheel: RV52/RV63/RV55/BG57/BG23//BG11/YG63

Close Up of my Twirly-Whirly Birthday Card
Close Up of my Design Team Card

————————–

Card Recipe for Twirly-Whirly Birthday Card:

Emma with Pinwheel, Paper Nest Dolls
Paper Basics – Stamper’s Select White Cardstock, Papertrey Ink
Splendid Sunshine 6” x 6” Paper Pad, Echo Park Paper Co.
I {Heart} Summer 6” x 6” Paper Pad, Simple Stories
Sweet Taffy Designer Series Paper, Stampin’ Up!
Large Slimline with Sliders Dies, Lawn Fawn
Slimline Stitched Hillside Borders Dies, Lawn Fawn
Sizzlits Pinwheel, Stampin’ Up!
Wishes You Way Stamp Set, Stampin’ Up!
Silver Mini Brads, Stampin’ Up!
Clear Wink of Stella, Stampin’ Up!
White Gelly Roll Pen, Sakura
Melon Mambo and Granny Apple Green Card Stock, Stampin’ Up!

Finished card size: 3.5” x 6”

————————–

To view my other Paper Nest Dolls cards, please click here.

Hope you like my Design Team card using
Emma with Pinwheel by Paper Nest Dolls!

Thank you for stopping by!

Hugs,
Laurie

Woodland Camping Fun

My Camping Fun Design Team Card for Rachelle Anne Miller Creative Studios
My Woodland Camping Fun Design Team Card for Rachelle Anne Miller Creative Studios

Hello Crafty Friends! It’s Laurie here with my Woodland Camping Fun Design Team Card for Rachelle Anne Miller Creative Studios using her cute Woodland Camping Digital Stamp. Isn’t this the sweetest image! I had a lot of fun colouring it with my Copic Markers! I decided to create a day time scene instead of a night time one to show you the versatility of the stamp.

Where marshmallows are involved, I love to eat them anytime! On a scale of 1 to 10, how do you like your marshmallows toasted? I love mine black on the outside and gooey melty on the inside like #9! Yum!

Marshmallows Scale
Marshmallows Scale

To make the fluffy clouds in the sky, I first masked the tent and animals with a Post-it Note. I then sponged Balmy Blue ink with a Picket Fences Blender Brush on the Krafty Scenery Stencil by Kraftin’ Kimmie Stamps. By brushing the ink on the stencil in different angles, the clouds fill the sky.

I love the sentiment from the Summer Adventure Paper Pad, “Like campfires and marshmallows, we are better TOGETHER!”! It sums up this card perfectly with the little boy and his furry friends!

————————–

Copic Markers:

Skin: E000/E00/E21/E11/E04/R20
Hair: E25/YR24/Y26/Y21
Pants: B99/B97/B95/B93/B91
Shirt: G29/YG17/YG23
Shoes: E23/E25/E27
Fox: E33/YR27/YR16/YR12/W2/W1/W0/R20/0
Bunny: E30/E31/E33/W1/R20
Tent: E23/E25/E27/E29
Marshmallow: C3/C1/0
Marshmallow Stick: E23/E25/E29
Fire Flames: Y15/Y17/YR15/YR04/YR18
Campfire Wood: E23/E25/E27/E29/E30/E31/E33
Fire Pit Sand: E30/E31/E33
Fire Glow: Y11
Rocks: C7/C3/C1
Leaves/Grass: YG23/YG17/G29
Flower: E04/Y17

Close Up of My Woodland Camping Fun Design Team Card for Rachelle Anne Miller Creative Studios

Card Recipe for Woodland Camping Fun Design Team Card:

Rachelle Anne Miller Creative Studios Woodland Camping Digital Stamp
Sweet Sentiment Premium Coloring Paper
Lawn Fawn Spring Showers Dies
Krafty Scenery Stencil, Kraftin’ Kimmie Stamps
Rectangle Stitched Dies, Stampin’ Up!
Sweet Silhouettes Dies, Stampin’ Up!
Corrugated Embossing Folder, Stampin’ Up!
Summer Adventure by Lori Whitlock 6” x 6” Paper Pad, Echo Park
Wood Textures 6” x 6” Designer Series Paper, Stampin’ Up!
Blender Brushes, Picket Fence
Tuxedo Black Memento Ink Pad
Balmy Blue Classic Stampin’ Pad, Stampin’ Up!
Soft Suede, Daffodil Delight, Garden Green and
Whisper White Card Stock, Stampin’ Up!
Post-it Note

————————–

Like campfires and marshmallows, we are better TOGETHER!

To view my other Copic Marker cards using Rachelle Anne Miller Creative Studios Digital Stamps, please click here.

Hope you like my Woodland Camping Fun Design Team Card with Woodland Camping Digital Stamp by Rachelle Anne Miller Creative Studios!
Thank you for stopping by!

Hugs,
Laurie

Chasing Butterflies

My Chasing Butterflies Design Team Card for Rachelle Anne Miller Creative Studios
My Design Team Card for Rachelle Anne Miller Creative Studios

Hello Crafty Friends! It’s Laurie here with my Chasing Butterflies Design Team Card for Rachelle Anne Miller Creative Studios using her sweet Chasing Butterflies Digital Stamp. I had a lot of fun creating this scene with all the wonderful layers and die cuts that make it up! There was a lot of dimensionals used to get the scene just the way I wanted. The bright colours of the card stock and Doodlebug Paper were perfect for such a happy carefree image! I can just see her running through the grass trying to catch a butterfly!

All the Layers of My Design Team Card for Rachelle Anne Miller Creative Studio

————————–

Copic Markers:

Skin: E000/E00/E21/E11/E04/R20
Hair: E30/E31/E33/E35/E37
Pinks: RV21/RV13/RV14
Blues: BG10/BG11/BG13/BG15
Greens: YG03/YG63/YG67/G99
Net: E30/E31/E33/C1/C0
Butterfly: Y11/Y13/Y15/C1/C3/YG03/YG63/YG67

————————–

Close Up of My Design Team Card for Rachelle Anne Miller Creative Studio

Card Recipe for Chasing Butterflies Design Team Card:

Rachelle Anne Miller Creative Studios, Chasing Butterflies Digital Stamp
Sweet Sentiment Premium Coloring Paper
Lawn Fawn Spring Showers Dies
Lawn Fawn Mushroom Border Dies (Grass)
Die-namics Stitched Cloud Edges, My Favorite Things
Spellbinders Nestabilities Dies Classic Scallop Circle
Sweet Silhouettes Dies, Stampin’ Up!
Hello Sunshine 6” x6” Paper Pad, Doodlebug Designs Inc.
Craftsmart Butterflies, Michaels
Clear Wink of Stella
Stardust Clear Gelly Roll Pen
Costal Cabana, Daffodil Delight, Granny Apple Green and
Whisper White Card Stock

————————–

Wouldn’t you just love to run after butterflies with no cares in the world!

To view my other Copic Marker cards, please click here.

Hope you like my Design Team Card with Chasing Butterflies Digital Stamp by Rachelle Anne Miller Creative Studios!
Thank you for stopping by!

Hugs,
Laurie

Storytime Design Team Card

My Storytime! Card using Storytime by Rachelle Anne Miller Creative Studio
My Storytime Design Team Card

Hello Crafty Friends! It’s Laurie here with my Storytime Design Team Card for Rachelle Anne Miller Creative Studios using their Storytime Digital Stamp. This is my first card as a new Design Team Member for Rachelle Anne Miller Creative Studios! I’m so excited to join such a talented team!

I love this sweet image with all the cute forest friends gathered around to listen to a story! The panels to the left are all the wonderful stories they are reading. Once Upon a Time…there was a ranger who confronted a dragon guarding his hoard. Once Upon a Time…there was a knight on a chivalrous quest. Or, maybe they are reading Jack and the Beanstalk as the vine travels to the clouds! This image just sparks my imagination! The sentiment is from a Kraftin Kimmie Stamp that I thought was perfect for these little forest friends! “We’ll be friends forever…the end!”

————————–

Copic Markers:

Fox: E18/08/YR18/14/R20
W1/W0/0
Black Jelly Pen for Nose

————————–

Porcupine: W6/4/3/1
E000/00/11/R20
White Jelly Pen for quills
Black Jelly Pen for nose

————————–

Bunny: C3/C1/C0/R20/0

————————–

Yellow Bird: Y11/13/15/17
Beak – YR04

————————–

Owl: E29/27/25/23
E40/41/42/43/R20
Beak – YR04/16

————————–

Leaves/Grass: YG03/63/67/G99

————————–

Tree/Stump: E47/57/44/55/41
Top of Stump – E43/42/41

————————–

Rock: C4/3/2/1

————————–

Book: R24/27/29/C3
Pages/Label – C1/0

————————–

Card Recipe for
My Storytime Design Team Card:

Rachelle Anne Miller Creative Studios: Storytime
Kraftin Kimmie Stamps: Reading Lexi (Sentiment)
Sweet Sentiment Premium Coloring Paper
Lawn Fawn Spring Showers Dies
Memory Box Delicate Vine Border Die
Songs of Spring Paper Embelishments (Kite), Michaels Stores Inc
Enchanted Forest 8” x 8” Paper Pack, Graphic 45
I {Heart} Summer 6” x 6” Paper Pack, Simple Stories
Summer Fresh 6” x 6” Paper Pack, Simple Stories
Garden Green, Early Espresso, Daffodil Delight and
Whisper White Card Stock

————————–

Measurements:

Whisper White Card Base: 5 ½ x 5 ½
Garden Green Card Stock: 5 3/8” x 5 3/8“
Red and White Checked Paper from Summer Fresh: 2 ¼” x 5 ¼”  
Sky with Clouds Paper from I {Heart} Summer: 3 ¼”  x 5 ¼”
Once Upon a Time, Ranger and Dragon and Knight Panels from Enchanted Forest 8” x 8” Paper Pack
Early Espresso Card Stock 4 5/8” x 4 7/8
Sweet Sentiment Premium Coloring Paper: 4 ½” x 4 ¾” 
Scraps of Daffodil Delight for Sun, Garden Green for Vine, and Whisper White for Clouds and Sentiment

————————–

Happiness is Reading!

To view my other Copic Marker cards, please click here.

Hope you like my Storytime Design Team Card with Storytime by Rachelle Anne Miller Creative Studios!
Thank you for stopping by!

Hugs,
Laurie

My Surf’s Up! Card

It’s Laurie here with My Surf’s Up! Card using Surfer Owen for the Design Team at Paper Nest Dolls! Now that Summer is officially here, it’s time to go surfing with this sweetie! I had a lot of fun colouring him with my Copic Markers and creating this fun card using all things beachy from my stash.

Close Up of My Surf's Up! Card with Surfer Owen from Paper Nest Dolls
Close Up of My Surf’s Up! Card with Surfer Owen from Paper Nest Dolls

————————–

Copic Markers:

Skin: E04/11/21/00/000
Hair: E57/43/53/50
Yellows: Y11/21/35
Blues: B12/14/39
Necklace: E35/31/21 (string) and E40/42 (shark tooth)
Sand: E30/31/33/35

————————–

Card Recipe for My Surf’s Up! Card:

Surfer Owen Digi Stamp
Sweet Sentiment Premium Coloring Paper
Bo Bunny Barefoot and Bliss Collection 6 x 6 paper pack
Lawn Fawn Spring Showers Dies
Marianne Design Craftables Sea Shells
Sea Shells from Dollar Store
Stampin’ Up!:
Under the Sea Framelits
In The Woods Framelits
Subtle 3D Embossing Folder
Tropical Oasis Memories and More Card Pack
Pacific Point, Crumb Cake, Daffodil Delight and
Thick Whisper White Card Stock

————————–

Measurements:

Thick Whisper White Card Base: 5 ½ x 5 ½
Pacific Point card stock: 5 3/8” x 5 3/8
Bo Bunny Barefoot and Bliss Collection: 5 ¼” x 5 ¼”
Crumb Cake for sand dunes x 2: 5 ¼” x 2”
Scraps of Daffodil Delight for sun and starfish
Whisper White for clouds and sand dollars

————————–

Surf’s Up! Let’s go to the Beach!

To view my other Copic Marker cards, please click here.

Hope you like My Surf’s Up! Card with Surfer Owen by Paper Nest Dolls! Thank you for stopping by!

Hugs,
Laurie

My Summer of Sun Card

It’s Laurie with another Design Team Card using Surfer Emma from Paper Nest Dolls! Isn’t she a sweetie! I had a lot of fun colouring her with my Copic Markers and creating this card using things from my stash. I thought the Topical Oasis Suite from Stampin’ Up! was perfect for my card! I’m so ready for my Summer of Sun to begin!

Close Up of Surfer Emma from My Summer of Sun Card

————————–

Copic Markers:

Skin:E04/11/21/00/000
Hair: E29/27/25/23/21
Yellows: Y11/21/35
Reds: R22/24/27/29/C4
Glasses: R22/24/27 and C3/4/5
White Jelly Roll Pen and Glossy Accents on Sunglasses
Clear Wink of Stella on Hibiscus on Surf Board and Flowers in the corner

————————–

Card Recipe for Summer of Sun Card:

Sweet Sentiment Premium Coloring Paper
Lawn Fawn Spring Showers Dies
Stampin’ Up!:
In the Tropics Dies
Tropical Thinlits Dies
Stitched Rectangle Dies
Tropical Oasis Designer Series Paper
Tropical Oasis Memories and More Card Pack
Real Red, Daffodil Delight, Whisper White, Garden Green, Pear Pizzaz and Thick Whisper White Card Stock

————————–

Measurements:

Thick Whisper White Card Base: 5 ½ x 5 ½
Real Red card stock: 5 3/8” x 5 3/8
Tropical Oasis Designer Series Paper: 5 ¼” x 5 ¼”
Stitched Rectangles x 3: 1 ¼” x 3 ¼”
Scraps of Daffodil Delight, Whisper White, Garden Green and Pear Pizzaz

————————–

Who’s ready for the summer and beach weather to arrive?
Let’s go catch a wave!

To view my other Copic Marker cards, please click here.

Hope you like my Summer of Sun Card! Thank you for stopping by!

Hugs,
Laurie