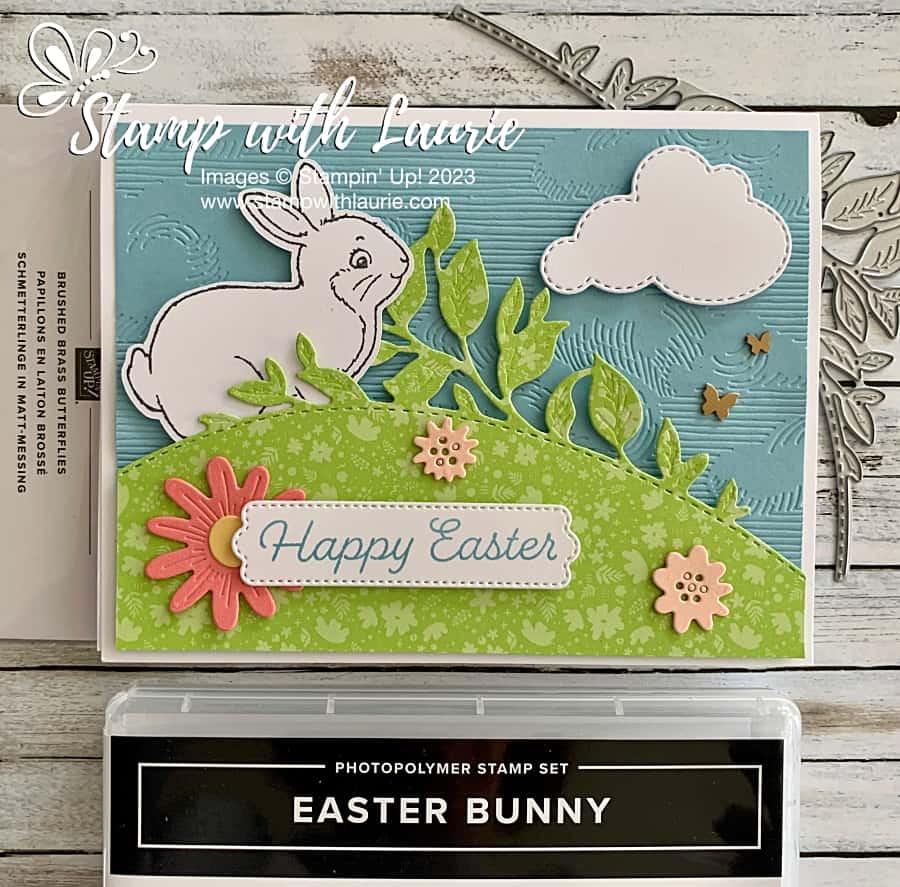
Hello Crafty Friends! Laurie here again! I am sharing My Happy Easter Bunny Card using the Easter Bunny Stamp Set by Stampin’ Up!
The Details of My Cards
For my cards, I thought it would be fun to create a scene with the Easter Bunny peeking through the leaves from the Around the Bend Dies as he’s hiding his Easter eggs!
The Into the Clouds Embossing Folder created the perfect sky for my scene with a die cut white cloud adding some interest.
I decided to use the Parakeet Party In Color DSP as my grass and leaves using the Around the Bend Die. A scattering of die cut flowers were used to add colour and highlight the sentiment which was die cut from the Pretty Pillowbox Dies.
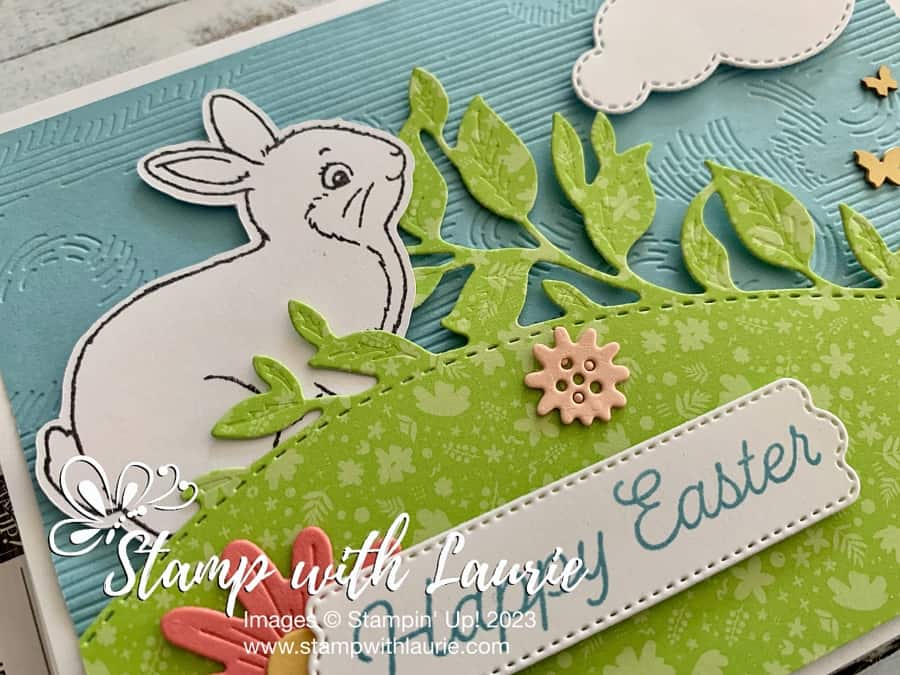
The bunny was stamped in black on Basic White showing that you don’t always need to color it to make it stand out.
A couple of Brass Butterflies were added to complete my scene.
Supplies:
Stamps/Bundles/Dies: Easter Bunny Stamp Set (160272), Around the Bend Dies (160649), Give It a Whirl Dies (154336), Pretty Pillow Box Dies (156321)
Inks: Tuxedo Black Memento Ink Pad (132708), Balmy Blue (147105)
Paper: Basic White Thick (159229), Balmy Blue (146982), Basic White (159276), Flirty Flamingo (141416), Petal Pink (146985), In Color 2022–2024 6″ x 6″ Designer Series Paper (159253)
Accessories: Brushed Brass Butterflies (158136), Into the Clouds Embossing Folder (159171), Paper Snips (103579), Bone Folder (102300), Stampin’ Dimensionals (104430), Stampin’ Seal (152813), Mini Glue Dots (103683)
Close Up of the Easter Bunny Stamp
Measurements:
Basic White Thick:
5 ½” x 8 ½” scored at 4 ¼”
Balmy Blue:
4” x 5 ¼”
Basic White (3 pieces):
2 ¼” x 2-1/8”
2” x 1 ¼”
Scrap for sentiment
Flirty Flamingo:
Scrap
Petal Pink:
Scrap
In Color 2022–2024 Designer Series Paper:
5 ¼” x 3 ½”
More Information on My Happy Easter Bunny Card:
For more of my Stampin’ Up! cards, please click here.
You will find the items listed above in my online store.
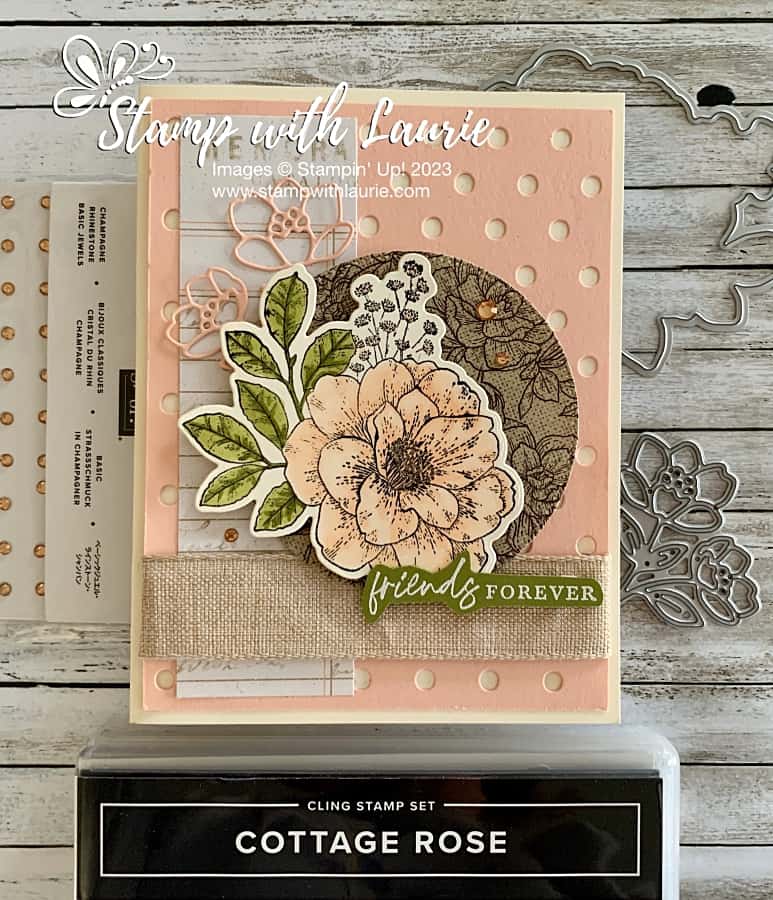
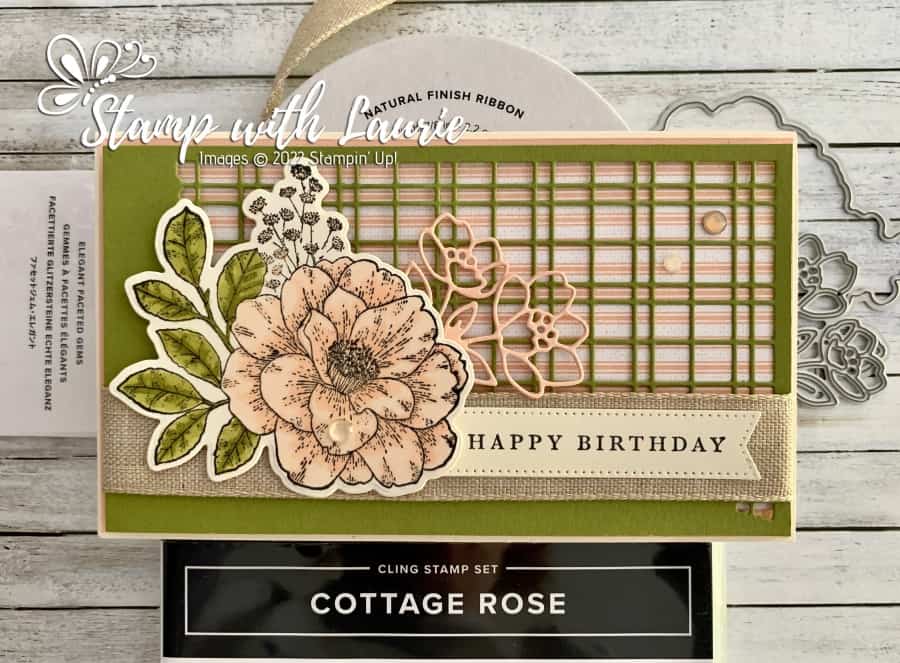
Hello Crafty Friends! Laurie here again! I am sharing My Friends Forever Cards using the Abigail Rose Suite Collection by Stampin’ Up! with two different backgrounds.
I was honoured to be asked to present my colouring with Stampin’ Blends at a Playdate for fellow Stampin’ Up! demonstrators. I presented my colouring several times so that I had enough roses to create multiple cards. I have included links to some videos at the end of this post that cover my colouring techniques, as well as the card that I used as my swap for the event.
The Details of My Cards
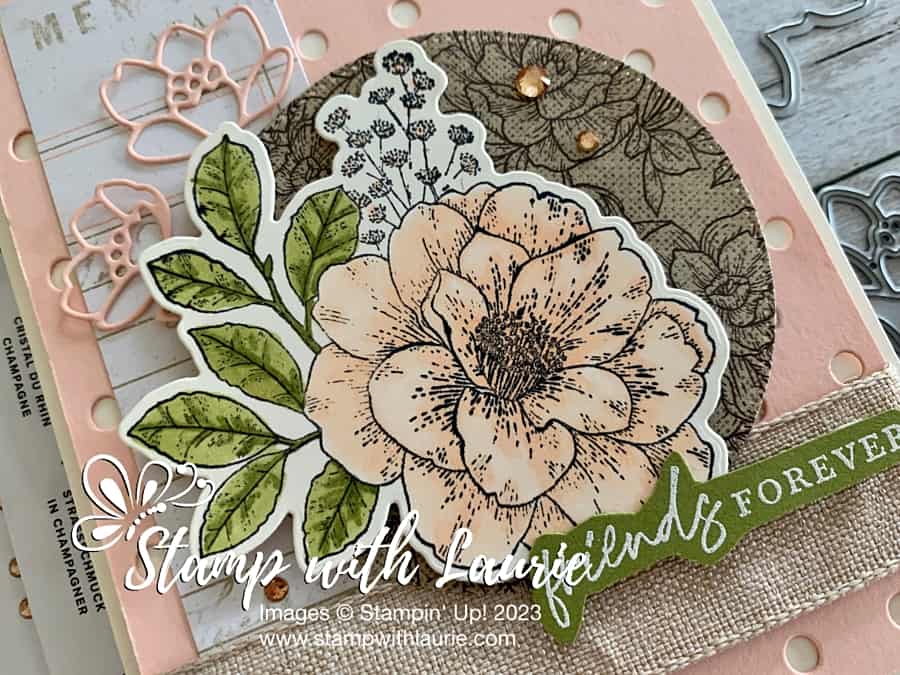
I had a lot of fun using my Stampin’ Blends to colour the rose from the Cottage Rose Stamp Set!
Card with Timeworn Type Embossing Folder
Both of my cards have the same layout. The only difference is that I used the Timeworn Type Embossing Folder for one and the Dots & Spots Die for the other card with the Petal Pink card stock. Which do you like best?
Card with Spots & Dots Die
I decided to go with the journaling paper from the Abigail Rose Designer Series Paper since I didn’t want too much to detract from my focal point, but it still added interest. I used the largest stitched circle from the Stylish Shapes Dies for my other piece of DSP. Since this pattern was a darker tone-on-tone, it made the coloured piece really pop without a lot of distraction.
The sentiment was heat embossed in white on Old Olive card stock and then fussy cut out with my Paper Snips.
A Petal Pink die cut floral piece was added behind the focal point adding interest to the journaling paper and balancing out the sentiment.
The Natural Finish Ribbon ran the width of the card grounding the focal point while adding interest. A scattering of Champagne Rhinestone Basic Jewels added sparkle to the card.
Supplies:
Stamps/Bundles/Dies: Abigail Rose Suite Collection (159052), Dots & Spots Dies (159164), Stylish Shapes Dies (159183)
Inks: Tuxedo Black Memento Ink Pad (132708), VersaMark ink (102283)
Paper: Very Vanilla Thick (144237), Petal Pink (146985), Basic White (159276), Old Olive (100702), Abigail Rose 12″ x 12″ Designer Series Paper (in Suite)
Accessories: Champagne Rhinestone Basic Jewels (151193), Timeworn Type 3D Embossing Folder (156505), Natural Finish Ribbon (in Suite), Paper Snips (103579), Basics Embossing Powder (155554), Embossing Additions Tool Kit (159971), Heat Tool (129053), Old Olive Stampin’ Blends Combo Pack (154892), Petal Pink Stampin’ Blends Combo Pack (154893), Stampin’ Blends Color Lifter (144608), Bone Folder (102300), Stampin’ Dimensionals (104430), Stampin’ Seal (152813), Mini Glue Dots (103683)
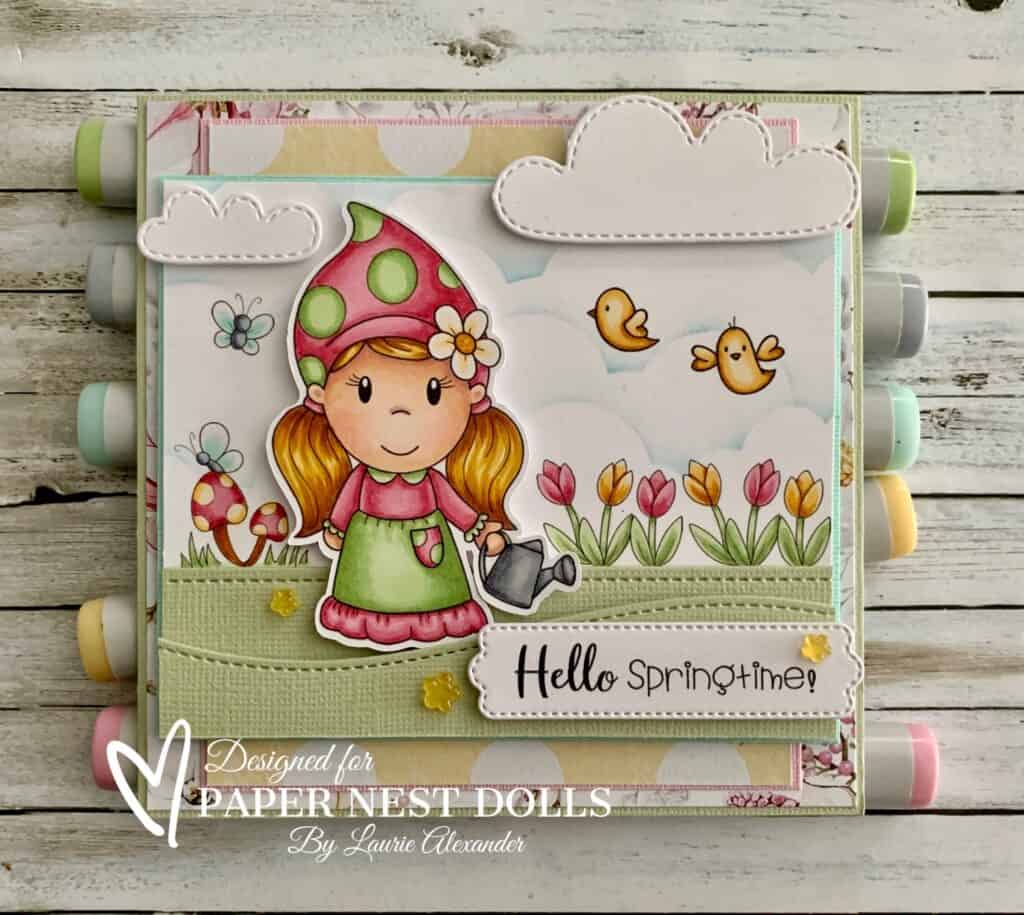
Hello Crafty Friends! Welcome Spring! It’s Laurie here! I am sharing Hello Springtime! as my Design Team Inspiration Card for Paper Nest Dolls using Watering Can Gnome from theGnome Set. There are ten images in the set including:
Shears Gnome
Tulip Gnome
Shovel Gnome
Watering Can Gnome
Bird Bath
Tulips
Daises
Mushroom with Butterfly
Wheelbarrow
Gnome Home
Since today is the First Day of Spring, I thought I would create a Spring card with tulips blooming, birds singing and butterflies fluttering! For my card, I decided to create a scene using several stamps from the Gnome Set.
The Details of My Card
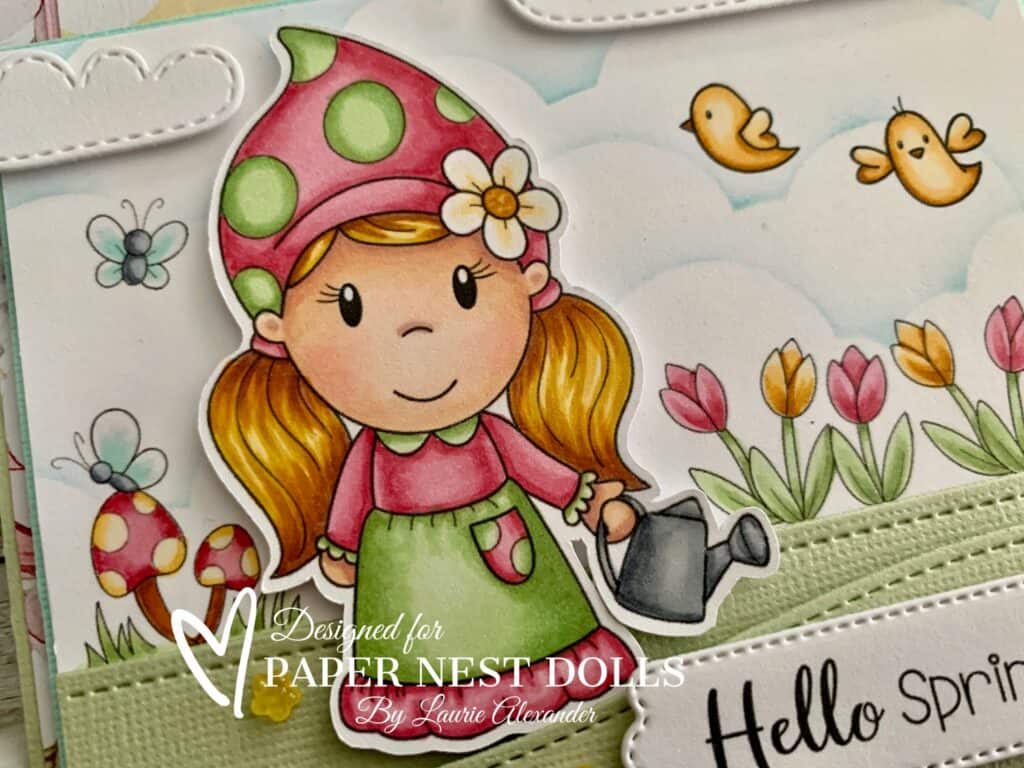
I used Microsoft Word to layout my carefully planned scene so that when I added the Watering Can Gnome, she wouldn’t block any of the other images. I printed and coloured her with my Copic markers separately so that I could add some depth to my scene.
Once everything was coloured, I used the different sizes of the Blending Brushes by Picket Fence and a Kraftin’ Kimmie Stamps cloud stencil to create my sky around the coloured images. It’s nice that the blending brushes come in different sizes! The smaller ones allowed me to get into areas close to the coloured images without having to mask them.
Tip: Use parts of digital stamps, like the birds from the birdbath, instead of the whole stamp to create interest.
For the grass, I wanted a straight part where the flowers were and then a hill to add interest. So, for the straight piece, I used the largest Small Mini Slimline Stackables Die to get the stitching along the top. The hill was from the Slimline Stitched Hillside Border Dies by Lawn Fawn. To create dimension and differentiate the two pieces of grass, I used dimensionals.
Tip: use your slimline dies for more than just slimline cards.
I tucked my coloured gnome into the hill part of the grass but added dimensionals behind her to give depth to my scene.
I added die cut stitched clouds to match the stitching on the grass. The sentiment was printed out on my computer and them die cut with another stitched die.
Clear Wink of Stella was added to the wings of the butterflies and Glossy Accents to her watering can. A scattering of yellow resin flowers in the grass added to my Spring theme.
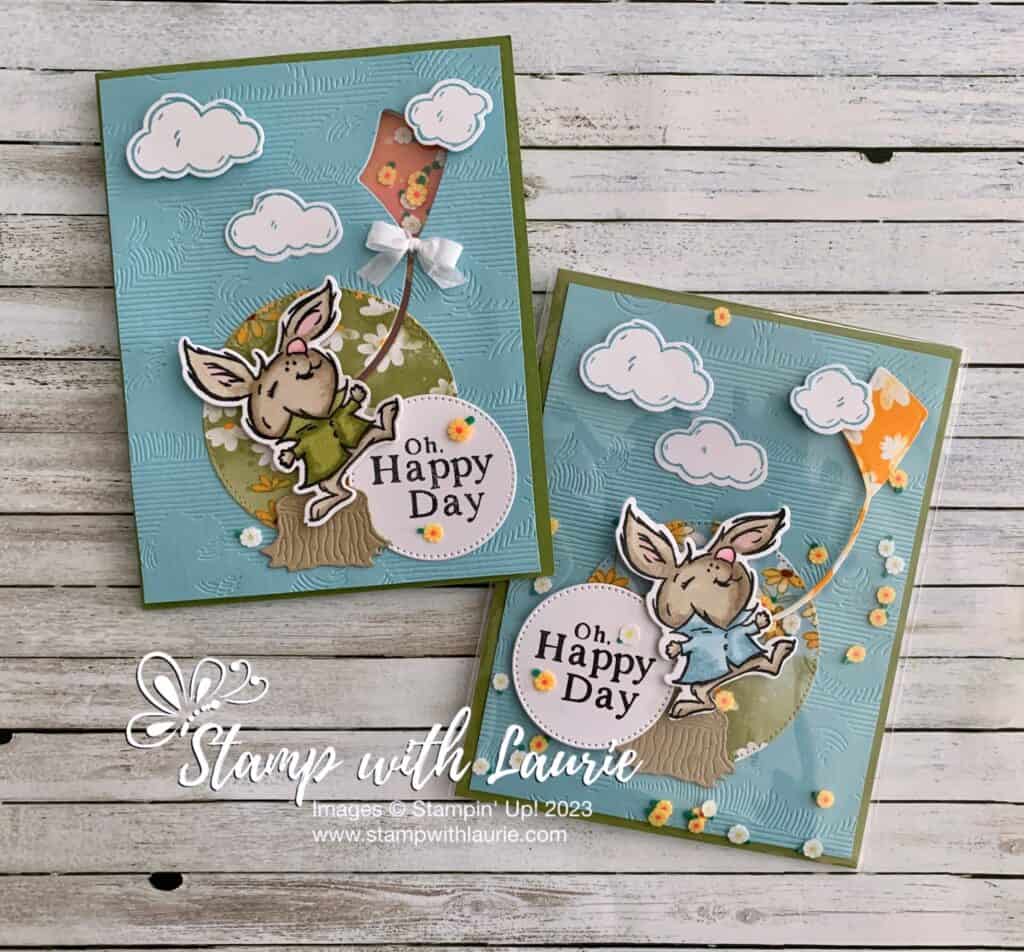
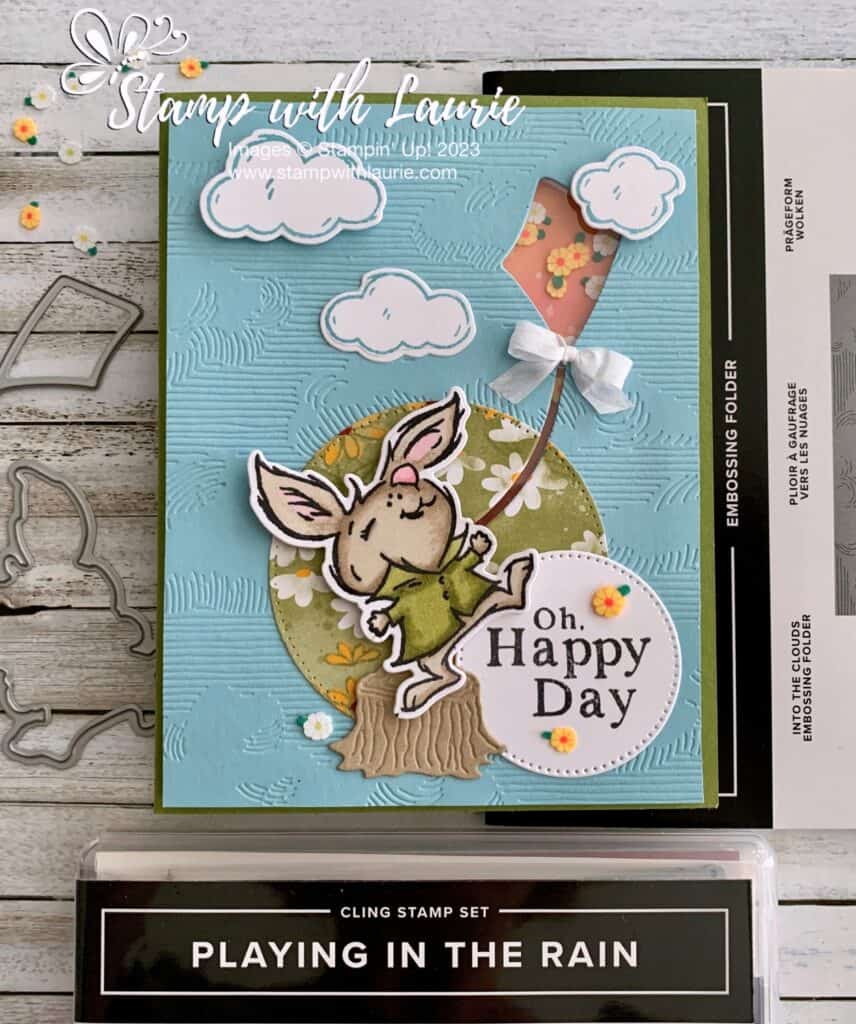
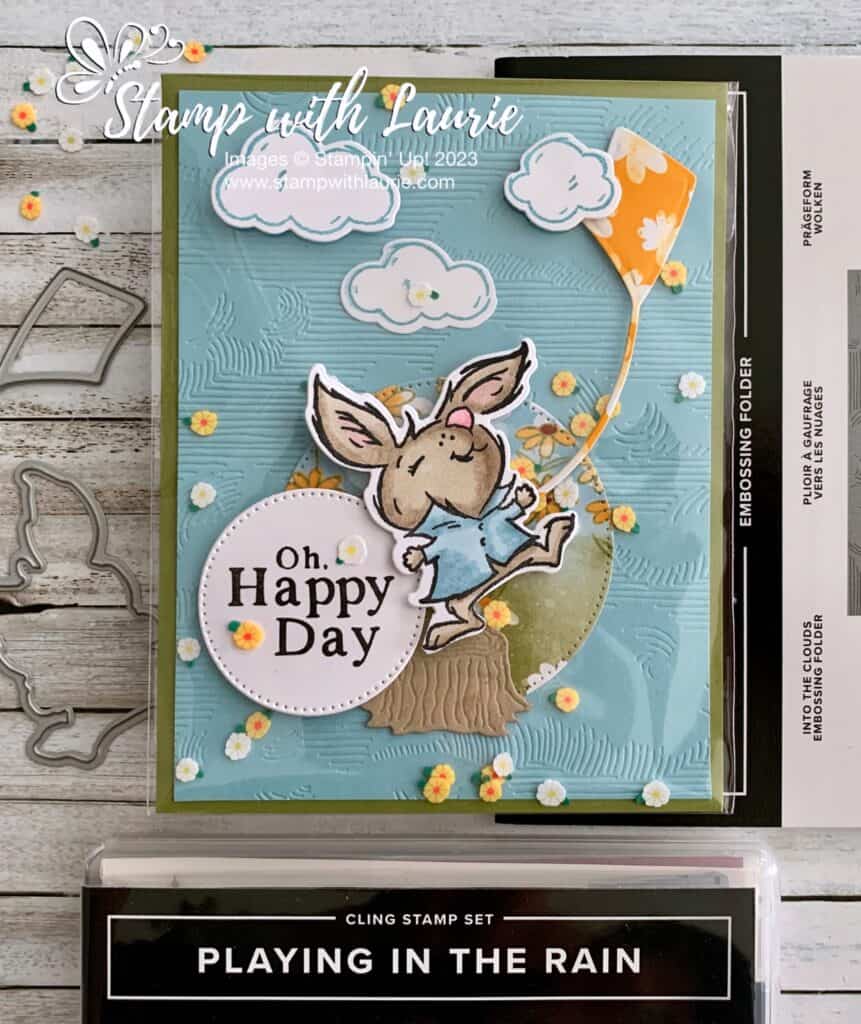
Hello Crafty Friends! Laurie here again! I am sharing my Oh, Happy Day Cards using the Rain or Shine Suite Collection by Stampin’ Up! I created two shaker cards. One was for a swap of the Mini Catalogue and the other was a faux-shaker card. Same design, but with different ways to make a shaker card.
The Details of My Cards
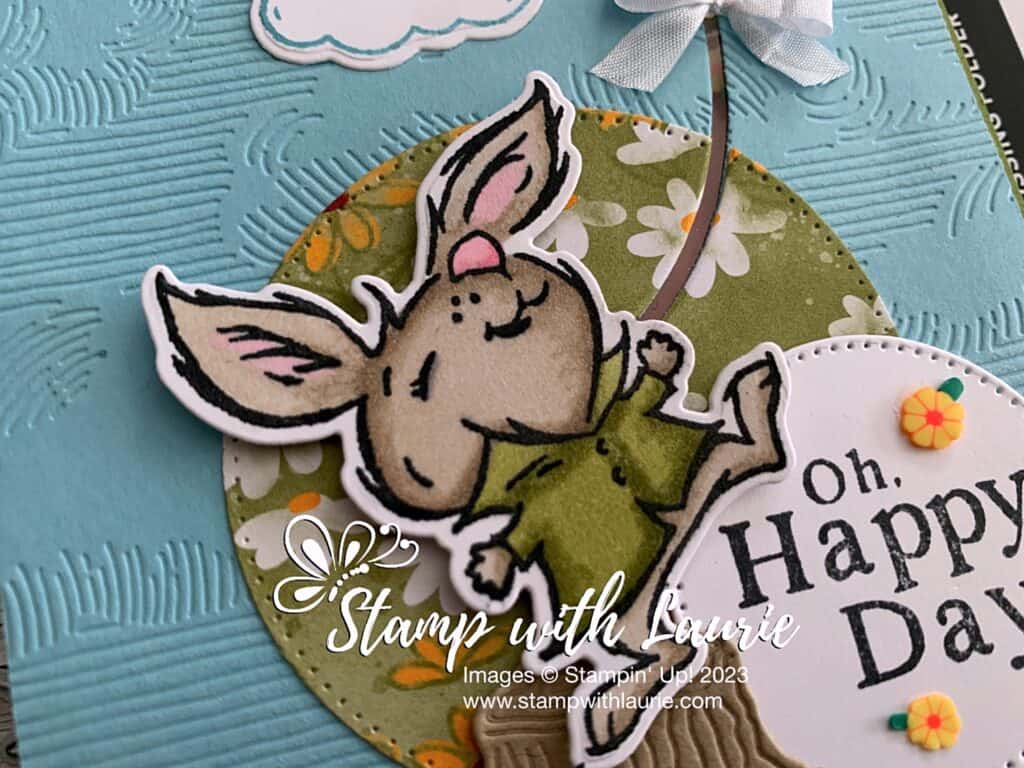
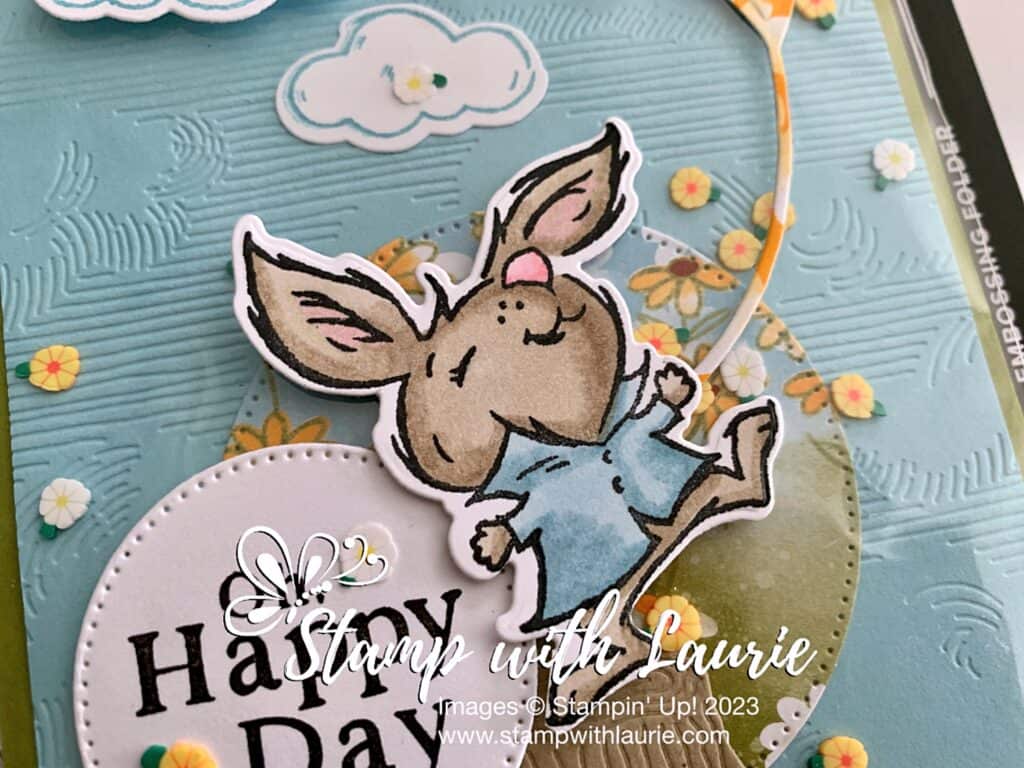
I had a lot of fun colouring this cute rabbit with my Stampin’ Blends! I coloured him with two different coloured shirts depending on the card. Once I finished colouring him, I die cut him out. Even though the bunny is splashing in a puddle on the stamp, the die just cuts him out making him more versatile. So, I decided that since he is bouncing with happiness that I would have him flying a kite.
My Swap Card Details
For my swap card, I made a traditional shaker card and used the kite die for my shaker part. Those Daisy Embellishments are so cute and perfect for a shaker! I backed my shaker part with a little DSP to add some visual interest.
My Swap Card
To get the placement of the kite, I placed my die cut bunny and DSP circle and the Balmy Blue where I wanted them and then positioned my kite die. Using a post-it note, I secured the DSP, and the kite die to the Balmy Blue and then ran it through my die cutting machine. Once that was done, I pulled part the pieces and embossed the Balmy Blue piece with the Into the Clouds Embossing Folder.
For the shaker part, I used a piece of window sheet that I adhered to the back of the Balmy Blue over the kite opening. Next, I used the foam adhesive strips and manipulated them around my kite. These strips are perfect for a shaker card and so easy to use!
Tip
Once the adhesive strip is down, rub the embossing buddy that comes in the Embossing Additions Tool Kit along the edges. This will help with static and keeps the shaker pieces from sticking to the adhesive.
Close Up of Rabbit
Next, I added my shaker elements to the centre of the window sheet on the back. I removed the backing from the adhesive strip and secured the DSP over top. I added more strips to add dimension around the edges of the Balmy Blue so that the card would keep its shape. This part is adhered to the Old Olive card base.
Once that was done, it was just a matter of adhering all the elements in place. A Whisper White bow was added as the tail of the kite. A few daises were added to the sentiment and one beside the tree stump.
Faux Shaker Card Details
A faux shaker card is super easy to make and so fun! For my Faux Shaker Card, I embossed the Balmy Blue and adhered it to the Old Olive mat. Next, I adhered the DSP circle, the stump and one of the clouds to the Balmy Blue.
Faux Shaker Card
Taking a Medium clear envelope, I slid this piece into it. I added my daisy shaker elements to the front on the envelope and sealed it. Using liquid glue, I adhered the envelope to the Thick Basic White card base.
Next, I added the sentiment and the kite with liquid glue to the front on my card. The bunny and the remaining clouds are popped up. A few daisies were added to the sentiment. Easy peasy!
Supplies:
Stamps/Bundles/Dies: Rain or Shine Suite Collection (160556), Stylish Shapes Dies (159183)
Inks: Tuxedo Black Memento Ink Pad (132708), Balmy Blue (147105)
Paper: Old Olive (100702), Balmy Blue (146982), Crumb Cake (120953), Basic White (159276), Basic White Thick (159229), Rain or Shine Specialty Designer Series Paper (in Suite), Window Sheets (142314)
Accessories: Loose Daisy Embellishments (in Suite), Into the Clouds Embossing Folder (159171), Whisper White 1/4″ Crinkled Seam Binding Ribbon (151326), Crumb Cake Stampin’ Blends Combo Pack (154882), Balmy Blue Stampin’ Blends Combo Pack (154830), Old Olive Stampin’ Blends Combo Pack (154892), Flirty Flamingo Stampin’ Blends Combo Pack (154884), Embossing Additions Tool Kit (159971), Multipurpose Liquid Glue (110755), Clear Medium Envelopes (102619), Bone Folder (102300), Foam Adhesive Strips (141825), Stampin’ Dimensionals (104430), Stampin’ Seal (152813), Mini Glue Dots (103683), Post-It Note
Close Up of Rabbit on Faux Shaker Card
Measurements:
Old Olive:
5 ½” x 8 ½” scored at 4 ¼” (card base for shaker)
Or 5 ½” x 4 ¼” (card front for faux shaker)
Thick Basic White:
5 ½” x 8 ½” scored at 4 ¼” (card base for faux shaker)
Balmy Blue:
4” x 5 ¼”
Crumb Cake:
1-3/8” x 7/8”
Basic White (3 pieces):
1-7/8” x 2-3/8” (Rabbit)
1-7/8” x 1-7/8” (Circle)
2 ½” x 2” (Clouds)
Rain or Shine Specialty Designer Series Paper:
2 ¾” x 2 ¾” (Circle)
2-7/8” x 1 ¾” (Kite for Faux Shaker)
2” x 3” (For shaker under kite)
Window Sheet:
2” x 3”
More Information on My Oh, Happy Day Cards:
For more of my Stampin’ Up! cards, please click here.
You will find the items listed above in my online store.
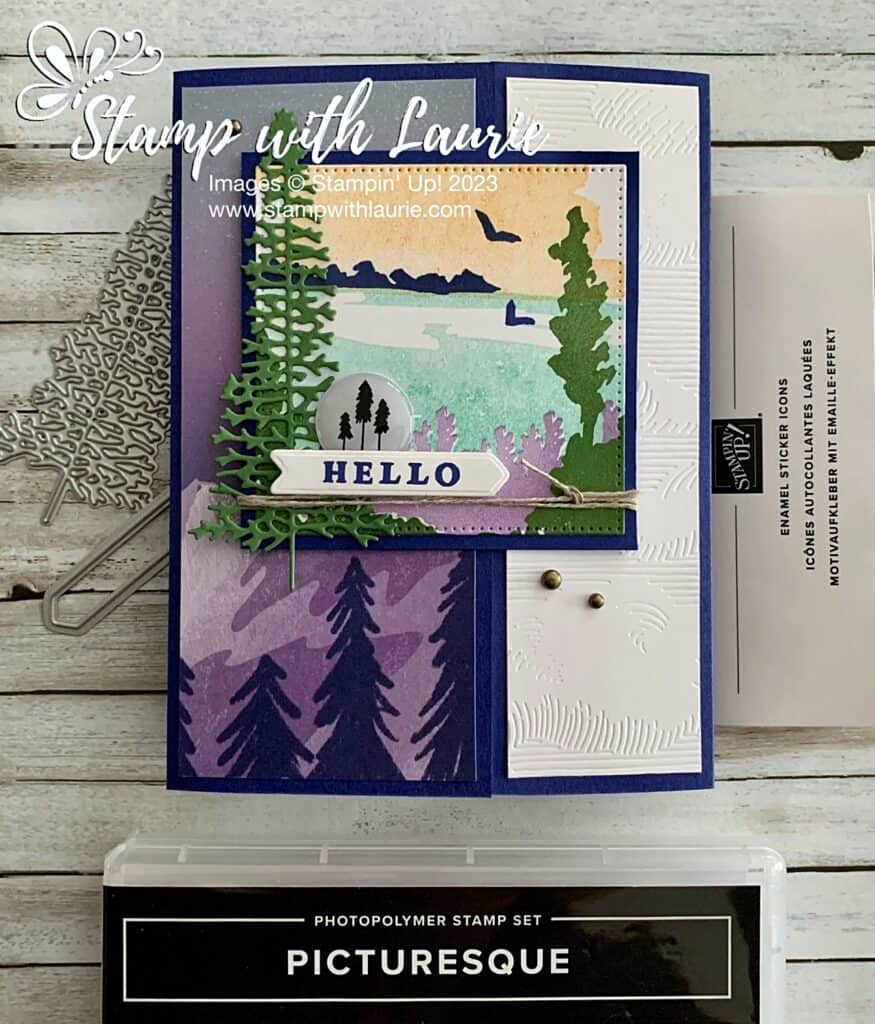
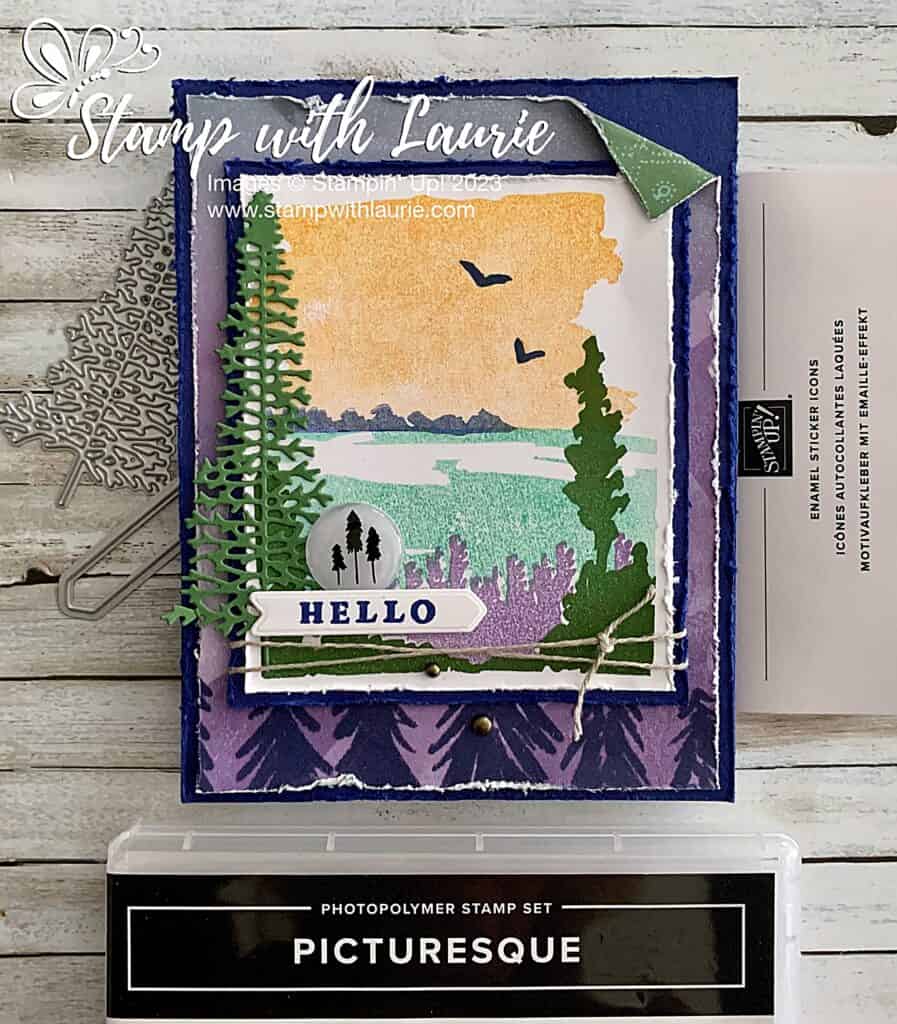
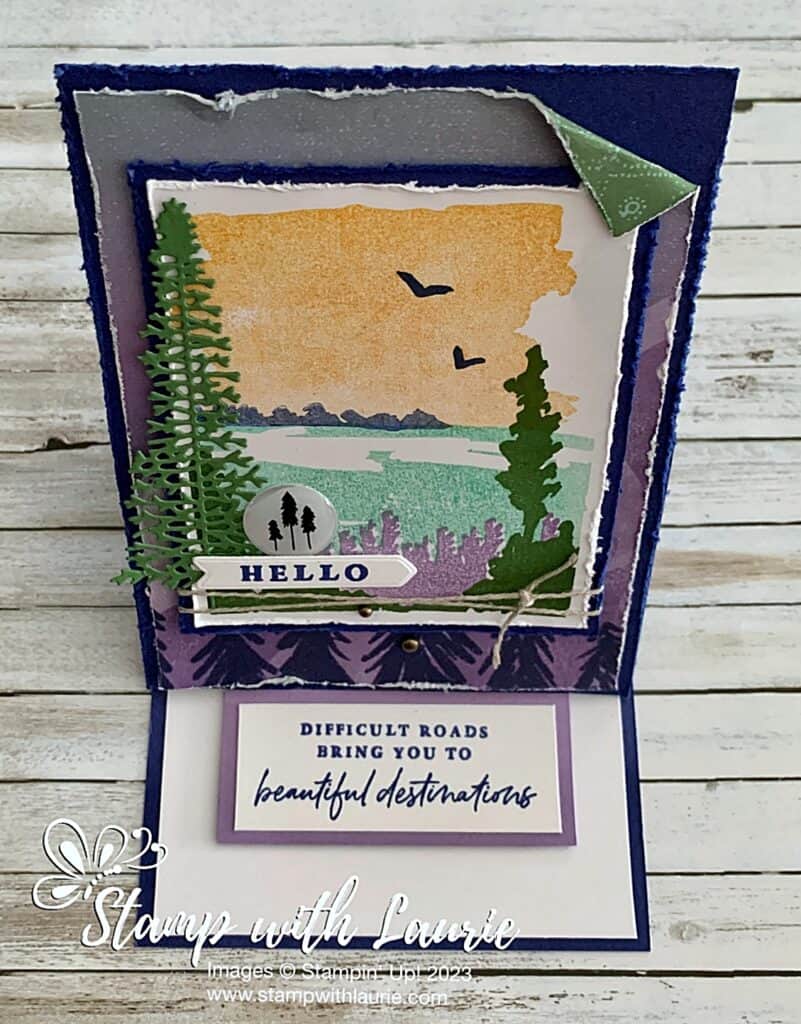
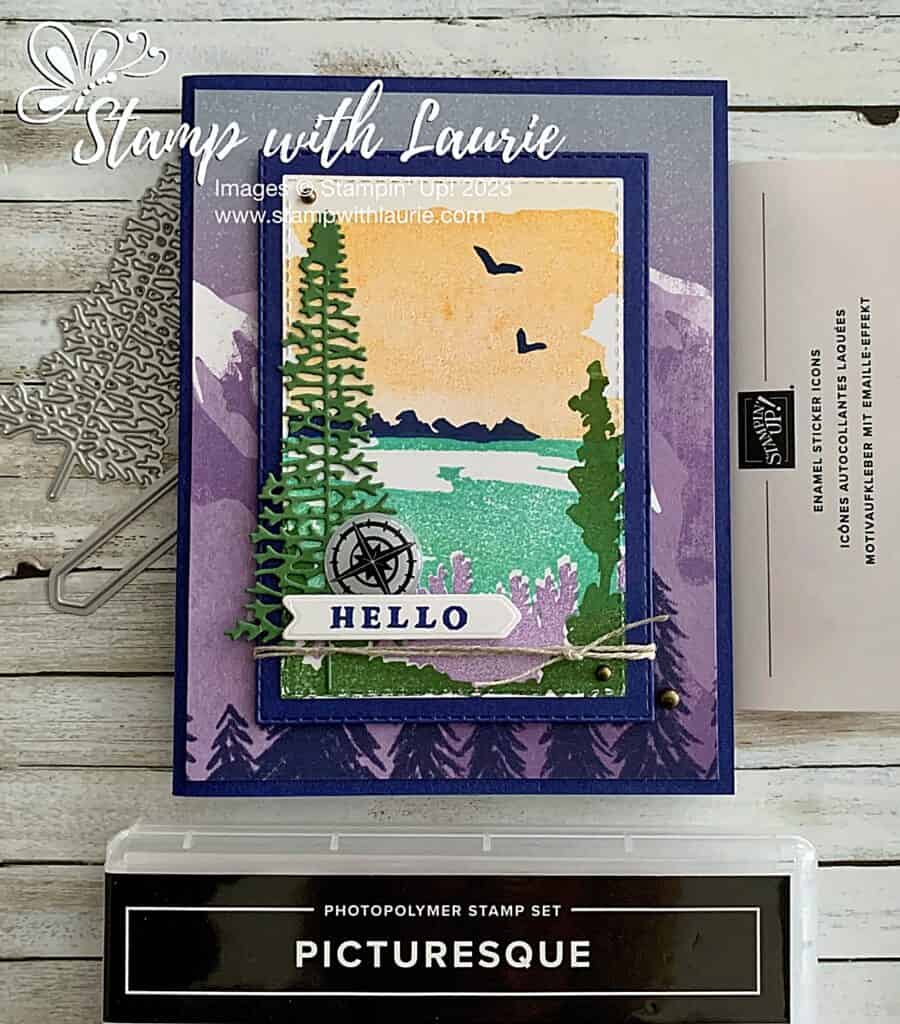
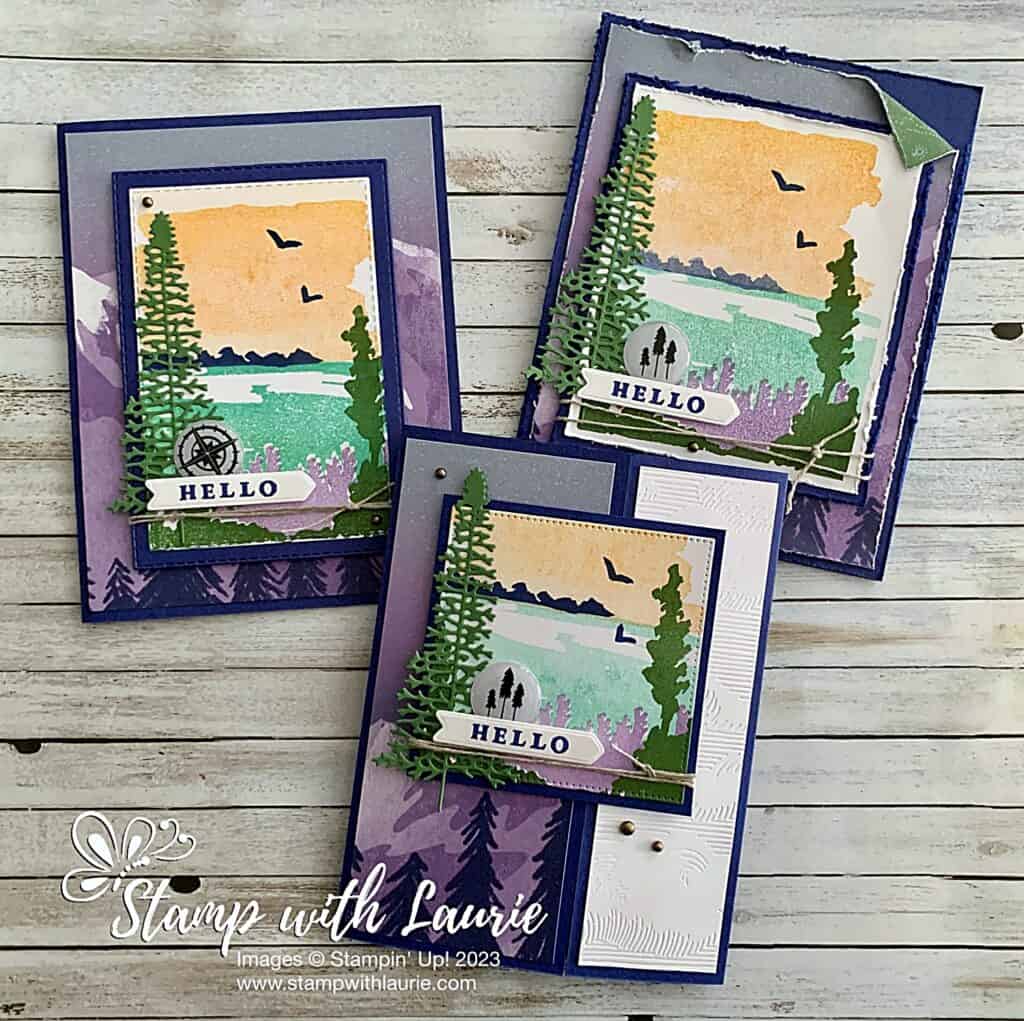
Hello Crafty Friends! Laurie here again! I am sharing My Picturesque Hello Card using the Picturesque Stamp Set by Stampin’ Up! I had a lot of fun playing with this stamp set that I made three cards all with slight variations. One is a gate fold card, another an easel card, and the third is a regular card.
The Details of My Gate Fold Card
I needed to create a swap and decided that I would use the Picturesque Stamp Set for it and create a gate fold card. Give the set some love since there wasn’t a lot of cards out there using it and I always need more masculine card!
I decided this stamp set would be perfect with the Enjoy the Journey Designer Series Paper to create an outdoorsy masculine theme. It is currently free during Sale-a-Bration!
I went with one flap larger than the other since I wanted to show off the DSP. The Into the Clouds Embossing Folder created some interest on the smaller flap while lightening my card up. It also helped to balance the sentiment cluster.
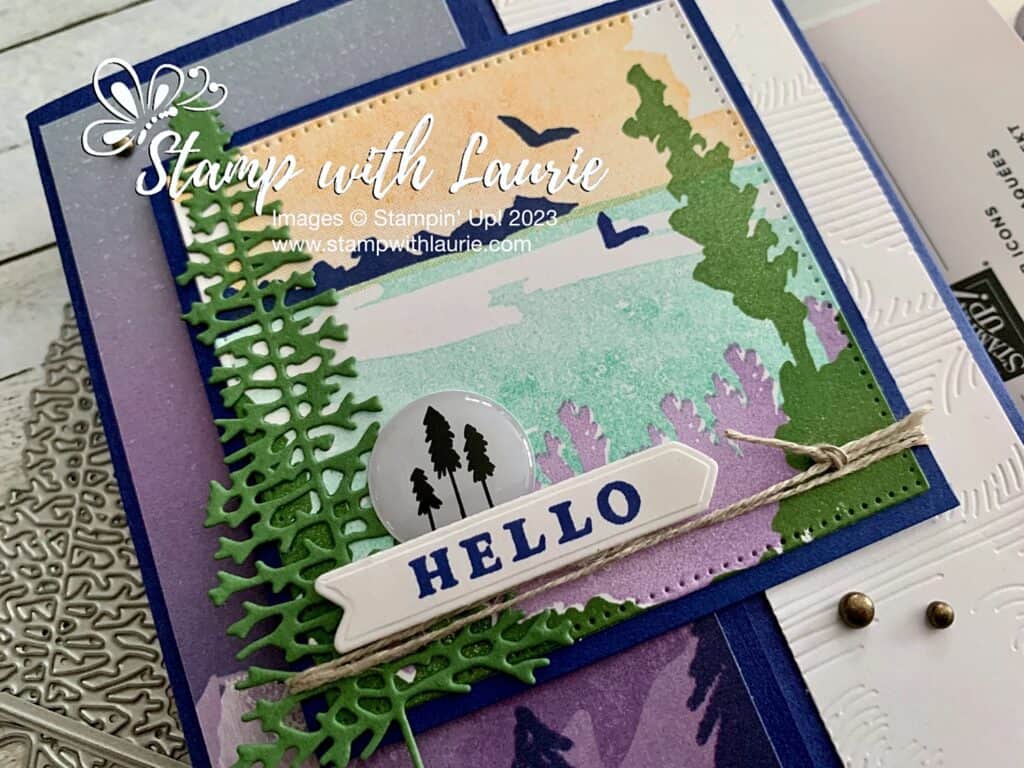
Close Up of Focal Point on my Card
For my stamped image, I used several colours to represent a sunset over a nature scene. The Coastal Cabana and Mango Melody were both stamped off once before stamping on the Basic White. For the sky, I decided to use the Oceanfront Stamp Set to give it a painted feel, but you could use the water stamp from the Picturesque Stamp Set instead.
Once everything was stamped, I used the largest stitched square from the Stylish Shapes Dies to cut it out and matted it with Starry Sky card stock.
Next, I wound some linen thread twice around my focal point and tied it in a knot on the opposite side from the sentiment cluster. The die cut tree was from the Majestic Mountain Dies and I thought it added to my outdoorsy theme and balanced the stamped tree on my focal point.
I stamped the sentiment in Starry Sky and used the arrow die from the All That Dies. I loved how it pointed into the scene while creating a base for the sticker and tree.
Those Enamel Sticker Icons are so neat! I went with the tree icon on my swaps since it went well with the die cut tree and my outdoorsy theme. The finishing touch was three Rustic Metallic Adhesive-Backed Dots.
The Details for My Other Cards
For the Easel card, I decided to give it a distressed look by using my scissors to run along the edges of everything. I even folded down a corner of the DSP so that the Garden Green back can be seen.
Easel Card Closed
I loved the encouraging sentiment and decided to use it for the inside as a stopper so that the easel could stand up.
Easel Card Opened
The full card was stamped the same way, but I used the Stitched Rectangle Dies to die cut the focal point and mat out. I also used the compass from the Enamel Sticker Icons.
Regular Card Base
Supplies:
Stamps/Bundles/Dies: Picturesque Stamp Set (160511), Majestic Mountain Dies (151608), All That Dies (159078), Oceanfront Stamp Set (157862), Stylish Shapes Dies (159183), Stitched Rectangle Dies (151820)
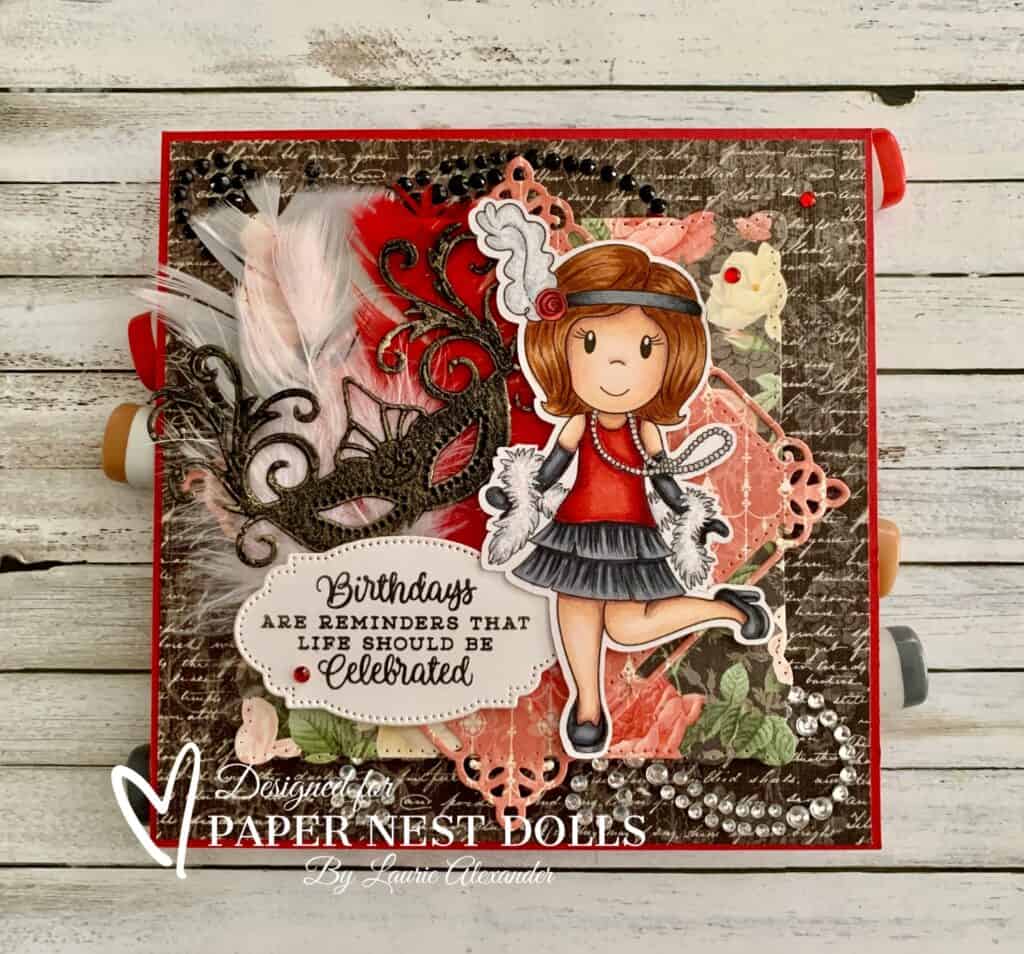
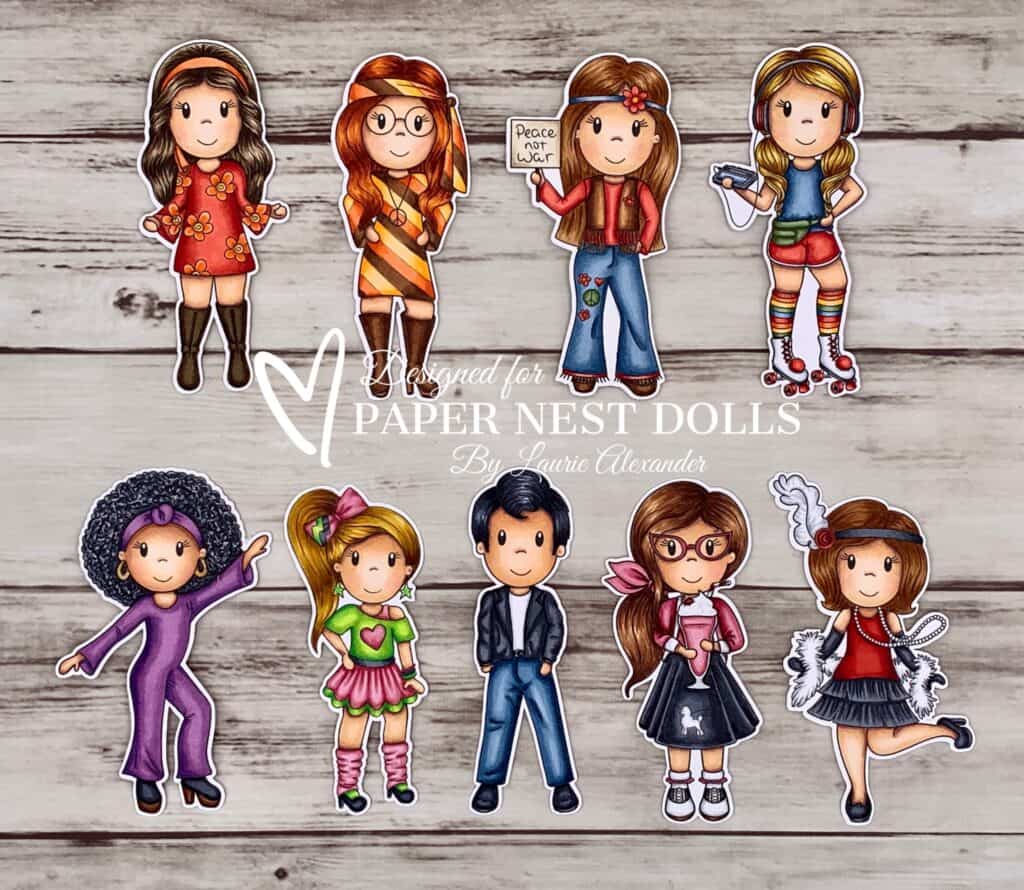
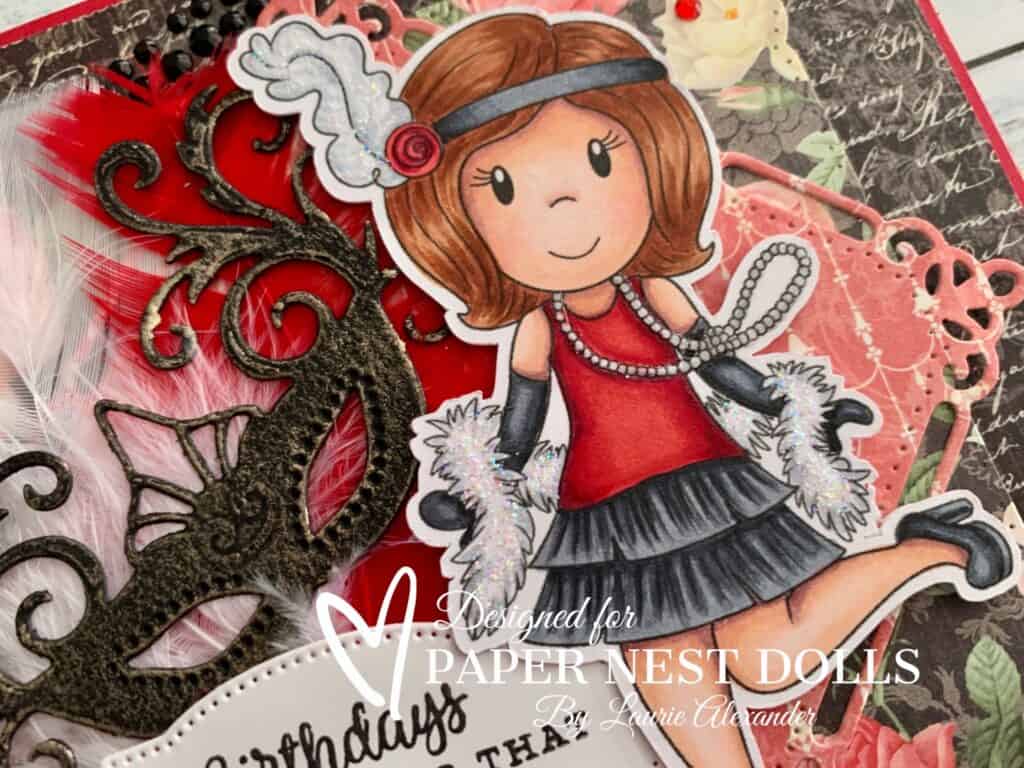
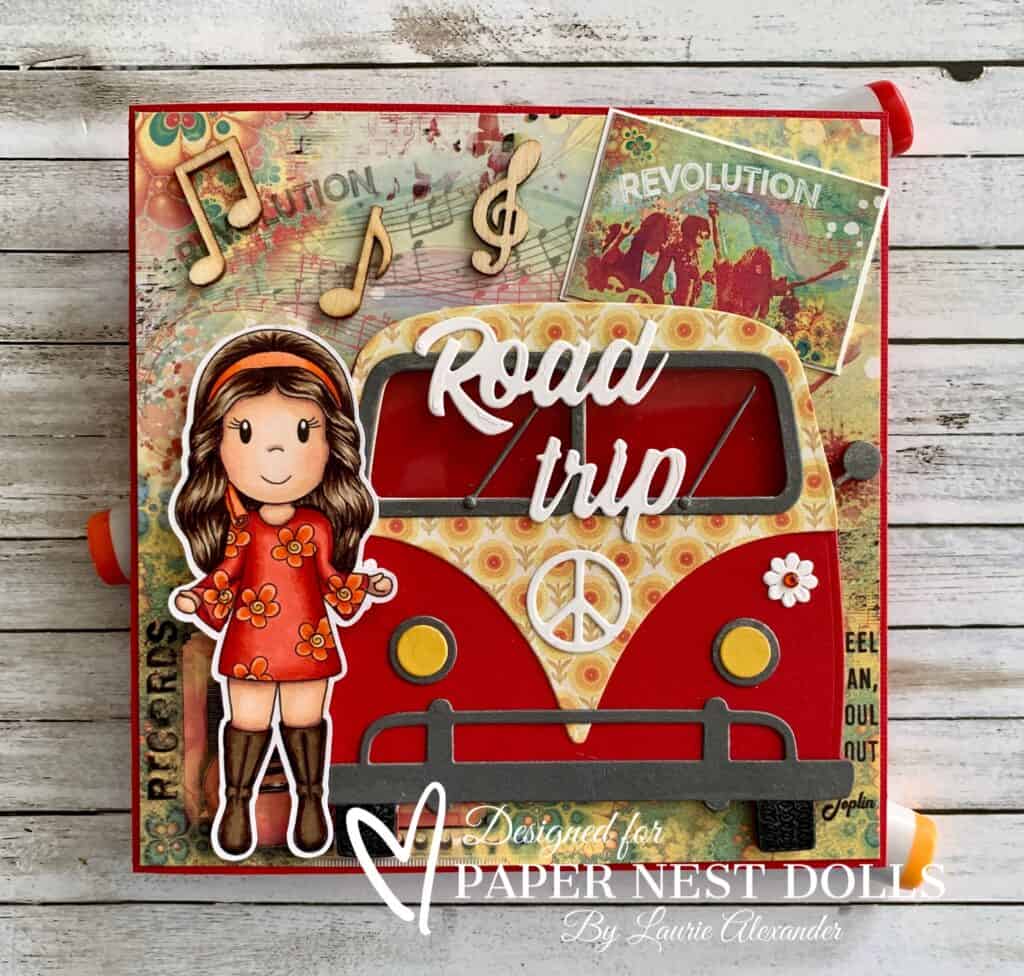
Hello Crafty Friends! It’s Laurie here! I am sharing Have a Flappable Birthday as my Design Team Inspiration Card for Paper Nest Dolls using Decade Collection Flapper Girl Emma. There are ten dolls in the Decade Collection that come in both rubber and digital stamps. You can find all the digital versions here.
Decade Doll Collection by Paper Nest Dolls
The Details of My Card
For my card, I used my Copic markers to colour Flapper Emma’s outfit in a very striking colour scheme of red and black to create a Roaring 20s theme. I love this Era with all it’s gorgeous outfits, Art Deco, and the dance/music scene!
The Mon Amour Papercrafting Paper by Graphic 45 had women with vintage style clothing on it, but I decided to go with the more neutral designs since I wanted the embellishments and Emma to shine. I felt that the Marvelous Squares Dies created an Art Deco feel with their die cuts adding to my Roaring Twenties theme.
Since Emma had a boa on, I decided to add some real feathers in white and red to tie in my colour scheme. Also, since it’s Mardi Gras week, I thought a mask would be a fun accent to add in front of the feathers. To bring out the details of the mask, I rubbed some white gold wax across it.
Don’t you love the sentiment! Perfect for my card since the Roaring 20s was all about living life to the fullest!
To add some sparkle, I used black and clear rhinestone sticker flourishes in opposite corners and a scattering of red rhinestones. I also added Star Dust Stickles to Emma’s boa and her headpiece. Glossy Accents was added to her pearls.
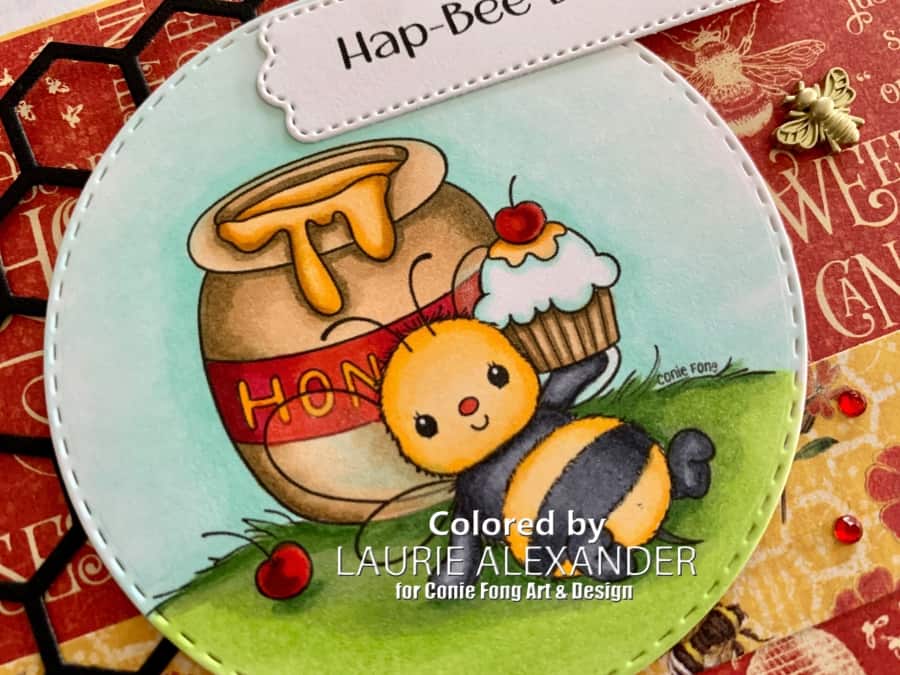
Hello Crafty Friends! It’s Laurie here! I am sharing My Hap-Bee Birthday Card as my Design Team Inspiration Card for Conie Fong Art & Design using Cupcake Honey Bee and Sentiment Bundle.
This Bundle includes 6 images:
Title 1: Cupcake Honey Bee PNG
Title 2: For My Sweet Friend Sentiment PNG
Title 3: Hap-Bee Birthday PNG
Title 4: Sweet As Can Bee PNG
Title 5: Just Bee Cause PNG
Title 6: Just Bee Cause – Bold PNG
The Details of My Card
Conie Fong Art & Design has come out with several cute bee stamps in her New Release, and I couldn’t wait to colour this cutie up with my Copic markers! In fact, I coloured him twice and will share my other card in another post.
The Graphic 45 paper was perfect for my card with all the Bee sayings on it! I even had a strip of bees with honeycomb leftover from another bee card that I used to anchor my bee scene. The other card will be mentioned at the end of this post.
I couldn’t resist using the honeycomb cluster die on one side of my scene. To help balance out the layout, I used the fun sentiment “Hap-Bee Birthday”, a bee trinket and some red rhinestones on the other side.
I used Clear Wink of Stella on the bee’s wings and Glossy Accents on the cherries.
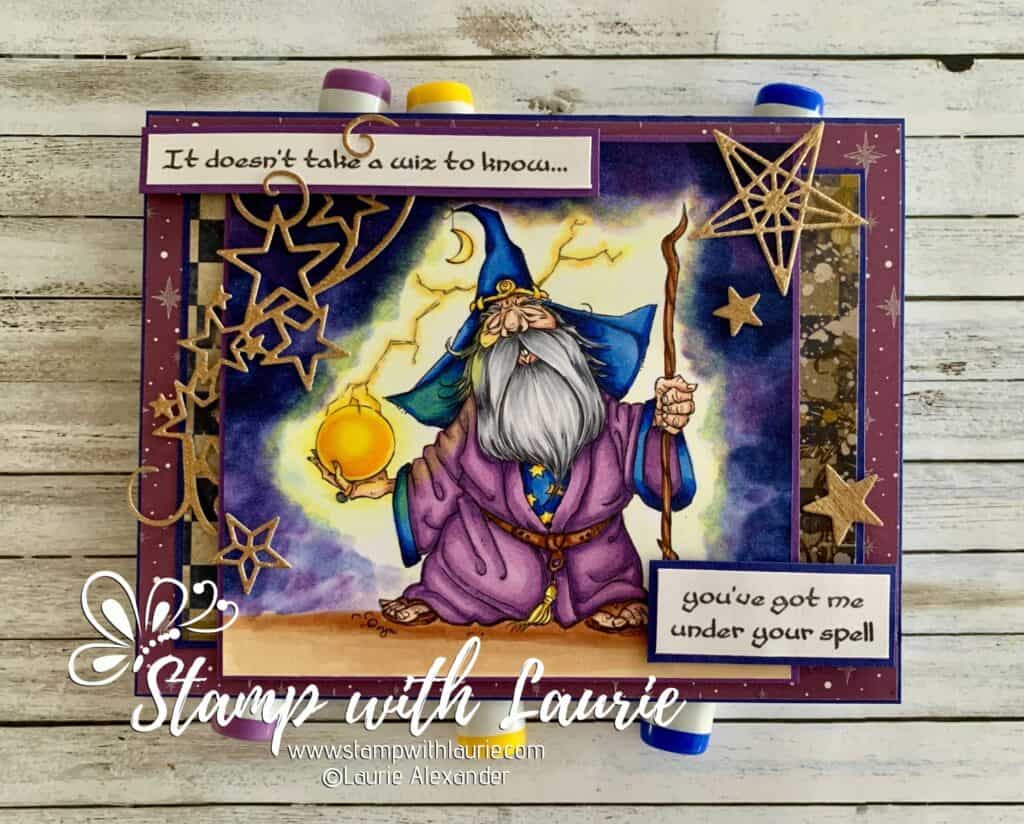
Hello Crafty Friends! It’s Laurie here! I am sharing my Under Your Spell Card using Wiz by Mo’s Digital Pencil.
This past week was Valentine’s Day, and I made this card to give my Hubby. He loves anything fantasy and I thought the Wiz would be a fun card to make for him!
The Details of My Card
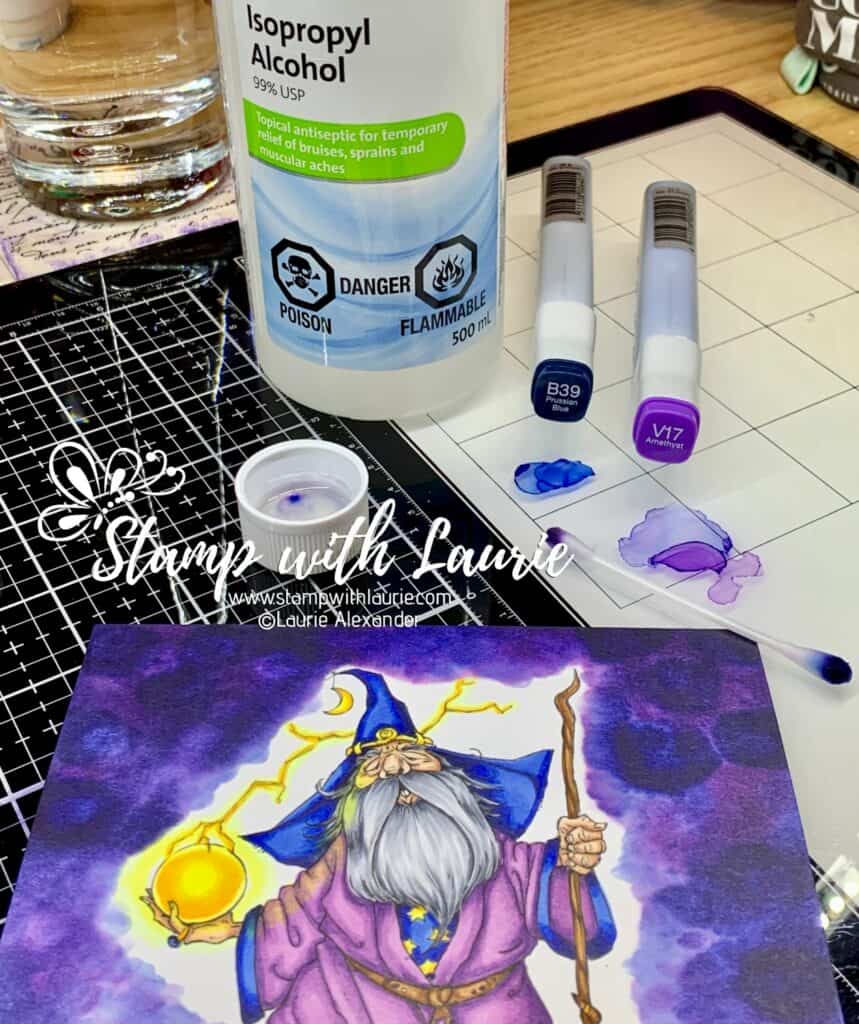
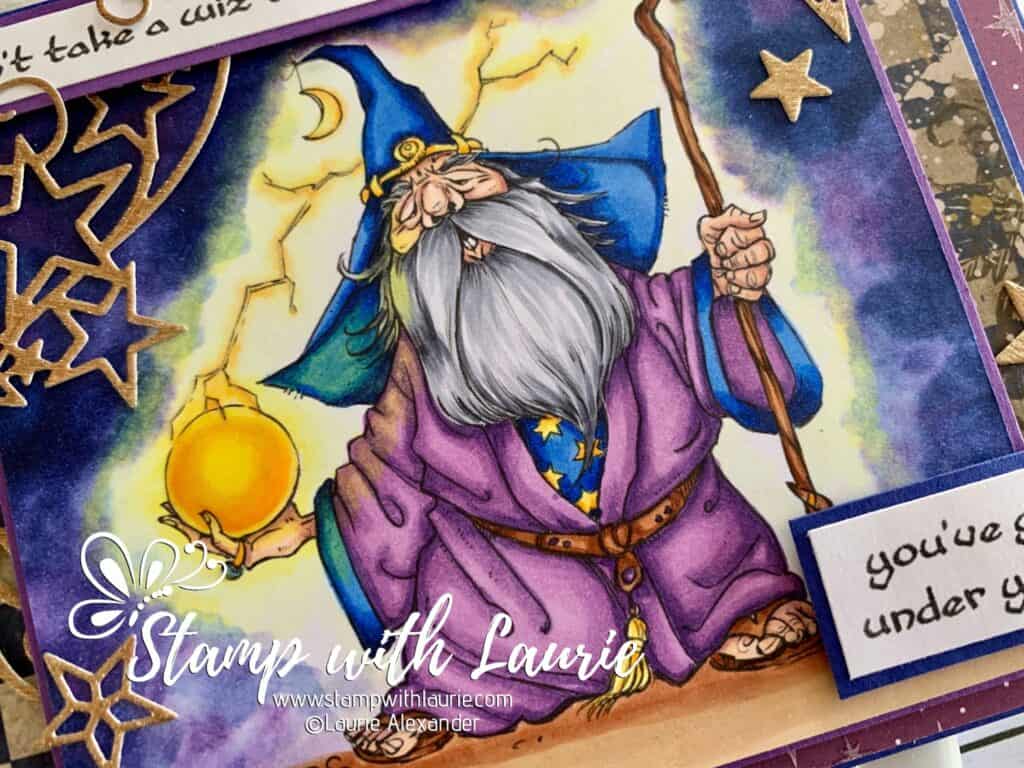
For my card, I coloured the Wiz with my Copic markers in magical shades of purples and blues with bright yellow accents. I used my Copic refills in B39 and V17 with 99 % Isopropyl Alcohol to create the mystical auras around him. You can use any colours for this effect, but I picked two colours that draw on the colour scheme that I used on the image.
Background Technique
To create this technique, I worked in small sections to keep the ink wet while I played. I dripped a few drops of each refill making sure that the drops were far enough away from the image since they bled. I also overlapped them which helped with the blending and coverage.
While the ink was wet, I dipped the q-tip into the alcohol and dotted and dabbed through the inks. As I dabbed, I pulled the ink toward the image. The dotting created lighter splotches where the ink was repelled. I re-dipped the q-tip regularly into the rubbing alcohol to push the ink around and dotted toward the Wiz and ground. This section was much more diluted to achieve an effect that the ink was blended out to white. I also added reinker to a glass mat and dipped the wet q-tip into it add more ink in the diluted area.
Background Technique Using Copic Reinkers
Once I was happy with the background, I use Y02/Y000 to push the darker background inks back from my image to create a yellow glow that softens the darker edges.
I added some die cut stars in gold glimmer paper swirling around the top sentiment. A scattering of other glimmer stars helped with the mystical theme.
Glossy accents were added to the mystical crystal ball. I used a gelly roll pen on the mystical lightening arcing from the crystal ball. Clear Wink of Stella was added to the stars on his shirt, the gold band on his hat and the star hanging from his hat.
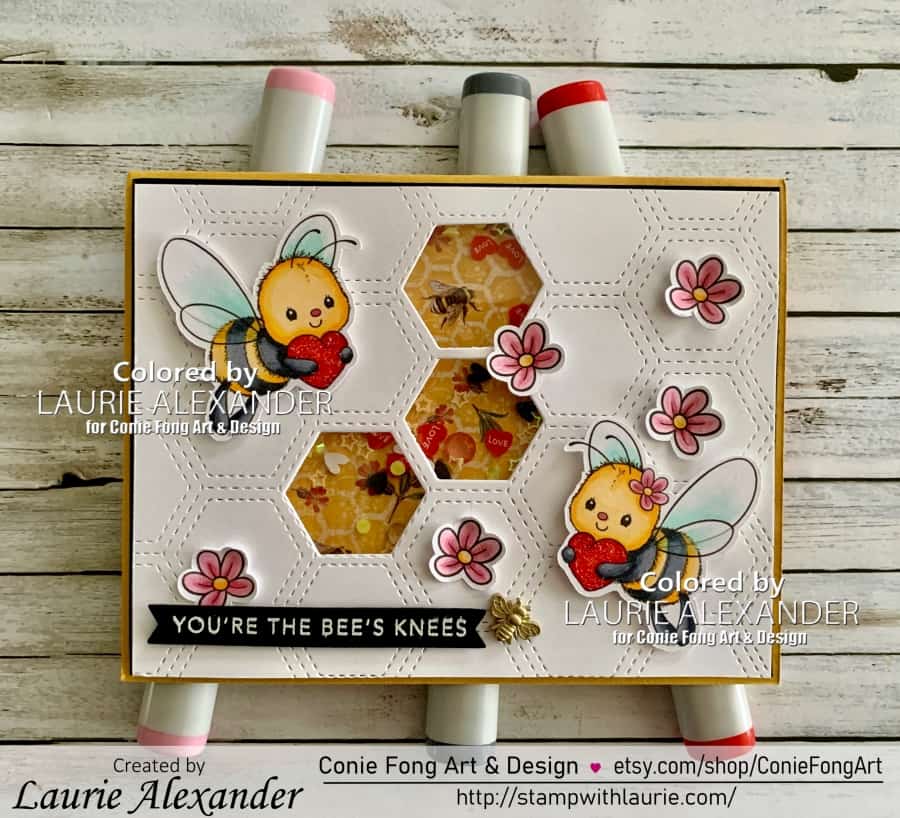
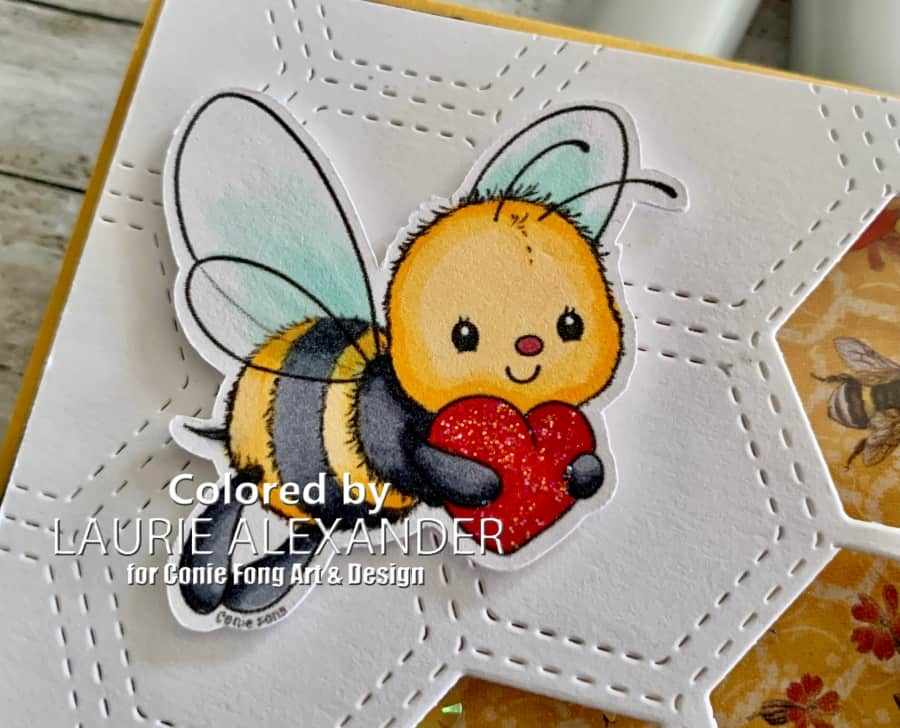
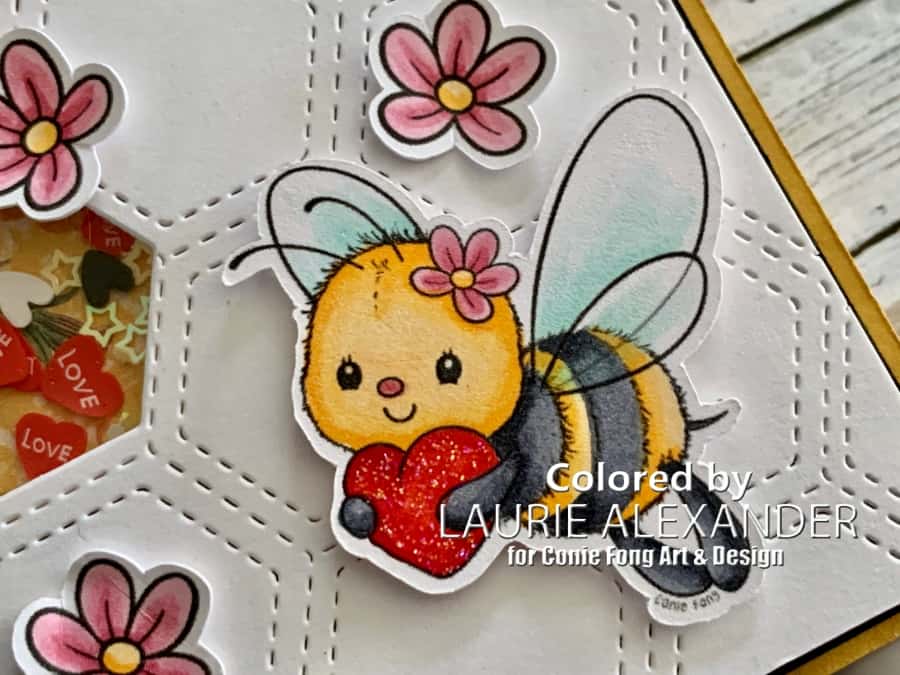
Hello Crafty Friends! It’s Laurie here! I am sharing my Bee’s Knees Card as my Design Team Inspiration Card for Conie Fong Art & Design using the super cute Bee With Heart Bundle.
This Bundle includes 5 images:
Title 1: Bee With Heart – Boy (PNG)
Title 2: Bee With Heart – Girl (PNG)
Title 3: Flower Accessory for Bee (PNG)
Title 4: For My Sweet Friend Sentiment (PNG)
Title 5: Sending Hugs Sentiment (PNG)
The Details of My Card
These bees are such a fast colour with my Copic markers and perfect for a super cute Valentine card, but they could also be used for an anniversary, a wedding, even a birthday!
I decided to use the quilt top die and the individual hexagons that you can place where you want to create a fun shaker card. The Graphic 45 paper with the honeycomb pattern, bees and flowers made it feel like you are glimpsing into a busy hive. I used several different shaker elements, especially hearts, to tie in my Valentine theme.
Close Up of Boy Bee
The Bundle comes with sentiments, but I wanted to heat emboss with white on black card stock. I love the contrast of white on black especially for my card! The stamp comes with several great bee sentiments that can be used for all occasions, but I used one appropriate for a Valentine card.
I printed the Flower Accessory several times and coloured them with my Copic markers. To add depth to the flowers, I used an Embossing Stylus Tool and rolled it around the flowers on the Stampin’ Pierce Mat. This made the edges curl up to create dimension. The only embellishment I used was a bumblebee trinket. To add sparkle, I used Clear Wink of Stella on their wings and Stickles on the hearts that they carry.
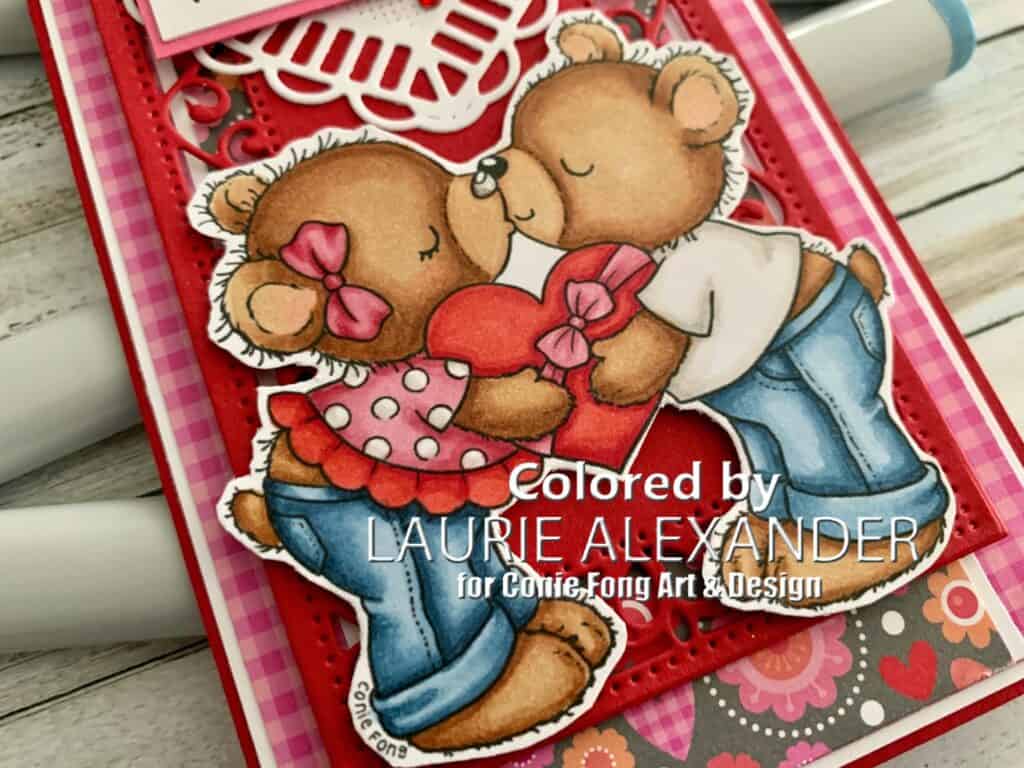
Hello Crafty Friends! It’s Laurie here! I am sharing my Valentine Kiss Card as my Design Team Inspiration Card for Conie Fong Art & Design usingBella and Benji Kiss.
This digital purchase includes 4 stamps:
Image: Bella and Benji Kiss
Sentiment 1: Happy Anniversary Sentiment
Sentiment 2: Happy Valentine’s Day
Sentiment 3: I Love You
The Details of My Card
Conie Fong makes the cutest bears and these two are perfect for a Valentine, an anniversary, and even a birthday! For my card, I decided to create a mini slimline Valentine card since it is only a few weeks away.
I had fun colouring them with my Copic markers. Don’t you just love the blue jeans that they are wearing! I went with red/pink for her top and the box of chocolates since they are the quintessential colours for Valentine’s Day! I also made his shirt white to match her polka dots.
Have to love being able to use scraps! I had some scraps of the Doodlebug paper leftover from another project which were perfect for a mini slimline card!
The die cut rectangle from the Swiss Collection created a wonderful back drop for these cuties since the frame looked like hearts. I love the versatility of these dies that can layer depending on the size of your card! I went with the two middle rectangle dies since they fitted the slimline shape perfectly!
For the die cut heart, I went with white to add some contrast from the background and to create a focal point for my sentiment. A scattering of red rhinestones around the sentiment added a bit of sparkle.
The finishing touches were Clear Wink of Stella on Bella’s hair bow, her polka dots on her shirt and the bow on the box of chocolates.
Bella and Benji Kiss, Conie Fong Art & Design Paper Basics – Stamper’s Select White Cardstock, Papertrey Ink Love Bugs 6” x 6” Paper Pad, Doodlebug Design Inc. Swiss Collection – Background, Creative Expressions by Sue Wilson Two of Hearts Dies, Cheery Lynn Designs Red Rhinestone Basic Jewels, Stampin’ Up! Clear Wink of Stella, Stampin’ Up! Real Red and Basic White Card Stock, Stampin’ Up!
Finished card size: 6” x 3 ½”
————————–
To view my other Conie Fong Art & Design projects, please click here.
Hope you like my Design Team Inspiration Card using Bella and Benji Kiss for Conie Fong Art & Design!
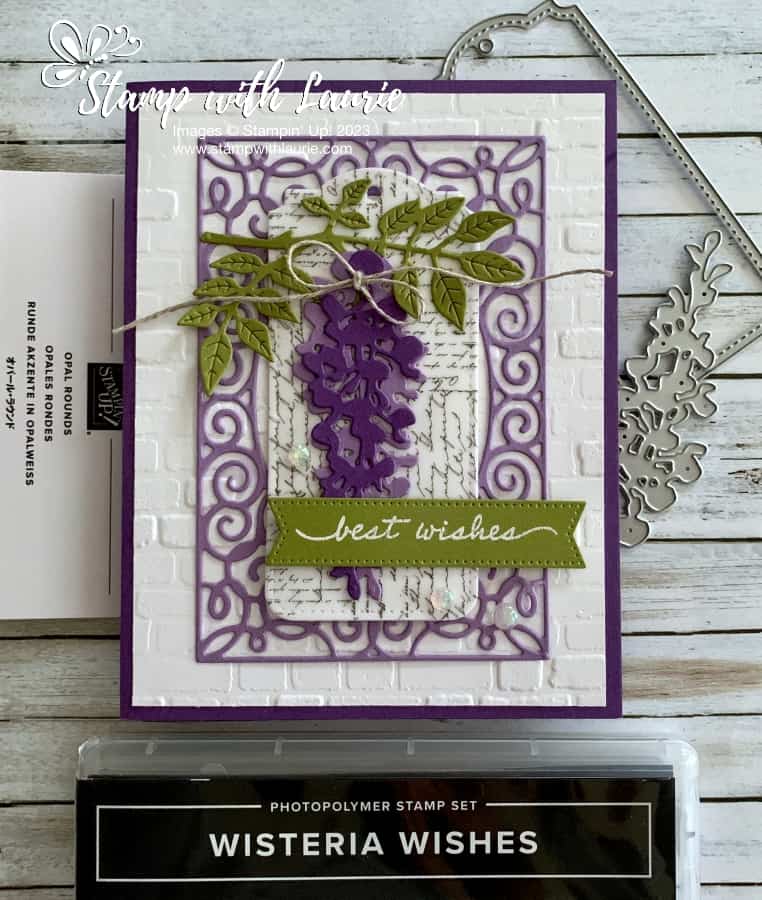
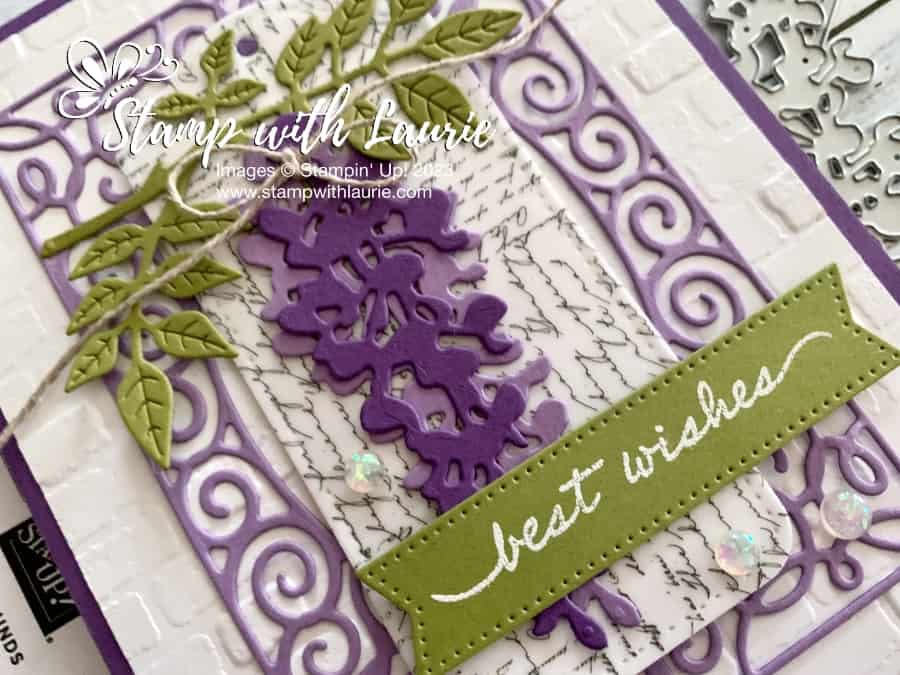
Hello Crafty Friends! Laurie here again! I am sharing my Best Wishes Birthday Card using the Wisteria Wishes Bundle by Stampin’ Up! For my card, I decided to create a birthday card, but this card could also be used for a wedding or an anniversary.
The Details of My Card
Wisteria comes in all different colours, but I just love wisteria in different tones of purples! So, it was a given that I would use Gorgeous Grape and Highland Heather for mine.
I decided to create several layers to build up to the wisteria focal point. The Brick & Mortar 3D Embossing Folder created a nice blank background while creating a bit of interest. The beautiful filigree die from the Fancy Frames Dies added to the delicateness of my wisteria and guided the eye to my focal point.
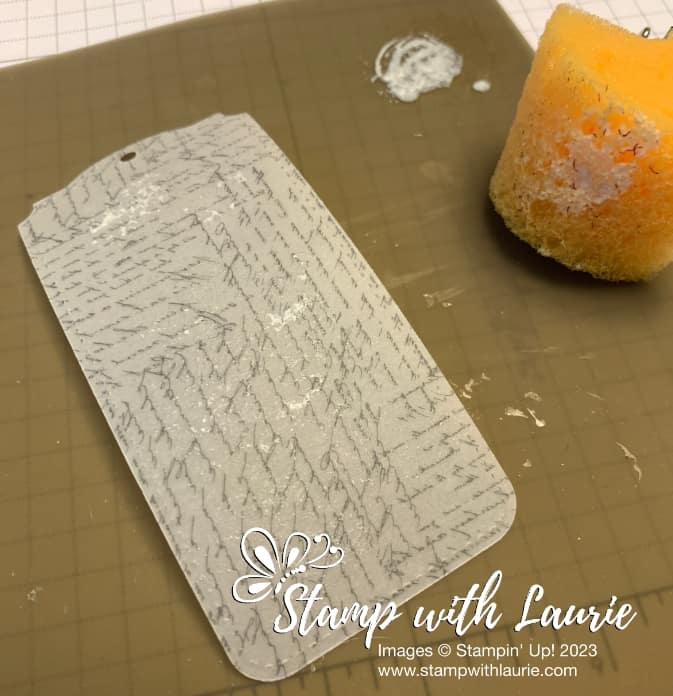
My wisteria needed a background to separate it from the filigree frame. So, the largest of the Tailor Made Tags was perfect. I die cut it twice using Basic White and the script sheet from the Vellum Layering Designs. I wanted the tag to be popped up and by adding the Basic White behind the vellum, it made it sturdy enough to do so.
Tip: to add glue to vellum so that you do not see it, use a Silicone Craft Sheet with a sponge and dab liquid glue onto the back.
Vellum and Liquid Glue Tip
The sentiment was heat embossed in white on a flag from the Stylish Shapes Dies.
For embellishments, I added some Linen Thread and a scattering of Opal Rounds.
Supplies:
Stamps/Bundles/Dies: Wisteria Wishes Bundle (158860), Fancy Frames Dies (159176), Tailor Made Tags Dies (155563), Stylish Shapes Dies (159183)
Inks: VersaMark Ink (102283)
Paper: Gorgeous Grape (146987), Highland Heather (146986), Old Olive (100702), Basic White (159276), Vellum Layering Designs (157764)
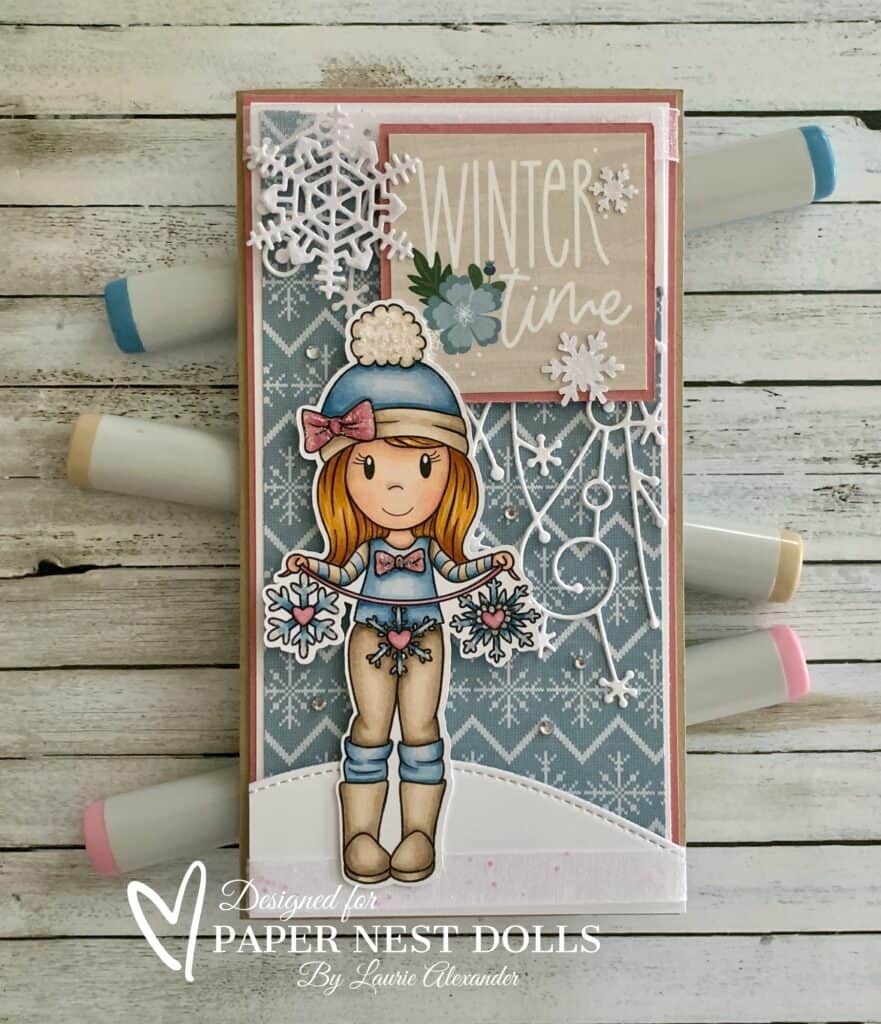
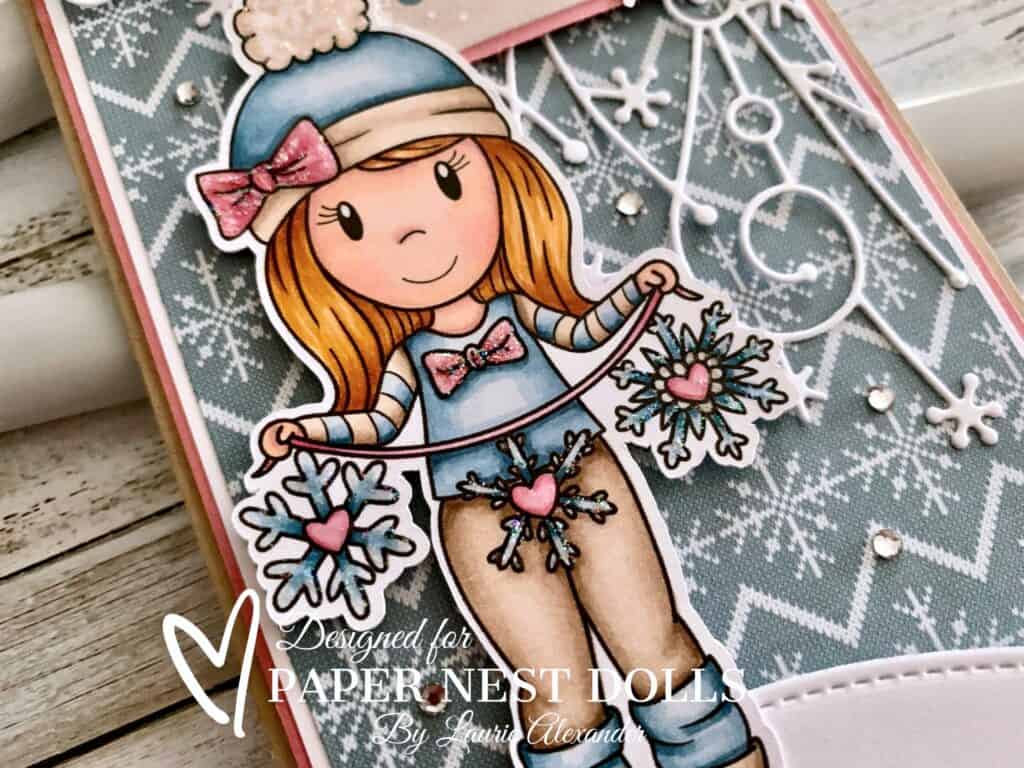
Hello Crafty Friends! It’s Laurie here! I am sharing my Wintertime Wishes Card as my Design Team Inspiration Card for Paper Nest Dolls using the sweet Emma with Snowflake Banner. She is perfect for a winter birthday or Valentine’s Day with her heart banner!
The Details of My Card
For my card, I coloured Emma with my Copic markers in one of my favourite colour combos of pinks, blues, and tans! I added Glossy Accents to the hearts on her snowflake banner and Stardust Stickles to her hat pompom, bows and the snowflakes.
The Snowed In Paper was perfect for my card since the knitted snowflake pattern created a cozy warm feel and suited my snowflake theme. Even the “Wintertime” sentiment was from the Paper Pad.
I had the Frostyville Corner Die from Memory Box in my stash and thought it would work for a mini slimline card. I love how it peeks put from under the sentiment creating interest over the knitted snowflake paper! A few more glimmery snowflakes from punches and a die were added for sparkle. To ground Emma, I added a stitched snowbank and ran some Glittered Organdy Ribbon over it to add more sparkle. I also added the ribbon across the top of the so that the sentiment hangs from it.
The finishing touch was a scattering of rhinestones on the knitted paper to add even more sparkle!
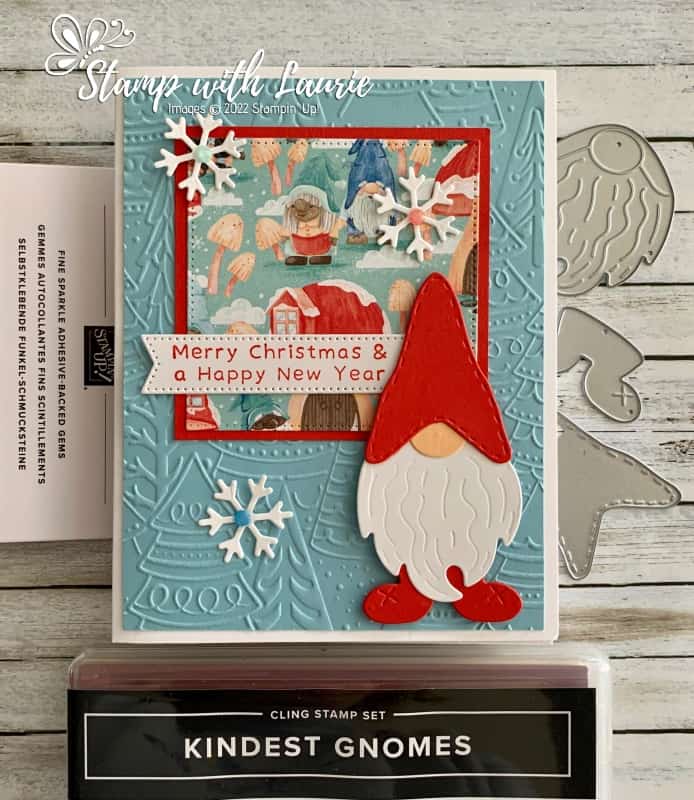
Hello Crafty Friends! Laurie here again! I am sharing my Merry Sweet Gnome Card using the Kindest Gnomes Bundle and the matching Storybook Gnomes 12″ x 12″ Designer Series Paper. The Kindest Gnomes Bundle includes the Kindest Gnomes Stamp Set and the Gnomes Dies.
The Details of My Card
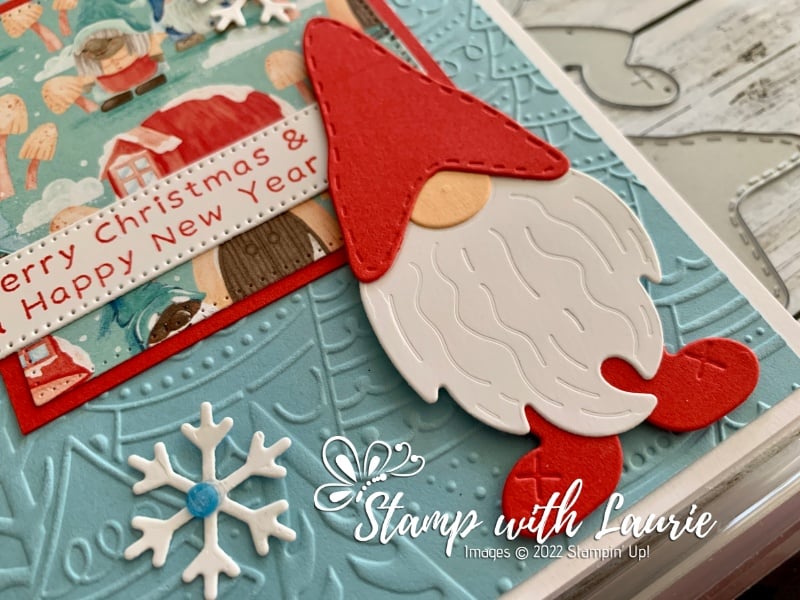
When I saw that the Gnomes Dies had a build your own gnome, I just wanted to make a card using them! He is just sooo cute! I also decided to use the Snowy White Velvet Sheets for his beard to add a soft texture to it.
From that idea, I decided to use the DSP with all the gnome homes on it. Sort of like a Merry Christmas from our home to yours idea! So, I used the largest stitched square from the Stylish Shapes Dies to cut a piece out and matted it with Poppy Parade.
The only stamping was the sentiment making this a fast and easy card! It was stamped in Poppy Parade and was die cut using the Stylish Shapes Dies as well.
Don’t you just love the Whimsical Woodland 3D Embossing Folder! So fun! It was the perfect backdrop to my card!
For embellishments, I used a scattering of Fine Sparkle Adhesive-Backed Gems on the snowflakes that were die cut from the Frosted Flurry Dies.
Supplies:
Stamps/Bundles/Dies: Kindest Gnomes Bundle (159626), Stylish Shapes Dies (159183), Frosted Flurry Dies (159811)
Inks: Poppy Parade Classic Stampin’ Pad (147050)
Paper: Basic White Thick (159229), Balmy Blue (146982), Poppy Parade (119793), Basic White (159276), Petal Pink (146985), Storybook Gnomes Designer Series Paper (159615), Snowy White Velvet Sheets (156405)
Accessories: Whimsical Woodland 3D Embossing Folder (159831), Fine Sparkle Adhesive-Backed Gems (159967), Bone Folder (102300), Stampin’ Dimensionals (104430), Stampin’ Seal (152813), Mini Glue Dots (103683)
Close Up of Gnome
Measurements:
Basic White Thick:
5 ½” x 8 ½” scored at 4 ¼”
Balmy Blue:
4” x 5 ¼”
Poppy Parade:
4” x 4”
Scraps for hat and feet
Basic White:
Scraps for sentiment and snowflakes
Petal Pink:
Scraps for nose
Storybook Gnomes Designer Series Paper:
2 ¾” x 2 ¾”
Snowy White Velvet Sheets
Scrap for beard
More Information on My Merry Sweet Gnome Card:
For more of my Stampin’ Up! cards, please click here.
You will find the items listed above in my online store.
Here is another card that I made using the Kindest Gnomes Bundle. It is an easel card. Please click here to see my post.
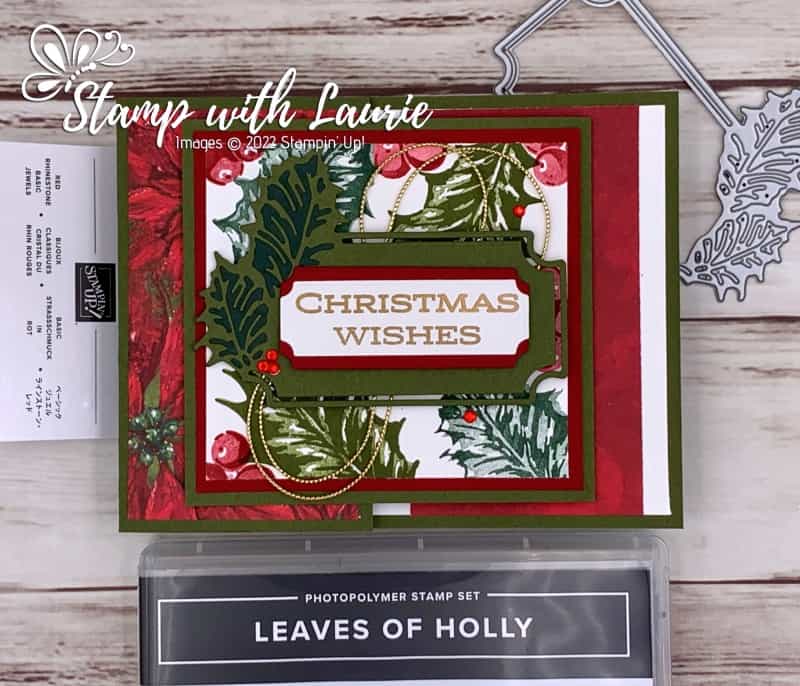
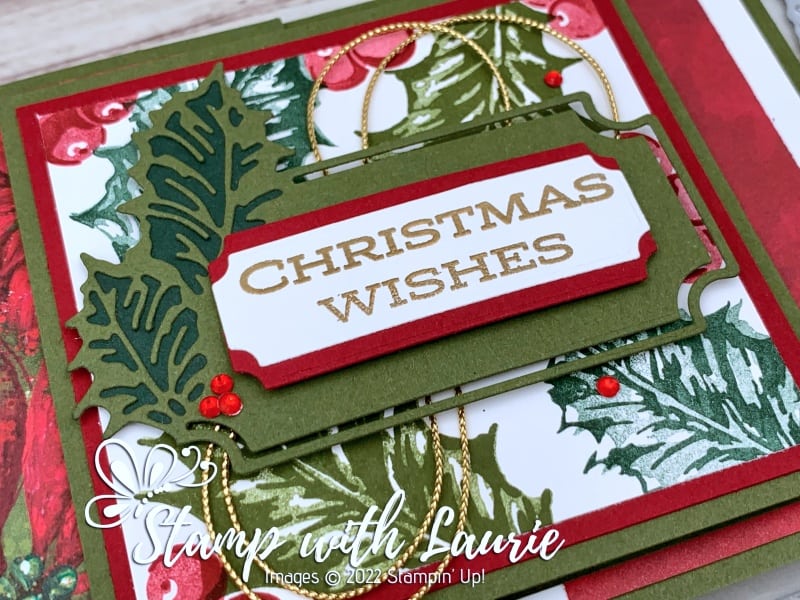
Hello Crafty Friends! Laurie here again! I am sharing my Christmas Holly Wishes Card using the Leaves of Holly Bundle which includes the Leaves of Holly Stamp Set and the Holly Berry Dies by Stampin’ Up!
The Details of My Card
For my card, I decided to make a Joy Fold card since it’s a card within a card and oh, so fun!
I love the Leaves of Holly Stamp Set with its Two-Step design to create images with added texture and dimension. Since the berries and holly are created with two stamps, I stamped the outline stamp first in Shaded Spruce and Garden Green for the holly and Cherry Cobbler for the berries on a piece of Basic White. Next, I inked the mostly solid stamp in the same colours, stamping on a piece of scrap paper to lighten the colour, and then stamping inside the outline.
Close Up of Stamping
Once I created my background for the die cut sentiment, I gold embossed the sentiment on Basic White and die cut it out. I die cut another piece in Cherry Cobbler which I then cut in half and adhered to the top and bottom.
Inside of First Flap of Card
The sentiment was layered on the die cut Garden Green/Shaded Spruce holly piece. I added some gold trim to tie in the gold embossed sentiment and placed it peeking out under the sentiment piece.
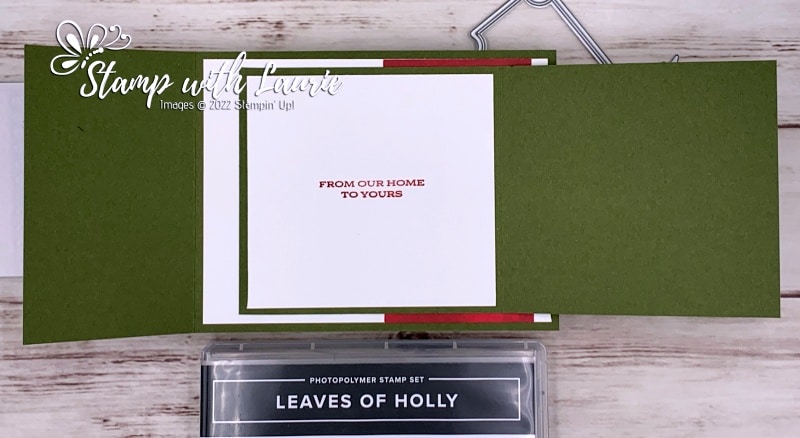
Card Fully Open
Next, I added Basic White for the stamped inside sentiment of the smaller card and to the base of the larger card followed by the DSP to both card bases. The sentiment piece was next. Finally, the two cards could be adhered together with the smaller one centred on the larger one. A finishing touch was some red rhinestones to mimic berries were added to the holly die cut.
Supplies:
Stamps/Bundles/Dies: Leaves of Holly Bundle (159608)
Inks: Garden Green Classic Stampin’ Pad (147089), Shaded Spruce Classic Stampin’ Pad (147088), Cherry Cobbler Classic Stampin’ Pad (147083), VersaMark Ink Pad (102283)
Paper: Basic White (159276), Garden Green (102584), Shaded Spruce (146981), Cherry Cobbler (131202), Boughs of Holly Designer Series Paper
Accessories: Simply Elegant Trim (155766), Red Rhinestone Basic Jewels (146924), Embossing Additions Tool Kit (159971), Metallics Embossing Powder (155555), Heat Tool (129053), Bone Folder (102300), Stampin’ Dimensionals (104430), Stampin’ Seal (152813), Mini Glue Dots (103683)
Card Standing Up
Measurements:
Garden Green: (3 pieces)
8” x 4 ¼” scored at 2 ½”
8” x 3 ¾” scored at 4”
3 ¾” x 2 ¾”
Basic White: (4 pieces)
3-1/8” x 3 ¼”
3 ¼” x 3 ½”
5 ¼” x 4”
2 ½” x ¾”
Cherry Cobbler:
3 ¾” x 3 ½”
Shaded Spruce: Scraps
Boughs of Holly Designer Series Paper (2 pieces):
4” x 2 ¼”
More Information on My Christmas Holly Wishes Card:
For more of my Stampin’ Up! cards, please click here.
You will find the items listed above in my online store.
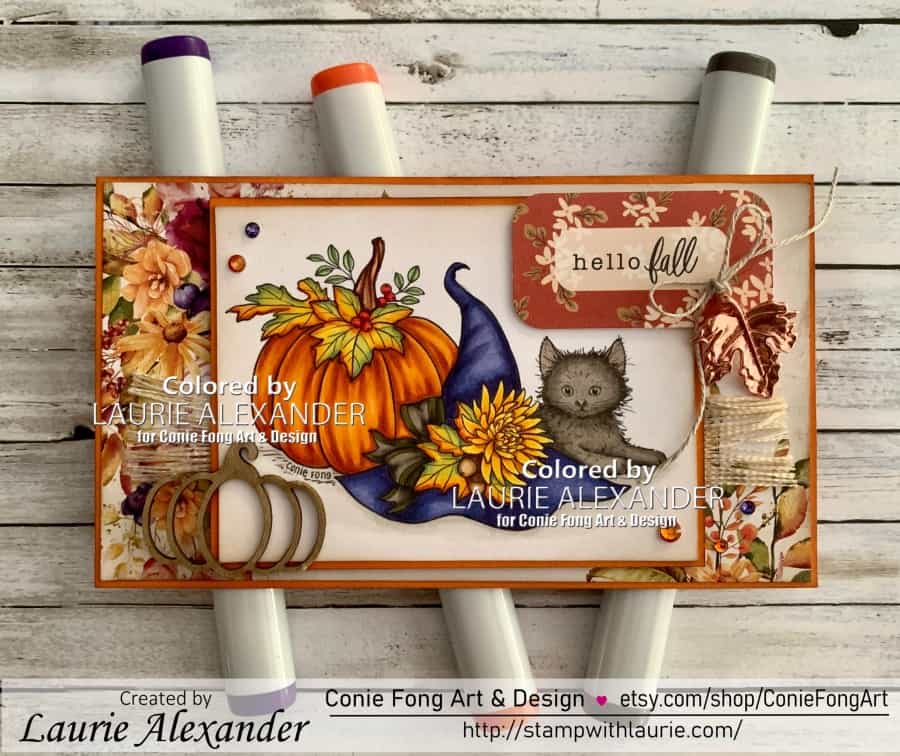
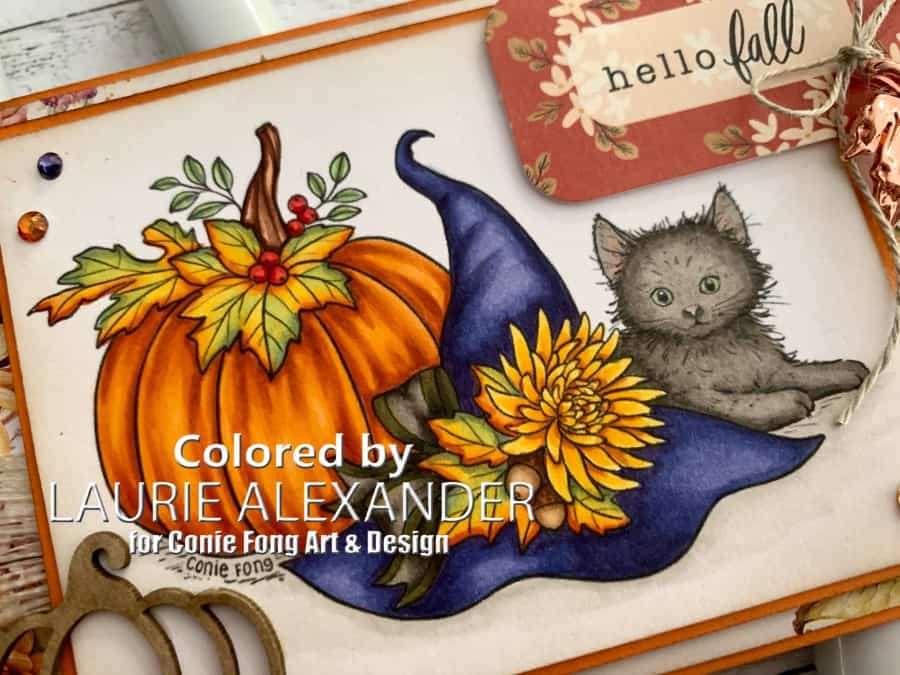
Hello Crafty Friends! It’s Laurie here! I am sharing My Hello Fall Card as my Design Team Inspiration Card for Conie Fong Art & Design using Sweet Autumn Kitty. This stamp is the quintessential Fall stamp with the pumpkin, fall leaves, acorns, a witch hat, and cat!
The Details of My Card
For my mini slimline card, I used this beautiful paper by P13 called The Four Seasons – Autumn and decided to colour the stamp to match. I couldn’t resist giving the leaves a fall colour using several Copic markers to get the variations in their colour. I have discovered that I love colouring pumpkins and getting such rich colour depth in them! The hat was coloured in a blue/violet tone to match some of the smaller berries on the paper and to give it an unexpected pop of colour. I went with a black cat since all witches should have a black cat! Lol!
Since the paper had a rustic feel to it, I blended some Walnut Stain to all the edges of the papers including the stamped piece. To add to the rustic charm, I added a frayed natural ribbon beneath my focal point. The sentiment is from an ephemera tag pack and summed up my theme perfectly! The metal leaf embellishment tied with linen thread, as well as the pumpkin chipboard, added to the Fall theme.
To further tie in my colour scheme, I coloured some rhinestones with my Copic markers and added them to opposite corners.