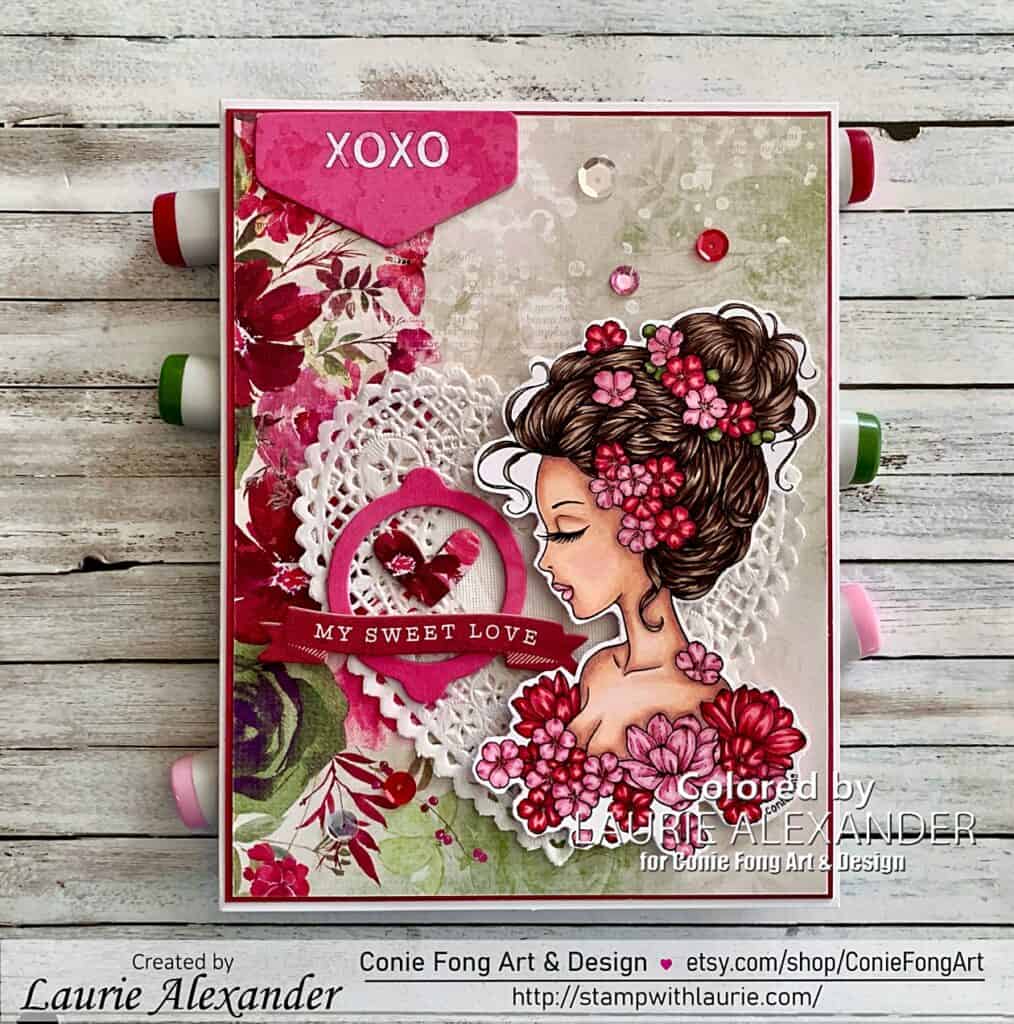
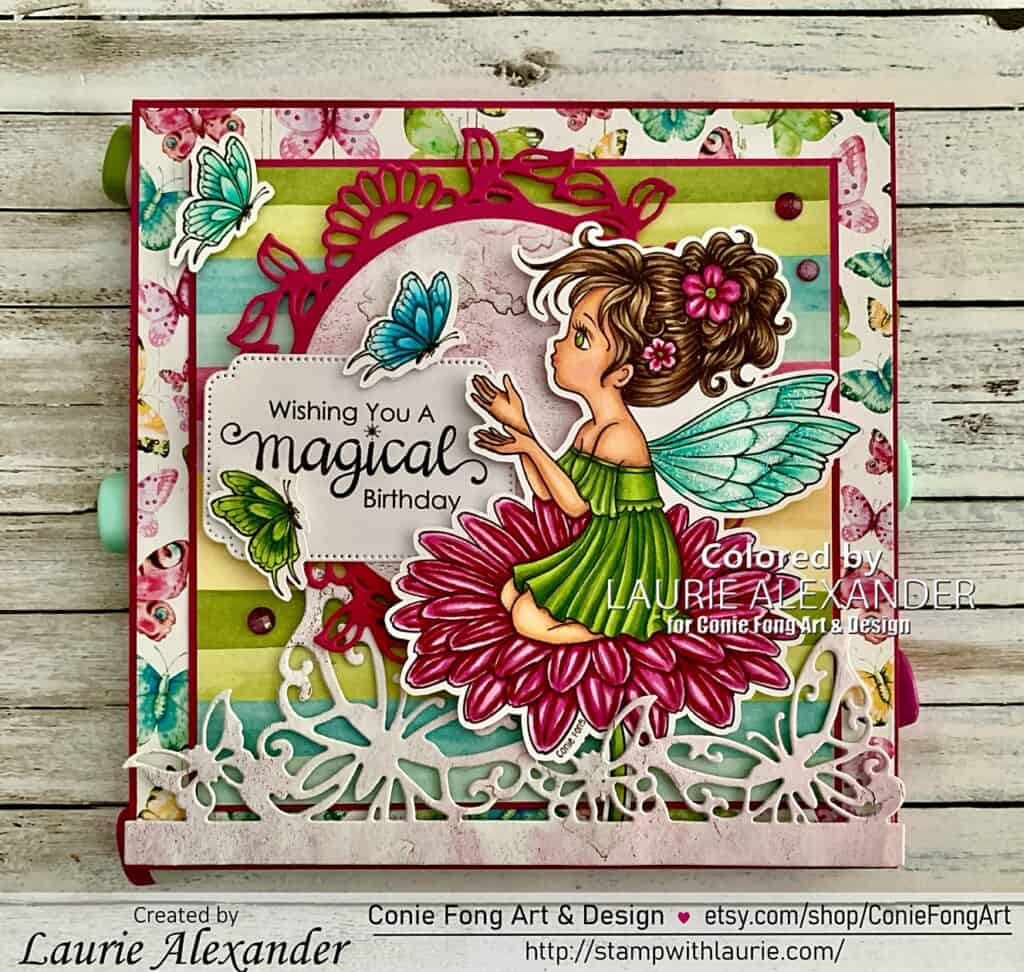
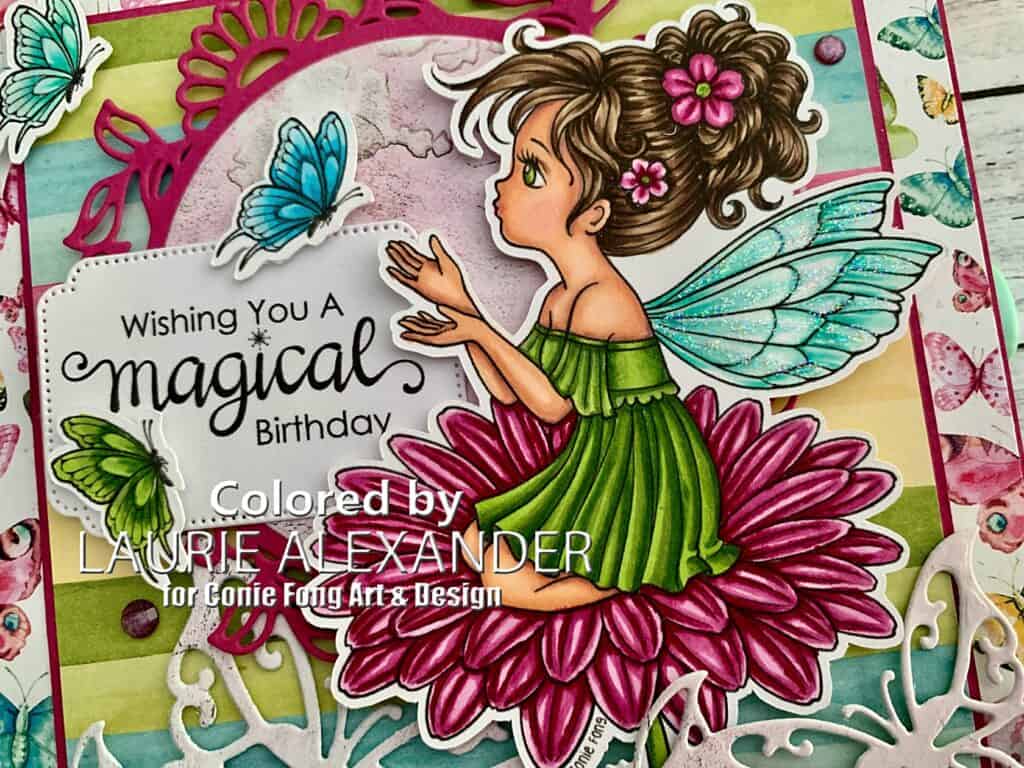
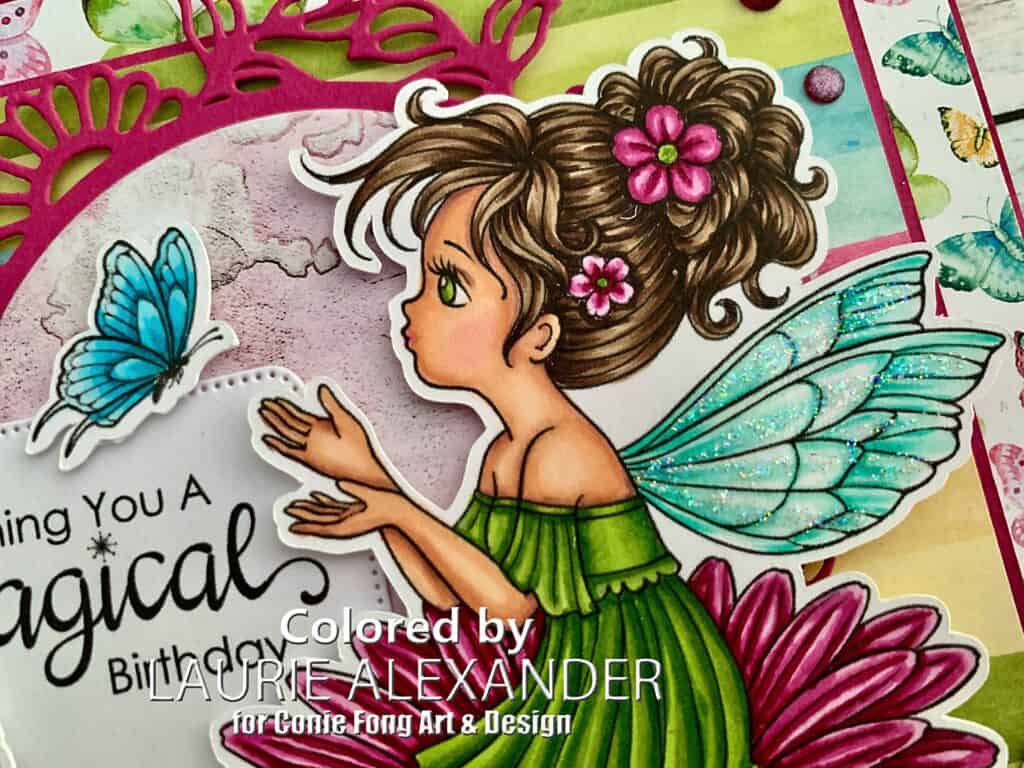
Hello Crafty Friends! It’s Laurie here! I am sharing My Sweet Valentine Card as my Design Team Inspiration Card for Conie Fong Art & Design using the beautiful Isabella Blossoms. This purchase includes 2 Images with girl facing right and left.
The Details of My Sweet Valentine Card
Valentine’ Day is coming up! So, I thought I would create a Valentine card with this beautiful lady. I coloured her in pinks and reds to match the Art Options Rouge Paper by 49 and Market. Love this paper and the matching Chipboard Elements! The paper has a lot of texture and design to it already. Therefore, my card didn’t need much to finished it off! Card making made easy!
Since my card was for Valentine’s Day, I pulled out a heart lace doily as a backdrop to my focal point. Then, I layered several chipboard elements to create my sentiment beside Isabella. I also added the “XOXO” chipboard flag at the top of my card.
Next, I added Clear Star Gelly roll pen to the centre of the flowers for sparkle. To soften the look, I lightly touched the centres with my finger to remove some of the gel. I also added Glossy Accents to the green pearls in her hair.
The finishing touch was a scattering of sequins and rhinestones that matched my colour scheme.
————————–
Copic Markers:
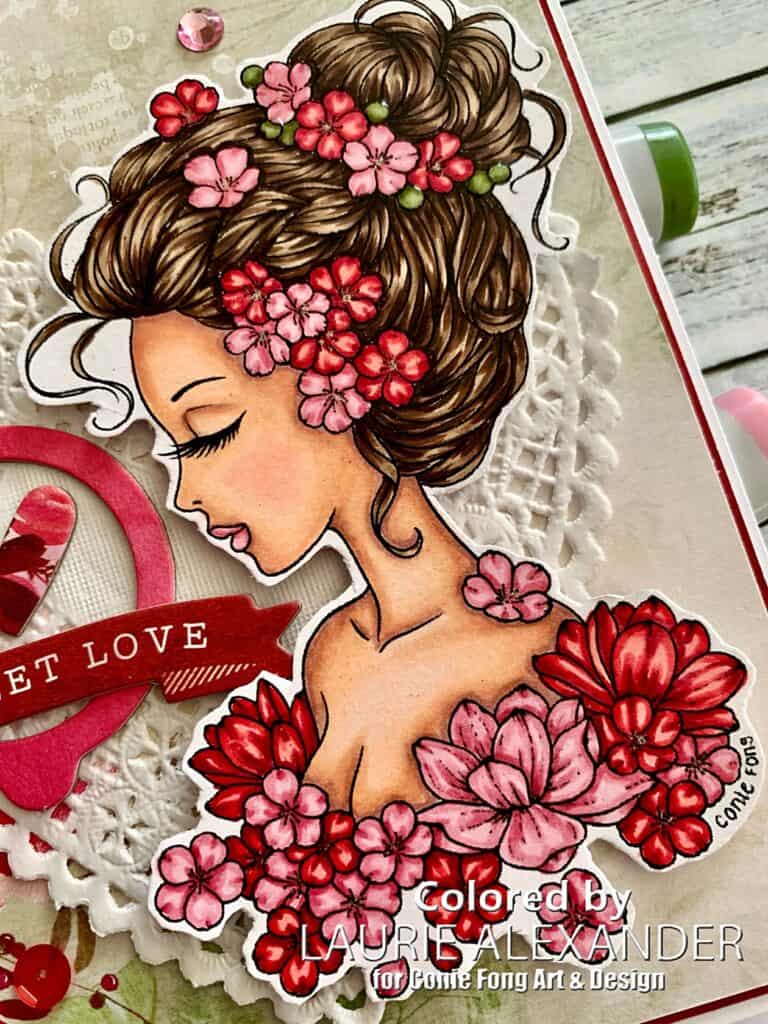
Skin: E000/E00/E21/E11/E04/R20 Hair: E49/E47/E44/E43 Pink Flowers: R85/R83/R81/Clear Star Gelly Roll Pen Red Flowers: R39/R37/R35R/32/Clear Star Gelly Roll Pen Green Pearls: G21/G94/G99/Glossy Accents
Close Up of Isabella
————————–
Card Recipe for My Sweet Valentine Card:
Isabella Blossoms, Conie Fong Art & Design Paper Basics – Stamper’s Select White Cardstock, Papertrey Ink Value Pack Cards & Envelopes by Recollections, Michael’s Arts & Crafts Art Options Rouge 6” x 8” Paper Collection Pack, 49 and Market Art Options Rouge Chipboard Element Set, 49 and Market 4” Valentine’s Day Heart Doily, Celebrate, Michael’s Art & Crafts Valentine’s Day Bling Stickers, Recollections, Michael’s Art & Crafts Peppermint Stick Sequin Mix, Neat & Tangled Clear Star Gelly Roll Pen, Sakura Glossy Accents, Ranger
Finished card size: 5” x 6 ½”
————————–
To view my other Conie Fong Art & Design projects, please click here.
Hope you like my Design Team Inspiration Card using Isabella Blossoms for Conie Fong Art & Design!
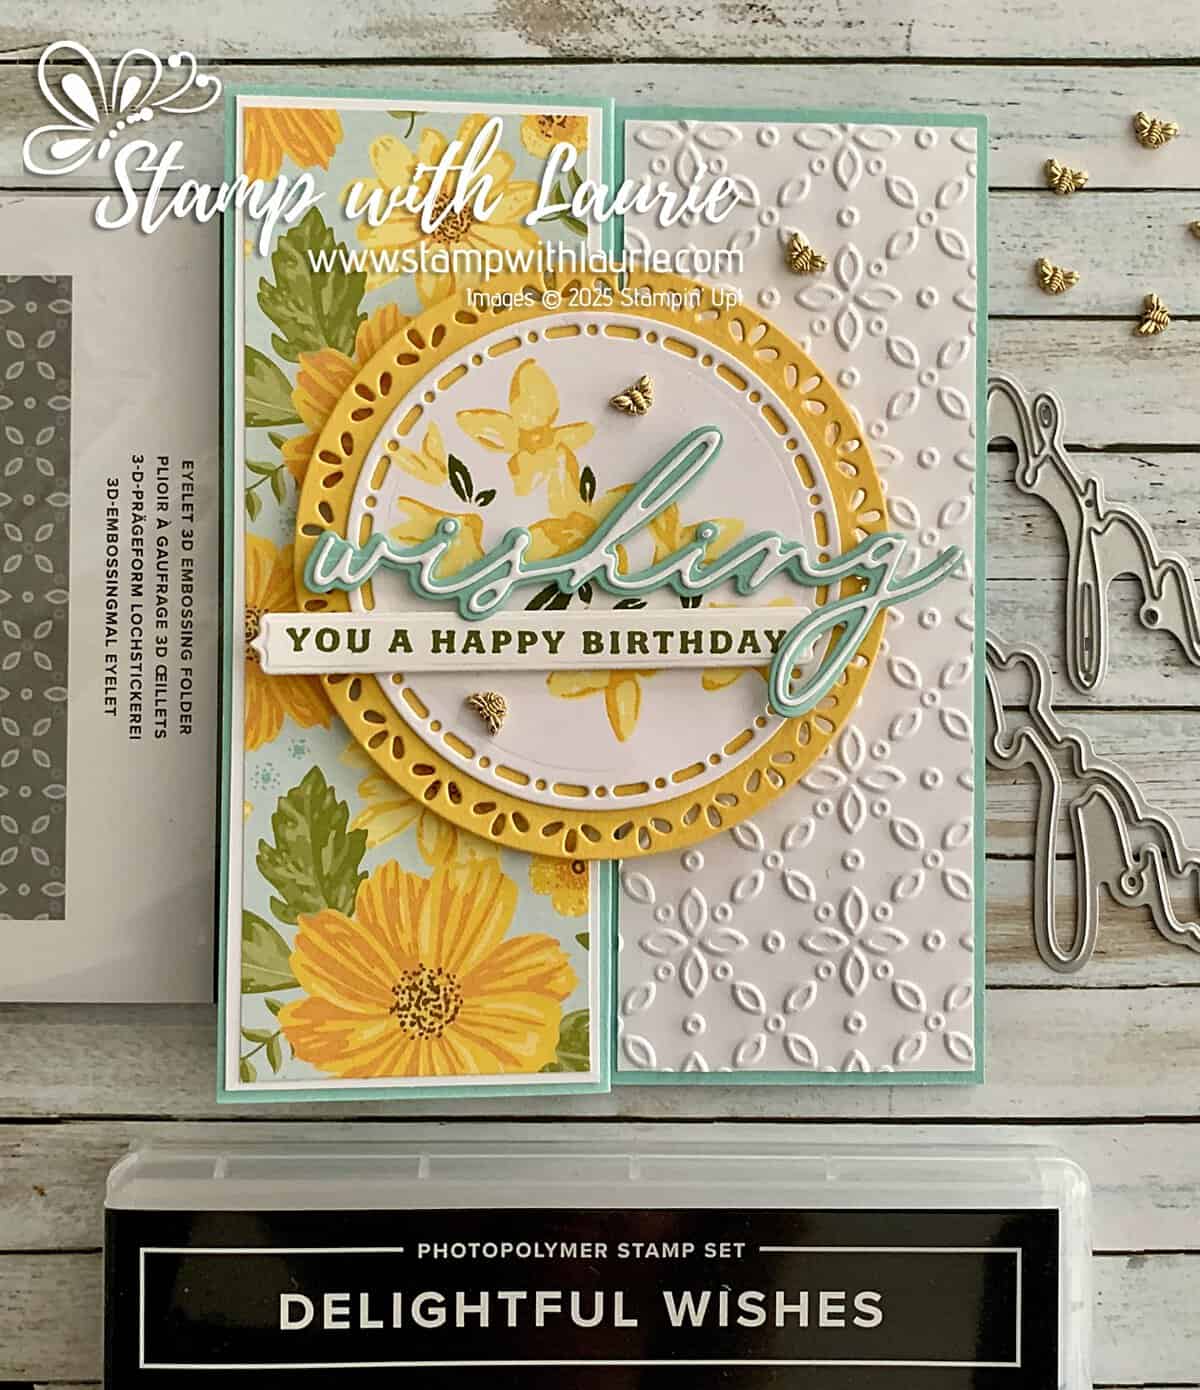
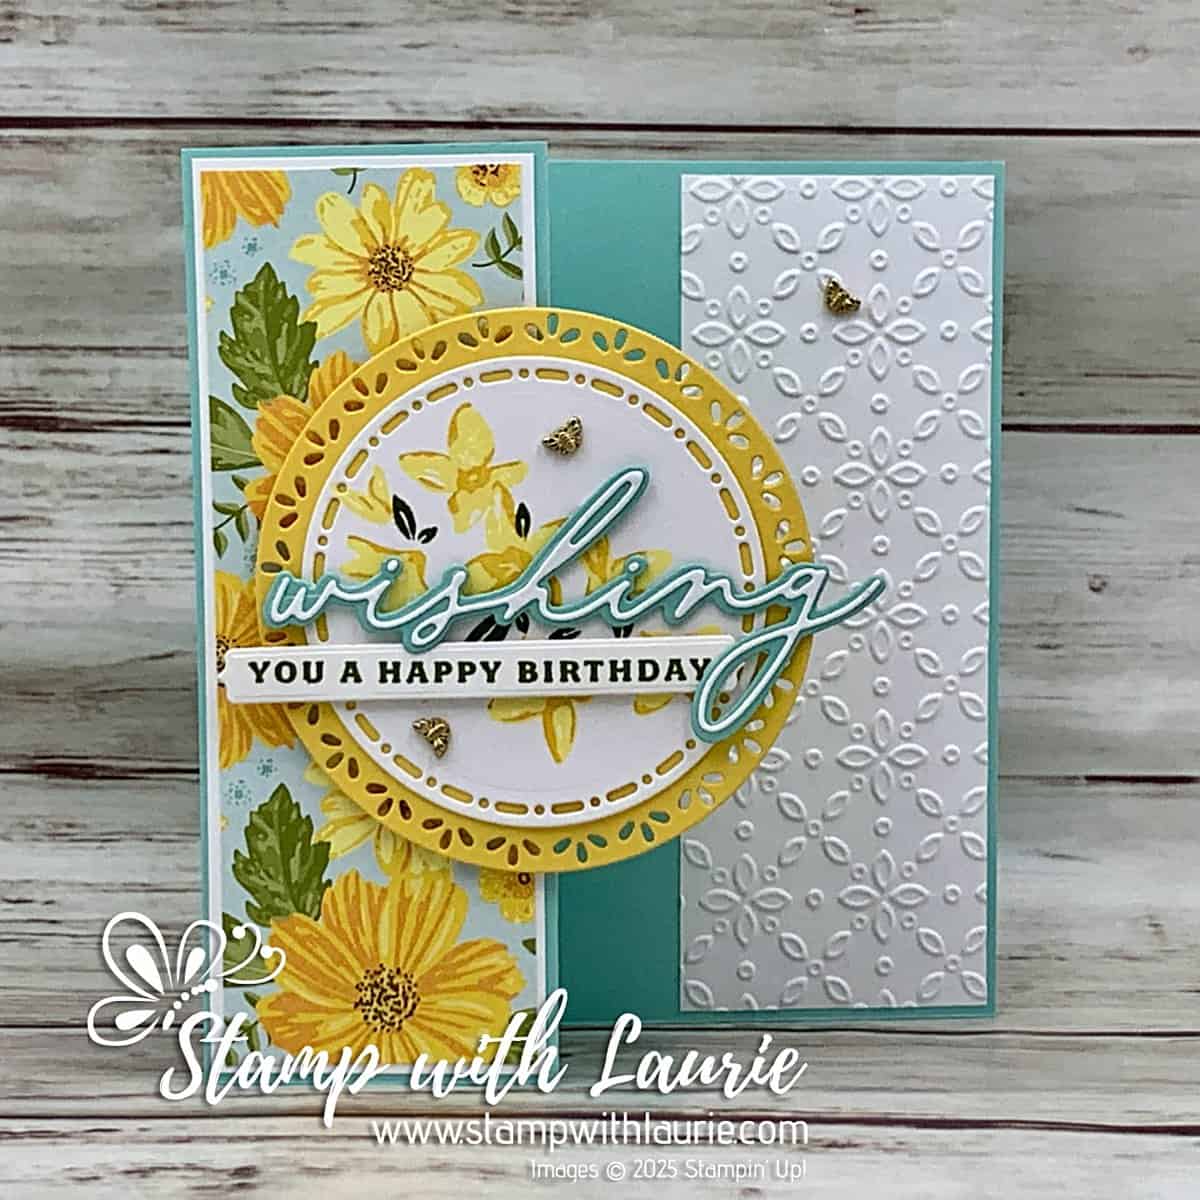
Hello Crafty Friends! Laurie here again! I am sharing My Delightful Birthday Card using theFloral Delight Suite Collection from the new Stampin’ Up! 2025 Mini Catalogue. I have 6 family birthdays all within a week coming up at the end of January. So, I am in birthday card mode! One card done…just 5 more to go! Lol!
The Details of My Delightful Birthday Card
My card was for a demonstrator swap using new products from the January – April 2025 Mini Catalogue. So, I decided to use the beautiful Floral Delight Suite Collection. I just love the bright and cheery colours of the Floral Delight Designer Series Paper, ready to be used on cards and scrapbook pages for a touch of spring, summer, or autumn.
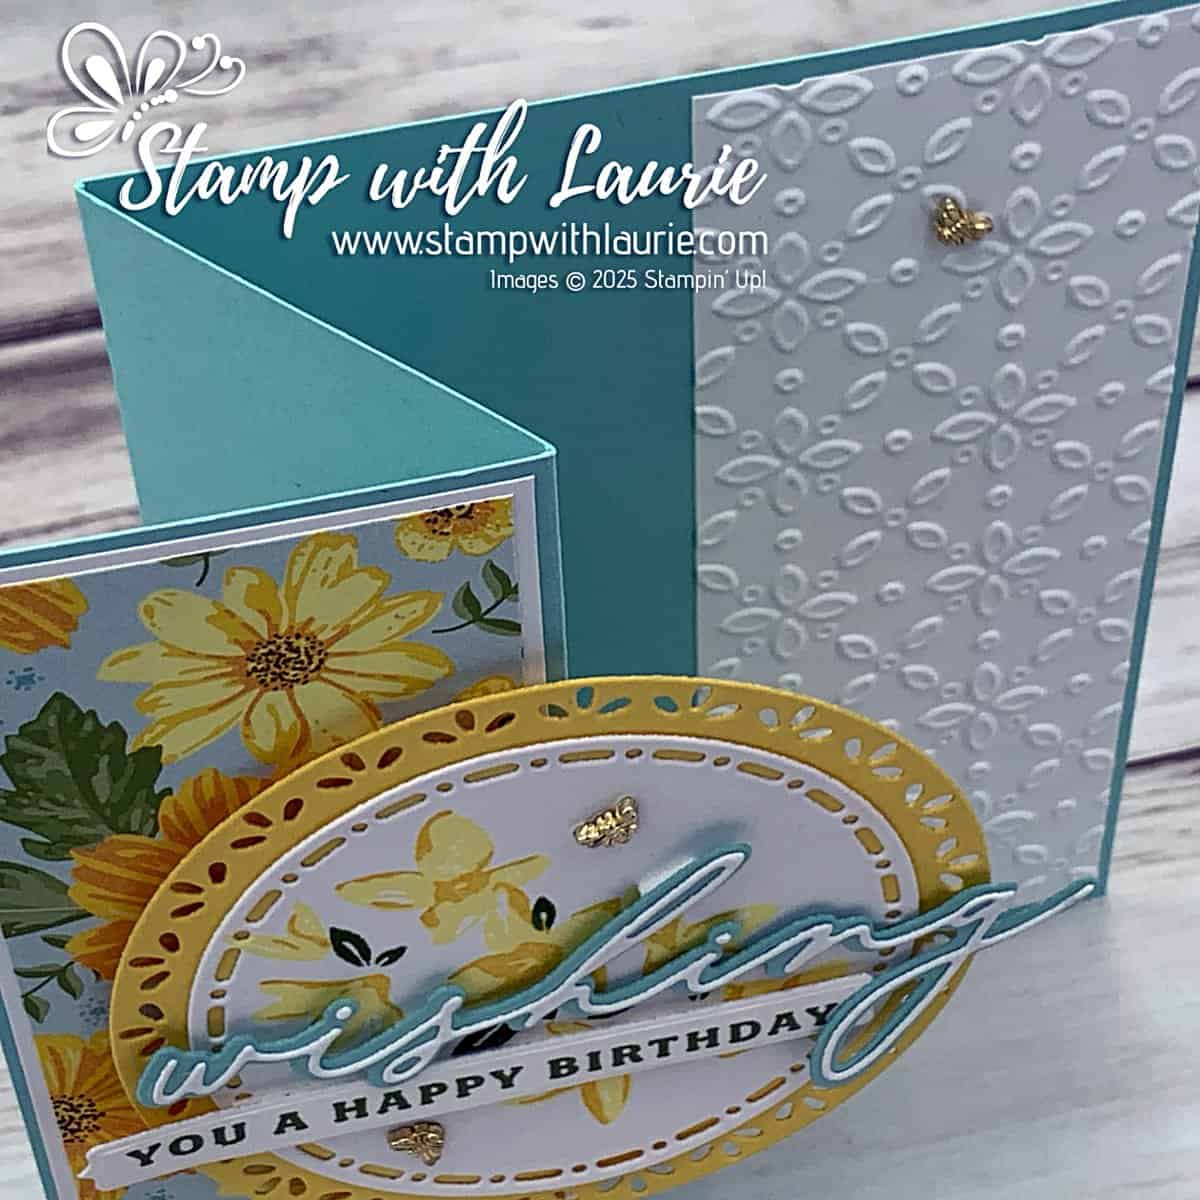
For my card, I decided to create a Z-fold card with the DSP on the front panel and an Eyelet Embossed Basic White piece on the inside, but still visible when the card was closed. The embossed piece added interest while not detracting from the focal point.
Top of Z-Fold
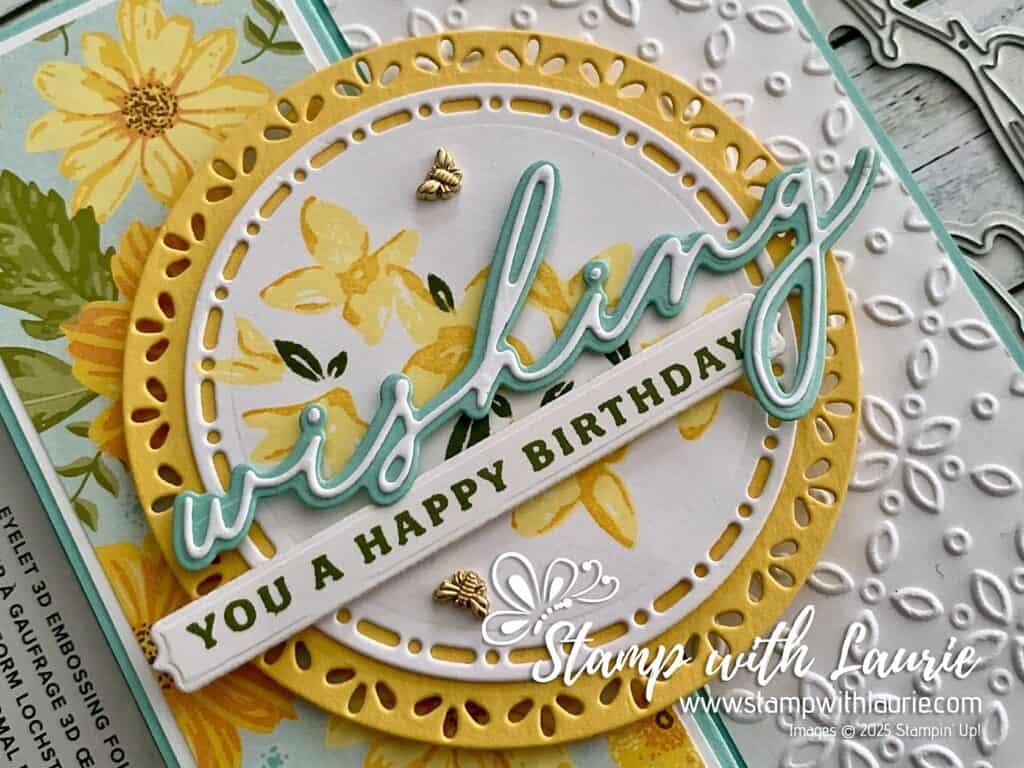
For the focal point, I decided to layer two circles from the Spotlight on Nature Dies. I thought that the delicate edging of the Daffodil Delight piece coordinated well with the embossed eyelet piece.
The Delightful Wishes Stamp Set is a Two-Step Stampin’ set; it allows you to layer two or more images to create one final image with extra texture and dimension in the colours you want. So, I used Daffodil Delight Ink to stamp the outline image first. I found that doing this first helped to line up the Lemon Lolly stamped main image. Next, I stamped the leaves in Old Olive to add some colour. I love the way this turned out creating a soft look behind the sentiments.
Card Standing Up
Next, for the sentiment, I decided to layer the “wishing” die cuts to create dimension with the Old Olive stamped sentiment nestled below.
Finally, as a finishing touch, I added a scattering of the sweet Tiny Bee Trinkets around my sentiment and on the Eyelet Embossed piece. A perfect accent to my card!
Supplies:
Stamps/Bundles/Dies: Delightful Wishes Bundle (164710), Spotlight on Nature Dies (163580)
Inks: Olive Classic Classic Stampin’ Pad (147090), Lemon Lolly Classic Stampin’ Pad (161666), Daffodil Delight Classic Stampin’ Pad (147094)
Paper: Pool Party (122924), Basic White (159276), Daffodil Delight (119683), Floral Delight 12” x 12” Designer Series Paper (164700)
Accessories: Eyelet 3D Embossing Folder (163414), Tiny Bee Trinkets (164714), Stampin’ Cut & Emboss Machine (149653), Stampin’ Paper Trimmer (152392), Bone Folder (102300), Stampin’ Dimensionals (104430), Mini Stampin’ Dimensionals (144108), Stampin’ Seal (152813), Multipurpose Liquid Glue (110755)
Focal Point of Card
Measurements:
Pool Party:
8 ½” x 5 ½” scored at 4 ¼” and 2-1/8”
Scrap (for sentiment)
Daffodil Delight:
3 ½” x 3 ½”
Basic White:
2” x 5-3/8” (for front)
2” x 5-3/8” (for inside)
3” x 3” (for circle)
Scraps (for sentiments)
Floral Delight Designer Series Paper:
1-7/8” x 5 ¼”
More Information on My Delightful Birthday Card
For more of my Stampin’ Up! cards, please click here.
You will find the items listed above in my online store.
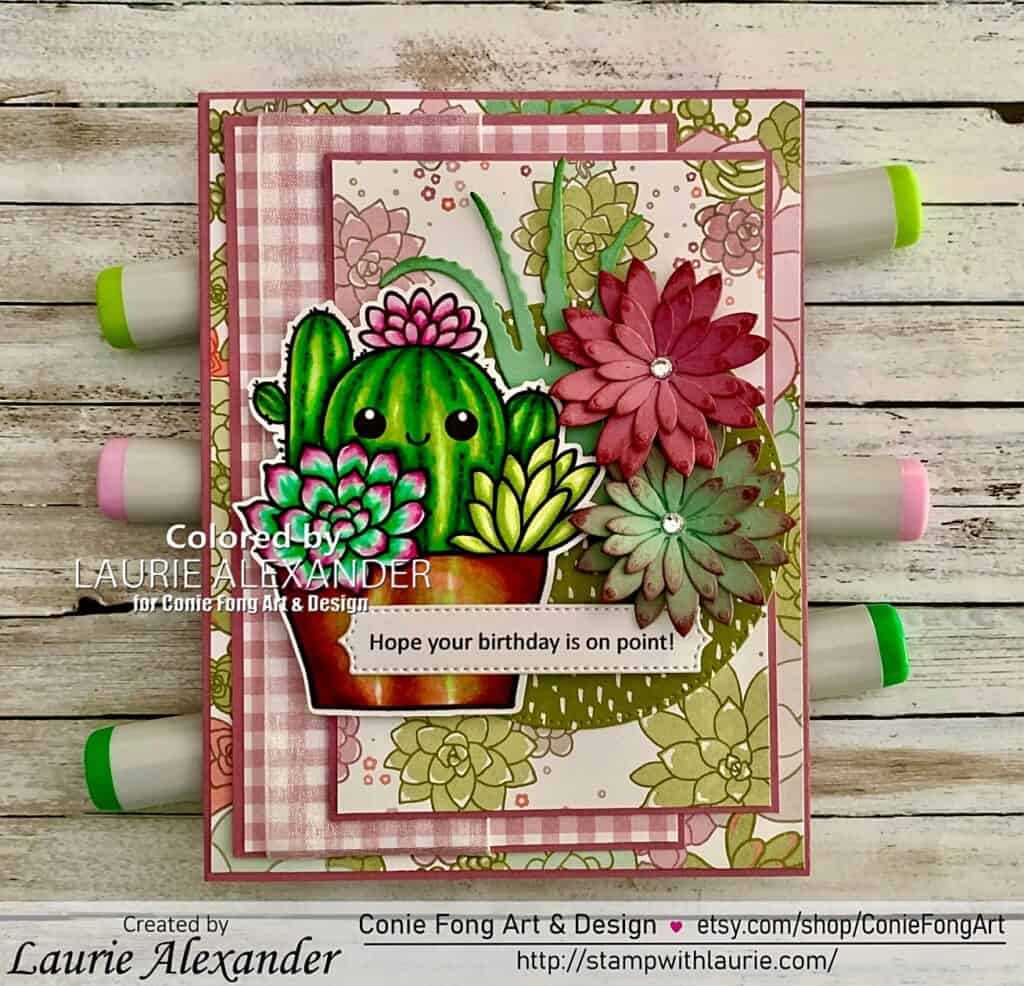
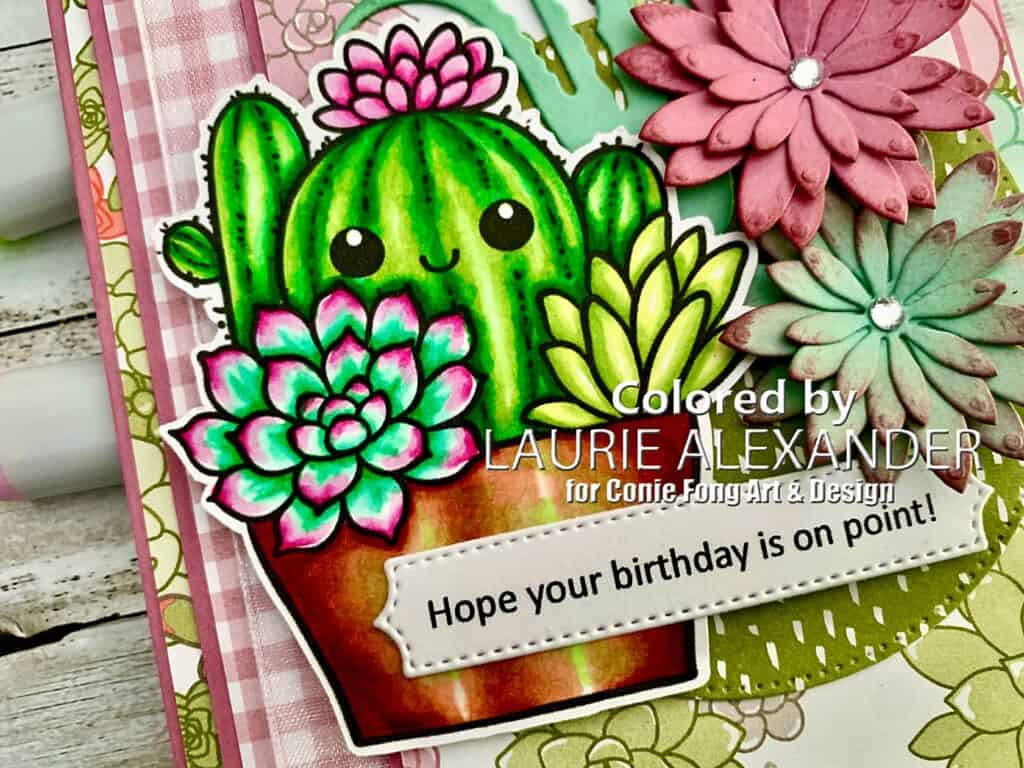
Hello Crafty Friends! It’s Laurie here! I am sharing my On Point Birthday Card as my Design Team Inspiration Card for Conie Fong Art & Design using the Succulent and Cactus Bundle.
This purchase includes 12 Images:
Echeveria In Pot
Echeveria In Pot Kawaii
Cactus Family
Bunny Ears Cactus
Bunny Ears Cactus Kawaii
Jade In Pot
Hoya Kerri Succulent
Potted Echeveria
Aloe Vera In Pot
Cactus Succulent Arrangement
Cactus Succulent Arrangement Kawaii
Aloe Sweet Friend Sentiment
The Details of My On Point Birthday Card
I just loved these cute Kawaiis with the eyes that I decided to colour the Cactus Succulent Arrangement Kawaii twice in different colours. One was for a friend’s birthday who loves succulents and the other was for a colour challenge at Kendra’s Card Challenges.
My Colouring of the Cactus Succulent Arrangement Kawaii
For my friend’s birthday card, I decided to use bright cheery colours for my colouring. I had a lot of fun colouring the succulent in two different tones of colours! I even gave the pot a variegated look! Lots of techniques from which to play!
I used the retired Succulent Garden Designer Series Paper from Stampin’ Up since it was perfect for the stamp. To create my focal point, I added some die cut succulents and aloe around my coloured stamp. These dies cuts were brushed with matching inks for a tone-on-tone look, but still added dimension. In addition to this, I used a roller-ball stylus in the centre of the succulents to make them pop up.
Don’t you just love the sentiment! What a hoot! And I knew my friend would get a kick out of it!
Finally, the finishing touches were rhinestones in the centre of the succulents and a strip of sheer ribbon.
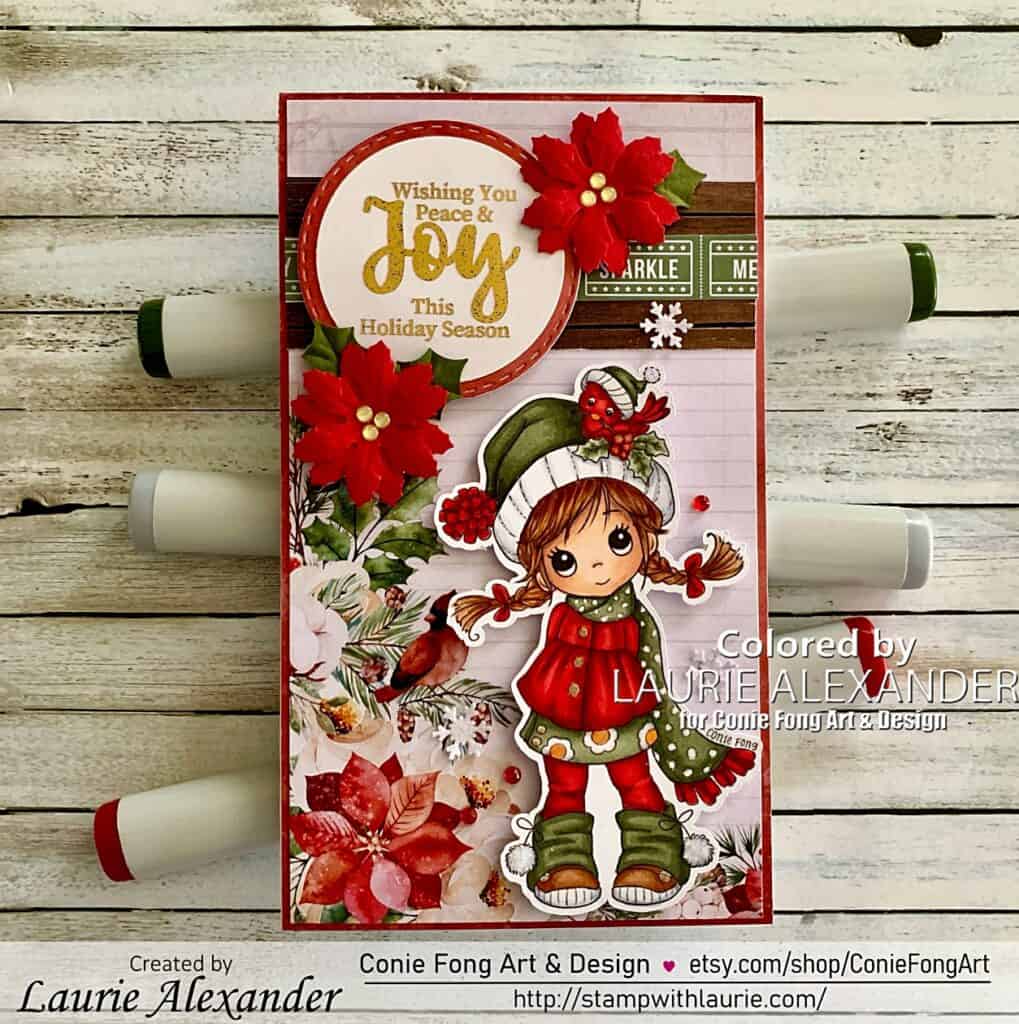
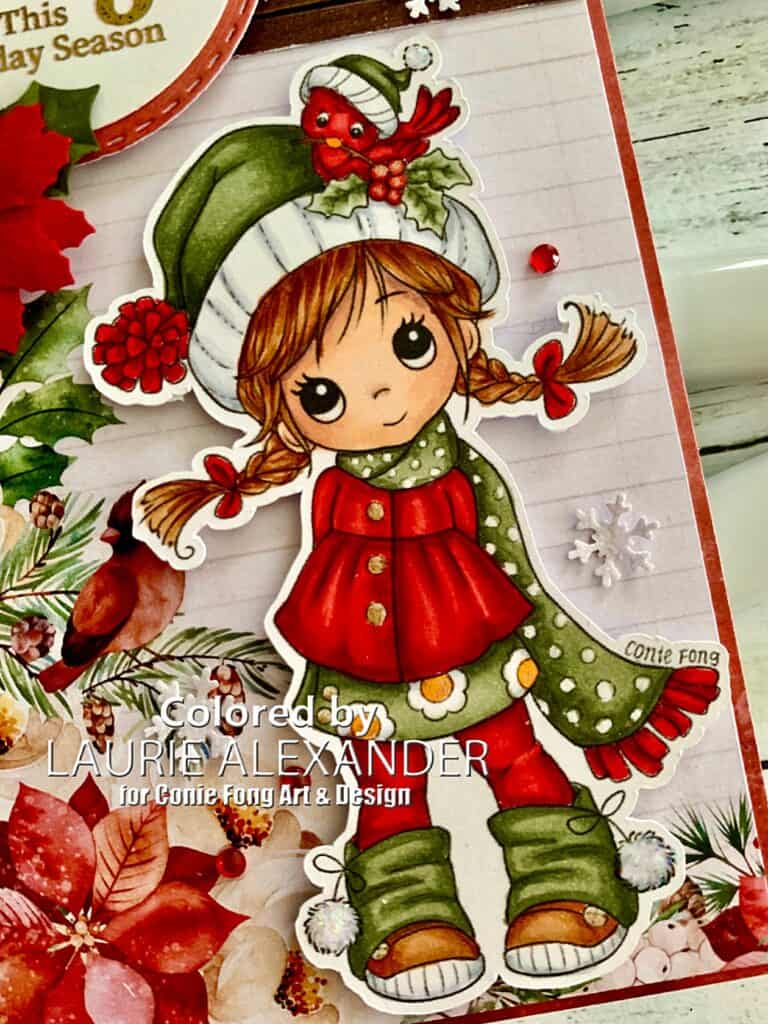
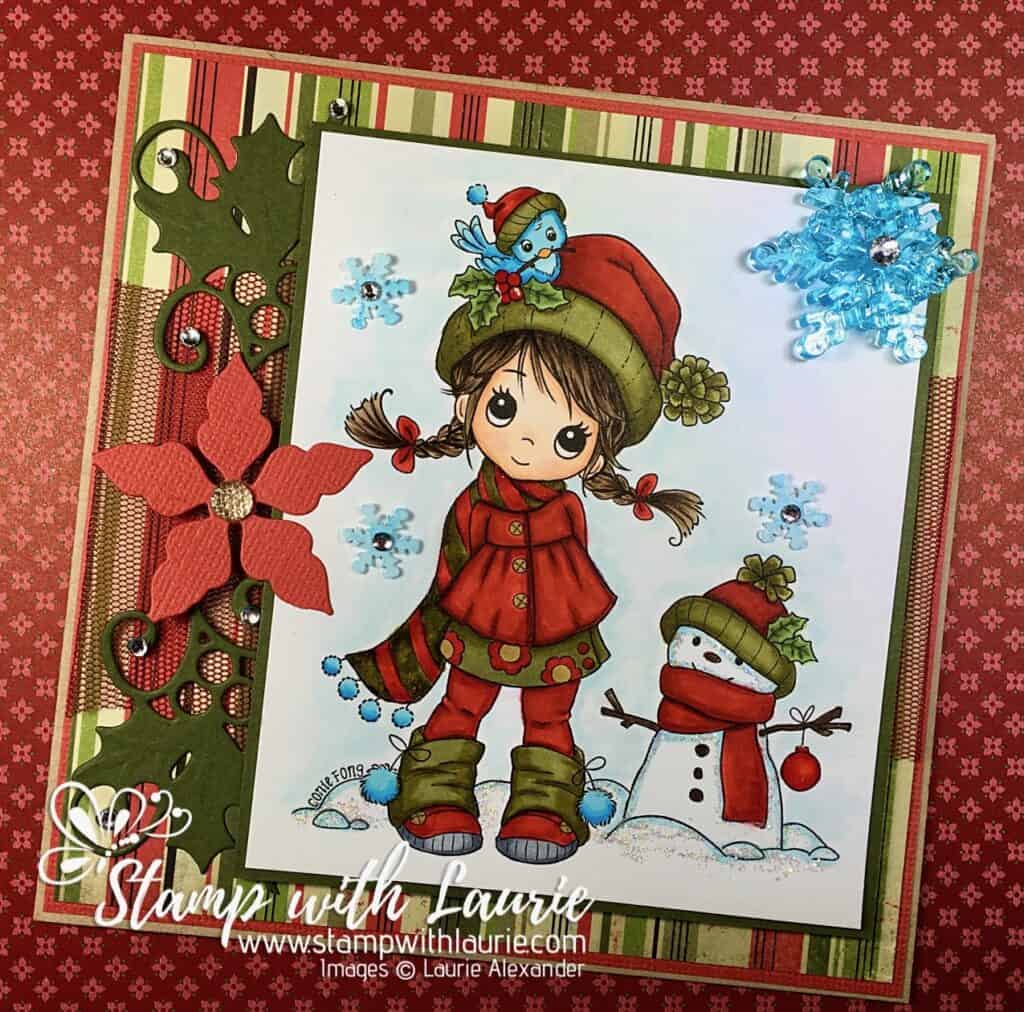
Hello Crafty Friends! It’s Laurie here! I am sharing my Peace & Joy Christmas Card as my Design Team Inspiration Card for Conie Fong Art & Design using Molly Cutie from the Molly Winter Bundle. This Bundle includes 4 digital stamps:
Molly’s Winter Friends
Molly’s Joy
Molly Cutie
Molly Cutie Without Birdie
The Details of My Peace & Joy Christmas Card
I checked and this was my fourth time colouring different variations of this stamp! Lol! It is obviously one of my favourites of Conie Fong! The other three were before I was on Conie’s Design Team, and I will include them at the end of this post.
For my card, I had this gorgeous Merry Little Christmas Paper Collection by Paper Rose. So, I decided to use the piece that had the cardinal on it since I coloured the birdie as a cardinal this time. I also used the paper for the sentiment banner with the wood and Christmas word tickets.
The sentiment was foil embossed in gold with my laminator and gold foil. This is something that I have discovered recently and plan to do more often! So fun! I backed the foiled sentiment with a stitched circle from the red paper in the Collection. Tip: I die cut it out of the centre of the red mat that is behind my floral piece. Since you do not see it, it saved on paper.
The poinsettias were hand punched and assembled with gold glitter dots to mirror the poinsettia in the paper.
I had some punched glittery snowflakes on my desk from another card. So, I added them for interest.
Finally, for sparkle, I added some red rhinestones around her, as well as Star Dust Stickles to Molly’s and the bird’s pompoms. Clear Star gelly roll was added to the flowers on her dress with white gelly roll added to the polka dots on her scarf and gold gelly roll to her buttons. Glossy Accents was added to the berries that the birdie is carrying. You can never have too much sparkle on a Christmas card! Lol!
Molly Winter Bundle, Conie Fong Art & Design Paper Basics – Stamper’s Select White Cardstock, Papertrey Ink Merry Little Christmas 6” x 6” Paper Collection, Paper Rose White Glimmer Paper, Stampin’ Up! Snowflake Border Punch, Martha Stewart Sentiment, Sassy LLC 2” Layering Stitched Circle Die, Memory Box 1 ¾” Circle Punch, Stampin” Up! Gold Foil, My Stash Laminator Laser Printer Gold Glitter Enamel Dots, Stampin’ Up! Clear Star Gelly Roll Pen, Sakura Gold Gelly Roll Pen, Sakura White Gelly Roll Pen, Sakura Star Dust Stickles, Ranger Glossy Accents, Ranger Red Rhinestone Basic Jewels, Stampin’ Up!
Real Red and Mossy Meadow Card Stock, Stampin’ Up!
Finished card size: 6” x 3 ½”
————————–
Molly’s Winter Friends
Molly Cutie
Molly Cutie
To view my other Conie Fong Art & Design projects, please click here.
Hope you like my Design Team Inspiration Card using Molly Cutie from Molly Winter Bundle for Conie Fong Art & Design!
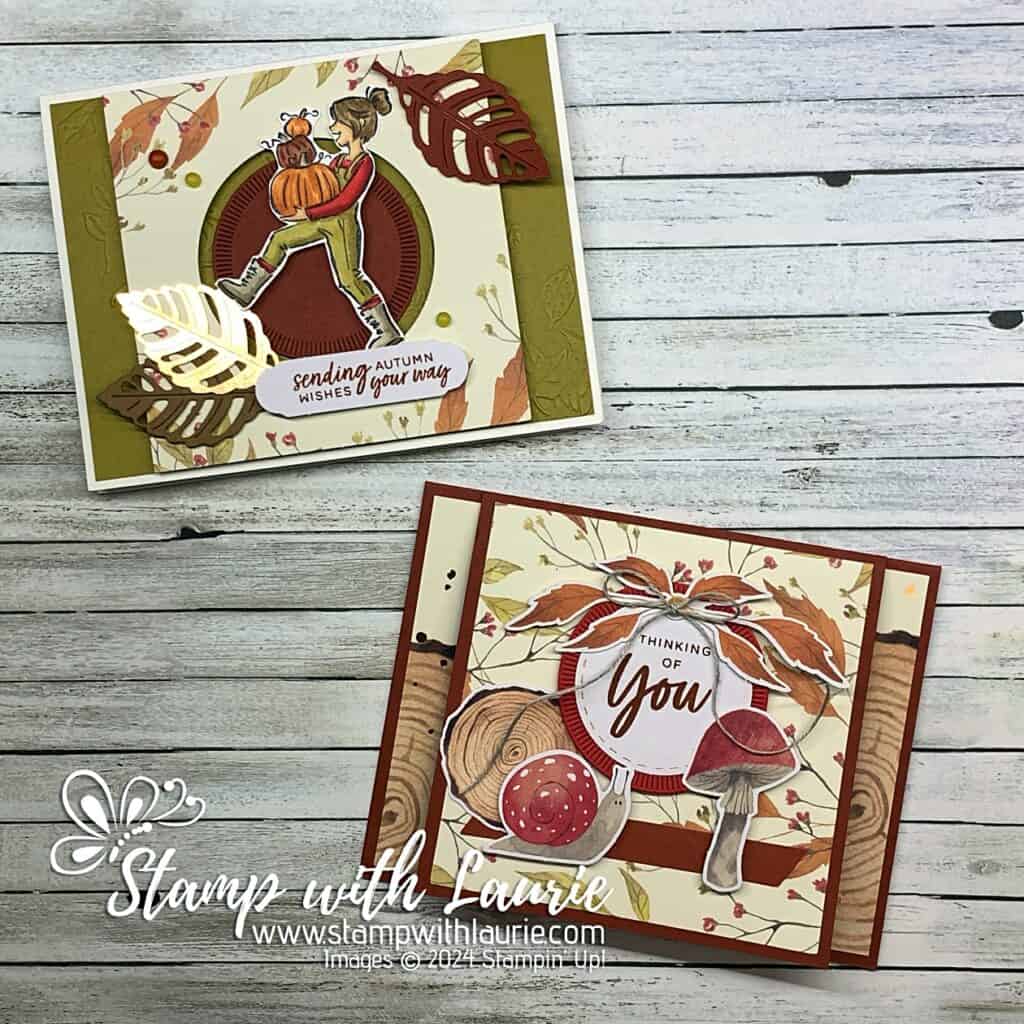
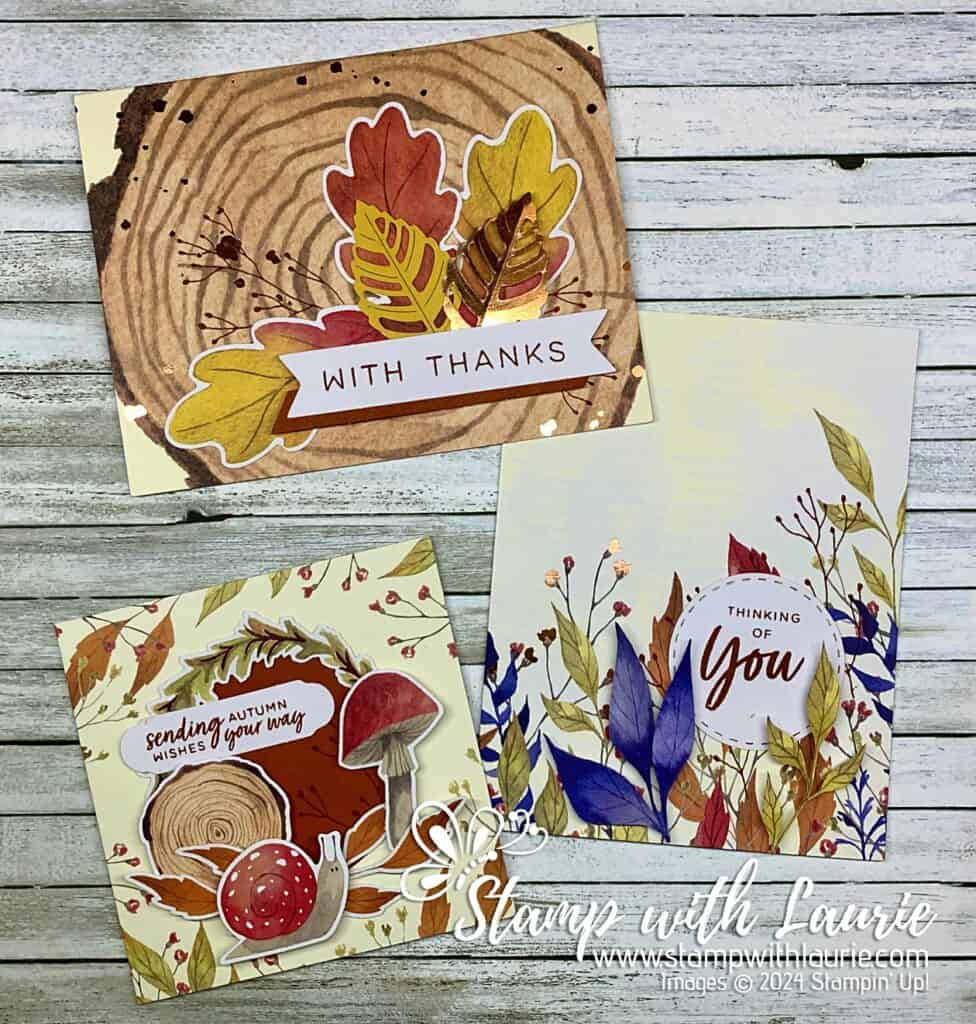
Hello Crafty Friends! Laurie here again! I am sharing my Autumn Wishes Alternative Cards using the Autumn Abundance September 2024 Paper Pumpkin Kit by Stampin’ Up! Since this weekend is our Canadian Thanksgiving, I decided to create two alternative cards for the holiday!
But, first, here are the three cards that the kit makes. Perfect for this time of year!
Autumn Abundance September 2024 Paper Pumpkin Kit
The Details of My Autumn Wishes Alternative Cards
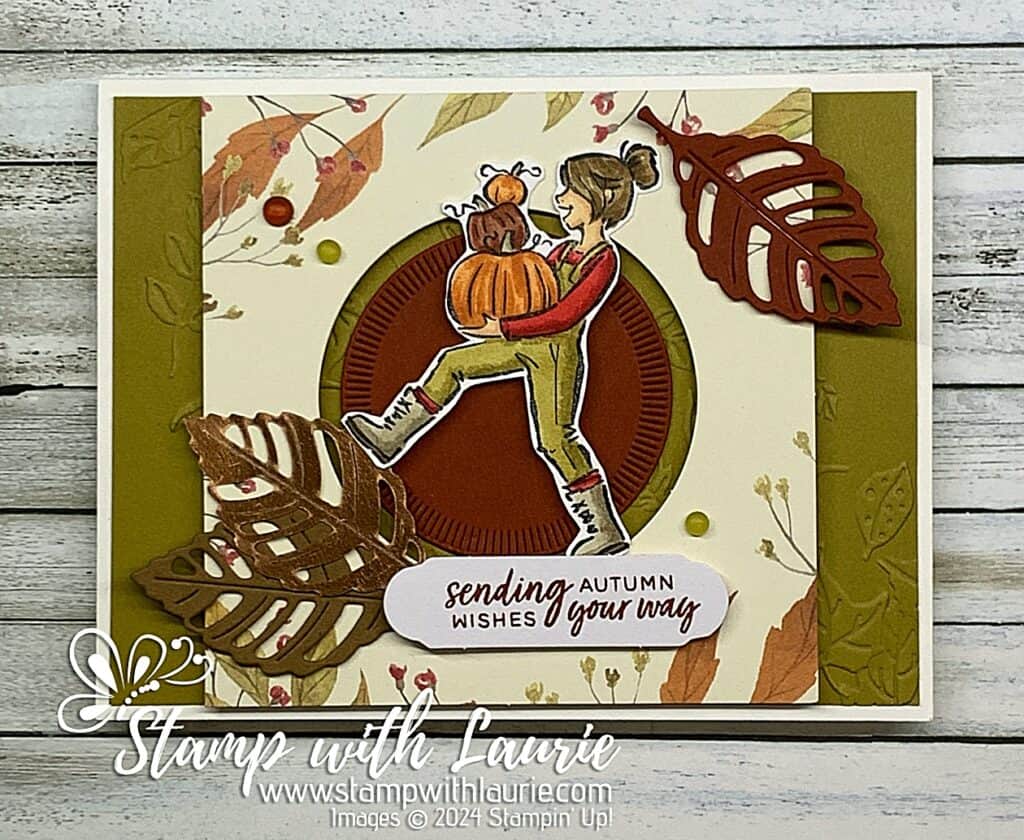
My Hey Pumpkin Card
For my first alternative card, I decided to do some colouring with my Stampin’ Blends using the girl with the pumpkins from the Warms My Heart Stamp Set. I thought she would suit my autumnal theme very well!
My Hey Pumpkin Card
I used the front half of the smaller leaves card to create a focal point for my girl. To separate her from the Leaf Fall 3D Embossing Folder that I used for the Wild Wheat background, I added a Cajun Craze die cut circle using the Spotlight on Nature Dies.
Next, I added the bronze foil leaf in the kit and two more leaves for which I used the add-on Every Celebration Dies. For embellishments, I added three Faux Glass Dots that matched my colour scheme.
Measurements:
Basic White Card Base:
8 ½” x 4 ¼”
3” x 2 ¼” (to stamp girl)
Wild Wheat:
5 ¼” x 4”
Scrap for leaf
Cajun Craze:
2-1/8” x 2-1/8”
Scrap for leaf
Kit Leaves Card Front:
4” x 4”
Other Pieces from Kit:
Bronze Leaf
Sentiment
My Triple Panel Card
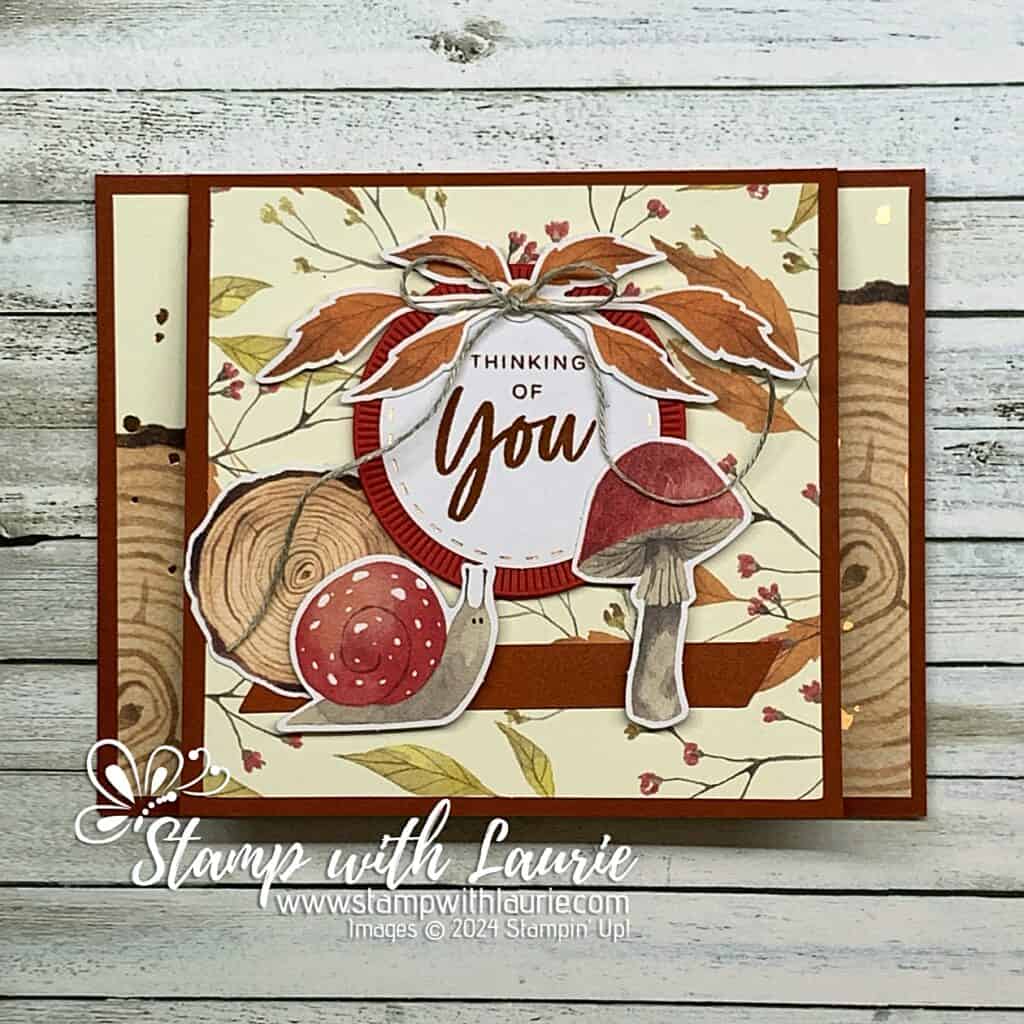
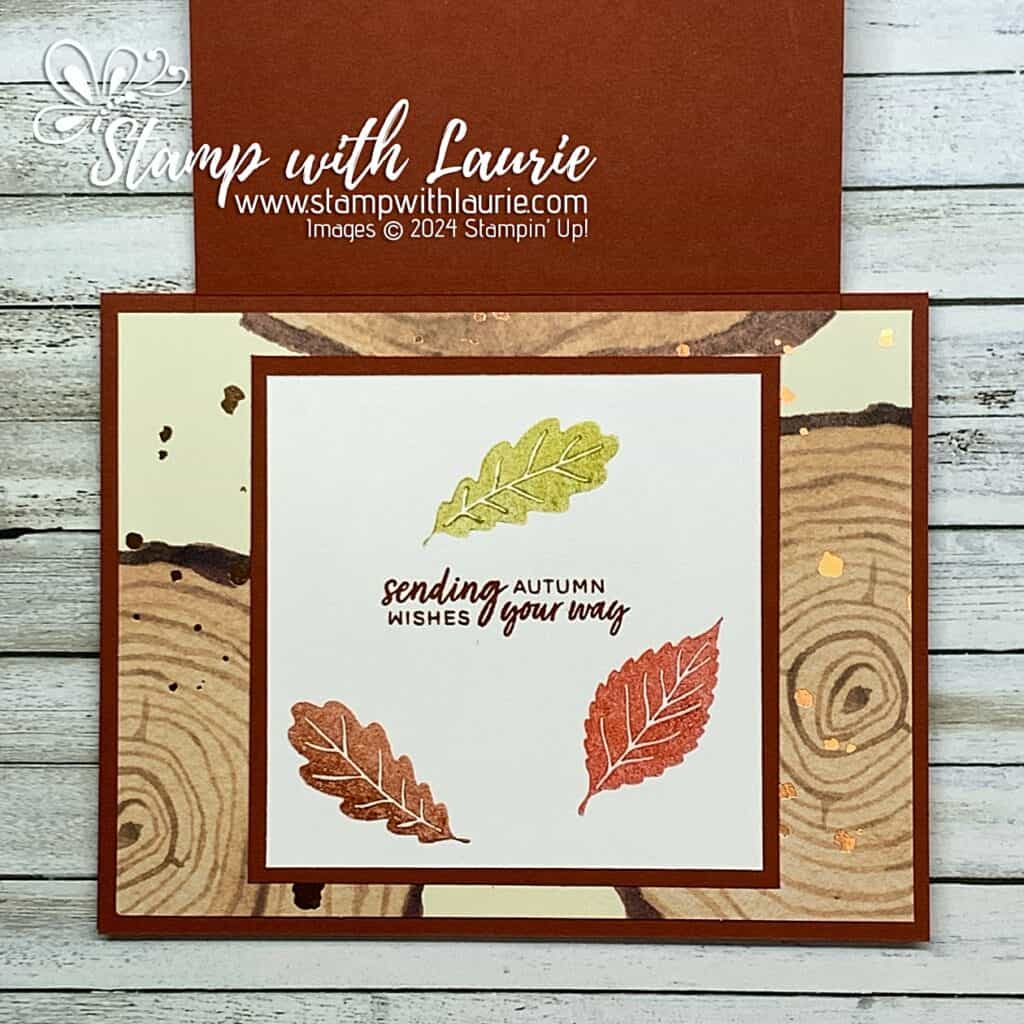
For my second alternative card using the Autumn Abundance September 2024 Paper Pumpkin Kit, I made a triple panel card.
Since I had leftover the back of the smaller card, I used it for the front of this card. For the front panel, I die cut a Poppy Parade circle using the Spotlight on Nature Dies to layer behind my sentiment. I added some Linen Thread tied into a bow for my embellishment.
I made the Cajun Craze mat a little longer and scored it to create a tab that I tucked in behind the log DSP.
My Triple Panel Card
For the middle panel, I used the front of the log card base and then added a sentiment with stamped off leaves in Cajun Craze, Wild Wheat and Poppy Parade.
Panel 2 of My Triple Panel Card
Since I planned to send this card to my family for Thanksgiving, I wanted the final panel to say, “Happy Thanksgiving” and the sentiments from The Gift of Fall August 2019 Paper Pumpkin Kit were perfect for my card! They were stamped in Cajun Craze and Poppy Parade. One final leaf was stamped in Wild Wheat beside the sentiment.
Final Panel of My Triple Panel Card
Measurements:
Cajun Craze:
8 ½” x 4 ¼”
4 ¼” x 6” with score mark at 4 ¼” (tuck tab behind log DSP)
3 ½” x 3 ½”
Basic White:
3 ¼” x 3 ¼”
4” x 5 ¼”
Kit Leaves Card Front:
4” x 4”
Kit Log Card Front:
4” x 5 ¼”
Other Pieces from Kit:
Snail
Log
Mushroom
Leaves
Cajun Craze Strip
Sentiment
More Information on My Autumn Wishes Alternative Cards
For more of my Stampin’ Up! paper Pumpkin cards, please click here.
You will find the items listed above in my online store
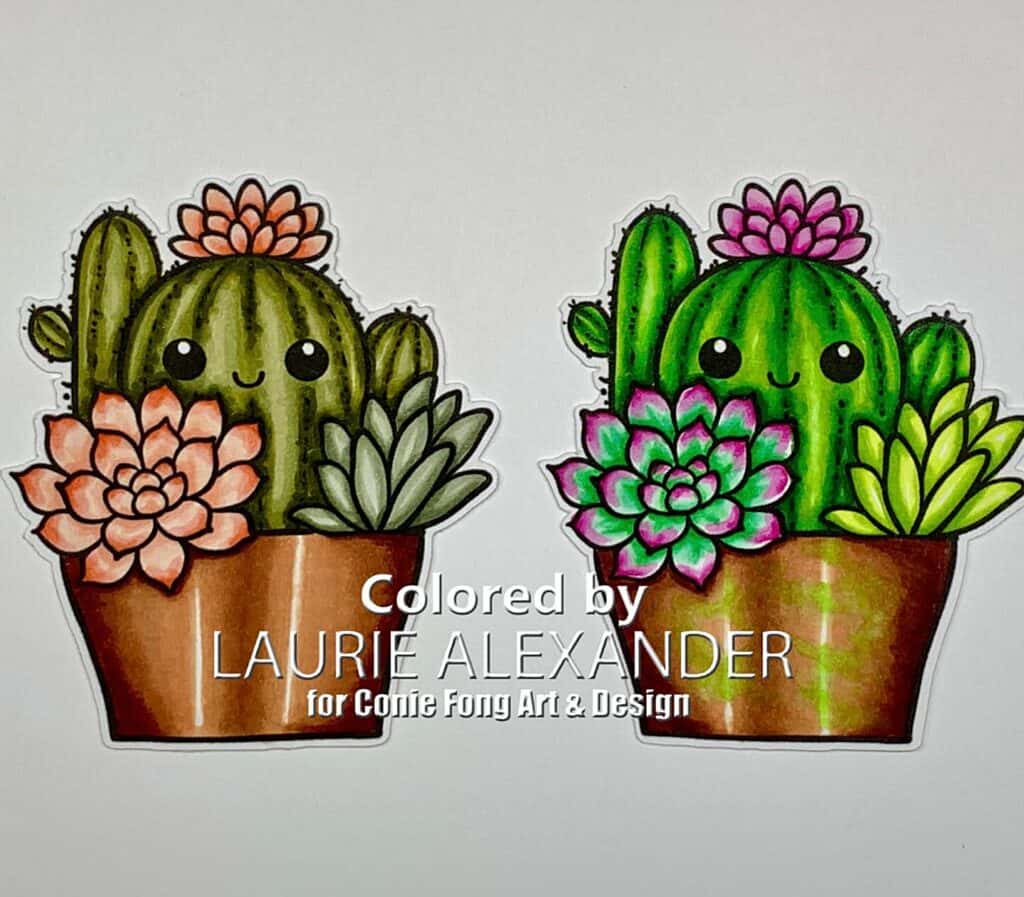
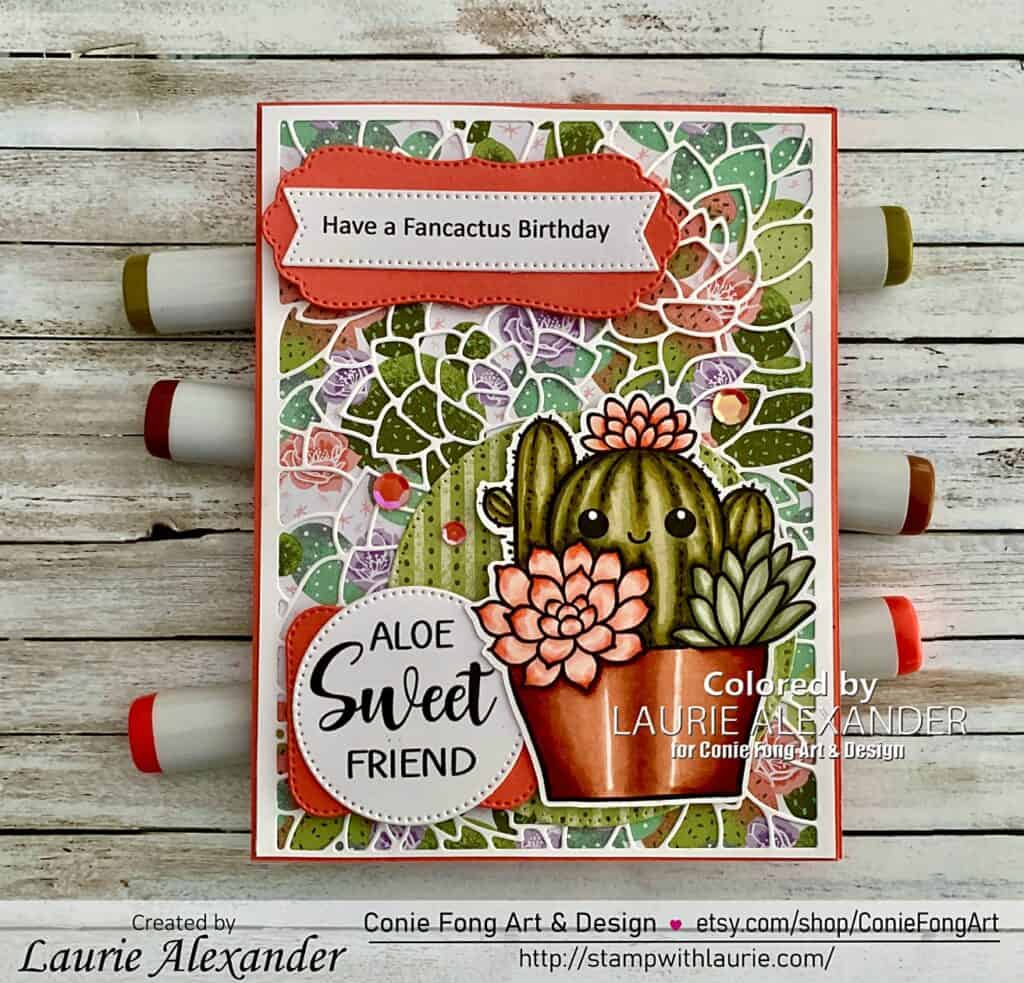
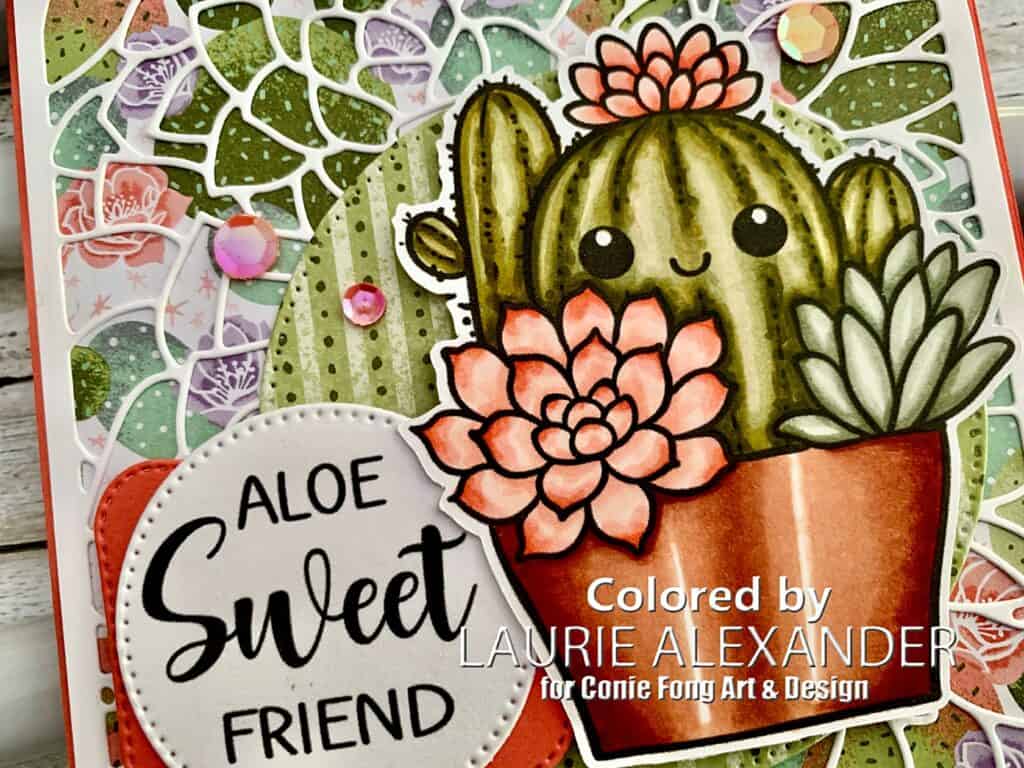
Hello Crafty Friends! It’s Laurie here! I am sharing my Aloe Sweet Friend Card as my Design Team Inspiration Card for Conie Fong Art & Design using the Succulent and Cactus Bundle.
This purchase includes 12 Images:
Echeveria In Pot
Echeveria In Pot Kawaii
Cactus Family
Bunny Ears Cactus
Bunny Ears Cactus Kawaii
Jade In Pot
Hoya Kerri Succulent
Potted Echeveria
Aloe Vera In Pot
Cactus Succulent Arrangement
Cactus Succulent Arrangement Kawaii
Aloe Sweet Friend Sentiment
The Details of My Aloe Sweet Friend Card
I just loved these cute Kawaiis with the eyes that I decided to colour the Cactus Succulent Arrangement Kawaii twice in different colours. One was for a friend’s birthday who loves succulents and the other was for a colour challenge at Kendra’s Card Challenges.
My Colouring of the Cactus Succulent Arrangement Kawaii
For the colour challenge card, I used Copic marker combos that would be like the colours listed below. Kendra had succulent and cactus digital papers that you could download with the colours for the challenge, but in the end, I decided to use Flowering Cactus Designer Series Paper instead.
Kendra’s Card Challenge – Color Challenge
The Potted Succulent Dies had a beautiful detailed outline die that covered the whole card front. So, I decided to use it with the DSP peeking out from under it. Since this piece was so detailed, I didn’t add a lot to my card, other than the focal point and the sentiments.
I used the largest Stylish Shaped circle die to add a circle from the DSP and placed it behind my image to anchor it. The sentiments were also die cut from the Stylish Shaped Dies. I added Calypso Coral frames from the Potted Succulents Dies to the sentiments to help distinguish them from the background.
Don’t you just love the pun of the sentiment, “Aloe Sweet Friend” which comes with the Bundle. For the other sentiment, I typed it on my computer, printed it and die cut it out.
Finally, the finishing touch was a scattering of Calypso Coral sequins around my focal point.
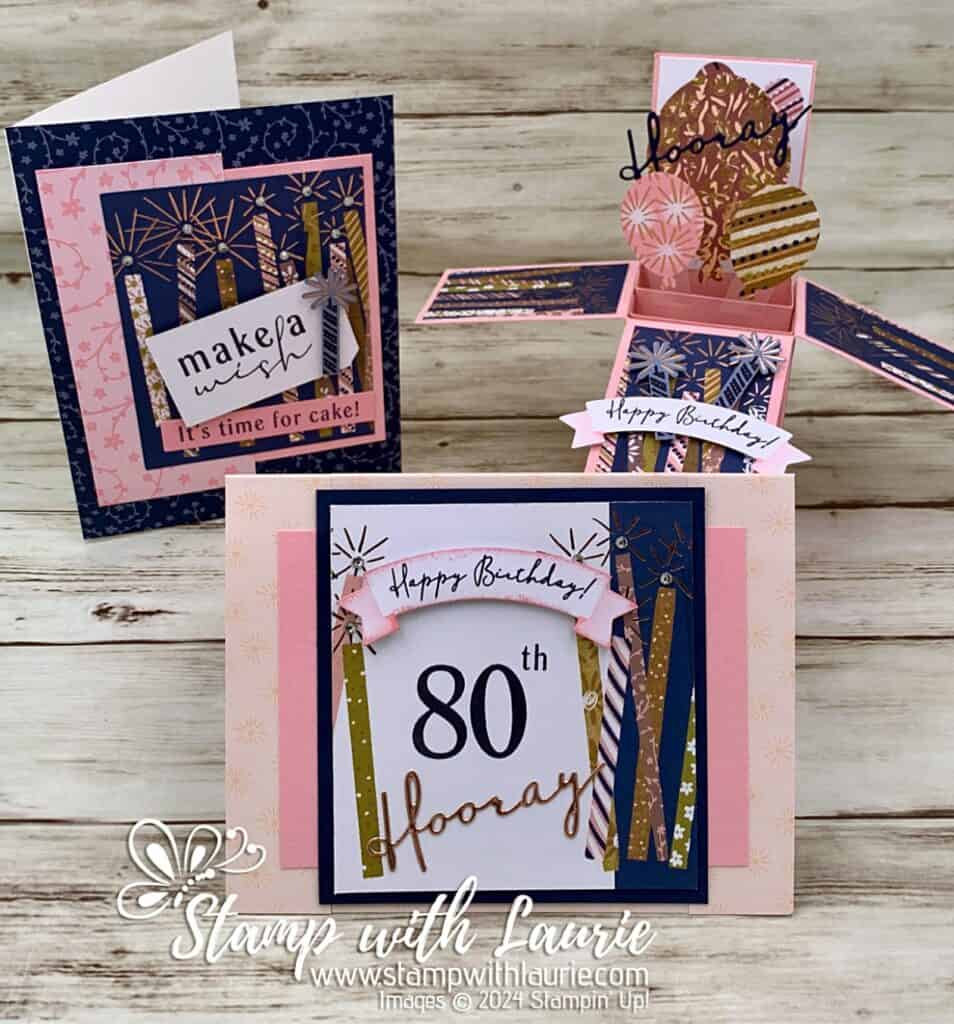
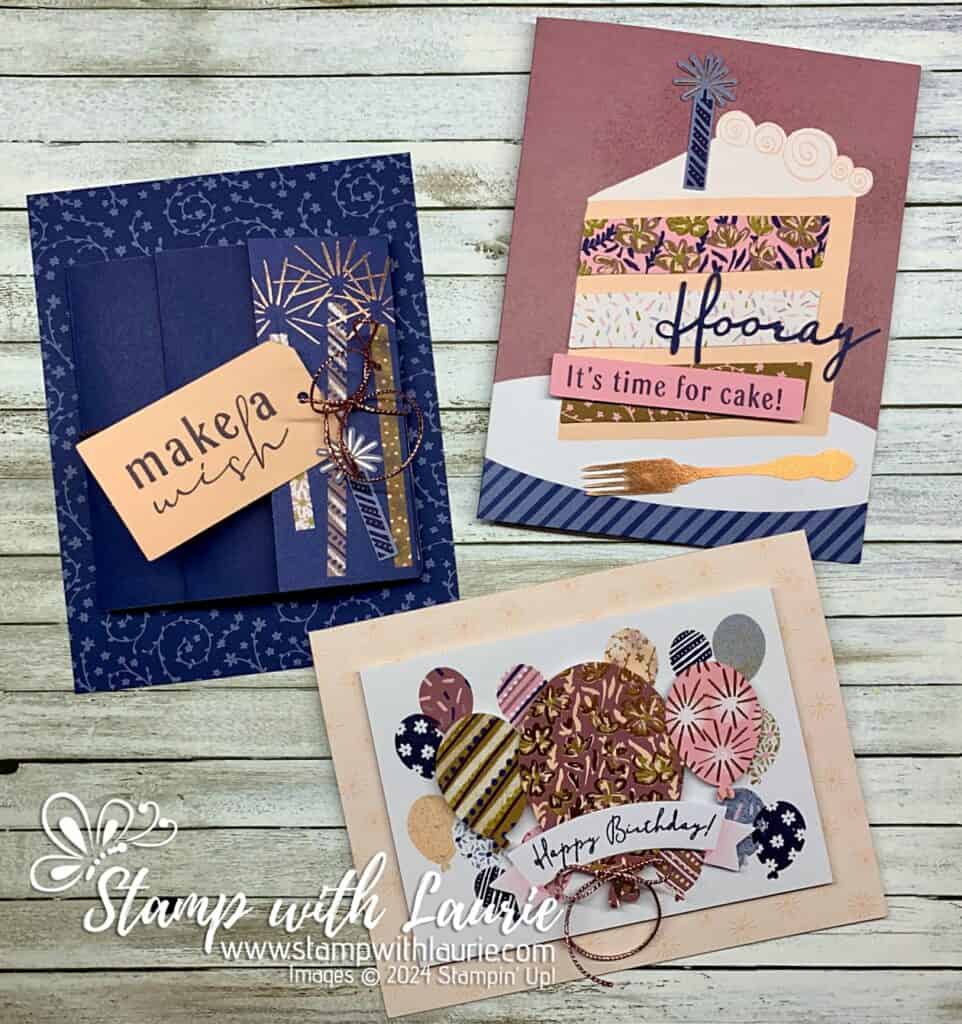
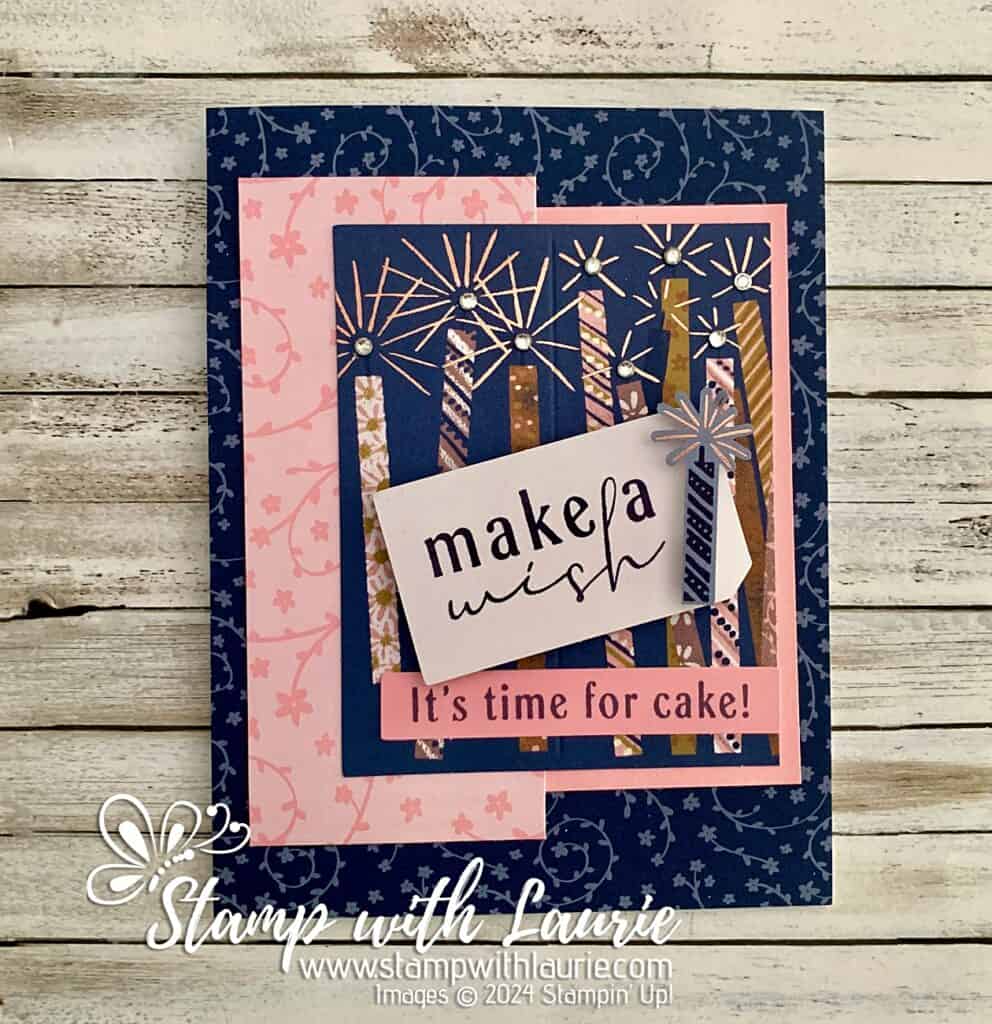
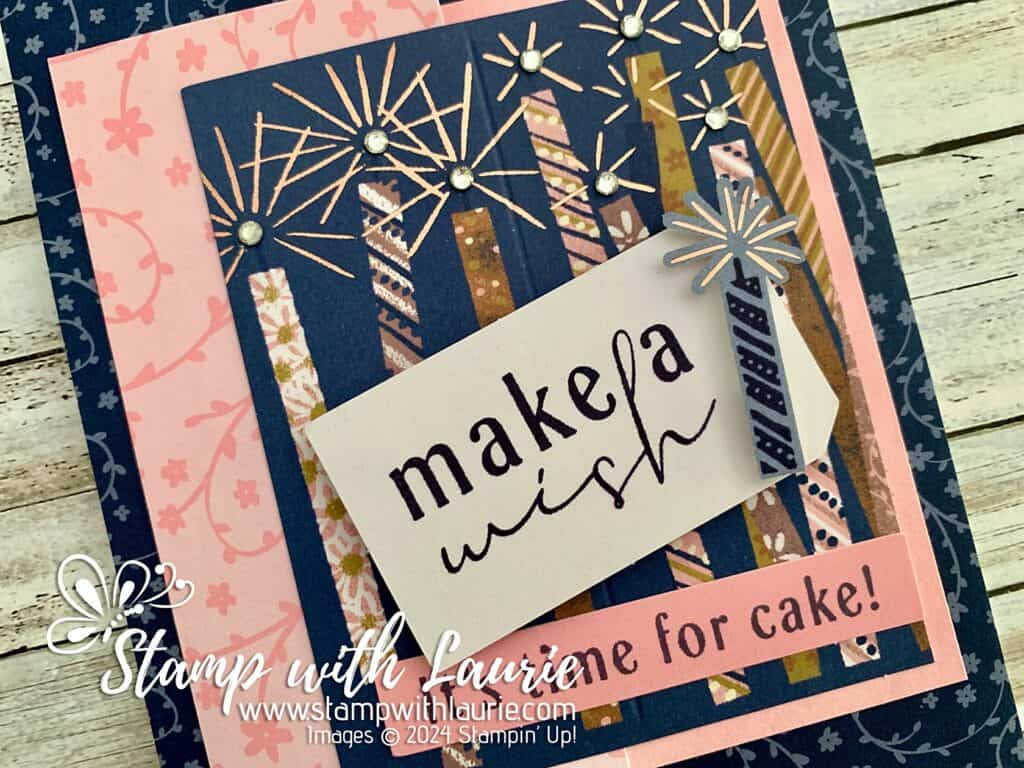
Hello Crafty Friends! Laurie here again! I am sharing my Time for Cake Alternative Cards using the August Time for Cake Paper Pumpkin Kit by Stampin’ Up! I created three alternative cards using the Kit. Two fun folds and a regular card. But, first, here are the three cards that the kit makes. Perfect for those birthday cards that everyone needs!
Cards from the August Time for Cake Paper Pumpkin Kit
The Details of My Time for Cake Alternative Cards
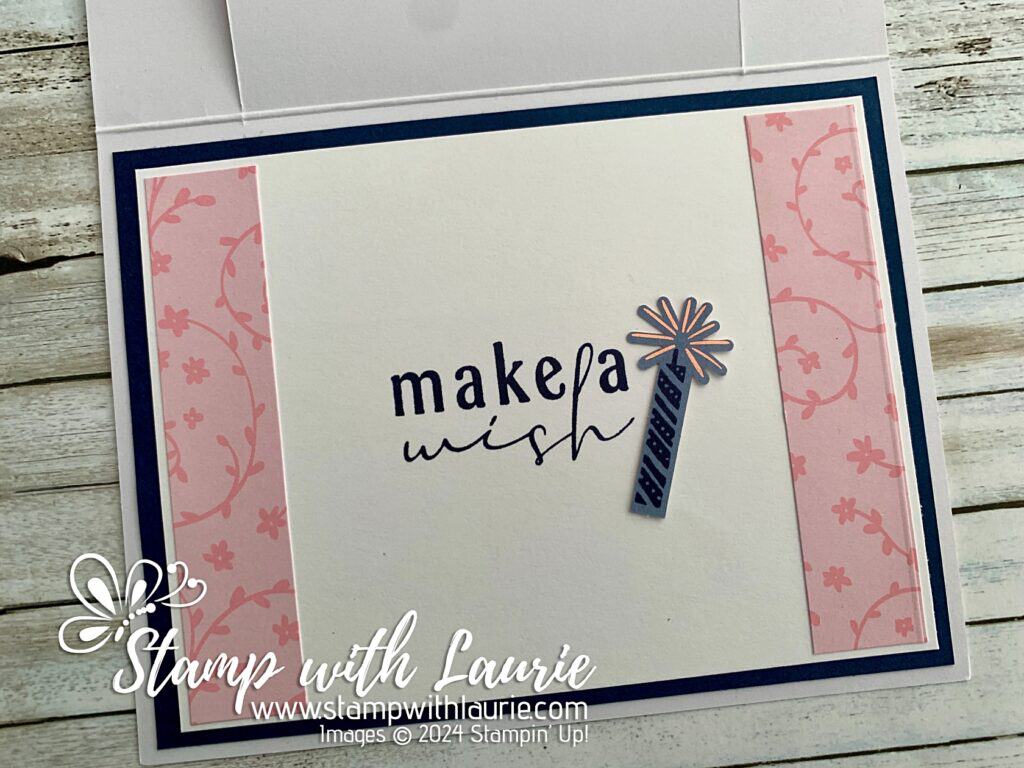
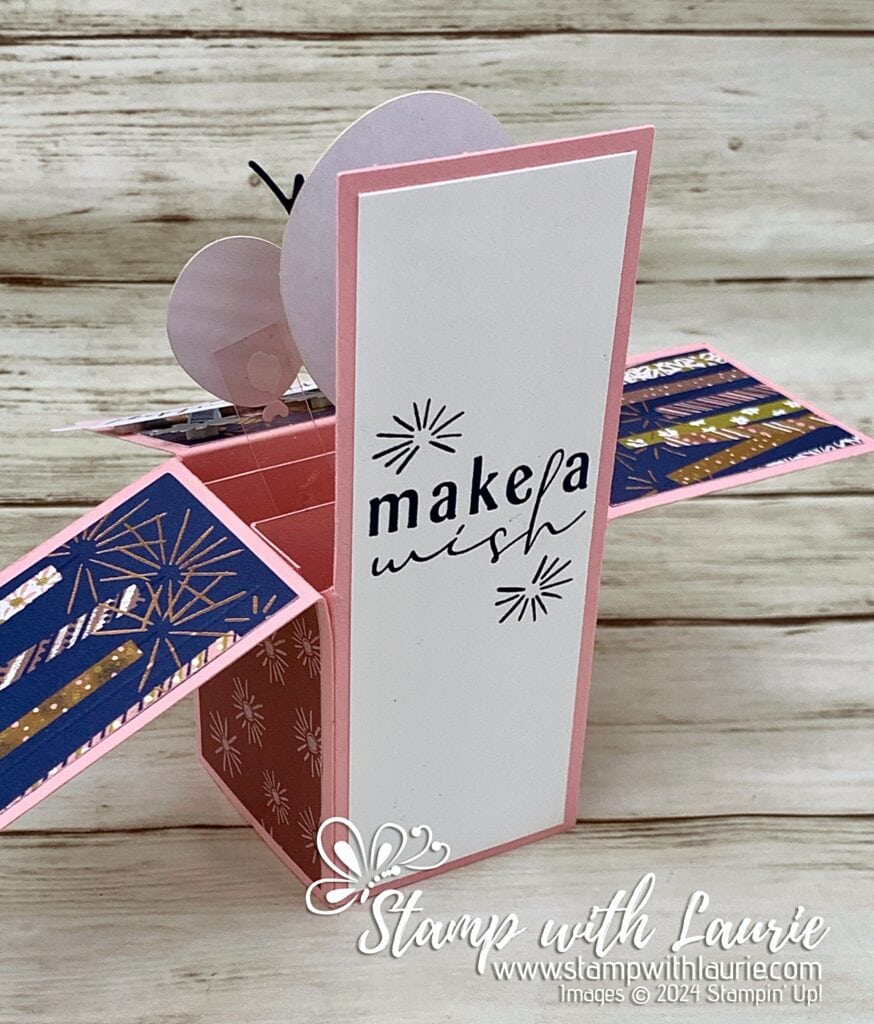
Make a Wish Card
Make a Wish Card
For my first alternative card, I decided to create a Thick Basic White card base with the floral Night of Navy card base adhered to it. I trimmed down the candles DSP to fit on my card front and added a Pretty in Pink mat to one side.
Close Up of Focal Point
I couldn’t resist cutting apart one of the Pretty in Pink envelopes to use as a strip on my card! I turned the tag over to stamp on the white side and added a candle over the hole to hide it. The other sentiment was stamped on the Pretty in Pink piece from the cake card. Finally, I added some Rhinestone Jewels to the candle flames for sparkle.
Measurements:
Basic White Card Base:
8 ½” x 4 ¼”
Pretty In Pink Mat:
2” x 4”
Candle DSP:
3” x 3 ¾”
Envelope DSP:
2” x 4 ½”
Other Pieces from Kit:
Floral Night of Navy
Tag
Pretty in Pink Sentiment Strip
Candle
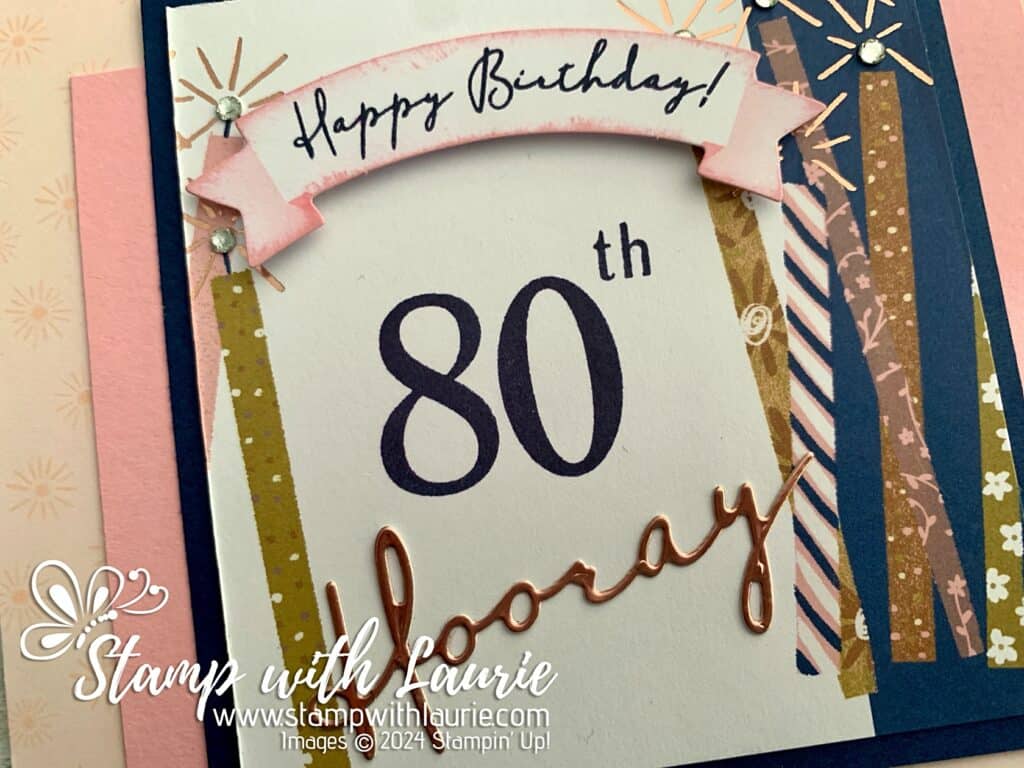
Triple Fold Bridge Card
For my second alternative card using the Time for Cake August 2024 Paper Pumpkin, I made a triple fold bridge card! Love the free stamp set with the numbers! Perfect for those special milestone birthdays!
Triple Fold Bridge Card
I took the Petal Pink card base and cut 1” on either side up to the card fold to create three panels.
For the front, I used part of the candle DSP and stamped 80th on it from the free stamp set. This was matted with Night of Navy and then a strip of Pretty in Pink was added to make sure that this bridge was securely in place.
Close Up of Focal Point
Next, I stamped the Happy birthday sentiment on the banner. To make the banner stand out from the white in the background, I sponged Pretty in Pink onto the edges. The Hooray was die cut from some Rose Gold Foil that I had from another project. The finishing touch was some Rhinestone Jewels to the candle flames for sparkle.
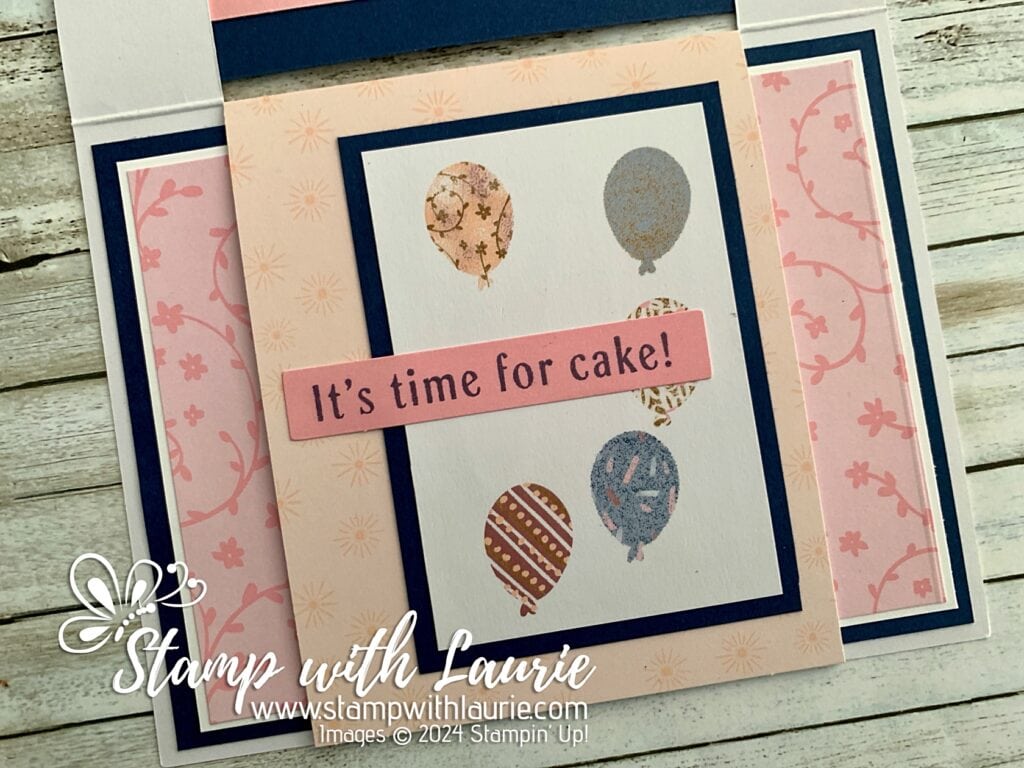
Inside Panel of Card
Now that the front was decorated, it was time to decorate the inside panel. I used half of the balloon DSP from the Kit and matted it with Night of Navy. Since the balloons had a white space in the centre, it was the perfect place to add my sentiment. I love that the sides of inside layer of the card can be seen before you open it!
Inside of Card
For the inside of the card, I used strips of the envelope DSP from the previous card to add borders to a Basic White piece. These were both matted with Night of Navy. The sentiment was stamped, and a candle added.
Measurements:
Card Base:
From Kit
Pretty In Pink Mat:
3 ¼” x 4 ½”
Night of Navy Mats:
4” x 3 ¾” (Front)
3 ½” x 2 ½” (Balloon Piece)
4”x 5 ¼” (Inside)
Candle DSP:
3 ¾” x 3 ½”
Balloon DSP:
3 ¼” x 2 ¼”
Envelope DSP (2):
3 5/8” x ¾”
Basic White (Inside):
3 ¾” x 5”
Other Pieces from Kit:
Banner
Pretty in Pink Sentiment Strip
Candle
Pop-up Box Card
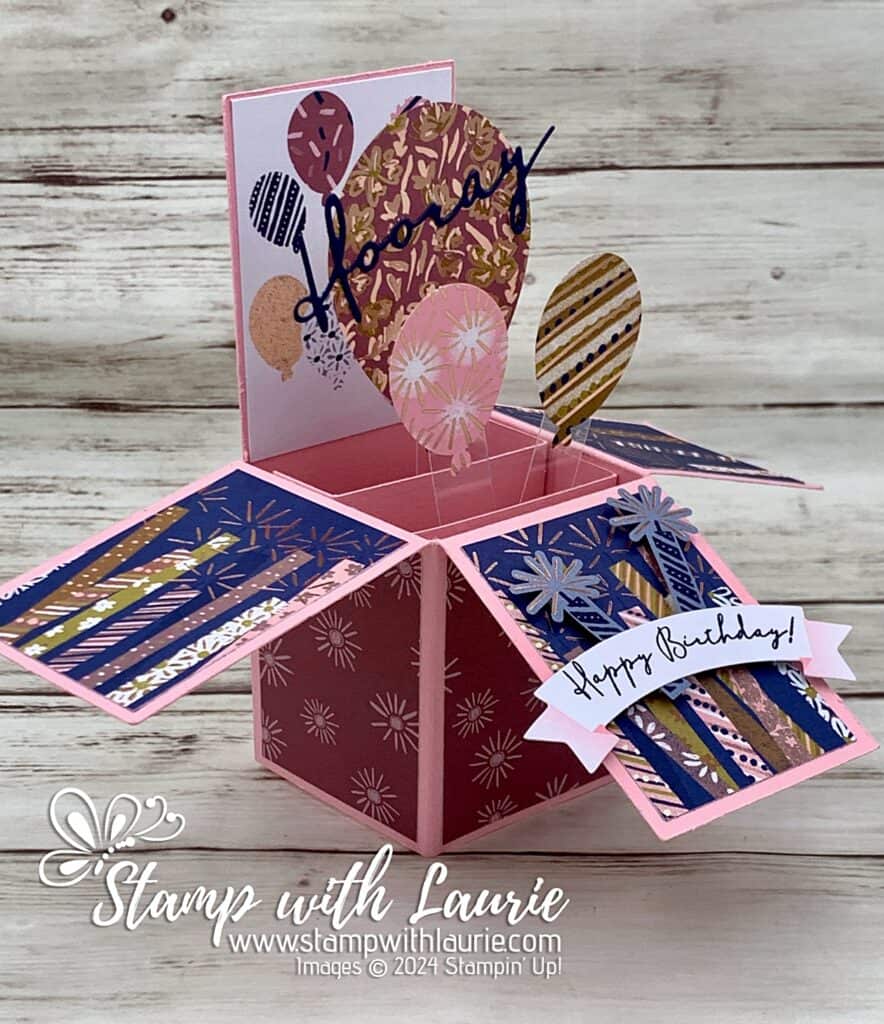
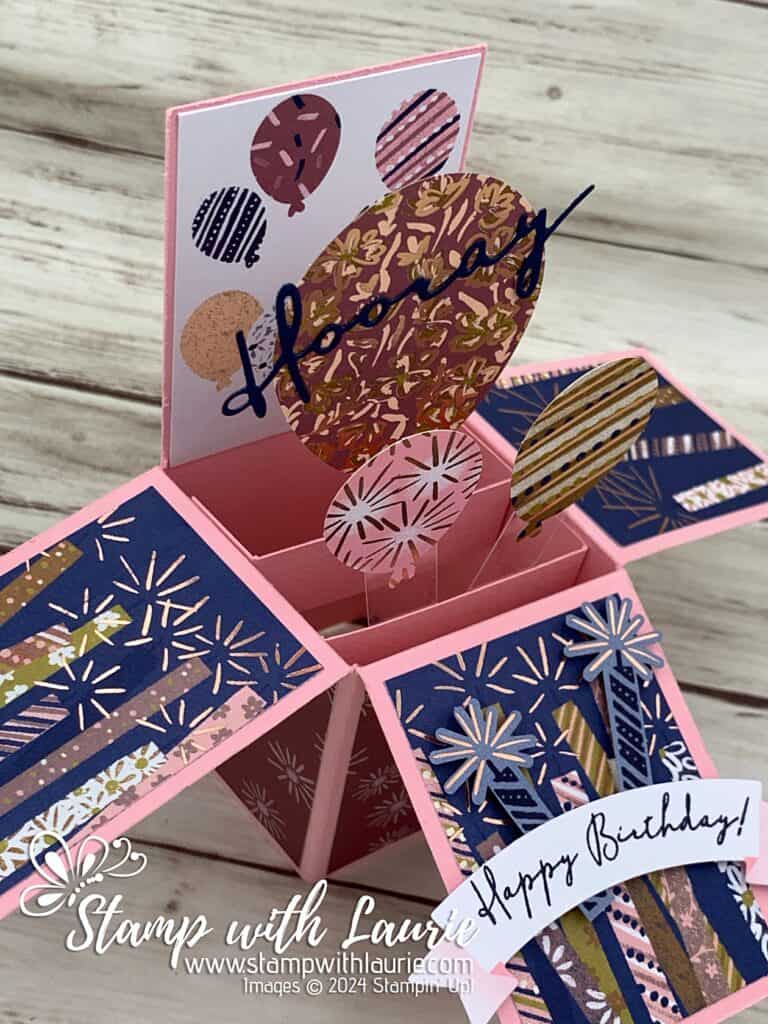
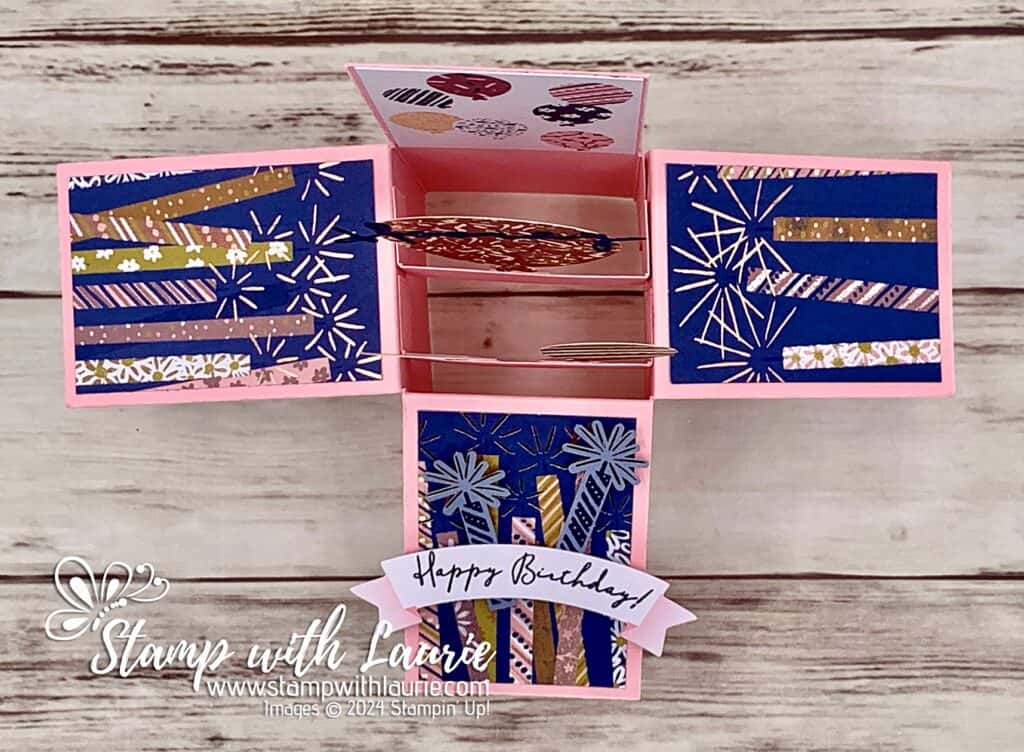
Here is my last alternative card using the Time for Cake August 2024 Paper Pumpkin, I made a fun pop-up box card that is sure to impress!
Pop-up Box Card
For my card, I thought it would be fun to have the balloons suspended over a box! To make my card, I used a lot of bits from the different cards and envelopes, but it was well worth it!
So, I created the box according to the measurements below and added the tabs for the balloons on the inside. Note: adhere the tabs to one side of box. Then, adhere to the other side of tabs and box tab. Fold flat and tuck in the tabs so that they adhere to the other side of box.
I used the Candle DSP to decorate the top flaps. For the front flap, I added the banner and two candles. Unfortunately, the banner does stick out when the card is folded down. So, I had to use a larger envelope for it.
View of the Balloons
Next, I used pieces of an envelope to decorate the outside of the box. You could decorate the top outside flaps too, but I decided not to since I didn’t want to use another envelope.
The balloon DSP was left over from the other card, and I trimmed it down to fit.
Top View
For the balloons, I used a thin strip of Window Sheet that I adhered to the balloons and to the tabs. I made sure to hold them in place while the glue set. I placed the larger balloon at the back with the smaller ones at a slight angle in front of it. Note: make sure that when the card is closed that the balloons do not extend above the card top or sides.
Back View
The final piece was the stamped Basic White piece for the message.
Measurements:
Card Base:
5 ½” x 8 ½”:
Score at 2”, 4” 6” 8” along 8 ½” side
Score down middle at 2 ¾” of 5 ½” side
Cut each score mark until reach middle score mark (2 ¾”)
Cut off the narrow tab at 2 ¾” and trim at angle the remaining piece
Tabs (2):
¾” x 3 ¼”
Score at 5/8” on both sides
Candle DSP:
2 ½” x 1-7/8” (3 pieces)
Envelope DSP:
2 ½” x 1-7/8” (3 pieces)
Balloon DSP:
3 ¼” x 1-7/8”
Basic White (Sentiment):
5 ¼” x 1 ¾”
Window Sheet: 1 ½” X ½” (3 pieces)
Other Pieces from Kit:
Banner
Candle
Hooray
Balloons
More Information on My Time for Cake Alternative Cards
For more of my Stampin’ Up! Paper Pumpkin cards, please click here.
You will find the items listed above in my online store.
Hello Crafty Friends! It’s Laurie here! I am sharing My Flutterby Birthday Card as my Design Team Inspiration Card for Conie Fong Art & Design using the sweet Flutterby Daisy.
For my card, I decided that I wanted to use Flutterby Daisy facing left with her daisy. I loved colouring her and her daisy with my Copic markers in bright cheery colours to match my Mintay papers. Flutterby comes with one butterfly, but I thought a couple of extra butterflies would add a touch of fun to my card!
Close Up of Flutterby
I found this beautiful Daisy Circle Frame a while back and thought it would be perfect for the backdrop of Flutterby! So, I die cut it in a colour that matched my colouring of her daisy and the papers.
Since I wanted to create a birthday card, I used the sentiment from the Dandelion Wishes stamp. Perfect for a fairy birthday card! Though I did use “Fluttering by with a friendly hi” for the inside of my card.
Next, I added a butterfly die cut border of the Mintay papers along the bottom of the card with it overlapping the daisy in places hiding the stem end of the coloured daisy.
Finally, the finishing touch was a scattering of Berry Burst Shimmer Gems around my card.
————————–
Copic Markers:
Skin: E000/E00/E21/E11/E04/R20 Hair: E49/E47/E44/E43 Dress: YG67/YG63/YG03 Wings: BG13/BG11/BG10/Star Dust Stickles Flowers: RV69/RV66/RV63 Dark Blue Butterfly: BG09/BG05/BG01/BG000/Clear Wink of Stella Light Blue Butterfly: BG13/BG11/BG10/Clear Wink of Stella Green Butterfly: YG67/YG63/YG03/Clear Wink of Stella
Flutterby
————————–
Card Recipe for My Flutterby Birthday Card:
Flutterby Daisy, Conie Fong Art & Design Dandelion Wishes, Conie Fong Art & Design Paper Basics – Stamper’s Select White Cardstock, Papertrey Ink Better Times 6” x 6” Paper Pad, Mintay Papers– Daisy Circle Daisy Circle Frame Die, Creative Expressions Unbounded Love Dies, Stampin’ Up! Butterfly Border Die, Joy Crafts Purple Fine Shimmer Gems, Stampin’ Up! Star Dust Stickles, Ranger Clear Wink of Stella, Stampin’ Up!
Berry Burst Card Stock, Stampin’ Up!
Finished card size: 5 ½” x 5 ½”
————————–
To view my other Conie Fong Art & Design projects, please click here.
Hope you like my Design Team Inspiration Card using Flutterby Daisy for Conie Fong Art & Design!
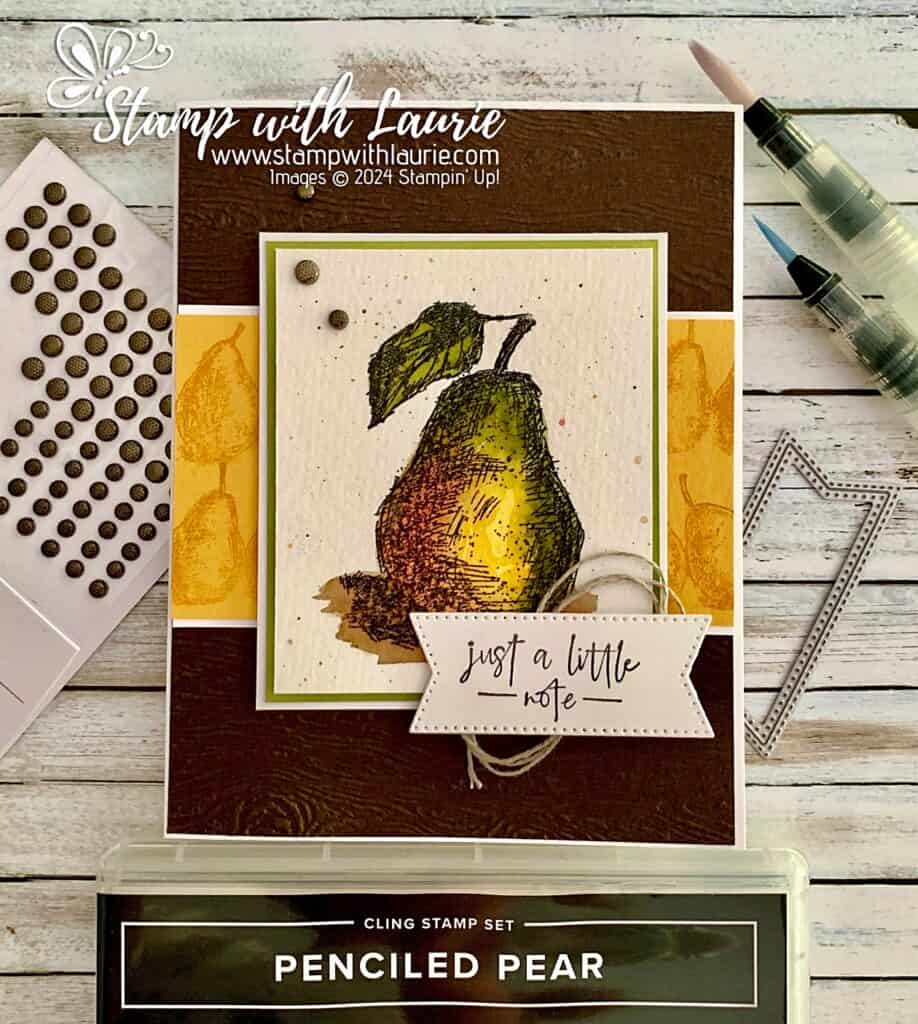
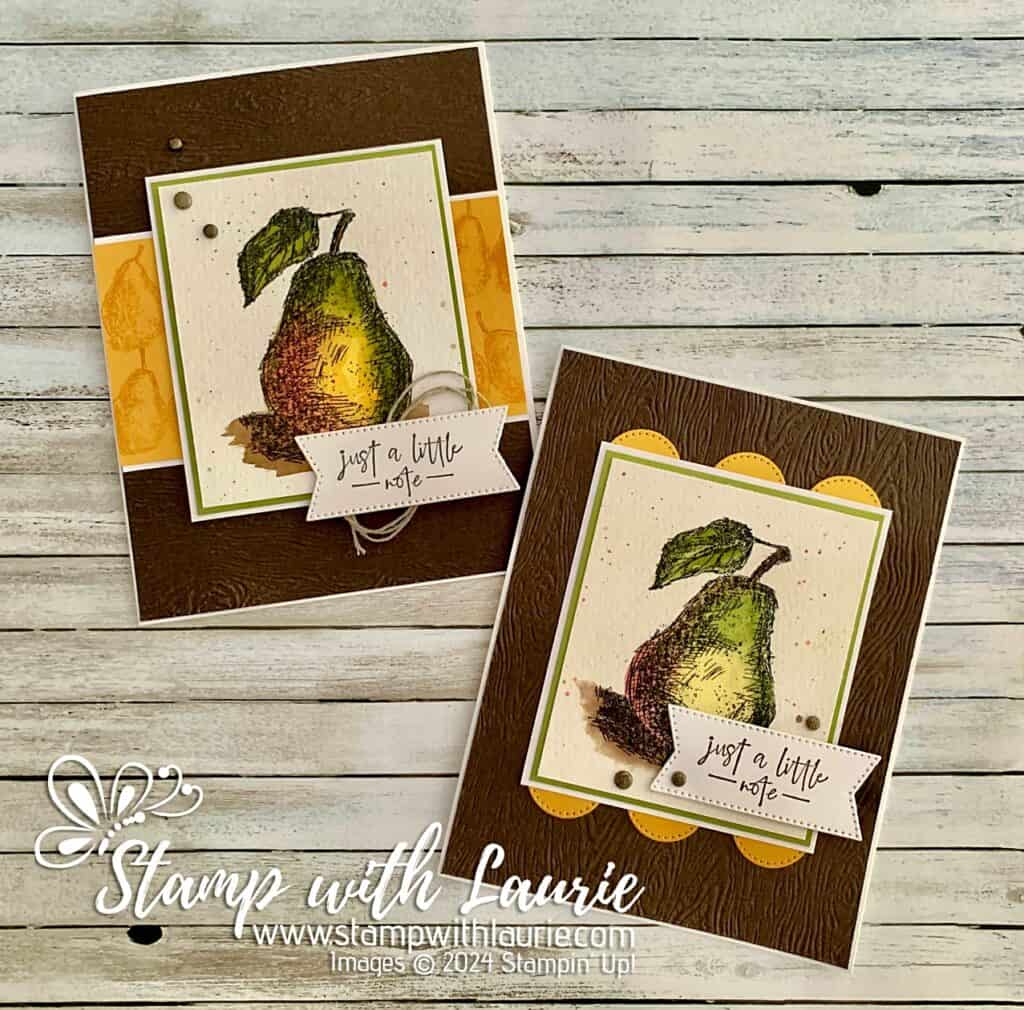
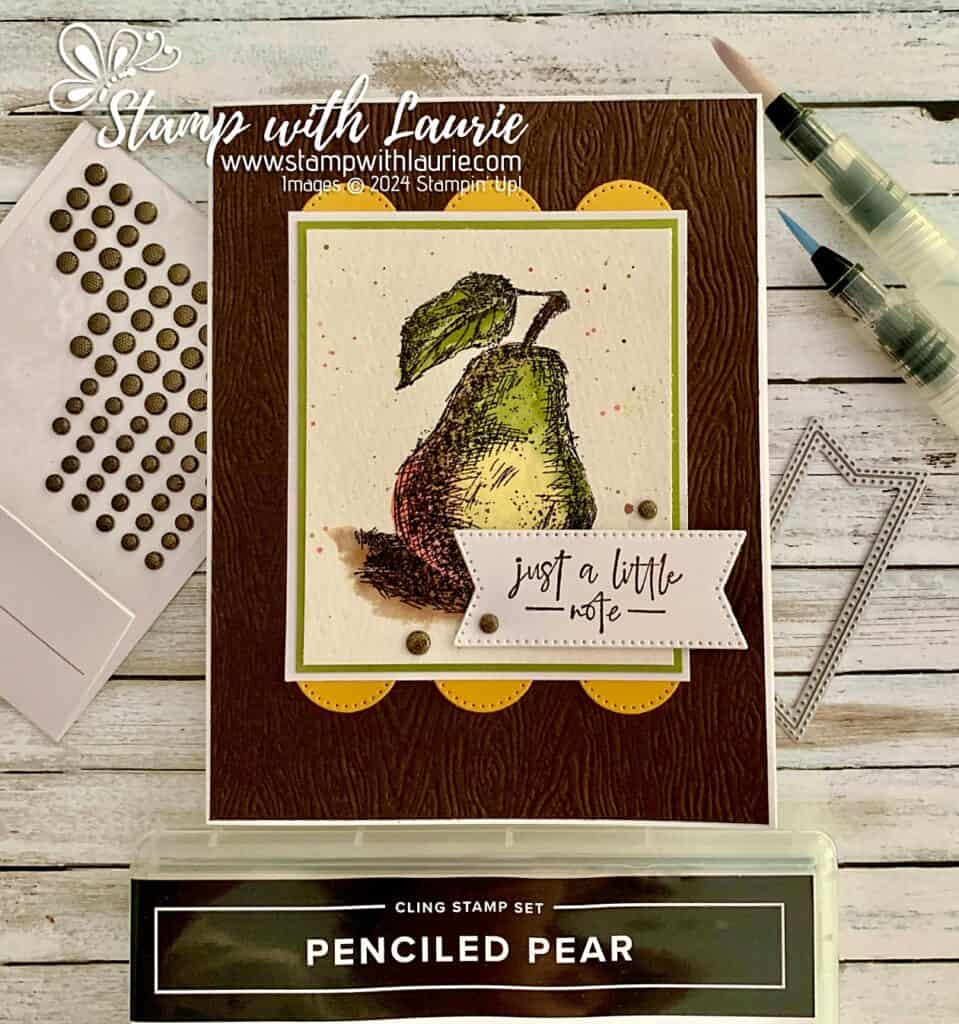
Hello Crafty Friends! Laurie here again! I am sharing my Just a Little Note Card using the Penciled Pear Stamp Set by Stampin’ Up! Since masculine cards are so hard to make, I decided to create a masculine card with this stamp for a swap. In fact, I made 2 different cards with similar layouts.
My Two Variations
The Details of My Just a Little Note Card
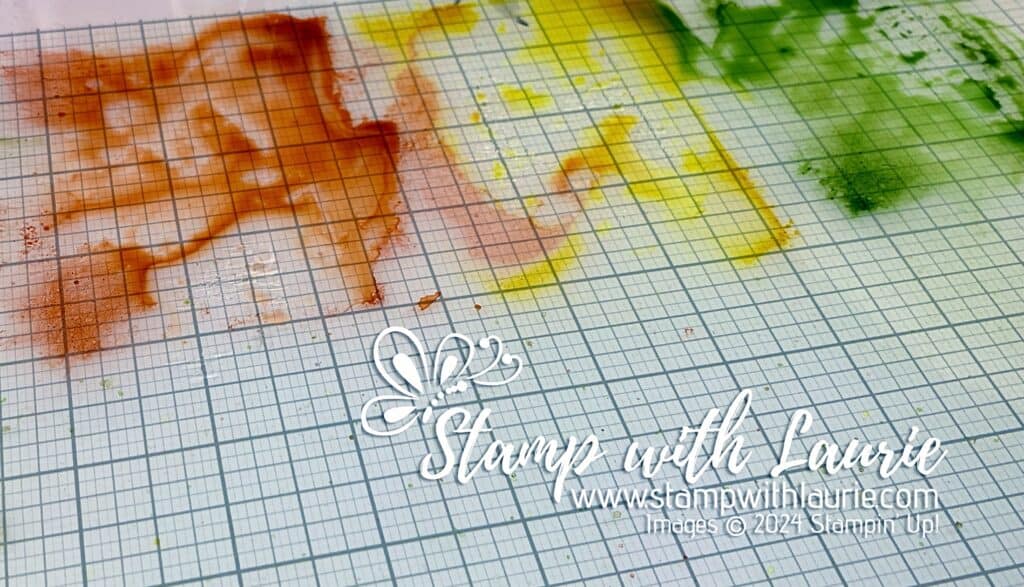
For my card, I knew that I wanted to watercolour the pear with my Water Painters and ink that I squished onto my glass mat. Such a fun technique that allowed me to pick up as much ink as I needed!
Ink Pools
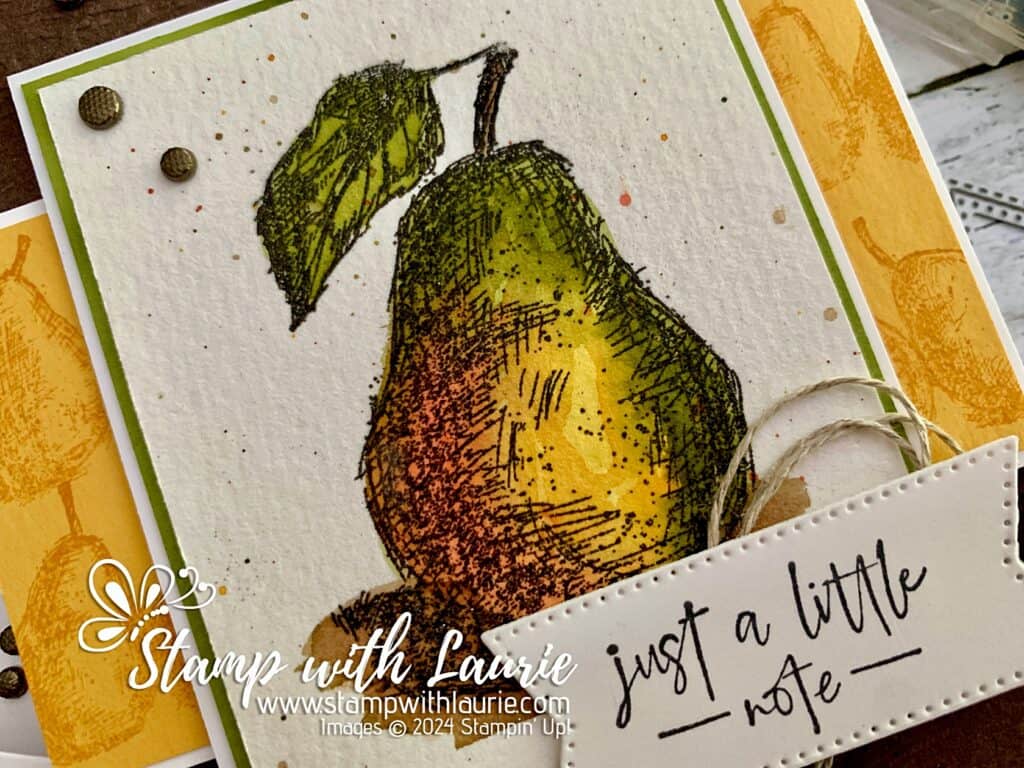
So, I heat embossed in black my stamped pear on watercolor paper. Tip: the heat embossing created a raised edge that kept the ink in the lines. Once that was done, I water coloured the pear in different colours since they can come in various shades of colours until they ripen. To add interest, I picked up the different inks on my brush and splattered it into onto the watercolor paper.
I matted the finished water coloured piece onto Old Olive and Basic White card stock to create my focal point.
Close Up of Focal Point
The sentiment was stamped in Black, die cut out and linen thread was added beneath it. The pears stamp was stamped multiple times in Crushed Curry onto Crush Curry card stock to add even more interest. This was matted with Basic White.
Next, I embossed the Early Espresso card stock with Timber 3D Embossing Folder to add to the masculine feel of my card.
The finishing touch was Adhesive-Backed Textured Dots in the opposite corner from my sentiment. Don’t you think these dots look like golf balls (hmmm ideas! lol!)? Very masculine!
Supplies:
Stamps/Bundles/Dies: Penciled Pear Stamp Set (163526), Stylish Shapes Dies (159183)
Inks: Early Espresso Classic Stampin’ Pad (147114), Crushed Curry Classic Stampin’ Pad (147087), Old Olive Classic Stampin’ Pad (147090), Cajun Craze Classic Stampin’ Pad (147085), VersaMark Ink (102283), Tuxedo Black Memento Ink Pad (132708)
Paper: Basic White Thick Cardstock (159229), Early Espresso (119686), Basic White (159276), Crushed Curry (131199), Old Olive (100702), Fluid 100 Watercolor Paper (149612)
Accessories: Timber 3D Embossing Folder (156406), Adhesive-Backed Textured Dots (163338), Linen Thread (104199), Water Painters (151298), Basics Embossing Powder (165679), Heat Tool (129053), Embossing Additions Tool Kit (159971), Stampin’ Glass Mat Studio (163987), Bone Folder (102300), Stampin’ Dimensionals (104430), Mini Stampin’ Dimensionals (144108), Stampin’ Seal (152813), Mini Glue Dots (103683)
Measurements:
Basic White Thick Cardstock:
8 ½” x 5 ½” scored at 4 ¼”
Early Espresso:
5 3/8” x 4-1/8”
Basic White (3 pieces):
4-1/8” x 2-3/8”
3 ½” x 3”
Scrap for Sentiment
Crushed Curry:
4-1/8” x 2 ¼”
Old Olive:
2-7/8” x 3-3/8”
Watercolor Paper:
2 ¾” x 3 ¼”
My Other Variation
More Information on My Just a Little Note Card
For more of my Stampin’ Up! cards, please click here.
You will find the items listed above in my online store
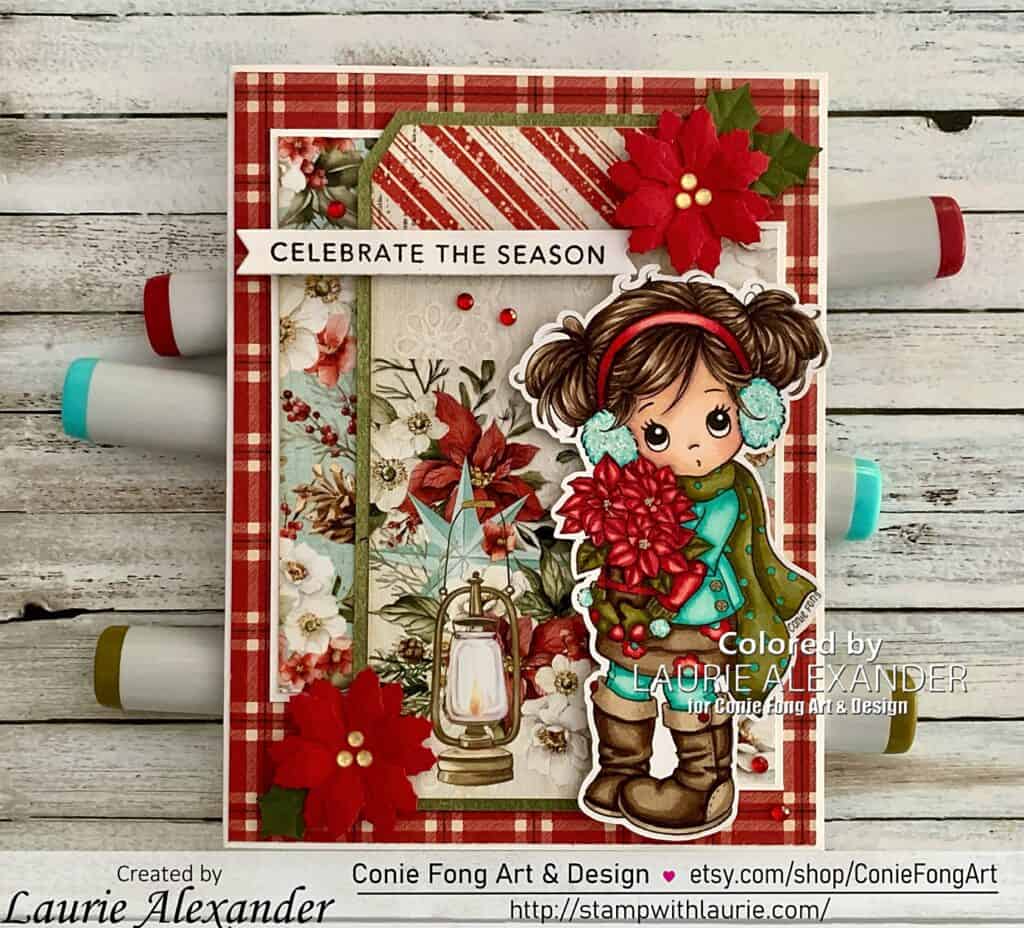
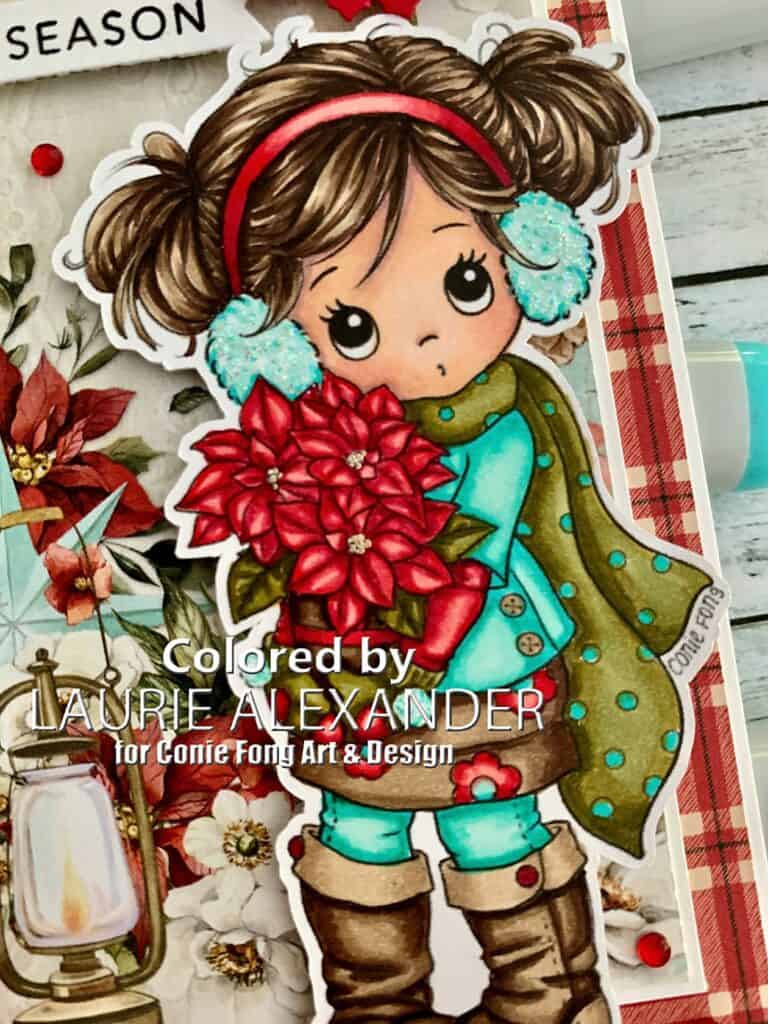
Hello Crafty Friends! It’s Laurie here! Christmas in July might be over, but I am still adding to my Christmas card supply. Lol! So, I am sharing My Poinsettia Season Card as my Design Team Inspiration Card for Conie Fong Art & Design using the sweetHolly Poinsettia.
The Details of My Poinsettia Season Card
I loved colouring Holly with her poinsettias using my Copic markers! She is such a sweetie!! I used colours to match the gorgeous Mintay paper! To add some sparkle, I used Star Dust Stickles on her ear muffs and pom poms on her mittens.
Of course, I had to use a tag from the matching Paper Elements for my backdrop of Holly. To tie in the greens of my colouring, I gave the tag a mat with one of the papers in the pad.
The Paper Elements also came with some envelopes that you make. I thought the floral envelope with the blue background perfectly matched my colour scheme. So, I trimmed a piece off the envelope and cut it in half. These pieces I matted with white and placed them in opposite corners of my tag so that they are peeking out from my focal point.
Since Holly had poinsettias, I decided to use my Poinsettia and Holly Punch by Nellie to make some paper flowers. The flowers were accented with Gold Glitter Enamel Dots. The gold centres mirrored the gold Gelly Roll Pen that I used on Holly’s poinsettias.
The sentiment was stamped in black and die cut out with matching the die.
Finally, the finishing touch was a scattering of red rhinestones around my card.
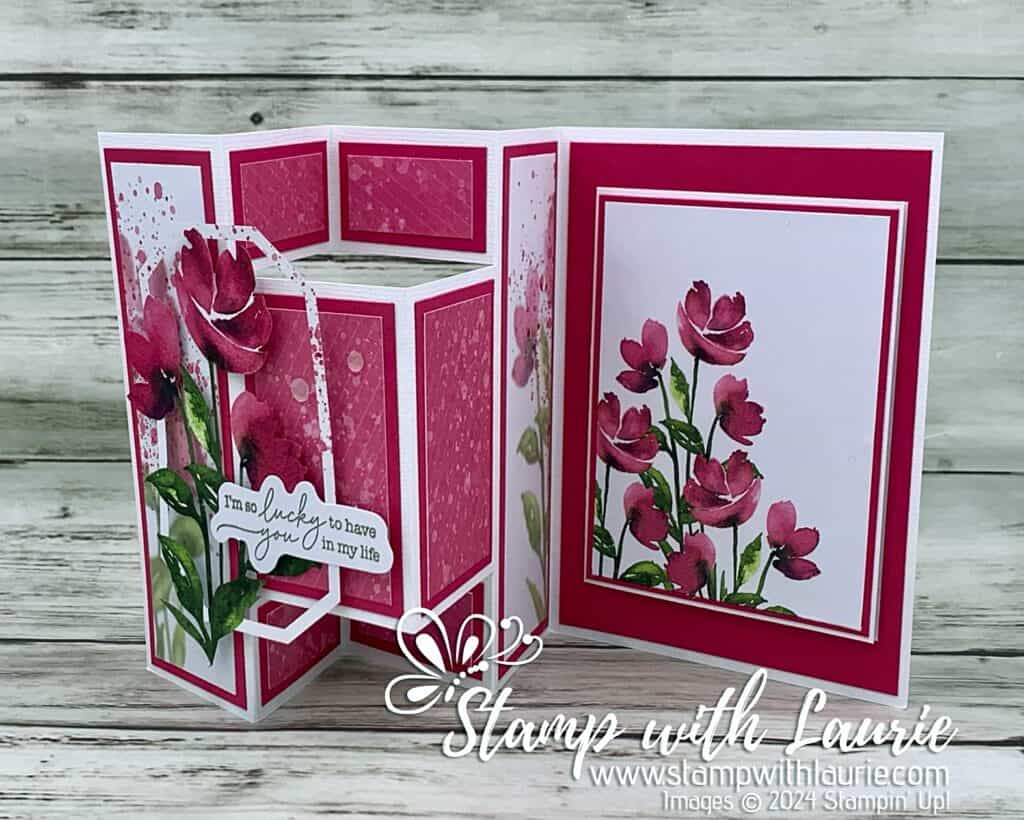
Hello Crafty Friends! Laurie here again! I am sharing my Painted Petals Alternative Card using the July Painted Petals Paper Pumpkin Kit by Stampin’ Up! I created some alternative cards using the Kit and shared three of them the other day (will include a link to the post at the end). So, I thought I would share this fun fold alternative card today. But, first, here are the three cards that the kit makes. They are so pretty!
Three Cards from the Kit
The Details of My Painted Petal Alternative Card
For my last alternative card, there was a fun fold that I wanted to try, and I thought this kit would be perfect for it especially with those die cut flowers! So, I used the Melon Mambo card base and one of the matching envelopes. I kept the extra products down as much as possible by only adding card stock.
Card Front
I love how when it’s folded down you can’t see all the layers, but as you open it, the layers keep on going! And there is a hidden card at the end that you don’t expect! How cool is that!
Small Inside Card Opened
I trimmed the Melon Mambo card base from the Kit in half separating the back from the front. For the front of the card base, I cut it in half and then trimmed it to 1 ½” so that I could have as much of the flowers showing as possible. Then, I trimmed the top and bottom to make these panels 5” tall.
Once that was done, I used the back of the card base for all the other smaller panels.
For the card inside, I used the envelope and trimmed it down to show only the flowers.
Inside of Card Laid Flat
I adhered all these pieces to the Melon Mambo mats and then adhered them to the Basic White card base. The floral die cut fitted perfectly on the front. I stamped two sentiments and adhered one to the front and one to the inside of the smaller card. For the inside of the smaller card, I added the Melon Mambo strip from the kit under the sentiment.
The finishing touch was adding three of the sequins that came in the kit to the front.
Close Up of Card Front
Measurements of My Painted Petals Alternative Card:
Card Base:
12” x 5 ½” cut/scored according to template below
4 ¼” x 6 ½” (for inside card)
Mats:
1” x 1 ¾” (4 pieces)
5 ¼” x 3 ¾” (2 pieces)
5 ¼” x 3 ¾”
4 ¼” x 3-1/8” (for inside card)
1st DSP:
5” x 1 ½” (2 pieces)
2 ½” x 1 ½” (2 pieces)
2nd DSP:
¾” x 1 ½” (4 pieces)
4” x 3” (for inside card)
More Information on My Painted Petals Alternative Card
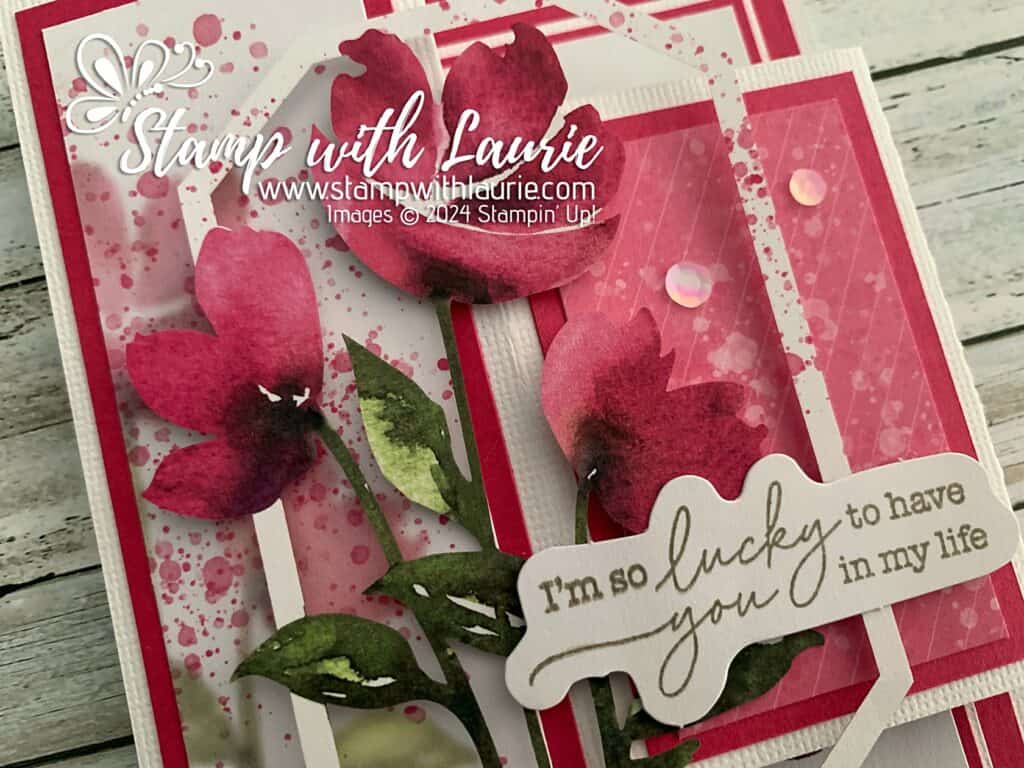
Downloadable Creative Fold Card Template
To download a PDF of the Creative Fold Card Template, please click here.
Creative Fold Template
Here are the other alternatives cards that I have made with this Kit. They are centre-step cards. For more information on them, please click here.
Side View of Cards
For more of my Paper Pumpkin Alternative cards, please click here.
For more of my Stampin’ Up! cards, please click here.
You will find the items listed above in my online store.
Hello Crafty Friends! Laurie here again! I am sharing my Painted Petals Centre-Step Cards using the July Painted Petals Paper Pumpkin Kit by Stampin’ Up! When I saw this kit, I was in love with it, especially how the die cuts all layer on top of the card fronts! So many ideas came flooding into my head! Lol! In fact, I created five alternative cards using the Kit. But, first, here are the three cards that the kit makes. They are so pretty!
Three Cards from the Kit
The Details of My Painted Petal Centre-Step Cards
For my three alternative cards, I decided to use my favourite fun fold, a centre-step! I kept the extra products down as much as possible by only adding card stock and the Eyelet 3D Embossing Folder.
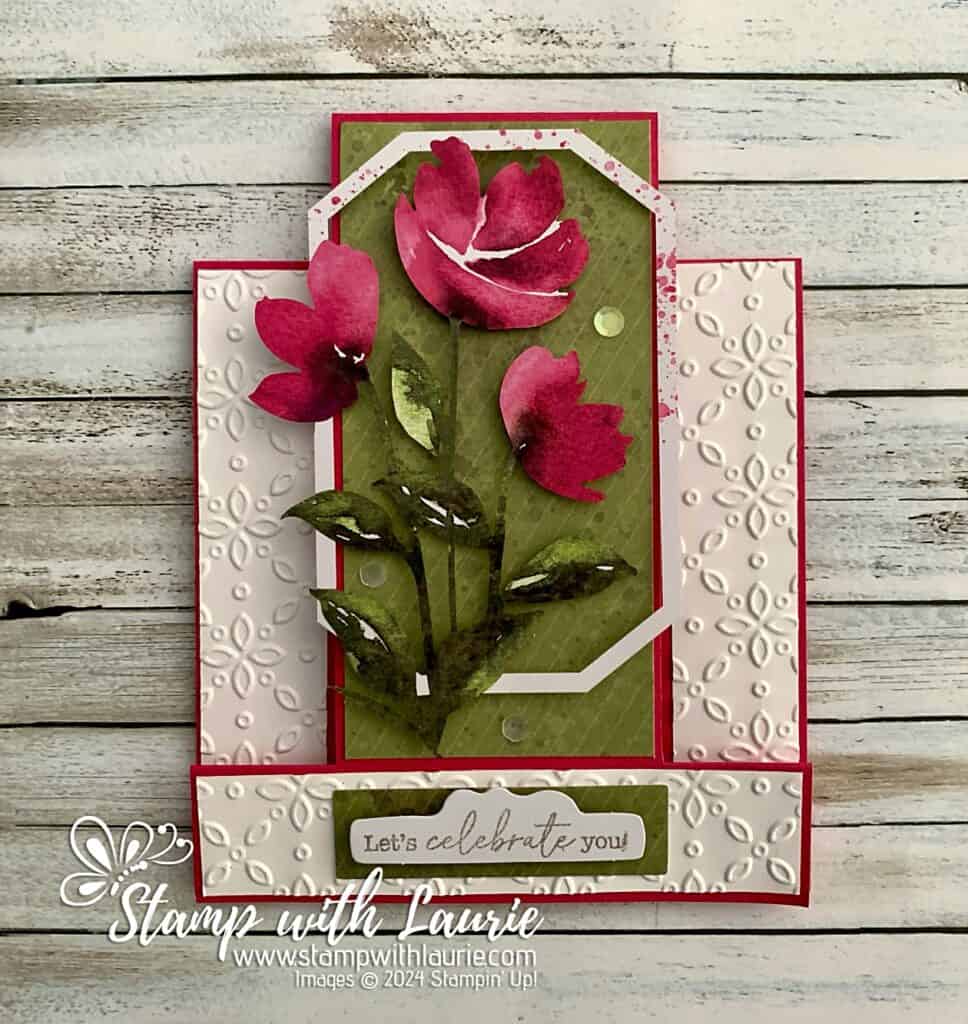
For the rose flower card, I decided to use the Eyelet 3D Embossing Folder for the various strips to add some interested. I also decided to use the Old Olive card backing from one of the cards instead of the matching card front for variation.
Rose Centre-Step Card
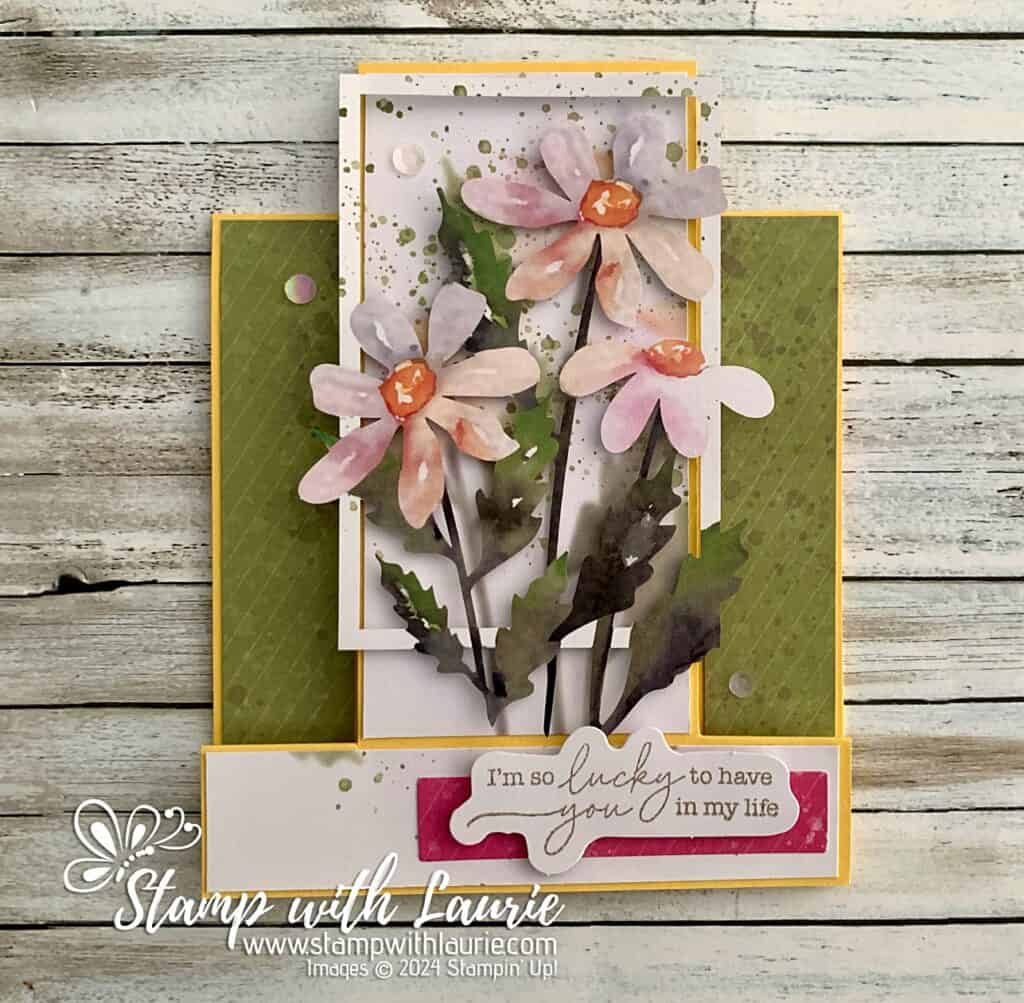
For the daisy flower card, I had some of the Old Olive card backing from the previous card. So, I used it for the two side strips. The bottom strip was left over from the front of the card when I trimmed it down. I love that you can see the splotches on it! I decided to use the matching card front for the centre panel and layered the die cut on top of this panel.
Daisy Centre-Step Card
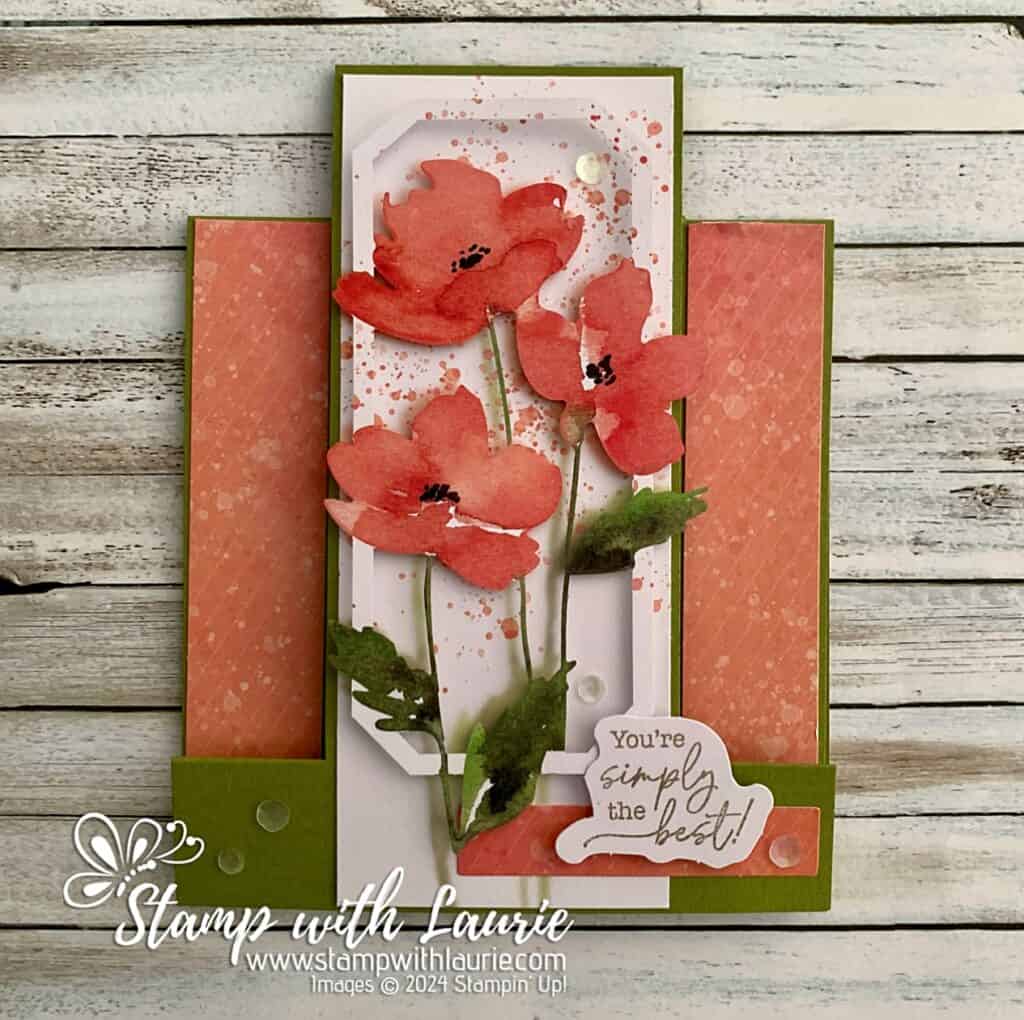
For the poppy flower card, I used all the bits from the card base. Since the poppy die cut was longer than the others, I decided not to trim down the centre panel as much, leaving the sides of the bottom panel free for the sentiment on one side and the embellishments on the other.
Poppy Centre-Step Card
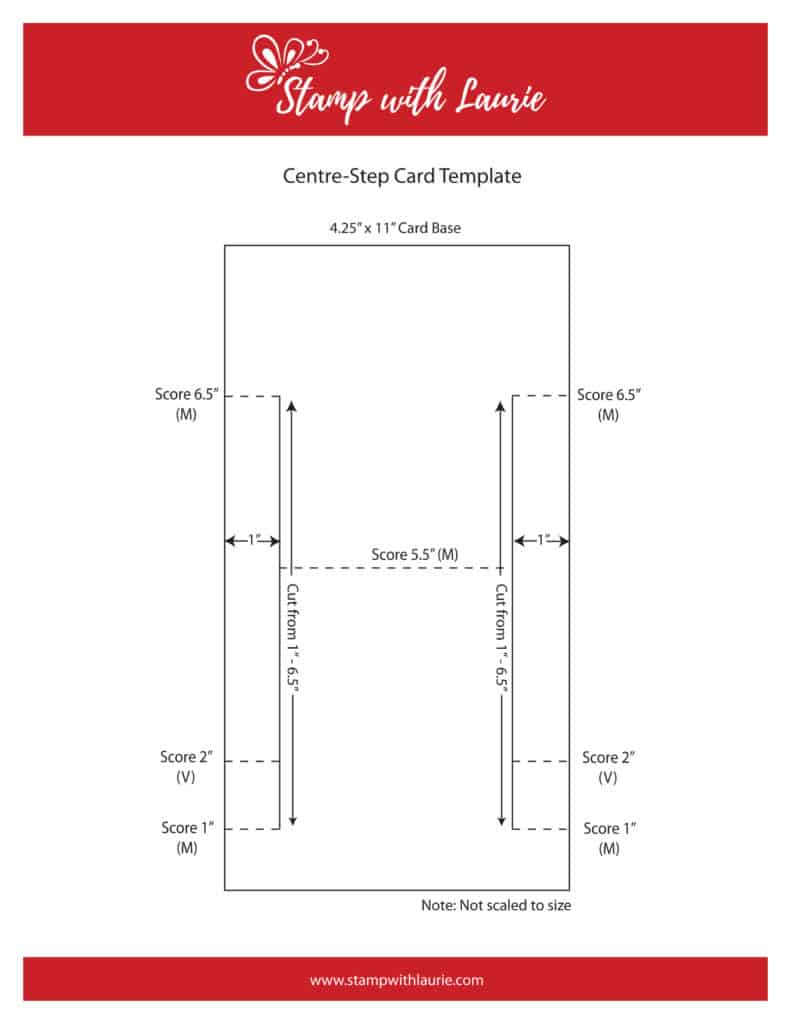
Measurements of My Painted Petals Centre-Step Cards:
Card Base:
11″ x 4 ¼” cut/scored according to template below
Centre Panel:
2-1/8″ x 4-3/8″
2 Side Strips:
7/8″ x 4-3/8″
Bottom Strip:
7/8″ x 4-1/8″
Side View of Cards
More Information on My Painted Petals Centre-Step Cards
Stay tune for my other alternative cards using this kit. I made two more fun folds cards, but different than these ones.
Downloadable Centre-Step Card Template
To download a PDF of the Centre-Step Card Template, please click here or on the picture.
Centre-Step Card Template
For more of my Stampin’ Up! cards, please click here.
You will find the items listed above in my online store.
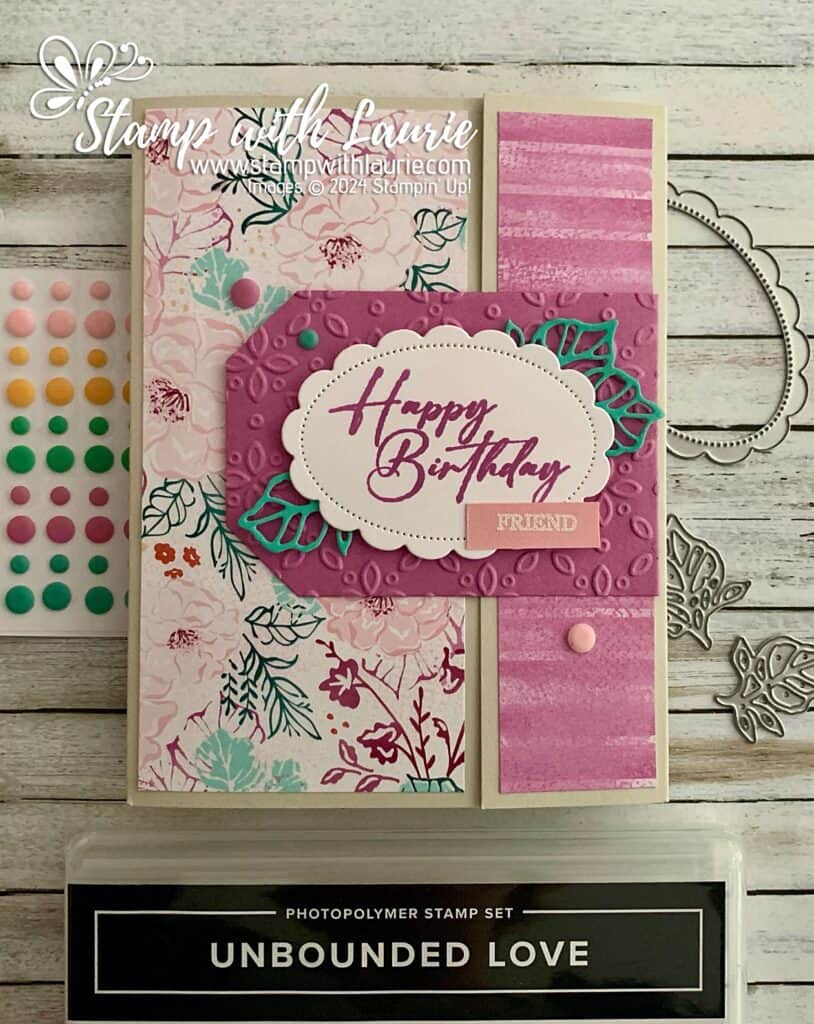
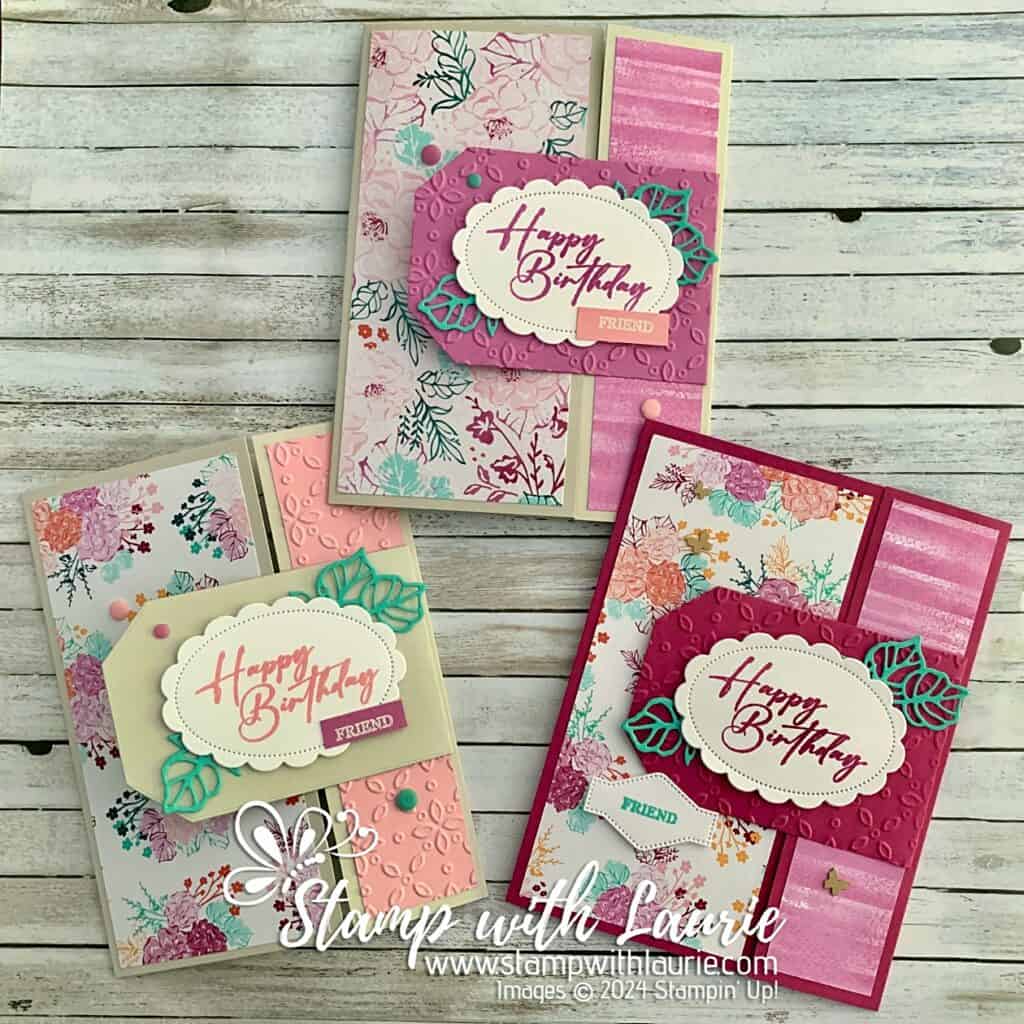
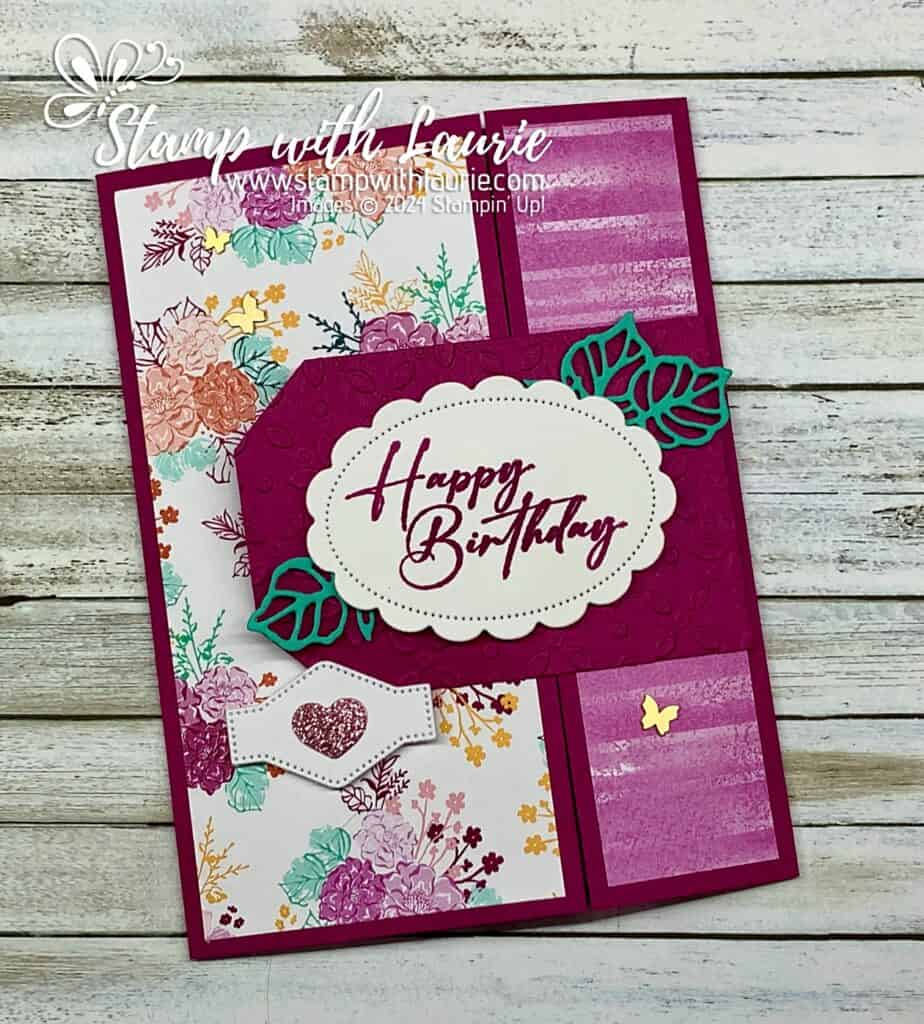
Hello Crafty Friends! Laurie here again! I am sharing My Friendly Birthday Card using the Unbounded Love Bundle which includes the Unbounded Love Stamp Set and the Unbounded Love Dies by Stampin’ Up! I had a lot of fun playing with this bundle that I made 3 similar cards with slight variations. One was for a swap and the others were sent to a friend and my mom for their birthdays.
The Three Different Cards
The Details of My Friendly Birthday Card
For my card, I thought I would create a fun gate fold card which incorporated a tab with the sentiment that wrapped around from one side.
So, I used the third largest Countryside Corners Die to die cut a piece of Petunia Pop which I embossed with the Eyelet 3D Embossing Folder. I though this embossing folder went well with the pretty colours and the carefree summeriness of my card. Once it was embossed, I used my Paper Trimmer to score the right side of the embossed piece to make it easy to fold over. I tucked this piece under the DSP to hide the edge.
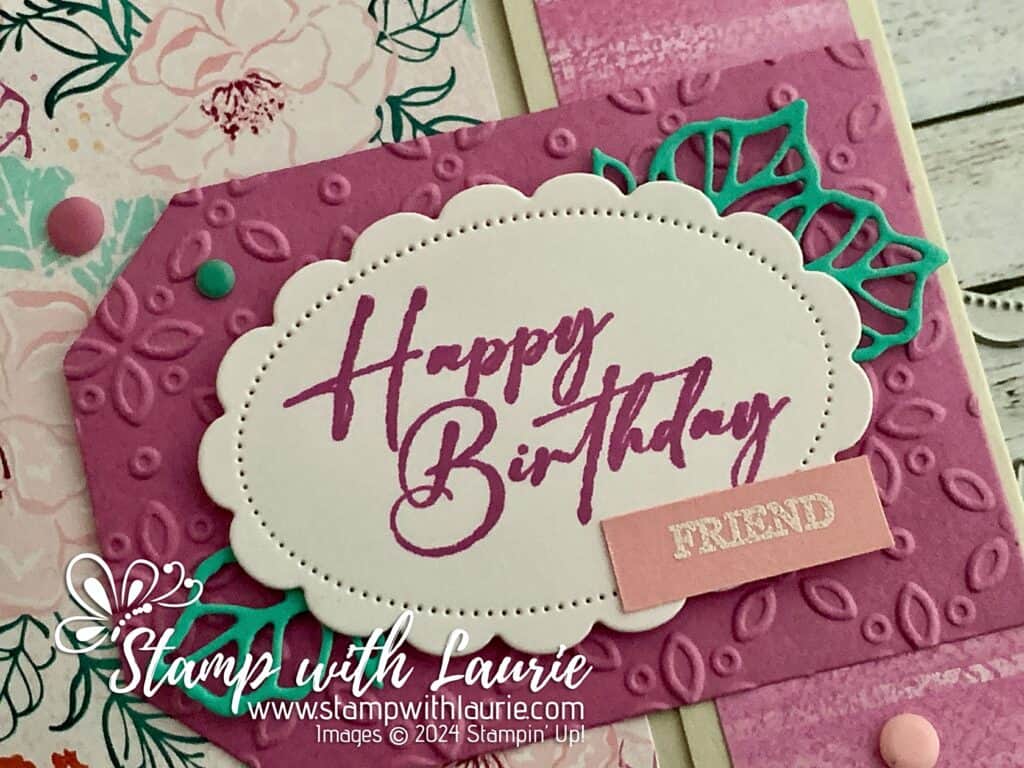
The sentiment was stamped in Petunia Pop and die cut out with the pretty stitched oval. A couple of leaves were layered underneath making the sentiment look like a flower. Next, I added the white embossed “Friend” on a scrap of Pretty in Pink card stock to my sentiment cluster, but you could leave it off to make it more universal.
Birthday Card without Friend Sentiment
The finishing touch was a scattering of 2024–2026 In Color Resin Dots to match my colour scheme.
Supplies:
Stamps/Bundles/Dies: Unbounded Love Bundle (163384), Countryside Corners Dies (161471)
Inks: Petunia Pop Classic Stampin’ Pad (163811), VersaMark Ink (102283)
Paper: Basic Beige (164511), Petunia Pop (163801), Basic White (159276), Shy Shamrock (163795), Pretty in Pink (163793), Unbounded Beauty Designer Series Paper (163372)
Accessories Eyelet 3D Embossing Folder (163414), 2024–2026 In Color Resin Dots (163389), Basics Embossing Powder (165679), Heat Tool (129053), Embossing Additions Tool Kit (159971), Bone Folder (102300), Stampin’ Dimensionals (104430), Stampin’ Seal (152813), Mini Glue Dots (103683), Paper Trimmer (152392), Paper Snips (103579), Multipurpose Liquid Glue (110755)
Close Up of Sentiment
Measurements:
Basic Beige:
5 ½” x 8 ½” scored at 2 ½” and 6 ¾”
Petunia Pop:
2 ½” x 4 ¼”
Basic White
2 ¾” x 2”
Shy Shamrock:
Scrap
Pretty in Pink:
Scrap
Unbounded Beauty Designer Series Paper (2 pieces):
1 ¼” x 4”
2 ½” x 4”
Another Card with Variations
More Information on My Friendly Birthday Card
For more of my Stampin’ Up! cards, please click here.
You will find the items listed above in my online store.
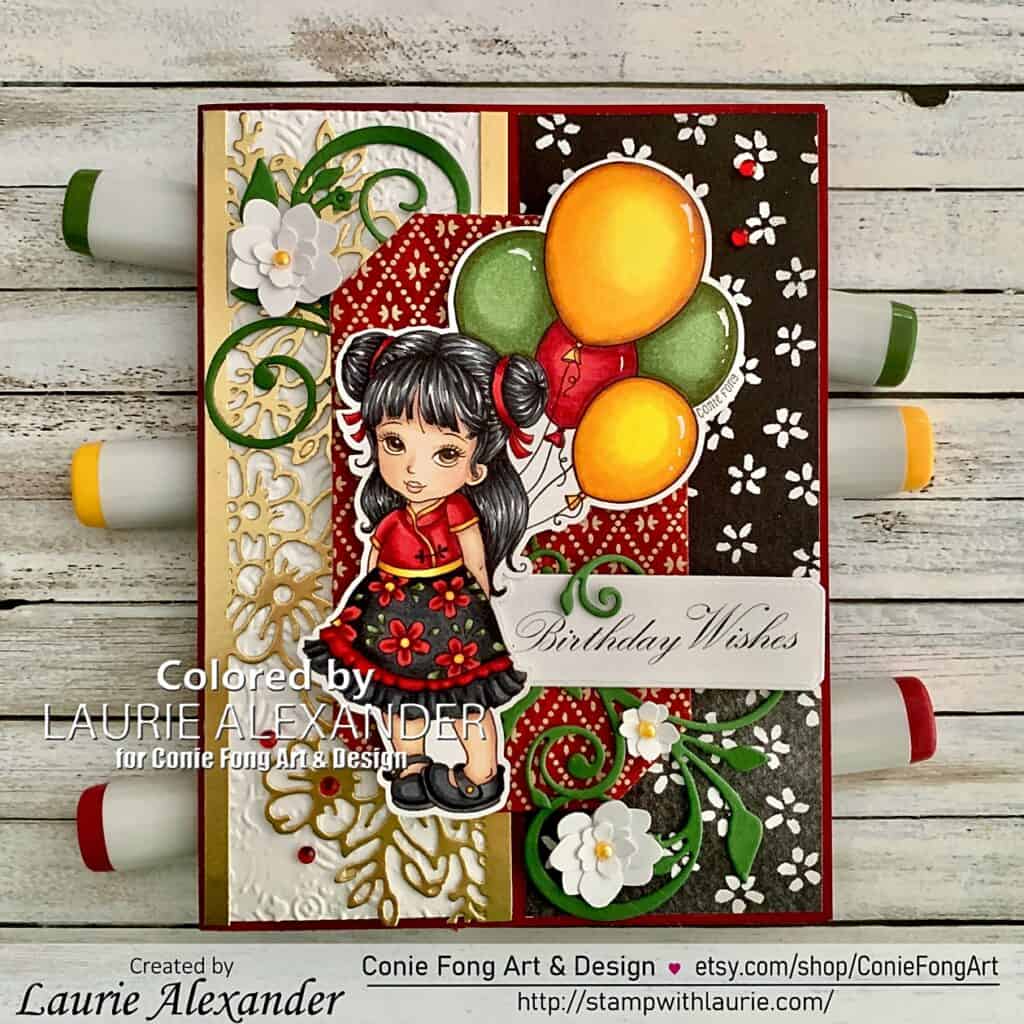
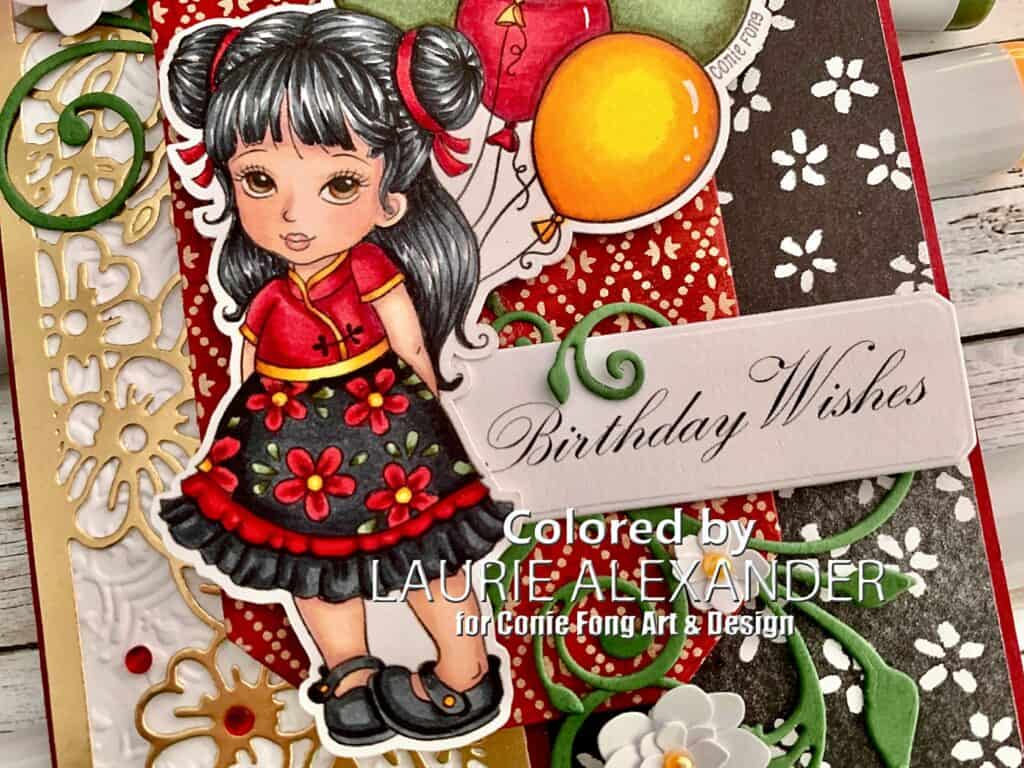
Hello Crafty Friends! It’s Laurie here! I am sharing my Birthday Blossom Wishes Card as my Design Team Inspiration Card for Conie Fong Art & Design using the beautiful Little Blossom. She is perfect for a birthday card for a special someone!
The purchase includes 3 Images:
1 Image: Little Blossom Holding Balloons
2 Image: Little Blossom
3 Image: Little Blossom without background
The Details of My Birthday Blossom Wishes Card
I was given as a gift this beautiful handmade paper in rich reds and golds and knew I wanted to use it as a backdrop for Little Blossom on my card. So, I coloured her with my Copic markers in red and blacks with golds for the trim. I added green to the leaves on her dress and some of the balloons to break up the colours.
For my card, I had a gorgeous bloom border die from Paper Rose that looked like the flowers on her dress. So, I die cut Gold Foil Paper to match the golden trim on her dress. To add interest behind the bloom die, I embossed a piece of Basic White card stock with the Distressed Tile Embossing Folder. This gave it a slight texture without interfering with the beautiful golden flowers.
Next, I added a piece of floral black and white DSP to balance out the other side. Again, I thought the flowers looked similar to the flowers on her dress.
Now for my focal point! I used the beautiful handmade paper behind her and added some greenery to tie in the green balloons. The finishing touch was to add a few white blooms to brighten up my card. For the pearls in the centres, I coloured them with my Y38 Copic marker.
To add a sparkle, I added a scattering of Red Rhinestone and Clear Wink of Stella on her hair ties, the flowers and gold trim of her dress.
Little Blossom, Conie Fong Art & Design Paper Basics – Stamper’s Select White Cardstock, Papertrey Ink Lost & Found, Union Square 6” x 6” Paper Pad, My Mind’s Eye Petal Passion Designer Series Paper, Stampin’ Up! Gold Foil Sheets, Stampin’ Up! Wedding Blooms Border Die, Paper Rose Small Elegant Flourish Die, Paper Rose Countryside Corners Dies, Stampin’ Up! Distressed Tile 3D Embossing Folder, Stampin’ Up! Hydrangea Punch, Martha Stewart Iridescent Pearl Basic Jewels, Stampin’ Up! Red Rhinestone Basic Jewels, Stampin’ Up! Clear Wink of Stella, Stampin’ Up!
Cherry Cobbler, Garden Green, and Basic White Card Stock, Stampin’ Up!
Finished card size: 5 ½” x 4 ¼”
————————–
To view my other Conie Fong Art & Design projects, please click here.
Hope you like my Design Team Inspiration Card using Little Blossom for Conie Fong Art & Design!
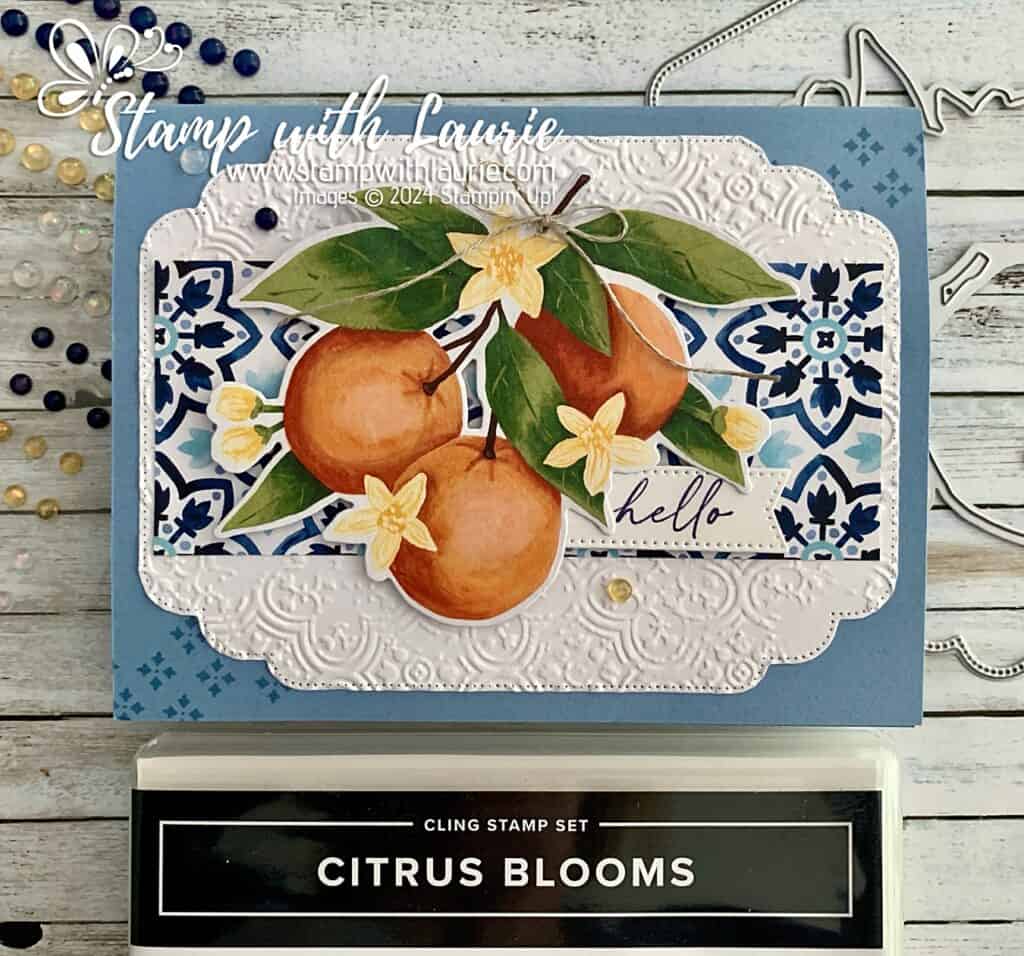
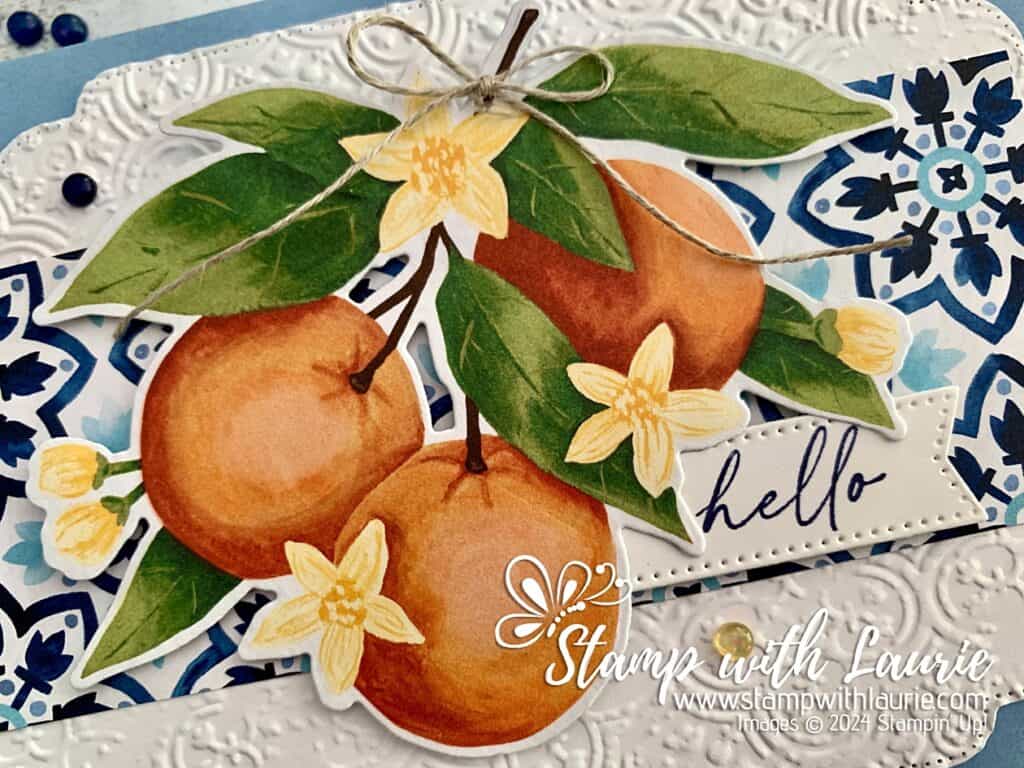
Hello Crafty Friends! Laurie here again! I am sharing My Mediterranean Hello Card using the Citrus Blooms Bundle which includes the Citrus Blooms Stamp Set and the matching Citrus Blooms Dies by Stampin’ Up! I was keen to use this Bundle. So, I created this card was for a swap that I participated in on the weekend.
The Details of My Mediterranean Hello Card
For my card, I loved the tile look of the Mediterranean Blooms Designer Series Paper and thought it would be a striking background for the die cut oranges from the DSP!
So, I decided to use the largest die from the Citrus Blooms Dies to create a base for my focal point. For this Basic White piece, I used the Distressed Tile 3D Embossing Folder to add some texture and break up the white. This embossing folder went so well with my “tile” idea!
To add even more interested, I stamped the tilework image in Boho Blue in opposite corners on the Boho Blue card base.
The finishing touches were a linen thread bow on the oranges and a scattering of Opal Rounds.
Close Up of Focal Point
Supplies:
Stamps/Bundles/Dies: Citrus Blooms Bundle (163295), Stylish Shapes Dies (159183)
Inks: Boho Blue Classic Stampin’ Pad (161650), Night of Navy Classic Stampin’ Pad (147110)
Paper: Boho Blue (161724), Basic White (159276), Mediterranean Blooms Designer Series Paper (163284)
Accessories: Distressed Tile 3D Embossing Folder (162189), Opal Rounds Assortment (163298), Linen Thread (104199), Bone Folder (102300), Stampin’ Dimensionals (104430), Mini Stampin’ Dimensionals (144108), Stampin’ Seal (152813), Mini Glue Dots (103683)
Measurements:
Boho Blue:
8 ½” x 5 ½” scored at 4 ¼”
Basic White (2 pieces):
5 ¼” x 4”
Scrap for Sentiment
Mediterranean Blooms Designer Series Paper (2 pieces):
2” x 4-7/8”
Die Cut Oranges
More Information on My Mediterranean Hello Card
For more of my Stampin’ Up! cards, please click here.
You will find the items listed above in my online store.