Halloween Is Here Card 

Halloween Is Here Card -Halloween Card with a Witch with a broomstick in front of a haunted house
Halloween Is Here Card

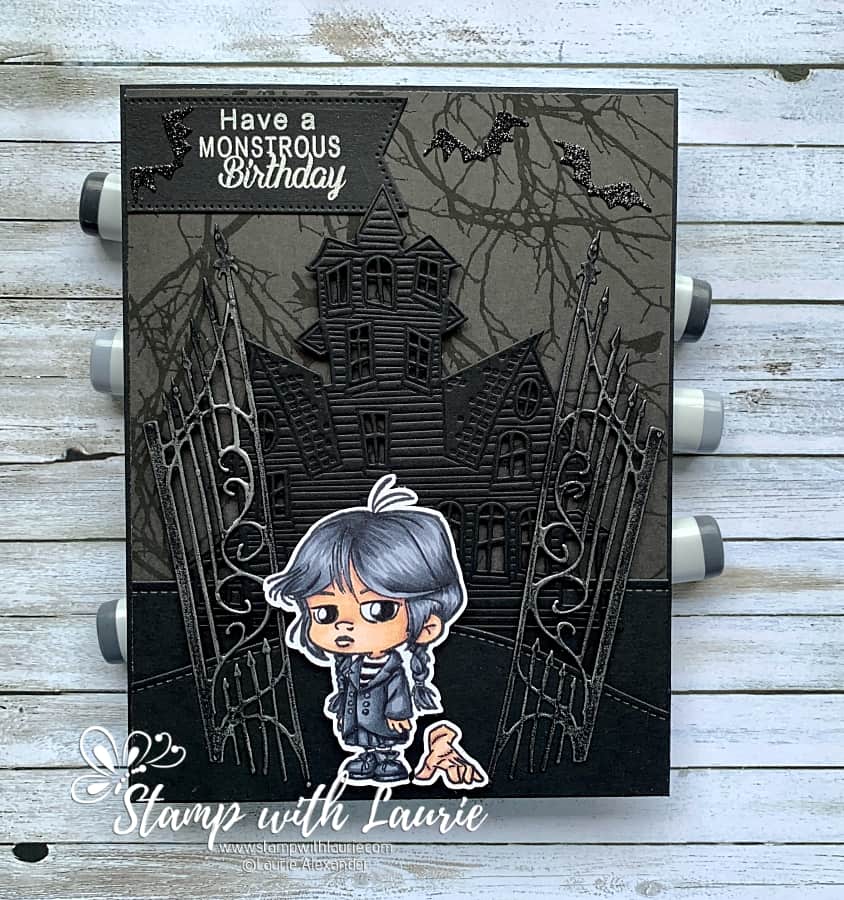
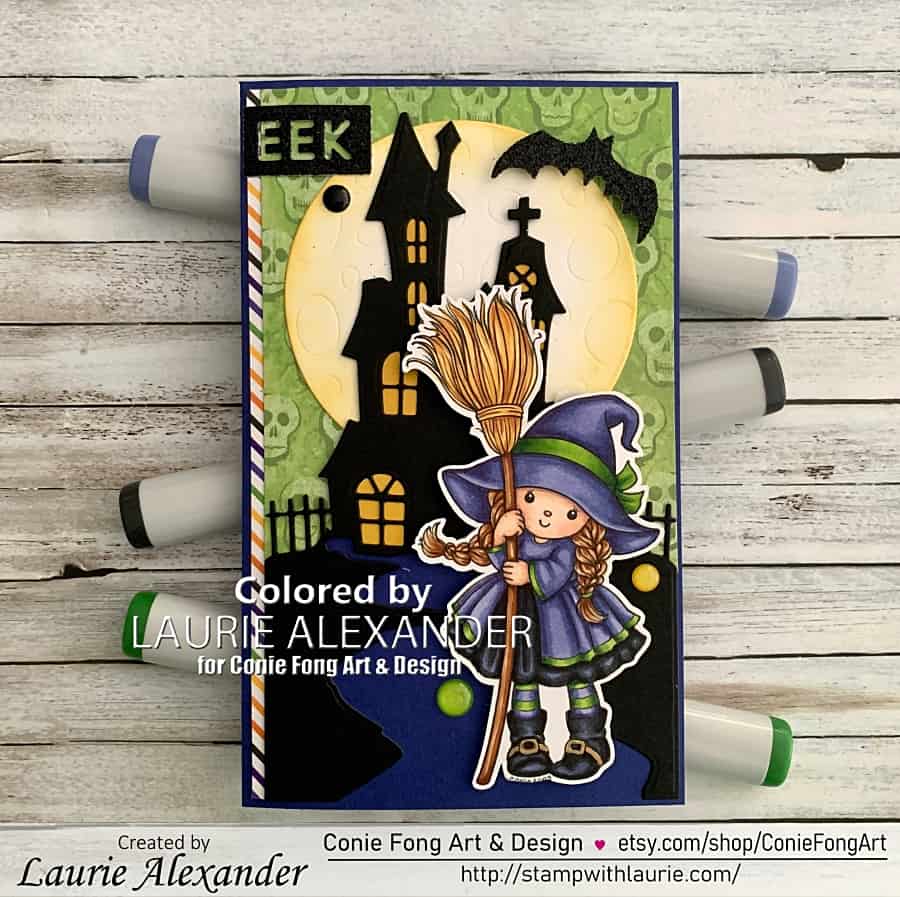
Hello Crafty Friends! It’s Laurie here! I am sharing my Halloween Is Here Card using the new release Broomstick Emily Witch by Conie Fong Art & Design as my Design Team Inspiration Card. This purchase includes 4 stamps:

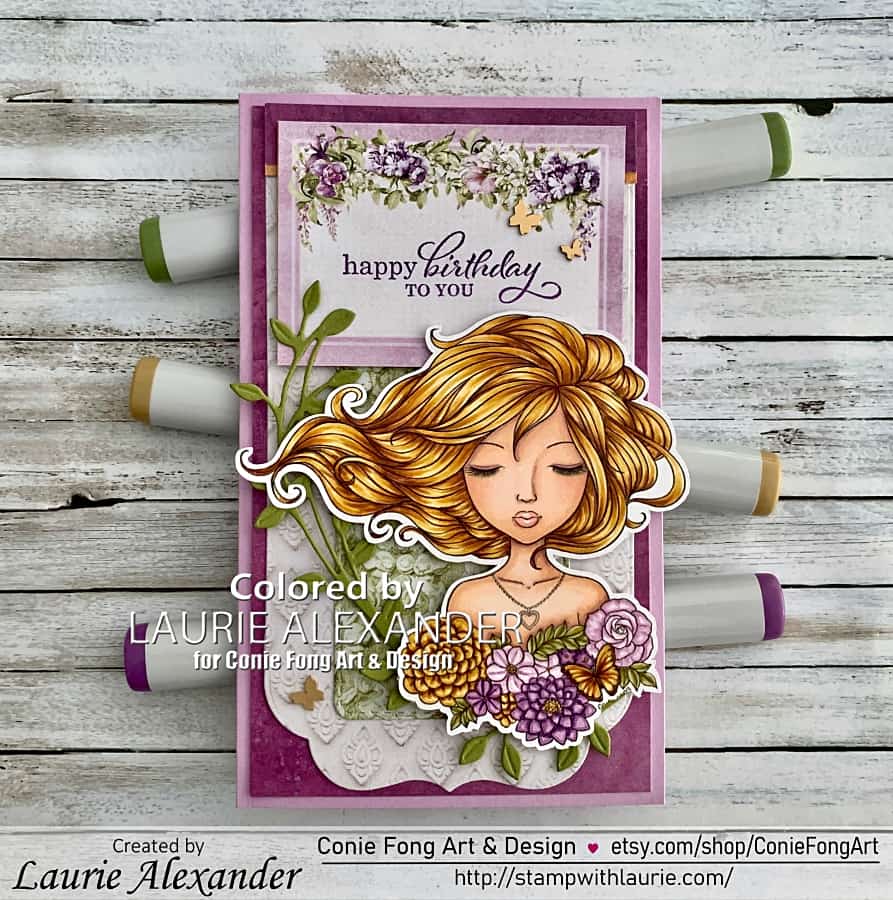
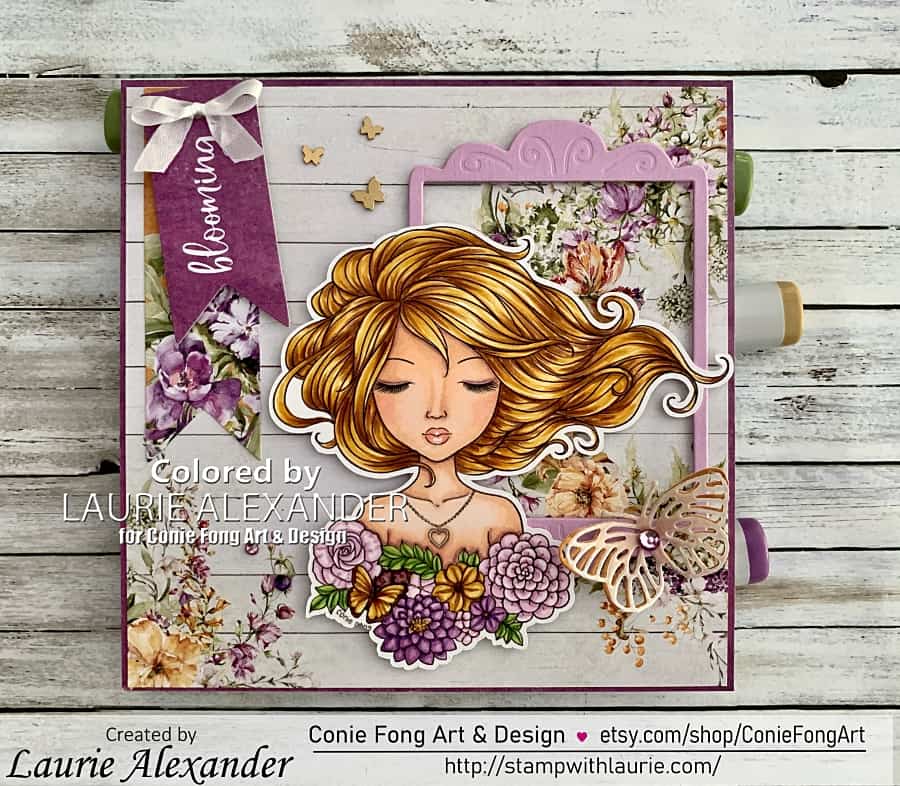
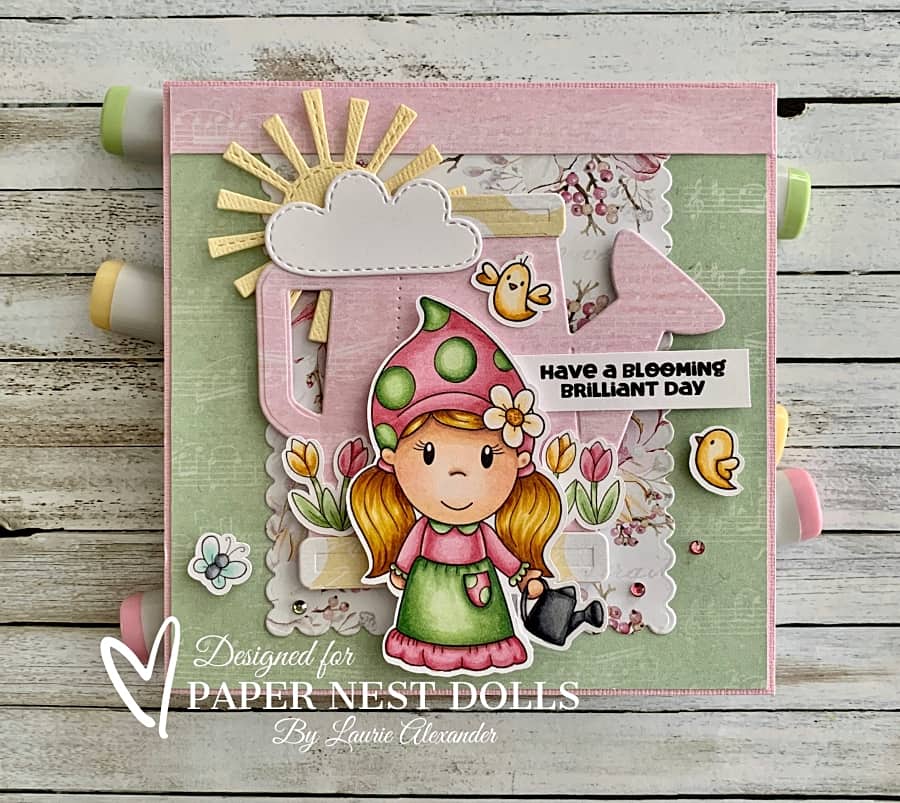
The Details of My Halloween Is Here Card

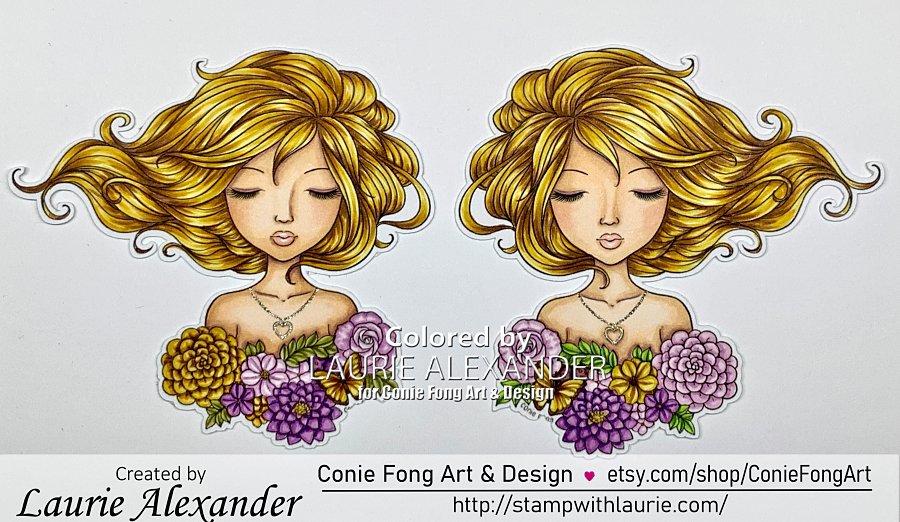
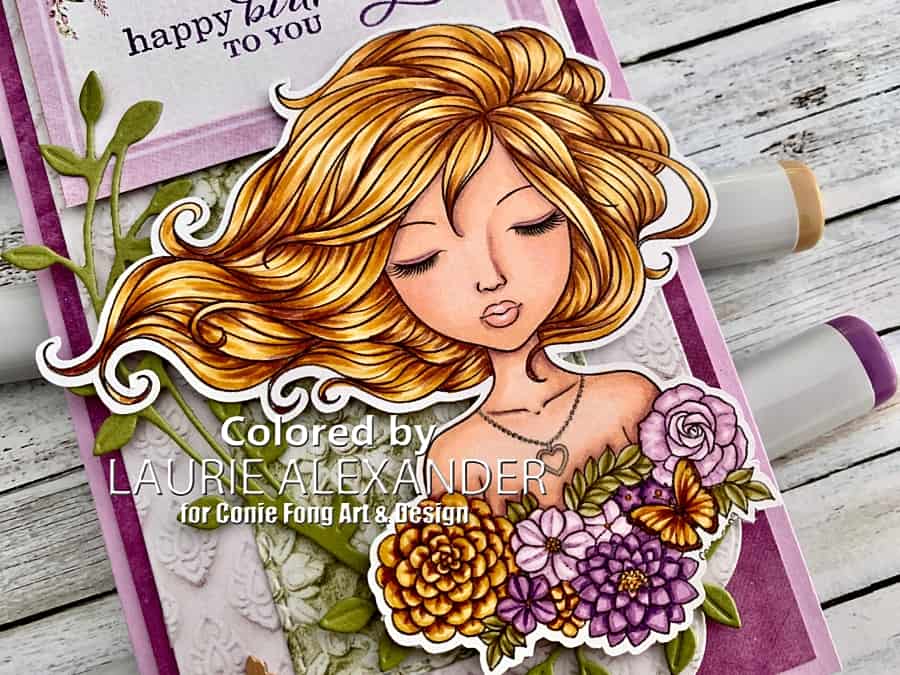
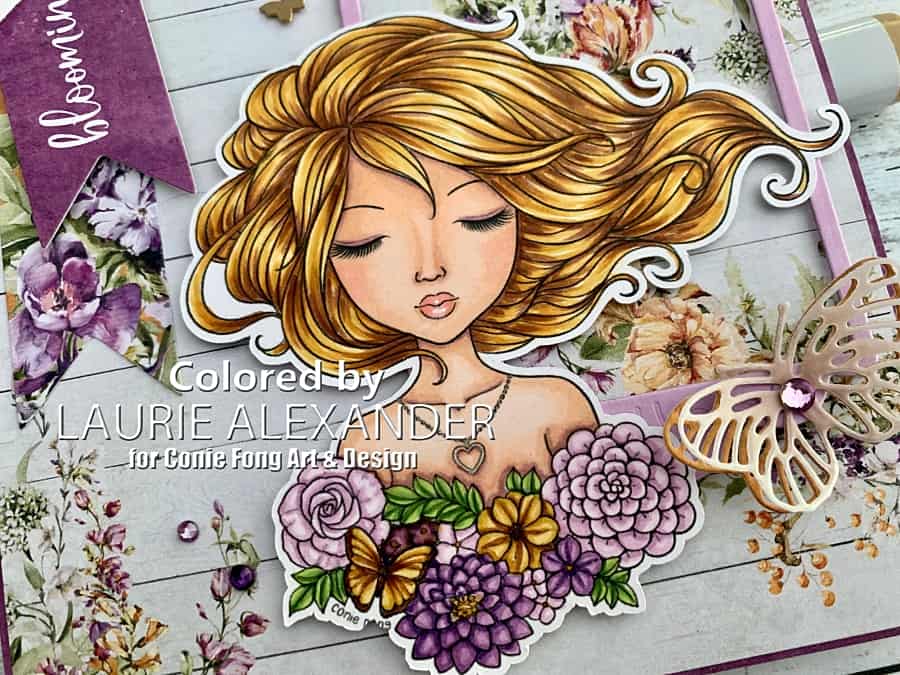
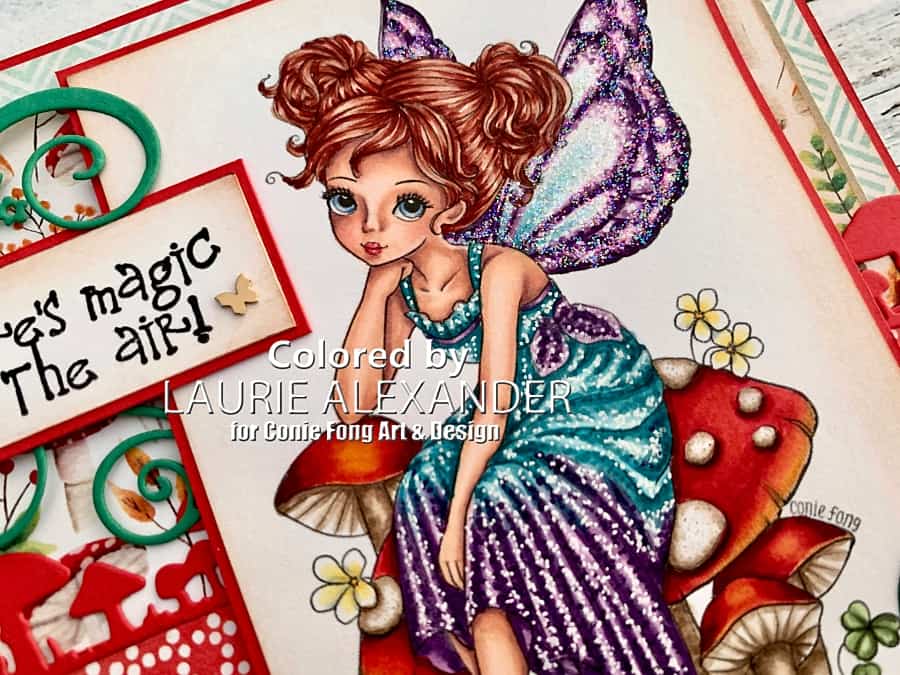
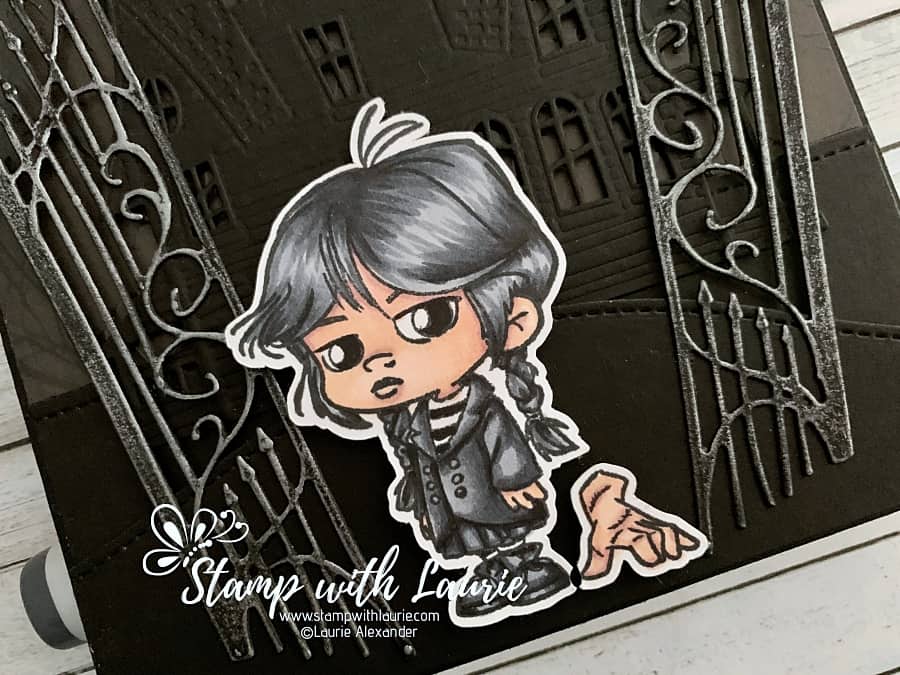
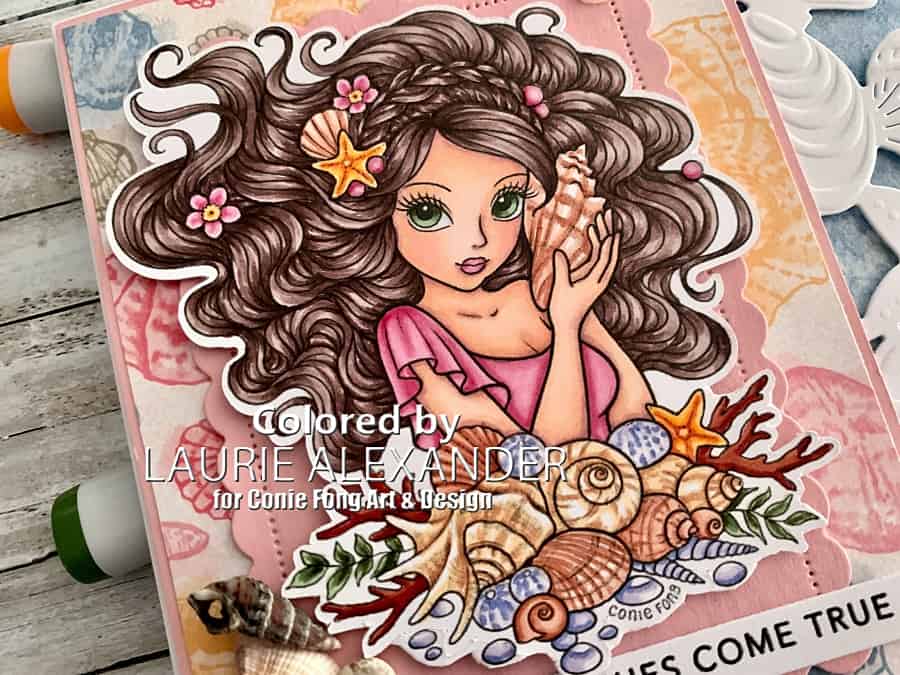
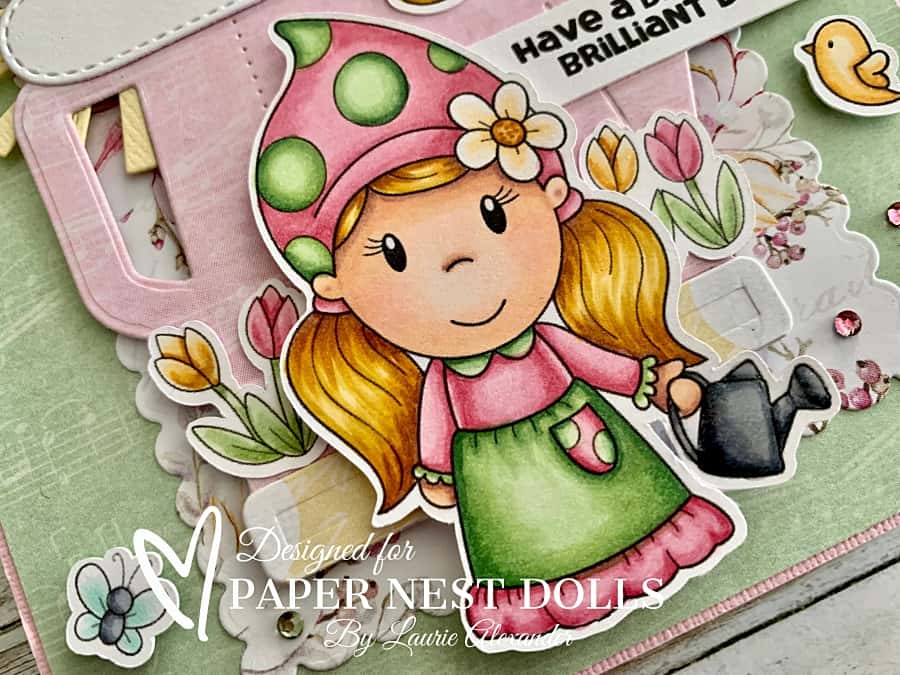
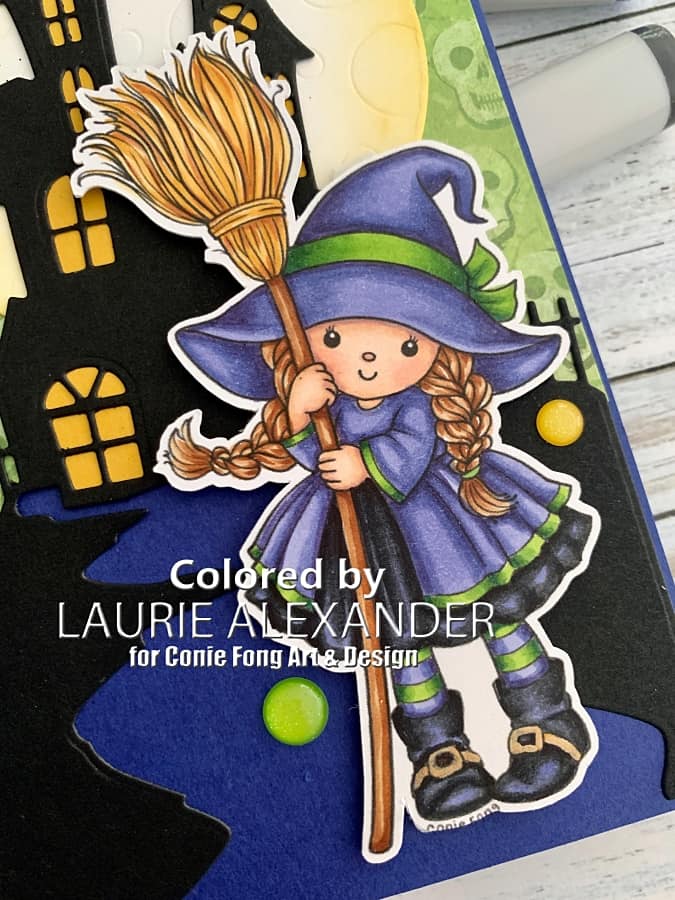
I had so much fun colouring Broomstick Emily Witch with my Copic Markers in Halloween colours! Once she was coloured, I added Gold Gelly Roll to her boot buckles and Clear Wink of Stella to all the green trim pieces on her hat and top.

Next, I decided to create a mini slimline card since I wanted to use my new Haunted House Coverplate by Photo Play and thought it would be a perfect backdrop for Broomstick Emily Witch. I added some Crushed Curry behind the windows to make them glow eerily.

I decided that the haunted house needed a big full moon. So, I die cut the moon die and brushed Fossilized Amber Distress Oxide Ink along the edges to give it dimension. Of course, if you have a haunted house, you need a sparkly bat flying around.

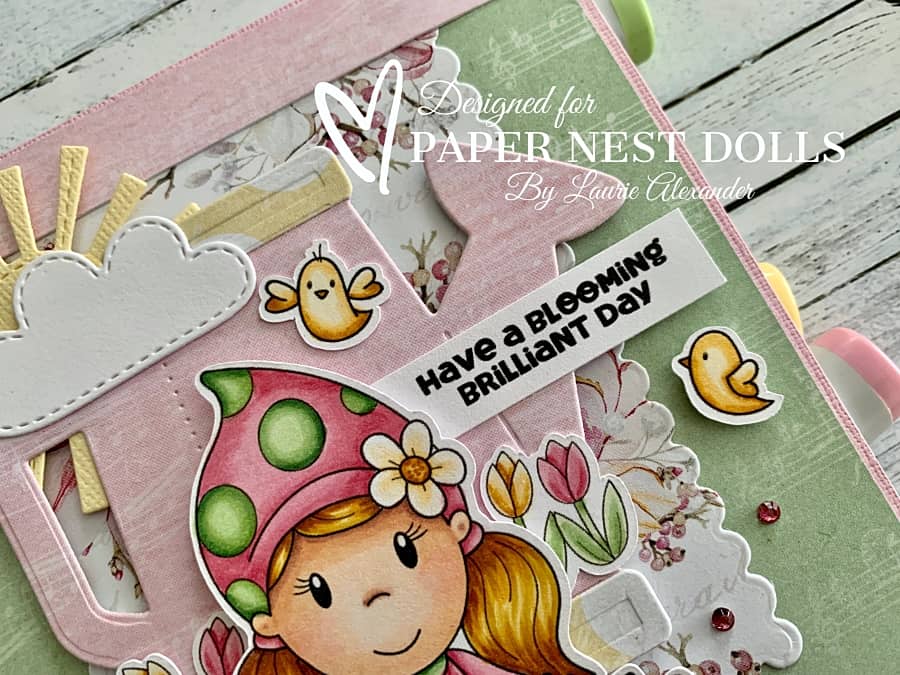
For the sky, I went with some spooky green skulls paper to match my colouring. The other piece of DSP I used was a border along the left side to balance out Emily and to add some unexpected colour. This border was a perfect anchor for my black sparkly “EEK” sentiment.

Finally, the finishing touch was a scattering of sprinkles that matched my colour scheme.

————————–

Copic Markers:

Skin: E000/E00/E21/E11/E04/R20
Hair: E37/E35/E34/E31
Greens: G29/YG67/YG17/YG03
Blues: BV08/BV04/BV02
Blacks 100/N10/N08/N06
Broom: E15/YR23/YR21/Y21/E37/E35/E31

Close Up of Witch
Close Up of Broomstick Emily Witch

————————–

Card Recipe for My Halloween Is Here Card:

Broomstick Emily Witch, Conie Fong Art & Design
Paper Basics – Stamper’s Select White Cardstock, Papertrey Ink
Kelly Panacci Halloween Designer Mat Pad, K & Company
Ghouls & Goodies 6” x 6” Paper Pad, Doodlebug Design Inc.
Black Glimmer Paper, Stampin’ Up!
Haunted House Coverplate, Photo Play
Full Moon Dies, Lawn Fawn
Reverse Cut Halloween Words, Frantic Stamper Inc.
Bat Punch, Stampin’ Up!
Fossilized Amber Distress Oxide Ink, Ranger
Blending Brush, Stampin’ Up!
Bright Glitter Assortment Sprinkles, Doodlebug Design Inc.,
Black & White Assortment Sprinkles, Doodlebug Design Inc.,
Gold Gelly Roll Pen, Sakura
Clear Wink of Stella, Stampin’ Up!

Starry Sky, Basic Black, Basic White and Crushed Curry Card Stock, Stampin’ Up!

Finished card size: 3 ¾” x 6 ¼”

————————–

To view my other Conie Fong Art & Design projects, please click here.

Hope you like my Design Team Inspiration Card using Broomstick Emily Witch for Conie Fong Art & Design!

Thank you for stopping by!

Hugs,
Laurie

My Serene Birthday Card

My Serene Birthday Card - A birthday card with a girl holding flowers
My Serene Birthday Card

Hello Crafty Friends! It’s Laurie here! I am sharing my second card using Serenity by Conie Fong Art & Design called My Serene Birthday Card. The Design Team members are celebrating Girls/Ladies this weekend with all things feminine! So, I picked this beautiful image to celebrate, and I coloured her twice! I will post my other card at the end.

The Details of My Card

For My Serene Birthday Card, I decided to create a mini slimline card to show that you can create different sized cards with the same image. I made my card size a little larger than a normal mini slimline to fit all my elements, but it can still fit in a No. 10 envelope.

I used the Secret Garden paper again for my colour choices in her colouring with a slight variation on her flowers from my first card. Clear Star Gelly Roll Pen was used for her necklace and Wink of Stella for the butterfly’s wings to add some shimmer.

Two different coloured versions of the lady
Serenity

Next, I went with the Photo Play dies for my background. One of the dies is shaped like a tag, but I wanted to use it for the green piece behind her. So, I snipped off the tag part and hid that part beneath the sentiment piece. The two top horizontal banners were remnants from my first card, and I didn’t want them to go to waste. Plus, they gave a finished edge to the top while tying in the colour scheme.

For the next step, I stamped the sentiment in Gorgeous Grape onto a tag cut out from the P13 paper pad.

I thought the leafy vine going from my girl to the sentiment tied everything together so nicely while adding interest.

Finally, I added a scattering of brass butterflies for embellishments.

————————–

Copic Markers:

Skin: E000/E00/E21/E11/E04/R20
Hair: E25/YR24/Y26/Y21
Eyeshadow: V12
Lips: R21/R20/White Gelly Roll Pen
Greens: YG97/YG95/YG93
Purples: V17/V15/V12
Light Purples: V12/V01/V0000
Yellows/Butterfly: E25/YR24/Y26/Y21/Clear Wink of Stella

Close Up of lady holding flowers
Close Up of Serenity

————————–

Card Recipe for My Serene Birthday Card:

Serenity, Conie Fong Art & Design
Paper Basics – Stamper’s Select White Cardstock, Papertrey Ink
Secret Garden 6” x 6” Paper Pad, P13
Bracket/Speech Bubble Dies, Photo Play
Dainty Delight Dies, Stampin’ Up!
Gorgeous Grape Ink Pad, Stampin’ Up!
Best Year Stamp Set, Stampin’ Up!
Brushed Brass Butterflies, Stampin’ Up!
White Gelly Roll Pen, Sakura
Clear Star Gelly Roll Pen, Sakura
Clear Wink of Stella, Stampin’ Up!

Fresh Freesia Card Stock, Stampin’ Up!

Finished card size: 3 ¾” x 6 ¼”

————————–

To view my other Conie Fong Art & Design projects, please click here.

Here is my other card using this stamp. Please click here or on the photo for more information on my card.

A card with a Lady holding flowers
My Serenity Blooms Card

Hope you like my Design Team Inspiration Card using Serenity for Conie Fong Art & Design!

Thank you for stopping by!

Hugs,
Laurie

My Serenity Blooms Card 

My Serenity Blooms Card - A card with a Lady holding flowers
My Serenity Blooms Card

Hello Crafty Friends! It’s Laurie here! I am sharing My Serenity Blooms Card as my Design Team Inspiration Card for Conie Fong Art & Design using Serenity. The Design Team are celebrating Girls/Ladies this weekend with all things feminine! So, I picked this beautiful image to celebrate!

The Details of My Card

When you buy this digital stamp, you will receive two stamps with the girl’s hair flowing left or right. I couldn’t resist colouring them both with the same colour scheme, but with a variation on their flowers. So, I made one card for today and the other card will follow later.

Two different coloured versions of the lady
Two Versions of Serenity

For My Serenity Blooms Card, I decided to use the Secret Garden paper and decorative tags by P13 for my colour choices. I just love the gorgeous colours of them! I picked the paper with a wreath off to the side for my background and matted it with a matching purple paper from the P13 paper pad.

Next, I decided to add a die cut frame behind her to create some visual interest, but I thought it would be fun to have her off-centred from it. As a result, the wreath was flowing through my frame and they created a nice backdrop for my colouring.

The Decorative Tags are a perfect match to the paper, and I decided to use two of them to tie in my colour scheme. I added a bow to the top to cover the hole and finish the tags off.

For the next step, the Clear Star Gelly Roll Pen was used for her necklace and Wink of Stella for the butterfly’s wings to add some shimmer.

Finally, for embellishments, I added a scattering of brass butterflies and rhinestones coloured with my Copic markers to match my colour scheme.

————————–

Copic Markers:

Skin: E000/E00/E21/E11/E04/R20
Hair: E25/YR24/Y26/Y21
Eyeshadow: V12
Lips: R21/R20/White Gelly Roll Pen
Greens: YG67/YG63/YG03
Purples: V17/V15/V12
Light Purples: V12/V01/V0000
Butterfly: E25/YR24/Y26/Y21/Clear Wink of Stella

Close Up of Lady
Close Up of Serenity

————————–

Card Recipe for My Serenity Blooms Card:

Serenity, Conie Fong Art & Design
Paper Basics – Stamper’s Select White Cardstock, Papertrey Ink
Secret Garden 6” x 6” Paper Pad, P13
Secret Garden Decorative Tags, P13
Vellum Cardstock, Stampin’ Up!
Fabolous Frames Dies, Stampin’ Up!
Brilliant Wings Dies, Stampin’ Up!
White Crinkle Seam Binding Ribbon, Stampin’ Up!
Brushed Brass Butterflies, Stampin’ Up!
Basic Rhinestone Jewels, Stampin’ Up
White Gelly Roll Pen, Sakura
Clear Star Gelly Roll Pen, Sakura
Clear Wink of Stella, Stampin’ Up!

Fresh Freesia Card Stock, Stampin’ Up!

Finished card size: 5 ½” x 5 ½”

————————–

To view my other Conie Fong Art & Design projects, please click here.

Hope you like my Design Team Inspiration Card using Serenity for Conie Fong Art & Design!

Thank you for stopping by!

Hugs,
Laurie

My Dino Birthday Party Cards

Two birthday cards. One with a boy and a Dino and the other a girl and Dino.
My Dino Birthday Party Cards

Hello Crafty Friends! It’s Laurie here! Paper Nest Dolls is celebrating their 10th birthday this year! So, I am sharing two birthday cards to celebrate! My Dino Birthday Party Cards are my Design Team Inspiration Cards using Dino Party Amara and Dino Party Owen by Paper Nest Dolls. Don’t you think these two stamps go so perfectly together!

The Details of My Cards

I had debated about placing them on the same card, but in the end decided to go with two different cards with the same party theme using boy and girl matching papers. So, the Doodlebug papers were perfect with those gorgeous bright colours! I used the same coordinating papers from each paper pack such as the cupcakes, the Happy Birthday, the sweets, and confetti.

Once I decided on the papers, I coloured Owen and Amara in bright colours with my Copic markers to match it.

For my Amara card, I decided to create a regular A2 card with lots of layers in greens and pinks to match my colouring. I included some fun banners and a balloon since it’s a birthday card.

The girl with Dino birthday card
Amara Dino Birthday Card

For my Owen card, I decided to create a different shaped card. Again, I used lots of layers, this time in blues, but with a mini slimline card layout. I used the same banners and balloon to match Amara’s card, but with different dies for the background.

Boy with Dino birthday card
Owen Dino Birthday Card

The sentiments for both cards came from the Simple Strips – Birthday by Taylored Expressions. I love that you can stamp 18 sentiments at once and die cut them all out at the same time!

Clear Wink of Stella was added to the party hats and the pink ribbon on Amara’s dino. For Owen’s cupcake, I added white gelly pen sprinkles to his cupcake. The finishing touch was adding sequins to both the cards since sequins say birthday party to me! Lol!

————————–

Copic Markers:

Dino Party Amara
Skin: E000/E00/E21/E11/E04/R20
Hair: E18/E15/YR23/Y21
Pinks: R85/R83/R81
Greens: YG67/YG63/YG03
Dino: BG57/BG23/BG11/R85/R83/R81

Close Up of girl and Dino
Close Up of Amara and Dino

Dino Party Owen
Skin: E000/E00/E21/E11/E04
Hair: E57/E43/E53
Greens: YG67/YG63/YG03
Blues: B39/B28/B24/B32
Shoes: E37/E35/E31
Dino: YR09/YR07/YR15/E15/E37/E35/E31

Close Up of boy and Dino
Close Up of Owen and Dino

————————–

Card Recipe for My Dino Birthday Party Cards:

Dino Party Amara and Dino Party Owen, Paper Nest Dolls
Paper Basics – Stamper’s Select White Cardstock, Papertrey Ink
Party Time 6” x 6” Paper Pad, Doodlebug Design Inc.
Hey Cupcake 6” x 6” Paper Pad, Doodlebug Design Inc.
Butterfly Kisses 6” x 6” Designer Series Paper, Stampin’ Up!
Simple Strips – Birthday, Taylored Expressions
Simple Strips Die – Birthday, Taylored Expressions
VersaFine Ink Pad Onyx Black, Tsukineko
Bracket/Speech Bubble Dies, PhotoPlay
Balloon Pop-Up Thinlit Dies, Stampin’ Up!
Framed Florets Dies, Stampin’ Up!
Flag Banner Dies, from my Stash
Pastel Adhesive-Backed Sequins, Stampin’ Up!
Clear Wink of Stella, Stampin’ Up!
White Gelly Roll Pen, Sakura
Starry Night and Thick Basic White Card Stock, Stampin’ Up!

Finished cards sizes: 5 ½” x 4 ¼” and 3 ½” x 6”

————————–

To view my other Paper Nest Dolls cards, please click here.

Hope you like my Design Team cards using
Dino Party Amara and Dino Party Owen by Paper Nest Dolls!

Happy 10th Birthday Paper Nest Dolls!

Thank you for stopping by!

Hugs,
Laurie

Magic in the Air Card 

A Card with a Fairy Sitting on a mushroom
Magic in the Air Card

Hello Crafty Friends! It’s Laurie here! I am sharing my Magic in the Air Card as my Design Team Inspiration Card for Conie Fong Art & Design using Sitting Pretty on Mushroom. I coloured this beautiful image twice this month using the Kit and Clowder Whimsical Wonders Class as inspiration. This is my second card, but I will include a link to the other card at the end of this post.

The Details of My Card

For my card, I used the alternative colour choice from the Kit and Clowder class and gave her a sparkly dress using a White Gelly Roll Pen and lots of dots!

Two Fairies Coloured
My Colouring of Sitting Pretty on Mushroom

Once she was coloured, I pulled out some DSP with mushrooms on it to match her mushrooms. A mushroom border die in Poppy Parade also added to this theme.

Some greenery flourishes were added behind the sentiment and in the opposite corner for a splash of colour. I love how the swirls come from below to overlap the image adding depth and interest.

The sentiment was from Rosabelle by Kraftin’ Kimmie Stamps. Perfect sentiment for a fairy, don’t you think?

I brushes some Vintage Photo ink to the edges of the image, sentiment and DSP to give it an earthy feel to match the distressing in places on the Pool Party piece of DSP.

I added for embellishments brass butterflies beside the sentiment and fairy with red rhinestones in the other corner.

For shimmer, I added stickles to her wings! Every fairy should have sparkly wings!

Close Up of Fairy
Close Up of Fairy

————————–

Card Recipe for Magic in the Air Card:

Sitting Pretty on Mushroom, Conie Fong Art & Design
Paper Basics – Stamper’s Select White Cardstock, Papertrey Ink
Painted Seasons Designer Series Paper, Stampin’ Up!
Rosabelle, Kraftin’ Kimmie Stamps
VersaFine Ink Pad Onyx Black, Tsukineko
Mushroom Border Die, C.C. Designs
Elegant Flourish Small Die, Paper Roses
Brushes Brass Butterflies, Stampin’ Up!
Red Rhinestone Basic Jewels, Stampin’ Up!
Vintage Photo Distress Ink, Ranger
Blending Brushes, Stampin’ Up!
Star Dust Stickles, Ranger

Poppy Parade, Crumb Cake, Call Me Clover Card Stock, Stampin’ Up!

Finished card size: 5 ½” x 5 ½”

————————–

This is the other card that I created using the Sitting Pretty on Mushroom. To view it, please click here or on the photo.

A birthday card with a fairy sitting on mushrooms
My Fairy Wishes Card

To view my other Conie Fong Art & Design projects, please click here.

Hope you like my Design Team Inspiration Card using Sitting Pretty on Mushroom for Conie Fong Art & Design!

Thank you for stopping by!

Hugs,
Laurie

My Fairy Wishes Card

A birthday card with a fairy sitting on mushrooms
My Fairy Wishes Card

Hello Crafty Friends! It’s Laurie here! I am sharing My Fairy Wishes Card as my Design Team Inspiration Card for Conie Fong Art & Design using Sitting Pretty on Mushroom

The Details of My Card

The Conie Fong Art & Design Team are celebrating fairies today. I decided to create a clean and simple card that highlighted my colouring with my Copic markers. I re-watched my Kit & Clowder Whimsical Wonders Class that used this stamp to inspire my colouring with slight variations in colours.

For my card, I used one sheet of the Mintay paper with a beautiful background to keep my card CAS. It even looked like a fairy glen with its butterflies, trees, and hedgehogs! Perfect place for a fairy to live!

The sentiment was from Dandelion Wishes by Conie Fong Art & Design as well. I thought it suited the theme of my card!

The only embellishments that I added were brass butterflies around the sentiment and beside the fairy.

For shimmer, I added stickles to her wings! Every fairy should have sparkly wings! I also added Clear Wink of Stella to the yellow flowers.

Close Up of Fairy Sitting on Mushroom

————————–

Card Recipe for My Fairy Wishes Card:

Sitting Pretty on Mushroom, Conie Fong Art & Design
Dandelion Wishes, Conie Fong Art & Design
Paper Basics – Stamper’s Select White Cardstock, Papertrey Ink
Better Times 6” x 6” Paper Pad, Mintay Papers
Brushed Brass Butterflies, Stampin’ Up!
Stylish Shapes Dies, Stampin’ Up!
Clear Wink of Stella, Stampin’ Up!
Star Dust Stickles, Ranger
.05 Multi Liner, Copic
Polished Pink Card Stock, Stampin’ Up!

Finished card size: 6” x 6”

————————–

Blog Challenges

I am entering this card into the following challenges:
Worldwide Crafters and Colorists Challenge #5 – First Prize Winner
Passion for Markers – Week 692–make it square
Crafting Happiness Challenges: June: 143-Anything Goes
613 Avenue Create: June 2023-Anything Goes – Top Rocker
A Perfect Time To Craft Open Challenge for June, #6-2023
Sweet Stampin’ – Things With Wings
Paper Dragonfly Creative Challenges- Challenge #18 Anything Goes
Morgan’s ArtWorld Challenge #6 Anything Goes – Runner Up

————————–

To view my other Conie Fong Art & Design projects, please click here.

Hope you like my Design Team Inspiration Card using Sitting Pretty on Mushroom for Conie Fong Art & Design!

Thank you for stopping by!

Hugs,
Laurie

My MerMay Card 

A card with three mermaids on it
My MerMay Card

Hello Crafty Friends! It’s Laurie here! I am sharing My MerMay Card using the Mermaid Set by Paper Nest Dolls for my Design Team Inspiration Card. This Set comes with 12 digital stamps, and I use 3 of them on my card.

The Details of My Card

For my card, I decided to create an underwater scene using the Under the Sea Slimline Designer Paper by Whimsy. Once I decided which sheet of paper to use, I coloured my mermaids with my Copic markers in different colours to match my paper,

I die cut the Whimsy Bubbles in a lighter blue designer paper to make them stand out from the background and highlight my mermaids. Then I placed my mermaids so that they each centered on the circles with the one sitting on the rock overlapping the sentiment. The sentiment was sitting on my desk leftover from another mermaid card. Crumb Cake ink was brushed over the sentiment to give it a sandy feel.

Next, I added real shells in the bottom corners on top of some pink and green vellum die cut seaweed. A silver seahorse charm was added to the sentiment using my Flush Wire Cutter to cut off the loops on the charm to make it lie flat. Tip: use Glossy Accents to create a strong adhesive hold for shells and charm.

I added a scattering of clear bubble embellishments to mimic air bubbles in the water and add dimension.

Clear Wink of Stella was added to the mermaids’ tails and starfish to give them a subtle shimmer and Glossy Accents to the pearl and braid tie for the Green Mermaid. 

————————–

Copic Markers:

Mermaid in Pink
Skin: E000/E00/E21/E11/E04/R20
Hair: E25/YR24/Y38/Y35
Outfit: R85/R83/R81
Pearl: R83/R81/0/ Glossy Accents
Pearl Bed: R81/0
Shell: E15/E13/E11
Flower: R85/R83/YR24

Mermaid in pink holding a pearl in a clam shell
Mermaid in Pink

Mermaid in Purple
Skin: E000/E00/E21/E11/E04/R20
Hair: W9/W7/W5/W3
Outfit: V17/V15/V12
Rock: E47/E44/E43/E41
Shell: E15/E13/E11

Mermaid in Purple sitting on a rock hold a shell to her ear
Mermaid in Purple

Mermaid in Green
Skin: E000/E00/E21/E11/E04/R20
Hair: E49/E47/E44/E43/E42
Outfit: YG67/YG63/YG03
Starfish: YR18/YR04/Y38/Y35

Mermaid in Green holding a starfish
Mermaid in Green

————————–

Card Recipe for My MerMay Card:

Mermaid Set, Paper Nest Dolls
Paper Basics – Stamper’s Select White Cardstock, Papertrey Ink
Rosealea Mermaid And Sentiment Bundle, Conie Fong Art & Design
Under the Sea Slimline Designer Paper, Whimsy Stamps
Perennial Essence Vellum Cardstock, Stampin’ Up!
Foil Designer Paper 12” x 12”, Craft, Dollar Store
Build an Ocean Die Set, Whimsy Stamps
Slimline Connected Bubbles Dis, Whimsy Stamps
Spring Blooms Embellishments, The Robin’s Nest
Seahorse Charm, Bead Landing
Shells from Dollar Store 
Crumb Cake Ink Pad, Stampin’ Up!
Blending Brushes, Stampin’ Up!
Clear Wink of Stella, Stampin’ Up!
Glossy Accents, Ranger
Flush Wire Cutter
Cucumber Crush Card Stock, Stampin’ Up!

Finished card size: 8 ¾” x 3 ¾”

————————–

To view my other Paper Nest Dolls cards, please click here.

Hope you like my Design Team card using
Mermaid Set by Paper Nest Dolls!

Thank you for stopping by!

Hugs,
Laurie

Have a Mermazing Day 

A card with a mermaid on it in an underwater scene.
Have a Mermazing Day

Hello Crafty Friends! It’s Laurie here! I am sharing my Have a Mermazing Day as my Design Team Inspiration Card for Conie Fong Art & Design using the beautiful Rosealea Mermaid And Sentiment Bundle.

The Details of My Card

For my card, I knew that I wanted to incorporate what I learn in a December 2020 Kit and Clowder Colouring Class to colour Rosealea. In the class, I learned how to create a rainbow-coloured fin as well as lots of texture on her tail using a stippling technique. I love that you can take what you learn and apply it to other things! I was so pleased with how Rosealea turned out!

Once my image was coloured, I pulled out the perfect piece of Whimsy Slimline paper! The colours in the scene matched my colouring to a T! The Whimsy paper makes it so easy to create a fast scene! The paper was die cut with a scallop boarder to mirror the scallops of her scales on her tail.

The sentiment was from the Bundle and to create interest, I added some real shells on one side and a silver mermaid charm on the other side. I used my Flush Wire Cutter to cut off the loops on the charm to make it lie flat. Tip: use Glossy Accents to create a strong adhesive hold.

I added a scattering of clear bubble embellishments around Rosealea to mimic air bubbles in the water and add dimension.

Clear Wink of Stella was added to her tail to give it a subtle shimmer and Glossy Accents to the pearls in her hair. 

Close of of mermaid
Close up of Rosealea

————————–

Card Recipe for My Have a Mermazing Day Card:

Rosealea Mermaid And Sentiment Bundle, Conie Fong Art & Design
Paper Basics – Stamper’s Select White Cardstock, Papertrey Ink
Under the Sea Slimline Designer Paper, Whimsy Stamps
Perennial Essence Vellum Cardstock, Stampin’ Up!
Slimline Pull Tab Dies, Heffy Doodle
Build an Ocean Die Set, Whimsy Stamps
Spring Blooms Embellishments, The Robin’s Nest
Mermaid Charm, Bead Landing
Shells from Dollar Store
Clear Wink of Stella, Stampin’ Up!
Glossy Accents, Ranger
Flush Wire Cutter
Emerald Envy Card Stock, Stampin’ Up!

Finished card size: 8 ½” x 3 ½”

————————–

Blog Challenges

I am entering this card into the following challenges:
Crafting Happiness Challenges: May: 142 Anything Goes
Your Scrapbook Place: May Challenge – Beccy’s Place
613 Avenue Create: May 2023-Anything Goes – Won Top Rocker
Worldwide Crafters and Colorists Challenge #5

————————–

To view my other Conie Fong Art & Design projects, please click here.

Hope you like my Design Team Inspiration Card using Rosealea Mermaid And Sentiment Bundle for Conie Fong Art & Design!

Thank you for stopping by!

Hugs,
Laurie

A Monstrous Birthday Card 

A birthday card with a girl in front of a haunted house
A Monstrous Birthday Card

Hello Crafty Friends! It’s Laurie here! I am sharing A Monstrous Birthday Card using Wednesday from The BFF Stamp Set by C.C. Designs. Today is my big brother’s birthday and I always send him cards that suit him. He has a twisted sense of humour. So, I knew he would get a kick out of my card!

The Details of My Card

I love the new Wednesday TV series and when I saw these stamps by C.C. Designs, I couldn’t resist getting them to colour! Since Wednesday is always in black, I pulled out my Cool Copic markers to colour her up. To make her eyes pop, I used a matt black gelly roll pen on them. Of course, I had to include Thing as her sidekick.

For my card, I wanted to recreate the scene from the show where she is entering through the gates to the Gates Mansion. So, I pulled out my spookiest dies, papers, and Basic Black card stock.

The Kaisercraft paper had a spooky scene with trees and crows laminated on the black night sky. Why do all horror shows have the characters enter a scary haunted house at night! Lol! Since my card is in blacks, I used the Haunted House die and my embossing mat to get a lot of detail in my house. 

Next, I used several dies to create my hill and ground that the house stood on. For the gates, I die cut them and them rubbed Brushed Iron Metallique Wax to make them stand out from the black background.

I thought the sentiment “Have a monstrous birthday” was perfect for my card! So, I white embossed it and trimmed the sentiment piece to create a flag. I added some die cut black glimmer bats to my scene to add sparkle.

————————–

Copic Markers

Skin: E04/E11/E21/E00/E000
Hair: C9/C7/C4/C3
Outfit: C9/C7/C4
Stripes: C9/C3/C1/0
Shoes: C9/C7/C4

Close Up of girl
Close Up of Wednesday

————————–

Card Recipe for A Monstrous Birthday Card

The BFF, C.C. Designs
Paper Basics – Stamper’s Select White Cardstock, Papertrey Ink
13th Hour 6 ½” Paper Pad, Kaisercraft
Black Glitter Paper, Stampin’ Up!
Halloween Collection – Haunted House, Creative Expressions, Sue Wilson
Big Shot Embossing Mats, Sozzox
Gate Keeper Thinlits Dies, Sizzix, Tim Holtz
Slimline Stitched Hillside Borders, Lawn Fawn
Large Slimline with Slider Dies, Lawn Fawn
Stylish Shapes Dies, Stampin’ Up!
Mini Monsters Stamp Set, Kraftin’ Kimmies Stamps
Versamark Ink Pad, Stampin’ Up!
White Embossing Powder, Stampin’ Up!
Heat Tool, Stampin’ Up!
Brushed Iron Metallique Wax, Art Alchemy
Matt Black Gelly Roll Pen, Sakura
Black Dimensionals, Stampin’ Up!

Finished card size: 5” x 6 ½”

————————–

To view my other Copic cards, please click here.

Hope you like A Monstrous Birthday Card using Wednesday from The BFF by C.C. Designs!

Thank you for stopping by!

Hugs,
Laurie

Happy Mother’s Day Card

A Mother's Day Card with a girl holding a peony
Happy Mother’s Day Card

Hello Crafty Friends! It’s Laurie here! I am sharing my Happy Mother’s Day Card as my Design Team Inspiration Card for Paper Nest Dolls using Lulu with Peony. I decided to make a Mother’s Day card since tomorrow is Mother’s Day, but Lulu would be great for so many other cards like birthday, thinking of you, and more!

The Details of My Card

For my card, I decided to colour the peony a hot pink colour using my RV Copic markers. We have peonies in our garden that are this gorgeous colour and I just love them! I went with purples and greens for Lulu since these colours go so well with the peony colour!

When I looked through my papers, I didn’t have any peonies the particular colour. So, I went online and found some digital papers to match my colouring. This is a great resource for papers that you may wish to find. It’s amazing how many digital papers are available!

The other papers were pulled from my stash to match the purple and green of Lulu’s dress. I already had the Graphic 45 die cut green piece leftover from another project. So, I decided it would work for this card to give Lulu a nice backdrop from the peony paper.

The sentiment was stamped in Berry Burst onto a tag that came from the Artistry Collector’s Edition Vol 2. The doily under the sentient and stamp also came from that Collection. I love it when you get a collection that has all these fun elements that match the papers!

I added a wooden butterfly layered on top of the stamp to add interest. The rhinestones and glossy dots added some sparkle to the card. Clear Wink of Stella was added to her bow and to the peony for shimmer.

————————–

Copic Markers

Skin: E04/E11/E21/E00/E000/R20
Hair: E37/E35/E33/E31
Peony: RV09/RV04/R83/R81/RV000 
Purples: V17/V15/V12
Greens: YG67/YG63/YG11

Close Up of girl holding peony
Close Up of Lulu

Card Recipe for My Happy Mother’s Day Card

Lulu with Peony, Paper Nest Dolls
Paper Basics – Stamper’s Select White Cardstock, Papertrey Ink
Mystique Paper, Vintage Artistry Collector’s Edition Vol 2, 49 and Market
Tag, Stamp and Doily, Artistry Collector’s Edition Vol 2, 49 and Market
Botanical Tea 8” x 8” Paper Pad, Graphic 45
Watercolor Peonies Digital Paper, PrintsDigitalDecor
Labels Eight Dies, Nestabilities, Spellbinders
Berry Burst Ink Pad, Stampin’ Up!
Dressed to Impress Stamp Set, Stampin’ Up!
Glossy Dots Assortment, Stampin’ Up!
Butterfly Elements, Stampin’ Up!
Basic Rhinestone Jewels, Stampin’ Up!
Clear Wink of Stella, Stampin’ Up!

Finished card size: 5 ½” x 4 ¼”

Stamp Size: 4”

————————–

To view my other Paper Nest Dolls cards, please click here.

Hope you like my Design Team Inspiration Card using Lulu with Peony by Paper Nest Dolls!

Thank you for stopping by!

Hugs,
Laurie

Seashell Wishes Card

A birthday card with a girl listening to a seashell
Seashell Wishes Card

Hello Crafty Friends! It’s Laurie here! I am sharing my Seashell Wishes Card as my Design Team Inspiration Card for Conie Fong Art & Design using the beautiful new release Seashell Rosealea

The Details of My Card

When I saw the new release for Conie Fong, I couldn’t wait to get started colouring her, especially that hair! So gorgeous! So, I used my Copic markers to colour her up. I decided to go with natural tones for the shells since I wanted her to shine. A scattering of the coloured blue shells tied in my blue colour scheme from the DSP. 

Once she was coloured, I placed Rosealea onto a Blushing Bride die cut scallop base to help anchor her and distinguish her from the shells DSP.

The DSP was perfect for my cards with its shells in different colours and blue watery sheets! I thought the white shells die against the blue DSP really popped! To add to the dimension of the die cut shells, I used my Embossing Mat to make the details really stand out.

I thought it would be fun to add real shells to my card! So, I used some from the Dollar Store. Tip: use Glossy Accents to create a strong adhesive hold. I also used Glossy accents on the pink pearls in her hair. 

To add an iridescent look, I used a scattering of Flat Adhesive-Backed Pearls and Clear Wink of Stella on the flowers in her hair.

The finishing touch was a stamped die cut sentiment making this a perfect birthday card!

————————–

Copic Markers:

Skin: E000/E00/E21/E11/E04/R20
Hair: E79/E77/E74/E71
Eyes: G99/G94/G21/C3/C1/0
Lips: R83/R81
Pinks: R85/R83/R81
Starfishes: YR18/YR04/Y38/Y35
Shells 1: E15/E13/E11
Shells 2: E33/Y32
Blue Shells: BV000/BV13
Coral: E19/E18/E15
Flowers: R85/R53/R81/YR24/Y21

Close Up of Girl listening to seashell
Close Up of Seashell Rosealea

————————–

Card Recipe for My Seashell Wishes Card:

Seashell Rosealea, Conie Fong Art & Design
Paper Basics – Stamper’s Select White Cardstock, Papertrey Ink
Sand & Sea Designer Series Paper, Stampin’ Up!
Scalloped Contours Dies, Stampin’ Up!
Joy! Crafts Shell Border Die
Embossing Mat, Stampin’ Up!
Manual Die Cutting Machine 
Simple Strips – Birthday, Taylored Expressions
Simple Strips Die, Taylored Expressions
VersaFine Ink, Onyx Black, Tsukineko
Flat Adhesive-Backed Pearls, Stampin’ Up!
Shells from Dollar Store 
Clear Wink of Stella, Stampin’ Up!
Glossy Accents, Ranger
Blushing Bride and Thick Basic White Card Stock, Stampin’ Up!

Finished card size: 5 ½” x 5 ½”

————————–

Blog Challenges

I am entering this card into the following challenges:
Crafting Happiness Challenges: May: 142 Anything Goes
Your Scrapbook Place: May Challenge – Beccy’s Place – Top 3 Winner
613 Avenue Create: May 2023-Anything Goes – Won Top Rocker and Front Porch

————————–

To view my other Conie Fong Art & Design projects, please click here.

Hope you like my Design Team Inspiration Card using Seashell Rosealea for Conie Fong Art & Design!

Thank you for stopping by!

Hugs,
Laurie

My Brewtiful Day Card

Card with a girl holding a coffee cup
My Brewtiful Day Card

Hello Crafty Friends! It’s Laurie here! I am sharing My Brewtiful Day Card as my Design Team Inspiration Card for Paper Nest Dolls using Avery with Coffee (Without Glasses).

The Details of My Card

For my card, I used the Brewtiful paper to create horizontal bands with the coffee theme. The green corrugated band that draws the eye to Avery mirrors the one on Avery’s coffee cup.

I had fun colouring this cutie with my Copic markers especially those curls! I went with espresso-coloured (since we are talking about coffee! Lol) pants, bright green for her top and purple for her sweater.

Don’t you just love the hearts on the coffee cup and in her hair! To mirror these hearts, I added some hearts over the coffee, especially since we know Avery loves her coffee!

And talk about coffee! Wouldn’t you just love a coffee as big as the die cut coffee cup! The sentiment was stamped in Early Espresso ink (another homage to coffee) on the coffee cup!

Star Dust Stickles was added to the hearts. The only other embellishment was a scattering of red rhinestones for a bit of sparkle.

————————–

Copic Markers

Skin: E04/E11/E21/E00/E000/R20
Hair: E25/YR24/Y26/Y21
Hearts: R39/R37/R35/Star Dust Stickles
Top/Coffee Sleeve: YG67/YG63/YG03
Sweater: V12/V15/V17
Pants: E29/E27/E25/E23
Shoes: YG67/YG63/YG03/ E35/E33/E31
Coffee Cup: E35/E33/E31
Coffee Lid: B000/0

Close up of girl holding coffee cup
Close Up of Avery

————————–

Card Recipe for My Brewtiful Day Card

Avery with Coffee (Without Glasses), Paper Nest Dolls
Paper Basics – Stamper’s Select White Cardstock, Papertrey Ink
Brewtiful Day 12” x 12” Paper Pad, Craftsmart, Michael’s Arts & Crafts
Early Espresso Ink Pad, Stampin’ Up!
Coffee Café Photopolymer Stamp Set, Stampin’ Up!
Coffee Cups Framelits Dies, Stampin’ Up!
Give it A Whirl Dies, Stampin’ Up!
Corrugated Embossing Folder, Stampin’ Up!
Red Rhinestone Basic Jewels, Stampin’ Up!
Star Dust Stickles, Ranger
Real Red, Early Espresso, Crumb Cake, Garden Green and Basic White Card Stock

Finished card size: 5 ½” x 4 ¼”

Stamp Size: 4 ½”

————————–

To view my other Paper Nest Dolls cards, please click here.

Hope you like my Design Team Inspiration Card using Avery with Coffee (Without Glasses) by Paper Nest Dolls!

Thank you for stopping by!

Hugs,
Laurie

My Magical Birthday Card 

A birthday card with a girl gnome in a field of mushrooms.
My Magical Birthday Card

Hello Crafty Friends! Laurie here again! I am sharing My Magical Birthday Card using the retiring Friendly Gnomes Stamp Set and the retiring Gnomes Dies by Stampin’ Up! My card is using several items that are retiring! There is only a few more days left! So, don’t miss out! Get them while you can!

The Details of My Card

For my card, I decided to create a magical scene with the girl gnome, mushrooms, and the Happy Forest Friends Designer Series Paper! The DSP was perfect since one of the sheets had mushrooms on it! The retiring Layering Diorama Dies were used to create my scene with the retiring Hive Embossing Folder as the backdrop for my scene. 

I had a lot of fun colouring my girl gnome in bright happy colours with my Stampin’ Blends! I love that the Gnome Dies work for both the Friendly Gnomes Stamp Set and the retired Kindest Gnomes Stamp Set! 

The die cut sentiment was from the retiring Layering Circles Dies. The scallop and circles layer perfectly with each other. The girl gnome was layered onto the sentiment and DSP. The die cut mushrooms were placed so that they were popping out of the diorama.

I added a few Fun Flowers Resin Shapes around the sentiment to complete my scene.

Supplies:

Stamps/Bundles/Dies: Friendly Gnomes Stamp Set (160714), Gnomes Dies (159625), Deckled Rectangles Dies (159173), Layering Circles Dies (151770), Layering Diorama Dies (155565)

Inks: Tuxedo Black Memento Ink Pad (132708), Soft Suede (147115)

Paper: Old Olive (100702), Daffodil Delight (119683), Calypso Coral (122925), Basic White (159276), Soft Suede (115318), Happy Forest Friends Designer Series Paper (158941)

Accessories: Hive 3D Embossing Folder (157955), Fun Flowers Resin Shapes (159123), Soft Suede Stampin’ Blends Combo Pack (154906), Daffodil Delight Stampin’ Blends Combo Pack (154883), Old Olive Stampin’ Blends Combo Pack (154892), Calypso Coral Stampin’ Blends Combo Pack (154881), Multipurpose Liquid Glue (110755), Bone Folder (102300), Stampin’ Dimensionals (104430), Stampin’ Seal (152813), Mini Glue Dots (103683)

Close Up of Girl Gnome

Measurements: 

  • Old Olive (4 pieces): 
    • 5 ½” x 8 ½” scored at 4 ¼”
    • 2 ¼” x 2 ¼”
    • Scraps for grasses
  • Daffodil Delight:
    • 5” x 3 ¾”
  • Basic White (2 pieces):
    • 2 ¼” x 2 ¼” (Sentiment)
    • 2 ½” x 1 ¾” (Gnome)
  • Soft Suede:
    • Scrap
  • Calypso Coral:
    • Scrap
  • Happy Forest Friends Designer Series Paper:
    • 3 ½” x 4 ¾”

More Information on My Magical Birthday Card:

For more of my Stampin’ Up! cards, please click here.

You will find the items listed above in my online store.

Blooming Wishes Birthday Card

A Birthday Card with a Gnome Holding a Watering Can
Blooming Wishes Birthday Card

Hello Crafty Friends! It’s Laurie here! I am sharing my Blooming Wishes Birthday Card that was published in the March Issue (#242) of the Simply Cards and Papercraft Magazine. I was honoured when Christine Young, owner of Paper Nest Dolls, asked me to create a card to be published using Watering Can Gnome from the Gnome Set. There are ten images in the set including:

  • Shears Gnome
  • Tulip Gnome
  • Shovel Gnome
  • Watering Can Gnome
  • Bird Bath
  • Tulips
  • Daises
  • Mushroom with Butterfly
  • Wheelbarrow Gnome
  • Gnome Home

The Details of My Card

For my card, the Magazine had specified pastel colours with a Spring theme. So, I used The Four Seasons Spring, P13 paper for my card. I coloured my images with my Copic markers to match my paper.

To build my card, I used the largest mini slimline scallop die to create a banner behind my focal point. I trimmed it down to fit my card. Next, I added a banner along the top to finish off the top.

Tip: Use mini slimline dies for different sized cards by trimming down to fit project.

I thought that the watering can die would be fun way to anchor my watering can gnome. Accordingly, I die cut the watering can twice, once in pink and once in yellow. Then, I trimmed the top and bottom of the yellow watering can and adhered to the pink to give the watering can a two tone look.

Once that was done, I layered the watering can with a sun and cloud from my favourite die set. I added the tulips along the bottom of the watering can and added one of the birds from the Bird Bath Stamp.

Tip: Use parts of digital stamps, like the birds from the birdbath, instead of the whole stamp to create interest.

The sentiment was printed out on my computer and slid behind the watering can gnome’s head almost like she is wishing the recipient a blooming birthday!

The other bird and butterfly were added to the music paper on the card base.

Clear Wink of Stella was added to the wings of the butterflies and Glossy Accents to her watering can A scattering of rhinestones that were coloured with my Copic markers were added to give sparkle.

————————–

Copic Markers

Watering Can Gnome
Skin
: E15/E13/E11/E00/E000/R20
Hair: E25/YR24/Y26/Y21
Pinks: R85/R83/R81 
Greens: G82/G43/G40 
Yellows: YR24/YR31/YR30 
Flower Petals: YR31/YR30
Flower Centre: YR24/YR31
Watering Can: C5/C3/C2

Close Up of Gnome Holding Watering Can
Close Up of Watering Can Gnome and Tulips

Tulips
Pinks: R85/R83/R81
Yellows: YR24/YR31/YR30
Greens: G82/G43/G40

Birds
Yellows: YR24/YR31/YR30
Beaks: YR24

Close Up of Birds
Close Up of Birds

Butterfly
Body: C5/C3/C2
Wings: BG11/BG10

Close Up of Butterfly

Rhinestones: R85/G82

————————–

Card Recipe for My Blooming Wishes Birthday Card

Gnome Set, Paper Nest Dolls
Paper Basics – Stamper’s Select White Cardstock, Papertrey Ink
The Four Seasons Spring, P13
Chiffon Card Stock, Bazzill
Romance Card Stock, Bazzill
Spring Showers Dies, Lawn Fawn
Shaped Card-Watering Can Dies, Creative Expressions by Sue Wilson
Petite Scallop Mini Slim Stacklets, Taylored Expressions
Gnome Men Sentiments, Polkadoodles Stamps & Papercrafting
Clear Wink of Stella, Stampin’ Up!
Glossy Accents, Ranger
Basic Rhinestone Basic Jewels, Stampin’ Up!

Finished card size: 5” x 5”

Stamp Size: 3”

————————–

To view my other Paper Nest Dolls cards, please click here.

Hope you like my Design Team Inspiration Card using
Watering Can Gnome from the Gnome Set by Paper Nest Dolls!

Thank you for stopping by!

Hugs,
Laurie

My Hoppy Easter Card 

An Easter Card with a girl with bunny ears on pulling a wagon with two bunnies in it.
My Hoppy Easter Card

Hello Crafty Friends! It’s Laurie here! I am sharing My Hoppy Easter Card as my Design Team Inspiration Card for Paper Nest Dolls using Bunny Wagon

The Details of My Card

I coloured this cutie with my Copic markers in bright Easter colours to match my Easter paper.

For my card, I decided to create several flags using the different papers in varying sizes at the top left and bottom right. I used my Punch to create my flags in the different widths.

The white background already had a texture to it, but I used a ruler and a multi liner to draw lines along the edges to add even more interest.

To highlight my focal point, I added a stitched circle in pink behind the Bunny Wagon.

The sentiment was stamped, and die cut with a stitched banner die which was cut off at the edge to match the other flags.

Star Dust Stickles was added to the heart on her dress. The only other embellishment was a scattering of sequins.

————————–

Copic Markers

Skin: E04/E11/E21/E00/E000/R20
Hair: E37/E35/E33/E31
Pink: R85/R83/R81 
Green: YG17/YG13/YG11
Bunny Ears: W5/W3/W1/R83/R81
Wagon: E39/E37/E35/E33 
Handle: C6/C4/C3
Wheels: C9/C6/C4
Bunny 1: W5/W3/W1/R83/R81/R20
Bunny 2: E33/E31/E30/R83/R81/R20

Close Up of girl with bunny ears
Close Up of Bunny Wagon Stamp

————————–

Card Recipe for My Hoppy Easter Card

Bunny Wagon, Paper Nest Dolls
Paper Basics – Stamper’s Select White Cardstock, Papertrey Ink
Springtime 6” x 6” Paper Pad, Doodlebug Design Inc.
Welcome Easter 6” x 6” Paper Pad, Echo Park paper Co.
Hoppy Easter 12” x 12” Sheet, Doodlebug Design Inc.
Purple Palisades, Bazzill Cardstock
Mono Canvas, Bazzill Cardstock
Hoppy Easter Stamp Set, Doodlebug Design Inc. 
VersaFine Ink, Onyx Black, Tsukineko
Banners Pick a Punch, Stampin’ Up!
Stylish Shapes Dies, Stampin’ Up!
0.3 Black Multi Liner, Copic
Paper Snips, Stampin’ Up!
Sequins, From my Stash
Star Dust Stickles, Ranger

Finished card size: 5 ½” x 4 ¼”

Stamp Size: 4”

————————–

To view my other Paper Nest Dolls cards, please click here.

Hope you like my Design Team Inspiration Card using Bunny Wagon by Paper Nest Dolls!


Thank you for stopping by!

Hugs,
Laurie