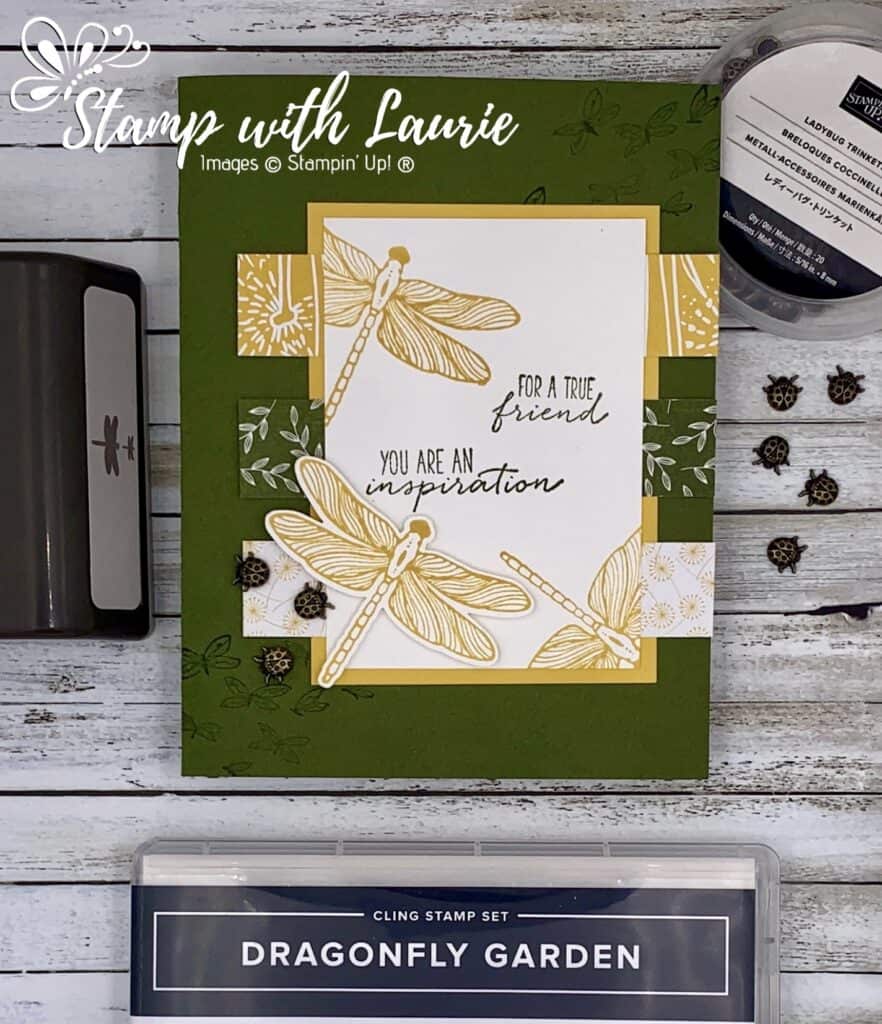
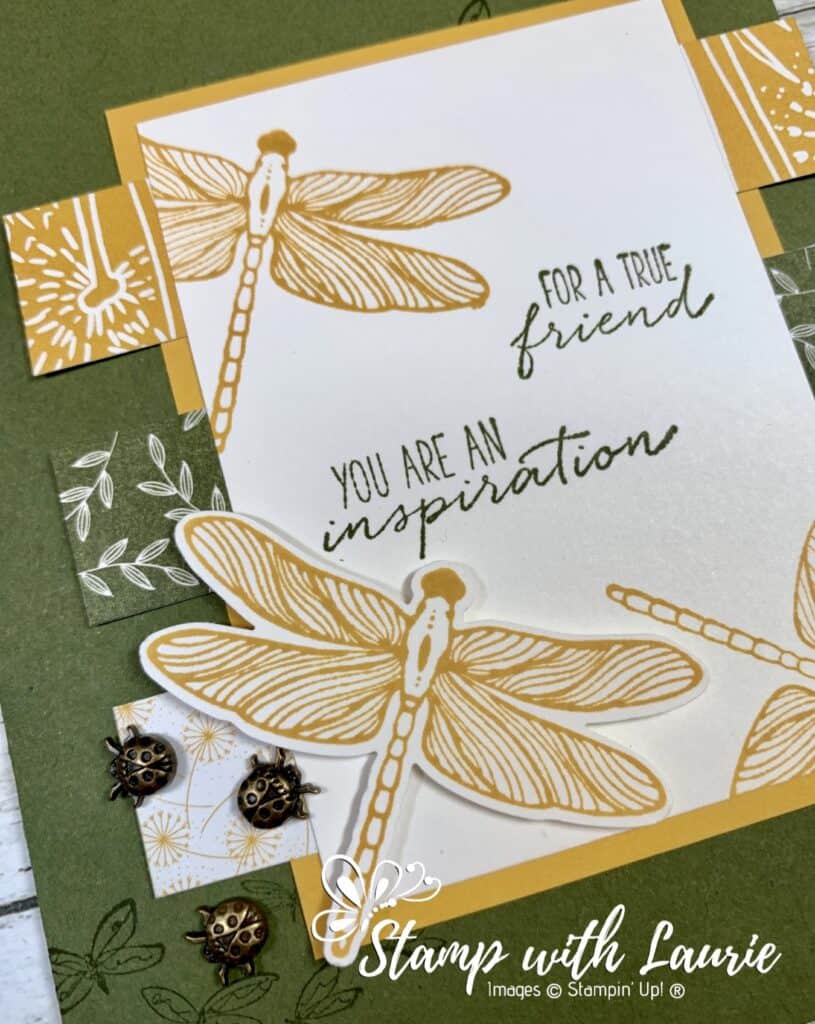
I was lucky enough to attend the Stampin’ Up! OnStage@Home Event in November. For this event, we were allowed to buy things from the new Mini Catalogue early! The Dragonfly Garden Bundle with the Dandy Garden Designer Series Paper and the Ladybug Trinkets were on the list. We made 3 cards using these products and I am sharing with you my first Dragonfly Garden Card today.
I love that you get a punch with the stamp set for this bundle! Makes it so handy! And those Ladybug Trinkets are so adorable!
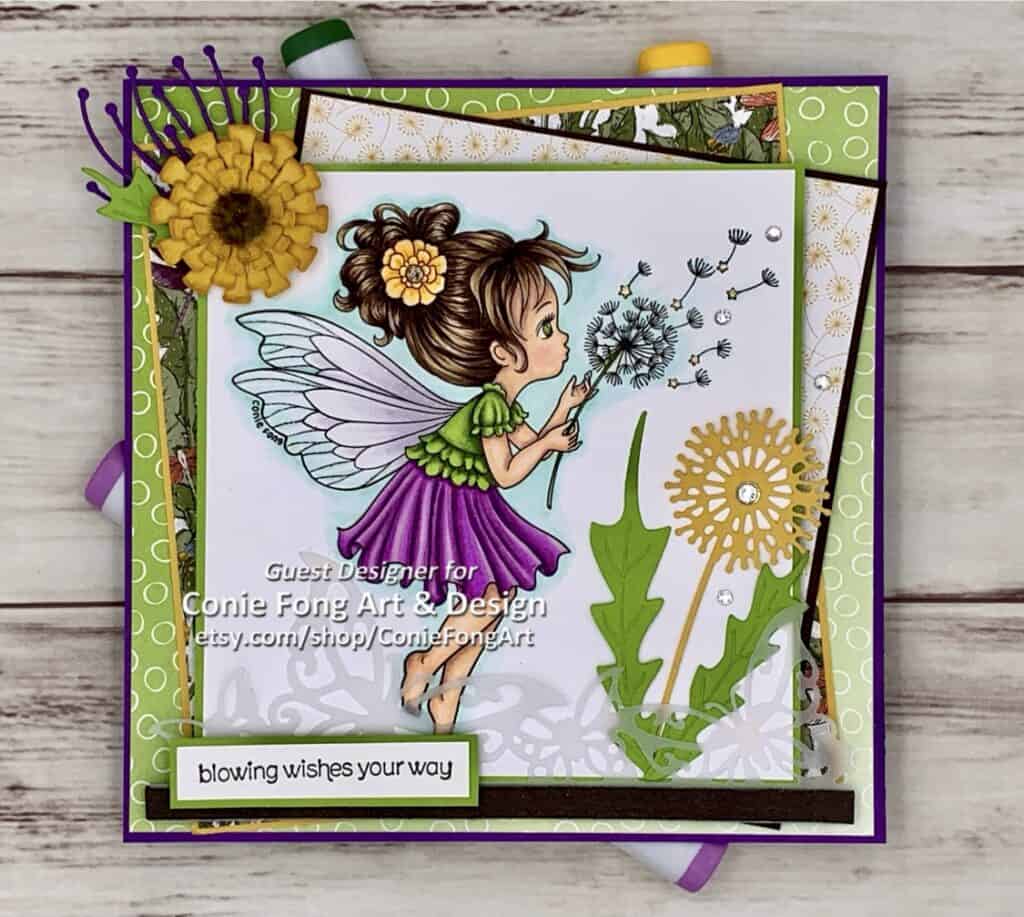
My Blowing Wishes Your Way Card for Conie Fong Art & Design
Happy New Year’s Eve! Hello Crafty Friends! It’s Laurie here! For my last card of 2020, I am sharing my Guest Design Team Inspiration for Conie Fong Art & Design using Dandelion Wishes. This sweet fairy is “blowing wishes your way” for a wonderful 2021!
I had so much fun colouring her with my Copics markers in bright and bonny colours for a change from the Christmas colours that I have been using lately! This digital stamp can be used for so many different occasions, but I decided that I wanted to create a New Year’s Eve card. I knew that I wanted to use some new Stampin’ Up! products that I received that tied in the dandelion theme nicely like the Designer Series Paper and the Dies!
————————–
Copic Markers:
Skin: E000/E00/E21/E11/E04/R20 Hair: E49/E47/E43/E42 Eyes:YG07/YG63/G99 Flower: Y38/Y35/Y32/E47/E43/Clear Star Gelly Roll Pen for Flower Centre Greens: YG03/YG63/YG67/G99 Purples: V000/V01/V04/V06/V09 Wings: BG10/V20/0/Clear Star Gelly Roll Pen Dandelion Stars: Y38/Y32/Clear Star Gelly Roll Pen Sky: BG10/0
Close Up of My Guest Design Team Card for Conie Fong Art & Design
————————–
Card Recipe for Blowing Wishes Your Way:
Dandelion Wishes, Conie Fong Art & Design Paper Basics – Stamper’s Select White Cardstock, Papertrey Ink Oh So Ombre 6” x 6” Designer Series Paper, Stampin’ Up! Dandy Garden 6” x 6” Designer Series Paper, Stampin’ Up! Vellum, Stampin’ Up! Sweet Silhouettes Dies, Stampin’ Up! Dandy Wishes Dies, Stampin’ Up! Butterfly Edge, Joy! Crafts Dies Basic Rhinestone Jewels, Stampin’ Up! Perennial Essence Floral Centers, Stampin’ Up! Faux Suede Trim, Stampin’ Up! Wishes Your Way Stamp Set, Stampin’ Up! Clear Star Gelly Roll Pen Stamping Sponges, Stampin’ Up! VersaFine Ink, Onyx Black, Tsukineko Bumblebee and Early Espresso Ink, Stampin’ Up! Gorgeous Grape, Bumblebee, Granny Apple Green and Early Espresso Card Stock, Stampin’ Up! Finished card size: 6” x 6”
————————–
To view my other Copic Marker cards, please click here.
Hope you like my last Guest Design Team card for 2020 using Dandelion Wishes for Conie Fong Art & Design!
Happy New Year Everyone! May it be a better one than 2020!
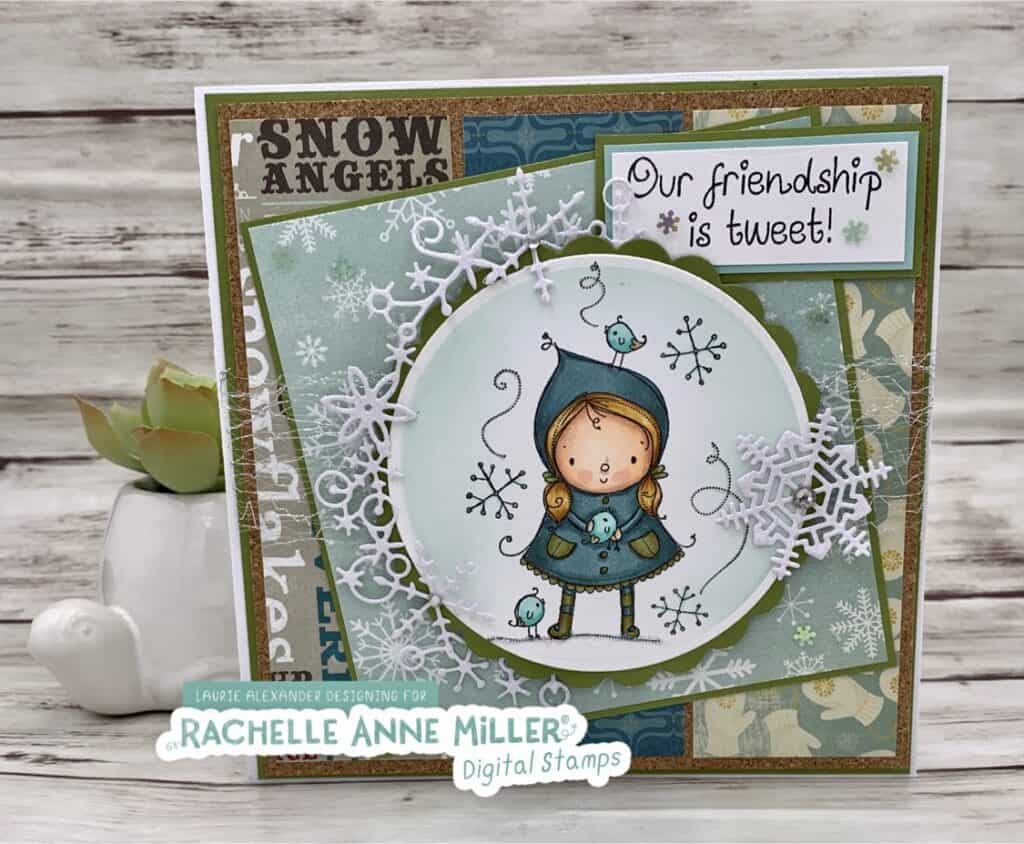
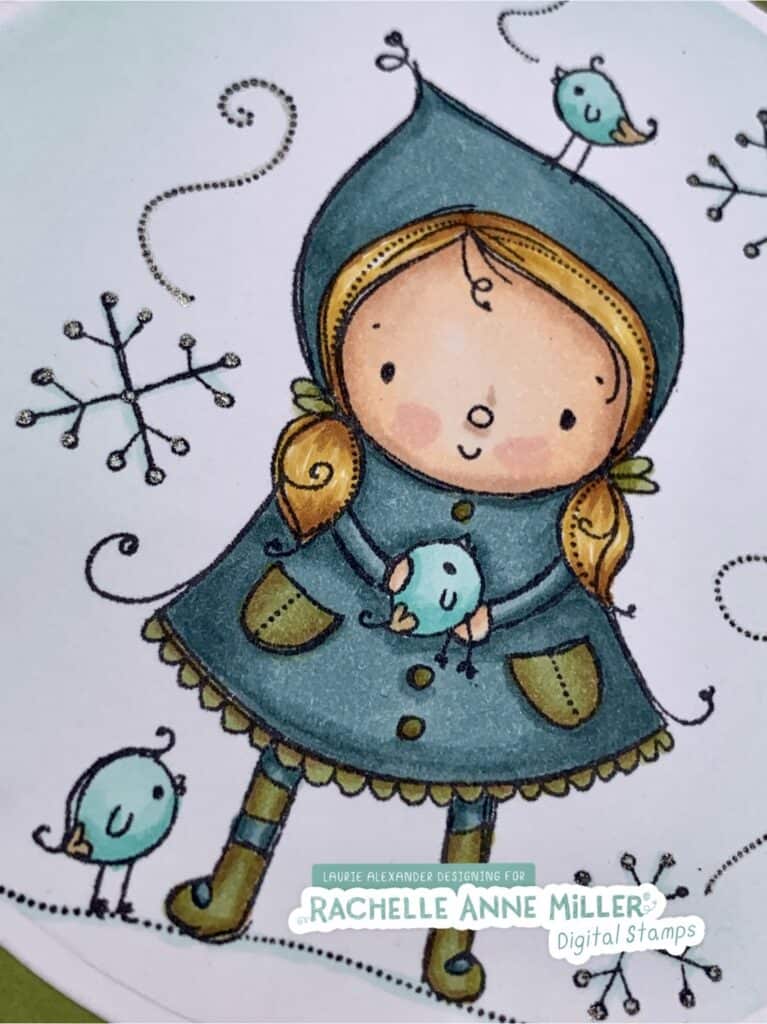
It’s Laurie here with Our Friendship is Tweet Card for Rachelle Anne Miller Creative Studios using her cute ‘Tweet Friendship’ Christmas Digital Stamp. I have been a big fan of Rachelle Anne Miller’s for a long time. In fact, I used my rubber stamp that was in my stash to create my card, but you can get the digital version in her store.
I love this sweet little girl with her tweet friends! I though she made a perfect card for a winter birthday and I have a lot of them coming up in January and February. So I have plans for her!
For my card, I coloured her with my favourite BG and YG colour combinations of Copic markers. I then created a frame by laying down the die that I used to cut her out and sponged Pool Party Ink with my new Blending Brush from Stampin’ Up! When I lifted the die up, I was left with a white frame to set off my image. I love the Frostyville Wreath in the Sparkle Glimmer Paper, but it was too small for my image. So, I cut it apart and draped it along the frame. To balance the “wreath” of snowflakes, I placed another larger snowflake opposite them. I thought that the Metallic Mesh Ribbon looked like cracked ice creating a subtle texture to the card. A scattering of Adhesive-backed Snowflakes added to the Winter Wonderland theme of my card.
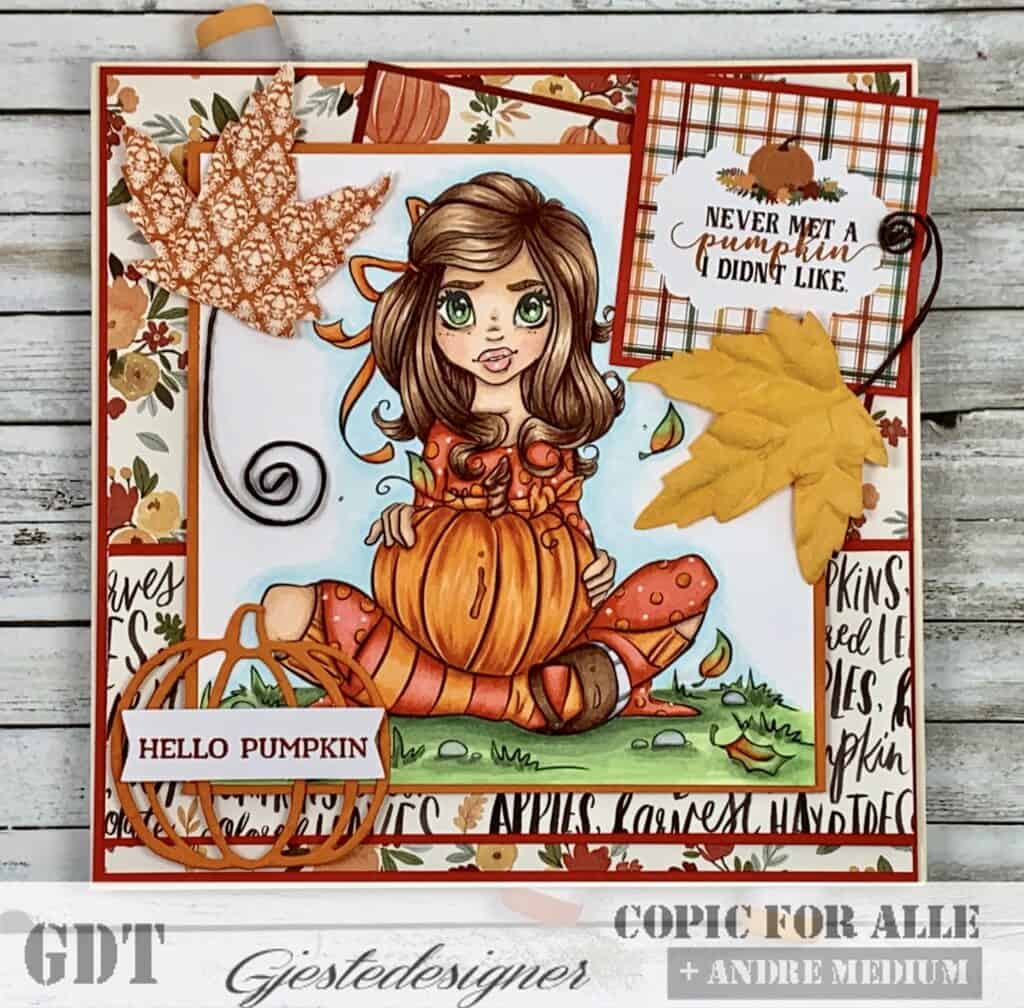
Hello Crafty Friends! It’s Laurie here with my Hello Pumpkin Guest Design Team Card for the Copic for ALLE Facebook Group using Krista Smith Stamps Pretty Pumpkin Digital Stamp. I was so honoured to be asked by this group to be a Guest Designer for their YR (Yellow/Red) Copic Challenge for October. This combination screams pumpkins to me and since I haven’t coloured a Krista Smith image in a while, I thought Pretty Pumpkin would be perfect for my card! Of course, for a Fall card, you need falling paper leaves that I pulled from my stash! Hope you like my take on this Color Challenge!
Pretty Pumpkin Digital Stamp, Krista Smith Paper Basics – Stamper’s Select White Cardstock, Papertrey Ink Hello, Pumpkin Stamp Set, Paper Pumpkin Kit, Stampin’ Up! Patterned Pumpkins Thinlits Dies, Stampin’ Up! Happy Fall 6” x 6” Paper Pad, Echo Park Paper Co. Hello Autumn 6” x 6” Paper Pad, Carta Bella Paper Fall Leaves, Recollections White Gelly Roll Pen Clear Wink of Stella Cajun Craze Classic Ink Pad, Stampin’ Up! Poppy Parade, Cajun Craze, Pumpkin Pie, Whisper White Card Stock Finished card size: 6” x 6”
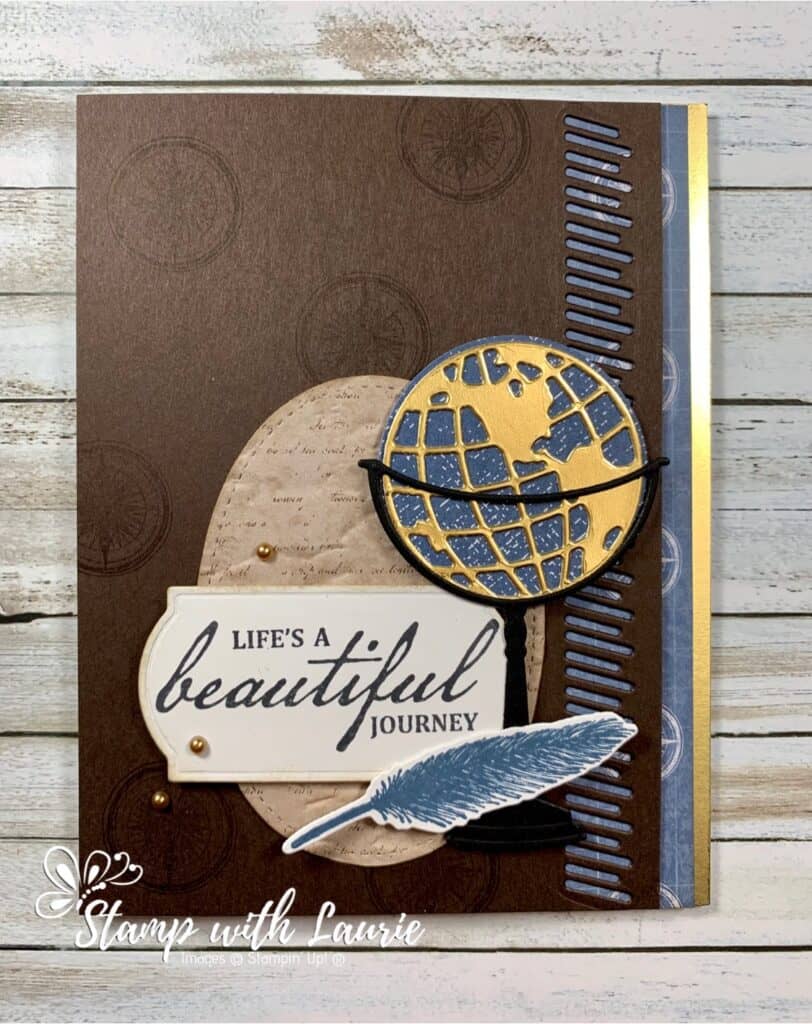
Life is A Beautiful Journey Card using the World of Good Suite
Today I am sharing My Life Is A Beautiful Journey Card that I created for a swap that uses products from the new Stampin’ Up! Annual Catalogue and the World of Good Suite. This card is a perfect masculine card especially for a retirement or a graduation!
I love how the pops of Misty Moonlight ink and the World of Good Designer Series Paper add a nice touch of colour to this very neutral card. I used Gold Foil Sheets instead of the Brass Foil Sheets only because they were on backorder at the time. The Brass ones would look just as nice! I wanted to add a bit of an old paper look by sponging Crumb Cake around the sentiment’s edges and on the DSP after it was embossed with the Old World Paper 3D Embossing Folder. I was so happy to find out that the Metallic Pearls had carried over and I used them as the perfect accent to finish the card.
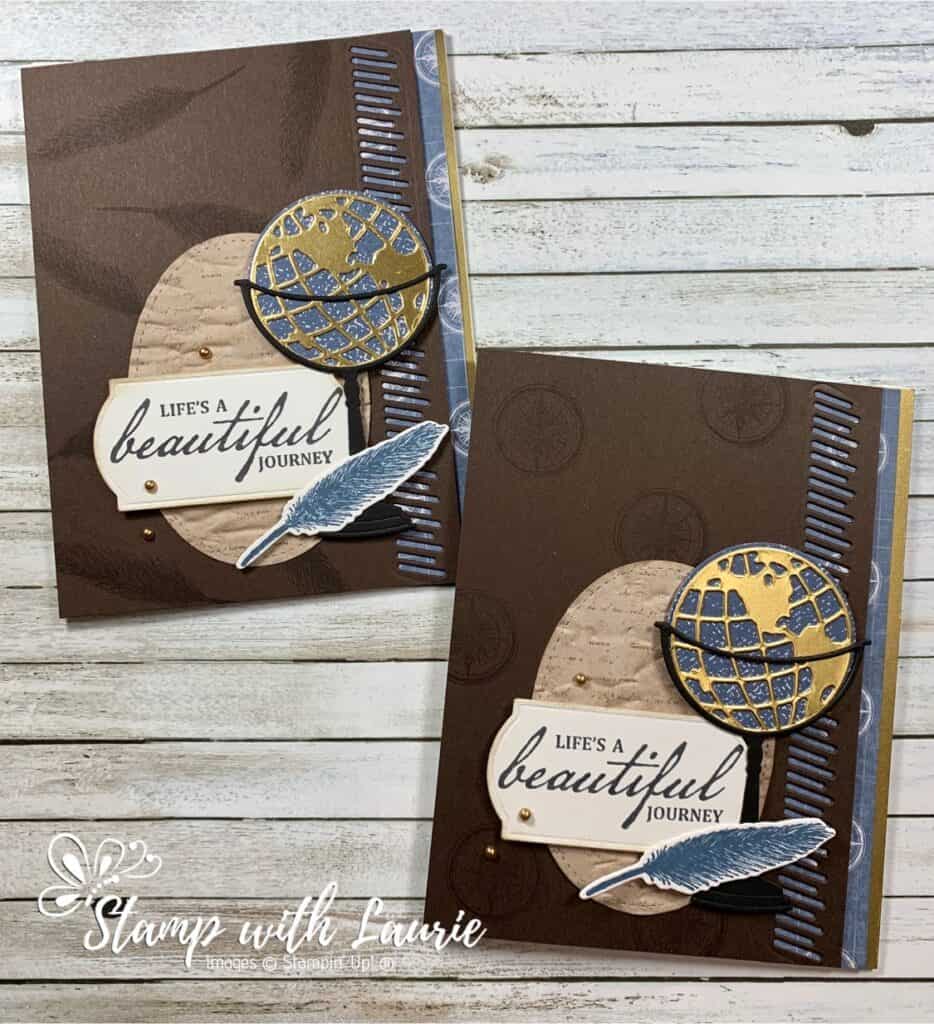
Life is A Beautiful Journey Alternative Card using the World of Good Suite
I had so much fun playing with this Suite that I created another card using the feather stamp as the background. Which one do you like best?
Supplies for My Life Is A Beautiful Journey Card:
Stamps: Beautiful World Bundle (154091)
Inks: Tuxedo Black Memento Ink Pad (132708), Early Espresso Classic Stampin’ Pad (147114), Crumb Cake Classic Stampin’ Pad (147116), Misty Moonlight Classic Stampin’ Pad (153118)
Paper: Whisper White Thick (140272 ), Early Espresso (119686), Whisper White (100730), Basic Black (121045), Gold Foil Sheets (132622), World of Good Designer Series Paper (152491), 2020–2022 In Color 6″ x 6″ Designer Series Paper (153070)
Accessories: World Map Dies (152712), Old World Paper 3D Embossing Folder (153200), Painted Label Dies (151605), Stitched Shapes Dies (152323 ), Metallic Pearls (146282), Stamping Sponges (141337), Bone Folder (102300), Adhesive Sheets (152334 ), Multipurpose Liquid Glue (110755 ), Mini Glue Dots (103683), Stampin’ Seal (152813), Stampin’ Dimensionals (104430)
Measurements for My Life is a Beautiful Journey Card:
Whisper White Thick: 8 ½” x 5 ½”; scored at 4 ¼”
Early Espresso: 3 7/8” x 5 ½”
World of Good Designer Series Paper – 2 pieces
5 ½” x 1” (for border)
3 ½” 2 ½” (for stitched Oval)
2020–2022 In Color 6″ x 6″ Designer Series Paper: 2” x 2”
Amazing how beautiful and packed full of coordinating products the WORLD OF GOOD SUITE in the Stampin’ Up! Annual Catalog is. The Beautiful World cling stamp set has globe imagery and sentiments that have to do with adventure. The sentiments are designed to work on the outside and the inside of your card project. The World Map dies cut out the imagery from the stamp set. The World of Good Specialty DSP has a 16th Century map style feel with gold foiling. The star maps on the DSP represent both Northern and Southern Hemispheres. Get the perfect weathered looking paper with the Old World Paper 3D embossing folder. Using this embossing folder will make it faster and easier to get an aged look on your paper, without the unwanted tearing.
To add to the travel and adventure theme Stampin’ Up! has included the Old World Memories and more card pack. When adding the final touches to your project you will love the antiqued brushed embellishments and the Early Espresso ribbon.
Hello Crafty Friends! It’s Laurie here with my Storytime Design Team Card for Rachelle Anne Miller Creative Studios using their Storytime Digital Stamp. This is my first card as a new Design Team Member for Rachelle Anne Miller Creative Studios! I’m so excited to join such a talented team!
I love this sweet image with all the cute forest friends gathered around to listen to a story! The panels to the left are all the wonderful stories they are reading. Once Upon a Time…there was a ranger who confronted a dragon guarding his hoard. Once Upon a Time…there was a knight on a chivalrous quest. Or, maybe they are reading Jack and the Beanstalk as the vine travels to the clouds! This image just sparks my imagination! The sentiment is from a Kraftin Kimmie Stamp that I thought was perfect for these little forest friends! “We’ll be friends forever…the end!”
————————–
Copic Markers:
Fox: E18/08/YR18/14/R20 W1/W0/0 Black Jelly Pen for Nose
————————–
Porcupine: W6/4/3/1 E000/00/11/R20 White Jelly Pen for quills Black Jelly Pen for nose
————————–
Bunny: C3/C1/C0/R20/0
————————–
Yellow Bird: Y11/13/15/17 Beak – YR04
————————–
Owl: E29/27/25/23 E40/41/42/43/R20 Beak – YR04/16
————————–
Leaves/Grass: YG03/63/67/G99
————————–
Tree/Stump: E47/57/44/55/41 Top of Stump – E43/42/41
————————–
Rock: C4/3/2/1
————————–
Book: R24/27/29/C3 Pages/Label – C1/0
————————–
Card Recipe for My Storytime Design Team Card:
Rachelle Anne Miller Creative Studios: Storytime Kraftin Kimmie Stamps: Reading Lexi (Sentiment) Sweet Sentiment Premium Coloring Paper Lawn Fawn Spring Showers Dies Memory Box Delicate Vine Border Die Songs of Spring Paper Embelishments (Kite), Michaels Stores Inc Enchanted Forest 8” x 8” Paper Pack, Graphic 45 I {Heart} Summer 6” x 6” Paper Pack, Simple Stories Summer Fresh 6” x 6” Paper Pack, Simple Stories Garden Green, Early Espresso, Daffodil Delight and Whisper White Card Stock
————————–
Measurements:
Whisper White Card Base: 5 ½ x 5 ½ Garden Green Card Stock: 5 3/8” x 5 3/8“ Red and White Checked Paper from Summer Fresh: 2 ¼” x 5 ¼” Sky with Clouds Paper from I {Heart} Summer: 3 ¼” x 5 ¼” Once Upon a Time, Ranger and Dragon and Knight Panels from Enchanted Forest 8” x 8” Paper Pack Early Espresso Card Stock 4 5/8” x 4 7/8” Sweet Sentiment Premium Coloring Paper: 4 ½” x 4 ¾” Scraps of Daffodil Delight for Sun, Garden Green for Vine, and Whisper White for Clouds and Sentiment
————————–
Happiness is Reading!
To view my other Copic Marker cards, please click here.
Hope you like my Storytime Design Team Card with Storytime by Rachelle Anne Miller Creative Studios! Thank you for stopping by!
Today I am sharing this pretty Grace’s Garden Gate Card. For this card, I combined the Beautiful Moments Stamp Set and the Grace’s Garden Bundle. I thought these two sets went perfectly together! The Pressed Petals Specialty Designer Series Paper is perfect for the gate. I used my Paper Snips to cut the gate doors so that it can open to reveal the beautiful scene beyond. Wouldn’t it be wonderful to walk through a lavender field! There is a Sneak Peek of one of the new Greenery Embossing Folders that frames the scene. Let’s get started.
My Grace’s Garden Gate Card Close Up
Supplies for Grace’s Garden Gate Card:
Stamps: Beautiful Moments Cling Stamp Set (151677), Grace’s Garden Bundle (153789), Very Versailles Cling Stamp Set (149275)
Inks: Tuxedo Black Memento Ink Pad (132708), Highland Heather Classic Stampin’ Pad (147103)
Paper: Pool Party (122924), Old Olive (100702), Rococo Rose (150882), Whisper White (100730), Whisper White Thick (140272 ), Pressed Petals Specialty Designer Series Paper (149500)
Accessories: Garden Gateway Dies (151512), Pool Party Stampin’ Blends Markers Combo Pack (144605), Old Olive Stampin’ Blends Marker Combo Pack (154892), Highland Heather Stampin’ Blends Markers Combo Pack (147276), Rococo Rose Stampin’ Blends Combo Pack (149572), Crumb Cake Stampin’ Blends Combo Pack (154882), Ivory Stampin’ Blends Marker (144606), Greenery Embossing Folder (152716), Rhinestone Basic Jewels (144220), Paper Snips (103579), Bone Folder (102300), Multipurpose Liquid Glue (110755), Mini Glue Dots (103683), SNAIL Adhesive (104332), Stampin’ Dimensionals (104430)
Measurements for Grace’s Garden Gate Card:
Whisper White Thick: 8 ½” x 5 ½”; scored at 4 ¼”
Pool Party: 4 ¼” x 5 ½”
Old Olive: 3” x 5½”
Whisper White:
2 ¼” x 3 ¾” (for scene)
2 pieces at 1 ¼” x 2 ¾” (flowers)
1 piece 3 ¾” x ¾” (sentiment)
Rococo Rose: scraps
Pressed Petals Specialty Designer Series Paper:
2 ¾” x 4” (Gate)
2 pieces at ½” x 5 ½”
My Grace’s Garden Gate Card with Open Gate
Instructions for Grace’s Garden Gate Card:
Fold the Whisper White Thick card stock in half to create the card base.
Stamp the image of the girl on the larger piece of Whisper White in Tuxedo Black Memento Ink Pad.
Stamp the butterflies above the girl in Memento. Using the Blends markers, colour her and the scene.
Using the die cut from the Garden Gateway Dies that corresponds to the inside of the gate, cut her out.
Next, stamp the larger flower image in Tuxedo Black Memento Ink on the two pieces of Whisper White card stock and colour with the Blends markers. Die cut them out with corresponding die.
Stamp the sentiment from the Very Versailles Cling Stamp Set in Highland Heather on the Whisper White strip.
Die cut the gate from the Pressed Petals Specialty Designer Series Paper.
Using the flower dies from the Garden Gateway Dies, die cut them in Rococo Rose.
Emboss the Old Olive piece using the large leaves from the Greenery Embossing Folders.
Using SNAIL, adhere the Pool Party card stock to the Whisper White card base.
Adhere the strips of script from the Pressed Petals Specialty Designer Series Paper to the Old Olive piece
Adhere the embossed piece with Multipurpose Liquid Glue to the Pool Party piece.
Position the scene closer to the top of card and adhere with Multipurpose Liquid Glue to Old Olive piece.
Position the gate over the scene and adhere with Multipurpose Liquid Glue.
Using Paper Snips, cut the center of the gate door and fold back.
Adhere the flowers on either side of the gate with dimensionals.
Adhere the sentiment with dimensionals making sure not to overlap the gate so that it can open.
Using glue dots, adhere three Rococo Rose flowers and add rhinestones to the centre of them.