Thanksgiving Memories Card

Fall Card with a Gnome on It
Autumn Memories Card

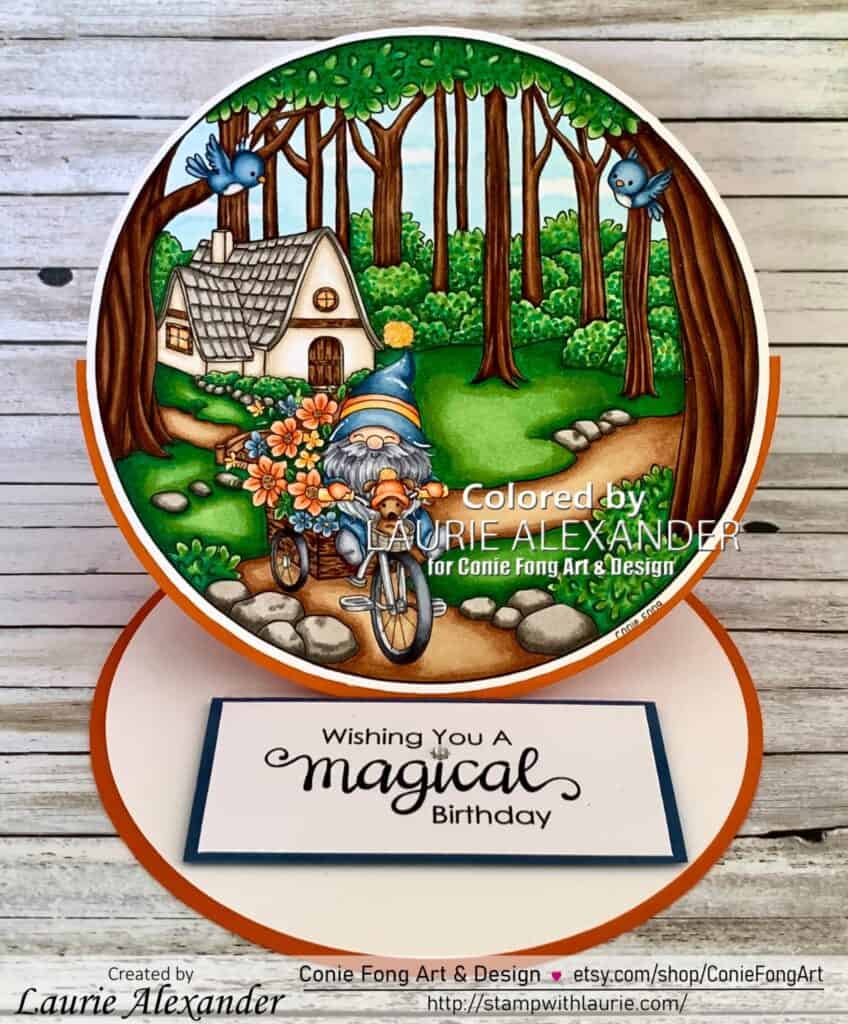
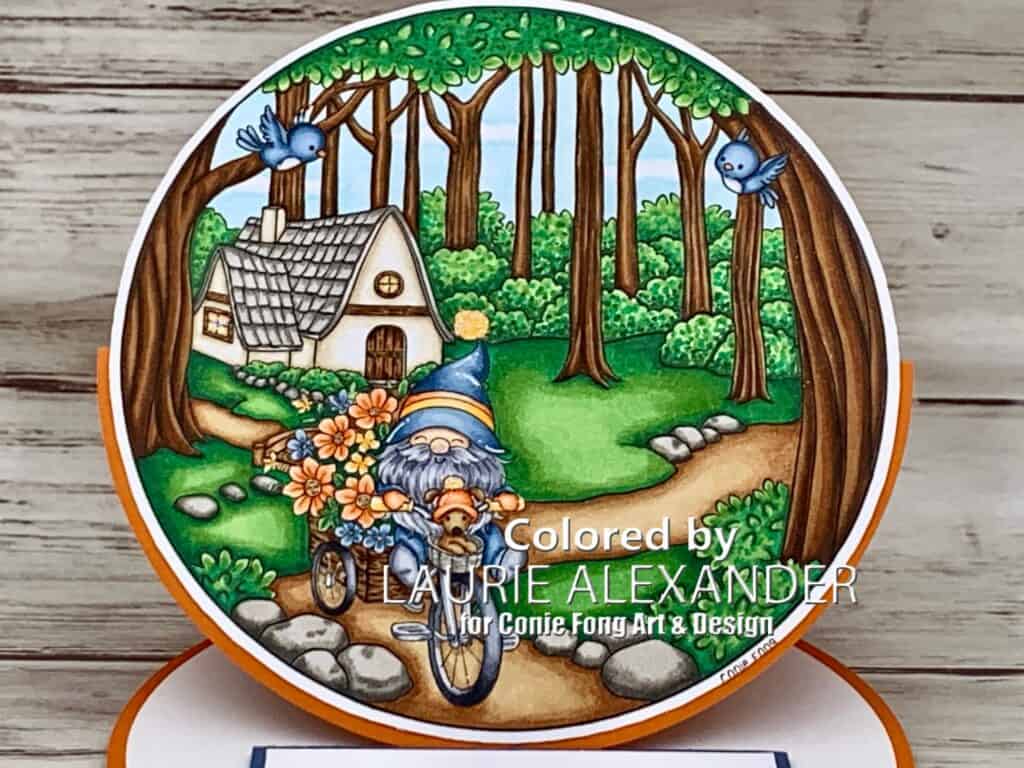
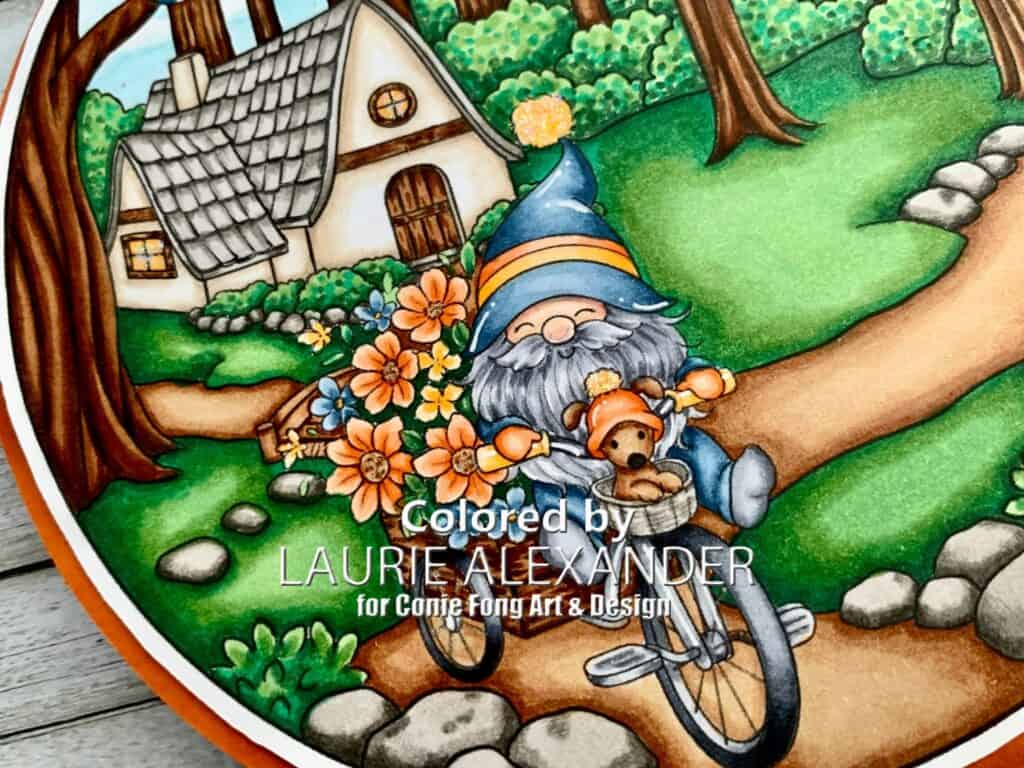
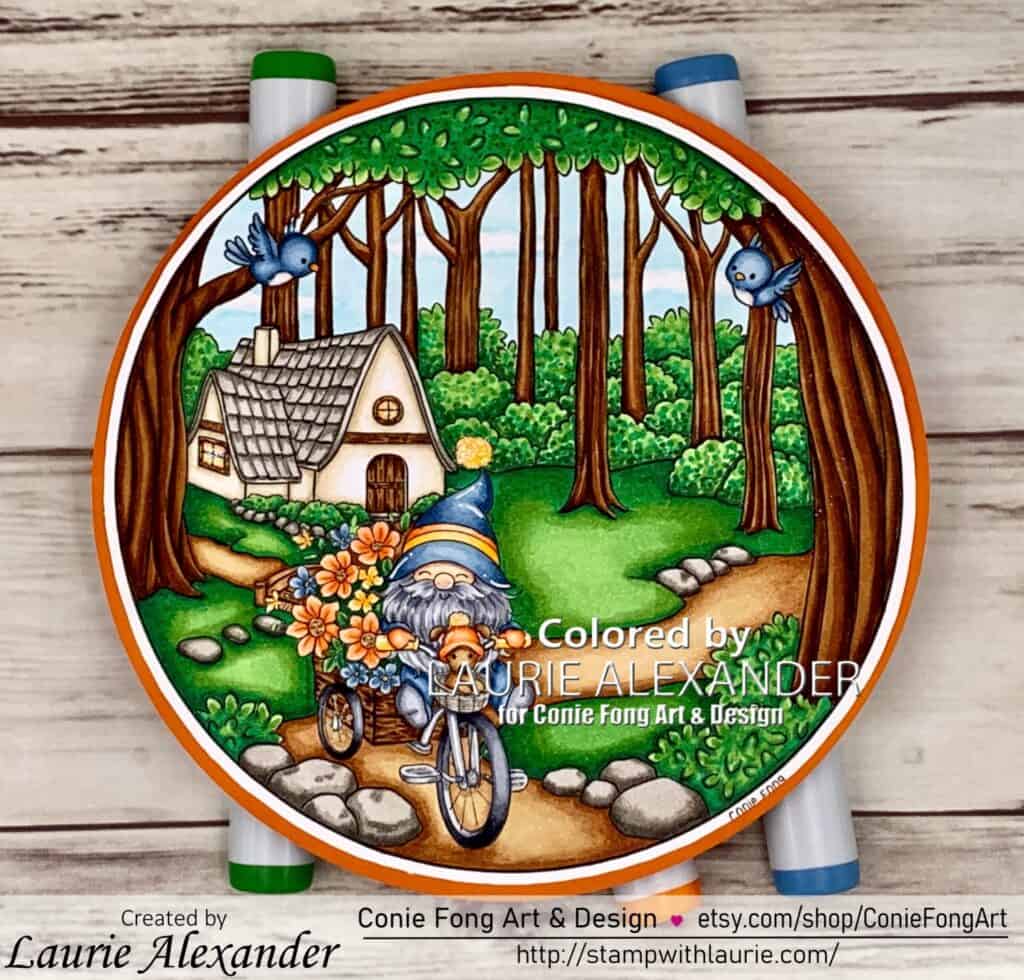
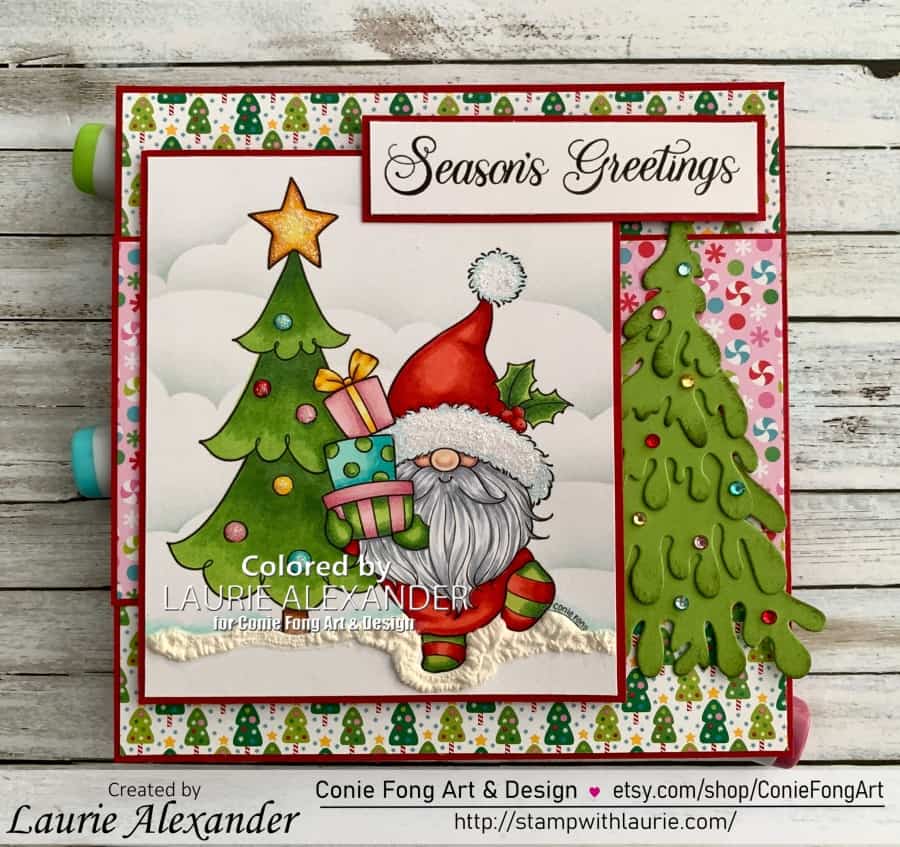
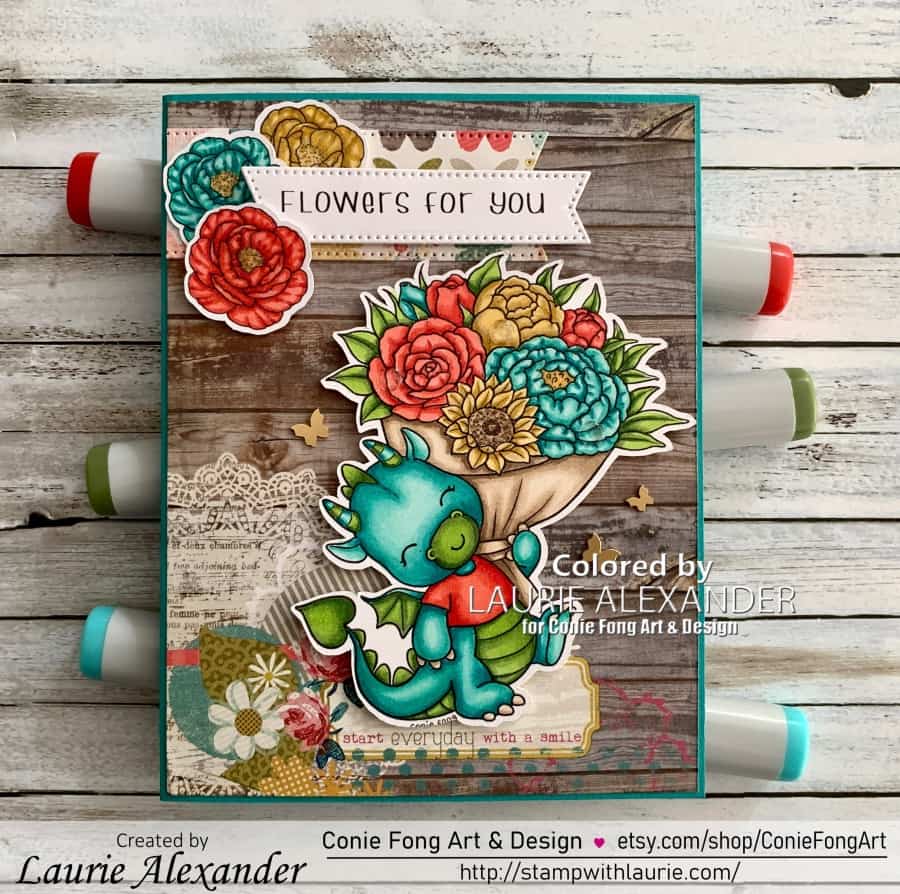
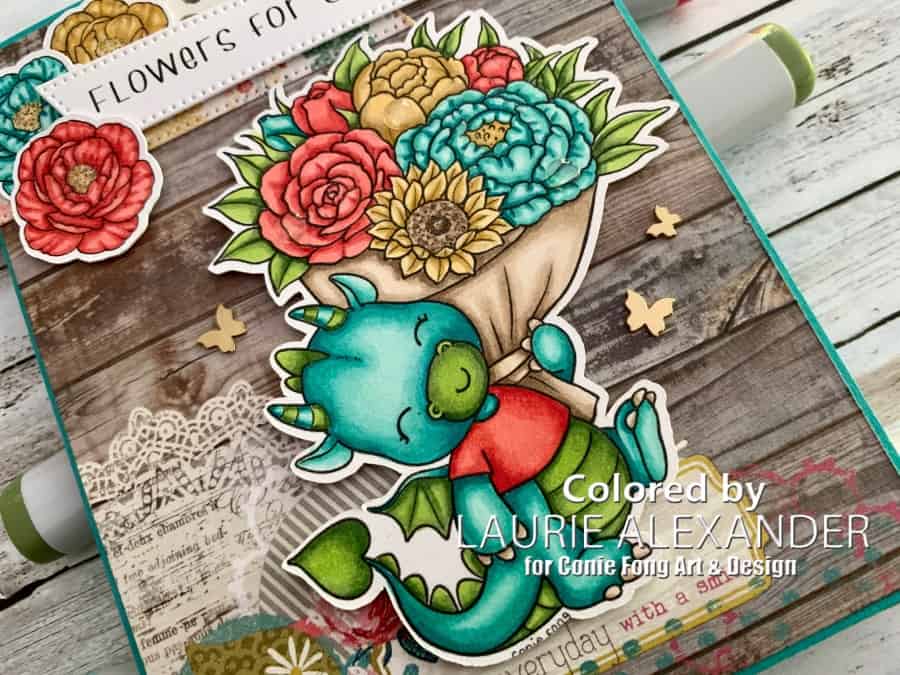
Hello Crafty Friends! Happy Canadian Thanksgiving! It’s Laurie here! I am sharing my Thanksgiving Memories Card as my Design Team Inspiration Card for Conie Fong Art & Design using Sunflower Pumpkin Gnome. This digital stamp comes with or without the background and in both png and jpg formats.

The Details of My Card

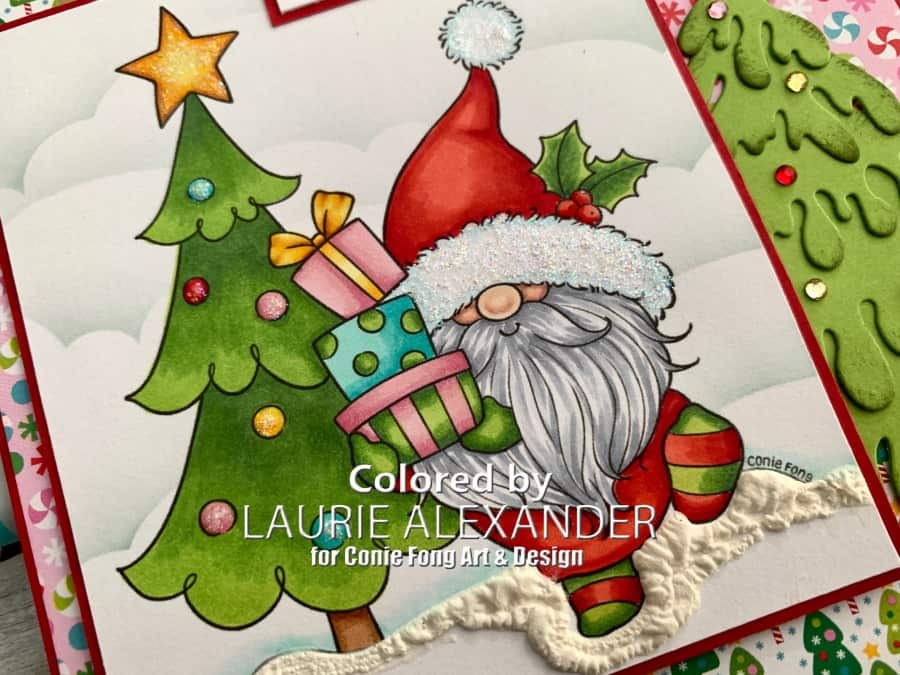
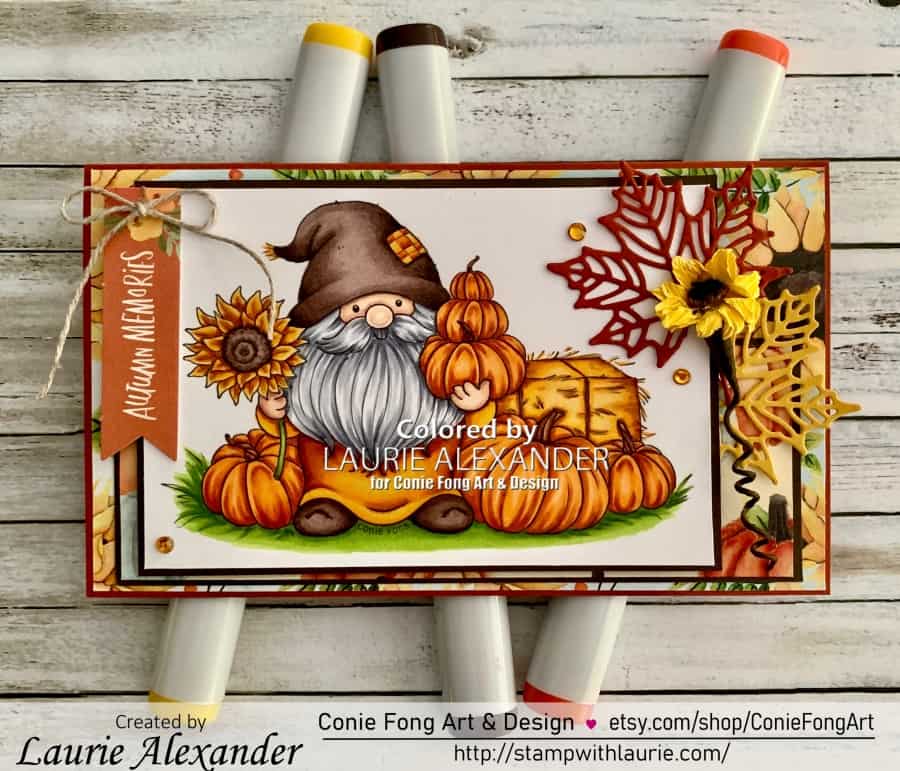
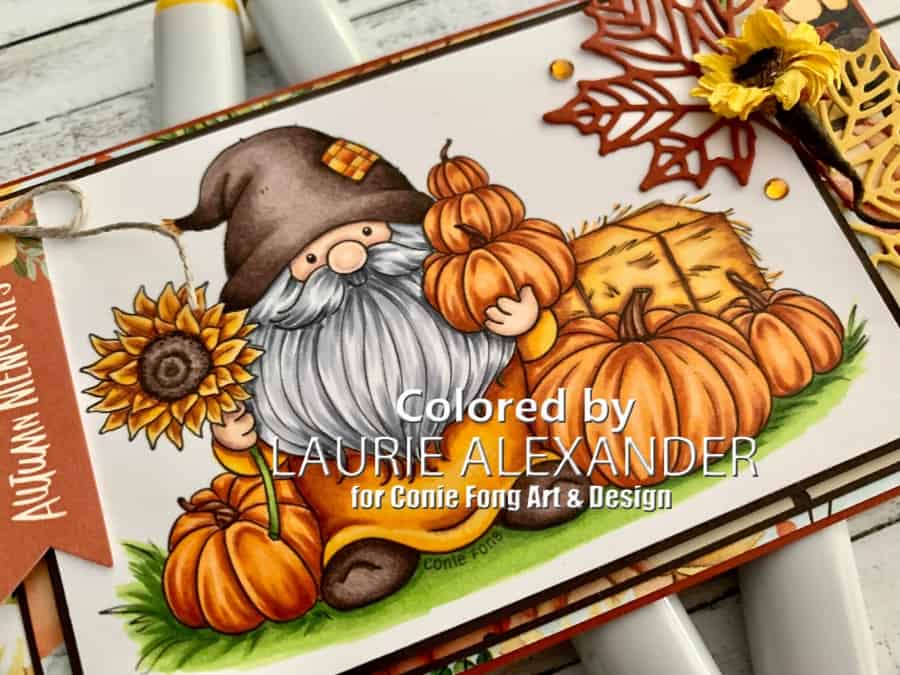
Since this weekend is the Canadian Thanksgiving, I decided to create a mini slimline Thanksgiving card using this cutie with the background. I love this time of year with the changing leaves and being thankful for so many things! I had a lot of fun colouring him in Autumnal colours of oranges, yellows, and browns! And I happen to be on a kick for mini slimline cards! So, that was a given! Lol!

Once he was coloured, I trimmed him to fit my card. I added some die cut leaves with a paper sunflower that I had in my stash. On the other side, I added a Fall flag that was perfect for my theme since Thanksgiving is all about family, memories and being grateful! The only embellishments were a lined thread bow on the flag and a scattering of rhinestones to match my colour scheme.

————————–

Copic Markers:

Skin: E04/E11/E21/E00/E000/R20
Hair: C5/C4/C3/C1
Sunflower Petals/Shirt/Straw: E15/Y38/Y15/Y21
Hat/Shoes/Flower Centre: E49/E77/E74/E71
Patch on Hat: YR18/YR14/Y38/Y15
Pumpkins: E15/YR18/YR14/YR15/YR12
Pumpkin Stems: E29/E25/E21
Grass/Sunflower Stem: YG67/YG63/YG03

Close Up of Gnome on Card
Close Up of Sunflower Pumpkin Gnome

————————–

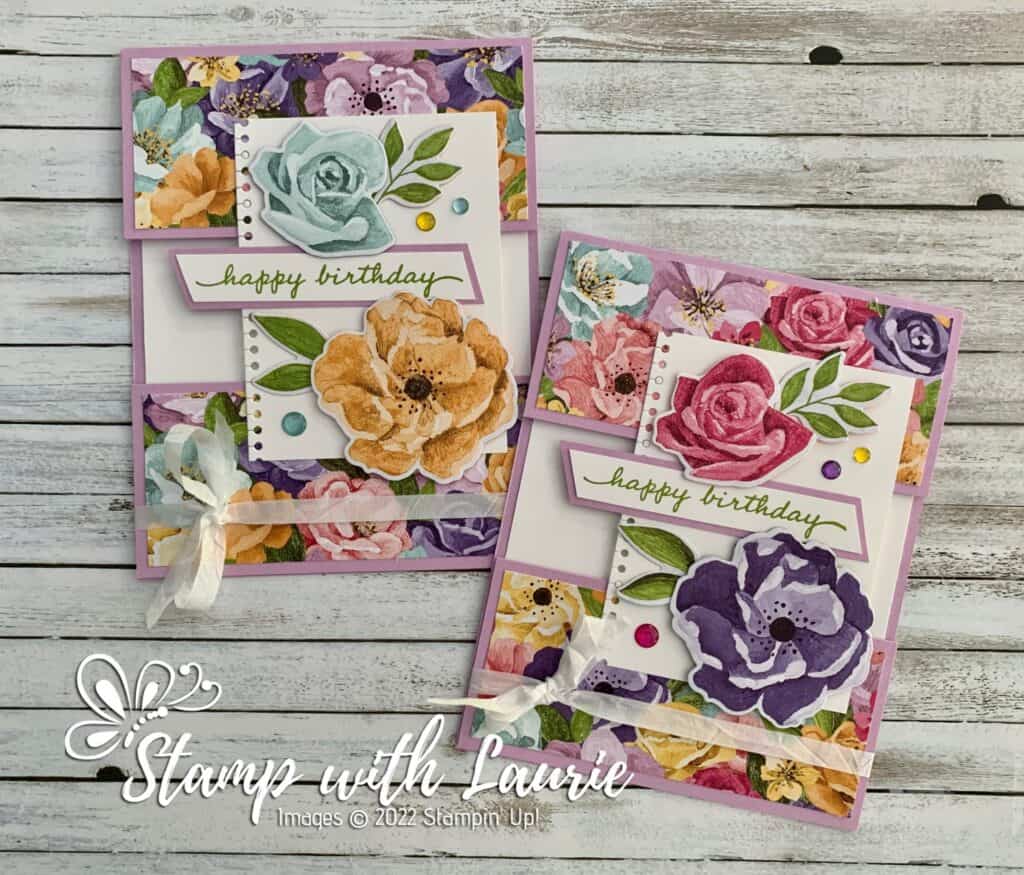
Card Recipe for My Thanksgiving Memories Card:

Sunflower Pumpkin Gnome, Conie Fong Art & Design
Paper Basics – Stamper’s Select White Cardstock, Papertrey Ink
Hello Autumn Frames & Tags, Carta Bella Paper Co.
Colorful Season Dies, Stampin’ Up!
Sunflower Paper Flower, From My Stash
Linen Thread, Stampin’ Up!
Holiday Rhinestone Basic Jewels, Stampin’ Up!
Cajun Craze, Crushed Curry and Early Espresso Card Stock, Stampin’ Up!

Finished card size: 6” x 3.5”

————————–

To view my other Conie Fong Art & Design projects, please click here.

Hope you like my Design Team Inspiration Card using
Sunflower Pumpkin Gnome for Conie Fong Art & Design!

For more of my cards, please join my Facebook Group or my Instagram..

I am entering this card in the following challenges:
Passion For Markers – Week 662 Challenge – ATG/Markers
World Wide Open Design Team Challenge #09 – ATG
Path of Positivity Challenge #105 – ATG/Celebrate Something Special about
YOUR FAVOURITE SEASON
LeAnn’s World 101 Challenge #55 – ATG
Everybody-Art-Challenge  – #521 – Autumn

Thank you for stopping by!

Hugs,
Laurie

My Clockwork Anniversary Card

A card with a girl holding a pocket watch
My Clockwork Anniversary Card

Hello Crafty Friends! It’s Laurie here with My Clockwork Anniversary Card using the beautiful Steampunk Time digital stamp By Krista Smith Stamps for my 28th wedding anniversary card for my Hubby.

My hubby loves anything steampunk and I found this awesome digital stamp by Krista Smith Stamps that I thought would make a beautiful card for him!

The Details of My Card

For my card, I decided to colour her with my Copic markers in muted tones to match my paper and my grungy steampunk theme. I haven’t used this colour scheme before but was very happy with how it turned out! I went with black hair with blue underpainting to give her a hip edge. Another first for me to colour like this!

Using Blue marker to add to black hair
Underpainting B24 to Hair

Once I finished colouring her, I blended some ink along the edges of the paper to give it a distressed look. I also blended ink along the edges of the design paper and sentiment to make them more worn. The paper from Stamperia was perfect for my steampunk theme since it had that industrial look to it.

Of course, I had to add the pocket watch die since she is holding a pocket watch. I rubbed some Brushed Iron Wax on it, the gears, and mats to make them look worn and to bring out the details on them. This is my new favourite product, next to my Copic markers, of course!

You can never have too many gears on a steampunk card! So, I pulled out my Tim Holtz idea-ology gears, as well as another small silver gear that I had in my stash. I love how the silver gear had a heart for the centre of it instead of a circle! Perfect for an anniversary card!

Glossy accents were added to her pocket watch and Star Dust Stickles was added to the heart for the sentiment.

Using another trick that I like to implement, I coloured the rhinestones with my Copic markers to match my colours.

A simple sentiment with another heart says it all!

————————–

Copic Markers:

Skin: E000/E00/E21/E11/E04/R20
Hair: B24/C7/C9/100
Leather Vest: E29/E39/E35
Dress: E18/E09/E08/E07
Stripes: E18/E09/E08/E07/C9/C7/C6
Gloves: C9/C7/C6/C3
Metal Bits: C7/C5/C3
Rhinestones: E09

Close Up of Girl
Close Up of Steampunk Time Stamp

————————–

Card Recipe for My Clockwork Anniversary Card:

Steampunk Time, Krista Smith Stamps
Paper Basics – Stamper’s Select White Cardstock, Papertrey Ink
Mechanical Sea World 8″ x 8″ Paper Pad, Stamperia
Mixed Essentials Industrial Collection Steampunk Dies, Sue Wilson Creative
5.5” Gear Border die, From My Stash
Walnut Stain Distress Ink, Ranger
Mini Ink Blending Tool, Ranger 
Art Alchemy-Metallique Wax – Brushed Iron, Prima Marketing
Various Gears, Idea-ology, Tim Holtz
VersaFine, Onyx Black, Tsukineko
Rhinestone Basic Jewels, Stampin’ Up!
Star Dust Stickles, Ranger
Glossy Accents, Ranger

Basic Black Card Stock, Stampin’ Up!

Finished card size: 5” x 6 ½”

————————–

I have created several steampunk cards over the years for my hubby. Here are four of them that I have made.

Steampunk Cards That I Made
Past Steampunk Cards That I Made

Hope you like My Clockwork Anniversary Card using Steampunk Time by Krista Smith Stamps.

I am entering this card in the following challenge:
Passion For MarkersWeek 658 Challenge – use your favourite tool/product or embellishment

Thank you for stopping by!

Hugs,
Laurie

Love You Lots Card

Card with a girl catching raining hearts
Love You Lots Card

Hello Crafty Friends! It’s Laurie here! I am sharing Love You Lots Card using Raining Hearts by Paper Nest Dolls for my Design Team Inspiration Card.

The Details of My Card

My 28th wedding anniversary is coming up and I thought this cutie would be perfect for my hubby’s card from me!

I had fun colouring her with my Copic markers, especially the red! My hubby knows it’s one of my favourite colours. I even coloured her hair to look like mine when we first met. Don’t you love the falling hearts and her bucket filled with love!

The Smitten paper pulled out the red and pinks of my colouring. It has roses and hearts with keys on it. So, I decided to pull out my key embellishments as a nod to my Hubby having the key to my heart. I threaded it through some Real Red Ruffled ribbon to make it look like it was hanging from the card.

The die cut pink heart border added some popped up dimension to one side. All I added was some resin hearts to tie in the red colour scheme.

A pink stitched die cut heart and wooden heart added the perfect backdrop to my white embossed sentiment tying in my red and pink colour scheme!

————————–

Copic Markers:

Skin: E000/E00/E21/E11/E04/R20
Hair: E29/E27/E25/E23/E21
Reds: R29/R27/R25/R22
Yellows: Y38/Y35/Y32/E15
Hearts: R85/R83/R81
Soles of Boots: E27/E25/E23
Ground: E51/E50
Sky: B000/B000/0

Close Up of Girl catching hearts
Close Up of Girl

————————–

Card Recipe for Love You Lots Card:

Raining Hearts, Paper Nest Dolls
Paper Basics – Stamper’s Select White Cardstock, Papertrey Ink
Smitten, 6 x 6 Paper Pad, Authentique Paper
Cross Stitched Frame Borders Dies, Memory Box 
Give it a Whirl Dies, Stampin’ Up!
Love Notes Framelits Dies, Stampin’ Up!
Sealed with Love Stamp Set, Stampin’ Up!
VersaMark Ink Pad, Stampin’ Up!
White Stampin’ Emboss Powder, Stampin’ Up!
Real Red Mini Ruffled Ribbon, Stampin’ Up!
Resin Hearts Embellishments, Stampin’ Up!
Metal Key Embellishment, Michaels Arts & Crafts
Sending Love Embellishments, Wooden Heart, Stampin’ Up!
Clear Wink of Stella, Stampin’ Up! (on hearts)
Glossy Accents, Ranger (on boot and bucket)
Real Red and Rococo Rose Card Stock, Stampin’ Up!

Digital Stamp Size: 4” Tall

Finished card size: 5 ½” x 4 ¼”

————————–

To view my other Paper Nest Dolls cards, please click here.

Hope you like my Design Team card using
Raining Hearts by Paper Nest Dolls!


Thank you for stopping by!

Hugs,
Laurie

Magical Birthday Wishes Card

Easel Card with gnome riding a tricycle
Magical Birthday Wishes Card

Hello Crafty Friends! It’s Laurie here! I am sharing my Magical Birthday Wishes Card as my Design Team Inspiration for Conie Fong Art & Design using three different stamps that include Fairytale Cottage Background SceneTricycle Gnome and Sentiment Bundle PNG and Dandelion Wishes for the sentiment.

I decided to use a different sentiment than what comes in the Tricycle Gnome and Sentiment Bundle PNG. It does come with 11 images including a birthday sentiment, but I needed a larger sentiment for my card. The Bundle comes with:

  • Tricycle Gnome PNG
  • Tricycle Gnome – Double Heart Balloons PNG
  • Tricycle Gnome- Double Round Balloons PNG
  • Tricycle Gnome – Single Balloon PNG
  • Heart Balloon PNG
  • Round Balloon PNG
  • Happy Birthday Sentiment PNG Sentiment
  • With Sympathy Sentiment PNG Sentiment
  • Thinking Of You Sentiment PNG Sentiment
  • Sending You Love Sentiment PNG Sentiment
  • You Are So Special Sentiment PNG Sentiment

The Details of My Card

For my card, I thought it would be neat to combine the Fairytale Cottage and the Tricycle Gnome to create a fun easel card! I used the PNG version of the Tricycle Gnome so that the background would be visible behind the gnome. PNGs have a clear background.

For the Fairytale Cottage, there is a river that runs through it. But I decided that my gnome would be riding his tricycle down a dirt road instead of the river. So, I coloured the river as a road. I also strategically place him in the scene so that his flowers mostly cover up the wooden bridge. You probably wouldn’t notice it if I didn’t say anything. I also wanted to make sure that the quaint cottage was visible like he just left it to deliver his flowers.

Close Up of Scene
Close Up of Scene

I had a lot of fun colouring the scene and the gnome with my Copic markers! The card didn’t need any embellishments, but I did add Star Dust Stickles to the light coming from the windows, his pompom and the dog’s pompom. I also added some accents in white with a Gelly Roll Pen to his outfit. And finally, I added Clear Star Gelly Roll Pen to the spokes and pedals of his tricycle and the orange flower centres.

Since I didn’t have a metal die big enough to cut out my scene, I used my Brother Scan & Cut to cut out the scene and the subsequent circles for my easel. I love the easel card since it folds flat for mailing purposes!

————————–

Copic Markers:

Cottage:
Wood Trim: E47/E37/E35
Walls: E43/E42/E41/0
Roof: W5/W2
Windows: Y38/Y35/Y32/Star Dust Stickles

Scenery:
Grass/Bushes/Leaves: G29/G19/YG17/YG13
Rocks: W7/W5/W2
Road: E37/E35/E33/E31
Tree Trucks: E47/E37/E35
Sky: B00/B000/B0000/0
Birds: B97/B95/B93/B91/W2/0/YR04
Bridge: E37/E35/E33

Close Up of Gnome and Cottage

Gnome:
Skin: E000/E00/E21/E11/E04
Hair: C5/C4/C3/C1
Blues: B97/B95/B93/B91
Oranges: YR07/YR02/YR00
Yellows: Y38/Y35/Y32
Shoes: C5/C3/C1

Tricycle:
Wagon: E47/E37/E35
Tires: C9/C7/C5/C3
Metal Parts: C5/C3/C1/Clear Star Gelly Roll Pen
Blue Flowers: B97/B93/B91/Y38
Orange Flowers: YR07/YR02/YR00/E37/E35/E31
Yellow Flowers: Y38/Y35/Y32
Basket: W5/W2
Dog: E37/E35/E33/E31

————————–

Card Recipe for My Magical Birthday Wishes Card:

Fairytale Cottage Background SceneTricycle Gnome and Sentiment Bundle PNG and Dandelion Wishes, Conie Fong Art & Design
Paper Basics – Stamper’s Select White Cardstock, Papertrey Ink
White Gelly Roll Pen, Sakura
Clear Star Gelly Roll Pen, Sakura
Star Dust Stickles, Ranger
Brother Scan & Cut
Pumpkin Pie, Dapper Denim and Basic White card stock, Stampin’ Up!

Image sizes:
Scene: 5.5” x 5.5”
Gnome: 3” Tall

Finished card size: 5.75” x 5.75”

Card Laid Flat for Mailing

————————–

To view my other Conie Fong Art & Design projects, please click here.

Hope you like my Design Team Inspiration Card using
Fairytale Cottage Background SceneTricycle Gnome and Sentiment Bundle PNG and Dandelion Wishes for Conie Fong Art & Design!

I am entering this card in the following challenges:
613 Avenue Create – ATG (2 of 2)
World Wide Open Design Team Challenge Blog – ATG (3 of 3)
Polkadoodles Craft Challenge – ATG (2 of 2)

Thank you for stopping by!

Hugs,
Laurie

Hues of Happiness Birthday Card

Two cards with flowers on them.
Hues of Happiness Birthday Card

Hello Crafty Friends! Laurie here again! I am sharing my Hues of Happiness Birthday Card using the Hues of Happiness Suite Collection by Stampin’ Up!

The Details of My Card

This card was for a swap using products from the new Annual Catty. I love the bright and happy colours of the Hues of Happiness DSP! I also love that the dies die cut the flowers from the DSP!

Video of Die Cutting Flowers from the DSP

For my card, I thought a fun split panel card would work with the spiral notebook die as the panel joining the other 2 panels. I can see this spiral die working for so many cards, especially school cards! The two flowers and leaves were die cut from the DSP and matched the DSP colours on the panels.

One of the cards with pink and purple flowers on it
Version One of the Card

Since there are so many flowers that I could die cut, I decided to create different colour cards in the same layout. These two cards are only some of the colour combinations that I used.

A card with Blue and yellow flowers on it.
Second Version of the Card

Tip: to adhere the two card panels, I lined up the bottom panel with the bottom of the card base. Then, I added glue only to the top and bottom of the Basic White piece, careful not to add it too close to the centre. I made sure to leave enough room on the bottom panel to add my ribbon.

The sentiment was stamped onto ½” scrap and then snipped the edges on the angle. The Fresh Freesia was a 5/8” scrap and trimmed to match the Basic White piece.

The ribbon was wrapped around the bottom panel and tied in a bow. A scattering of matching Glossy Dots that come in the Suite added some shimmer.

Close Up of Version One Card

Supplies:

Stamps/Bundles/Dies: Hues of Happiness Suite Collection (158828)

Inks: Granny Apple Green (147095)

Paper: Fresh Freesia (155613), Basic White (159229)

Accessories: Whisper White Crinkled Seam Binding Ribbon (151326), Glossy Dots Assortment (included in Suite), Bone Folder (102300), Dimensionals (104430), Mini Stampin’ Dimensionals (144108), Stampin’ Seal (152813), Mini Glue Dots (103683), Paper Snips Scissors (103579)

Close Up of Version Two Card

Measurements: 

  • Fresh Freesia: 
    • 4 ¼” x 9 ½” scored a 5 ½”, fold and trim one side at 2”. Taking the separate piece, trim 2” off keeping this for the bottom panel.
    • Scrap for sentiment
  • Basic White:
    • 5 ¼” x 4” (inside of card)
    • 3 ½” x 2 ¾”
    • Scrap for sentiment
  • Hues of Happiness DSP:
    • 4” x 1 ¾” (2 pieces)
    • 2 die cut flowers and leaves

More Information on My Hues of Happiness Birthday Card:

Get to know the Hues of Happiness Suite with a burst of colorful florals! Check out this suite to use on your next paper-crafting projects and spread happiness. To find out more about this beautiful Suite, checkout this Stampin’ Up! video: https://www.youtube.com/watch?v=N9ac4l3EOPs

For more of my Stampin’ Up! cards, please click here.

You will find the other items listed above in my online store.

Colour Your World

A card with a Girl holding art supplies saying Fill your life with colors.
Colour Your World

Hello Crafty Friends! It’s Laurie here! I am sharing my Colour Your World as my Design Team Inspiration Card for Conie Fong Art & Design using the beautiful Artistic Leilani. She comes with 9 stamps including:

  • Artistic Leilani Left 
  • Artistic Leilani Right
  • Artistic Leilani Left – Short Dress
  • Artistic Leilani Right – Short Dress
  • Sentiment: You Color My World
  • Sentiment: You Colour My World
  • Sentiment: Happy Birthday To An Amazing Friend
  • Sentiment: I am not a hoarder. I am an artist.
  • Sentiment: Art comes from the heart

The Details of My Card

A good friend of mine retired recently and she loves to colour. In fact, she was the one who got me into making cards and colouring! So, I thought that Artistic Leilani would be perfect for her retirement card!

For my mini slimline card, I coloured Leilani with my Copic markers using the colour scheme of the Cute & Crafty Paper Pad with its bright colours. It was idea for my crafty colouring theme.

I used the piece of designer paper that had the bands of rainbow colours and layered it beneath my quatrefoil die cut. Isn’t it neat how the different bands of colour peek through the white die cut!

I love the cute Copic marker die cut piece from the Odds and Ends that I layered beneath my sentiment. A row of rainbow-coloured hearts is the other die cut piece that I pulled from the Chit Chat. You must have hearts when it comes to what you love to do!

I used Wink of Stella on the flowers in her hair and Glossy Accents on her pink jar. The finishing touch was some glittery sprinkles that matched my colour scheme.

————————–

Copic Markers:

Skin: E04/E11/E21/E00/E000/R20
Hair: E25/YR24/Y26/Y21
Pinks: RV25/RV23/RV10
Yellows: Y21/YR23/E25
Dress: BG15/BG13/BG11/BG10
Eyes: YG03/YG63/YG67
Copic Markers: C3/C0/YG67/RV23/BG15
Pencils: YG63/YG67/BG13/BG11/RV25/RV23
Paint Brushes: C5/C3/E25/E23/YR24/E21

Close Up of Girl holding art supplies
Close up of Artistic Leilani

————————–

Card Recipe for My Colour Your World:

Artistic Leilani, Conie Fong Art & Design
Paper Basics – Stamper’s Select White Cardstock, Papertrey Ink
Cute & Crafty 6” x 6” Paper Pad, Doodlebug Designs Inc.
#6 Quatrefoil Coverplate Etched Die, Photo Play
Stylish Shapes Dies, Stampin’ Up!
Cute & Crafty Odds & Ends, Doodlebug Designs Inc.
Cute & Crafty Chit Chat, Doodlebug Designs Inc.
Bright Glitter Assortment Sprinkles, Doodlebug Designs Inc.
White Gelly Roll Pen, Sakura
Glossy Accents, Ranger
Clear Wink of Stella, Stampin’ Up!
Granny Apple Green Card Stock, Stampin’ Up!

Finished card size: 6.5” x 3.5”

————————–

To view my other Conie Fong Art & Design projects, please click here.

Hope you like my Design Team Inspiration Card using
Artistic Leilani for Conie Fong Art & Design!

I am entering this card in the following challenges:
613 Avenue Create – ATG (1 of 2)
World Wide Open Design Team Challenge Blog – ATG (1 of 3)
Polkadoodles Craft Challenge – ATG

Thank you for stopping by!

Hugs,
Laurie

Hello My Friend Card

Card with a girl wearing a sweater with Eiffel Tower on it. She loves Paris.
Hello My Friend Card

Hello Crafty Friends! It’s Laurie here with my Hello My Friend Card using the sweet ‘Paris-Loving Laurie’ Digital Stamp By Rachelle Anne Miller Creative Studios. This stamp was created by Rachelle for me when I was on her Design Team. I just love my Mini Me and had been meaning to colour her for a long time.

The Details of My Card

For my card, I decided to colour with my Copic markers her top in this pretty blue colour that I love! Once I did, I discovered that it is a bang on colour match for the Stampin’ Up! colour Orchid Oasis! So, I pulled out the Tea Boutique DSP and used a floral sheet and an all-purpose pattern in Orchid Oasis. The hexagons were die cut from the DSP using the Beautiful Shapes Dies and pulled in the colours of the florals.

I stamped “my friend’ in black using the Hello Ladybug Stamp Set. It is clear photopolymer. So, I could die cut the hexagon and then stamp it. Next, I used the ombre hue of the Sweet Sorbet Glimmer Paper and foam adhesives sheets to die cut the Hello. To match the “hexagon hive”, I die cut a bee from some DSP and added Wink of Stella to its wings.

I added some ribbon through the hole of the tag matching the pink and Orchid Oasis metallic ribbon. The finishing touches were some matching matte dots and Clear Wink of Stella on the Eiffel Tower and the Stars.

————————–

Copic Markers:

Skin: E000/E00/E21/E11/E04/R20
Hair: E31/E33/E34/E35/E37
Shirt: B66/B63/B60
Collar: R32/R30/R000
Eiffel Tower: C5/C3/C1/Wink of Stella
Stars: Y00/E15/YR23/Y15/Y11/Wink of Stella
Sky: B0000/B000/B00

Close Up of 'Paris-Loving Laurie' Digital Stamp
Close Up of ‘Paris-Loving Laurie’ Digital Stamp

————————–

Card Recipe for My Hello My Friend Card:

‘Paris-Loving Laurie’ Digital Stamp, Rachelle Anne Miller Creative
Paper Basics – Stamper’s Select White Cardstock, Papertrey Ink
VersaFine Instant Dry Pigment Ink, Onyx Black, Tsukineko 
Hello Ladybug Stamp Set, Stampin’ Up!
Tea Boutique 6″ x 6″ Designer Series Paper, Stampin’ Up!
#6 Bracket & Tag Dies, PhotoPlay
2022–2024 In Color 6″ x 6″ Glimmer Paper, Stampin’ Up!
Foam Adhesive Sheets, Stampin’ Up!
Golden Honey Designer Series Paper, Stampin’ Up!
Detailed Bee Dies, Stampin’ Up!
Beautiful Shapes Dies, Stampin’ Up!
Hello Thinlits Dies, Stampin’ Up!
2022–2024 In Color Matte Decorative Dots, Stampin’ Up!
Orchid Oasis Metallic Woven Ribbon, Stampin’ Up!
Pink Ribbon, My Stash
Clear Wink of Stella, Stampin’ Up!
Orchid Oasis Card Stock, Stampin’ Up!

Finished card size: 6 ¼” x 3 ½”

————————–

To view my other Rachelle Anne Miller Creative Studios cards, please click here.

Hope you like my Hello My Friend Card using 
‘Paris-Loving Laurie’ Digital Stamp by Rachelle Anne Miller Creative Studios!

Thank you for stopping by!

Hugs,
Laurie

My Rebel Christmas Card

Baby Yoda Christmas Card
My Rebel Christmas Card

Hello Crafty Friends! It’s Laurie here! I am sharing my Rebel Christmas Card using Rebel Baby by Paper Nest Dolls for my Design Team Inspiration Card. It is never too early to start your Christmas cards and anyone who knows me, knows I love this little cutie patootie!

The Details of My Card

My Rebel Baby was already coloured from when I practiced for my presentation at the Wizards and Rebels Weekend for Paper Nest Dolls back in August (here is a link to that card). He has been sitting on my desk waiting to be put on a card and I thought a Christmas card would be fun!

For my card, I found the cutest digital Christmas paper with him on it in a buffalo check pattern! I wanted the image in the top left corner where he is in his pram peeking through on my card. So, I designed my card around that image…though there was a lot of cute images of him all over the paper! Lol!

I used several Christmas papers that matched my red and black theme. In fact, the stitched circle behind him was digital paper from the Weekend. I thought it would tie in the Star Wars genre.

Don’t you just love his Santa hat at a jaunty angle! It’s a retired Stampin’ Up! punch, but I’m sure there are lots of dies out there that would work just as well!

“A Merry Christmas I Wish You!” Of course, I had to have a Yoda-ish type sentiment which I typed on my computer and printed it out. Several handmade poinsettias and red rhinestones tie in the red Santa hat!

————————–

Copic Markers:

Rebel Baby
Skin: YG11/YG13/YG17/R20
Robes: E70/E71/E74

Close Up pf Baby Yoda on the Card
Close Up pf Rebel Baby

————————–

Card Recipe for My Rebel Christmas Card:

Rebel Baby, Paper Nest Dolls
Paper Basics – Stamper’s Select White Cardstock, Papertrey Ink
Sentiment, Printed out on Computer
Christmas Space Baby Digital Papers, SunrayBlossom
Star Wars Digital Paper, ArtStudio
Farmhouse Christmas 6” x 6” Paper Pad, Carta Bella
Make It Merry 6” x 8” Paper Pad, Simple Stories
Stitched Layering Circle Dies, Memory Box
Jolly Hat Builder Punch, Stampin’ Up!
Floral Punch Poinsettia, Nellie’s Choice
Metallic Pearls, Stampin’ Up!
Red Rhinestone Basic Jewels, Stampin’ Up!
Basic Black, Real Red, Old Olive
and Basic White Card Stock, Stampin’ Up!

Finished card sizes: 5.5” x 5.5”

————————–

To view my other Paper Nest Dolls cards, please click here.

Hope you like my Design Team card using
Rebel Baby by Paper Nest Dolls!

Thank you for stopping by!

Hugs,
Laurie

Stayin Alive Disco Card

A card with a Disco Dancer on it
Stayin Alive Disco Card

Hello Crafty Friends! It’s Laurie here! I am sharing my Stayin Alive Disco Card as my Design Team Inspiration Card for Paper Nest Dolls using Decade Collection Disco Amara. There are ten dolls in the Decade Collection that come in both rubber and digital stamps. You can find all the digital versions here.

Decade Doll Collection by Paper Nest Dolls

The Details of My Card

For my card, I used the Seventies Ciao Bella Paper again to create my mini slimline card. This piece of paper is the left-over piece from my Roller Disco Babe card! So, I was able to get 2 cards made using one sheet of the paper! I love the disco ball and the “Stayin Alive” words under her feet!! The “Funky” sentiment was snipped from the paper as well. Perfect for Disco Amara!

To match the glitz of a disco ball, I added stars in Gold Metallic Paper. I even added a star flourish behind Amara. Love the way the curls and swirls of the flourish mimic movement…almost like Amara is dancing off the card! The only other things the card needed was a scattering of rhinestones and Gold Gelly Roll Pen on her earrings.

————————–

Copic Markers

Skin: E15/E13/E11/E00/E000/R20
Hair: C9/C7/C5/C3
Outfit: V17/V15/V12
Boots: C9/C7/C5/E25/E23

Close Up of Disco Girl
Close Up of Disco Amara

————————–

Card Recipe for My Stayin Alive Disco Card

Decade Collection Disco Amara, Paper Nest Dolls
Paper Basics – Stamper’s Select White Cardstock, Papertrey Ink
Seventies 6” x 6” Paper Pad, Ciao Bella
Gold Metallic Specialty Paper, Stampin’ Up!
Rhinestone Basic Jewels, Stampin’ Up!
Stitched Stars Dies, Stampin’ Up!
Gold Gelly Roll Pen, Sakura
Gorgeous Grape Card Stock, Stampin’ Up!

Finished card size: 6” x 3 ½”

Stamp Size: 4”

————————–

To view my other Paper Nest Dolls cards, please click here.

My Other Cards in the Decade Collection

For more information on my cards, please click the photos.

Hippie Girl on a card
My Groovy Love Card
Grad with a girl in roller skates on it
Roller Disco Babe
Card with 50s greaser and girl with poodle skirt
My Grease Lightning Card
Card with a Girl from Seventies and a retro bus on it
My Road Trip Card
Card with a Hippie Girl
Peace Not War Card

Hope you like my Design Team Inspiration Card using
Decade Collection Disco Amara by Paper Nest Dolls!

Thank you for stopping by!

Hugs,
Laurie

Christmas Presents in July Card

Christmas card with gnome holding presents
Christmas Presents in July Card

Hello Crafty Friends! It’s Laurie here! Who else loves to make Christmas in July cards? I am sharing my Christmas Presents in July Card as my Design Team Card for Conie Fong Art & Design using the cute Christmas Present Gnome and Sentiment Bundle. This bundle comes with 9 stamps including Christmas Present Gnome PNG/JPG format, Christmas Present Gnome with Tree JPG format, Christmas Tree PNG/JPG format, Sentiment May Your Christmas Be Filled with Peace and Love PNG/JPG format and Sentiment Season’s Greeting PNG/JPG format.

Details of My Card

I had coloured with my Copic markers this sweet gnome a while back and I finally had a chance to make a card for him. I also made another card with him that I will post at the end.

For my card, the Doodlebug paper was perfect to match the bright colours in my colouring. Even the trees in the paper match my coloring! Lol!

I used the CC Designs Cloud Stencil and my Picket Fence Blending Brush to create clouds in Pool Party behind him.

I thought it would be fun to have him tromping through the snow. So, I pulled out my snow marker to create snow on the ground. I just love how it puffs up when I heat it with my Heat Tool.

Since it was a Christmas card, I needed lots of sparkle. So, I added Star Dust stickles to the star, ornaments, and trim on his hat. The holly berries even glisten with glossy accents!

The only die cut I used was a tree that I sponged Old Olive ink on and decorated with rhinestones coloured to match the ornaments on my tree.

————————–

Copic Markers:

Skin: E000/E00/E21/E11/E04
Hair: C4/C3/C1
Reds: R29/R27/R24/R22
Greens: G46/YG17/YG23
Pink: RV11/RV32/RV34
Blue: BG11/BG13/BG15
Yellow: Y17/Y15/Y11/E15
Tree Trunk: E37/E35/E33
Snow: BG11/Marvy Snow Marker
Rhinestones: R29/RV34/BG15/Y17

Close Up of Gnome Holding Presents
Close Up of Christmas Present Gnome

————————–

Card Recipe for My Christmas Presents in July Card:

Christmas Present Gnome and Sentiment Bundle, Conie Fong Art & Design
Paper Basics – Stamper’s Select White Cardstock, Papertrey Ink
Sugarplums 6” x 6” Paper Pad, Doodlebug Design Inc.
Snow Covered Tree Cutting Die, Dee’s Distinctively Dies
Cloud Stencil, C.C. Designs
Snow Marker Puff Paint, Marvy
Heat Tools, Stampin’ Up!
Rhinestone Basic Jewels, Stampin’ Up!
Star Dust Stickles, Ranger (on star, ornaments, and hat trim)
Glossy Accents, Ranger (on berries)
Old Olive, Pool Party Classic Ink Pads, Stampin’ Up!
Old Olive Classic Ink Pads, Stampin’ Up
Blending Brushes, Picket Fence
Sponge
Real Red and Granny Apple Green Card Stock, Stampin’ Up!

Finished cards size: 5.5” x 5.5”

————————–

To view my other Conie Fong Art & Design cards, please click here.

To view my other card using Christmas Present Gnome and Sentiment Bundle click the photo below.

My Design Team Card for Conie Fong Art & Design
Happy Christmas Presents Card

Hope you like my Design Team Inspiration Card using
Christmas Present Gnome and Sentiment Bundle for Conie Fong Art & Design!

Thank you for stopping by!

Hugs,
Laurie

Hello Ladybug Card

Card with a ladybug and daisies on it.
Hello Ladybug Card

Hello Crafty Friends! Laurie here again! I am sharing my Hello Ladybug Card using the Hello Ladybug Stamp Set and matching Ladybug Builder Punch.

The Details of My Card

This card was for a swap, but the Annual Catty was retiring. We couldn’t use any retiring product on the card. So, my solution was lots of punches and embellishments that I knew would carry over!

For my card, I decided to use the Picture This Dies again since it reminded me of the dots on the ladybug’s wings. These dies are so versatile, and I have used them for several cards! I used the circles die for this card and thought it would be neat having the daisies popping out of the holes!

Before adhering with dimensionals the die cut Real Red piece to the Basic Black mat, I wrapped white Baker’s twine around one of the holes and tied it in a bow.

After lots of punching and layering 2 sets of petals on top of each other followed by the flower centre from the Poppy Moments Dies, I had 3 sets of flowers for the holes.

Next came the ladybug. But first, I heat embossed in black the spots before I punch the wings out of Real Red cardstock. Then I punched out the body in Basic Black and assembled the ladybug.

Since the stamp set is photopolymer and I could line up my stamp easily, I die cut the smallest circle out of the Circles Die and then stamped the hello in black. Tip: only use the part of the die you want, not the whole thing to save paper. Another tip is use Multipurpose Liquid Glue to allow you time to slide the sentiment piece in place.

A scattering of black Classic Dots and Red Rhinestones tied in my ladybug theme.

Supplies:

Stamps/Bundles/Dies: Hello Ladybug Stamp Set (157693), Picture This Dies (155559), Poppy Moments Dies (151594)

Inks: Tuxedo Black Memento Ink Pad (132708), VersaMark ink (102283)

Paper: Basic White Thick (159229), Basic Black (121045), Basic White (159229) (159276), Real Red (102482), Crushed Curry (131199)

Accessories: Ladybug Builder Punch (157698), Medium Daisy Punch (149517), Baker’s Twine Essentials Pack (155475), Red Rhinestone Basic Jewels (146924), Classic Matte Dots (158146), Basics Embossing Powder (155554), Heat Tool (129053), Bone Folder (102300), Multipurpose Liquid Glue (110755Stampin’ Dimensionals (104430), Mini Stampin’ Dimensionals (144108), Stampin’ Seal (152813), Mini Glue Dots (103683)

Close Up of Card
Close Up of Card

Measurements: 

  • Basic White Thick: 
    • 5 ½” x 8 ½” scored a 4 ¼”
  • Basic Black:
    • 5 ¼” x 4”
    • Scrap for Ladybug body
  • Real Red:
    • 5” x 3 ¾”
    • Scrap for wings
  • Basic White:
    • 1 ¾” strip, enough to punch 6 flowers
    • Hello: 1” x 1”
  • Crushed Curry
    • Scrap for flower centers x 3

More Information on My Hello Ladybug Card:

For more of my Stampin’ Up! cards, please click here.

You will find the other items listed above in my online store.

My Groovy Love Card

Hippie Girl on a card
My Groovy Love Card

Hello Crafty Friends! It’s Laurie here! I am sharing My Groovy Love Card as my Design Team Inspiration Card for Paper Nest Dolls using Decade Collection Hippie Avery. There are ten dolls in the Decade Collection that come in both rubber and digital stamps. You can find all the digital versions here.

Decade Doll Collection by Paper Nest Dolls

The Details of My Card

For my card, I coloured Avery with my Copic markers to match my Seventies paper! Do you remember when chocolate brown and orange were in? Lol! I just had to give Avery red hair to go with my card!

I love the juxtaposition of the paper with circles and the square retro panel die floating on top. The paper pack included a sheet of sentiments, and I thought the “Let your Love grow tall” matched my card in colours and theme.

The finishing touch was a scattering of rhinestones that I coloured with my Copic markers to match Avery.

————————–

Copic Markers

Skin: E04/E11/E21/E00/E000/R20
Hair: YR14/YR18/E08/E18
Oranges: YR09/YR07/YR02
Browns: E27/E25/E23
Yellows: Y38/Y35/Y32
Boots: E27/E25/E23
Rhinestones: YR09/Y38/E27

Close Up of Hippie Girl
Close Up of Hippie Avery

————————–

Card Recipe for My Groovy Love Card

Decade Collection Hippie Avery, Paper Nest Dolls
Paper Basics – Stamper’s Select White Cardstock, Papertrey Ink
Seventies 6” x 6” Paper Pad, Ciao Bella
Retro Card Panel Precision Cutting Die, Frantic Stamper Inc.
Rhinestone Basic Jewels, Stampin’ Up!
Glossy Accents, Ranger
Thick Basic White, Pumpkin Pie, 
and Early Espresso Card Stock, Stampin’ Up!

Finished card size: 5 ½” x 4 ¼”

Stamp Size: 4”

————————–

To view my other Paper Nest Dolls cards, please click here.

To view my other card in this Collection, please click here.

My Other Cards in the Decade Collection

For more information on my cards, please click the photos.

Card with 50s greaser and girl with poodle skirt
My Grease Lightning Card
Card with a Girl from Seventies and a retro bus on it
My Road Trip Card
Card with a Hippie Girl
Peace Not War Card

Hope you like my Design Team Inspiration Card using
Decade Collection Hippie Avery by Paper Nest Dolls!

Thank you for stopping by!

Hugs,
Laurie

My Orchid Beauty Birthday Wishes

Birthday Card with a Girl with Orchids in her hair
My Orchid Beauty Birthday Wishes

Hello Crafty Friends! It’s Laurie here! I am sharing My Orchid Beauty Birthday Wishes as my Design Team Inspiration Card for Conie Fong Art & Design using the beautiful Alanna. Don’t you just love that serene look she has!

The Details of My Card

For my card, I decided to use some pretty papers with pastel colours from The Paper Boutique. So, I coloured with my Copic markers Alanna to match them. That blue is so pretty that I had to give her eyeshadow to match her dress!

I went with several die cuts like the leafy vine, the delicate pink frame, and the butterflies to decorate my card. The sentiment is from a matching paper pad and went perfectly with my colours. A scattering of gems and a gem in the centre of each butterfly added some sparkle. A finishing touch was Wink of Stella on the orchids. Such a beautiful image!

————————–

Copic Markers:

Skin: E04/E11/E21/E00/E000/R20
Hair: E29/E27/E25/E23/E21
Flowers/Lips: R32/R30/R000
Dress: B66/B63/B60/R32/R30/R000
Eyeshadow: B60

Close Up of girl on card
Close Up of Alanna

————————–

Card Recipe for My Orchid Beauty Birthday Wishes:

Alanna, Conie Fong Art & Design
Paper Basics – Stamper’s Select White Cardstock, Papertrey Ink
A4 Spring Whispers Coloured Card Collection, The Paper Boutique
Spring Whispers 8” x 8” Paper Pad, The Paper Boutique
Spring Whispers 8” x 8” Embellishment Pad, The Paper Boutique
In Bloom 6” x 6” Paper Pad, My Mind’s Eye
Fanciful Flourish, Cheery Lynn Designs
Fancy Frames Dies, Stampin’ Up!
Butterfly Beauty Thinlits Dies, Stampin’ Up!
Brilliant Wings Dies, Stampin’ Up!
Scallop Contours Dies, Stampin’ Up!
Elegant Faceted Gems, Stampin’ Up!
Clear Wink of Stella, Stampin’ Up!

Finished card size: 5.5” x 5.5”

————————–

To view my other Conie Fong Art & Design projects, please click here.

Hope you like my Design Team Inspiration Card using
Alanna for Conie Fong Art & Design!

Thank you for stopping by!

Hugs,
Laurie

My Flowers for You Card

A card with a dragon holding a bouquet of flowers
My Flowers for You Card

Hello Crafty Friends! It’s Laurie here! I am sharing My Flowers For You Card as my Design Team Inspiration Card for Conie Fong Art & Design using the Dragon Bouquet and Sentiment Bundle. This stamp is so versatile and can be used for so many occasions! It includes 6 images and comes in PNG or JPG:

  • Dragon Bouquet
  • Thinking Of You Sentiment
  • Have A Beautiful Day
  • Hello Friend
  • Just Because
  • Flowers For You Sentiment

The Details of My Card

For my card, I decided on the MME paper since I love the rustic wood texture and the collage on the paper! There is a sentiment on it under his feet, “start every day with a smile”. I thought this was such a sweet sentiment and would bring a smile to the recipient

From there, I picked out my Copic marker colours from the paper to colour my cute dragon and the bouquet. I also coloured some extra flowers that you get in the bundle in the colours I used for my bouquet. The sentiment from the bundle was die cut into a banner and layered with the coloured flowers and another banner below.

For embellishments, I used brass butterflies, clear epoxy dew drops and Clear Wink of Stella on the flowers.

————————–

Copic Markers:

Blue/Greens: BG49/BG15/BG13/BG32/BG11
Greens: YG67/YG63/YG03
Reds: R27/R24/R22
Yellows: Y26/Y28/Y21
Paper Bag: E44/E43/E42/E41
Sunflower: Y26/Y28/Y21/E42/E44/E43
Dragon’s Nails: E43/E41

Close Up of Dragon Holding a Bouquets of Flowers

————————–

Card Recipe for My Flowers for You Card:

Dragon Bouquet and Sentiment Bundle, Conie Fong Art & Design
Paper Basics – Stamper’s Select White Cardstock, Papertrey Ink
Dolled Up 6” x 6” Paper Pad, My Mind’s Eye
Stylish Shapes Dies, Stampin’ Up!
Silver & Clear Epoxy Essentials, Stampin’ Up!
Brushed Brass Butterflies, Stampin’ Up!
Clear Wink of Stella, Stampin’ Up!

Finished card size: 5.5” x 4.25”

————————–

To view my other Conie Fong Art & Design projects, please click here.

Hope you like my Design Team Inspiration Card using
Dragon Bouquet and Sentiment Bundle for Conie Fong Art & Design!

Thank you for stopping by!

Hugs,
Laurie

Good Grief! It’s Your Birthday!

Charlie Brown wishing a Happy Birthday
Good Grief! It’s Your Birthday!

Hello Crafty Friends! It’s Laurie here to share my Good Grief! It’s Your Birthday Card using The Great Box Limited Edition Box by Kindred Stamps! It’s my brother’s birthday today. I remember us watching the antics that the Charlie Brown Gang got up to in the cartoons. 

The Details of My Card

For my card, I decided to create a scene, but to fit all my characters, I went with a fun pop out card.

Top Side View of Card
Top View of Card Showing Folds

My inspiration was where they all go on stage and start dancing! I always loved that part! So, I used some wood Designer Series Paper to create the floor to my stage.

Linus, Sally, Schroder and Lucy
Linus, Sally, Schroder and Lucy on Stage

Once I coloured with my Copic markers my characters, I built my stage. The card folds out like a book, so you see more characters as it unfolds until you have it fully open.

Marcie, Peppermint Patty, Woodstock and Snoopy on Stage

For most of my card I used The Great Box Limited Edition Box. Don’t you love the doghouse with Snoopy and Woodstock dancing around the sentiment! The Charlie Brown chevron pattern paper was perfect for the backdrop of my card! Almost like curtains to the stage.

Inside Card Laid Flat

————————–

Copic Markers:

Charlie Brown
Skin: E04/E11/E21/E00/E000
Tongue/Mouth: R20/R22
Shirt: Y38/Y35/Y32/C7/C6/C4
Shorts: C7/C6/C4
Shoes: E11/E15
Socks: Y38/Y35/Y32

Close Up of Charlie Brown

Linus
Skin: E04/E11/E21/E00/E000
Hair: E31/E30
Shirt/Socks: R29/R27/R24/R22
Shorts: C9/C7/C6
Shoes: E11/E15
Blanket: B28/B24/B21

Close Up of boy holding a blanket
Close Up of Linus

Sally
Skin: E04/E11/E21/E00/E000/R20
Hair: YR24/Y26/Y21
Dress: B29/B28/B24/B21/White Gelly Roll Pen
Shoes: C3/C1/0

Schroder
Skin: E04/E11/E21/E00/E000
Hair: YR24/Y26/Y21
Shirt: V12/V15/V17
Pants: B99/B97/B95/B93
Shoes: E11/E15
Piano: R29/R27/R24/R22/C6

Lucy
Skin: E04/E11/E21/E00/E000/R20
Hair: C9/C7/C6C4
Dress: B26/B28/B21
Shoes: C7/C6/C4/C3/0

Close Up of boy playing piano and two girls listening
Close Up of Sally, Schroder and Lucy

Marcie
Skin: E04/E11/E21/E00/E000
Hair: C9/C7/C6/C4
Top/Socks: YR18/YR16/YR14/YR12
Shorts: C7/C6/C4
Shoes: C3/C1
Glasses: B000/0

Peppermint Patty
Skin: E04/E11/E21/E00/E000
Tongue/Mouth: R20/R22
Hair: E18/E08/YR16/YR14
Top: YG03/YG63/YG67
Shorts: B21/B24/B28
Shoes: E11/E15

Close up girl in glasses and another girl
Close Up of Marcie and Peppermint Patty

Woodstock
Feathers: Y38/Y35/Y32/
Tongue/Mouth: R20/R22/W2

Snoopy
Fur: W8/W6/W4/W2/0
Tongue/Mouth: R20/R22/W2

Close Up of bird and dog infront of doghouse
Close Up of Woodstock and Snoopy

————————–

Card Recipe for My Good Grief! It’s Your Birthday! Card:

The Great Box Limited Edition Box, Kindred Stamps
(The Great Paper Pad, Great Box Stamp Set,
Doghouse Die, Sequins and Washi Tape)
Paper Basics – Stamper’s Select White Cardstock, Papertrey Ink
Wood Textures Designer Series Paper, Stampin’ Up!
Handsomely Suited Stamp Set, Stampin’ Up!
White Gelly Roll Pen
Tuxedo Black Memento Ink, Stampin’ Up!
Basic White Thick, Basic Black, Crushed Curry
and Real Red, Card Stock Stampin’ Up!

Finished card size: 4.25” x 5.5”

My Card in Action

————————–

For more of my Copic cards, please click here.

Hope you like My Good Grief! It’s You Birthday! Card using the
The Great Box Limited Edition Box by Kindred Stamps!

Front of My Card with a boy on it wishing a Happy Birthday
Front of My Card

Thank you for stopping by!

Hugs,
Laurie