My Happy 2024 Calendars

Happy 2024 Calendars - two handmade calendars. One with a bee on it and one with a bird.
My Happy 2024 Calendars

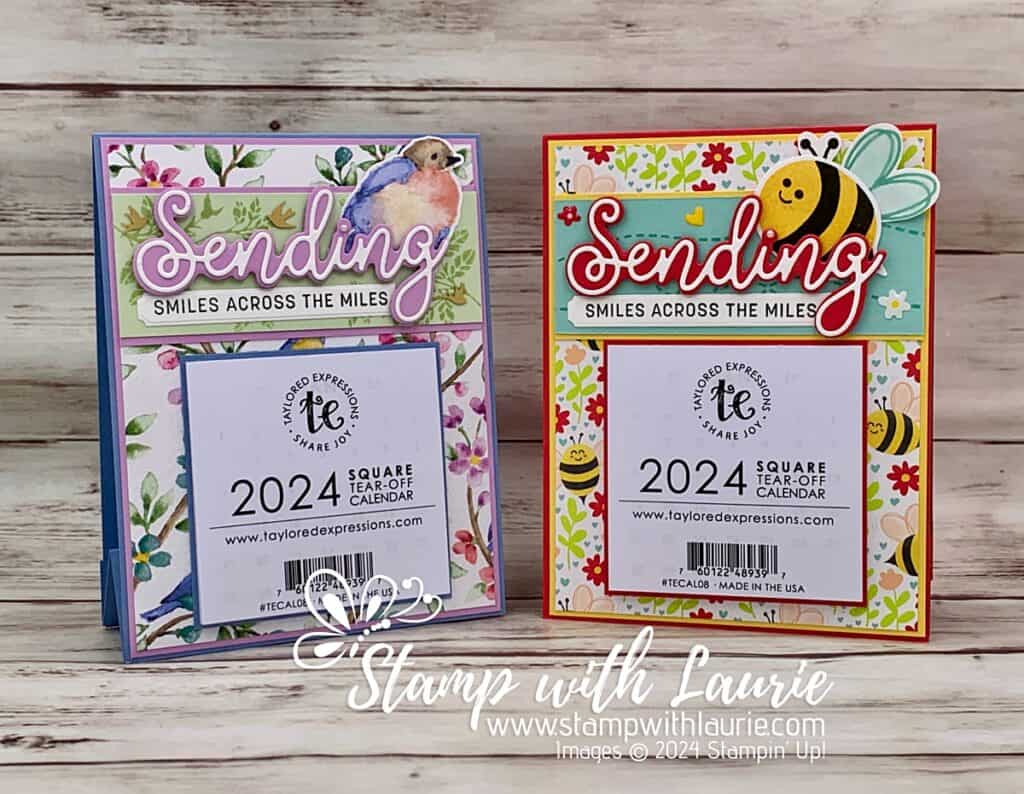
Hello Crafty Friends! Laurie here again! I am sharing My Happy 2024 Calendars using the Bee My Valentine Bundle and the Flight & Airy Designer Series Paper by Stampin’ Up! I didn’t get done my Christmas cards this year due to catching Covid. So instead, I decided to send out calendars to some of my customers in the new year.

The Details of My Happy 2024 Calendars

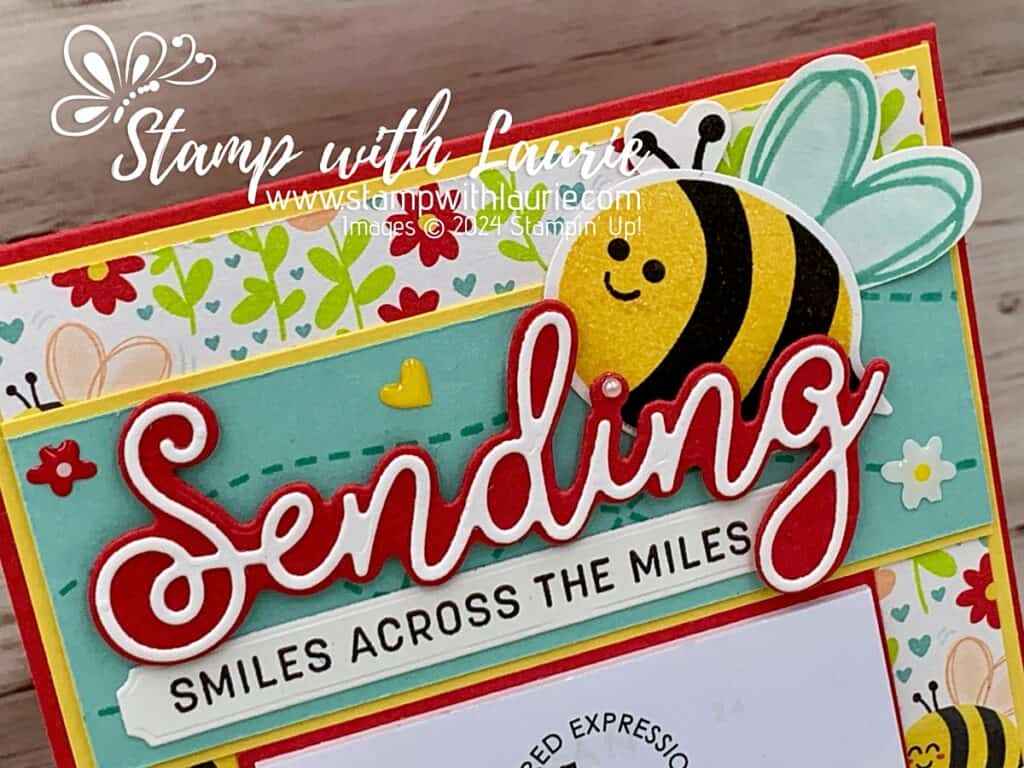
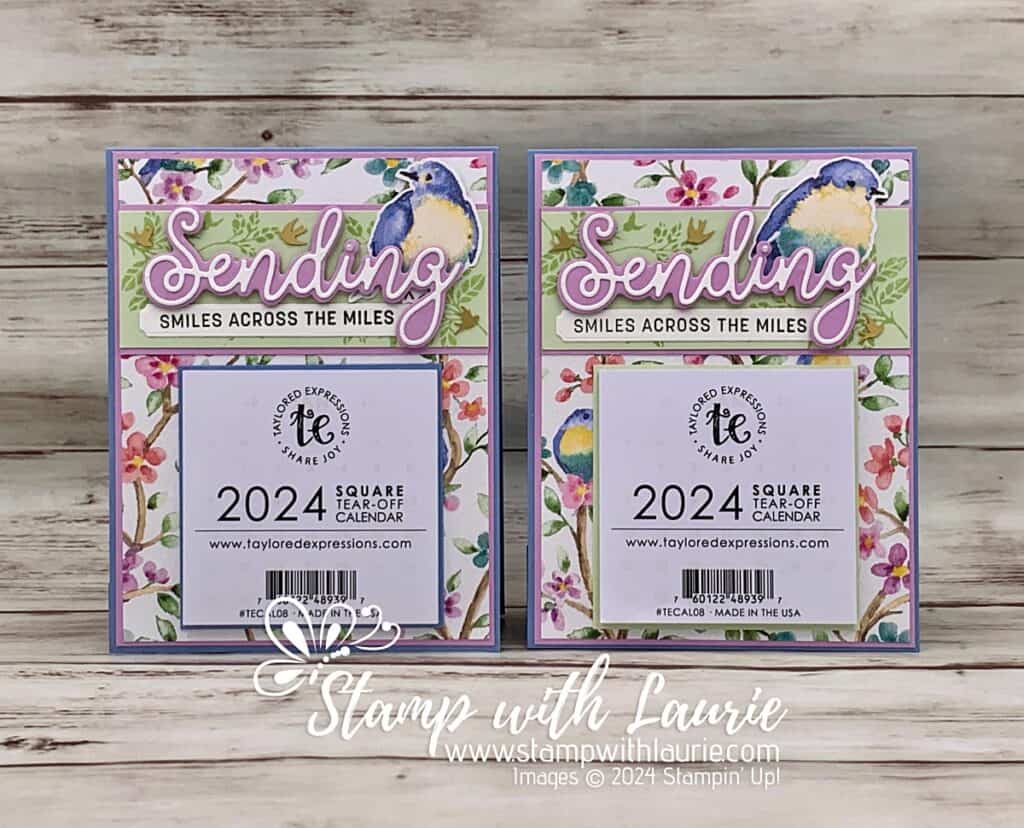
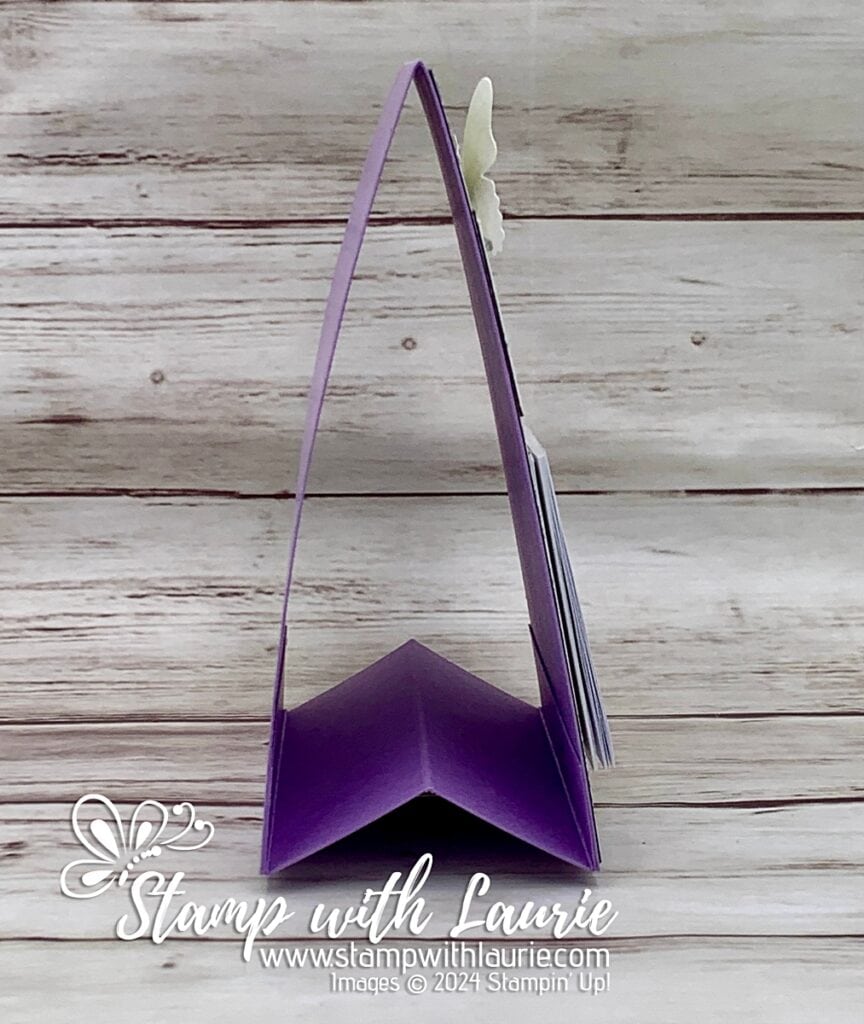
For my calendars, I decided to create two different calendars with the same design but using different products. I couldn’t resist using the beautiful Flight & Airy Designer Series Paper which is a Sale-a-bration freebie if you spend $60.00 CDN on qualifying orders. And don’t you just love those cute bees from the Bee My Valentine Bundle!

Five Bee Calendars
Bee Calendars

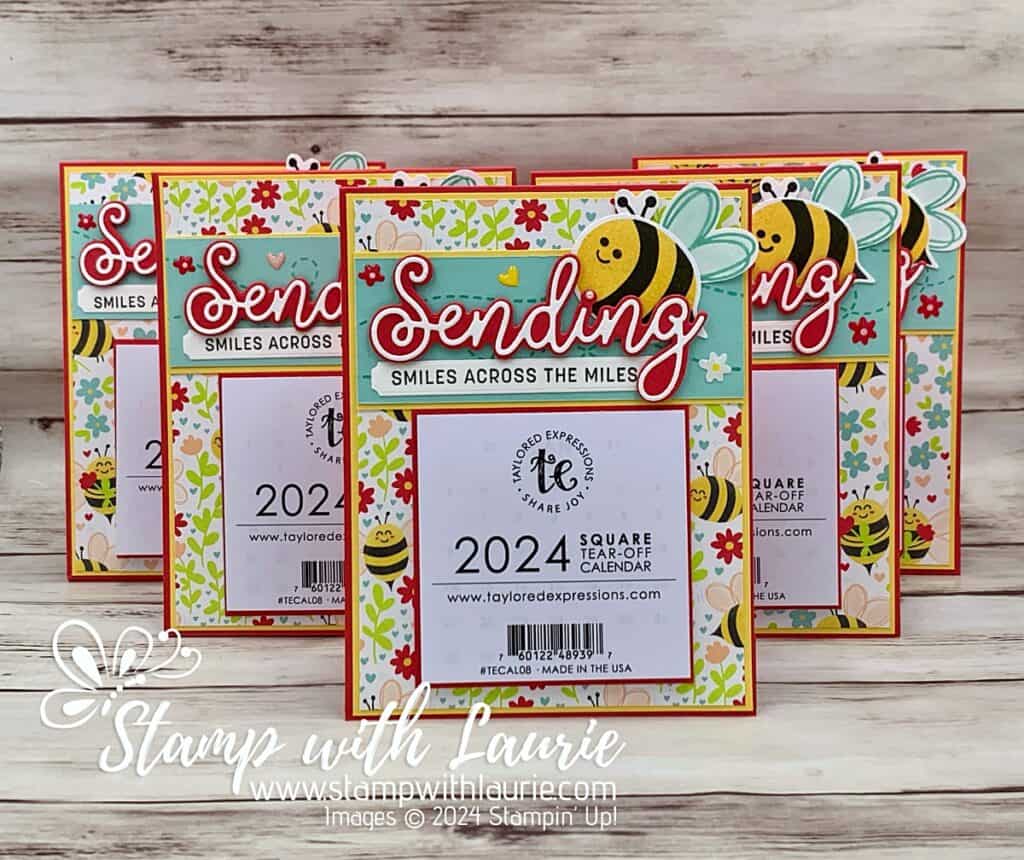
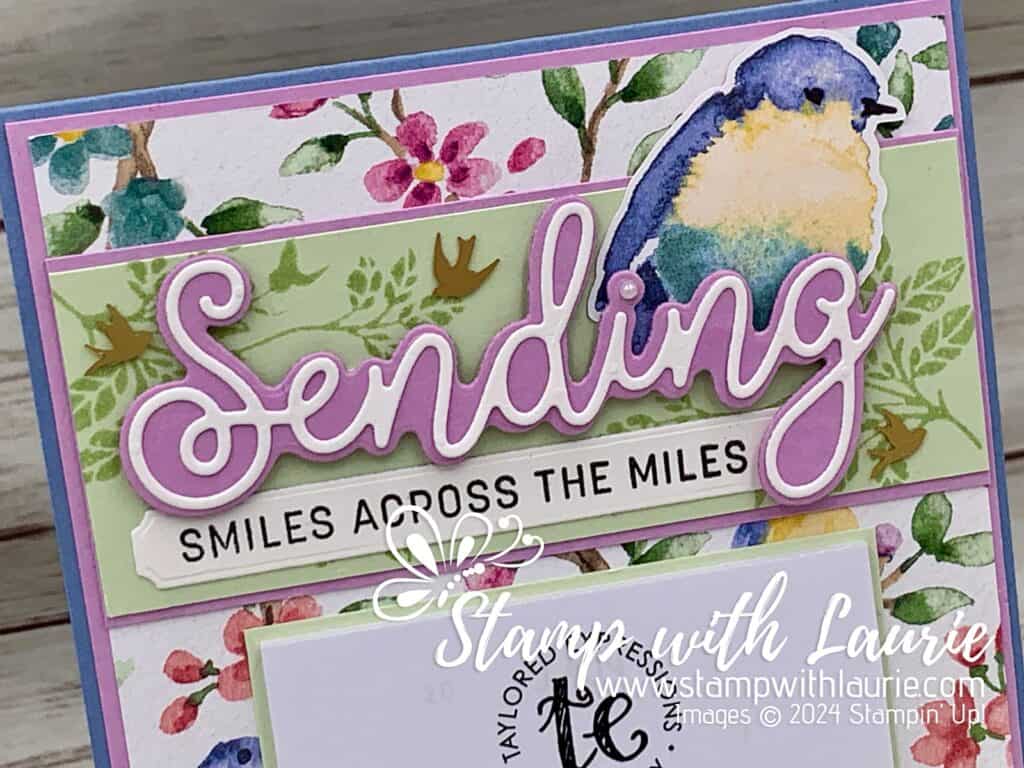
Since I planned to mail these out, the Sending Dies was perfect way to send “smiles across the miles”! To add some interest to the Pool Party and Soft Sea Foam card stocks behind my focal point, I did some tone-on-tone stamping. For the Pool Party one, I stamped a couple of times the bee trail in Pool Party. For the Soft Sea Foam, I stamped the leaves from the Softly Sophisticated Bundle twice in Soft Sea Foam. This bundle is also free with a $120 CDN on qualifying orders during Sale-a-bration.

Five Bird Calendars
Bird Calendars

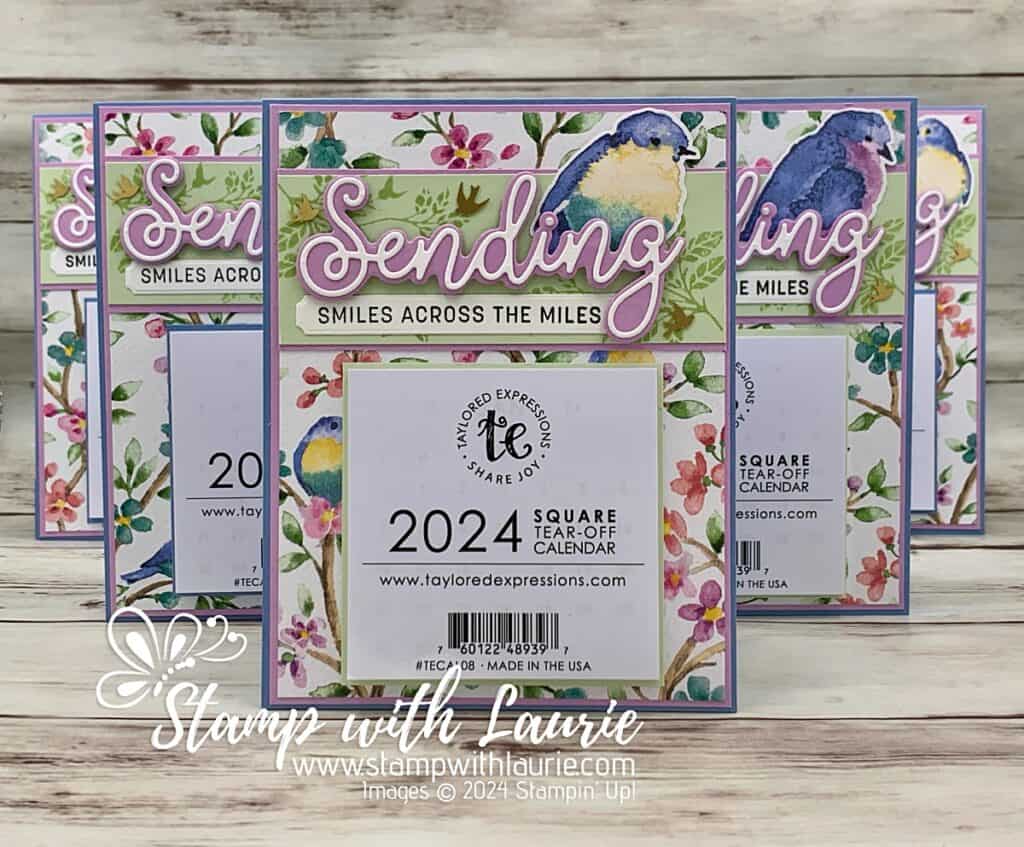
The bee was stamped and punched out with the matching builder punch. The birds were fussy cut from the Flight & Airy DSP. I used different birds for each calendar since there was such a selection from which to choose.

Two of the Bird Calendars

Next, I used the Adhesive-Backed Hearts & Flowers and Adhesive-Backed Dragonflies & Birds for embellishments. I also used a pearl for the “i” in “Sending”.

Close Up of Focal Point with Bird

The final thing was to use the technique where you press the ink pad lid when closed to get some ink. I did this with the Pool Party ink pad and picked it up with my Wink of Stella. This gave the bee wings a nice sparkle!

Close Up of Focal Point with Bee

Supplies:

Stamps/Bundles/Dies: Bee My Valentine Bundle (162554), Sending Smiles Stamp Set (158701), Sending Dies (159271), Softly Sophisticated Bundle (162947)

Inks: Pool Party Classic Stampin’ Pad (147107), Sea Foam Classic Stampin’ Pad (147102), Tuxedo Black Memento Ink Pad (132708), Daffodil Delight Classic Stampin’ Pad (147094), 

Paper: Real Red (102482), Balmy Blue (146982), Soft Sea Foam (146988), Pool Party (122924), Fresh Freesia (155613), Daffodil Delight (119683), Basic White (159276), Bee Mine Designer Series Paper (162546), Flight & Airy Designer Series Paper (162977)

Accessories: Adhesive-Backed Hearts & Flowers (162557), Iridescent Pearl Basic Jewels (158987), Adhesive-Backed Dragonflies & Birds (162743), Wink of Stella (141897), Paper Trimmer (152392), Paper Snips (103579), Bone Folder (102300), Stampin’ Dimensionals (104430), Mini Stampin’ Dimensionals (144108), Stampin’ Seal (152813), Mini Glue Dots (103683), Taylored Expression Calendars

Two Different Birds on Calendars

Measurements: 

  • Real Red/Balmy Blue (3 pieces):
    • 11” x 4 ¼” scored at 5 ½”
    • 4” x 4 ¼” scored at ¾”, 2” and 3 ¼” along 4” side
    • 3-7/8” x 3-7/8” (for behind calendar)
    • 1 ½” x 3 ½” (Sending die)
  • Daffodil Delight/Fresh Freesia: 
    • 4-1/8” x 5-3/8”
    • 4” x 2-5/8”
    • 1 ½” x 3 ½” (Sending die)
  • Pool Party/Soft Sea Foam: 4” x 2 ½”
  • Basic White:
    • 1 ½” x 3-3/8” (Sending die)
    • 3/8” x 3-3/8” (Sentiment)
    • 1 ¾” x 1-3/16” (Bee body)
    • Scraps for wings and antenna
  • Bee Mine Designer Series Paper:
    • 4” x 5 ¼”
  • Flight & Airy Designer Series Paper:
    • 4” x 5 ¼”
Side View of Calendar

More Information on My Happy 2024 Calendars

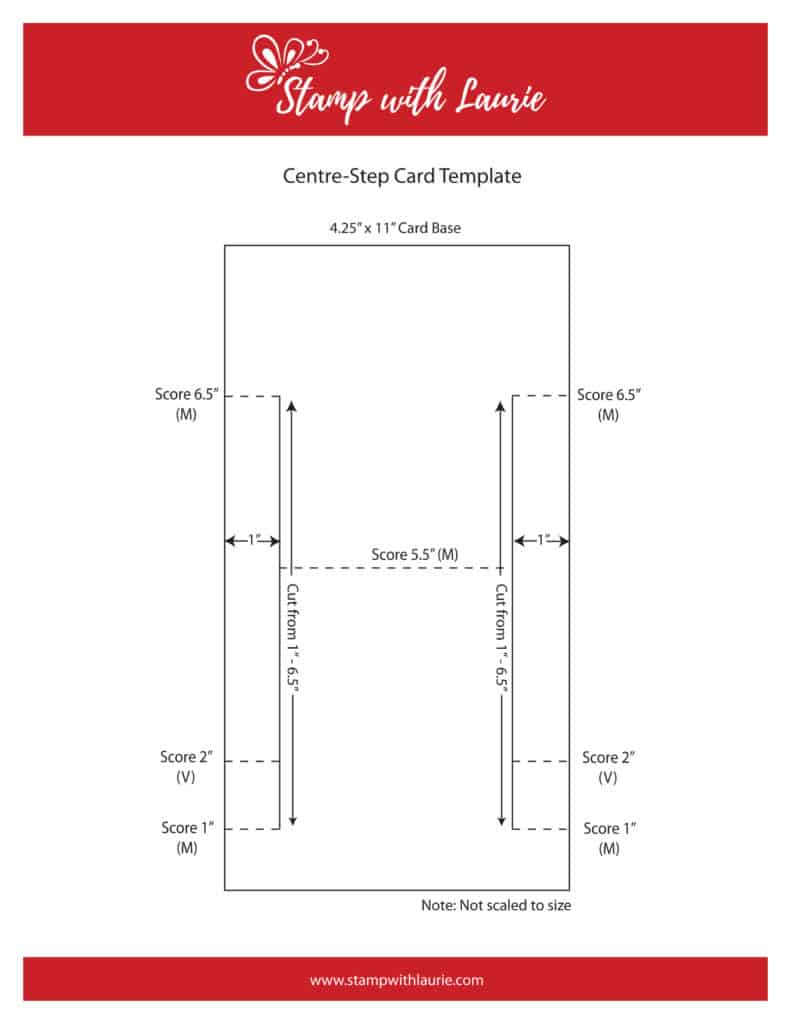
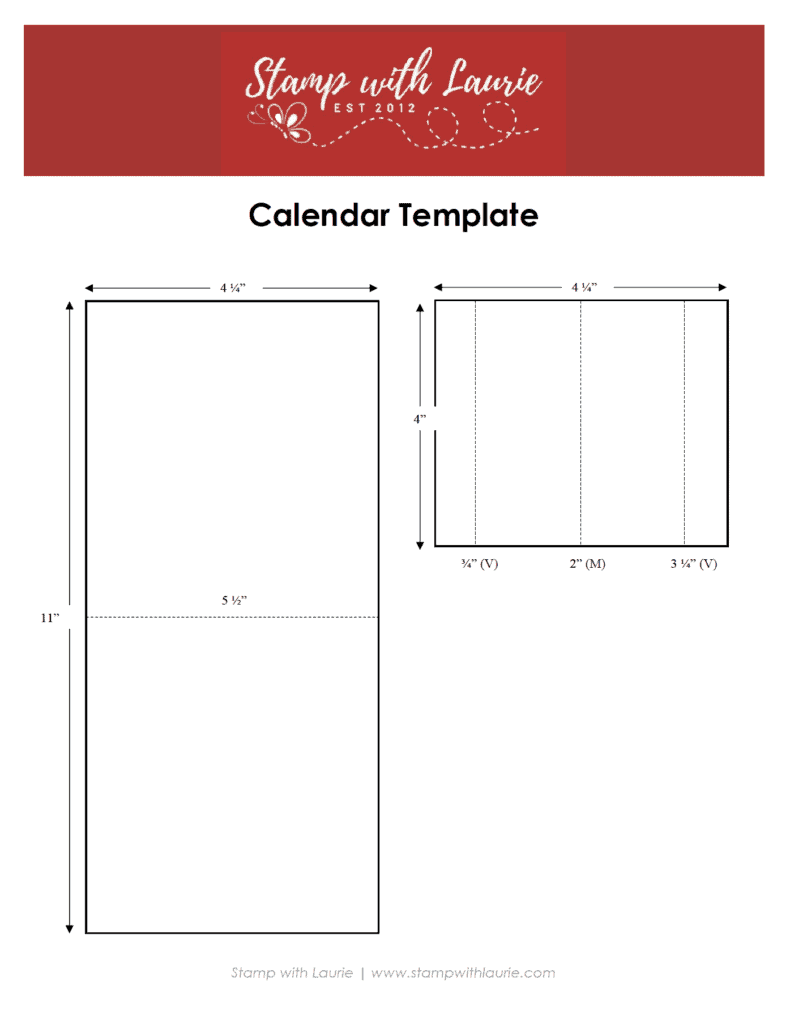
To download a PDF of the Calendar Template, please click here or on the picture.

Downloadable Calendar Template

For more of my Stampin’ Up! cards, please click here.

You will find the items listed above in my online store.

Warmest Winter Wishes Card 

Warmest Winter Wishes Card - a winter birthday card with baby seals in the Arctic.
Warmest Winter Wishes Card

Hello Crafty Friends! It’s Laurie here! I am sharing my Warmest Winter Wishes Card as my Design Team Inspiration Card for Conie Fong Art & Design using the Baby Seals On Iceberg from her drawing tutorial on You Tube. Conie Fong has started a Draw with Conie YouTube channel where you can draw along with her: https://www.youtube.com/@DrawWithConie. Don’t forget to subscribe to her channel while you are there for more tutorials that come out each week!

You can share your drawings in her Draw with Conie Facebook Group: https://www.facebook.com/groups/339082068864209/

The Details of My Warmest Winter Wishes Card

For my card, I kept my card design simple in line with the simple drawing of the seals. The seals were coloured with very few Copic markers leaving a lot of uncoloured white space. Really, I just coloured the shadows for them and the ice flow and used my Colorless Blender to soften the edges of the colour to the white.

I had the perfect Designer Series Paper from Stampin’ Up! to create a mini slimline card for these cuties! It had a winter artic scene with icebergs and ice flow, but it had polar bears on it! So, I strategically cut my DSP so that the bears would be hidden by the placement of my seals. Lol!

Next, I used a white mini slimline scallop die cut to frame my scene having it pop from all the blues. This also gave a support for my seals so that it looked like the seals are floating out of the scene.

The sentiment was stamped on white, and die cut with a stitched flag die. Again, I liked how it popped against the dark blue sky. The final touch was a few wooden stars that I had in my stash.

————————–

Copic Markers:

Seals: W3/W1/W0/0
Ice Flow: B01/B00/B000/0

Close Up of Baby Seals

————————–

Card Recipe for My Warmest Winter
Wishes Card:

Baby Seals On Iceberg, Conie Fong Art & Design
Paper Basics – Stamper’s Select White Cardstock, Papertrey Ink
Beary Christmas Designer Series Paper, Stampin’ Up!
Versafine Onyx Black Ink, Tsukineko
Essentials Mini Slimline Stitched Scallop Rectangle Die, Pink Fresh Studio
Stylish Shapes Dies, Stampin’ Up!
Free Skate Stamp Set, Stampin’ Up!
Foam Adhesive Strips, Stampin’ Up!
Wooden Star Elements. From My Stash
Night of Navy and Basic White Card Stock, Stampin’ Up!

Finished card size: 6 ¼” x 3 ¼”

————————–

To view my other Conie Fong Art & Design projects, please click here.

Hope you like my Design Team Inspiration Card using Baby Seals On Iceberg for Conie Fong Art & Design!

Thank you for stopping by!

Hugs,
Laurie

My Beary Christmas Cards 

My Beary Christmas Cards  - two Christmas card with a Polar Bear and a wintery scene
My Beary Christmas Cards

Hello Crafty Friends! Laurie here again! I am sharing My Beary Christmas Cards using the Beary Cute Bundle by Stampin’ Up! which includes the Beary Cute Stamp Set and coordinating Beary Cute Punch. This bundle is retiring. So, make sure you get it before it’s too late!

The Details of My Beary Christmas Cards

For my cards, I decided to make a floating element using one of the scenes from the Beary Christmas Designer Series Paper. I had so much fun that I created two different cards with the same elements. For one, I used Misty Moonlight and the other, Balmy Blue card stock bases. A floating element uses acetate or window sheet on which you adhere strips of DSP leaving gaps between the pieces. Then you use dimensionals under the DSP to make it look like the element is floating.

The scene strips were cut at ½” width and lined up in order on my window sheet for placement before adhering them down. I started with the two end pieces and then the centre ones working out to the ends. Tip: use grid paper for an even gap between pieces. Since the DSP was ½ wide, it allowed me to place my dimensionals behind the paper. Thus, hiding them to complete my floating element.

Misty Moonlight Card

I made the Misty Moonlight card portrait and used the largest square from the Stylish Shapes Dies to die cut my square once I had adhered the 5 DSP scene pieces to the Window Sheet.

Misty Moonlight Card with a Polar Bear on it.
Misty Moonlight Card

I stamped snowflakes in Misty Moonlight for a tone-on-tone around my central focal point.

The sentiment was white embossed on some Real Red card stock and then fussy cut with my Paper Snips.

The polar bear was stamped in Misty Moonlight and Real Red for his scarf before it was punched out.

Balmy Blue Card

For my Balmy Blue card, I decided that I wanted to use more of the DSP. So, I made the floating element larger with 6 pieces of DSP and wider gaps. I stamped the Balmy Blue snowflakes at an angle through the centre of the card. This allowed the snowflakes to show through the Window Sheet!

Balmy Blue Card with a Polar Bear on it
Balmy Blue Card

The sentiment was stamped in Real Red and snipped on an angle with my Paper Snips.

For both cards, I used the white snowflakes from the Adhesive-Backed Snowflake Assortment as my embellishments.

Supplies:

Stamps/Bundles/Dies: Beary Cute Bundle (162023), Stylish Shapes Dies (159183)

Inks: Misty Moonlight Classic Stampin’ Pad (153118), VersaMark Ink (102283), Balmy Blue Classic Stampin’ Pad (147105), Real Red Classic Stampin’ Pad (147084)

Paper: Misty Moonlight (153081), Balmy Blue (146982), Window Sheets (142314), Real Red (102482), Basic White (159276), Beary Christmas Designer Series Paper (162015)

Accessories: Adhesive-Backed Snowflake Assortment (162129), Basics Embossing Powder (155554), Embossing Additions Tool Kit (159971), Heat Tool (129053), Paper Snips (103579), Grid Paper (130148), Bone Folder (102300), Stampin’ Dimensionals (104430), Mini Glue Dots (103683), Mulitpurpose Liquid Glue (110755)

Measurements: 

  • Misty Moonlight/Balmy Blue:
    • 8 ½” x 5 ½” scored at 4 ¼”
  • Window Sheet:
    • 3” x 3” (for Misty Moonlight Card)
    • 3” x 4 1/8” (for Balmy Blue Card)
  • Real Red:
    • Scrap
  • Basic White: (3 pieces)
    • 2” x 2 ½” (Polar Bears)
    • Scrap (Sentiment)
  • Beary Christmas Designer Series Paper:
    • 3” x 2 ½” (for Misty Moonlight Card)
    • 3” x 3” (for Balmy Blue Card)

More Information on My Beary Christmas Cards:

For more of my Stampin’ Up! cards, please click here.

You will find the items listed above in my online store

Yeti for the Holidays?

Yeti for the Holidays? - A Christmas Card with a Yeti Father and Son getting a Christmas Tree.
Yeti for the Holidays?

Hello Crafty Friends! It’s Laurie here! I am sharing my Yeti for the Holidays? as my Design Team Inspiration Card for Paper Nest Dolls using Yeti Father and Son. I just love these cuties. There is a Yeti Mom and Baby that you could add to this card for the whole family! Lol!

The Details of My Yeti for the Holidays?

I had a lot of fun colouring these two with my Copic markers! I decided to create a fur texture with individual strokes in the shadows and left the highlights white. The tree was also coloured with individual strokes to create texture. The Father Yeti’s tie pulled together my colour scheme of red and green.

For my card, I wanted to use the Whimsy paper with these cuties. This paper is perfect for those wintery scenes! In fact, I used it for another card that I made a few years ago and will post it at the end.

So, I created a slimline card using the Dotted Slimline Dies by Studio Katia. I used all three dies that came in the set to create my card. I thought it would be fun having the yetis stepping out of the wintery scene with their Christmas tree.

To complete my wintery scene and to add interest, I used a Stitched Hillside Die to add an extra layer to the scene. I made sure that my “snowbank” did not cover up the snow-covered trees on the background.

Next, I typed and printed my sentiment out on my computer. There are so many great sentiments out there that it was hard to pick one! Lol! The sentiment was die cut out with another stitched die.

For embellishments, I used some wooden snowflakes that I had in my stash for that rustic look and a scattering of red rhinestones to add sparkle.

————————–

Copic Markers

Fur: W3/W1/W0/0
Faces: E43/E42/E41/E40/RV00/0
Horns/Nails/Tree Trunk: E44/E43/E42/E41
Reds: R29/R27/R24/R22
Greens: G29/YG63/YG03

Close Up of Yeti Father and Son Stamp
Close Up of Yeti Father and Son

————————–

Card Recipe for My Yeti for the Holidays?

Yeti Father and Son, Paper Nest Dolls
Paper Basics – Stamper’s Select White Cardstock, Papertrey Ink
Frozen Slimline Designer Paper Pack, Whimsy Stamps
Dotted Slimline Dies, Studio Katia
Slimline Stitched Hillside Border Dies, Lawn Fawn
Stylish Shapes Dies, Stampin’ Up!
Wooden Snowflake Embellishments, Stampin’ Up!
Red Rhinestone Jewels, Stampin’ Up!
Garden Green and Real Red Card Stock, Stampin’ Up!

Finished card size: 8 ½” x 3 ½”

Stamp Size: 3”

————————–

To view my other Paper Nest Dolls cards, please click here.

My Merry Penguins Card

For more information on my other card, please click here or on the photo.

My Design Team card with 3 Penguins on it.
My Merry Penguins Card

Hope you like my Yeti for the Holidays? Card using
Yeti Father and Son by Paper Nest Dolls!

Thank you for stopping by!

Hugs,
Laurie

Grouchy Kitty Birthday Card 

Grouchy Kitty Birthday Card - a birthday card with a cat holding a balloon
Grouchy Kitty Birthday Card

Hello Crafty Friends! It’s Laurie here! I am sharing my Grouchy Kitty Birthday Card using the Grouchy Pets Clear Stamp Set and matching dies by CC Designs. It was my sister-in-law’s birthday recently and I thought she would find this kind of snarky card funny!

The Details of My Card

For my Grouchy Kitty Birthday Card, I knew that I wanted to use the grouchy cats from CC Designs since I thought my SIL (sister-in-law) would get a kick out of them! Plus, I found the perfect poem online that I typed out on my computer and printed off. If you watch Sheldon the TV series, you will get the reference. I knew that my SIL would get a laugh out of it!

A poem about a grouch cat
Grouchy Kitty Poem

My SIL has a brown tabby cat. So, I coloured with my Copic markers one of the cats to look like it. For variation, I made another black and the third an orange tabby. For the tabby cats, I used a Copic multi liner to create their stripes in a triangle scribble shape.

Cats Coloured with my Copic Markers

Next, I pulled out my Small Slimline with Lift the Flaps Dies by Lawn Fawn. I love this interactive die set! So fun! I thought it would be neat to have one cat on the front holding a balloon. Don’t you just love the face on this cat! Like he is so put out that he must hold a balloon! Lol!

When the flaps are open, you see the other cats and the grouchy kitty poem. I used my paper snips to cut down the cats to fit and added a party hat sticker to each of the cats. Again, the faces of those cats are so priceless especially since they must wear party hats! I can definitely see a cat making that face! Lol!

All Three Panels Open showing two cats with party hats and the grouchy kitty poem
All Three Panels Open

I added a few present stickers to dress up the poem panel. On the front of the card, I added some paw gems and red rhinestones for embellishments.

————————–

Copic Markers:

Black Cat
Fur: C7/C6/C4
Tummy: C3/C1/0
Ears: R22/R20
Eyes: G99/G94/C3/C1/0

Close Up of Black Cat

Brown Tabby Cat
Fur: E47/E44/E43/E42/E41
Stripes: 0.3 Multi Liner Black, Copic
Ears: R22/R20
Eyes: C3/C1/0

Close Up of Brown Tabby Cat

Orange Tabby Cat
Fur: YR18/YR14/YR12/Y17
Stripes: 0.3 Multi Liner Sepia, Copic
Ears: R22/R20
Eyes: C3/C1/0

Close Up of Orange Tabby Cat

————————–

Card Recipe for My Grouchy Kitty Birthday Card:

Grouchy Pets Clear Stamp Set, CC Designs
Grouchy Pets Outline Die, CC Designs
Paper Basics – Stamper’s Select White Cardstock, Papertrey Ink
Biggest Wish Stamp Set, Stampin’ Up!
VersaMark Ink, Stampin’ Up!
White Embossing Powder, Stampin’ Up!
Heat Tool, Stampin’ Up!
Playful Pets Designer Series Paper, Stampin’ Up!
Small Slimline with Lift the Flaps Dies, Lawn Fawn
Stylish Shaped Dies, Stampin’ Up!
Fun Balloons Stickers, Autumn Leaves
Multi Size Presents Stickers, Jolee’s Boutique
Party Hat Stickers, Crafts, Dollarama
Paw Adhesive Gems, The Paper Studio
Red Rhinestone Jewels, Stampin’ Up!
0.3 Multi Liner Sepia, Copic
0.3 Multi Liner Black, Copic
Paper Snips, Stampin’ Up!
Computer to print sentiment

Real Red, Soft Suede and Thick Basic White Card Stock, Stampin’ Up!

Finished card size: 8 ½” x 3 ½”

All Three Cats on Card

————————–

To view my other Copic cards, please click here.

Hope you like my card using Grouchy Pets Clear Stamp Set by CC Designs!

Thank you for stopping by!

Hugs,
Laurie

Rudolph Red-Nose Reindeer Card

Rudolph Red-Nose Reindeer Card - A Christmas Card with a reindeer who's nose lights up
Rudolph Red-Nose Reindeer Card

Hello Crafty Friends! It’s Laurie here! I am sharing my Rudolph Red-Nose Reindeer Card as my Design Team Inspiration Card for Conie Fong Art & Design using Reindeer Lights and Sentiment. The Design Team are celebrating Christmas in July at Conie Fong Art & Design Facebook Group with a 25% off sale for 3 days, July 7, 8 and 9, 2023. No coupon code needed. Visit the Etsy store at https://www.etsy.com/shop/ConieFongArt.

The Details of My Card

For my card, I found some fun Christmas lights paper with matching papers to use on my card. Once I decided on them, I coloured the reindeer in the same colours to match. I trimmed him out with my Brother Scan n’ Cut. Then, I added glossy accents to the light bulbs and Star Dust Stickles to his hat trim.

I thought it would be fun to make the reindeer’s nose glow just like Rudolph’s nose! I love an interactive card with a light switch that you push! So, I used a light mechanism from Pear Blossom Press and strategically placed it under the green piece of paper. Once I did that, I poked a hole through the green paper right where I planned to place the reindeer’s nose. I used extra thick dimensionals on the green piece to allow enough space for the light mechanism. The “Push” circle was done on my computer, printed out and then punched with a ¼” punch.

The sentiment was from the stamp set and die cut with a Stitched Rectangle Die. To balance out my card, I added some foil die cut light bulbs in matching colours to Rudolph’s light bulbs. The die cut black piece was from the light bulb die set to hang lights off, but I thought it added some fun at the top so that it looks like my focal point it being held up by it.

The finishing touch was adding some red rhinestones with one on the “Twinkle” and a couple beside the die cut light bulbs!

————————–

Copic Markers:

Fur: E37/E35/E33/E31/W3/W1/0/R20
Antlers: E74/E71/E70
Eyes: W3/W1/0
Hoofs/Plug: C6/C4/C3
Reds: R39/R37/R35/C5
Blues: B28/B24/B32
Greens: YG67/YG63/YG03
Yellows: Y38/Y35/Y32

Close Up of reindeer
Close Up of Rudolph

————————–

Card Recipe for My Rudolph Red-Nose Reindeer Card:

Reindeer Lights and Sentiment, Conie Fong Art & Design
Paper Basics – Stamper’s Select White Cardstock, Papertrey Ink
Gnome for the Holidays Christmas, Photo Play
Red, Green and Blue Foil Sheets, Craft Perfect, Tonic
3 pack of One Light, Pear Blossom Press 
String of Lights, Frantic Stamper Inc.
Deckled Rectangles Dies, Stampin’ Up!
Stitched Rectangle Dies, Stampin’ Up!
Brother Scan n’ Cut
¼” Inch Punch, Stampin’ Up!
Take You Pick Tool, Stampin’ Up!
3 D Foam Squares (.25” x .25” x .08”), Scrapbook Adhesives
Red Rhinestone Jewels, Stampin’ Up!
Star Dust Stickles, Ranger
Glossy Accents, Ranger
Poppy Parade and Basic Gray Card Stock, Stampin’ Up!

Finished card size: 5 ½” x 4 ¼”

————————–

To view my other Conie Fong Art & Design projects, please click here.

Hope you like my Design Team Inspiration Card using Reindeer Lights and Sentiment for Conie Fong Art & Design!

Thank you for stopping by!

Hugs,
Laurie

True North Beavers Card

A Canada Day card with two beavers on it
True North Beavers Card

Hello Crafty Friends! It’s Laurie here with my True North Beavers Card using ‘Canadian Beavers’ Digital Stamp by Rachelle Anne Miller Creative Studios. This stamp is quintessentially Canadian, and I thought it would make a great Canada Day card!

The Details of My Card

For my card, I knew that I wanted to use the O Canada 2 cardstock. I have been waiting to use it since I bought it last summer! It’s perfect to celebrate Canada Day especially with the Eh! word bubbles! Lol! I also knew that I wanted to use the maple leaves and wood grain papers. So, I created a simple tryptic card front to layer my polaroid focal point.

The beavers were coloured with my Copic markers to match the papers. I made the parent beaver a little darker than the little beaver to help distinguish the two. I coloured their noses with a black gelly pen and used a white one to add highlights. Once they were coloured, I placed them into my polaroid frame that I die cut out. It’s like they are taking a selfie on Canada Day! Lol!

I added a die cut maple leaf at the base of the polaroid frame with a sentiment from the stickers. The stitched real red heart was die cut and layered with a heart with maple leaves from the ephemera pack to balance the sentiment. I trimmed down the True North piece from the ephemera pack and place it so that it was peeking out from my frame. Red rhinestones were the finishing touch adding some sparkle and tying in my red colour scheme. 

————————–

Copic Markers:

Parent Beaver: E79/E77/E74/E71/R20
Little Beaver: E74/E71/E70/R20
Leaves: YG97/YG95/YG93/YG91
Branch/Log: E27/E25/E23
Sky: BG11/BG10/0

Close Up of the Beavers

————————–

Card Recipe for My True North Beavers Card:

‘Canadian Beavers’ Digital Stamp, Rachelle Anne Miller Creative
Paper Basics – Stamper’s Select White Cardstock, Papertrey Ink
Designer Cardstock O Canada 2, PhotoPlay
Ephemera Cardstock O Canada 2, PhotoPlay
Cardstock Stickers O Canada 2, PhotoPlay
Give it A Whirl Dies, Stampin’ Up!
Seasonal Layers Thinlits, Stampin’ Up!
Polaroid Photo Frame Die, From my Stash
Black Gelly Roll Pen, Sakura
White Gelly Roll Pen, Sakura
Red Rhinestone Jewels, Stampin’ Up!
Real Red Card Stock, Stampin’ Up!

Finished card size: 5 ½” x 4 ¼”

————————–

To view my other Rachelle Anne Miller Creative Studios cards, please click here.

Here is my last year’s Canada Day card using Red, White & Pooh! Digital Stamp by Polka Dot Orchard. To view it, please click here or on the image.

Winnie the Pooh hold a Canadian Flog
Happy Canada D-Eh! Card

Hope you like my True North Beavers Card using ‘Canadian Beavers’ Digital Stamp by Rachelle Anne Miller Creative Studios!

Thank you for stopping by!

Hugs,
Laurie

My Dino Birthday Party Cards

Two birthday cards. One with a boy and a Dino and the other a girl and Dino.
My Dino Birthday Party Cards

Hello Crafty Friends! It’s Laurie here! Paper Nest Dolls is celebrating their 10th birthday this year! So, I am sharing two birthday cards to celebrate! My Dino Birthday Party Cards are my Design Team Inspiration Cards using Dino Party Amara and Dino Party Owen by Paper Nest Dolls. Don’t you think these two stamps go so perfectly together!

The Details of My Cards

I had debated about placing them on the same card, but in the end decided to go with two different cards with the same party theme using boy and girl matching papers. So, the Doodlebug papers were perfect with those gorgeous bright colours! I used the same coordinating papers from each paper pack such as the cupcakes, the Happy Birthday, the sweets, and confetti.

Once I decided on the papers, I coloured Owen and Amara in bright colours with my Copic markers to match it.

For my Amara card, I decided to create a regular A2 card with lots of layers in greens and pinks to match my colouring. I included some fun banners and a balloon since it’s a birthday card.

The girl with Dino birthday card
Amara Dino Birthday Card

For my Owen card, I decided to create a different shaped card. Again, I used lots of layers, this time in blues, but with a mini slimline card layout. I used the same banners and balloon to match Amara’s card, but with different dies for the background.

Boy with Dino birthday card
Owen Dino Birthday Card

The sentiments for both cards came from the Simple Strips – Birthday by Taylored Expressions. I love that you can stamp 18 sentiments at once and die cut them all out at the same time!

Clear Wink of Stella was added to the party hats and the pink ribbon on Amara’s dino. For Owen’s cupcake, I added white gelly pen sprinkles to his cupcake. The finishing touch was adding sequins to both the cards since sequins say birthday party to me! Lol!

————————–

Copic Markers:

Dino Party Amara
Skin: E000/E00/E21/E11/E04/R20
Hair: E18/E15/YR23/Y21
Pinks: R85/R83/R81
Greens: YG67/YG63/YG03
Dino: BG57/BG23/BG11/R85/R83/R81

Close Up of girl and Dino
Close Up of Amara and Dino

Dino Party Owen
Skin: E000/E00/E21/E11/E04
Hair: E57/E43/E53
Greens: YG67/YG63/YG03
Blues: B39/B28/B24/B32
Shoes: E37/E35/E31
Dino: YR09/YR07/YR15/E15/E37/E35/E31

Close Up of boy and Dino
Close Up of Owen and Dino

————————–

Card Recipe for My Dino Birthday Party Cards:

Dino Party Amara and Dino Party Owen, Paper Nest Dolls
Paper Basics – Stamper’s Select White Cardstock, Papertrey Ink
Party Time 6” x 6” Paper Pad, Doodlebug Design Inc.
Hey Cupcake 6” x 6” Paper Pad, Doodlebug Design Inc.
Butterfly Kisses 6” x 6” Designer Series Paper, Stampin’ Up!
Simple Strips – Birthday, Taylored Expressions
Simple Strips Die – Birthday, Taylored Expressions
VersaFine Ink Pad Onyx Black, Tsukineko
Bracket/Speech Bubble Dies, PhotoPlay
Balloon Pop-Up Thinlit Dies, Stampin’ Up!
Framed Florets Dies, Stampin’ Up!
Flag Banner Dies, from my Stash
Pastel Adhesive-Backed Sequins, Stampin’ Up!
Clear Wink of Stella, Stampin’ Up!
White Gelly Roll Pen, Sakura
Starry Night and Thick Basic White Card Stock, Stampin’ Up!

Finished cards sizes: 5 ½” x 4 ¼” and 3 ½” x 6”

————————–

To view my other Paper Nest Dolls cards, please click here.

Hope you like my Design Team cards using
Dino Party Amara and Dino Party Owen by Paper Nest Dolls!

Happy 10th Birthday Paper Nest Dolls!

Thank you for stopping by!

Hugs,
Laurie

Down on the Farm Card

A card with a farmer, cow and horse on a farm.
Down on the Farm Card

Hello Crafty Friends! It’s Laurie here! I am sharing my Design Team Inspiration Card using Down on the Farm Bundle by Paper Nest Dolls. This card would be great for Father’s Day! This bundle comes with 15 digital stamps including 5 dolls, horse, cow, pig, ewe, chicken coop, tractor, hay, corn, sunflowers and so many more. I created another slimline card using this bundle which I will link at the end of this post.

The Details of My Card

For my card, I decided to create a mini slimline card with a farm scene that revolved around the characters that I coloured with my Copic markers. Aren’t they just the cutest!

The Farm Scape dies were perfect for my scene. I die cut the dies multiple times to get the variation in colours of the barn, tractor and trees and pieced them together. Once that was done, I layered the Fun on the Farm papers for the sky and grasses to complete my scene. All I needed to add were the characters.

————————–

Copic Markers:

Farmer Boy
Skin: E000/E00/E21/E11/E04
Hair: E57/E43/E53
Shirt/Boots: YG67/YG63/YG03
Overalls: B26/B23/B12
Hat: E35/E33/E31/YG67/YG63/YG03
Pitchfork: C4/C3

Close Up of Farmer

Cow
Hide: E27/E25/E23/C3/C0/0/R20
Hair: C3/C0
Hoofs: C6/C4/C3
Horns: E41/E40/0

Close Up of Cow and Horse

Horse
Coat: E29/E27/E25/E23
Mane/Hoofs: C6/C4/C3

————————–

Card Recipe for My Down on the Farm Card:

Down on the Farm Bundle, Paper Nest Dolls
Paper Basics – Stamper’s Select White Cardstock, Papertrey Ink
Fun on the Farm 6” x 6” Paper Pad, Echo Park Paper Co.
Farm Scape Dies, Sugar Pea Designs
Slimline Grassy Hillside Borders Dies, Lawn Fawn
Soft Suede, Real Red, Granny Apple Green and Basic Black Card Stock, Stampin’ Up!

Finished card size: 6” x 3.5”

————————–

To view my other Paper Nest Dolls cards, please click here.

This is the other card that I created using the Down on the Farm Bundle. To view it, please click here or on the photo.

Card with farmers horse, cow and pig on it
From the Herd Birthday Card

Hope you like my Design Team card using
Down on the Farm Bundle by Paper Nest Dolls!

Thank you for stopping by!

Hugs,
Laurie

Have a Mice Day! 

A card with a mouse holding a flowers and three daisy flowers beside her.
Have a Mice Day! Card

Hello Crafty Friends! It’s Laurie here! I am sharing my Have a Mice Day! as my Design Team Inspiration Card for Conie Fong Art & Design using the Daisy Mouse And Hailey Hamster Bundle.

This Bundle includes 8 images:

  • Title 1: Daisy Mouse JPG format
  • Title 2: Hailey Hamster JPG format
  • Title 3 & 4: Daisy Flower Right JPG / PNG format
  • Title 5 & 6: Daisy Flower Left JPG / PNG format
  • Title 7 & 8: Have A Mice Day! Sentiment JPG / PNG format

The Details of My Card

For my card, I decided to create a CAS (Clean and Simple) card using Daisy Mouse and a bouquet of daisies. It’s funny that I find making CAS so hard. I keep wanting to add things to it! Lol!

I knew that I wanted to create a mini slimline card with Daisy on one side and the bouquet of daisies on the other side with the sentiment. Once I laid out my design in Microsoft Word, I coloured the images with my Copic Markers. I thought colouring the daisies in yellow would have them pop off the white paper.

For embellishments, I only added some epoxy stickers that look like dew drops on a petal of each flower. To add a bit of sparkle, I used Clear Wink of Stella on Daisy’s bow on her tail.

I felt the card still needed a little something and decided to use a multi liner pen and a ruler to draw in a border around the whole card. I thought about free handing it but decided that I didn’t want to chance ruining my project! Lol! So, in the end, I found the straight lines helped to ground Daisy while adding a fun element!

————————–

Copic Markers:

Daisy
Fur: E35/E34/E31/E30/R20
Bow/Nose: R85/R83/R81

Close Up of Mouse holding a flower
Close Up of Daisy Mouse

Daisies
Petals: E15/Y17/Y15/Y01
Leaves: YG17/YG13/TG03
Daisy Centres: E29/E27/E25/E23

Close Up the flowers on the card
Close Up of Daisies

————————–

Card Recipe for My Have a Mice Day! Card:

Daisy Mouse And Hailey Hamster Bundle, Conie Fong Art & Design
Paper Basics – Stamper’s Select White Cardstock, Papertrey Ink
Clear Epoxy Shapes, Stampin’ Up!
0.3 Multi Liner Pen, Copic
8” Cut-Align Ruler, My Sweet Petunia
Clear Wink of Stella, Stampin’ Up!
Microsoft Word/Printer
Rococo Rose Card Stock, Stampin’ Up!

Finished card size: 6” x 3 ½”

————————–

To view my other Conie Fong Art & Design projects, please click here.

Hope you like my Design Team Inspiration Card using Daisy Mouse And Hailey Hamster Bundle for Conie Fong Art & Design!

Thank you for stopping by!

Hugs,
Laurie

Buzzing by to Say Hi Card 

A card with a bee holding a cupcake leaning against a honey pot
Buzzing by to Say Hi Card

Hello Crafty Friends! It’s Laurie here! I am sharing my Buzzing by to Say Hi Card as my Design Team Inspiration Card for Conie Fong Art & Design using Cupcake Honey Bee and Sentiment Bundle.

This Bundle includes 6 images:

  • Title 1: Cupcake Honey Bee PNG
  • Title 2: For My Sweet Friend Sentiment PNG
  • Title 3: Hap-Bee Birthday PNG
  • Title 4: Sweet As Can Bee PNG
  • Title 5: Just Bee Cause PNG
  • Title 6: Just Bee Cause – Bold PNG

The Details of My Card

I was having so much fun colouring this cutie with my Copic markers that I created two cards. I shared one already and will post a link at the end, but here is the other card that I promised.

For my card, I used the honeycomb quilt top die again, but this time I used the whole die and placed individual die cut honeycombs on top. Some I layered with dimesionals and other I adhered directly to the honeycomb quilt.

The Bundle comes with sentiments, but I wanted to heat emboss with white on black card stock. I love the contrast of white on black especially for my card! The honeycomb die set comes with individual dies that have a heart, star and hi. For the sentiment, I die cut the word “HI” off and used the “hi” honeycomb instead. So fun!

I used Clear Wink of Stella on the bee’s wings and Glossy Accents on the cherries. And a scattering of red rhinestones added some sparkle.

————————–

Copic Markers:

Bee: Y38/Y35/Y32/C8/C6/C4/R24
Wings/Sky: BG11/BG10/0
Honey Pot: E87/E55/E53/E50/R59/R46/R24/Y38
Honey: Y38/YR24/YR21
Grass: YG67/YG63/YG03
Cupcake: Y38/YR24/YR21/BG11/BG10/0/E87/E55/E53/E50
Cherries: R59/R46/R24

Close Up of Cupcake Honey Bee

————————–

Card Recipe for My Buzzing by to Say Hi Card:

Cupcake Honey Bee and Sentiment Bundle, Conie Fong Art & Design
Paper Basics – Stamper’s Select White Cardstock, Papertrey Ink
Full Bloom 12” x 12” Sheet, Simple Stories
Bunnies + Blooms 12” x 12” Sheet, Simple Stories
Honeycomb Quilt Top Dies, Concord & 9th
Mini Strips – Bee Mine Stamp, Taylored Expressions
Mini Strips Flag Die, Taylored Expressions
Versamark Ink, Stampin’ Up!
Basic Embossing Powders, Stampin’ Up!
Heat Tools, Stampin’ Up!
Red Rhinestone Basic Jewels, Stampin’ Up!
Clear Wink of Stella, Stampin’ Up!
Glossy Accents, Ranger
Basic White, Basic Black, and Bumblebee Card Stock, Stampin’ Up!

Finished card size: 5 ½” x 4 ¼”

————————–

To view my other Conie Fong Art & Design projects, please click here.

To view my other Cupcake Honey Bee, please click here or on the photo.9

A birthday card with a bee holding a cupcake
My Hap-Bee Birthday Card

Hope you like my Design Team Inspiration Card using Cupcake Honey Bee and Sentiment Bundle for Conie Fong Art & Design!

Thank you for stopping by!

Hugs,
Laurie

My Rainy-Day Easter Cards 

Two Easter cards. One with a bunny and the other with a turtle on a bridge
My Rainy-Day Easter Cards

Hello Crafty Friends! Laurie here again! I am sharing My Rainy-Day Easter Cards using the Playing in the Rain Bundle by Stampin’ Up! This Bundle includes the Rain Stamp Set and the Playing in the Rain Dies.

The Details of My Cards

For my card, I decided to use the Playing in the Rain Dies to cut out the different animals from the DSP figuring you could use either the rabbit or the turtle for an Easter card. I love the glossy coating on this DSP. It adds a nice shine to the animals to make them stand out! The floral piece really makes the animals pop and creates a fun field of flowers behind them.

The Bunny Easter Card

The Fabulous Frames Dies created a perfect vignette for my scene with the bridge, cloud and the grasses popping out of the frame!

To add a bit of interest to the Balmy Blue mat, I embossed it with the Raindrops Embossing Folder.

The clouds were stamped in Balmy Blue, and die cut out. I then used the different sizes for my cards.

The Turtle Easter Card

The sentiment was stamped in Soft Suede and punched out with the Double Oval Punch. The Old Olive scallop mat was punched from the same punch. I love that you get two punches for one!

I couldn’t resist using the Dragonfly Trinkets to add a bit of whimsy to my card!

Supplies:

Stamps/Bundles/Dies: Playing in the Rain Bundle (160551), Fabulous Frames Dies (159163)

Inks: Soft Suede (147115), Balmy Blue (147105)

Paper: Basic White Thick (159229), Balmy Blue (146982), Basic White (159276), Soft Suede (115318), Old Olive (100702), Rain or Shine 12″ x 12″ Specialty Designer Series Paper (160540)

Accessories: Double Oval Punch (154242), Raindrops Embossing Folder (160554), Dragonfly Trinkets (160520), Bone Folder (102300), Stampin’ Dimensionals (104430), Stampin’ Seal (152813), Mini Glue Dots (103683)

Close Up of Bunny
Close Up of Bunny

Measurements: 

  • Basic White Thick:
    • 5 ½” x 8 ½” scored at 4 ¼”
  • Balmy Blue:
    • 4” x 5 ¼”
  • Basic White (3 pieces):
    • 2 ¾” x 4” (Frame)
    • 2 ½” x 2” (Clouds)
    • Scrap for sentiment
  • Soft Suede:
    • 2-7/8” x 1-1/8”
  • Old Olive:
    • 5/8” x 1-1/8” (Grasses)
    • 2-1/8” 1 ¼” (Sentiment)
  • Rain or Shine Specialty Designer Series Paper:
    • 2 ½” x 3 ¼” (Floral Background)
    • Die cut animals accordingly
Close Up of Turtle
Close Up of Turtle

More Information on My Rainy-Day Easter Cards:

For more of my Stampin’ Up! cards, please click here.

You will find the items listed above in my online store.

My Hoppy Easter Card 

An Easter Card with a girl with bunny ears on pulling a wagon with two bunnies in it.
My Hoppy Easter Card

Hello Crafty Friends! It’s Laurie here! I am sharing My Hoppy Easter Card as my Design Team Inspiration Card for Paper Nest Dolls using Bunny Wagon

The Details of My Card

I coloured this cutie with my Copic markers in bright Easter colours to match my Easter paper.

For my card, I decided to create several flags using the different papers in varying sizes at the top left and bottom right. I used my Punch to create my flags in the different widths.

The white background already had a texture to it, but I used a ruler and a multi liner to draw lines along the edges to add even more interest.

To highlight my focal point, I added a stitched circle in pink behind the Bunny Wagon.

The sentiment was stamped, and die cut with a stitched banner die which was cut off at the edge to match the other flags.

Star Dust Stickles was added to the heart on her dress. The only other embellishment was a scattering of sequins.

————————–

Copic Markers

Skin: E04/E11/E21/E00/E000/R20
Hair: E37/E35/E33/E31
Pink: R85/R83/R81 
Green: YG17/YG13/YG11
Bunny Ears: W5/W3/W1/R83/R81
Wagon: E39/E37/E35/E33 
Handle: C6/C4/C3
Wheels: C9/C6/C4
Bunny 1: W5/W3/W1/R83/R81/R20
Bunny 2: E33/E31/E30/R83/R81/R20

Close Up of girl with bunny ears
Close Up of Bunny Wagon Stamp

————————–

Card Recipe for My Hoppy Easter Card

Bunny Wagon, Paper Nest Dolls
Paper Basics – Stamper’s Select White Cardstock, Papertrey Ink
Springtime 6” x 6” Paper Pad, Doodlebug Design Inc.
Welcome Easter 6” x 6” Paper Pad, Echo Park paper Co.
Hoppy Easter 12” x 12” Sheet, Doodlebug Design Inc.
Purple Palisades, Bazzill Cardstock
Mono Canvas, Bazzill Cardstock
Hoppy Easter Stamp Set, Doodlebug Design Inc. 
VersaFine Ink, Onyx Black, Tsukineko
Banners Pick a Punch, Stampin’ Up!
Stylish Shapes Dies, Stampin’ Up!
0.3 Black Multi Liner, Copic
Paper Snips, Stampin’ Up!
Sequins, From my Stash
Star Dust Stickles, Ranger

Finished card size: 5 ½” x 4 ¼”

Stamp Size: 4”

————————–

To view my other Paper Nest Dolls cards, please click here.

Hope you like my Design Team Inspiration Card using Bunny Wagon by Paper Nest Dolls!


Thank you for stopping by!

Hugs,
Laurie

My Happy Easter Bunny Card

An Easter card with the Easter Bunny on it
My Happy Easter Bunny Card

Hello Crafty Friends! Laurie here again! I am sharing My Happy Easter Bunny Card using the Easter Bunny Stamp Set by Stampin’ Up!

The Details of My Cards

For my cards, I thought it would be fun to create a scene with the Easter Bunny peeking through the leaves from the Around the Bend Dies as he’s hiding his Easter eggs!

The Into the Clouds Embossing Folder created the perfect sky for my scene with a die cut white cloud adding some interest.

I decided to use the Parakeet Party In Color DSP as my grass and leaves using the Around the Bend Die. A scattering of die cut flowers were used to add colour and highlight the sentiment which was die cut from the Pretty Pillowbox Dies.

The bunny was stamped in black on Basic White showing that you don’t always need to color it to make it stand out.

A couple of Brass Butterflies were added to complete my scene.

Supplies:

Stamps/Bundles/Dies: Easter Bunny Stamp Set (160272), Around the Bend Dies (160649), Give It a Whirl Dies (154336), Pretty Pillow Box Dies (156321)

Inks: Tuxedo Black Memento Ink Pad (132708), Balmy Blue (147105)

Paper: Basic White Thick (159229), Balmy Blue (146982), Basic White (159276), Flirty Flamingo (141416), Petal Pink (146985), In Color 2022–2024 6″ x 6″ Designer Series Paper (159253)

Accessories: Brushed Brass Butterflies (158136), Into the Clouds Embossing Folder (159171), Paper Snips (103579), Bone Folder (102300), Stampin’ Dimensionals (104430), Stampin’ Seal (152813), Mini Glue Dots (103683)

Close Up of the Easter Bunny
Close Up of the Easter Bunny Stamp

Measurements: 

  • Basic White Thick:
    • 5 ½” x 8 ½” scored at 4 ¼”
  • Balmy Blue:
    • 4” x 5 ¼”
  • Basic White (3 pieces):
    • 2 ¼” x 2-1/8”
    • 2” x 1 ¼”
    • Scrap for sentiment
  • Flirty Flamingo:
    • Scrap
  • Petal Pink:
    • Scrap
  • In Color 2022–2024 Designer Series Paper:
    • 5 ¼” x 3 ½”

More Information on My Happy Easter Bunny Card:

For more of my Stampin’ Up! cards, please click here.

You will find the items listed above in my online store.

My Easter Bunny Trio Card

An easter card with 3 bunnies on it.
Easter Bunny Trio Card

Hello Crafty Friends! It’s Laurie here! I am sharing My Easter Bunny Trio Card as my Design Team Inspiration Card for Conie Fong Art & Design using the New Release Easter Rabbit Trio Bundle.

This Bundle includes 4 images:

  • Title 1: Easter Rabbit Trio 
  • Title 2: Rabbit Holding Egg
  • Title 3: Rabbit Holding Daffodil
  • Title 4: Rabbit Holding Carrot

The Details of My Card

For my card, I thought I would create a fun Centre-Step card (downloadable template at end of post) with these three cuties on it! The bunnies come as individual images, but if you get the PNG versions, you can use Microsoft Word to place them together like I did. I made the Egg Bunny larger than the other two since he is in front of the other two.

Once I printed them out, I coloured them with my Copic markers. I decided to colour them in different colours since bunnies come in all sorts of colours and to distinguish them from each other. I coloured the Easter egg to match the purple paper with yellow to match the daffodil and orange to match the carrot. You could say that the Easter egg tied up my colour scheme in a bow.

Side View of card to show the dimension of the easel card.
Side View of Easel Card

I went with soft pastels of purples, yellows, and greens for my paper choices since they are the perfect Easter colors! The Wisteria Wonder Baker’s Twine tied in a bow behind my cuties added some interest to the yellow base. The sentiment piece was die cut with a 3” stitched circle die on the yellow paper from the Welcome Easter Paper Pad by Echo Park. The die cut sentiment was glued directly to the circle.

I used Clear Wink of Stella on the Easter egg to make it sparkle. A scattering of sequins was added to give even more sparkle.

————————–

Copic Markers:

Egg Bunny: E37/E35/E33/E31/R20
Daffodil Bunny: W6/W4/W2/W1/0/R20
Carrot Bunny: C3/C1/0/R20
Egg: V17/V15/V12/YR07/YR04/Y17/Y15
Daffodil Outside Petals: E13/Y17/Y15/Y11
Daffodil Inside Petals: E15/YR16/Y17/Y15/Y11
Stamin: YR16
Carrot: YR07/YR04/YR02/YR00
Daffodil Stem/Carrot Leaves: G28/YG25/YG23/YG11

Close Up of Bunnies
Close Up of Bunnies

————————–

Card Recipe for My Easter Bunny Trio Card:

Easter Rabbit Trio Bundle, Conie Fong Art & Design
Paper Basics – Stamper’s Select White Cardstock, Papertrey Ink
Spring Gnomes 8” x 8” Paper Pad, Beverly Eden, The Artists’ Collection, The Paper Boutique
Welcome Easter 6” x 6” Paper Pad, Echo Park Paper Co.
3” Stitched Circle Die, Memory Box
Happy Easter Dies, From my Stash!
Wisteria Wonder Baker’s Twine, Stampin’ Up!
Sequins, From my Stash!
Clear Wink of Stella, Stampin’ Up!
Multipurpose Liquid Glue, Stampin Up!
Dimensionals, Stampin’ Up!
Basic White, Highland Heather, and Pear Pizzaz Card Stock, Stampin’ Up!

Finished card size: 5 ½” x 4 ¼”

————————–

To view my other Conie Fong Art & Design projects, please click here.

Downloadable Centre-Step Template
To download a PDF of the Centre-Step Template, please click here or on the picture.

Centre-Step Card Template

Hope you like my Design Team Inspiration Card using Easter Rabbit Trio Bundle for Conie Fong Art & Design!

Thank you for stopping by!

Hugs,
Laurie