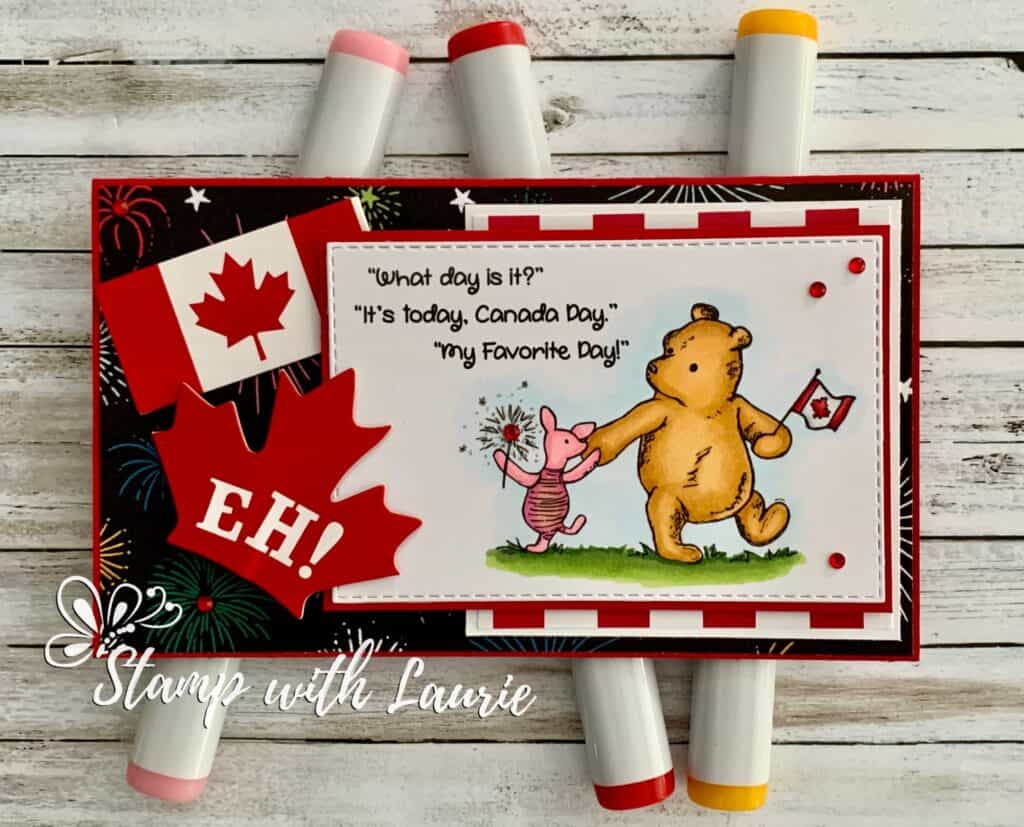
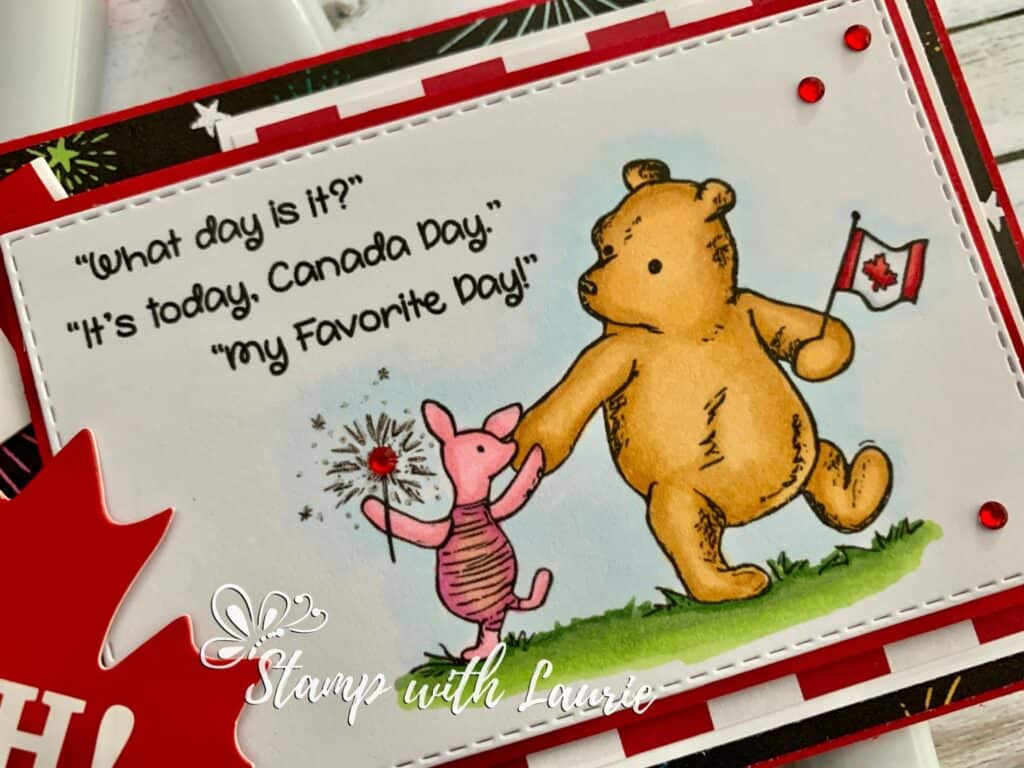
Hello Crafty Friends! Happy Canada Day to all my Canadian peeps! It’s Laurie here! I am sharing my mini slimline Happy Canada Day Card using Red, White & Pooh! Digital Stamp by Polka Dot Orchard.
The Details of My Card
I’m a big fan of Winnie the Pooh and when I saw this stamp, I couldn’t resist buying it and colouring it with my Copic markers on Canada Day!
I don’t have a lot of Canadian papers and embellishments, but the Celebrate Everything Designer Series Paper was perfect since it has a design with fireworks! The Canadian flag and Eh! Maple leaf are toppers for food that I repurpose for my card. I used my Gelly Roll Pen and a red rhinestone to add some sparkle to Piglet’s sparkler. A scattering of more red rhinestones tie in the Canadian theme.
Red, White & Pooh! Digital Stamp, Polka Dot Orchard Paper Basics – Stamper’s Select White Cardstock, Papertrey Ink Celebrate Everything Designer Series Paper, Stampin’ Up! Christmas Around the World Designer Series Paper, Stampin’ Up! Stitched Rectangle Dies, Stampin’ Up! Canada Day Toppers, Ashland Galvanized Metal Paper, Stampin’ Up! Red Rhinestone Basic Jewels, Stampin’ Up! Clear Star Gelly Roll Pen, Sakura Real Red and Basic White Card Stock, Stampin’ Up!
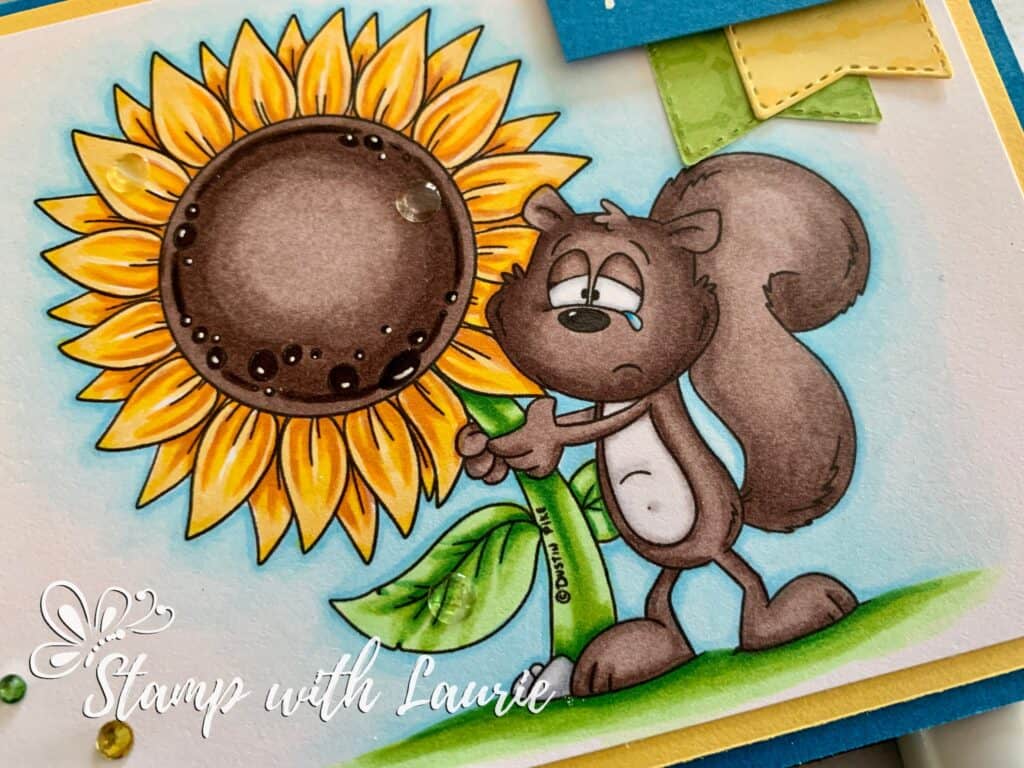
Hello Crafty Friends! It’s Laurie here! I am sharing My Tears for Ukraine Card using theClarence with Sunflower for Ukraine illustrated by Dustin Pike for The Rabbit Hole Designs. The people at TRHD were kind enough to make this stamp free so that we can all show our support for the Ukraine.
This stamp really sums up how I feel about all the unrest going on with Russia and the Ukraine! My heart bleeds for the Ukraine! So, I wanted to show my support in the best what I can…through my crafting!
The Details of My Card
For my card, I decided to make the stamp the focal point with minimal embellishments and paper since this card is all about the message!
I coloured Clarence and his sunflower with my Copic markers and added a few accents with my White Gelly Roll Pen on the seeds of the sunflower.
I decided to use Daffodil Delight and Pacific Point as my card stock choices to reflect the colours of the Ukrainian flag. A couple of layered paper flags under the “heartfelt” sentiment help to set it off. I wanted it to be highlighted since this is what my card is all about. To match my colour choices, I coloured some clear rhinestones with my Copic markers. Finally, I added some clear epoxy stickers on certain parts of the flower to represent the tears of the people.
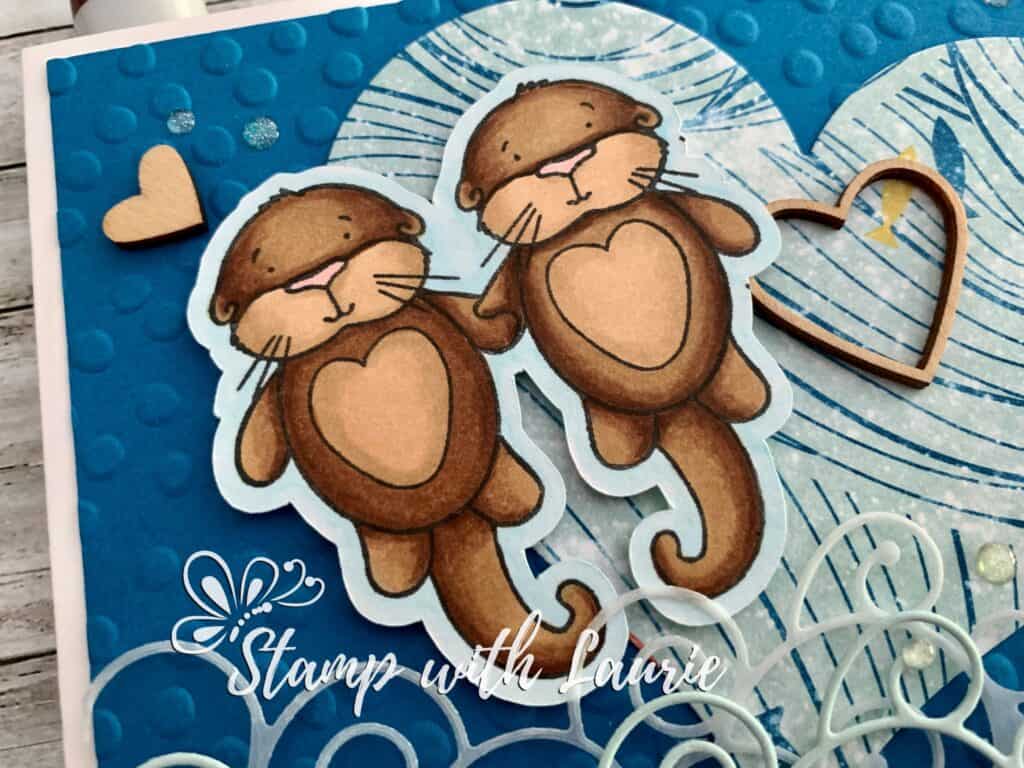
Hello Crafty Friends! It’s Laurie here! I am sharing My Otter-ly Love Anniversary Card using From The Otter Side by Kraftin’ Kimmie Stamps. Today is our 27th Wedding Anniversary and this is one of the cards that I gave my Hubby.
Aren’t these two otters just the cutest with their heart shaped tummies! My Hubby loves otters. In fact, there is a YouTube channel that he loves to watch that is all about two otters, Kotaro and Hana, and the antics that they get up to living in an apartment in Japan!
For my card, I decided that I wanted to create a fun “watery” scene for my two otters. So, I pulled from my stash some Designer Series Paper that had fish and waves on it and die cut it into a heart. I embossed the Detailed Dots onto the Pacific Point background to represent water bubble. I love the detail of the Memory Box wave die! In fact, I loved it so much that I made two layers with one being in Vellum! I couldn’t resist having one of the cute otters holding a wooden heart! How perfect for an anniversary card! The fun puny sentiment “To my Otter Half” was white embossed on a strip of Pacific Point with a couple of heart embellishments. A couple more wooden hearts and some water droplets on the waves all add to my anniversary/watery scene!
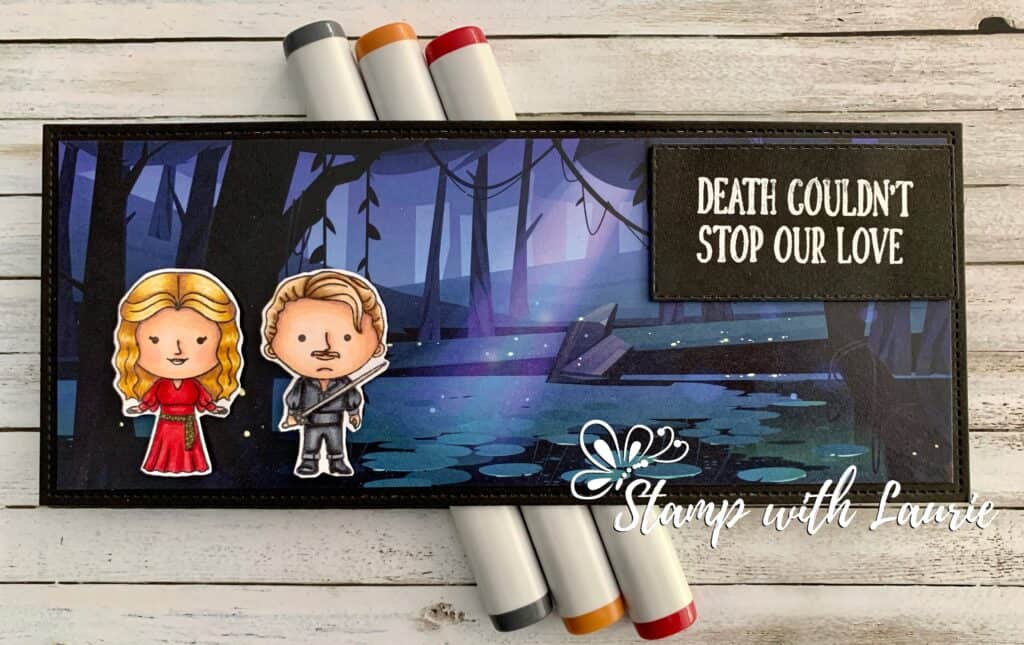
Hello Crafty Friends! It’s Laurie here to share my As You Wish Card using the Twoo Luv Stamp Set by Kindred Stamps! Princess Bride is one of my favourite movies ever! So, when I saw Kindred Stamps has this stamp set, I couldn’t resist buying it!
This is another super-fast card to make since the stamps colour up so quickly and the background paper is from the Enchanted Forest Paper Pack by Whimsy Stamps. I used my Copic markers to colour my characters to match the characters in the movie. I thought this slimline paper was perfect to represent the ‘Fire Swamp’ in the movie where Westley and Buttercup meet the R.O.U.S.’s (Rodents of Unusual Size)! The only other thing that needed to be added was the sentiment which I embossed in white on black cardstock. Easy-peasy!
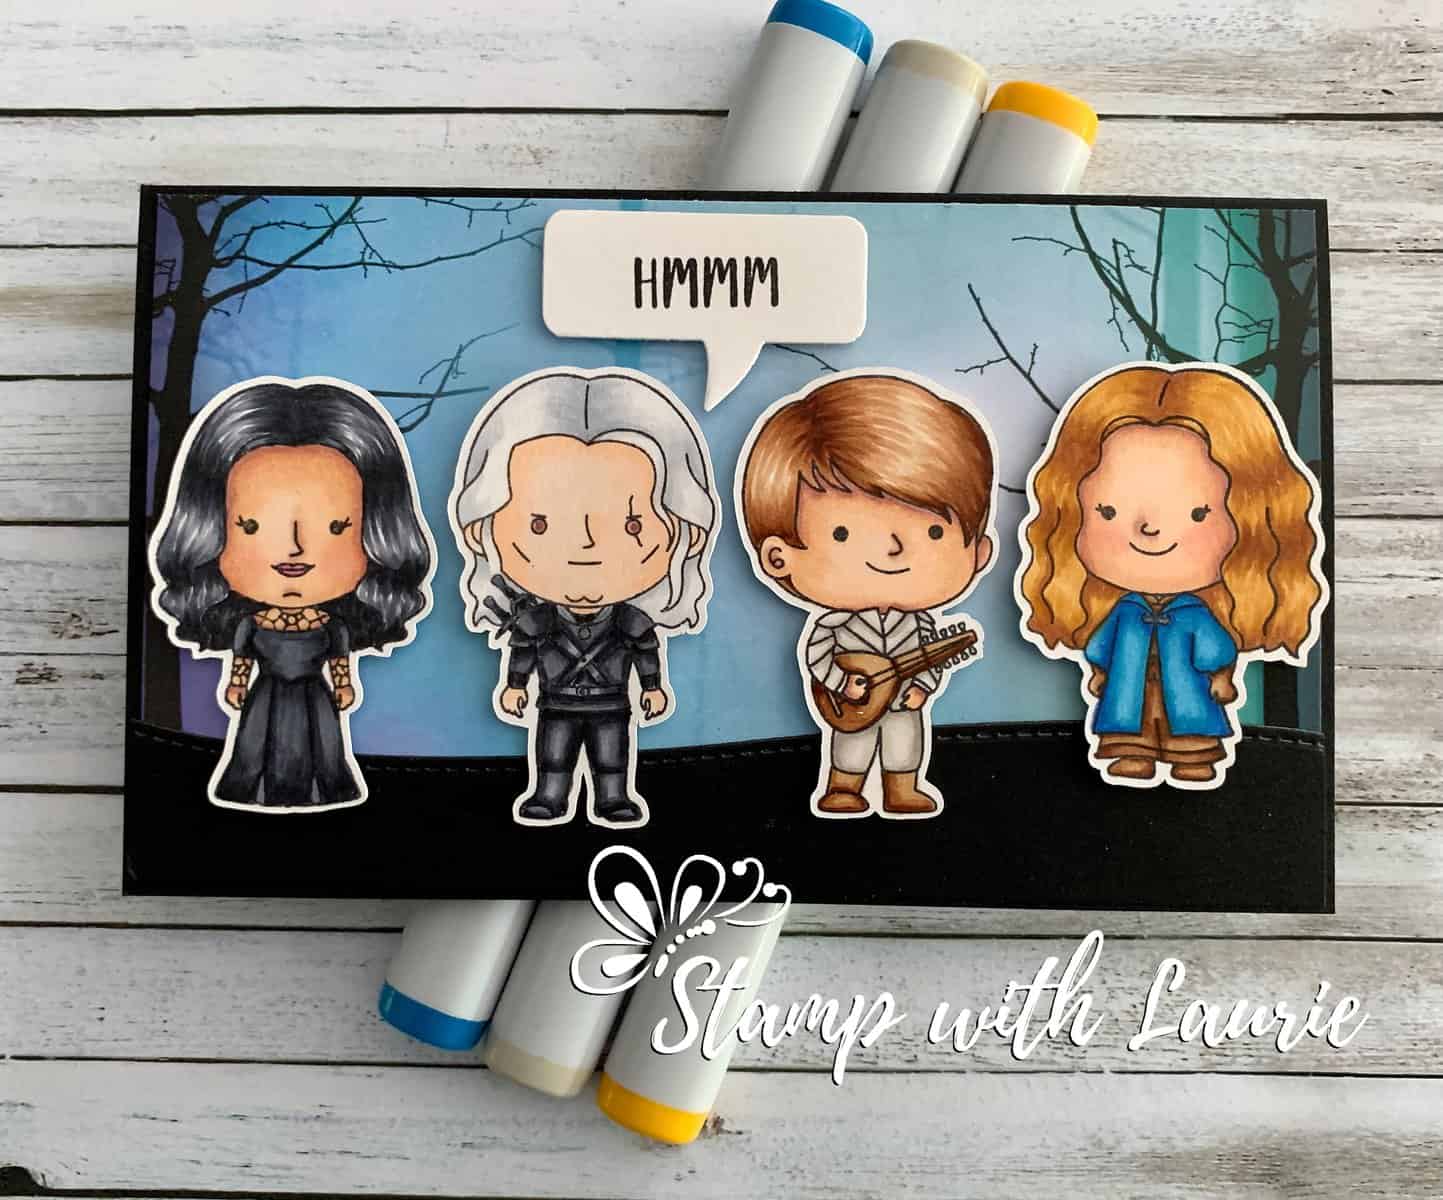
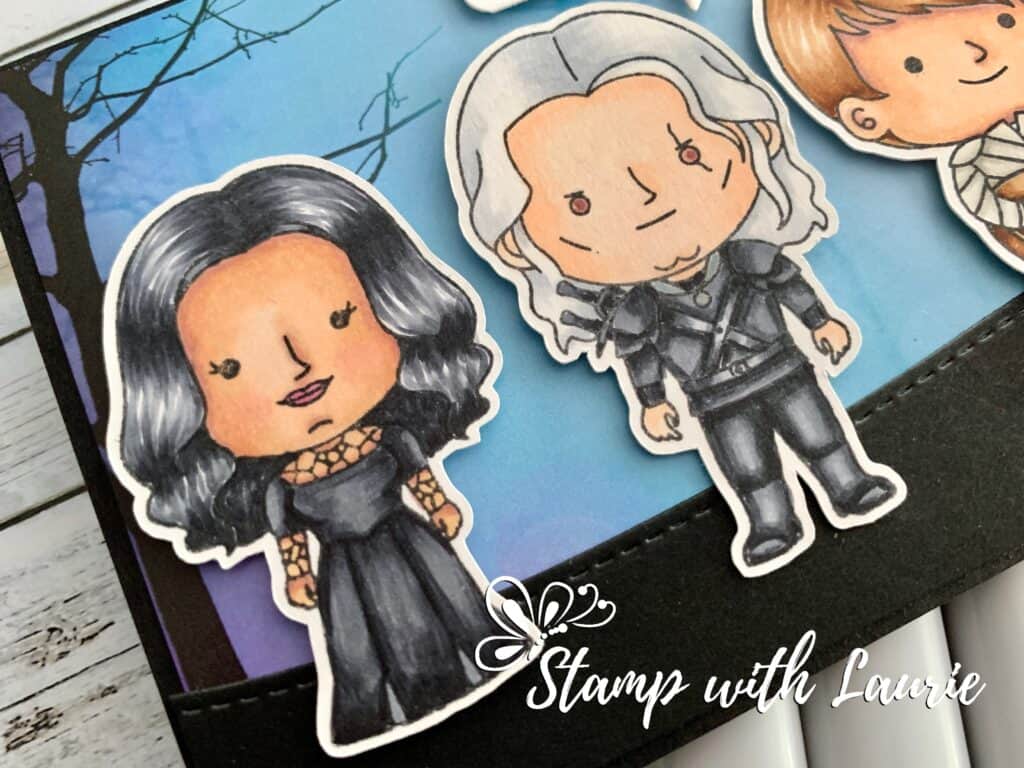
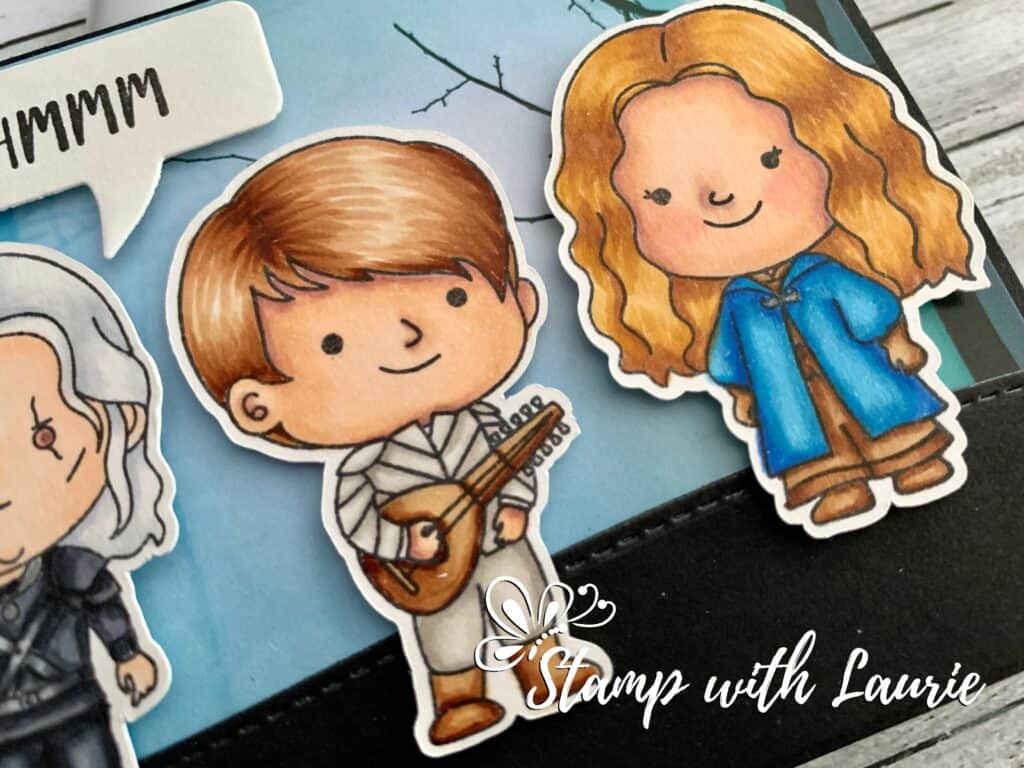
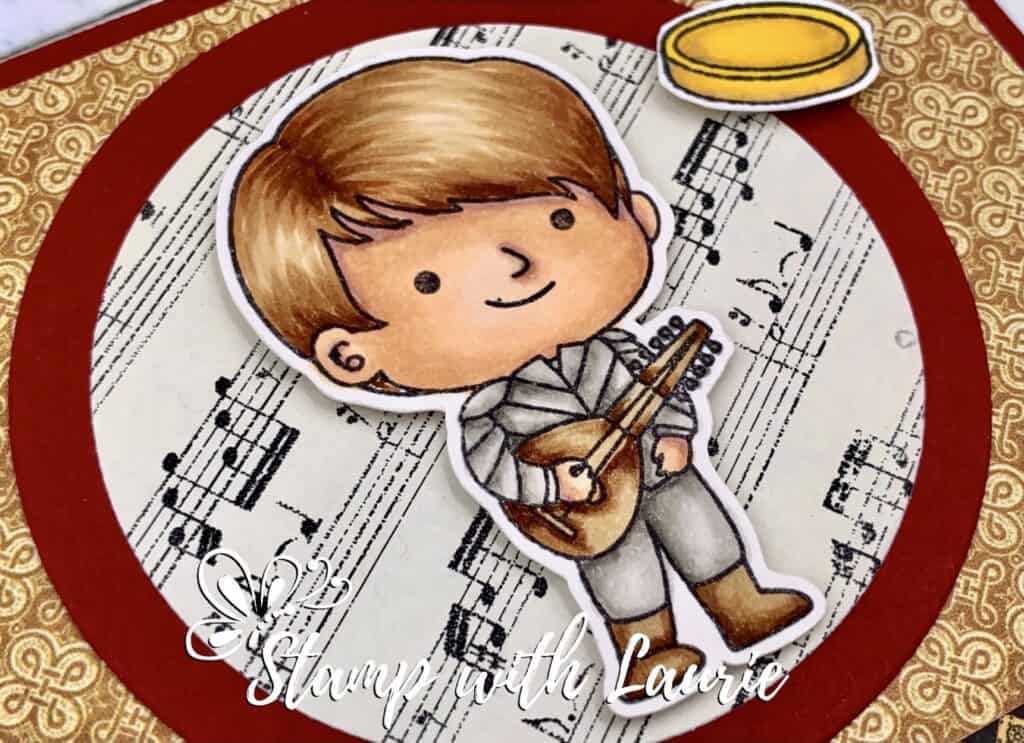
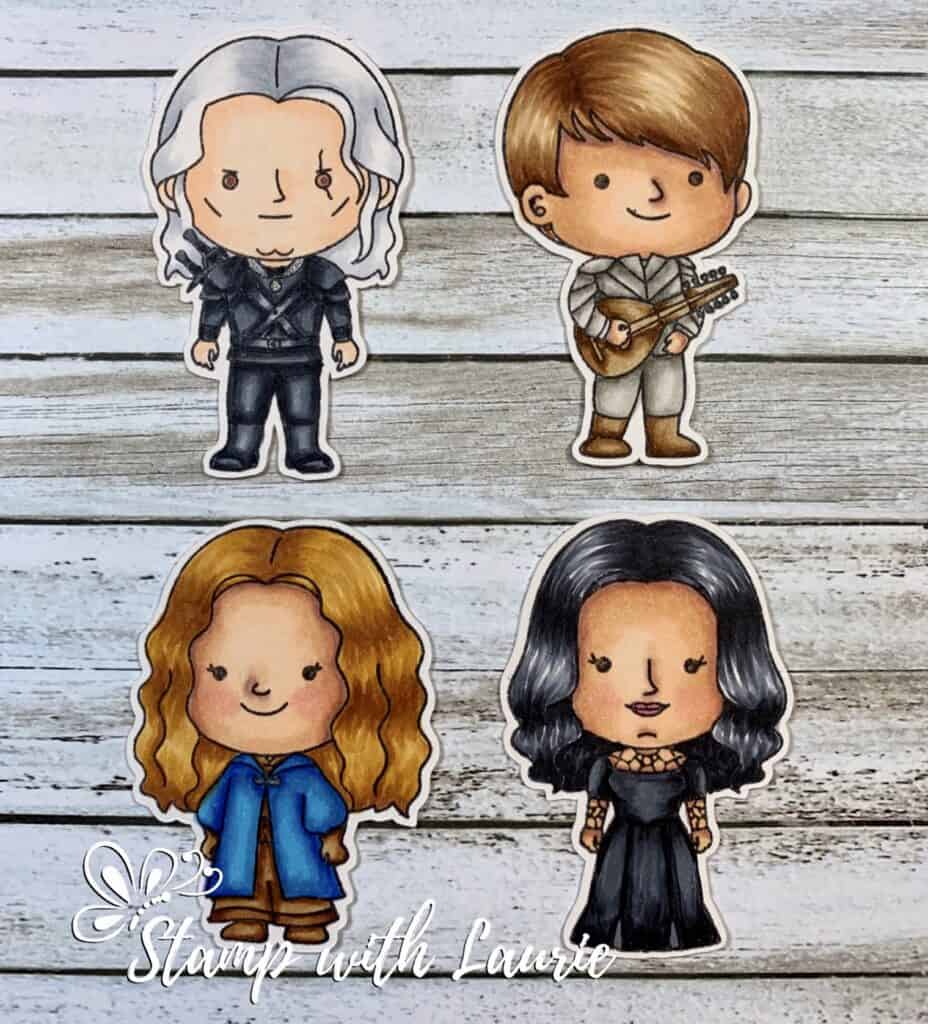
Hello Crafty Friends! It’s Laurie here to share my Witcher Birthday Card! Today is my big brother’s birthday and I know that The Witcher TV Series is right up his alley. So, I combined all 4 characters from the Monster Hunter Stamp Set by Kindred Stamps onto my mini slimline card.
I coloured the whole Monster gang with my Copic markers for a colouring challenge a while ago. I used the Bard for another card (I will link it at the end of the post). So, I had to recolour him. I love Kindred Stamps! They are such a fast colour!
For my card, I created a scene using only a few things. I love the Lavinia SceneScapes Paper! They have such amazing eerie scenes that can be used for square 6” x 6” card or cut down to fit my mini slimline card. I used the Stitched Hillside dies to create the ground. Finally, I used the Word Bubble dies to finish my scene.
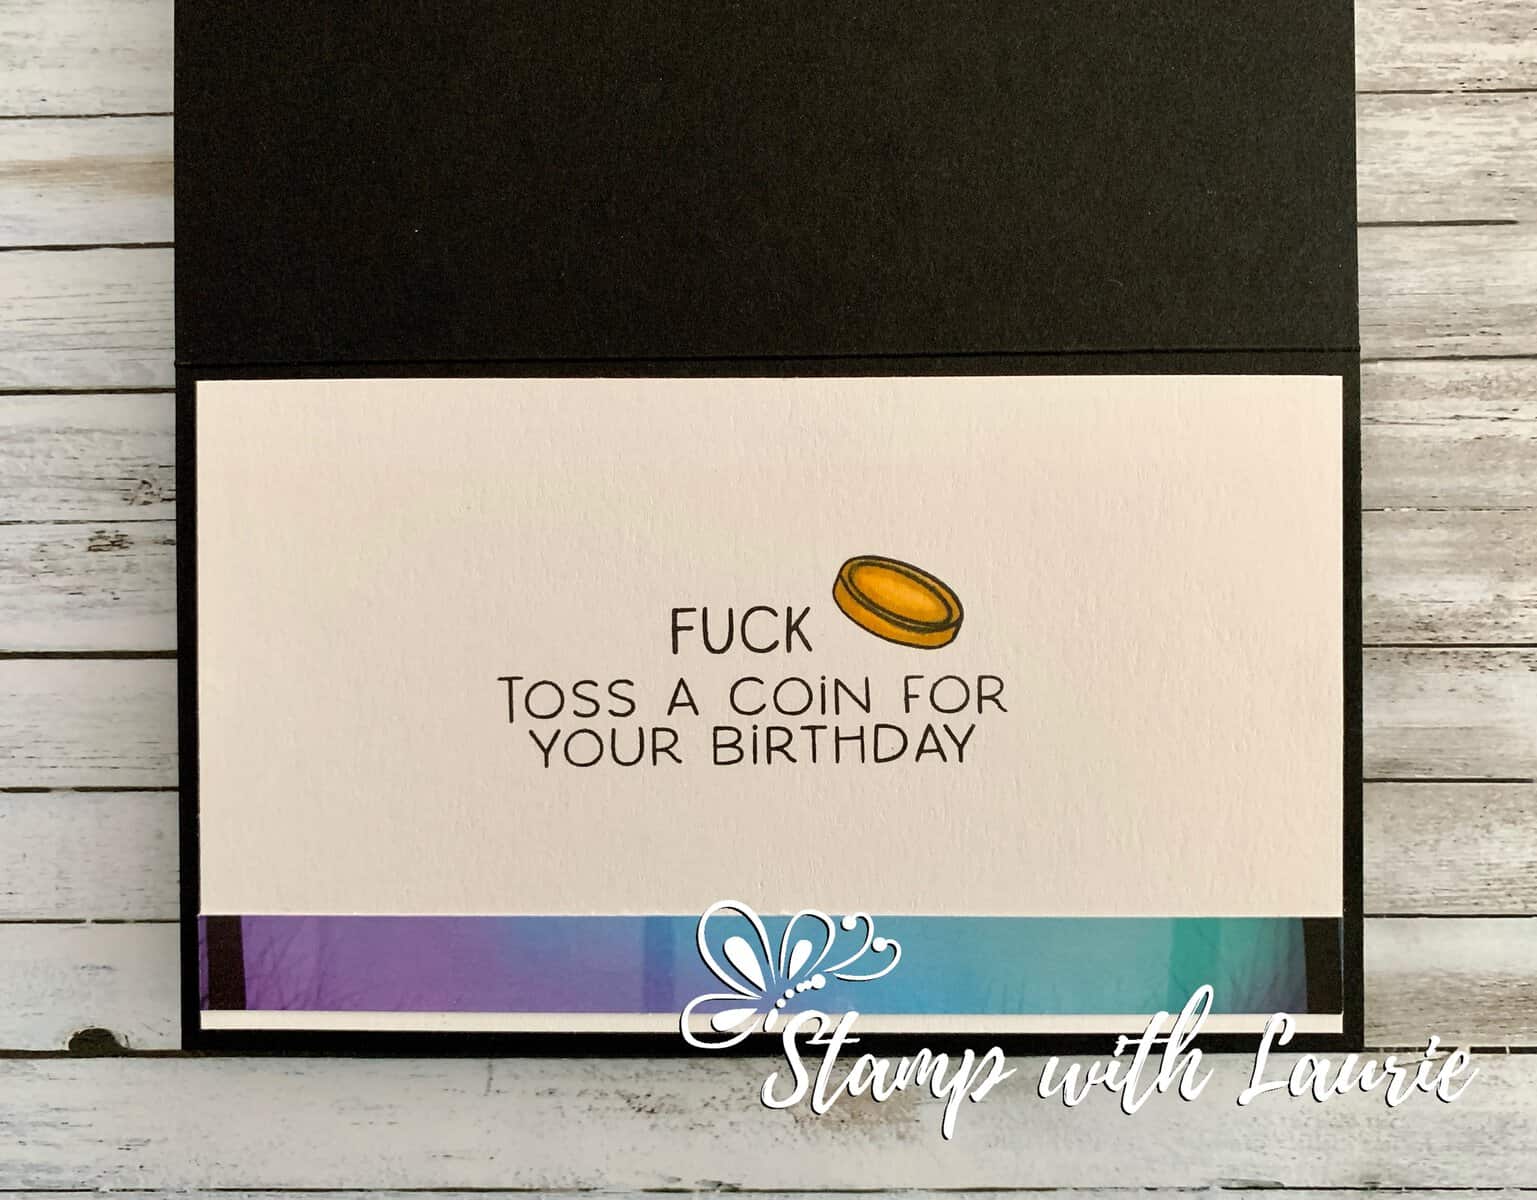
I even decorated the inside of my card with a coin from the stamp set that I coloured with my Copic markers and a strip of the leftover paper. If you watched the Witcher, you know that he swears…a lot. So, I included a couple of more colourful sentiments inside my card that I knew my brother would recognize.
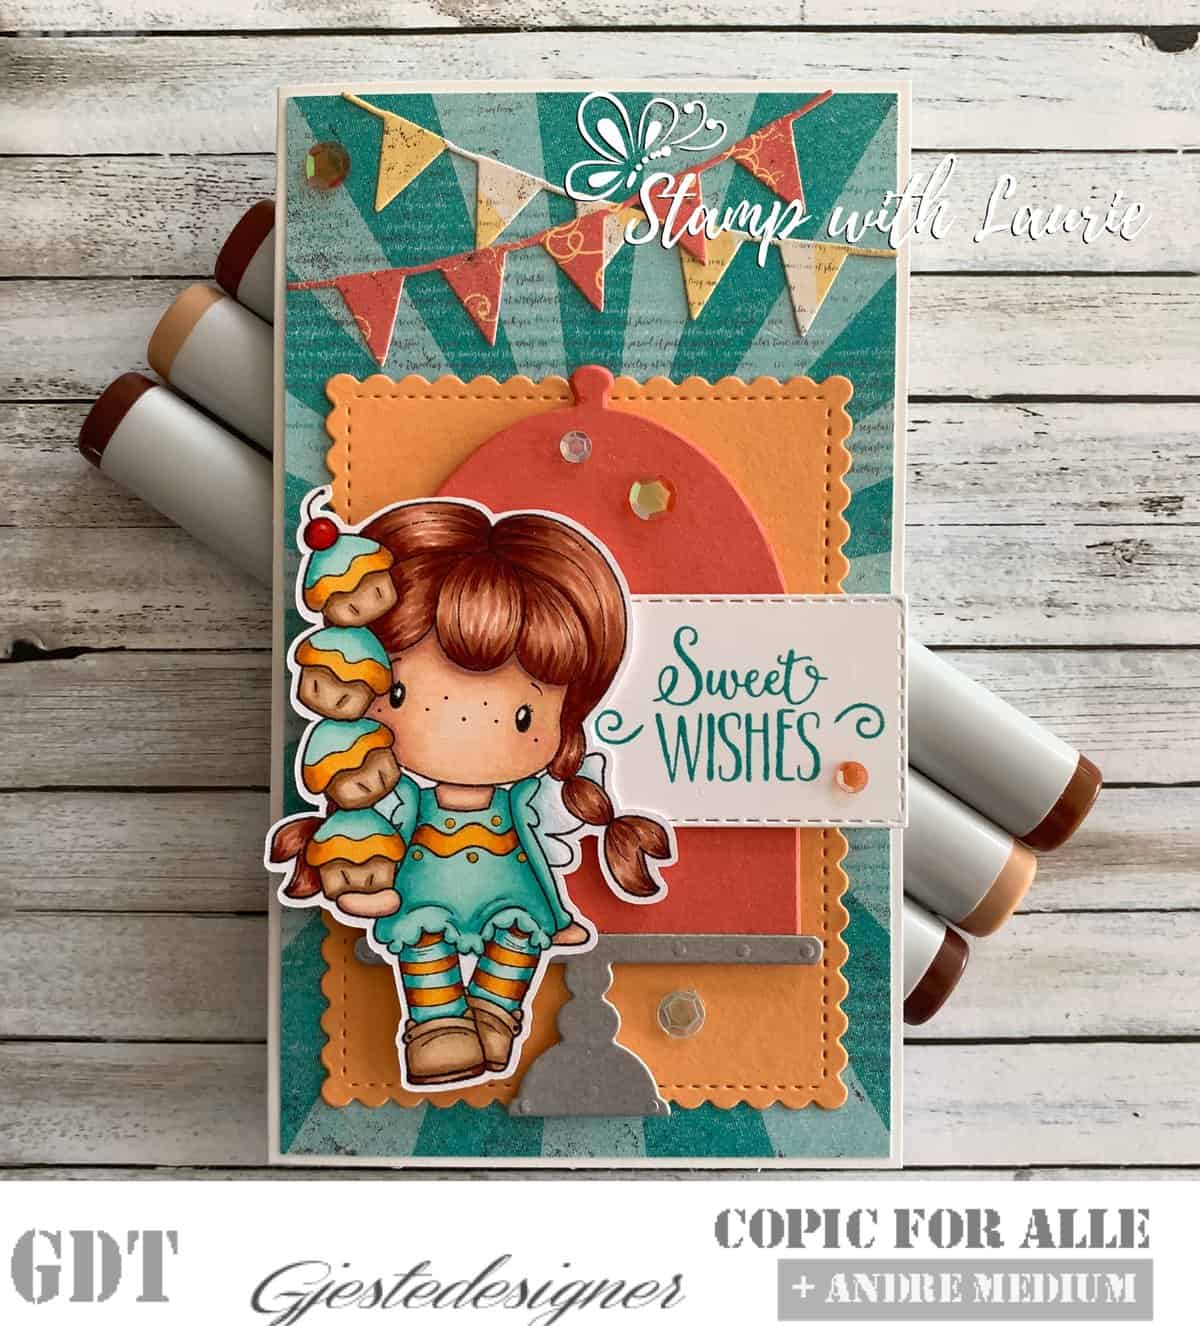
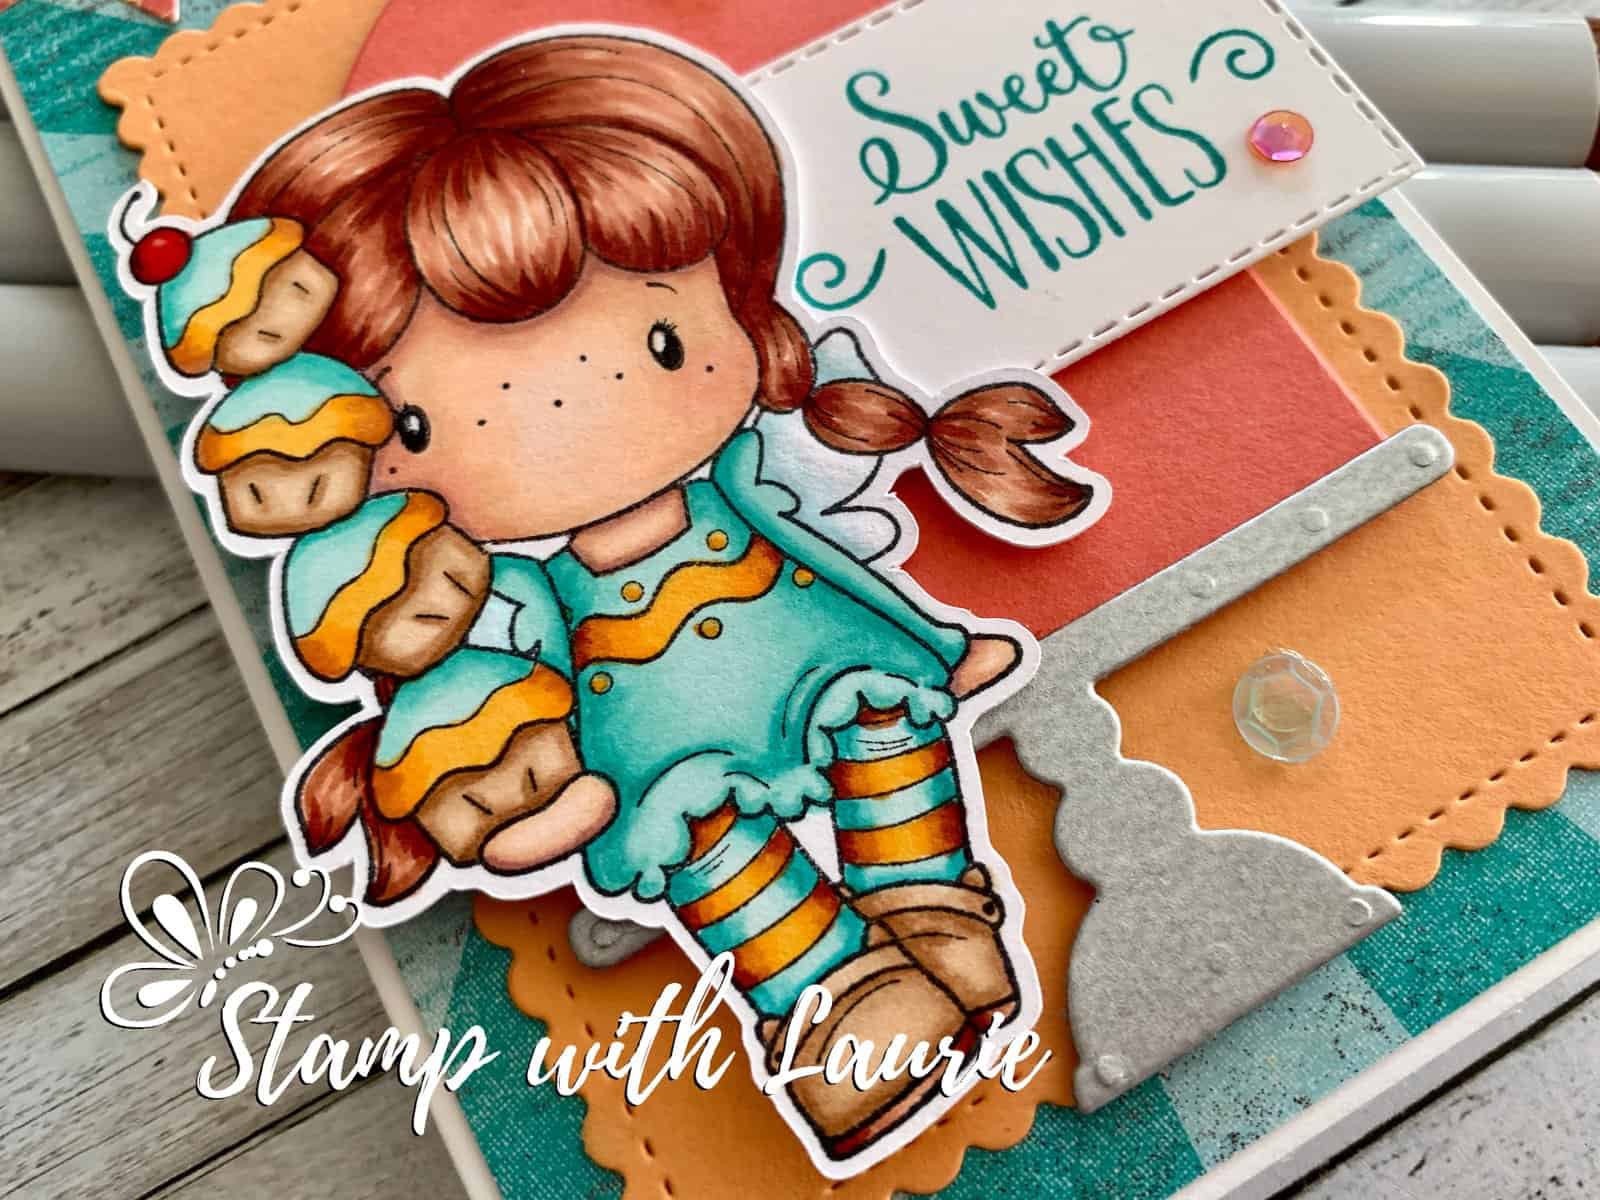
Hello Crafty Friends! It’s Laurie here! I am sharing my Stack of Sweet Wishes Card as my Guest Design Team Card for Copic for ALLE. I was so excited to be asked to be on their GDT again for the month of May. Their Color Challenge for May is using E (Earth Tone) Copic markers. I use Es in so much of my colouring. They really are a staple for me!
For my card, I pulled out Swiss Pixie Cupcake Birgitta by C.C. Designs Rubber Stamps. A friend, Nathalie, asked me to show her some colouring techniques and I thought this image would be a good one for us to colour together.
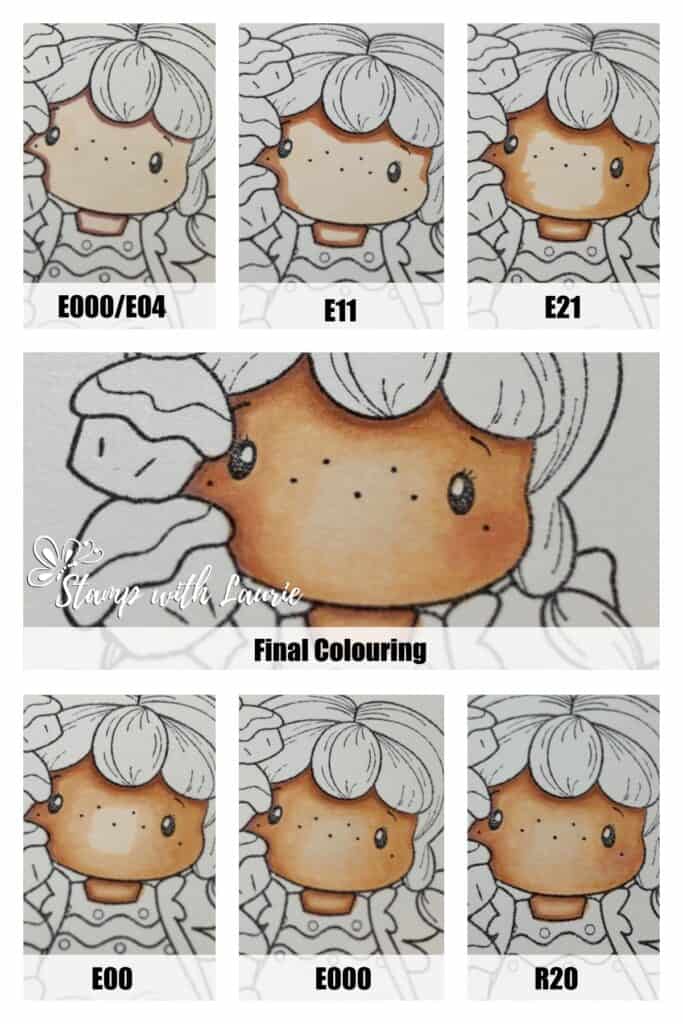
I showed her skin blending using E Copic Markers (E000/00/21/11/04/R20). Here is a collage of the skin colouring steps:
Skin Colouring with Copic Markers
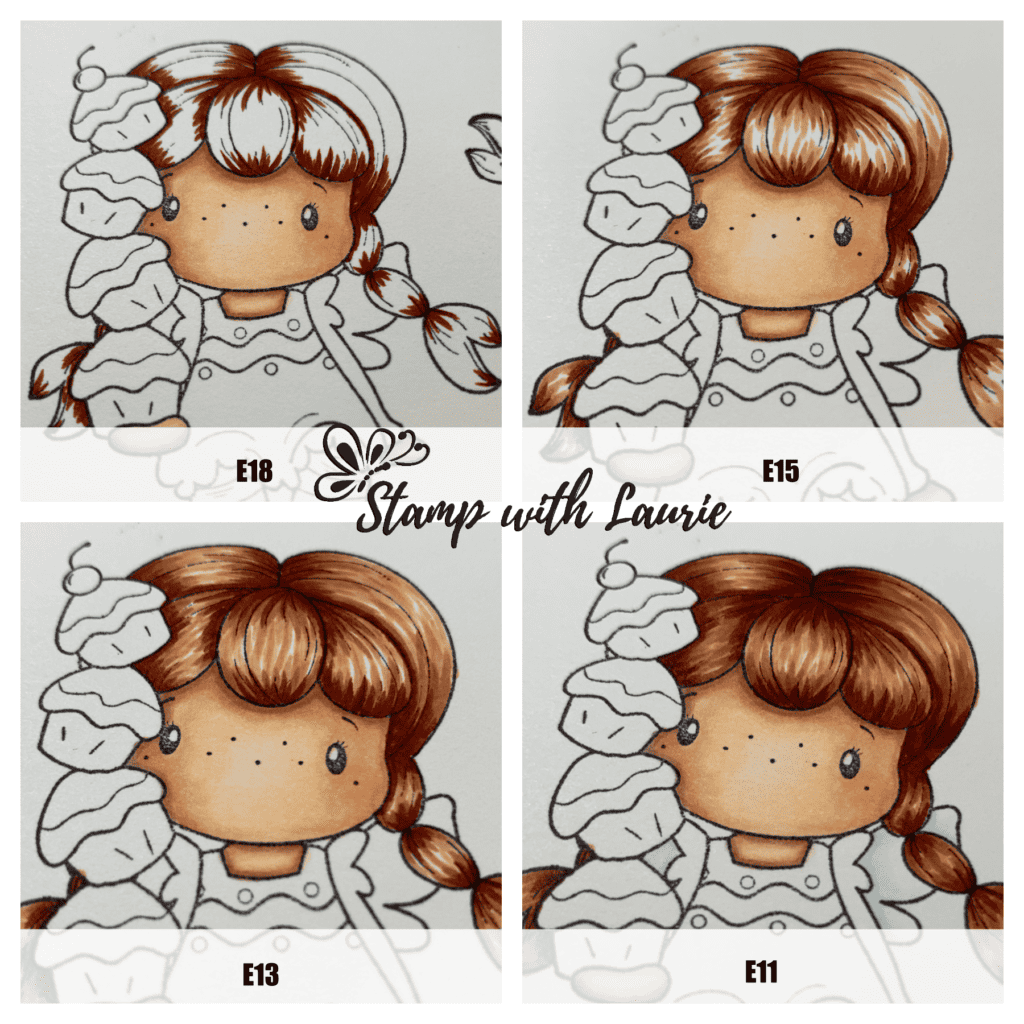
Next we worked on her hair using E Copic Markers (E18/E15/E13/E11). This is the collage for the step to colour the hair:
Hair Colouring with Copic Markers
For my card, I created a mini slimline card for my sweet Birgitta! Since she is sitting, I placed her on a cake pedestal. I thought it would be a fun way to show her off. I use Galvanized Metallic paper for the pedestal. The flag banners were cut from the DSP so that they would match the other elements. A scattering of sequins adds some birthday festiveness to the card!
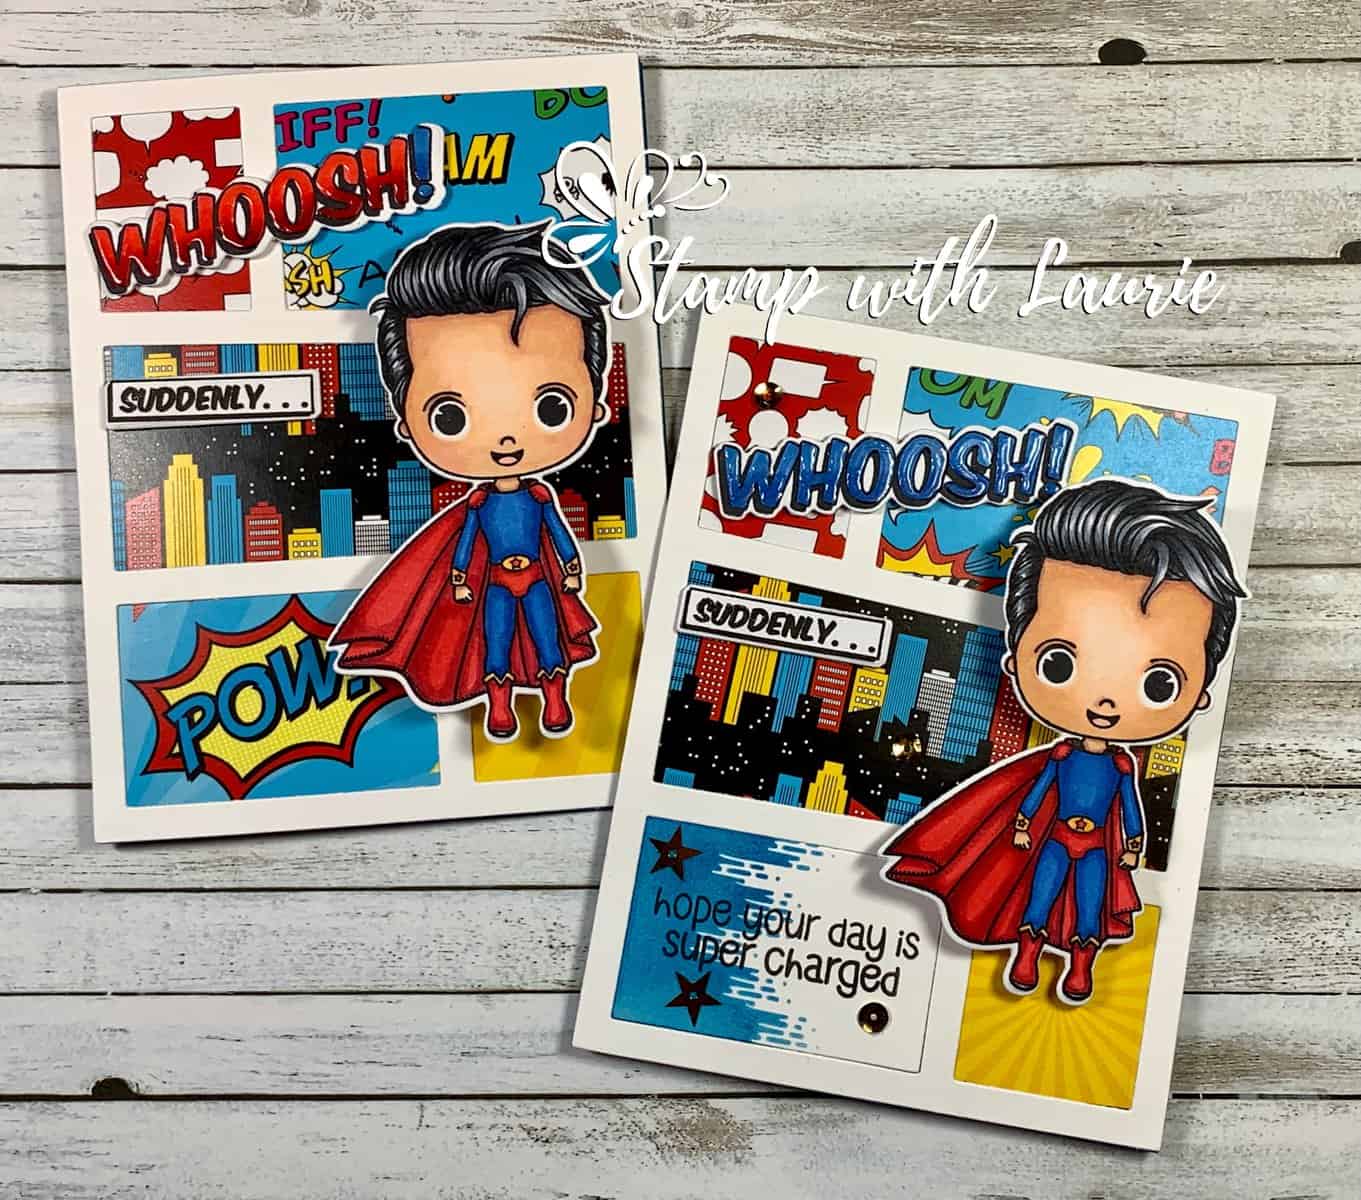
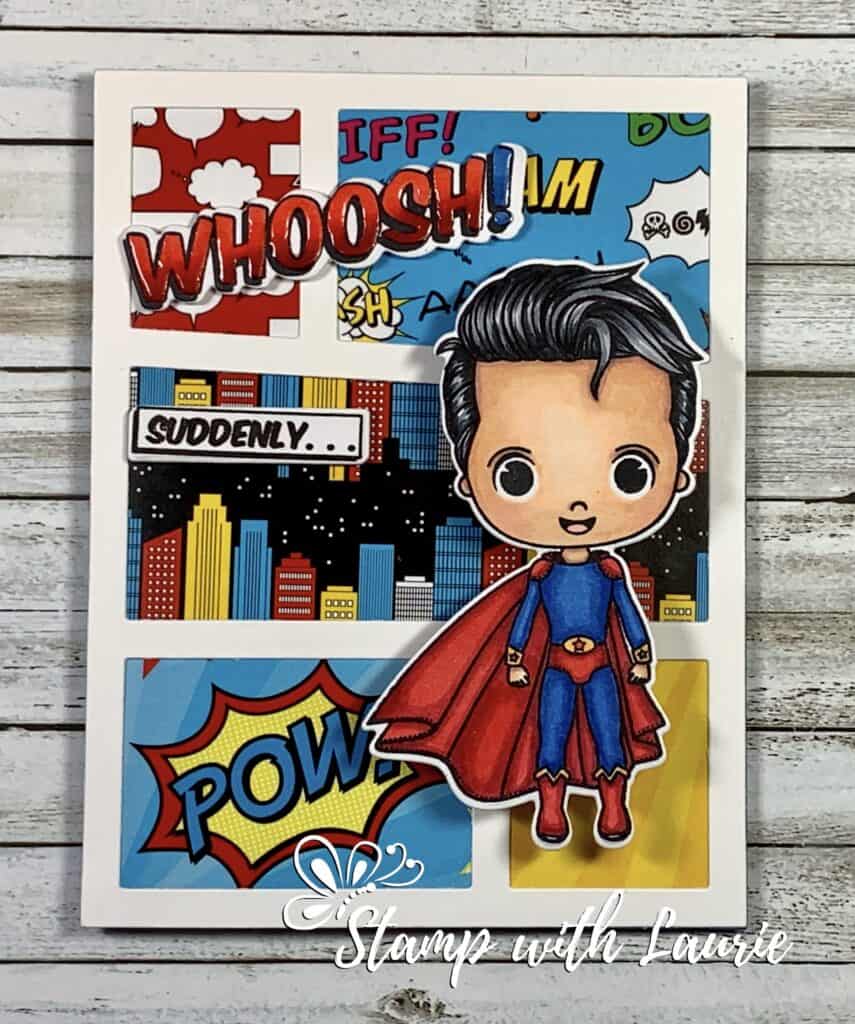
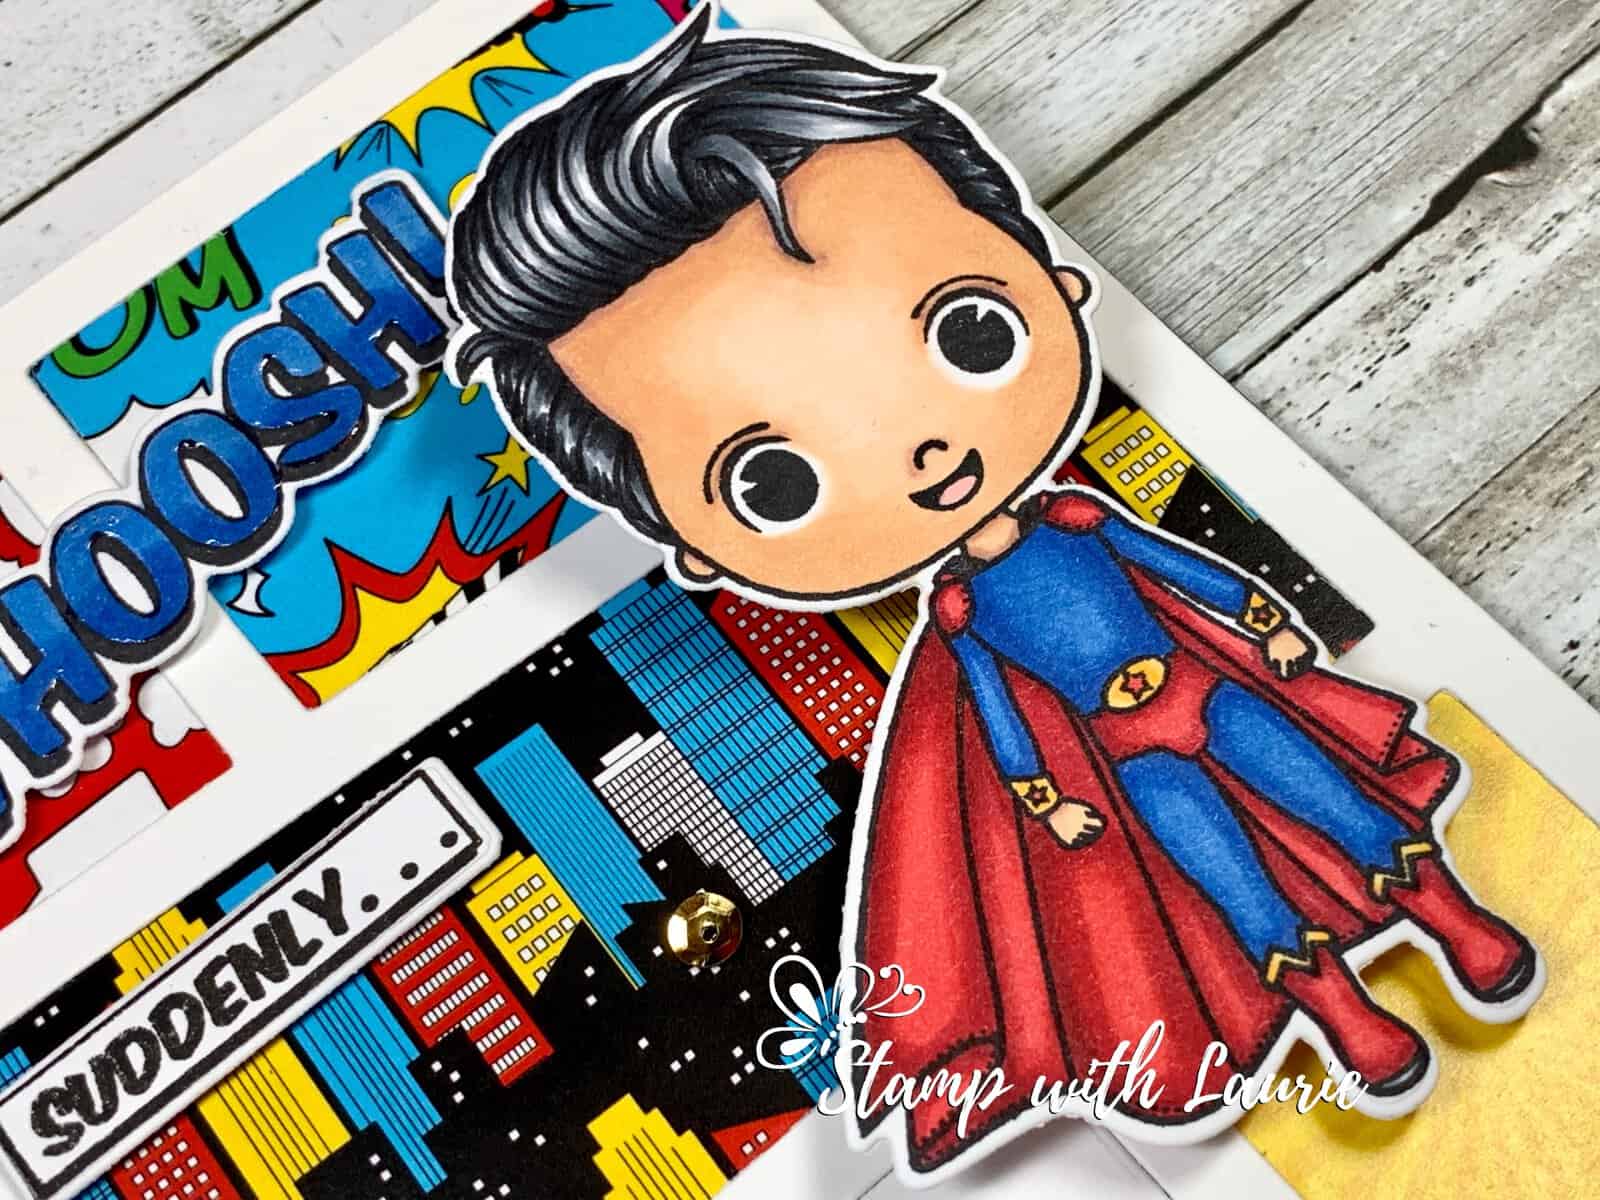
Hello Crafty Friends! Yesterday was a little boy’s birthday and a few weeks ago was a big boy’s birthday. The big boy collects comics especially Superman and the little boy sent me a card with a Superman stamp on the envelope. So, I pulled out my Save The Day Grab and Go Box by Stamp Anniething to make My Super Birthday Cards.
The Details of My Cards
I love that this Grab and Go Box has everything you need to make your card including paper, adhesive, card bases and more! I stamped my super heroes twice and used my Copic Markers to colour them. Then I die cut them out using the matching die included in the box.
My Super Birthday Card – Version 1
My cards were quick ones to make since I mainly used the Save the Day paper sheets and the Comic Mat Die that come with the box. For one card, I pulled out the Background Scene Stencil and did some inking directly onto the white panel that was cut out from the Comic Mat Die. Next, I stamped the sentiment in black and just placed it back into the empty slot on the mat. The other panels were filled with different papers. I love the “Suddenly” just like in the old comics! I stamped the Whoosh!, coloured them with my Copic markers and then added Glossy Accents to make them pop. A few sequins add to the sparkle of the card.
My Super Birthday Card – Version 2
For my other card, I decided to use the “POW” from the paper since the big birthday boy would get a kick out of it from the old TV shows that we use to watch.
One final piece was that I put my super heroes onto Action Wobbles. How fun is that! The recipient can have them wobble on the card! Check it out!
Save The Day Grab and Go Box, Stamp Anniething Paper Basics – Stamper’s Select White Cardstock, Papertrey Ink #1 Stamp, Save The Day Grab and Go Box, Stamp Anniething #7 Stamp, Save The Day Grab and Go Box, Stamp Anniething #8 Stamp, Save The Day Grab and Go Box, Stamp Anniething Metal Die Outlines, Save The Day Grab and Go Box, Stamp Anniething 6” x 6” Paper Sheets, Save The Day Grab and Go Box, Stamp Anniething Comic Mat Die, Save The Day Grab and Go Box, Stamp Anniething Background Scene Stencil, Save The Day Grab and Go Box, Stamp Anniething Tuxedo Black Memento Ink Pad, Stampin’ Up! Pacific Point, Stampin’ Up! Blending Brushed, Stampin’ Up! Action Wobbles, My Stash Metallic Sequin Assortments, Stampin’ Up! Glossy Accents, Ranger Thick Whisper White Card Stock, Stampin’ Up!
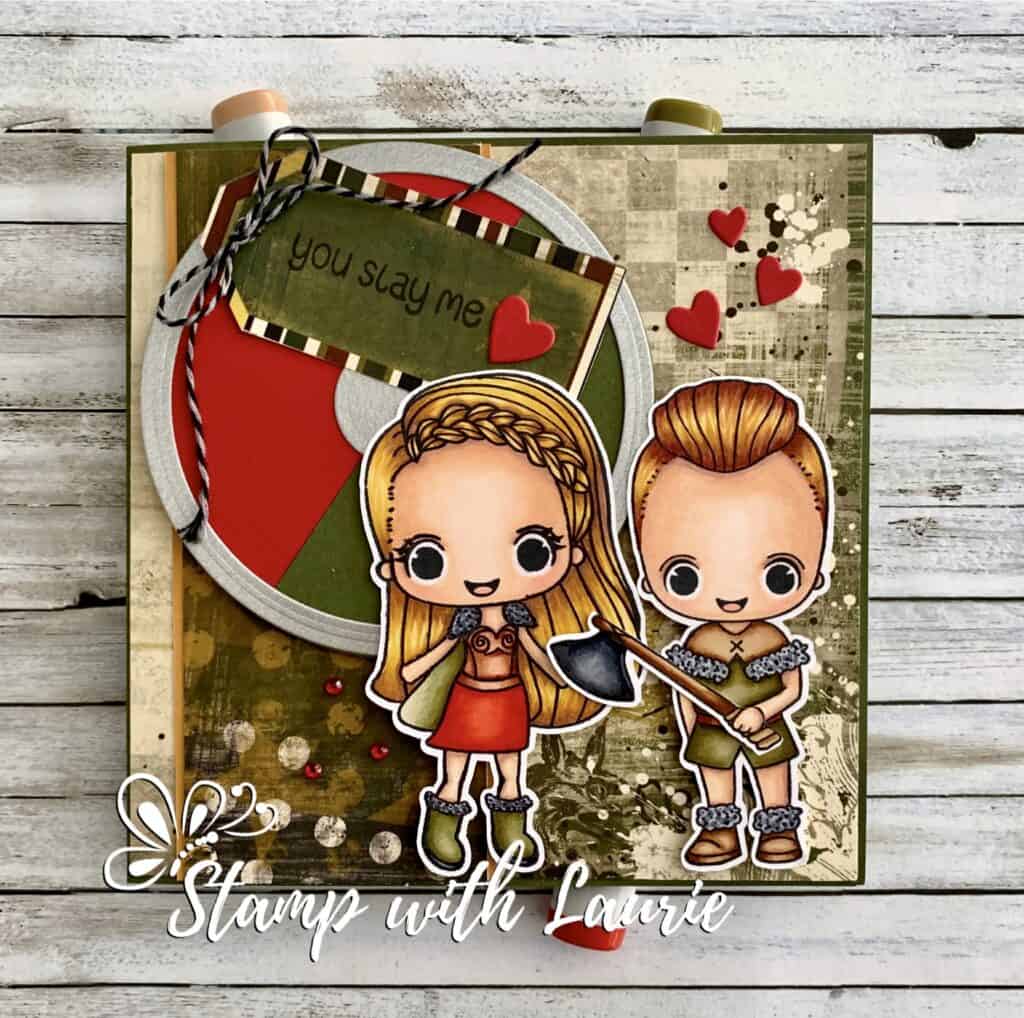
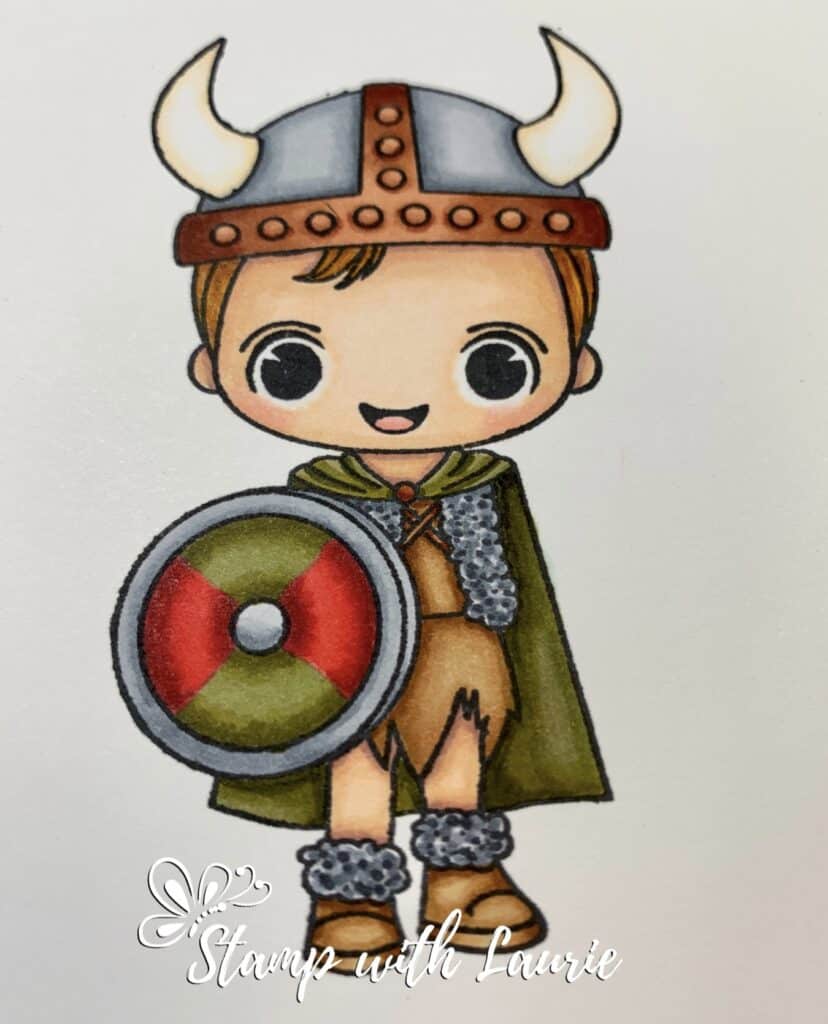
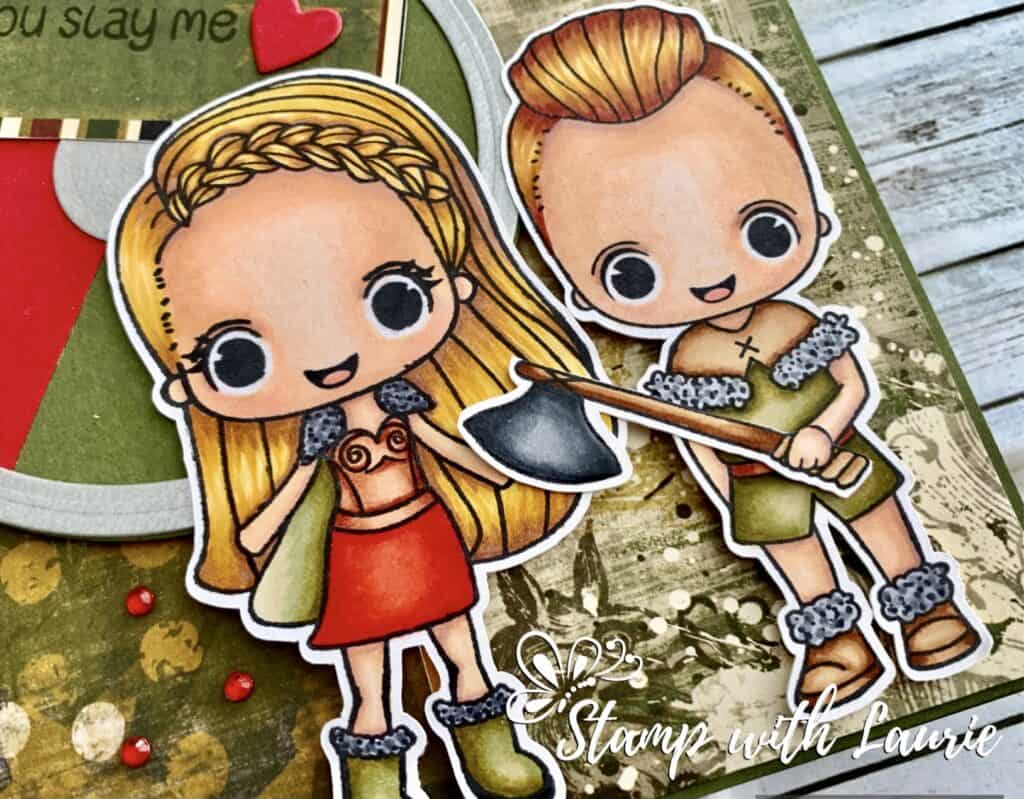
Hello Crafty Friends! Now that Valentine’s Day is over, I can share with you my You Slay Me Valentine Card that I gave to my Hubby. My Hubby loves anything that involves history and Vikings. He even has a Viking costume including a sword with scabbard for Society for Creative Anachronism (SCA) events and Halloween. In addition to that, we are currently re-watching the Vikings TV Series. When I saw that Stamp Anniething’s January release was Vikings, I just had to get the whole release! There are three Vikings in it. I used two of them on this card and the third is on another card that I will share later.
Details of My Card
I coloured both of these cuties with my Copic markers in the colours of the main characters in the Vikings TV Series…all blonde hair and natural tones, other than Siv’s skirt to tie in my red hearts that I wanted to use. Gale comes with a number of different weapons that you can swap out depending on what you want. I went with the axe and added Glossy Accents to the metal part to make it look like polished steel. I created my two-tone shield with a number of circle dies of varying width. My Hubby informed me that Vikings preferred coloured shields when I was colouring Torin below.
My Colouring of Torin, The Third Viking in the Release
I love the sentiment “You slay me” that comes with Gale. Perfect pun for my Hubby’s Valentine card! It fitted nicely on the tag that I cut out of the matching paper. I added some twine and a die cut heart to add some visual interest to it. Some hearts and a couple of red rhinestones add a bit of pop in colour to my card.
My note to my Hubby said that I will be his Lagertha to his Ragnar always!
Siv – All I Ever Mead and Gale You Slay Me, Stamp Anniething Paper Basics – Stamper’s Select White Cardstock, Papertrey Ink Victory 12” Paper Pack, Cambridge Collection, Bo Bunny Stripe 12” Paper Pack, Cambridge Collection, Bo Bunny Cut Outs 12” Paper Pack, Cambridge Collection, Bo Bunny Galvanized Metallic Sheet, Stampin’ Up! Standard Layered Circle Dies, Large, Sizzix Cutting Dies Standard Layered Circle Dies, Small, Sissix Cutting Dies Be Mine Stitched Dies, Stampin’ Up! Black and Gray Twine, From my Stash Red Rhinestone Basic Jewels, Stampin’ Up Glossy Accents, Ranger Real Red, More Mustard and Mossy Meadow Card Stock, Stampin’ Up!
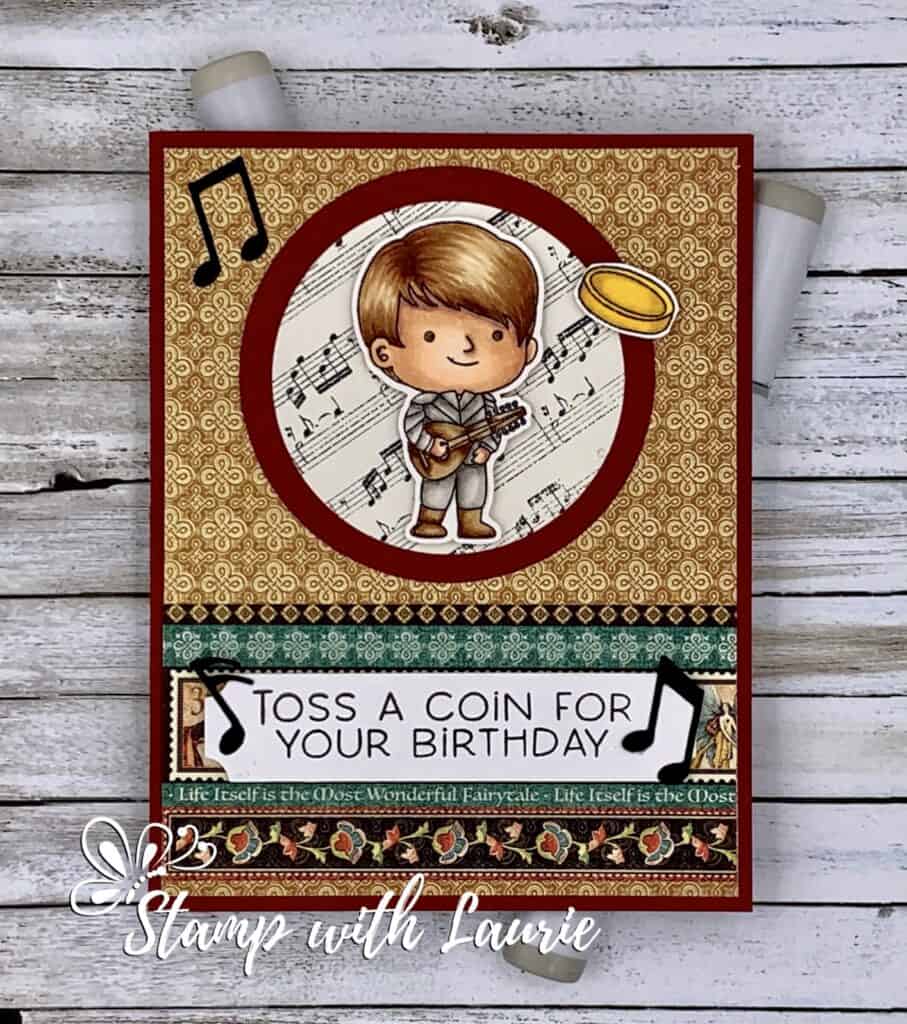
Hello Crafty Friends! It’s Laurie here to share my Toss A Coin Birthday Card! Today is a good friend’s birthday and I thought the bard from the Monster Hunter Stamp Set by Kindred Stamps would be perfect for him! He is the best bard role player ever! Plus loves the Witcher TV show!
I coloured the whole Monster gang with my Copic markers for a colouring challenge a while ago. But I knew that I wanted to give Jonathan the bard guy for his birthday. I love the sentiment “Toss a coin for your birthday”! The Enchanted Forest Graphic 45 Paper gave my card the fantasy feel that I was looking for, and of course, you have to have music paper and notes for a bard!
Now, I just need to get the other characters onto a card as well!
Monster Hunter Stamp Set, Kindred Stamps Paper Basics – Stamper’s Select White Cardstock, Papertrey Ink Tuxedo Black Memento Ink Enchanted Forest 8” x 8” Paper Pack, Graphic 45 Vintage Essentials 12” x 12” Paper Stack, DCWV Inc. Layering Circle Dies, Stampin’ Up! Project Life Cards and Labels Framelits Dies, Stampin’ Up! Music Notes Die Cherry Cobbler and Whisper White Card Stock, Stampin’ Up!
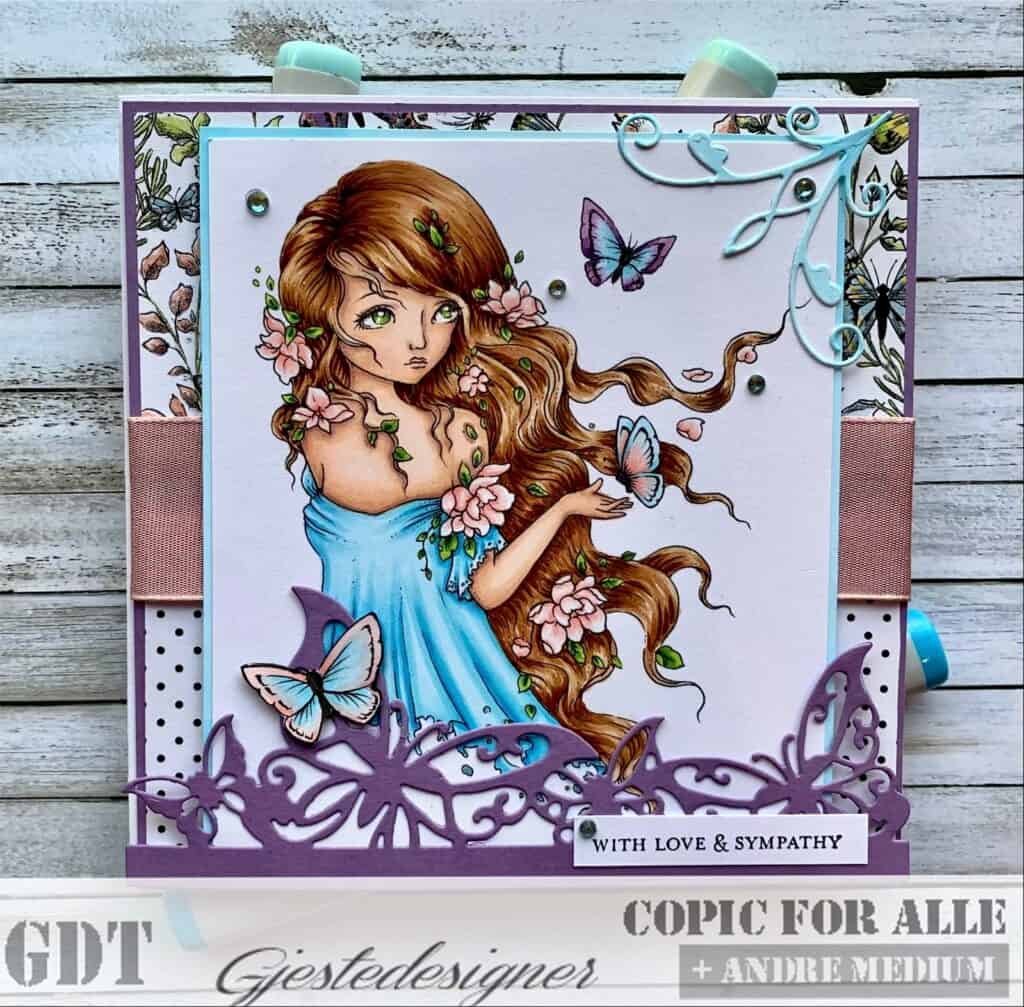
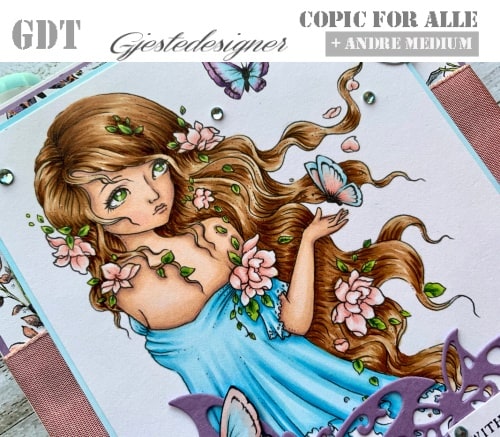
Hello Crafty Friends! It’s Laurie here! Today I am sharing my second November Guest Design Team Card for Copic for Alle and their Monthly Blue Color Challenge! For My Sympathy Card, I used the digital stamp So Long Yesterday by Ching-Chou Kuik. I thought she was perfect for a special sympathy card that I needed to make.
She was fun to colour with my Copic markers, especially all that hair! I knew that I wanted to highlight the butterflies in the stamp and DSP with the die. Unfortunately the die cut covered up one of the butterflies in the stamp, but easy enough to fix by fussy cutting it out and popping it up on the die cut.
Since the Challenge was Blue and I didn’t have card stock in the exact same colour that I coloured her dress, I coloured a Whisper White frame with my markers, as well as the corner die cut and the rhinestones to match. That is one thing that is nice with alcohol markers, you can colour more than just paper!
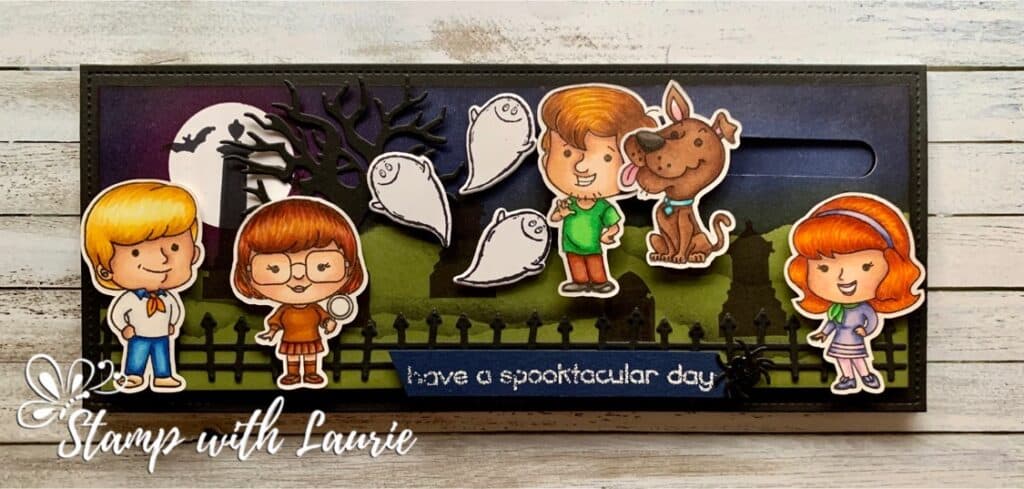
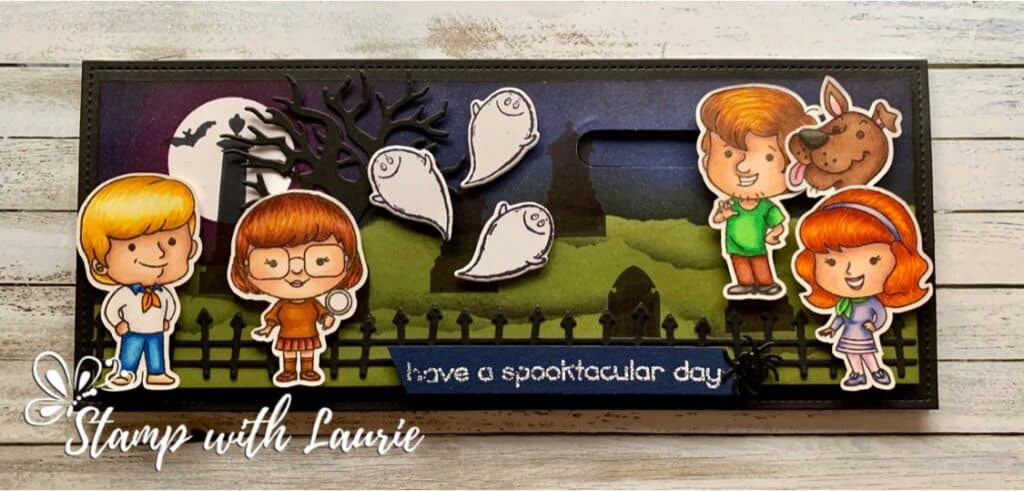
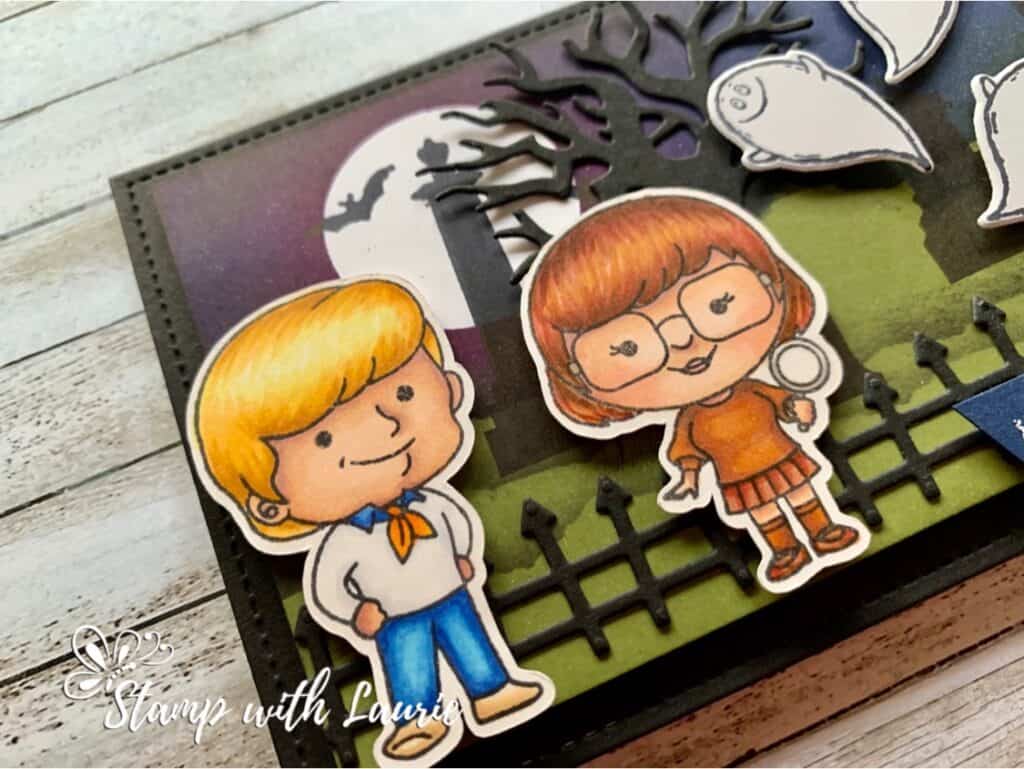
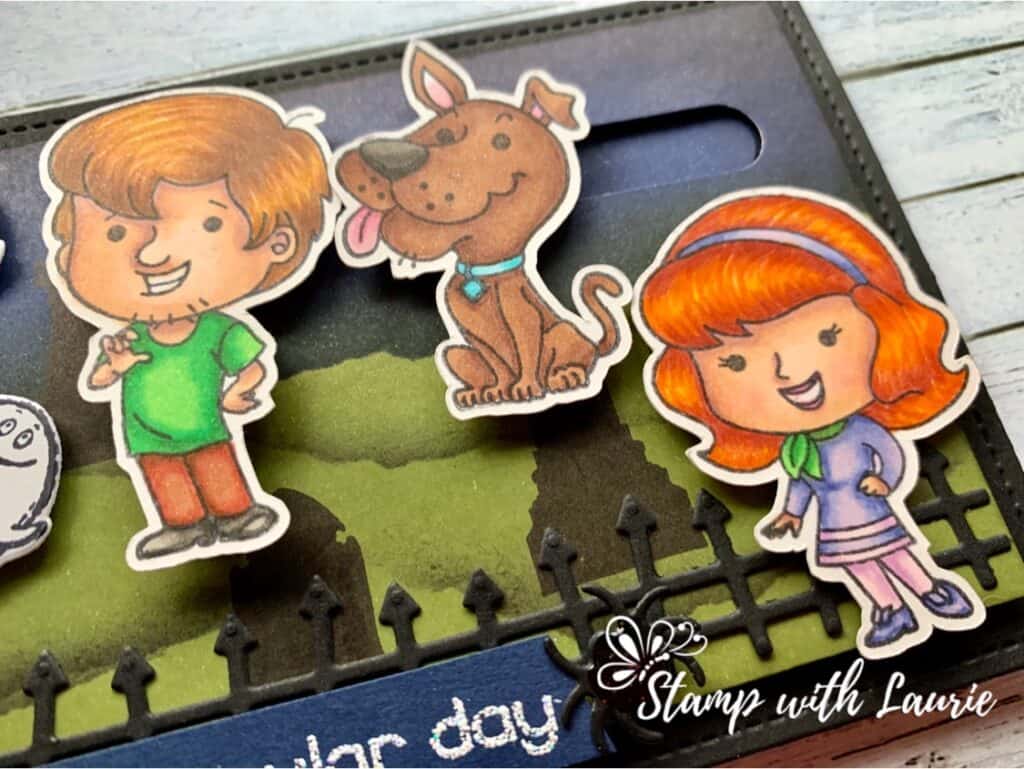
Hello Crafty Friends! It’s Laurie here with my Have a Spooktacular Birthday Card. Today is my Hubby’s birthday! He’s been hinting at a Scooby Doo card since I made one for my brother back in May (I have posted it at the end) or a Halloween card. So, I made him both! I coloured with my Copic markers the Teen Detectives from Kindred Stamps for the 30 Day Coloring Challenge in June in anticipation of this card. My card is a slimline card since they are all the rage right now.
Instructions for Have a Spooktacular Birthday Card
I had a ton of fun creating the spooky graveyard scene with lots of sponging and masking! The moon and the ground were masked while sponging Rich Razzleberry around the moon, Night of Navy for the sky and Memento at the edges of the sky. Next, I sponged the ground in Old Olive. Since it is a lighter colour then Night of Navy, I didn’t have to bother masking the sky. I added some hills by using the same masks and lightly sponging some black ink on different angles. Once I removed the masks, I stamped the grave stones and bats in black ink.
My Have a Spooktacular Birthday Card with Shaggy and Scooby Running Away
I added a slider mechanism for Shaggy and Scooby since they are always running away from the scary monsters in the series! LOL! And in this case, it is the cute ghosts that are immerging from the graveyard! The Large Slimline with Sliders Dies comes with sliders, but I found that they were too long for what I wanted. So, I created my own using the retired Classic Label Punch by Stampin’ Up! I punched one and a half times overlapping in the area I wanted the slider to be. I used some pennies and dimensionals to create my sliders.
A die cut spooky fence, tree and spider with Shimmery Crystal Effects to make it glitter add to the Spooktacular scene!
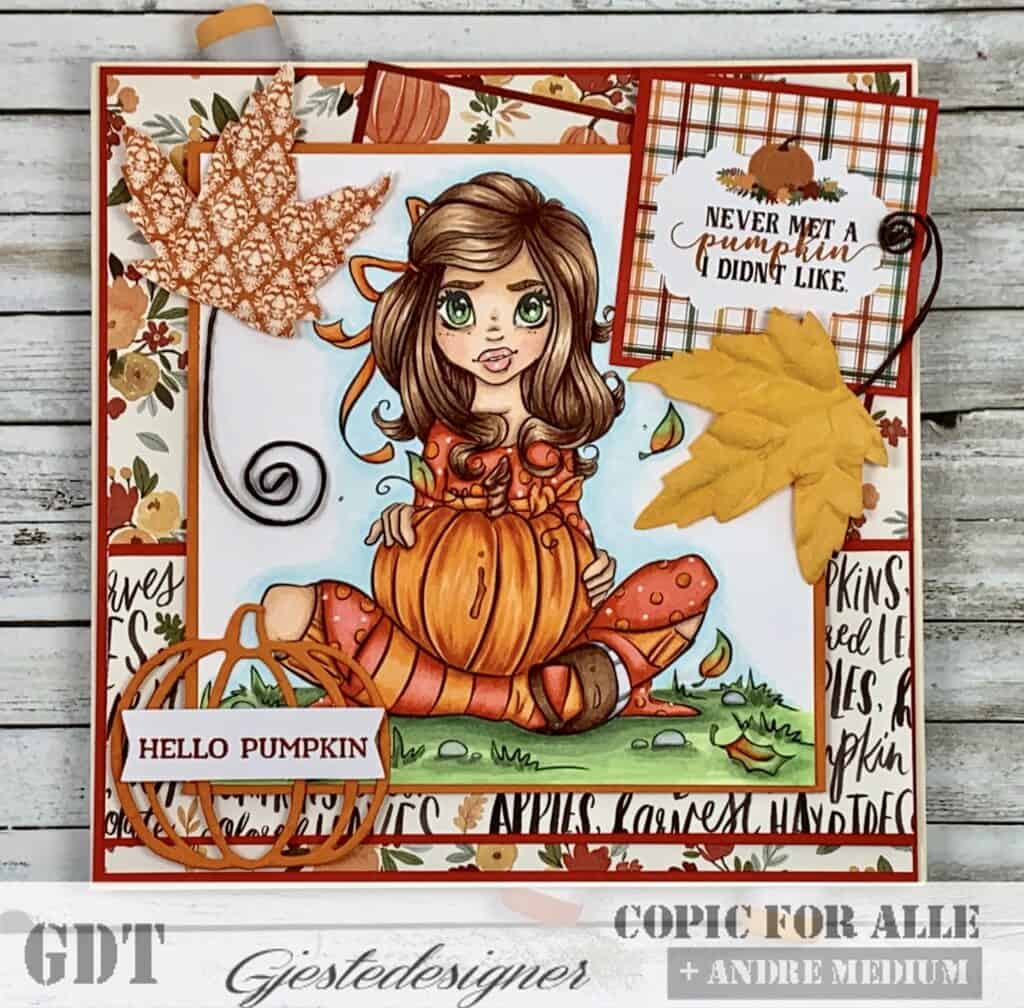
Hello Crafty Friends! It’s Laurie here with my Hello Pumpkin Guest Design Team Card for the Copic for ALLE Facebook Group using Krista Smith Stamps Pretty Pumpkin Digital Stamp. I was so honoured to be asked by this group to be a Guest Designer for their YR (Yellow/Red) Copic Challenge for October. This combination screams pumpkins to me and since I haven’t coloured a Krista Smith image in a while, I thought Pretty Pumpkin would be perfect for my card! Of course, for a Fall card, you need falling paper leaves that I pulled from my stash! Hope you like my take on this Color Challenge!
Pretty Pumpkin Digital Stamp, Krista Smith Paper Basics – Stamper’s Select White Cardstock, Papertrey Ink Hello, Pumpkin Stamp Set, Paper Pumpkin Kit, Stampin’ Up! Patterned Pumpkins Thinlits Dies, Stampin’ Up! Happy Fall 6” x 6” Paper Pad, Echo Park Paper Co. Hello Autumn 6” x 6” Paper Pad, Carta Bella Paper Fall Leaves, Recollections White Gelly Roll Pen Clear Wink of Stella Cajun Craze Classic Ink Pad, Stampin’ Up! Poppy Parade, Cajun Craze, Pumpkin Pie, Whisper White Card Stock Finished card size: 6” x 6”