My Retirement Wishes Card 

My Retirement Wishes Card - A retirement card with a trailer and a sunrise in the background
My Retirement Wishes Card

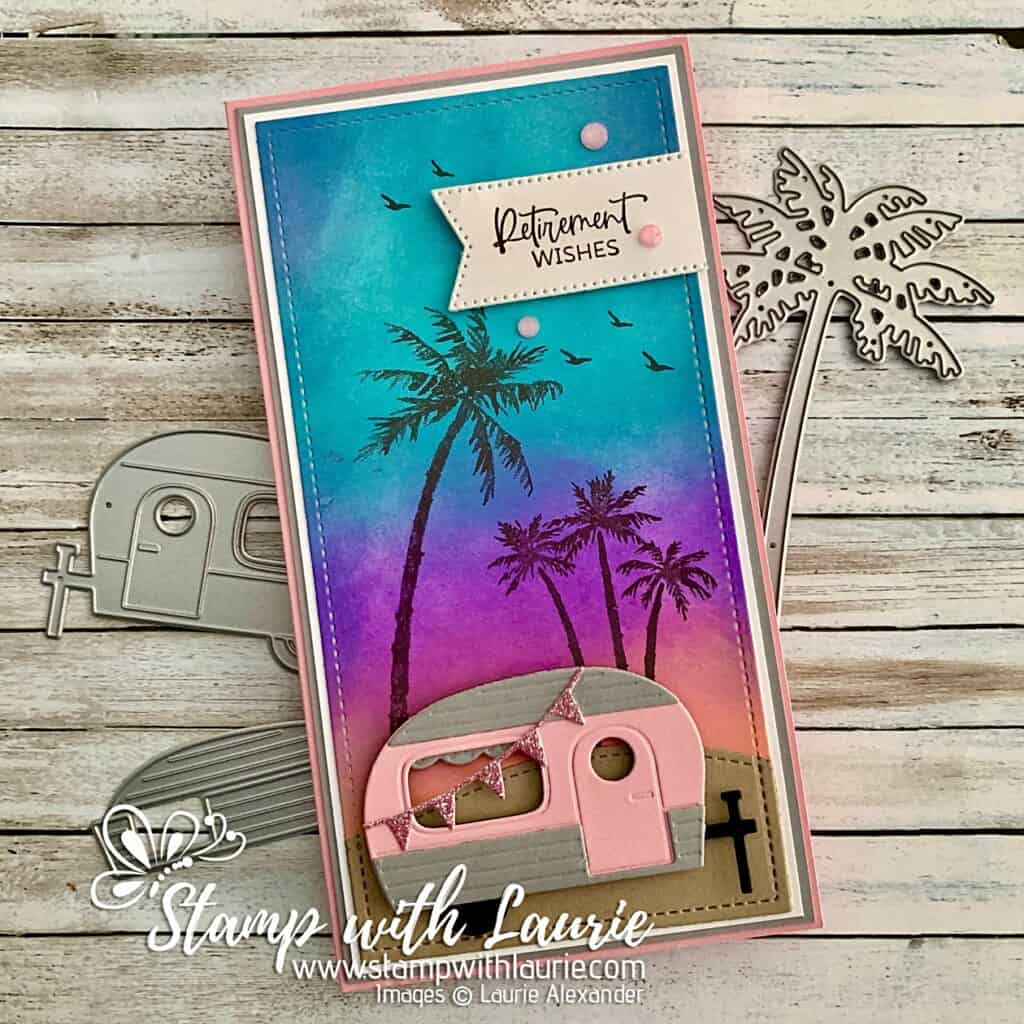
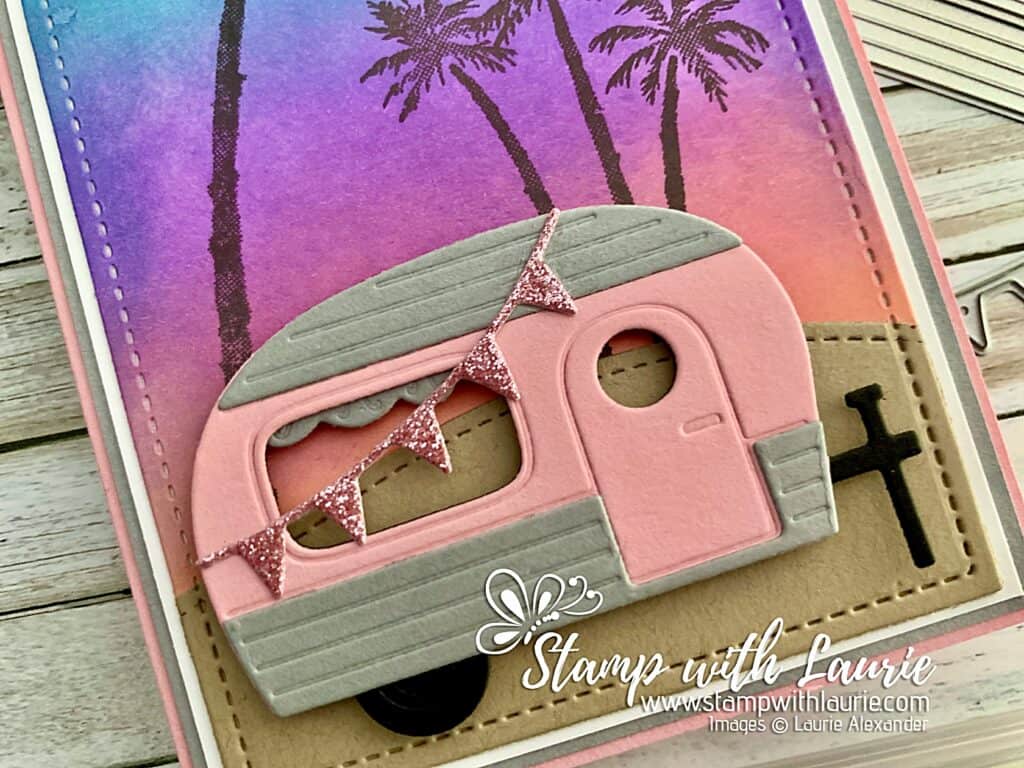
Hello Crafty Friends! Laurie here again! I am sharing My Retirement Wishes Card using the Paradise Palms Stamp Set and the Tree Lot Dies by Stampin’ Up! with a beautiful Distressed Oxide Inks sunrise. I had a lot of fun creating this card for a friend who is retiring. She is planning to go touring for the summer with her trailer. So, I decided to create a fun pink (she is a pink kind of person) trailer on her card.

The Details of My Card

For my card, I decided to go with a mini slimline design so that I could really show off a beautiful sunrise with the Distress Oxide inks. Especially since this is all about driving off into the sunset to enjoy retirement! 

Using my Blending Brushes, I blended the sky colours together in the order of Fossilized Amber, Worn Lipstick, Wilted Violet, Broken China and Faded Jeans on a piece of Basic White card stock. Once that was done, I created a Crumb Cake sand hill with one of the Slimline Stitched Hillside Border Dies. I used this for placement as I stamped my palm trees and seagulls in Early Espresso onto my sky piece. Next, I adhered the sand hill down and die cut everything at the same time with a mini slimline stitched die. 

Close Up of Sunset
Close Up of Sunset

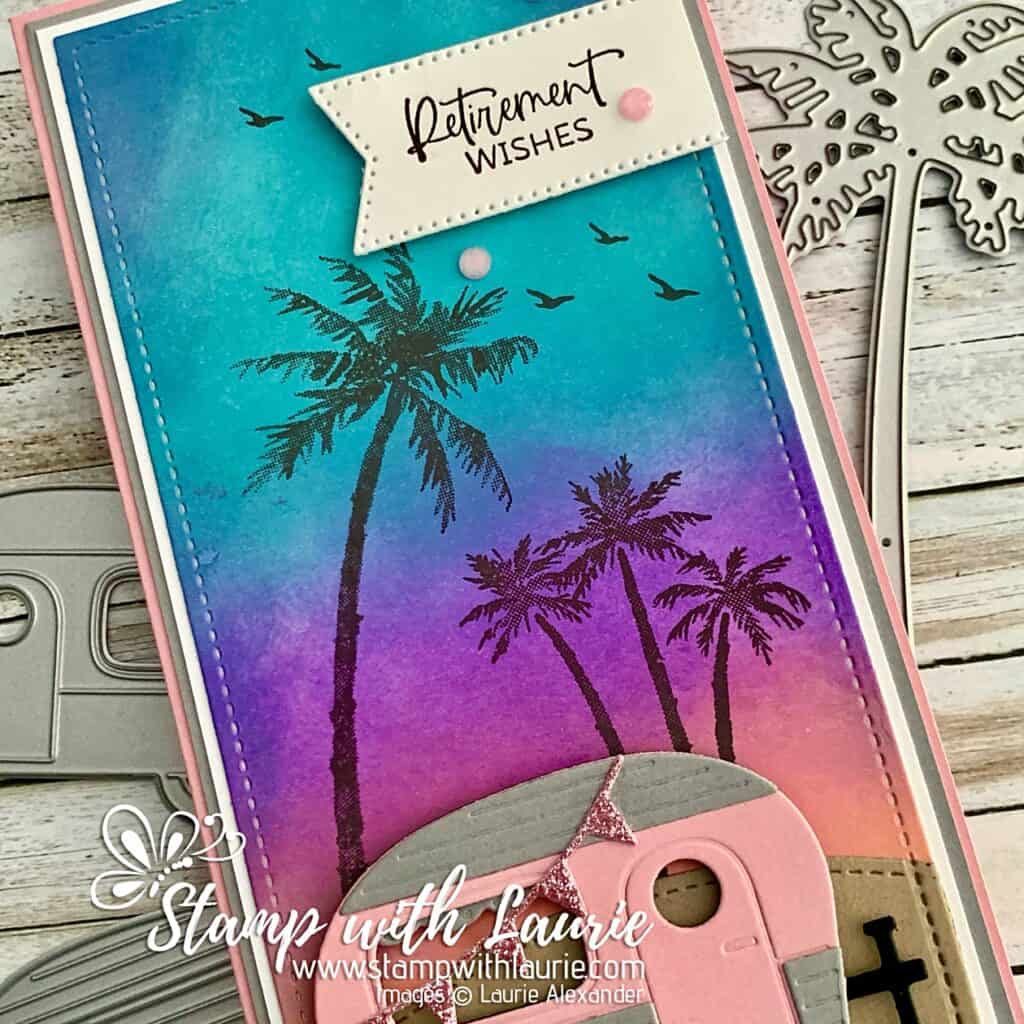
The sentiment was stamped in Black Onyx Versafine Ink and die cut with one of the flags from the Stylish Shapes Dies. Since I wanted this to hang over the edge of the sky piece and match up with my Basic White mat, I used my Paper Snips to cut off the edge.

Now, it was time to build my trailer with all the different dies. I loved this cute trailer once it was built! I also couldn’t resist adding some Pretty in Pink glimmer flags to match the trailer since we were celebrating!

Finally, the finishing touch was a couple of Pretty in Pink Shimmer Gems placed around my sentiment.

Close Up of Trailer
Close Up of Trailer

————————–

Card Recipe for My Retirement Wishes Card:

Paradise Palms Stamp Set, Stampin’ Up!
On the Horizon Stamp Set (seagulls), Stampin’ Up!
Tree Lot Dies, Stampin’ Up!
Large Mini Slimline Stackables, Lawn Fawn
Slimline Stitched Hillside Border Dies, Lawn Fawn
Stylish Shapes Dies, Stampin’ Up!
2024–2026 In Color Glimmer Specialty Paper, Stampin’ Up!
Blending Brush, Stampin’ Up!”
Fossilized Amber Distress Oxide Ink, Ranger
Worn Lipstick Distress Oxide Ink, Ranger
Wilted Violet Distress Oxide Ink, Ranger
Broken China Distress Oxide Ink, Ranger
Faded Jeans Distress Oxide Ink, Ranger
Early Espresso Classic Ink Pad, Stampin’ Up!
Black Onyx Versafine Ink, Tsukineko
2024–2026 In Color Shimmer Gems, Stampin’ Up!
Paper Snips, Stampin’ Up!
Pretty in Pink, Smoky Slate, Crumb Cake, Basic Black and Basic White Card Stock, Stampin’ Up!

Finished card size: 6 ¼” x 3 ¼”

————————–

Hope you liked My Retirement Wishes Card using the Paradise Palms Stamp Set and the Tree Lot Dies by Stampin’ Up! with a beautiful Distressed Oxide Inks sunrise.

For more of my Stampin’ Up! cards, please click here.

You will find the items listed above in my online store.

Thank you for stopping by!

Hugs,
Laurie

Birthday Blossom Wishes Card

Birthday Blossom Wishes Card - a birthday card with a little girl holding balloons
Birthday Blossom Wishes Card

Hello Crafty Friends! It’s Laurie here! I am sharing my Birthday Blossom Wishes Card as my Design Team Inspiration Card for Conie Fong Art & Design using the beautiful Little Blossom. She is perfect for a birthday card for a special someone!

The purchase includes 3 Images:

  • 1 Image: Little Blossom Holding Balloons
  • 2 Image: Little Blossom
  • 3 Image: Little Blossom without background

The Details of My Birthday Blossom Wishes Card

I was given as a gift this beautiful handmade paper in rich reds and golds and knew I wanted to use it as a backdrop for Little Blossom on my card. So, I coloured her with my Copic markers in red and blacks with golds for the trim. I added green to the leaves on her dress and some of the balloons to break up the colours.

For my card, I had a gorgeous bloom border die from Paper Rose that looked like the flowers on her dress. So, I die cut Gold Foil Paper to match the golden trim on her dress. To add interest behind the bloom die, I embossed a piece of Basic White card stock with the Distressed Tile Embossing Folder. This gave it a slight texture without interfering with the beautiful golden flowers.

Next, I added a piece of floral black and white DSP to balance out the other side. Again, I thought the flowers looked similar to the flowers on her dress.

Now for my focal point! I used the beautiful handmade paper behind her and added some greenery to tie in the green balloons. The finishing touch was to add a few white blooms to brighten up my card. For the pearls in the centres, I coloured them with my Y38 Copic marker.

To add a sparkle, I added a scattering of Red Rhinestone and Clear Wink of Stella on her hair ties, the flowers and gold trim of her dress.

————————–

Copic Markers:

Skin: E000/E00/E21/E11/E04/R20
Hair: C9/C7/C6
Eyes: E59/E57/E55/C3/C1/0
Lips: R20
Reds: R39/R37/R35
Blacks: C9/C7/C6
Yellows: E15/Y38/Y35/Y06
Greens: G99/G94/G21
Pearls: Y38

Close up of Little girl
Close up of Little Blossom

————————–

Card Recipe for My Birthday Blossom Wishes Card:

Little Blossom, Conie Fong Art & Design
Paper Basics – Stamper’s Select White Cardstock, Papertrey Ink
Lost & Found, Union Square 6” x 6” Paper Pad, My Mind’s Eye
Petal Passion Designer Series Paper, Stampin’ Up!
Gold Foil Sheets, Stampin’ Up!
Wedding Blooms Border Die, Paper Rose
Small Elegant Flourish Die, Paper Rose
Countryside Corners Dies, Stampin’ Up!
Distressed Tile 3D Embossing Folder, Stampin’ Up!
Hydrangea Punch, Martha Stewart
Iridescent Pearl Basic Jewels, Stampin’ Up!
Red Rhinestone Basic Jewels, Stampin’ Up!
Clear Wink of Stella, Stampin’ Up!

Cherry Cobbler, Garden Green, and Basic White Card Stock, Stampin’ Up!

Finished card size: 5 ½” x 4 ¼”

————————–

To view my other Conie Fong Art & Design projects, please click here.

Hope you like my Design Team Inspiration Card using Little Blossom for Conie Fong Art & Design!

Thank you for stopping by!

Hugs,
Laurie

Birthday Shellabration Card 

Birthday Shellabration Card - a birthday card with a girl listening to a shell
Birthday Shellabration Card

Hello Crafty Friends! It’s Laurie here! I am sharing my Birthday Shellabration Card as my Design Team Inspiration Card for Conie Fong Art & Design using the beautiful Seashell Rosealea. I love this image so much I have used her for another card awhile back. I will include a link at the end of this post to my other card.

The Details of My Birthday Shellabration Card

For my card, I decided to colour with my Copic markers Rosealea in Summer colours matching the Doodlebug papers. I had a lot of fun colouring her hair and all her beautiful shells! Once she was done, I used a blending brush to add some Crumb Cake “sand” along the edges.

To mirror her shells, I used a cluster of shell die cuts with other ocean elements in opposite corners. The starfish in the sentiment cluster was brushed with Peach Pie Ink to give it dimension and look like the starfishes in my colouring. I also brushed Crumb Cake Ink to the Basic White coral rounds to give them dimension and a sandy look. I couldn’t resist using a leaf trinket with my sentiment cluster to highlight it!

A border of shells peeking out behind her were embossed with my Embossing Mat to make the details really stand out. Then, I brushed Crumb Cake Ink to bring out the details even more. Tip: leave the die cut shells in the metal frame, brush the ink over the frame so that only the raised areas get the ink. This keeps the ink off the other areas making the raised areas stand out even more.

To add a sparkle, I added a scattering of Flat Adhesive-Backed Pearls, Clear Wink of Stella on the flowers and Star Dust Stickles to the pearls in her hair.

————————–

Copic Markers:

Skin: E000/E00/E21/E11/E04/R20
Hair: E25/YR24/Y26/Y21
Top: BG15/BG13/BG11
Eyes: G99/G94/G21/C3/C1/0
Lips: R83/R81
Starfishes: YR18/YR04/Y38/Y35
Shells 1: E15/E13/E11
Shells 2: E33/Y32
Pearls/Shells 3: BV000/BV13
Shells 4: R83/R81
Coral: E19/E18/E15
Flowers: R85/R53/R81/YR24/Y21
Leaves: G99/G94/G21

Close Up of girl holding shell
Close Up of Rosealea

————————–

Card Recipe for My Birthday Shellabration Card:

Seashell Rosealea, Conie Fong Art & Design
Paper Basics – Stamper’s Select White Cardstock, Papertrey Ink
Seaside Summer 6” x 6” Paper Pad, Doodlebug Design Inc.
Perennial Essence Vellum Cardstock, Stampin’ Up!
Build-an-Ocean Die Set, Whimsy Stamps
Seaside Wishes Dies, Stampin’ Up!
Joy! Crafts Shell Border Die
Embossing Mat, Stampin’ Up!
Manual Die Cutting Machine
Simple Strips – Birthday, Taylored Expressions
Simple Strips Die, Taylored Expressions
VersaFine Ink, Onyx Black, Tsukineko
Flat Adhesive-Backed Pearls, Stampin’ Up!
Tropical Oasis Trinkets, Stampin’ Up!
Crumb Cake Classic Ink, Stampin’ Up!
Peach Pie Classic Ink, Stampin’ Up!
Blending Brush, Stampin’ Up!
Star Dust Stickles, Ranger
Clear Wink of Stella, Stampin’ Up!

Coastal Cabana, Basic White, So Saffron, Peach Pie, Blushing Bride and Crumb Cake Card Stock, Stampin’ Up!

Finished card size: 5 ½” x 5 ½”

————————–

Blog Challenges

I am entering this card into the following challenges:
613 Avenue CreateJune 2024-Anything Goes
Morgan’s ArtWorld Challenge#77-Anything GoesCreative Team’s Favourite Winner
A Place to StartJUNE 2024 – ANYTHING GOES w/Optional Twist: ANYTHING BUT A CARDTop Sprout
The Outlawz Challenges BlogJune 2024
A Perfect Time To Craft Open Challenge June, #6-20242nd Place
Dream Valley ChallengesChallenge # 318 – Summer ColoursWinner
Card making, Craft, Papercraft Scrapbooking Digi Choosday ChallengeWK 23 Anything Goes
Daisy Chain ChallengesChallenge #86 – Birthday

————————–

Here is my other card using this same stamp but facing right. For more information on my card, please click here.

A birthday card with a girl listening to a seashell
Seashell Wishes Card

To view my other Conie Fong Art & Design projects, please click here.

Hope you like my Design Team Inspiration Card using Seashell Rosealea for Conie Fong Art & Design!

Thank you for stopping by!

Hugs,
Laurie

My Mediterranean Hello Card 

My Mediterranean Hello Card - a card with oranges and tiles paper that says Hello
My Mediterranean Hello Card

Hello Crafty Friends! Laurie here again! I am sharing My Mediterranean Hello Card using the Citrus Blooms Bundle which includes the Citrus Blooms Stamp Set and the matching Citrus Blooms Dies by Stampin’ Up! I was keen to use this Bundle. So, I created this card was for a swap that I participated in on the weekend.

The Details of My Mediterranean Hello Card

For my card, I loved the tile look of the Mediterranean Blooms Designer Series Paper and thought it would be a striking background for the die cut oranges from the DSP!

So, I decided to use the largest die from the Citrus Blooms Dies to create a base for my focal point. For this Basic White piece, I used the Distressed Tile 3D Embossing Folder to add some texture and break up the white. This embossing folder went so well with my “tile” idea! 

To add even more interested, I stamped the tilework image in Boho Blue in opposite corners on the Boho Blue card base.

The finishing touches were a linen thread bow on the oranges and a scattering of Opal Rounds.

Close Up of oranges
Close Up of Focal Point

Supplies:

Stamps/Bundles/Dies: Citrus Blooms Bundle (163295), Stylish Shapes Dies (159183)

Inks: Boho Blue Classic Stampin’ Pad (161650), Night of Navy Classic Stampin’ Pad (147110)

Paper: Boho Blue (161724), Basic White (159276), Mediterranean Blooms Designer Series Paper (163284)

Accessories: Distressed Tile 3D Embossing Folder (162189), Opal Rounds Assortment (163298), Linen Thread (104199), Bone Folder (102300), Stampin’ Dimensionals (104430), Mini Stampin’ Dimensionals (144108), Stampin’ Seal (152813), Mini Glue Dots (103683)

Measurements: 

  • Boho Blue:
    • 8 ½” x 5 ½” scored at 4 ¼”
  • Basic White (2 pieces):
    • 5 ¼” x 4”
    • Scrap for Sentiment
  • Mediterranean Blooms Designer Series Paper (2 pieces):
    • 2” x 4-7/8”
    • Die Cut Oranges

More Information on My Mediterranean Hello Card

For more of my Stampin’ Up! cards, please click here.

You will find the items listed above in my online store.

My Shellabrate Birthday Card 

My Shellabrate Birthday Card - a birthday card with a mermaid holding a seahorse on it
My Shellabrate Birthday Card

Hello Crafty Friends! It’s Laurie here! One final mermaid card for MerMay from me! I am sharing My Shellabrate Birthday Card as my Design Team Inspiration Card for Paper Nest Dolls using Mermaid Ellie with Seahorse

The Details of My Shellabrate Birthday Card

For my card, I decided to use the Mermaid Tales Collection Kit by Echo Park since it was perfect for my Mermaid theme! The Kit came with paper and stickers. So, I used the “Sparkle & Shine” sticker as well as the paper on my card. The Shellabrate flag was from the Mermaid Dreams Frames & Tags also by Echo Park.

Once I picked my papers, I used the colours from it to colour Ellie with my Copic markers. I used Clear Wink of Stella on her tail and on the fins of the seahorse to add some sparkle just like the sticker said!

Next, I added an angel fish die cut to match the fish in the paper, as well as a shell and seaweed beside the sticker to help ground her.

Finally, for embellishments, I added three dew drops that look like air bubbles to mirror the air bubble paper. I also added a black rhinestone for the fish’s eye.

————————–

Copic Markers

Skin: E04/E11/E21/E00/E000/R20
Hair: E49/E47/E44/E43
Purples: V17/V25/V22/V20 
Blues: BG53/BG57/BG78
Greens: YG67/YG63/YG03

Close Up of Mermaid with Seahorse
Close Up of Mermaid Ellie with Seahorse

————————–

Card Recipe for My Shellabrate Birthday Card

Mermaid Ellie with Seahorse, Paper Nest Dolls
Paper Basics – Stamper’s Select White Cardstock, Papertrey Ink
Mermaid Tales Collection Kit, Echo Park Paper Co.
Mermaid Dreams Frames & Tags, Echo Park Paper Co.
Perennial Essence Vellum Cardstock, Stampin’ Up!
Build-an-Ocean Die Set, Whimsy Stamps
Angel Fish Die Set, Frantic Stamper Inc.
Crumb Cake Classic Ink, Stampin’ Up!
Blending Brush, Stampin’ Up!
Spring Blooms Dew Drops, The Robin’s Nest
Black Rhinestone Basic Jewels, Stampin’ Up!
Clear Wink of Stella, Stampin’ Up!

Finished card size: 5 ½” x 4 ¼”

Stamp Size: 4”

————————–

To view my other Paper Nest Dolls cards, please click here.

Hope you like my Design Team Inspiration Card using Mermaid Ellie with Seahorse by Paper Nest Dolls!

Thank you for stopping by!

Hugs,
Laurie

My Wedded Bliss Card 

My Wedded Bliss Card - a wedding card with a couple on it
My Wedded Bliss Card

Hello Crafty Friends! It’s Laurie here! I am sharing My Wedded Bliss Card using the digital stamp Wedding Bells by Tiddly Inks Stamps! This past weekend, we celebrated a wonderful couple who tied the knot! 

The Details of My Wedded Bliss Card

For my card, I decided to colour with my Copic markers the couple on the card to look like the bridal couple who were getting married. I added Silver Gelly Roll Pen to the Bride’s tiara, her ring and the veil to tie in the silver embossed sentiment. Next, I used Clear Wink of Stella on her veil for even more sparkle.

The Lady’s Diary papers created an elegant look which tied in the masculine with the pinstripes and the feminine with the florals. The flowers and leaves were also punched out using the matching papers in the Lady’s Diary Pad.

Since this was a wedding card and I wanted an elegant look, I decided to emboss the sentiment before die cutting it out. I added a silver foil border to some leafy vellum that I tucked behind the sentiment. I also silver embossed the inside sentiment, added a silver foil border and a strip of the floral paper.

Inside of Card
Inside of Card

Finally, for embellishments, I added two heart charms, some silver metallic pearls to mirror the embossed silver accents and pearl jewels for the flower centres.

————————–

Copic Markers

Groom
Skin: E04/E11/E21/E00/E000
Hair: E49/E47/E44/E43/E42
Suit/Tie: B99/B97/B95/B93
Shirt: C3/C1/0

Bride
Skin
: E04/E11/E21/E00/E000/R20
Hair: C9/C7/C6/C4/C3
Dress/Veil: B000/B00/0/Silver Gelly Roll Pen
Necklace: B97/B95/B93/R85/Star Dust Stickles

Close Up of Bride & Groom

————————–

Card Recipe for My Wedded Bliss Card

Wedding Bells, Tiddly Inks Stamps
Paper Basics – Stamper’s Select White Cardstock, Papertrey Ink
Lady’s Diary 6” x 6” Paper Pad, P13
Silver Foil Sheet, Stampin’ Up!
Vellum Basics 12” x 12” Specialty Designer Series Paper, Stampin’ Up!
Something Fancy Dies, Stampin’ Up!
Lifetime of Love Stamp Set, Stampin’ Up!
Special Celebrations Stamp Set, Stampin’ Up!
Versamark Ink, Stampin’ Up!
Silver Embossing Powder, Stampin’ Up!
Heat Tool, Stampin’ Up!
Hydrangea Punch, Martha Stewart
Leaf Punch, EK Success
Heart Charms, Stampin’ Up!
Festive Pearls, Stampin’ Up!
Pearl Basic Jewels, Stampin’ Up!
Silver Gelly Roll Pen, Sakura
Star Dust Stickles, Ranger
Clear Wink of Stella, Stampin’ Up!

Finished card size: 5 ½” x 4 ¼”

————————–

I also made a Bridal Shower card a while back for the Bride-to-Be using Uptown Couple Emily and Ryan Under the Umbrella by Stamping Bella and thought I would share it here as well.

Bridal Shower Card with a couple kissing under an umbrella
Bridal Shower Card

To view my other Copic Marker cards, please click here.

I hope you liked My Wedded Bliss Card using the digital stamp Wedding Bells by Tiddly Inks Stamps!

Thank you for stopping by!

Hugs,
Laurie

My Let’s Catch Up Card 

My Let’s Catch Up Card - a card with two ladies enjoying coffees
My Let’s Catch Up Card

Hello Crafty Friends! Laurie here again! I am sharing My Let’s Catch Up Card using the Latte Love Bundle and the Coffee with Friends Stamp Set by Stampin’ Up! I thought it would be fun to combine them onto one card! They were just meant to be together! Lol!

The Details of My Let’s Catch Up Card

For my card, I decided to create a “polaroid” of the girls like a reminder for them to get together and catch up. As an alternative to colouring them, I embossed them with white embossing powder on Calypso Coral. Then, I die cut them out using the largest stitched square die from the Stylish Shapes Dies. I used Early Espresso for my first card but found it too dark (see top right card in photo below). So, I switched it up with the Calypso Coral. I tweaked another card (bottom) until I landed on my finished design (top left).

Different Variations of my Card

Since I made a “polaroid”, I had the perfect space to add the Lost Lagoon sentiment. For the Pecan Pie coffee drips, I stamped off before stamping them onto the Basic White so that they didn’t interfere with the other elements.

I loved that one of the Latte Love Dies cut out the coffee cups in the DSP! I made this card for a swap, and I had different coffee cups on my cards!

My Swap Cards
My Swap Cards

Next, I added a plaid flag with the Stylish Shapes Dies that had Calypso Coral in it to tie in my colour scheme and to balance the coffee cup.

I decided to place my focal point at an angle to fit all my elements onto the card. I layered this onto a piece of Pecan Pie that I embossed with the Painted Texture 3D Embossing Folder. You could also use the new So Swirly Embossing Folder, but I didn’t have that yet. Lol! Another piece of the DSP was placed so that it just peeked out from behind the focal point and tied in the Lost Lagoon colour.

Finally, I finished the card with a few Adhesive-Backed Swirl Dots to add a fun element to my card.

Supplies:

Stamps/Bundles/Dies: Latte Love Bundle (163461), Coffee with Friends Stamp Set (161389), Stylish Shapes Dies (159183)

Inks: Lost Lagoon (161678), Pecan Pie (161665), VersaMark Ink (102283)

Paper: Thick Basic White (159229), Lost Lagoon (133679), Pecan Pie (161717), Basic White (159276), Calypso Coral (122925), A Little Latte Designer Series Paper (163453)

Accessories: Adhesive-Backed Swirl Dots (163464), Painted Texture 3D Embossing Folder, (154317), Basics Embossing Powder (165679), Heat Tool (129053), Embossing Additions Tool Kit (159971), Bone Folder (102300), Stampin’ Dimensionals (104430), Stampin’ Seal (152813), Mini Glue Dots (103683)

Close Up of My Focal Point

Measurements: 

  • Thick Basic White:
    • 8 ½” x 5 ½” scored at 4 ¼”
  • Lost Lagoon:
    • 5 ¼” x 4”
  • Pecan Pie:
    • 3-7/8” x 5-1/8”
  • Basic White:
    • 4” x 3 ¼”
  • Calypso Coral:
    • 3” x 3”
  • A Little Latte Designer Series Paper (3 pieces):
    • 4” x 3 ¼”
    • Scrap for flag
    • One of the cups

More Information on My Let’s Catch Up Card

For more of my Stampin’ Up! cards, please click here.

You will find the items listed above in my online store.

Welcome Little One Card

Welcome Little One Card - a baby card with a girl holding a bird nest with a baby bird in it
Welcome Little One Card

Hello Crafty Friends! It’s Laurie here! I am sharing my Welcome Little One Card as my Design Team Inspiration Card for Paper Nest Dolls using Avery with Bird Nest. We discovered a bird nest with some robin eggs on one of our outdoor lights. So, I couldn’t resist creating a card around this miracle! I even used a photo of the eggs in the nest on my card!

The Details of My Welcome Little One Card

For my card, I decided to colour with my Copic markers Avery in similar colours to the eggs and nest but went with a bright red hair for all those gorgeous curls!

Next, I die cut the printed photo with a stitched circle die. I used this same die for all three layers of my “nest” so they would line up when layered. The top two offset layers consisted of leaves in two different greens to add dimension. I also added a few sprigs of leaves emanating from my nest.

I used the border leaf die on the darker DSP behind Avery to tie in my theme and make her stand out from the other DSP.

The sentiment was stamped in Balmy Blue, and one end was cut at an angle with my Paper Snips.

Finally, for embellishments, I added three birds from the Adhesive-Backed Dragonflies & Birds for a bit of sparkle.

————————–

Copic Markers

Skin: E04/E11/E21/E00/E000/R20
Hair: R08/YR07/YR14/YR21
Blues: BG02/BG01/BG000
Greens: YG67/YG63/YG03
Browns: E35/E33/E31/E30
Bird: BG02/BG01/BG000/W3/W1/W00

Close Up of girl holding bird nest
Close Up of Avery

————————–

Card Recipe for My Welcome Little One Card

Avery with Bird Nest, Paper Nest Dolls
Paper Basics – Stamper’s Select White Cardstock, Papertrey Ink
Spring Garden 12” x 12” Paper Collection, Paper Rose
Flight & Airy 12” x 12” Designer Series Paper, Stampin’ Up!
Stitched Layering Circle Dies, Memory Box
Birds & More Dies, Stampin’ Up!
Cradled in Love Stamp Set, Stampin’ Up!
Balmy Blue Ink Pad, Stampin’ Up!
Adhesive-Backed Dragonflies & Birds, Stampin’ Up!
Paper Snips, Stampin’ Up!
Computer and Printer
Calypso Coral, Granny Apple Green, and Garden Green Card Stock, Stampin’ Up!

Finished card size: 5 ½” x 4 ¼”

Stamp Size: 4”

————————–

To view my other Paper Nest Dolls cards, please click here.

Hope you like my Design Team Inspiration Card using Avery with Bird Nest by Paper Nest Dolls!


Thank you for stopping by!

Hugs,
Laurie

My Welcome MerMay Card 

My Welcome MerMay Card - a mermaid in an underwater scene
My Welcome MerMay Card

Hello Crafty Friends! It’s Laurie here! I am sharing My Welcome MerMay Card using the new release Little Mermaid by Conie Fong Art & Design as my Design Team Inspiration Card. Every May is MerMay in the card making industry and Conie Fong didn’t disappoint with this new release! Welcome to MerMay!

The Details of My Welcome MerMay Card

For my card, I decided to create a mini slimline card with an underwater scene for this cutie. The Mermaid Tales paper had a scene that was perfect for my background! Behind that I added paper with blue/green mermaid scales with golden accents and gold foil borders.

But first, I coloured my mermaid with my Copic markers in watery blue/green colours to match my scene. I had a lot of fun colouring the tail so that it shimmers between the blues to the greens! To add more shimmer, I used Clear Wink of Stella on her tail and Clear Star Gelly Roll Pen on her starfish in her hair. 

Next, I die cut the sandy bottom with the Slimline Stitched Hillside Border and used the Subtle 3D Embossing Folder to give it some texture. Once that was done, I brushed Crumb Cake ink along the edges for even more texture.

To create a backdrop for her, I die cut a Basic White shell on which I brushed Crumb Cake to bring out the detail. Behind that, I added a gold fold die cut coral to tie in my golden accents.

The sentiment flag was from the Mermaid Dreams Frames & Tags and was perfect for my card! I layered beneath it another die cut flag with gold shells on it. Even more gold accents! Lol! All these golden accents really added a beautiful sparkle to the card!

The finishing touch was a scattering of dew drops which I thought looked like air bubbles.

————————–

Copic Markers:

Skin: E000/E00/E21/E11/E04/R20
Hair: E25/YR24/Y26/Y21
Top: YG67/YG23/YG00
Tail: BG09/BG05/BG01/YG23/YG00/Clear Wink of Stella
Starfish: Y38/YR04/YR18/Clear Star Gelly Roll Pen

Close Up of Little Mermaid

————————–

Card Recipe for My Welcome MerMay Card:

Little Mermaid, Conie Fong Art & Design
Paper Basics – Stamper’s Select White Cardstock, Papertrey Ink
Mermaid Tales Collection Kit, Echo Park Paper Co.
Enchanting Paper Pad, Recollections, Michael’s Arts & Crafts
Gold Foil Sheets, Stampin’ Up!
Mermaid Dreams Frames & Tags, Echo Park Paper Co.
Build-an-Ocean Die Set, Whimsy Stamps
Slimline Stitched Hillside Border, Lawn Fawn
Banners Framelits Dies, Stampin’ Up!
Subtle 3D Embossing Folder, Stampin’ Up
Crumb Cake Classic Ink, Stampin’ Up!
Blending Brush, Stampin’ Up!
Spring Blooms Dew Drops, The Robin’s Nest
Clear Star Gelly Roll Pen, Sakura
Clear Wink of Stella, Stampin’ Up!
Granny Apple Green, Basic White, and Crumb Cake Card Stock, Stampin’ Up!

Finished card size: 3 ½” x 6-1/8”

————————–

To view my other Conie Fong Art & Design projects, please click here.

Hope you like my Design Team Inspiration Card using Little Mermaid for Conie Fong Art & Design!

Thank you for stopping by!

Hugs,
Laurie

My Happy Mail Card 

My Happy Mail Card - a card with a letter sticking out of a mailbox.
My Happy Mail Card

Hello Crafty Friends! Laurie here again! I am sharing My Happy Mail Card using the Sending Love Bundle and the Perennial Postage Dies by Stampin’ Up! I am so glad to see that both are carrying over to the new Annual Catty! However, the Bee Mine Designer Series Paper is retiring! So, if you want to get it, today is the last day!

The Details of My Happy Mail Card

For my card, I thought it would be fun to use the Perennial Postage Dies with the mailbox from the Sending Love Bundle! Who doesn’t love to get happy mail! So, I created a collage of DSP postage backgrounds for my mail elements. For the narrow postage die, I decided to stamp the franking stamp in Pool Party and then add the die cut Sent with Love Real Red sentiment with die cut hearts that match the DSP.

Next, I created an interactive mailbox with a repositionable Real Red flag using a round brad. I stamped the MAIL onto the mailbox in Real Red and added a Real Red post. I placed my mailbox at an angle so that the letter looks like it is falling out of the mailbox. Lol!

Don’t you just love the little letter that I die cut in more DSP. I couldn’t resist sealing it with an adhesive-backed heart!

The finishing touch was a few adhesive-backed flowers to add a fun element to my card.

Close Up of Card
Close Up of Card

Supplies:

Stamps/Bundles/Dies: Sending Love Bundle (162880), Perennial Postage Dies (162607)

Inks: Real Red (147084), Pool Party (147107)

Paper: Basic White (159276), Pool Party (122924), Real Red (102482), Petal Pink (146985), Bee Mine Designer Series Paper (162546)

Accessories: Round & Square Brads (155570), Adhesive-Backed Hearts & Flowers (162557), Bone Folder (102300), Stampin’ Dimensionals (104430), Stampin’ Seal (152813), Mini Glue Dots (103683)

Measurements: 

  • Basic White:
    • 8 ½” x 5 ½” scored at 4 ¼”
    • 4” x 4” (Mailbox)
    • Scrap for circle and narrow postage die cut
  • Pool Party:
    • 5” x 3 ¾”
  • Real Red (3 pieces):
    • 1 ¾” x 2 ¾” (Post)
    • Scraps for Mail Flag and Heart
  • Petal Pink:
    • Scrap for Heart
  • Bee Mine Designer Series Paper (3 pieces):
    • 2” x 2 ¾”
    • 1-7/8” x 1-7/8”
    • 3 ¼” x 2 ¼” (Envelope)

More Information on My Happy Mail Card

For more of my Stampin’ Up! cards, please click here.

You will find the items listed above in my online store.

My Birthday Notes Card 

My Birthday Notes Card - a birthday card with a journal page on the front
My Birthday Notes Card

Hello Crafty Friends! Laurie here again! I am sharing My Birthday Notes Card using the Nature’s Sweetness Suite Collection which includes the Notes of Nature Bundle, the Lovely & Sweet Bundle, the Nature’s Sweetness 12” x 12” Specialty Designer Series Paper and the Adhesive-Backed Cork Rounds all by Stampin’ Up! As I was exploring this gorgeous Suite, I ended up making 2 cards. I used one card for a swap, and this is the second card that I created. I will include a link to the other card at the end of this post. Some of these items are retiring! So, make sure you shop before they are gone!

The Details of My Birthday Notes Card

Like the other card, I thought it would be fun to continue the distressed field journal idea for my card front. 

First, I stamped the Field Notes in Pecan Pie and added some distressing with the grunge stamp in Pebbled Path on the Basic White “page”. I added a Pecan Pie tab at the top and the die cut holes like a spiral notebook. To add a worn look to the “page”, I spritzed it with water and crumpled it. Then, by placing dimensionals in strategic locations on my unraveled “page”, I was able to keep a lot of dimension in it.

The sentiment was stamped in Pecan Pie, and I used a Pebbled Path label to make it pop from the “page”.

For this card, I decided to use the cross hatch and the text pieces of the DSP to create a booklet look behind my journal. To match the gold accents on the DSP I added a strip of gold foil on my base and die cut leaves on the Field Notes “page”.

The finishing touch was a scattering of Adhesive-Backed Cork Rounds that come in the Nature’s Sweetness Suite Collection.

Close Up of Field Journal Page
Close Up of Focal Point

Supplies:

Stamps/Bundles/Dies: Notes of Nature Bundle (162640), Lovely & Sweet Bundle (162627)

Inks: Pecan Pie (161665), Pebbled Path (161648)

Paper: Pebbled Path (161722), Basic White (159276), Pecan Pie (161717), Gold Foil Sheets (132622), Nature’s Sweetness Specialty Designer Series Paper (162616)

Accessories: Adhesive-Backed Cork Rounds (162643), Stampin’ Spritzer (126185), Bone Folder (102300), Stampin’ Dimensionals (104430), Stampin’ Seal (152813), Mini Glue Dots (103683), water

Measurements: 

  • Pecan Pie
    • 8 ½” x 5 ½” scored at 4 ¼”
    • Scrap for Tab
  • Basic White (2 pieces):
    • 3” x 4”
    • Scrap for Sentiment
  • Pebbled Path
    • Scrap for Label
  • Gold Foil Sheets:
    • ¼” x 5 ¼”
    • Scrap for Leaves
  • Nature’s Sweetness Specialty Designer Series Paper (2 pieces):
    • 1” x 5 ¼”
    • 3” x 5 ¼”

More Information on My Birthday Notes Card

To find out more about my other card using the Nature’s Sweetness Suite Collection, please click here or on the photo.

My Field Notes Card - a birthday card
My Field Notes Card

For more of my Stampin’ Up! cards, please click here.

You will find the items listed above in my online store.

My Kiddie Birthday Card 

My Kiddie Birthday Card - a birthday card with a little girl holding a drawing of a sun
My Kiddie Birthday Card

Hello Crafty Friends! Laurie here again! I am sharing My Kiddie Birthday Card using the Kiddin’ Around Bundle and the Just Kiddin’ 12” x 12” Designer Series Paper by Stampin’ Up! I am pleased to see that the Kiddin’ Around Stamp Set and the Kiddin’ Around Dies are carrying over to the new Catty! Yay!

I was honoured to be asked to present my colouring techniques using Stampin’ Blends to several demonstrators at a Stampin’ Up! Play Date. They asked me to demonstrate colouring people with Stampin’ Blends and the Kiddin’ Around Stamp Set was perfect for this! I made several cards for the event, and this was one of them. I will include a link to my other cards at the end of this post.

The Details of My Kiddie Birthday Card

For this card, I decided to use the castle dies with the little girl from the stamp set and created a focal point with the Deckled Circle Dies.

I used the Stampin’ Blends Medium Combo for her skin, Basic Black for her hair, Fresh Freesia, and Daffodil Delight for her dress. I created a fold in the centre of her dress by adding a small Fresh Freesia triangle to add interest. To add texture to her hair, I left some white highlights which I then coloured with the bullet tip of the Light Basic Black. I find that the felt tip is always darker than the bullet tip, thus making it great to add a third tone. You could also use the Smoky Slate for that third tone. I used Light Smoky Slate and Light Fresh Freesia for her mouth.

For her paper with her sun drawing, I used Light Smoky Slate along the top under her hand, left side and bottom of the page. Next, I used the Color Lifter along the edges of Smoky Slate to soften the edge and push the ink back into the shadows of the paper. I let that dry before adding the Daffodil Delight since I wanted control of the ink and for it not to spread. Wink of Stella was added to the sun.

The sentiment was stamped in Tuxedo Black Memento and die cut with the Stylish Shapes Dies. Next, the stars were stamped in Daffodil Delight for a tone-on-tone look and to add interest on the Daffodil Card Stock.

Finally, to match my DSP colour that I used, I went with Berry Burst Glimmer Specialty Paper for the flag and banner.

As a finishing touch to my card, I added some Iridescent Foil Gems on either side of my focal point.

Close Up of Girl
Close Up of Girl

Supplies:

Stamps/Bundles/Dies: Kiddin’ Around Bundle (162839), Stylish Shapes Dies (159183), Deckled Circle Dies (162286)

Inks: Tuxedo Black Memento Ink Pad (132708), Daffodil Delight Classic Stampin’ Pad (147094) 

Paper: Thick Basic White (159229), Basic White (159276), Daffodil Delight (119683), Just Kiddin’ 12” x 12” Designer Series Paper (162828), Berry Burst, Old Olive & White 12” x 12” Glimmer Specialty Paper (163769)

Accessories: Iridescent Foil Gems (162842), Stampin’ Blends Medium Combo (159462), Basic Black Stampin’ Blends Combo (154843), Fresh Freesia Stampin’ Blends Combo (155518), Daffodil Delight Stampin’ Blends Combo (154883), Smoky Slate Stampin’ Blends Combo (154904), Stampin’ Blends Color Lifter (144608), Wink of Stella (141897), Paper Trimmer (152392), Bone Folder (102300), Stampin’ Dimensionals (104430), Mini Stampin’ Dimensionals (144108), Stampin’ Seal (152813), Mini Glue Dots (103683), Multipurpose Liquid Glue (110755)

Measurements: 

  • Thick Basic White:
    • 8 ½” x 5 ½” scored at 4 ¼”
  • Daffodil Delight:
    • 5 ¼” x 4”
  • Basic White:
    • Scraps (Castle and Sentiment)
    • 2 ½” x 2” (for Girl)
  • Berry Burst Glimmer Specialty Paper:
    • Scraps
  • Just Kiddin’ Designer Series Paper:
    • 3” x 3”

More Information on My Kiddie Birthday Card

If you wish to learn more about my centre-step cards from my presentation, please click here or on the photo.

Kiddin’ Around Birthday Cards - three birthday cards with children on them
Kiddin’ Around Birthday Cards

For more information on my colouring, here are some videos of my colouring techniques:

1 – PartWhiskey Business Card using Blending Different Colours Technique
Video Tutorial: Blending Different Colours Together

2 – PartCountry Harvest Card using Light to Dark Technique
Video Tutorial: Light to Dark/Dark to Light Colouring

3 – PartBeautiful Poppy Birthday Card using Smooth Colouring Technique
Video Tutorial: Smooth Colouring

4 – PartLet’s Gather Together Card using Tip to Tip Blending Technique
Video Tutorial: Tip to Tip Colouring

5 – PartSo Grateful Cardinal Card using Flicking Colouring Technique
Video Tutorial: Flicking Colouring

6 – PartLet’s Celebrate You Card using Flicking of Different Colours Technique
Video Tutorial: Flicking of Different Colours Technique

My Colouring Notes:
https://stampwithlaurie.com/wp-content/uploads/2020/08/Stampin-Up-Blends-2020.pdf

For more of my Stampin’ Up! cards, please click here.

You will find the items listed above in my online store.

Mother’s Day Birdhouse Card

Mother’s Day Birdhouse Card - a Mother;s Day card with a little girl holding a banner of 4 birdhouses
Mother’s Day Birdhouse Card

Hello Crafty Friends! It’s Laurie here! Mother’s Day is only a few weeks away! So, I am sharing my Mother’s Day Birdhouse Card as my Design Team Inspiration Card for Paper Nest Dolls using Avery with Birdhouse Banner

The Details of My Mother’s Day Birdhouse Card

I just love this sweet image with her birdhouse banner! Perfect for a Mother’s Day gift from a little girl! I coloured Avery with my Copic markers in soft purples and pinks to match my Spring Echo Park paper.

For my card, I decided to add a cute die cut birdhouse using the Echo Park papers to match my colouring and Avery’s birdhouse banner. And I couldn’t resist placing a momma bird inside the house by using the Bird Ballet DSP especially since this was a Mother’s Day card!

Next, I added a banner using the different papers that match my colour scheme. This overlayed the stamped Highland Heather sentiment that was die cut with the Scallop Contours Dies. All this was layered onto a larger scalloped Petal Pink piece to complete my focal point.

Finally, for embellishments, I added some Brass Butterflies to match the butterflies on the paper, as well as, added Star Dust Stickles to the hearts on Avery’s outfit.

————————–

Copic Markers

Skin: E04/E11/E21/E00/E000/R20
Hair: E25/YR24/Y36/Y21
Pinks: R02/RV42/R01 
Blues: BG75/BG72/BG70
Purples: V15/V12/V01
Browns: E35/E33/E31/E30

Close Up of little girl
Close Up of Avery

————————–

Card Recipe for My Mother’s Day Birdhouse Card

Avery with Birdhouse Banner, Paper Nest Dolls
Paper Basics – Stamper’s Select White Cardstock, Papertrey Ink
It’s Spring Time 12” x 12” Collection Kit, Echo Park Paper Co.
Bird Ballard Designer Series Paper, Stampin’ Up!
Build-A-Birdhouse Dies, Lawn Fawn
Fishtail Banner Borders Dies, Lawn Fawn
Scallop Contours Dies, Stampin’ Up!
Celebrate You Stamp Set, Stampin’ Up!
Highland Heather Classic Ink, Stampin’ Up!
Brushed Brass Butterflies, Stampin’ Up!
Star Dust Stickles, Ranger
Petal Pink and Pecan Pie Card Stock, Stampin’ Up!

Finished card size: 5 ½” x 4 ¼”

Stamp Size: 4”

————————–

To view my other Paper Nest Dolls cards, please click here.

Hope you like my Design Team Inspiration Card using Avery with Birdhouse Banner by Paper Nest Dolls!

Thank you for stopping by!

Hugs,
Laurie

My Lantern Window Card 

My Lantern Window Card - a thank you card with a lantern in a window
My Lantern Window Card

Hello Crafty Friends! Laurie here again! I am sharing My Lantern Window Card using the Lighting the Way Stamp Set and the Lighting the Way Dies by Stampin’ Up!

The Details of My Lantern Window Card

For my card, I decided to create a Window Double Open Fun Fold that allowed the gorgeous Perennial Lavender Designer Series Paper to show through behind the beautiful lantern.

First, I stamped the trail of lights in Gorgeous Grape on the card base for a tone-on-tone look.

Next, I used with the Deckle Circle Dies to create my window frame. Tip: add glue along the edge of the larger Crumb Cake die cut circle and adhere to the Gorgeous Grape card base before cutting out the circle centre. Then cut out both at the same time so that everything lines up.

I die cut the fireflies in White Glimmer Specialty Paper and brushes some Crushed Curry to their tails to make them glow. I placed the two on the front of the card following the trail of lights and one on the inside showing through the window.

Inside of Card showing floral paper
Inside of Card

The lantern was die cut twice in the Holographic Paper for the front and for the back to give the lantern a finished look from inside. I added some vellum to the inside of the lantern on which I stamped the fire glow in Crushed Curry.

The embossed sentiment helped to hold the lantern in place while a bow of Linen Thread and a glue dot anchored the top of the lantern.

For the inside of the card, I created the double open part by adhering the Perennial Lavender Designer Series Paper to folded Basic White card stock. Thus, creating a perfect place to write your message.

The Message Inside Part

Finally, to add a bit more magical shimmer, I used the Iridescent Rhinestone Basic Jewels scattered around my lantern. These are also retiring. So, make sure you get them before they are gone.

Supplies:

Stamps/Bundles/Dies: Lighting the Way Stamp Set (160868), Lighting the Way Dies (160496), Deckled Circle Dies (162286)

Inks: Gorgeous Grape (147099), VersaMark Ink Pad (102283), Crushed Curry (147087)

Paper: Gorgeous Grape (146987), Basic White (159229), Crumb Cake (120953), Starry Sky (159263), Vellum (101856), White Glimmer Specialty Paper (163769), Holographic Trio Specialty Paper (161744), Perennial Lavender Designer Series Paper (162593)

Accessories: Linen Thread (104199), Iridescent Rhinestone Basic Jewels (158130), Basics Embossing Powder (155554), Heat Tool (129053), Blending Brushes (153611), Paper Snips (103579), Bone Folder (102300), Stampin’ Dimensionals (104430), Stampin’ Seal (152813), Mini Glue Dots (103683)

Close Up of Lantern
Close Up of Lantern

Measurements: 

  • Gorgeous Grape:
    • 5 ½” x 8 ½” scored a 4 ¼”
  • Basic White:
    • 5 ¼” x 8” scored at 4” (inside of card)
  • Crumb Cake:
    • 4” x 4”
  • Holographic Trio Specialty Paper (Lantern) x 2:
    • 3 ½” x 2”
  • Starry Sky:
    • Scrap
  • Vellum:
    • Scrap
  • White Glimmer Specialty Paper:
    • Scrap
  • Perennial Lavender DSP:
    • 5” x 3 ¾”

More Information on My Lantern Window Card

I also made a split panel card using the same stamp set/dies and incorporated the lantern into it. For more information on this card, please click here

Light the Way Card - a card with a lantern and fireflies on it
Light the Way Card

For more of my Stampin’ Up! cards, please click here.

You will find the items listed above in my online store.

My Lavender Birthday Card

My Lavender Birthday Card - a birthday card with a Provençal theme of lavender fields scene
My Lavender Birthday Card

Hello Crafty Friends! Laurie here again! I am sharing My Lavender Birthday Card using the Hills of Tuscany Stamp Set by Stampin’ Up! I had so much fun creating the lavender fields in Provence for another card that I also made this mini slimline tri-fold window card! A link to the other card is included at the end of this post.

The Details of My Lavender Birthday Card

For my mini slimline card, I decided I wanted to create a three-panel card with the Provence scene peeking through the window on the front of my card.

Close Up of Scene
Close Up of Scene

First, I stamped the fields in Highland Heather followed by Gorgeous Grape to add interest to make it look like lavender. Next, I stamped Shaded Spruce trees on the opposite side of the springs of lavender on the front of the card to add balance. For the house, I used Crumb Cake for the walls and Copper Clay for the roof. I stamped the sky in Balmy Blue.

Inside of card with the scene
Second Panel of Card

Once the stamping was done, I die cut the stamped piece out with the largest stitched rectangle from the Stylish Shapes Dies. I also used the same die for the front of the card’s window. Tip: adhere down the piece of DSP to the front before die cutting to get placement. Run the die through the Stampin’ Cut & Emboss Machine multiple times to cut both DSP and card stock.

Next, I stamped butterflies in Gorgeous Grape on the inside panel to add some interest to that panel.

Third Panel of Card
Third Panel of Card

To complete my Provencal theme, I die cut a bouquet of lavender with Highland Heather, Gorgeous Grape and Shaded Spruce which was tied with Linen Thread and placed beneath the sentiment on the front. The sentiment from the Throughout the Year Stamp Set was stamped in Gorgeous Grape and die cut out using a Perennial Postage Die. 

The finishing touch was a scattering of Purple Fine Shimmer Gems to match my colour scheme.

Supplies:

Stamps/Bundles/Dies: Hills of Tuscany (162682), Throughout the Year Stamp Set (162312), Stylish Shapes Dies (159183), Perennial Postage Dies (162607), Painted Lavender Dies (162596), Painted Lavender Stamp Set (162594)

Inks: Gorgeous Grape (147099), Crumb Cake (147116), Highland Heather (147103), Copper Clay (161647), Shaded Spruce (147088), Balmy Blue (147105)

Paper: Highland Heather (146986), Basic White (159276), Gorgeous Grape (146987), Shaded Spruce (146981), Perennial Lavender 12” x 12” Designer Series Paper (162593)

Accessories: Linen Thread (104199), Purple Fine Shimmer Gems (162611), Paper Snips (103579), Bone Folder (102300), Stampin’ Dimensionals (104430), Stampin’ Seal (152813), Mini Glue Dots (103683)

Close Up of Stamped Scene

Measurements: 

  • Highland Heather
    • 6” x 10-3/8” scored at 3 ½”, 7”
  • Basic White (3 pieces):
    • 3 ¼”x 5 ¾”
    • 2 ½” x 1 ¼”
    • 3” x 3”
  • Gorgeous Grape:
    • Scrap for Lavender
  • Highland Heather:
    • Scrap for Lavender
  • Shaded Spruce:
    • Scrap for Lavender
  • Perennial Lavender 12” x 12” Designer Series Paper (2 pieces):
    • 3-3/8” x 5-7/8”
    • 3 ¼”x 5-7/8”

More Information on My Lavender Birthday Card

Here is my other card using the Hills of Tuscany, but with a Provence theme. For more information on it, please click here.

My Lavender Fields Card - A birthday card with a landscape scene
My Lavender Fields Card

For more of my Stampin’ Up! cards, please click here.

You will find the items listed above in my online store.