My Achievement Unlocked Card

My Achievement Unlocked Card - card with a video controller on it
My Achievement Unlocked Card

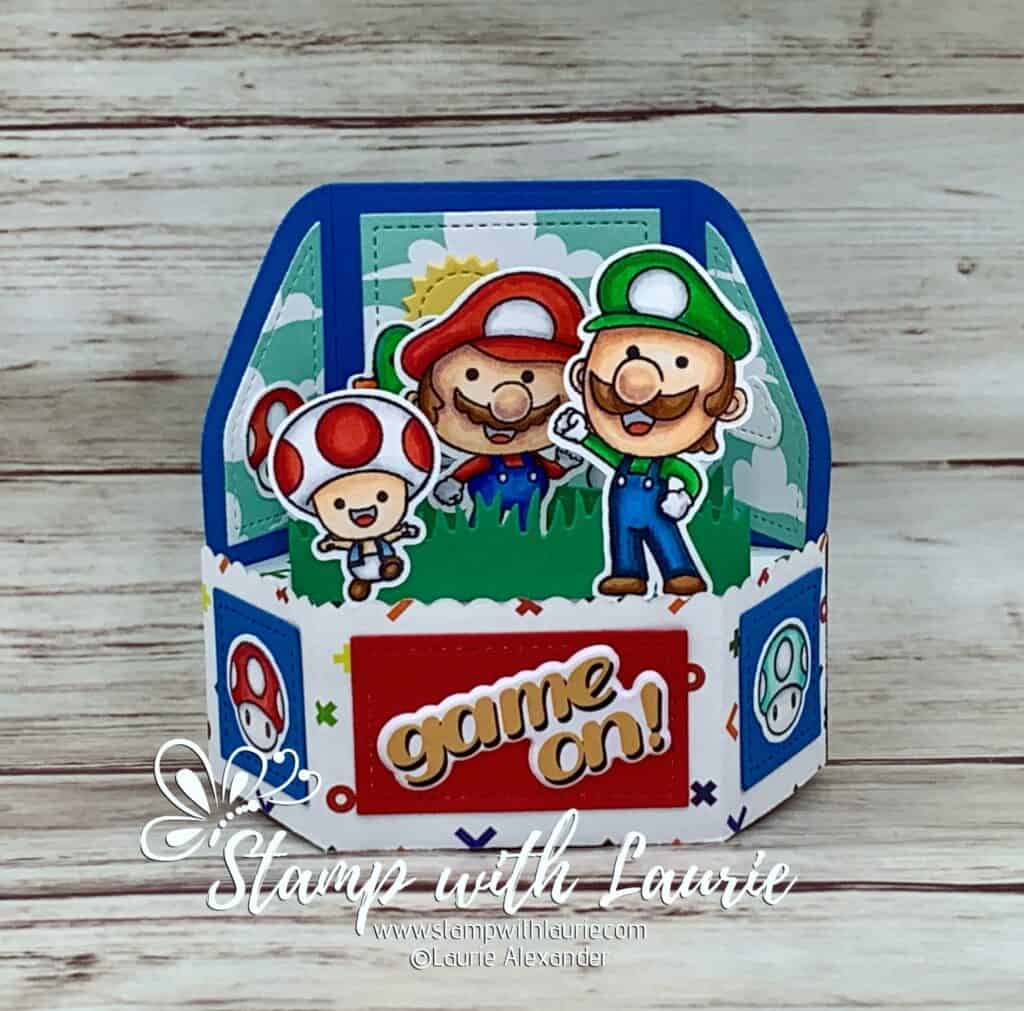
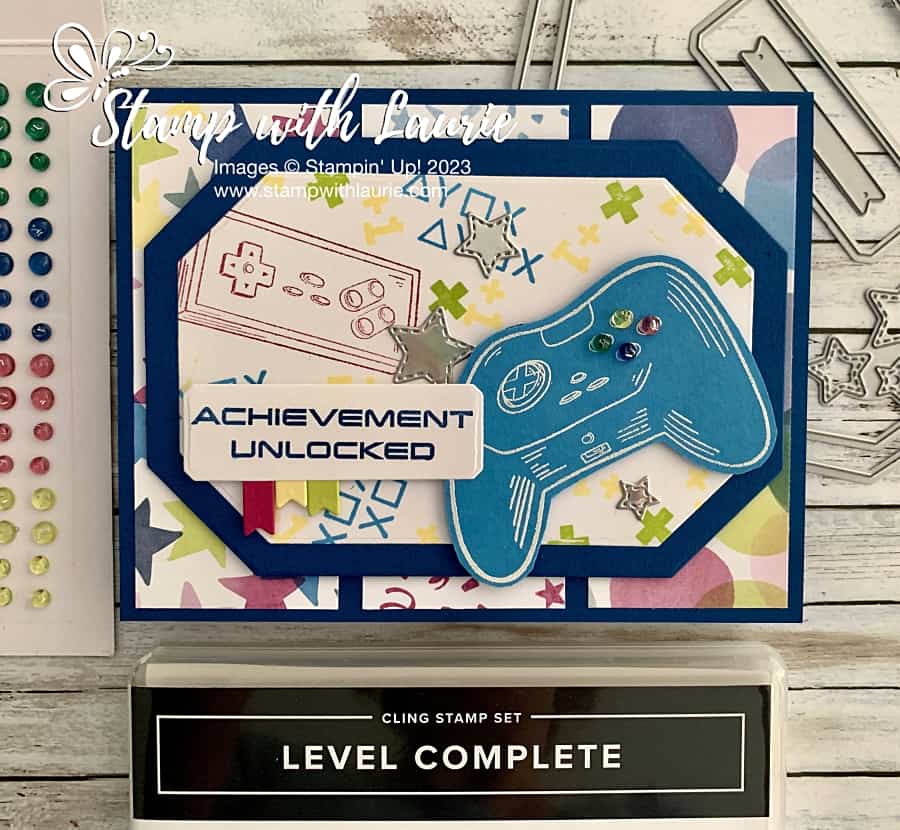
Hello Crafty Friends! Laurie here again! I am sharing My Achievement Unlocked Card using the Level Complete Stamp Set by Stampin’ Up! Tomorrow is National Video Games Day and this stamp set is perfect way to celebrate all those gamers in your life (and I have many! Lol!)!

The Details of My Achievement Unlocked Card

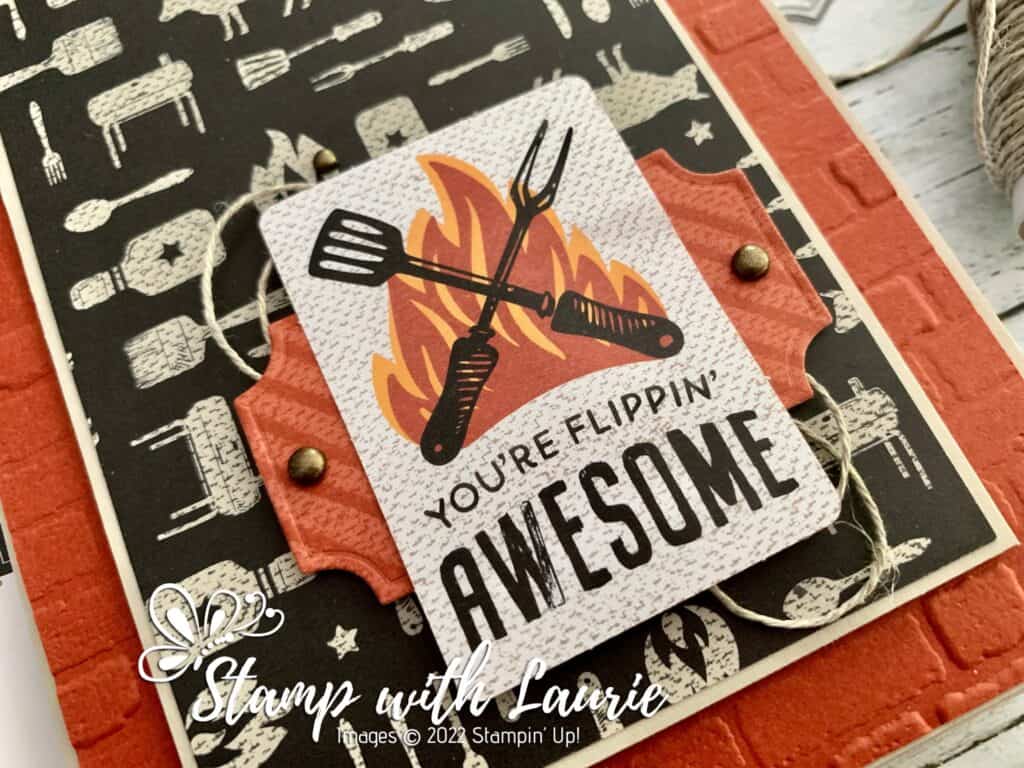
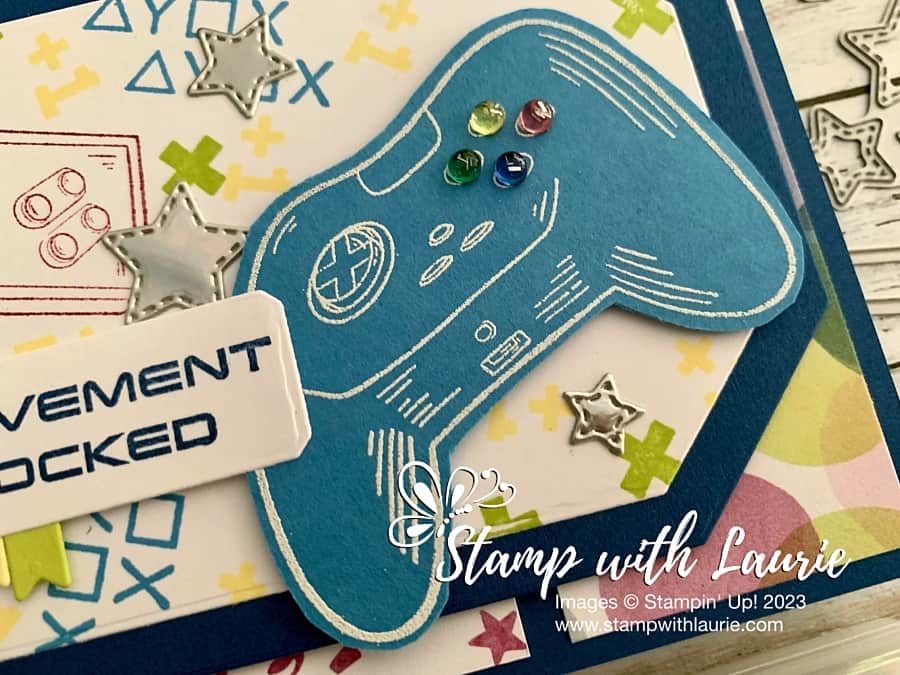
For my card, I decided to pull my fun colour scheme from the Bright & Beautiful DSP which I thought was perfect for a gamer card! Once I decided that, I stamped all the bits from the stamp set on a piece of Basic White in the various colours. I saved the controller stamp so that I could heat emboss it in white on a piece of Azure Afternoon which I then fussy cut out.

The Countryside Corners Dies were used to die cut out the stamped piece, the mat, and the Blueberry Bushel stamped sentiment. In addition to them, I used the smallest die to create coloured flags under the sentiment show the “different levels unlocked”.

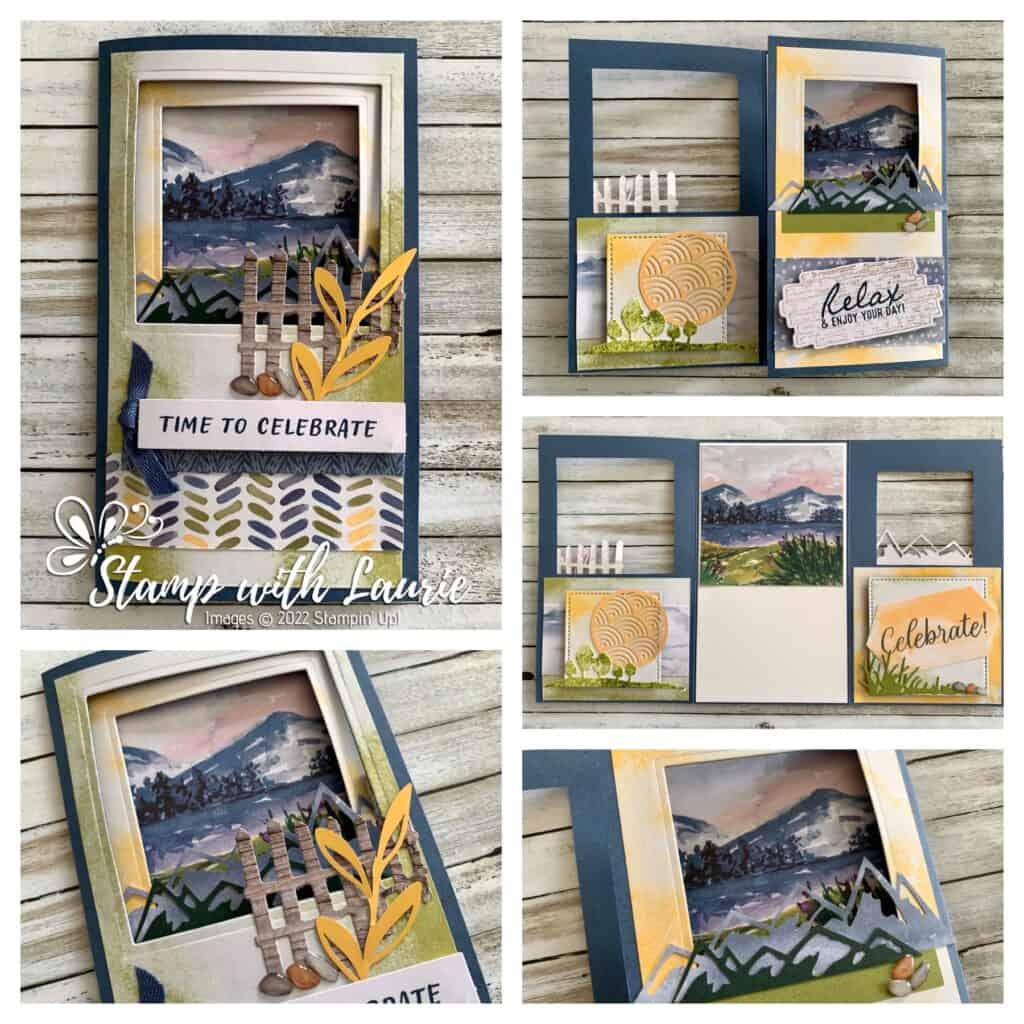
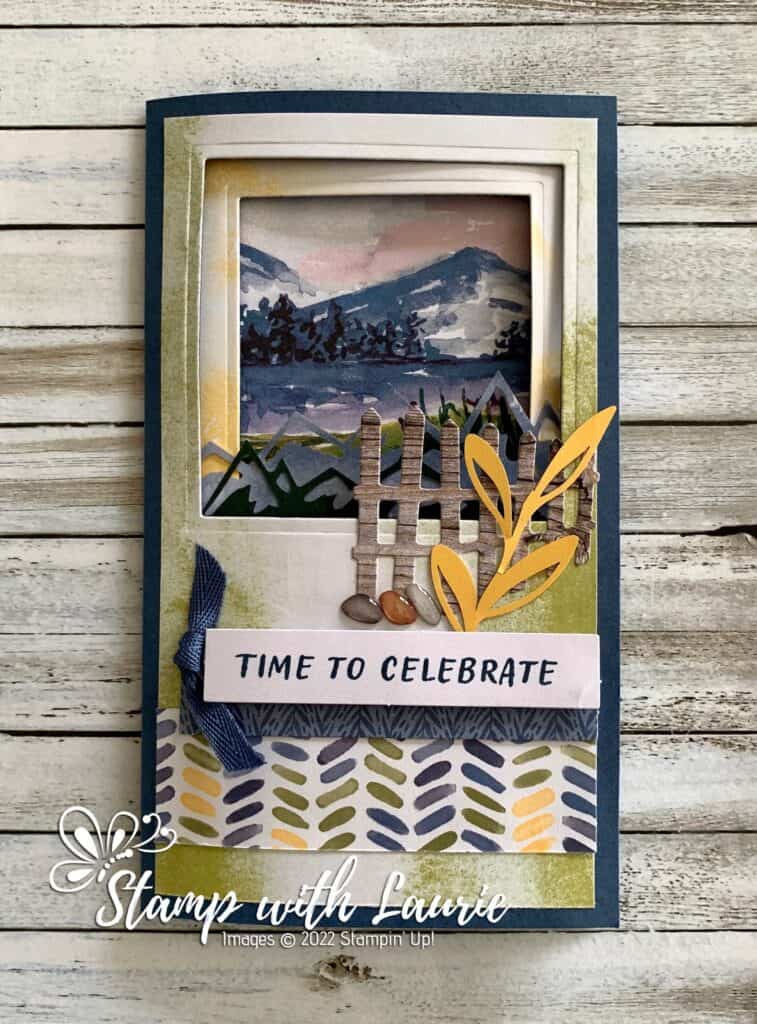
Since I created this card for a swap, I went with a panel of three different papers for my card base. This allowed me to get more cards made using the paper with minimal waste. Plus, it permitted me to include a piece of the stars paper on each card. To me, stars are the personification of a gamer card!

To mirror the stars from the DSP, I die cut some stars from the Holographic Trio Specialty Paper using the Give It a Whirl Dies. Love that the colours seem to shift and change as you move holographic paper! Such a fun mesmerizing effect for a fun card!

Four gems from the Tinsel Gems Four-Pack were used to mimic the buttons on the controller and to add some colour the controller.

Supplies:

Stamps/Bundles/Dies: Level Complete Stamp Set (161563), Countryside Corners Dies (161471), Give It a Whirl Dies (154336)

Inks: VersaMark (102283), Blueberry Bushel (147138), Azure Afternoon (161663), Berry Burst (147143), Lemon Lolly (161666), Lemon Lime Twist (147145)

Paper: Blueberry Bushel (146968), Azure Afternoon (161719), Basic White (159276), Berry Burst (144243), Lemon Lolly (161720), Lemon Lime Twist (144245), Bright & Beautiful 6” x 6” Designer Series Paper (161449), Holographic Trio 12” x 12” Specialty Paper (161744)

Accessories: Basics Embossing Powder (155554), Heat Tool (129053), Tinsel Gems Four-Pack (161623), Paper Snips (103579), Bone Folder (102300), Stampin’ Dimensionals (104430), Stampin’ Seal (152813), Mini Glue Dots (103683)

Close Up of video controller on card
Close Up of Card

Measurements: 

  • Blueberry Bushel (2 pieces):
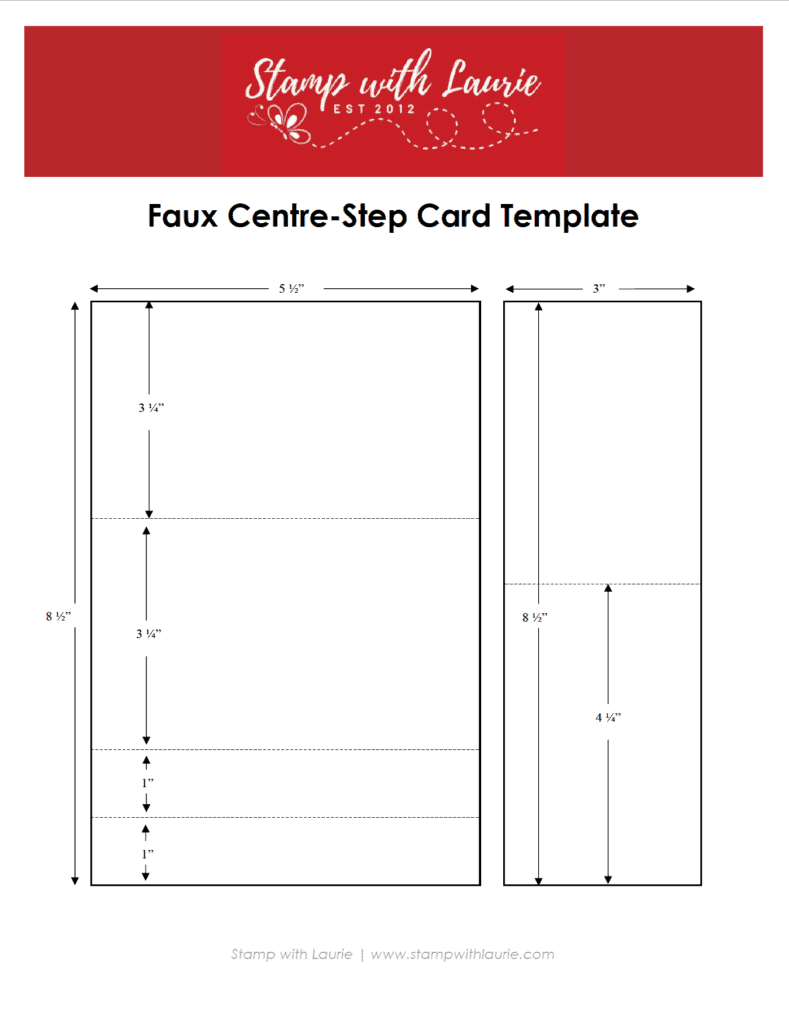
    • 8 ½” x 5 ½” scored at 4 ¼”
    • 5” x 3 ½”
  • Azure Afternoon:
    • 2 ¼” x 3”
  • Basic White: (2 pieces)
    • Sentiment: 2 ¼” x ½”
    • Background: 4 ½” x 3”
  • Lemon Lolly:
    • Scrap
  • Berry Burst:
    • Scrap
  • Lemon Lime Twist:
    • Scrap
  • Bright & Beautiful 12” x 12” Designer Series Paper (3 pieces):
    • 4” x 1-5/8”
  • Holographic Trio 12″ x 12″ Specialty Paper:
    • Scraps

More Information on My Achievement Unlocked Card

For more of my Stampin’ Up! cards, please click here.

You will find the items listed above in my online store.

Santa on Vacation Card 

A card with Santa on a beach eating ice cream
Santa on Vacation Card

Hello Crafty Friends! It’s Laurie here! I am sharing my Santa on Vacation Card for Christmas in July and as my Design Team Inspiration Card for Paper Nest Dolls using Vacation Santa Set. There are 7 stamps, which include Surfer Santa, Ice-cream Santa, Santa with Reindeer Floatie, Santa & Mrs. Claus, Palm tree and Flamingo & Gifts, that come in both rubber and digital stamps.

The Details of My Card

For my card, I decided to create a summer beach scene with Santa enjoying his ice cream! I coloured Santa and the palm tree with my Copic Markers. I love that he has a candy cane in his ice cream! Lol! I added Glossy Accents to his glasses and the light bulbs on the palm tree. For the palm tree, I used Clear Star Gelly Roll Pen to make the star sparkle and Silver Gelly Roll Pen on the wires for the lights.

Next, onto the scene building! The sky was created with watercolor paper and blending two blue Distress Oxide Inks onto it with my blending brush. Then, I used my splatter brush to splatter water to create some texture. Once that was done, I die cut some sand dunes and embossed them to give them the texture of sand. Finally, the sun and cloud were added to finish off my scene.

For the sentiment, I wanted just “Merry and Bright” even though the sentiment was “May Your Days be Merry and Bright”. So, I used Scotch Tape (you could also use a post-it note) to mask off the text that I didn’t want. Remember to remove the tape before you stamp though! Once the sentiment was stamped, I heat embossed it in white and die cut it out.

My beachy scene was added to a piece of Make A Splash paper that had palm trees in a bright greens and blue sky to mirror my scene.

The only embellishments added were some red rhinestones scattered around my focal point.

————————–

Copic Markers

Santa
Skin
: E15/E13/E11/E00/E000
Beard: C3/C1/C0
Reds: R29/R27/R24/R22
Greens: YG67/YG63/YG03
Ice Cream Cone: E35/E33/E31
Ice Cream: R85/R83/R81/E35/E33/E31/E53/E51/E50

Close up os Santa eating an ice cream cone
Ice-Cream Santa

Palm Tree
Trunk/Coconuts
: E35/E33/E31/E30
Leaves: YG67/YG63/YG03
Wire: C3/C1/C0
Red Light Bulbs: R29/R27/R24
Green Lights Bulbs: YG67/YG63/YG03
Blue Lights Bulbs: B28/B24/B32
Yellow Lights Bulbs/Star: Y38/Y35/Y32

Palm Tree with Christmas Lights

Card Recipe for My Santa on Vacation Card

Vacation Santa Set, Paper Nest Dolls
Paper Basics – Stamper’s Select White Cardstock, Papertrey Ink
Make a Splash 6” x 6” Paper Pad, Bo Bunny
Watercolor Paper, Stampin’ Up!
Stitched Circle Layering Dies, Memory Box
Slimline Stitched Hillside Border Dies, Lawn Fawn
Spring Showers Dies, Lawn Fawn
Stylish Shapes Dies, Stampin’ Up!
Subtle Textured Embossing Folder, Stampin’ Up!
Simple Strips – Christmas, Taylored Expressions
Versamark Ink Pad, Stampin’ Up!
White Embossing Powder, Stampin Up!
Heat Tool, Stampin’ Up!
Salty Ocean Distress Oxide Ink, Ranger
Tumbled Glass Distress Oxide Ink, Ranger
Blending Brush, Stampin’ Up!
Tim Holtz Splatter Brush, Ranger
Glossy Accents, Ranger
Clear Star Gelly Roll Pen, Sakura
Silver Gelly Roll Pen, Sakura
Red Rhinestone Jewels, Stampin’ Up!
Scotch Tape

Real Red, Crumb Cake, Crushed Curry and Basic White Card Stock, Stampin’ Up!

Finished card size: 5 ½” x 4 ¼”

Stamp Size: 3”

————————–

To view my other Paper Nest Dolls cards, please click here.

Hope you like my Design Team Inspiration Card using
Vacation Santa Set by Paper Nest Dolls!

Thank you for stopping by!

Hugs,
Laurie

Tri-Fold Shutter Card

Tri-Fold Shutter Card: A fun fold birthday card with a camping theme.
Tri-Fold Shutter Card

Hello Crafty Friends! Laurie here again! I am sharing my alternative Tri-Fold Shutter Card using the May 2023 Exploring In Color Paper Pumpkin Kit. I made one of these for Father’s Day (I will post it at the end) using the same kit but using a different card. It was a huge hit! So, I thought I would make one as a birthday card for a teenager who loves to camp! 

The Details of My Card

For my fun-fold card, I used a full card base front and back from the Paper Pumpkin Kit. Loved that the card bases were printed with a continual scene from front to back! Therefore, with some careful measuring, this made it easy to create my card! 

Front of Card Folded To A2 Card Size

Since the PP card base is 5 ½” tall (same as my card base), I trimmed ¼” off top and bottom to make it fit onto my card base with mats. I didn’t mat the two centre scene strips since they were so thin already. They also have the fold from the PP card base in them, but you really don’t notice it.

Next, the stamped images were from the stamp set that came in the kit. I made the boots look like they were walking. Lol! Since the stamped pieces filled the space so nicely, I didn’t need to mat them.

Card Laid Flat
Card Laid Flat

Finally, the only things that I added to my card was the card base, some In Color card stock and Adhesive-Backed Solid Gems. The linen thread, binoculars and sentiment pieces were all from the kit.

Supplies:

Stamps: May 2023 Exploring In Color Paper Pumpkin Kit, Gone Fishing Stamp Set (For Father’s Day Card) (161535)

Inks: Copper Clay Spot (In Kit)

Paper: Very Vanilla 12” x 12” Cardstock (144239), Copper Clay (161721), Boho Blue (161724), Wild Wheat (161725), Pebbled Path (161722)

Accessories: Adhesive-Backed Solid Gems (161300), Rustic Metallic Adhesive-Backed Dots (For Father’s Day Card) (159082), Linen Thread (In Kit), Bone Folder (102300), Stampin’ Dimensionals (In Kit), Stampin’ Seal (152813), Mini Glue Dots (In Kit)

Measurements: 

  • Very Vanilla:
    • 12” x 5 ½” (cut/scored according to template below
  • Copper Clay: (3 pieces)
    • 1 ¾” x 5 ¼” (2 pieces)
    • 2” x 3 ½”
  • Boho Blue:
    • 2 ¼” x 1 ¾” (2 pieces)
    • 2 ¼” x 3 ¾”
  • Wild Wheat:
    • 1 ¼” x 1 ¾” (2 pieces)
  • Pebbled Path (3 pieces):
    • 1 ¼” x 1 ¾” (2 pieces)
  • Card Pieces:
    • 1” x 5” (2 pieces) (long vertical pieces)
    • 1 ¼” x 3 ¾” (2 pieces) (long horizontal pieces)
    • 2” x 1 ½” (2 pieces)

More Information on My Tri-Fold Shutter Card

Lastly, here is my Father’s Day Card using the May Exploring In Color Paper Pumpkin Kit. Same measurements as above, but a Basic White card base, different Paper Pumpkin card from the kit and Rustic Metallic Adhesive-Backed Dots. The sentiment is from the Gone Fishing Stamp Set.

My Father's Day Card
My Father’s Day Card

Downloadable Tri-Fold Shutter Card Template

To download a PDF of the Tri-Fold Shutter Template, please click here or on the picture.

Tri-Fold Shutter Template

For more of my Stampin’ Up! cards, please click here.

You will find the items listed above in my online store.

You’re Stellar Wobble Card

A card with an Astronaut and planet on it.
You’re Stellar Wobble Card

Hello Crafty Friends! Laurie here again! I am sharing my You’re Stellar Wobble Card using the Stargazing Suite Collection by Stampin’ Up! This Collection includes the Reach for the Stars Stamp Set, Reach for the Stars Dies and Stargazing 12” x 12” Designer Series Paper.

The Details of My Card

My card was for a swap, and I decided to make a fun faux centre-step card to allow enough room for the astronaut and a planet to fit on my centre panel. I used the measurements from my faux centre-step template which I have included at the end of this post.

When I saw this Suite in the Annual Catty, I knew that I wanted to make a wobble card as well! They are so fun and interactive! I bought the Mini Action Wobble on Amazon.ca, but you could easily make your own by using a piece of bendable wire and wrap it around a pencil. Then, secure one end to your wobble piece and the other end to the card base.

Astronaut in Action

Since I made this card for a swap, I needed several planets, but only a couple fit the planet die and the rings die. I really wanted to use the ring die with silver foil paper! I thought it would add some cosmic shimmer along with the die cut stars! So, I fudged it. Tip: if you die cut the larger planets, make sure that the shadow is showing in the centre of the die. This gives it a realistic 3D look.

All Cards with Different Planets
Swap Cards with Different Planets

I decided to stamp my astronaut and sentiment in Basic Gray since there was already a lot of black to my card. Besides, it was a good alternative to colouring the astronaut since I would have used Smoky Slate to colour his shadows and left most of him white anyways. So, this did it for me!

Tip: to figure out where to place glue for the centre panel, I used my grid paper a pencil to mark the section.

Showing Gluing Tip
Showing Gluing Tip

The only embellishments were three Classic Matte Dots in each colour tying in my colour scheme. Of course, they had to be in a row showing my Star Trekkie side of me! Lol!

I made another card as well for a friend. This time I added the retired Shimmery Crystal Effects to the astronaut’s helmet. So fun!

Supplies:

Stamps/Bundles/Dies: Stargazing Suite Collection (161189)

Inks: Basic Gray (149165)

Paper: Basic Black (121045), Basic White (159276), Lemon Lime Twist (144245), Silver Foil 12” x 12” Specialty Pack (156457), Stargazing 12” x 12” Designer Series Paper (in Collection)

Accessories: Classic Matte Dots (158146), Multipurpose Liquid Glue (110755), Bone Folder (102300), Stampin’ Dimensionals (104430), Stampin’ Seal (152813), Mini Glue Dots (103683), Grid Paper (130148), pencil, Mini Action Wobble (from Amazon.ca)

Multiple cards with astronaut and planet on then
Swap Cards

Measurements: 

  • Basic Black: (2 pieces)
    • 8 ½” x 5 ½” cut/scored according to template below
    • 8 ½” x 3” cut/scored according to template below
  • Basic White: (4 pieces)
    • Sentiment: 2 ¼” x ½”
    • Astronaut: 4” x 2”
    • Centre Panel: 4-1/8” x 2-5/8”
    • Back Panel: 3-5/8” x 3-1/8”
  • Lemon Lime Twist
    • Scrap
  • Silver Foil (2 pieces):
    • 2 ½” x 1”
    • Stars: Scrap
  • Stargazing 12” x 12” Designer Series Paper (3 pieces):
    • Centre Panel: 4” x 2 ½”
    • Back Panel: 3” x 5 ¼”
    • Planet

More Information on My You’re Stellar Wobble Card

Downloadable Faux Centre-Step Template

To download a PDF of the Faux Centre-Step Template, please click here or on the picture.

Downloadable Faux Centre-Step Template

For more of my Stampin’ Up! cards, please click here.

You will find the items listed above in my online store.

Down on the Farm Card

A card with a farmer, cow and horse on a farm.
Down on the Farm Card

Hello Crafty Friends! It’s Laurie here! I am sharing my Design Team Inspiration Card using Down on the Farm Bundle by Paper Nest Dolls. This card would be great for Father’s Day! This bundle comes with 15 digital stamps including 5 dolls, horse, cow, pig, ewe, chicken coop, tractor, hay, corn, sunflowers and so many more. I created another slimline card using this bundle which I will link at the end of this post.

The Details of My Card

For my card, I decided to create a mini slimline card with a farm scene that revolved around the characters that I coloured with my Copic markers. Aren’t they just the cutest!

The Farm Scape dies were perfect for my scene. I die cut the dies multiple times to get the variation in colours of the barn, tractor and trees and pieced them together. Once that was done, I layered the Fun on the Farm papers for the sky and grasses to complete my scene. All I needed to add were the characters.

————————–

Copic Markers:

Farmer Boy
Skin: E000/E00/E21/E11/E04
Hair: E57/E43/E53
Shirt/Boots: YG67/YG63/YG03
Overalls: B26/B23/B12
Hat: E35/E33/E31/YG67/YG63/YG03
Pitchfork: C4/C3

Close Up of Farmer

Cow
Hide: E27/E25/E23/C3/C0/0/R20
Hair: C3/C0
Hoofs: C6/C4/C3
Horns: E41/E40/0

Close Up of Cow and Horse

Horse
Coat: E29/E27/E25/E23
Mane/Hoofs: C6/C4/C3

————————–

Card Recipe for My Down on the Farm Card:

Down on the Farm Bundle, Paper Nest Dolls
Paper Basics – Stamper’s Select White Cardstock, Papertrey Ink
Fun on the Farm 6” x 6” Paper Pad, Echo Park Paper Co.
Farm Scape Dies, Sugar Pea Designs
Slimline Grassy Hillside Borders Dies, Lawn Fawn
Soft Suede, Real Red, Granny Apple Green and Basic Black Card Stock, Stampin’ Up!

Finished card size: 6” x 3.5”

————————–

To view my other Paper Nest Dolls cards, please click here.

This is the other card that I created using the Down on the Farm Bundle. To view it, please click here or on the photo.

Card with farmers horse, cow and pig on it
From the Herd Birthday Card

Hope you like my Design Team card using
Down on the Farm Bundle by Paper Nest Dolls!

Thank you for stopping by!

Hugs,
Laurie

An Adventurous Birthday Card

A dwarf with a pick axe on a birthday card
An Adventurous Birthday Card

Hello Crafty Friends! It’s Laurie here! I am sharing An Adventurous Birthday Card using Dwarf 2 by Mo’s Digital Pencil. 

A good friend had his birthday and this was the card that I sent him. He loves to roleplay going on adventures and finding hordes of treasure. So, I thought Dwarf2 would make him a fun card!

The Details of My Card

For my card, I decided I would make a fun faux shaker card and fill it will gold, copper, and silver sequins to represent a treasure hoard.  I coloured the dwarf in muted colours with my Copic markers that would suit a miner digging for gold.

The Bo Bunny paper I had in my stash and suited my adventuring theme.

I die cut a piece of Basic Black card stock with a stitched rectangle die. Then, I embossed it with the Foundry Folder and rubbed brushed iron wax onto it. I loved the way it brought out the details of the metal pieces and rivets to look like a metal door! This was the perfect backdrop for my dwarf!

For the sentiments, I heat embossed them in white on Basic Black card stock and then die cut them with stitched rectangles too. Next, I rubbed the brushed iron wax on them as well to match the door.

The only embellishments were to glue a few sequins to the clear envelope that created my faux shaker card.

————————–

Copic Markers:

Skin: E000/E00/E21/E11/E04
Hair: E18/E15/E13/E11
Pants/Gloves: E35/E33/E31
Pant Laces: E29/C3
Leather Bits: E29/E39/E35
Vest: G99/G94/G21
Shirt/Candle: E53/E51/E50
Boots: E29/E39/E35/C7/C5/C3/C1
Hat/Knee Patches/Axe Head: C5/C3/C1
Wooden Axe Handle: E37/E35/E33/E31
Gold: Y38/Y32

Close Up of Dwarf
Close Up of Dwarf 2

————————–

Card Recipe for An Adventurous Birthday:

Dwarf 2, Mo’s Digital Pencil
Paper Basics – Stamper’s Select White Cardstock, Papertrey Ink
Cambridge Stripe12” x 12” Paper, Bo Bunny
Cambridge Victory12” x 12” Paper, Bo Bunny
Versamark Ink, Stampin’ Up!
Basics Embossing Powder, Stampin’ Up!
Heat Tool, Stampin’ Up!
Adventurous Journey Stamp Set, Stampin’ Up!
Stitched Rectangle Dies, Stampin’ Up!
3-D Texture Fades Embossing Folder – Foundry by Tim Holtz, Sizzix
Dazzling Metallics Sequins, Craft Medley
Clear Medium Envelopes, Stampin’ Up!
Brushed Iron Metallique Wax, Art Alchemy
Early Espresso and Basic Black Card Stock, Stampin’ Up!

Finished card size 5.5” x 4.25”

————————–

To view my other Copic cards, please click here.

I love the Dwarf stamps by Mo’s Digital Pencil! In fact, I used Dwarf 6 to create another card that we gave to the same friend a few years ago.

Card with dwarf looking in a beer mug
Card Using Dwarf 6

Hope you like my card using Dwarf 2 by Mo’s Digital Pencil!

Thank you for stopping by!

Hugs,
Laurie

My Classic Birthday Cards 

A masculine birthday card wishing a Happy Birthday to a classic with a car on it
My Classic Birthday Cards

Hello Crafty Friends! Laurie here again! I am sharing My Classic Birthday Cards using the He’s All That Bundle by Stampin’ Up! which includes the He’s All That Stamp Set and the All That Dies.

The Details of My Cards

For my cards, I need to create two masculine birthday cards and I thought the He’s All That Bundle is perfect for those kinds of cards! One card was for a car buff and the other was for my Father-in-law.

Early Espresso Version of My Classic Birthday Cards

I decided to use a sketch that I have used before for another card. I love using sketches to inspire me. A link to the other card using this sketch will be at the end of this post.

Card Sketch
Card Sketch used to make my Clubhouse Birthday Card.

The He’s the Man Specialty Designer Series Paper was perfect for my Classic Car theme! It even comes with coordinating die-cut images of which I used the arrows for my cards and the notebook die-cut for my Sahara Sand card.

For the sentiments, I used the “Huffing” Technique where you use the Stampin’ Write Markers to colour the stamp in different colours. When you are done, you huff on the stamp reactivating the dried ink so that you can stamp the image.

A stamp with some markers
Huffing Technique

Since my theme is classic cars, I thought the Metal Plate Embossing Folder in Early Espresso would add to that theme on my Early Espresso card.

Sahara Sand Version of My Classic Birthday Cards

The only embellishments were the Rustic Metallic Adhesive-Backed Dots that balance the arrow and adding to my masculine feel of the car theme.

Supplies:

Stamps/Bundles/Dies: He’s All That Bundle (159079

Paper: Sahara Sand (121043), Early Espresso (119686), Basic White (159276), He’s the Man 12” x 12” Specialty Designer Series Paper (159068)

Accessories: Neutrals Stampin’ Write Marker Assortment (147158), Regals Stampin’ Write Marker Assortment (147155), Metal Plate 3D Embossing Folder (160766), Rustic Metallic Adhesive-Backed Dots (159082), Bone Folder (102300), Stampin’ Dimensionals (104430), Stampin’ Seal (152813), Mini Glue Dots (103683)

Close Up of Sentiment on Early Espresso Card

Measurements: 

  • Early Espresso/Sahara Sand:
    • 5 ½” x 8 ½” scored at 4 ¼”
  • Early Espresso:
    • 4” x 2 ½”
    • Scraps for Diamond Die
  • Sahara Sand:
    • Scraps for Diamond Die
  • Basic White:
    • 1 ¾” x 2 ½”
  • He’s the Man Specialty Designer Series Paper:
    • 1 ½” x 4 ¼” (2 pieces/card)
    • Notebook Die Cut (for Early Espresso Card)
    • Arrows from Die-cuts Images
Close Up of Sentiment on Sahara Sand Version 1
Close Up of Sentiment on Sahara Sand Card

More Information on My Classic Birthday Cards:

For more of my Stampin’ Up! cards, please click here.

You will find the items listed above in my online store.

Here is the other card that I created using this Sketch. For more information on it, please click here or on the photo.

My Clubhouse Birthday Card

My Galaxy Part II Card 

A Valentine card with a galaxy boy and girl fighter
My Galaxy Part II Card

Hello Crafty Friends! It’s Laurie here to share My Galaxy Part II Card using the Galactic Fighter and the Galactic Sidekicks Stamp Sets by Kindred Stamps!

A friend of mine asked for me to create a custom Star Wars Valentine card for her Hubby who is a huge Star Wars fan! So, I made two for her selection. I showed the platform card that she picked, but here is the other card that I made. Since she picked the other card, I gave this one to my Hubby instead.

The Details of My Card

I thought a big heart with Hans Solo in it would be a fun Valentine card or even an anniversary card! So, I die cut a heart from the Whimsy Nebula paper that had reds in it. The white scallop border is just the back of the Nebula paper, but it added a nice contrast to the Nebula.

Since it was a Valentine card, you can never have too many hearts! So, I added die cut white hearts on top of embossed pink hearts for the background! The only embellishments were resin hearts on the nebula paper surrounding Hans Solo.

My Other Cards

I also had so much fun colouring these stamps that I made two other cards using the Stampin’ Up! January Paper Pumpkin Key to my Heart. I had just made a few of the cards from the Paper Pumpkin Kit and it was sitting on my desk. So, it was easy enough to add the characters to the cards and use the sentiments from the Galactic Sidekicks Stamp Set.

Valentine Card with Chewie
Valentine Card with Storm Trooper

————————–

Copic Markers:

Leia
Skin: E000/E00/E21/E11/E04/R20
Hair: E29/E27/E25
Lips: R22
Dress: C3/C1/0
Gun: C7/C5/C3

Close Up of Leia
Close Up of Leia

Hans Solo

Skin: E000/E00/E21/E11/E04
Hair: E49/E47/E43/E42
Shirt: E53/E51/E50
Pants: B39/B99/B97/B37
Vest/Boots/Gun: C7/C5/C3
Holster: E27/E25/E23/C5/C3

Close Up of Hans Solo

Chewie

Fur: E39/E37/E35/E33/E31
Crossbolt: C7/C5/C3
Sash: E29/E25/E5/E3

Close Up of Chewie
Close Up of Chewie

Trooper

C9/C7/C5/C3/C1/0/B34

Close Up of Storm Trooper

————————–

Card Recipe for My Galaxy Part II Card:

Galactic Fighter Stamp Set and the Galactic Sidekicks Stamp Set, Kindred Stamps
Paper Basics – Stamper’s Select White Cardstock, Papertrey Ink
Tuxedo Black Memento Ink
Nebula 8.5” x 3.5” Designer Paper, Whimsy Stamps
Be Mine Stitched Framelits Dies, Stampin’ Up!
Detailed Hearts Dies, Stampin’ Up!
Happy Heart Textured Impressions Embossing Folder, Stampin’ Up!
Resin Hearts Embellishments, Stampin’ Up!
Silver Gelly Roll Pen, Sakura
Real Red, Flirty Flamingo, and Basic White Card Stock, Stampin’ Up!

Finished card sizes: 5 ½” x 4 ¼”

————————–

To view my other Kindred Stamps cards, please click here.

To view my Star Wars platform card, please click here or on the photo.

A 3D card that has a droid and man and woman
My Galaxy Platform Card

Hope you like My Galaxy Part II Card using Galactic Fighter and the Galactic Sidekicks Stamp Sets by Kindred Stamps!

Thank you for stopping by!

Hugs,
Laurie

My Galaxy Platform Card 

A 3D card that has a droid and man and woman
My Galaxy Platform Card

Hello Crafty Friends! It’s Laurie here to share My Galaxy Platform Card using the Galactic Fighter and the Galactic Sidekicks Stamp Sets by Kindred Stamps!

A friend of mine asked for me to create a custom Star Wars Valentine card for her Hubby who is a huge Star Wars fan! As you might know, I have many different Star Wars stamps, but I decided to use Kindred Stamps since I just received them recently and their stamps are the right size for platform cards!

I had fun making another platform card for my brother’s birthday (I will link to it at the end of this post) that I decided to make one as an option from which my friend could choose. I also made a regular A2 card as another possibility and will post that another day.

The Details of My Card

My friend asked for Leia, Hans Solo and R2D2. So, I coloured them with my Copic markers in their traditional colours. When I showed her the stamp set, she loved the sentiment “I’ve searched the galaxy for you”.

I thought it would be fun for the platform to represent the Millennium Falcon’s bridge. So, I used the Foundry Embossing Folder to emboss the Basic Black die cut that wrapped around the card. Next, I rubbed Brushed Iron Wax to make all the details stand out. Perfect for a look of metal that had been cobbled together since the ship had been battered together so many times. Lol! I made the base Basic Gray like a metal floor and used the stitched rectangle die from the Add On to create stability for the pop-up characters.

Since this was supposed to be the Millennium Falcon’s bridge, I used a pretty Nebula paper from Whimsy Stamps for the windows behind R2D2.

The Stamp AnnieThing Galactic paper had the perfect Valentine theme with the word LOVE against a galaxy of twinkling stars. And it matched my Nebula paper!

I added a few red resin hearts to the sentiment but forgot to take another photo. So, you will just have to imagine that! Lol!

————————–

Copic Markers:

Leia
Skin: E000/E00/E21/E11/E04/R20
Hair: E29/E27/E25
Lips: R22
Dress: C3/C1/0
Gun: C7/C5/C3

Side View of Leia and Hans Solo

Hans Solo
Skin: E000/E00/E21/E11/E04
Hair: E49/E47/E43/E42
Shirt: E53/E51/E50
Pants: B39/B99/B97/B37
Vest/Boots/Gun: C7/C5/C3
Holster: E27/E25/E23/C5/C3

Side View of Woman and droid
Side View of Leia and R2D2

R2D2
B99/B37/C7/C5/C3/C1/R27

————————–

Card Recipe for My Galaxy Platform Card:

Galactic Fighter Stamp Set and the Galactic Sidekicks Stamp Set, Kindred Stamps
Paper Basics – Stamper’s Select White Cardstock, Papertrey Ink
Tuxedo Black Memento Ink
Galactic Love 6” x 6” Paper Pad, Stamp AnnieThing
Nebula 8.5” x 3.5” Designer Paper, Whimsy Stamps
Platform Pop-Up Dies, Lawn Fawn
Platform Pop-Up Add-On Dies, Lawn Fawn
3-D Texture Fades Embossing Folder – Foundry by Tim Holtz, Sizzix
Brushed Iron Metallique Wax, Art Alchemy
Resin Hearts Embellishments, Stampin’ Up!
Basic Black, and Basic Gray Card Stock, Stampin’ Up!

Finished card size: 5 ¼” x 3-5/8”

Top View Of Platform Card

————————–

To view my other Kindred Stamps cards, please click here.

To view my other platform card, please click here or on the photo.

A pop-up card with Super Mario Brothers
Game on Platform Card

Hope you like My Galaxy Platform Card using Galactic Fighter and the Galactic Sidekicks Stamp Sets by Kindred Stamps!

Thank you for stopping by!

Hugs,
Laurie

My Picturesque Hello Card 

A card with a nature scene with lake and trees
My Picturesque Hello Card

Hello Crafty Friends! Laurie here again! I am sharing My Picturesque Hello Card using the Picturesque Stamp Set by Stampin’ Up! I had a lot of fun playing with this stamp set that I made three cards all with slight variations. One is a gate fold card, another an easel card, and the third is a regular card.

The Details of My Gate Fold Card

I needed to create a swap and decided that I would use the Picturesque Stamp Set for it and create a gate fold card. Give the set some love since there wasn’t a lot of cards out there using it and I always need more masculine card!

I decided this stamp set would be perfect with the Enjoy the Journey Designer Series Paper to create an outdoorsy masculine theme. It is currently free during Sale-a-Bration!

I went with one flap larger than the other since I wanted to show off the DSP. The Into the Clouds Embossing Folder created some interest on the smaller flap while lightening my card up. It also helped to balance the sentiment cluster.

Close Up of stamped nature scene
Close Up of Focal Point on my Card

For my stamped image, I used several colours to represent a sunset over a nature scene. The Coastal Cabana and Mango Melody were both stamped off once before stamping on the Basic White. For the sky, I decided to use the Oceanfront Stamp Set to give it a painted feel, but you could use the water stamp from the Picturesque Stamp Set instead.

Once everything was stamped, I used the largest stitched square from the Stylish Shapes Dies to cut it out and matted it with Starry Sky card stock.

Next, I wound some linen thread twice around my focal point and tied it in a knot on the opposite side from the sentiment cluster. The die cut tree was from the Majestic Mountain Dies and I thought it added to my outdoorsy theme and balanced the stamped tree on my focal point.

I stamped the sentiment in Starry Sky and used the arrow die from the All That Dies. I loved how it pointed into the scene while creating a base for the sticker and tree.

Those Enamel Sticker Icons are so neat! I went with the tree icon on my swaps since it went well with the die cut tree and my outdoorsy theme. The finishing touch was three Rustic Metallic Adhesive-Backed Dots.

The Details for My Other Cards

For the Easel card, I decided to give it a distressed look by using my scissors to run along the edges of everything. I even folded down a corner of the DSP so that the Garden Green back can be seen.

A card that is an easel with a nature scene on it.
Easel Card Closed

I loved the encouraging sentiment and decided to use it for the inside as a stopper so that the easel could stand up.

Easel Card Open
Easel Card Opened

The full card was stamped the same way, but I used the Stitched Rectangle Dies to die cut the focal point and mat out. I also used the compass from the Enamel Sticker Icons.

A Regular Card with the nature scene
Regular Card Base

Supplies:

Stamps/Bundles/Dies: Picturesque Stamp Set (160511), Majestic Mountain Dies (151608), All That Dies (159078), Oceanfront Stamp Set (157862), Stylish Shapes Dies (159183), Stitched Rectangle Dies (151820)

Inks: Garden Green (147089), Highland Heather (146986), Coastal Cabana (147097), Starry Sky (159212), Mango Melody (147093)

Paper: Starry Sky (159263), Garden Green (102584), Basic White (159276), Enjoy the Journey 12″ x 12″ Designer Series Paper (160586)

Accessories: Into the Clouds Embossing Folder (159171), Enamel Sticker Icons (160598), Rustic Metallic Adhesive-Backed Dots (159082), Linen Thread (104199), Multipurpose Liquid Glue (110755), Bone Folder (102300), Stampin’ Dimensionals (104430), Stampin’ Seal (152813), Paper Snips Scissors (103579)

Measurements: 

  • Starry Sky (2 pieces): 
    • 5 ½” x 8 ½” scored at 2 ½” and 6 ¾”
    • 3” x 3”
  • Basic White (3 pieces):
    • 1 ½” x 5 ¼”
    • 3” x 3”
    • Scrap for Sentiment
  • Garden Green:
    • Scrap
  • Enjoy the Journey DSP:
    • 2 ¼” x 5 ¼”
All Three card together
All Three Cards Using the Picturesque Stamp Set

More Information on My Picturesque Hello Card:

For more of my Stampin’ Up! cards, please click here.

You will find the items listed above in my online store.

Under Your Spell Card 

A Valentine card with a Wizard on it
Under Your Spell Card

Hello Crafty Friends! It’s Laurie here! I am sharing my Under Your Spell Card using Wiz by Mo’s Digital Pencil. 

This past week was Valentine’s Day, and I made this card to give my Hubby. He loves anything fantasy and I thought the Wiz would be a fun card to make for him!

The Details of My Card

For my card, I coloured the Wiz with my Copic markers in magical shades of purples and blues with bright yellow accents. I used my Copic refills in B39 and V17 with 99 % Isopropyl Alcohol to create the mystical auras around him. You can use any colours for this effect, but I picked two colours that draw on the colour scheme that I used on the image.

Background Technique

To create this technique, I worked in small sections to keep the ink wet while I played. I dripped a few drops of each refill making sure that the drops were far enough away from the image since they bled. I also overlapped them which helped with the blending and coverage.

While the ink was wet, I dipped the q-tip into the alcohol and dotted and dabbed through the inks. As I dabbed, I pulled the ink toward the image. The dotting created lighter splotches where the ink was repelled. I re-dipped the q-tip regularly into the rubbing alcohol to push the ink around and dotted toward the Wiz and ground. This section was much more diluted to achieve an effect that the ink was blended out to white. I also added reinker to a glass mat and dipped the wet q-tip into it add more ink in the diluted area.

A Technique to create a mystical background
Background Technique Using Copic Reinkers

Once I was happy with the background, I use Y02/Y000 to push the darker background inks back from my image to create a yellow glow that softens the darker edges.

I added some die cut stars in gold glimmer paper swirling around the top sentiment. A scattering of other glimmer stars helped with the mystical theme.

Glossy accents were added to the mystical crystal ball. I used a gelly roll pen on the mystical lightening arcing from the crystal ball. Clear Wink of Stella was added to the stars on his shirt, the gold band on his hat and the star hanging from his hat.

————————–

Copic Markers:

Skin: E000/E00/E21/E11/E04
Hair: C5/C3/C1
Purples: V17/V15/V12
Blues: B39/B28/B24
Yellows: Y17/Y15/Y02
Leather/Staff: E39/E37/E35/E33
Ground: E33/31
Magical Glow: Y02/Y000

Close Up of The Wizard
Close Up of The Wiz

————————–

Card Recipe for My Under Your Spell Card:

Wiz, Mo’s Digital Pencil
Paper Basics – Stamper’s Select White Cardstock, Papertrey Ink
Cambridge Chess 12” x 12” Paper, Bo Bunny
Myth & Magic Specialty Designer Series Paper, Stampin’ Up!
Gold Metallic Specialty Paper 6” x 6”, Stampin’ Up!
Stitched Stars Dies, Stampin’ Up!
99 % Isopropyl Alcohol
Q-tips
B39 Copic Refill
V17 Copic Refill
Tim Holtz Glass Media Mat, Tonic
Clear Star Gelly Roll Pen, Sakura
Glossy Accents, Ranger
Clear Wink of Stella, Stampin’ Up!
Value Pack Cards & Envelopes, Recollections
Starry Sky and Gorgeous Grape Card Stock, Stampin’ Up!

Finished card size 6.5” x 5”

————————–

To view my other Copic cards, please click here.

Hope you like my card using Wiz by Mo’s Digital Pencil!

Thank you for stopping by!

Hugs,
Laurie

Birthday…Happy Birthday Card

A file folder card
Birthday…Happy Birthday Card

Hello Crafty Friends! It’s Laurie here to share my Birthday…Happy Birthday Card using Secret Agent by Kindred Stamps! My Hubby is a big fan of the James Bond movies and when I saw this stamp set, I knew it would be hit for his birthday card!

The Kindred Stamps Design Team had several inspirational cards that inspired me to create my own version of a file folder with the Magic Iris. I knew that I wanted to use both elements on my card.

The Details of My Card

I had a lot of fun creating my file folder and it had to be a certain size to fit the Magic Iris. So, it is a little wider than a regular A2 card base since the folder tab sticks out. The File Folder Edgelit Dies by Stampin’ Up! are retired, but I have made a file folder with my Envelope Punch Board in the past as well. There is also a file folder in the Specimens Edgelit Dies, but I needed a larger one to fit the iris.

Close Up of Sentiment on Card

For the front of the folder, I decided to make it look like it’s been through the wars with blood running down the front (just like the opening of the movies! Lol!), blood splatter, mysterious footprints, and a few spy paraphernalia items! I even had the blood run onto the sentiment piece. The “Confidential” and “Top Secret” stamps come with the set and were perfect for my theme! To make it even more rough, I blended some Vintage Photo Ink on the edges of the folder and the sentiment. 

Inside My Card

Inside of Card
Inside of Card

Amanda Stevens, a Design Team Member for Kindred Stamps, created a file folder PDF that you can download for both birthday and Father’s Day. Here is the link to her YouTube channel that lists the files. I used the birthday mission part for the inside of my card. Love that you can customize it to suit your needs! I added My Hubby’s birthday date and his “also known as” (aka) handle “Sweetie” to the file. Lol! The piece of washi tape was his secret agent’s name that had been “redacted”! The stamp set even comes with a martini glass and I couldn’t resist using it! Again, I distressed the brief with ink and add some blood splatters before gluing it at the top and adding some metallic dots like the brief was clipped to the folder.

Close Up of Birthday Brief

For the other side, I decided to use the Magic Iris to mimic the opening of the movies when Bond enters. I embossed in black the Spiral Dye Stamp Set onto the black cardstock from which I die cut the front of the Iris. The part that wasn’t used for the iris, I glued down to continue the spiral on the page. I had die cut the “Filed” tab and had planned to add it to the front of the folder, but in the end, I placed it under the Iris to give the black a bit of colour.

Magic Iris Open Showing Secret Agent

————————–

Copic Markers:

Skin: E04/E11/E21/E00/E000
Hair: YR31/E37/E35/E33
Suit: C9/C7/C4
Shoes: C7/C6/C4
Tie/Gun: C3/C1
Shirt: C1/0

Close Up of Secret Agent

————————–

Card Recipe for My Birthday…Happy Birthday Card:

Secret Agent, Kindred Stamps
Paper Basics – Stamper’s Select White Cardstock, Papertrey Ink
Galvanized Metallic Sheet, Stampin’ Up!
Magic Iris Dies, Lawn Fawn
File Folder Edgelit Dies, Stampin’ Up!
Specimen Thinlits Dies, Sizzix
Spiral Dye Stamp Set, Stampin’ Up!
Gorgeous Grunge Stamp Set, Stampin’ Up!
Ghoulish Grunge Stamp Set, Stampin’ Up!
Daring Adventure Stamp Set, Stampin’ Up!
It’s a Mystery!, Kraftin’ Kimmie Stamps
Rustic Metallic Adhesive Dots, Stampin’ Up!
Magnifying glass charms antique silver tone, Nicole de Bruin Charms
Washi Tape, Stampin’ Up!
Real Red Classic Ink Pad, Stampin’ Up!
Early Espresso Classic Ink Pad, Stampin’ Up!
VersaFine, Onyx Black, Tsukineko
Tim Holtz Vintage Photo Distress Ink Pad, Ranger
Blending Brushes, Stampin’ Up!
Very Vanilla, Basic Black, Basic Gray
and Real Red, Card Stock Stampin’ Up!

Finished card size: 4.5” x 5.5”

Birthday…Happy Birthday Card in Action

————————–

For more of my Kindred Stamps cards, please click here.

Hope you like my Birthday…Happy Birthday Card using the
Secret Agent by Kindred Stamps!

My Viking Father’s Day Card

A Father's Day card with a viking father and son
My Viking’s Father’s Day Card

Hello Crafty Friends! It’s Laurie here! I am sharing My Viking Father’s Day Card for my Design Team Inspiration for Paper Nest Dolls using the Viking Bundle. This bundle has three characters and two animals – Viking Andrew (with and without the mustache ties), Viking Owen, Viking Dragon, and Viking Boar. I love this bundle and made another card using just Viking Andrew without the mustache ties. I will include a link to it at the end of this post.

The Details of My Card

I thought using Viking Andrew and Viking Owen together would make a perfect Father’s Day card! I had so much fun colouring with my Copic markers this brawny guy and his son in appropriate Viking colours! Their colouring even matches another card called My Let’s Go A-Viking Card that I made for Paper Nest Dolls for their New Year’s Day Event. Wouldn’t all three make a great family card!

For my card, I kept it simple simple to make the stamps stand out. I used the High Seas Embossing Folder to emboss the waves on Night of Navy card stock. This was placed on a Mossy Meadow card base. Next, I used a frame with Viking imagery that came with the digital papers for the perfect backdrop for my father and son! My simple sentiment was layered on a scrap of the Cozy Winter paper. This paper pack is not just for winter but has all-purpose patterns as well. The finishing touch was the Viking chipboard ship and some black matte dots.

————————–

Copic Markers

Viking Andrew
Skin: E04/E11/E21/E00/E000
Hair: W7/W6/W5/W3
Top: YG99/YG97/YG95/YG93/YG91
Pants/Mitts: R39/R37/R35/R32
Fur Trim: C7/C5/C3
Boots: E49/E47/E44
Axe: C7/C5/C4/C3/E49/E47/E44
Brass/Belt/Bracers: E18/E15/E11
Steel on Helmet: C7/C5/C3
Skull on Belt: E42/E41/E40/0
Horns on Helmet: E41/E40/0

Close Up of Viking Father and Son

Viking Owen
Skin: E04/E11/E21/E00/E000
Hair: E49/E39/E19/E13
Top/Boots/Shield: E29/E37/E35/E33
Pants: YG99/YG97/YG95/YG93/YG91
Fur Vest: C7/C5/C3
Steel: C7/C5/C3
Helmet/Belt: E18/E15/E11
Skull on Belt: E42/E41/E40/0
Horns on Helmet: E41/E40/0

————————–

Supplies for My Viking Father’s Day Card:

Viking Bundle, Paper Nest Dolls
Paper Basics – Stamper’s Select White Cardstock, Papertrey Ink
Cozy Winter 12” x 12” Designer Paper Pack, P13
Viking Digital Paper, Happy Watercolor Shop
High Seas Embossing Folder, Stampin’ Up!
Home & Garden Stamp Set, Stampin’ Up! (Sentiment)
Tuxedo Black Memento Ink Pad, Stampin’ Up!
Seafaring Chipboard, Kraftin’ Kimmie Stamps
Classic Matte Dots, Stampin’ Up! (Hearts)
Night of Navy, Mossy Meadow and Basic White Card Stock

Stamp Sizes
Viking Andrew: 4”
Viking Owen: 3 ½”

Finished card size: 5 ½” x 4 ¼”

————————–

To view my other Paper Nest Dolls cards, please click here.

My Other Viking Cards

For more information on my cards, please click the photos.

Valentine card with a Viking on it
Will You Be My Viking, Valentine?
A card with a Viking on it.
My Let’s Go a Viking Card

Hope you like My Viking Father’s Day Card using the Viking Bundle by Paper Nest Dolls!

Thank you for stopping by!

Hugs,
Laurie

You’re Flippin’ Awesome Card

Card with BBQ Tools on it
You’re Flippin’ Awesome Card

Hello Crafty Friends! Laurie here again! Father’s Day is just a few weeks away and I thought I would share with you my You’re Flippin’ Awesome Card using the new He’s The Man Suite Collection by Stampin’ Up! This suite is perfect for car lovers, grilling enthusiasts, camping buffs, and more! My Father-in-law loves to BBQ and I though this suite would make a perfect Father’s Day card for him! 

The Details of My Card

This card is a fast and easy card to make! No stamping involved on the front, but I did stamp the inside with “Wishing You a Happy Father’s Day” using the He’s All That Stamp Set that comes in the Collection.

The He’s The Man Designer Series Paper comes with 2 die cut sheets and I used one of the die cuts for my sentiment. Easy-peasy! To give it more of a focal point, I added a piece of DSP and die cut it out using the He’s All That Dies. I turned it so that it flanks the sentiment on either side. I love the “framed” look that the die gives the die cut piece. Gave it that little extra detail!

The Rustic Metallic Adhesive-Backed Dots were a perfect accompaniment to my manly card! I placed one on either side of the sentiment and one above it to the left. Tip: you always want odd numbers since they are pleasing to the eye.

The final thing I added to my focal point was some looped Linen Thread behind everything. How manly is that thread!

For the DSP, I made it smaller than usual since I wanted the Brick & Mortar 3D Embossing Folder to show up more. I went with a Cajun Craze bricked piece since it matched my DSP and what is more appropriate than orange bricks!

All this was place on a Sahara Sand card base.

Supplies:

Stamps/Bundles/Dies: He’s The Man Suite Collection (159083)

Inks: Tuxedo Black Memento Ink Pad (132708) For sentiment on inside card

Paper: Sahara Sand (121043), Cajun Craze (119684), Basic White (for inside card) (159276), He’s the Man 12″ x 12″ Specialty Designer Series Paper (included in Collection)

Accessories: Brick & Mortar 3D Embossing Folder (149643), Rustic Metallic Adhesive-Backed Dots (included in Collection), Linen Thread (104199), Bone Folder (102300), Stampin’ Dimensionals (104430), Mini Stampin’ Dimensionals (144108), Stampin’ Seal (152813), Mini Glue Dots (103683)

Close Up of Focal Point on card
Close Up of My Card

Measurements: 

  • Sahara Sand: (2 pieces)
    • 5 ½” x 8 ½” scored a 4 ¼”
    • 3 ¼”x 4 ½”
  • Cajun Craze”
    • 5 ¼” x 4”
  • Basic White: (inside of card)
    • 5 ¼” x 4”
  • He’s the Man Specialty Designer Series Paper: (2 pieces)
    • 3-1/8” x 4-3/8”
    • 2-3/8” x 1-5/8”

More Information on My You’re Flippin’ Awesome Card :

For more of my Stampin’ Up! cards, please click here.

Stampin’ Up! video that shows off the fun designs of the He’s the Man Suite: https://www.youtube.com/watch?v=UW1QMUO3s8E

You will find the other items listed above in my online store.

Beyond the Horizon Alternative Cards

Alternative Cards using the March 2022 Paper Pumpkin
Beyond the Horizon Alternative Cards

Hello Crafty Friends! Laurie here again! I am sharing my Beyond the Horizon Alternative Cards using the March 2022 Beyond the Horizon Paper Pumpkin. I loved this kit! It was perfect for all those masculine cards that you need to make. And I loved that it coordinated with the New Horizons Suite Collection!

I loved this Kit so much, that I created several alternative cards! I have gone into detail for my Mini Slimline Tri-Fold Window. At the end of this post, I have photos of all the other alternative cards with brief descriptions.

Details of My Mini Slimline Tri-Fold Window Card

For my first card, I decided to create a mini slimline Tri-Fold Window Card by combining the Paper Pumpkin Kit and the New Horizons Suite Collection. I thought it would be neat to see the beautiful water coloured scene peeking out of the windows between the mountain die cuts that came with the kit!

How to Cut the Card Base

The Misty Moonlight card base is 6” x 10.5” and scored at 3.5” and 7” along the long side to create 3 panels. I used the 2 largest retired Stitched Squares to create my windows for the scene. The largest Square on the outside panel and the next size down on the inside panel.

The Front Panel

Front of Tri-Fold Card

I cut apart 2 envelopes to use for my background pieces in Old Olive and Bumblebee. The Old Olive piece was on the front panel and the Bumblebee was on the right inside panel.

Tip: since the envelopes are thinner than card stock, you can glue them down and cut both the panel and the envelope at the same time.

The envelopes are printed on both sides. So, I was able to flip over leftover pieces where I needed another design such as the cross hatching on the front panel and the Misty Moonlight dotted piece. 

I used a small piece of the In Good Taste DSP for my fence to give it a wooden look. Don’t you just love the Pebbles Enamel Shapes! I couldn’t resist using them on three of my panels!

Close Up of Scene Through The Windows

The Right Inside Panel

I thought that the mountain dies that came in the Kit would be perfect to layer on the bottom of the Bumblebee window. Almost like you are looking through mountains at the scene.

Right Inside Panel

For this panel, I stamped the sentiment in Misty Moonlight onto a die cut Crumb Cake wood piece. Then I and layered it in front of a scrap of the dotted Misty Moonlight envelope.

Mountain Die Cuts with Scene

The Inside Panels

For the inside panels, I used leftover pieces of the envelopes under the windows and layered the leftover stitched squares on top.

For the left panel, I created a scene using the die cut trees from the Collection and the circle from the kit. Don’t you think the circle looks like a sun! I even used the trimmed top of the water-coloured piece for my sky behind the stitched square. I don’t throw anything out just in case I can use it.

Inside With All Panels Open

For the inside panel on the right, I used the sentiment from the floral stamp set that was the gift in the kit. I added some grasses and those pebbles again.

For the center piece, I added a Basic White mat to frame the water-coloured piece allowing an area to write.

Supplies:

Stamps/Bundles/Dies: New Horizons Suite Collection (157782)

Inks: Crumb Cake Classic Stampin’ Pad (147116), Misty Moonlight Spot (From Kit)

Paper: Misty Moonlight (153081), Basic White (159276), Old Olive (100702), In Good Taste Designer Series Paper (152494), New Horizons 6″ x 6″ Designer Series Paper (157768)

Accessories: 1/8″ Cotton Ribbon Combo Pack Paper (158140), Pebbles Enamel Shapes (158141), Retired Stitched Rectangles, Bone Folder (102300), Stampin’ Dimensionals (104430), Stampin’ Seal (152813), Mini Glue Dots (103683)

My Other Alternative Cards

Second Alternative Card

Second Alternative Card

This one of my alternative cards using the March Paper Pumpkin that I made for my Father-in-law’s birthday! It is based on the mini slimline design that they show on the back of the instruction sheet, but, of course, with a few tweaks from me.

I decided to use In Good Taste DSP for my fence to give it a wood texture. Since the card was for my FIL, I decided to use Old Olive card stock for the Time to Celebrate sentiment with the Lovely Labels Pick a Punch. A simple knot suited my FIL’s taste more than a bow. I used my Stampin’ Blends in Dark Old Olive and Dark Misty Moonlight to colour some rhinestones to match the New Horizons DSP.

Third Alternative Card

Third Alternative Card

I based this alternative on a mini slimline card, but I used the remainder of the New Horizon Designer Series Paper from the previous card. Since the DSP didn’t fill the background, I added a leftover piece of envelope behind the white embossed piece. I decided to use the Shaded Spruce die cut mountains that matched the jagged piece from the kit to create a base for my sentiment. For embellishments, I used the ribbon and the rhinestones from the Kit.

Fourth Alternative Card

Fourth Alternative Card

For this alternative, I decide to make a full A2 card using Misty Moonlight for the card base. I framed the scene with a Basic White frame, but if you were carefully with your trimming, you could use the card front with no frame. Then I add the wooden fence with die cut grass in front to balance the die cut mountains, circle and sentiment.

Fifth Alternative Card

Fifth Alternative Card

For my last alternative, I decided to cut apart one of the card fronts and added them to an Old Olive card base. I layered the sentiment on some leftover pieces from the Kit. I then added Misty Moonlight ribbon and rhinestones for my embellishments.

The Cards from the Kit

The Cards That the Kit Makes

More Information on my Beyond the Horizon Alternative Cards:

For more of my Stampin’ Up! cards, please click here.

To view my Paper Pumpkin Alternatives for other kits, please click here.