My Welcome MerMay Card 

My Welcome MerMay Card - a mermaid in an underwater scene
My Welcome MerMay Card

Hello Crafty Friends! It’s Laurie here! I am sharing My Welcome MerMay Card using the new release Little Mermaid by Conie Fong Art & Design as my Design Team Inspiration Card. Every May is MerMay in the card making industry and Conie Fong didn’t disappoint with this new release! Welcome to MerMay!

The Details of My Welcome MerMay Card

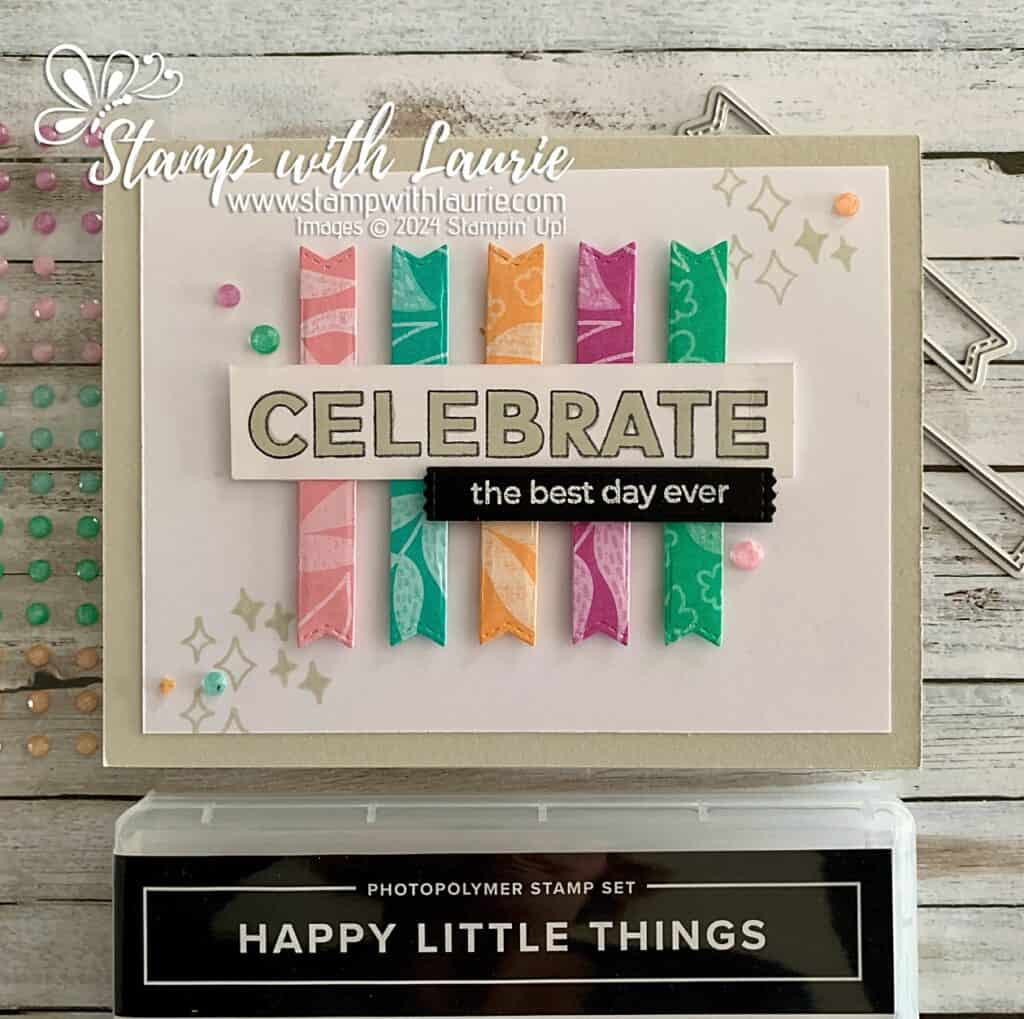
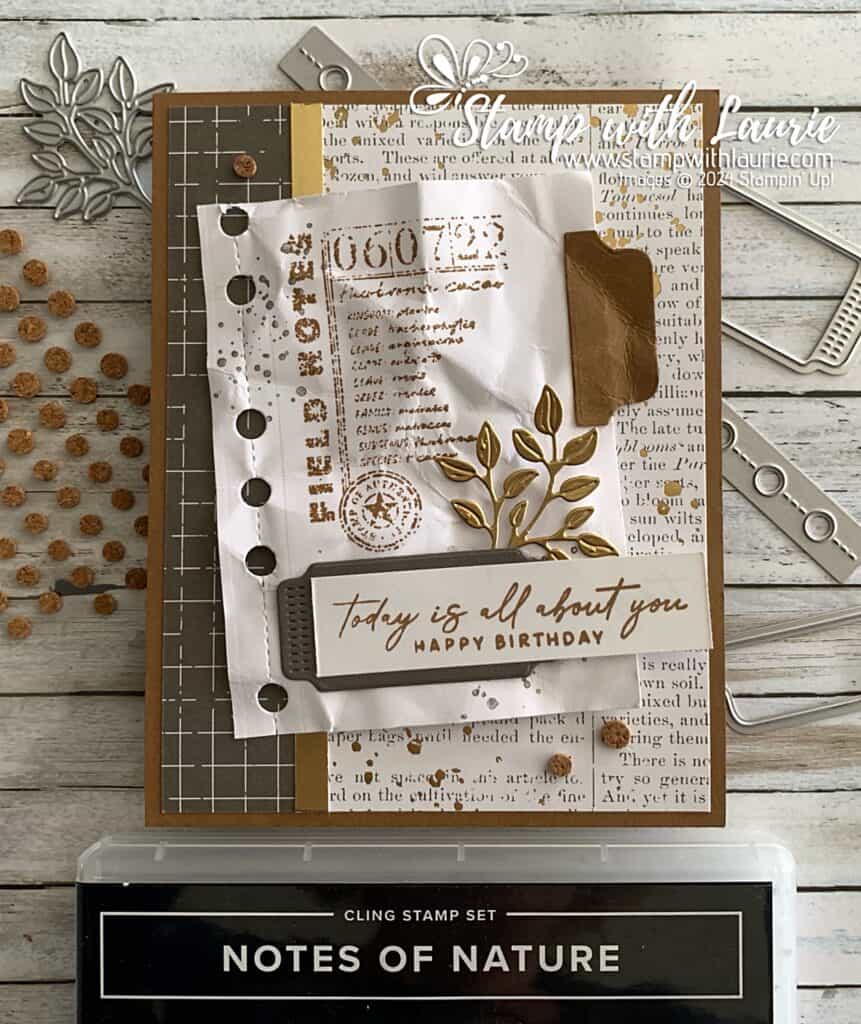
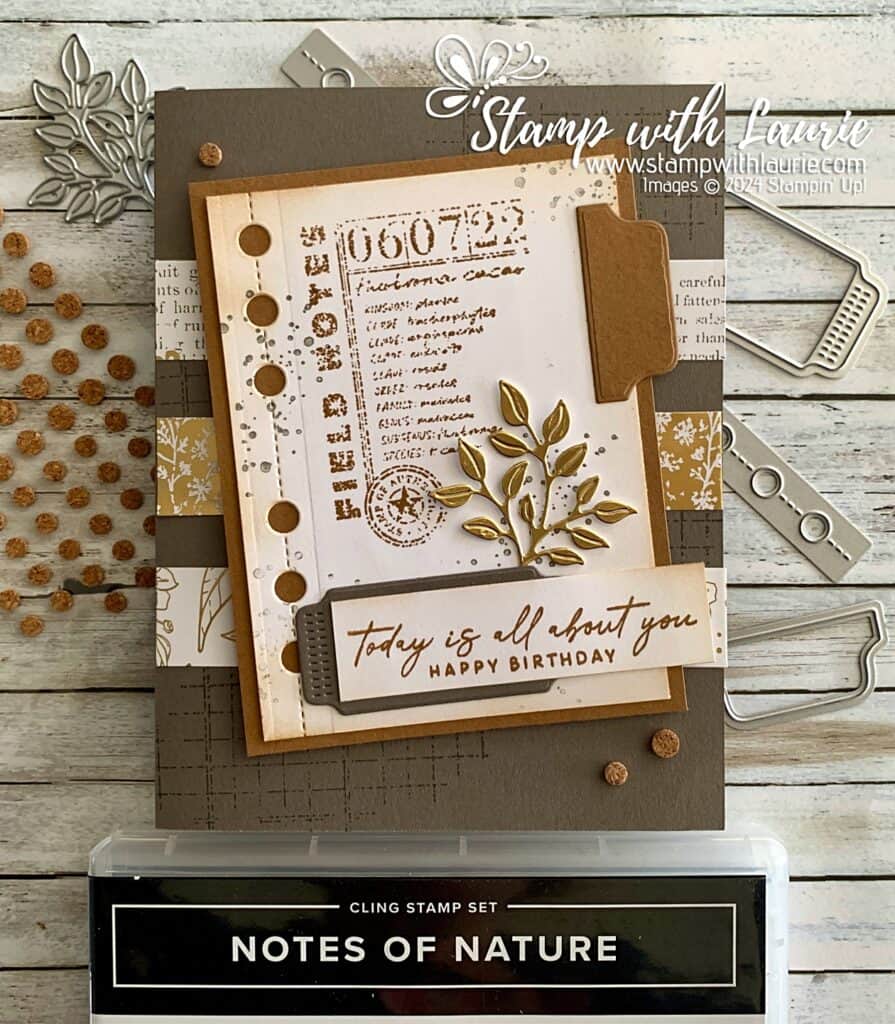
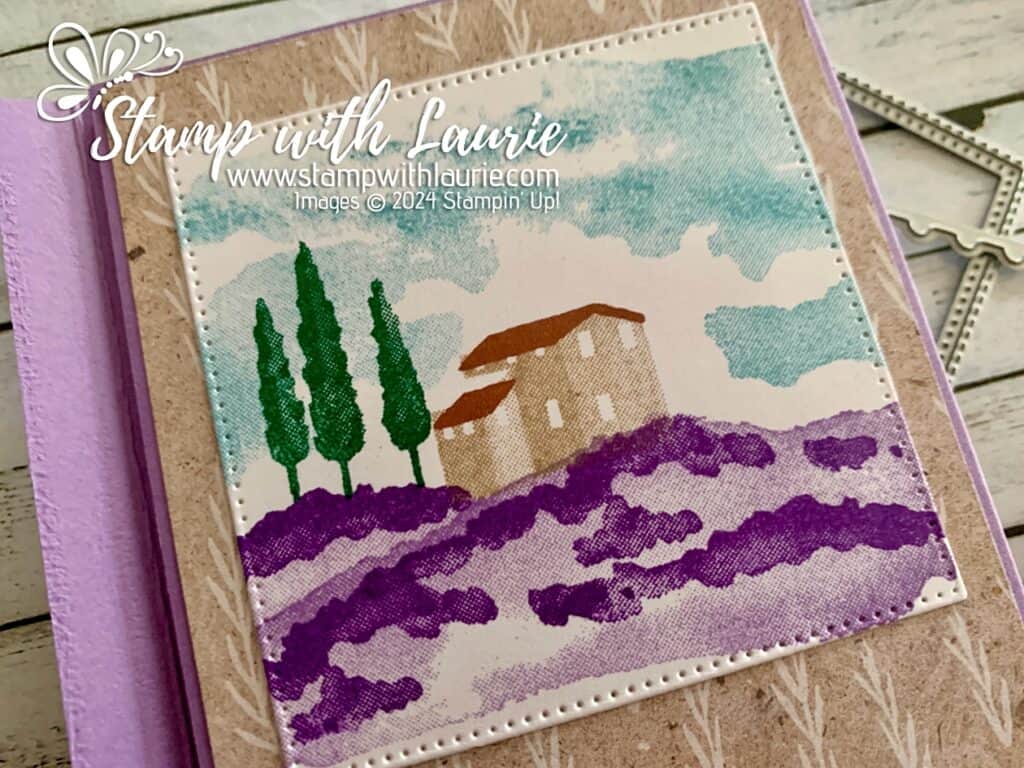
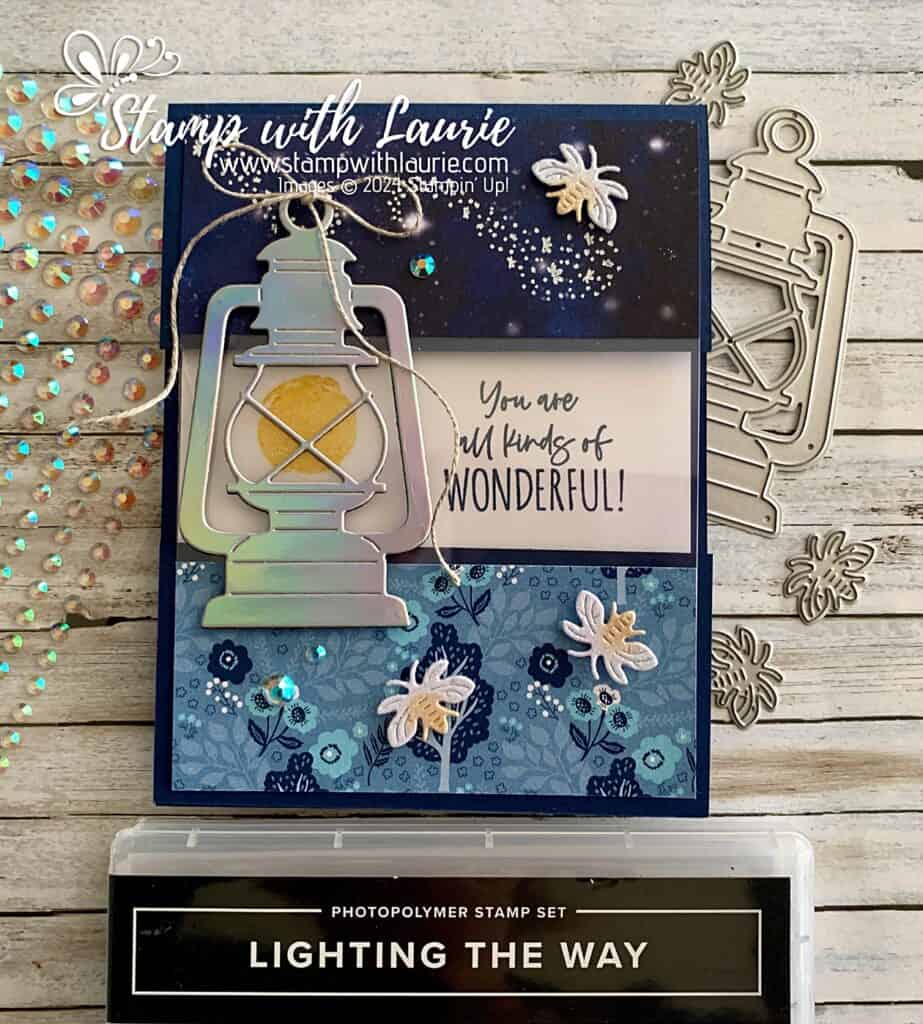
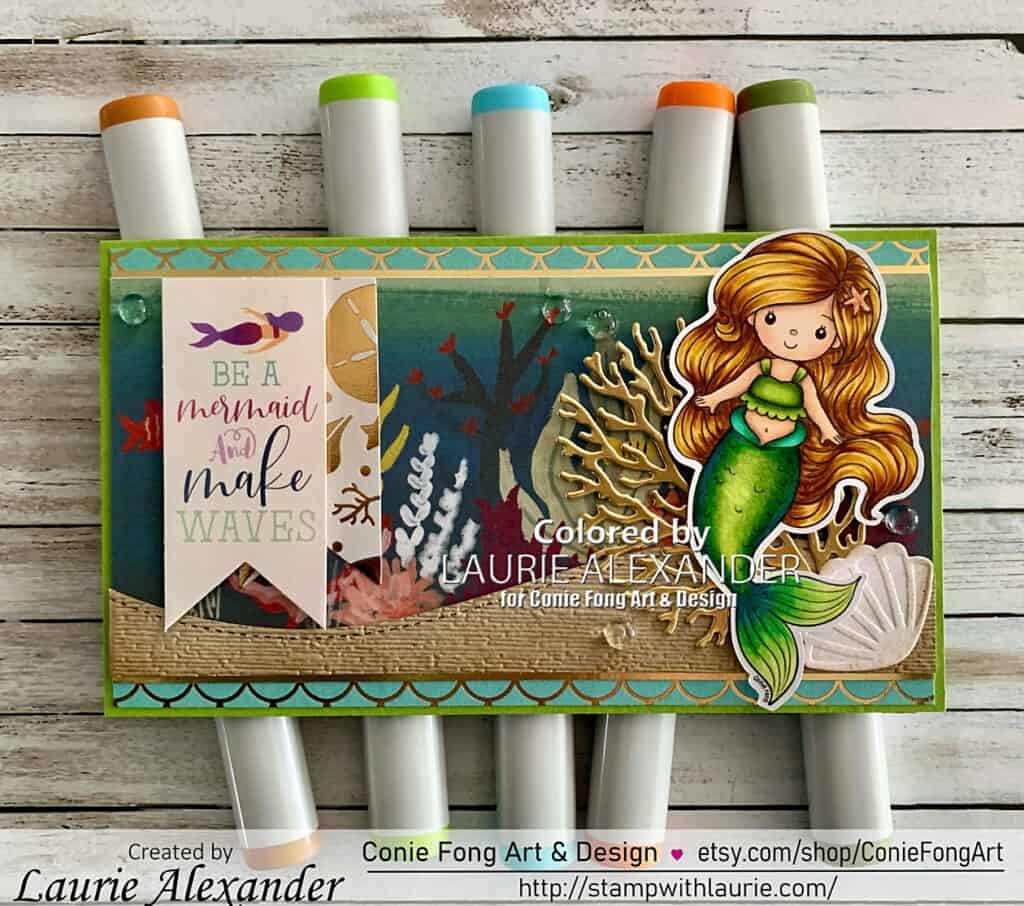
For my card, I decided to create a mini slimline card with an underwater scene for this cutie. The Mermaid Tales paper had a scene that was perfect for my background! Behind that I added paper with blue/green mermaid scales with golden accents and gold foil borders.

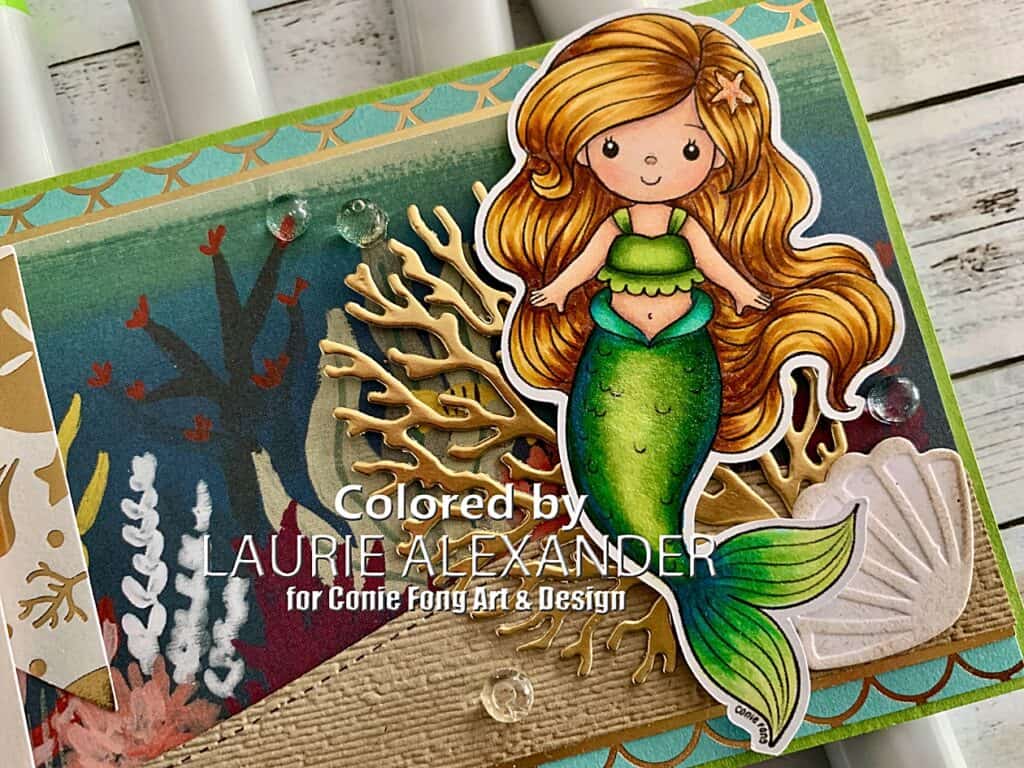
But first, I coloured my mermaid with my Copic markers in watery blue/green colours to match my scene. I had a lot of fun colouring the tail so that it shimmers between the blues to the greens! To add more shimmer, I used Clear Wink of Stella on her tail and Clear Star Gelly Roll Pen on her starfish in her hair. 

Next, I die cut the sandy bottom with the Slimline Stitched Hillside Border and used the Subtle 3D Embossing Folder to give it some texture. Once that was done, I brushed Crumb Cake ink along the edges for even more texture.

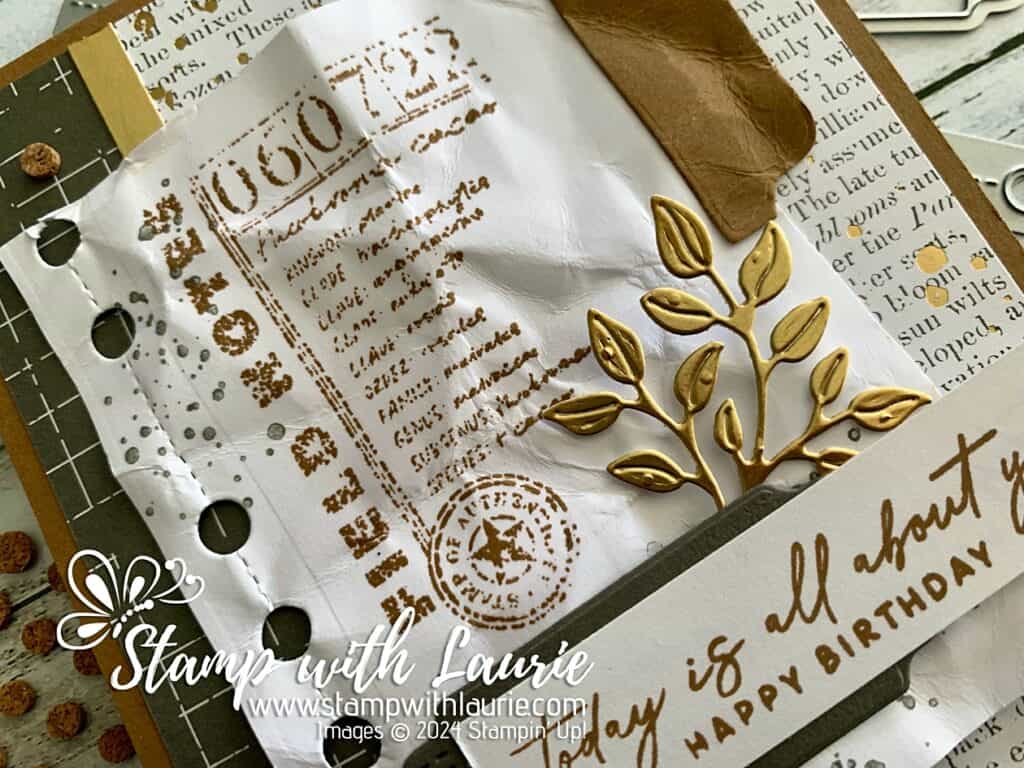
To create a backdrop for her, I die cut a Basic White shell on which I brushed Crumb Cake to bring out the detail. Behind that, I added a gold fold die cut coral to tie in my golden accents.

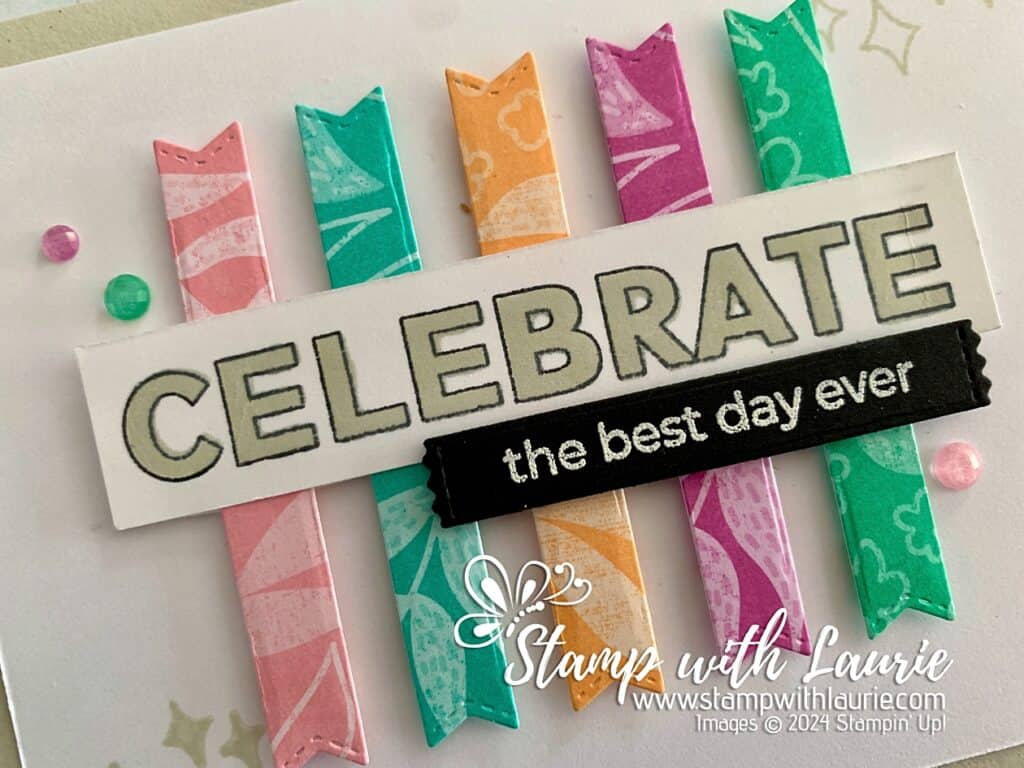
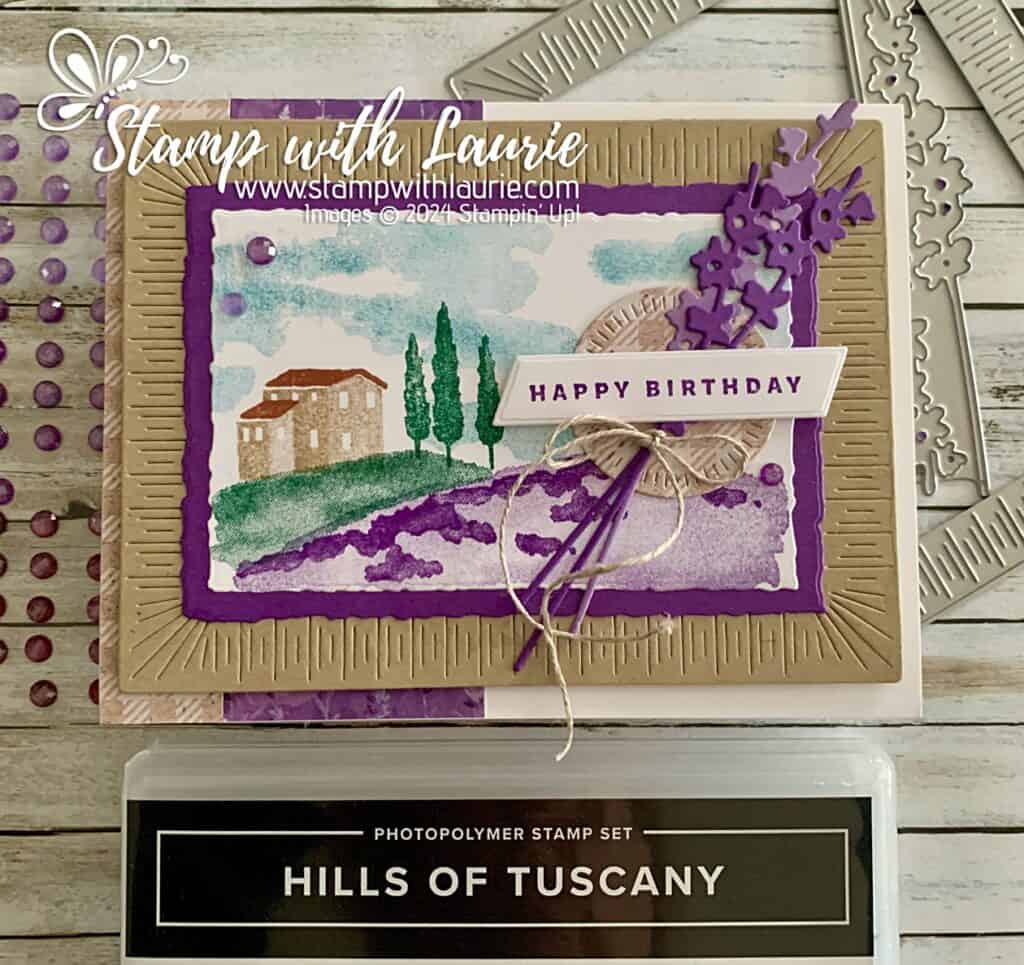
The sentiment flag was from the Mermaid Dreams Frames & Tags and was perfect for my card! I layered beneath it another die cut flag with gold shells on it. Even more gold accents! Lol! All these golden accents really added a beautiful sparkle to the card!

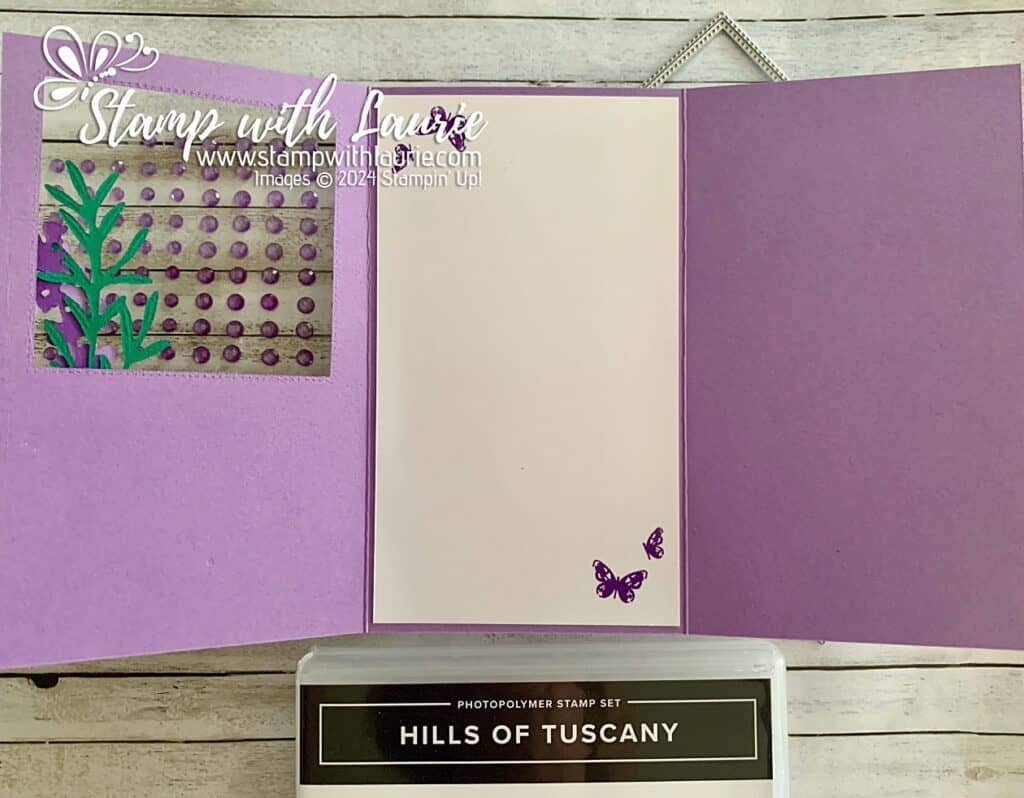
The finishing touch was a scattering of dew drops which I thought looked like air bubbles.

————————–

Copic Markers:

Skin: E000/E00/E21/E11/E04/R20
Hair: E25/YR24/Y26/Y21
Top: YG67/YG23/YG00
Tail: BG09/BG05/BG01/YG23/YG00/Clear Wink of Stella
Starfish: Y38/YR04/YR18/Clear Star Gelly Roll Pen

Close Up of Little Mermaid

————————–

Card Recipe for My Welcome MerMay Card:

Little Mermaid, Conie Fong Art & Design
Paper Basics – Stamper’s Select White Cardstock, Papertrey Ink
Mermaid Tales Collection Kit, Echo Park Paper Co.
Enchanting Paper Pad, Recollections, Michael’s Arts & Crafts
Gold Foil Sheets, Stampin’ Up!
Mermaid Dreams Frames & Tags, Echo Park Paper Co.
Build-an-Ocean Die Set, Whimsy Stamps
Slimline Stitched Hillside Border, Lawn Fawn
Banners Framelits Dies, Stampin’ Up!
Subtle 3D Embossing Folder, Stampin’ Up
Crumb Cake Classic Ink, Stampin’ Up!
Blending Brush, Stampin’ Up!
Spring Blooms Dew Drops, The Robin’s Nest
Clear Star Gelly Roll Pen, Sakura
Clear Wink of Stella, Stampin’ Up!
Granny Apple Green, Basic White, and Crumb Cake Card Stock, Stampin’ Up!

Finished card size: 3 ½” x 6-1/8”

————————–

To view my other Conie Fong Art & Design projects, please click here.

Hope you like my Design Team Inspiration Card using Little Mermaid for Conie Fong Art & Design!

Thank you for stopping by!

Hugs,
Laurie

Best Day Ever Card 

Best Day Ever Card - a card with different coloured flags to celebrate
Best Day Ever Card

Hello Crafty Friends! Laurie here again! Happy Annual 2024-25 Catalogue Day! I am sharing my Best Day Ever Card using the Online Exclusive Happy Little Things Bundle which includes the Happy Little Things Stamp Set and the Happy Little Things Dies by Stampin’ Up!

The Details of My Best Day Ever Card

For my card, I thought it would be fun to CASE (Copy and Share Everything) the card that is on the website for the Happy Little Things Bundle but change it up and put my own twist on it by tweaking it with the new 2024–2026 In Color Designer Series Paper and the new Basic Beige to celebrate the launch of the new Annual 2024-25 Catalogue.

So, I stamped the “Celebrate” in Memento first and then in Basic Beige. I found since the Basic Beige is so light that I had to do it in this order. Next, I stamped the heat embossed sentiment on Basic Black and used my white embossing powder and heat tool. This sentiment was die cut using the smaller die in the Happy Little Things Bundle. The final stamping was the Basic Beige in opposite corners on the Basic White card stock.

Next, I die cut a strip from each of the In Colors DSPs using the larger flag in the die set. To line the flags up, I used my grid paper with a ¼” separation between the colours. I added seal to the back of the “Celebrate” sentiment and laid it across the DSP making sure that it was towards the top of the centre point to help with the balance of my focal point. I added dimensionals to the back of the DSP and laid it onto the Basic White piece.

Finally, I added a mini dimensionals on each of the 3 right flags directly beneath the “Celebrate” sentiment for the overlapping Basic Black sentiment.

The finishing touch was to add one of each color of the 2024–2026 In Color Shimmer Gems to my card.

Close Up of Flags
Close Up of Focal Point

Supplies:

Stamps/Bundles/Dies: Happy Little Things Bundle (163710)

Inks: Basic Beige Classic Stampin’ Pad (163806), Tuxedo Black Memento Ink Pad (132708), VersaMark Ink (102283)

Paper: Basic Beige (164511), Basic White (159276), Basic Black (121045), 2024–2026 In Color 6” x 6” Designer Series Paper (163777)

Accessories: 2024–2026 In Color Shimmer Gems (163781), Basics Embossing Powder (165679), Heat Tool (129053), Embossing Additions Tool Kit (159971), Grid Paper (130148), Bone Folder (102300), Stampin’ Dimensionals (104430), Mini Stampin’ Dimensionals (144108), Stampin’ Seal (152813), Mini Glue Dots (103683), water

Measurements: 

  • Basic Beige:
    • 8 ½” x 5 ½” scored at 4 ¼”
  • Basic White (2 pieces):
    • 5” x 3 ¾”
    • 3 ¾” x ¾”
  • Basic Black
    • Scrap
  • 2024–2026 In Color Designer Series Paper (5 pieces):
    • 2 ¾” x ½”

More Information on My Best Day Ever Card

For more of my Stampin’ Up! cards, please click here.

You will find the items listed above in my online store.

My Happy Mail Card 

My Happy Mail Card - a card with a letter sticking out of a mailbox.
My Happy Mail Card

Hello Crafty Friends! Laurie here again! I am sharing My Happy Mail Card using the Sending Love Bundle and the Perennial Postage Dies by Stampin’ Up! I am so glad to see that both are carrying over to the new Annual Catty! However, the Bee Mine Designer Series Paper is retiring! So, if you want to get it, today is the last day!

The Details of My Happy Mail Card

For my card, I thought it would be fun to use the Perennial Postage Dies with the mailbox from the Sending Love Bundle! Who doesn’t love to get happy mail! So, I created a collage of DSP postage backgrounds for my mail elements. For the narrow postage die, I decided to stamp the franking stamp in Pool Party and then add the die cut Sent with Love Real Red sentiment with die cut hearts that match the DSP.

Next, I created an interactive mailbox with a repositionable Real Red flag using a round brad. I stamped the MAIL onto the mailbox in Real Red and added a Real Red post. I placed my mailbox at an angle so that the letter looks like it is falling out of the mailbox. Lol!

Don’t you just love the little letter that I die cut in more DSP. I couldn’t resist sealing it with an adhesive-backed heart!

The finishing touch was a few adhesive-backed flowers to add a fun element to my card.

Close Up of Card
Close Up of Card

Supplies:

Stamps/Bundles/Dies: Sending Love Bundle (162880), Perennial Postage Dies (162607)

Inks: Real Red (147084), Pool Party (147107)

Paper: Basic White (159276), Pool Party (122924), Real Red (102482), Petal Pink (146985), Bee Mine Designer Series Paper (162546)

Accessories: Round & Square Brads (155570), Adhesive-Backed Hearts & Flowers (162557), Bone Folder (102300), Stampin’ Dimensionals (104430), Stampin’ Seal (152813), Mini Glue Dots (103683)

Measurements: 

  • Basic White:
    • 8 ½” x 5 ½” scored at 4 ¼”
    • 4” x 4” (Mailbox)
    • Scrap for circle and narrow postage die cut
  • Pool Party:
    • 5” x 3 ¾”
  • Real Red (3 pieces):
    • 1 ¾” x 2 ¾” (Post)
    • Scraps for Mail Flag and Heart
  • Petal Pink:
    • Scrap for Heart
  • Bee Mine Designer Series Paper (3 pieces):
    • 2” x 2 ¾”
    • 1-7/8” x 1-7/8”
    • 3 ¼” x 2 ¼” (Envelope)

More Information on My Happy Mail Card

For more of my Stampin’ Up! cards, please click here.

You will find the items listed above in my online store.

My Birthday Notes Card 

My Birthday Notes Card - a birthday card with a journal page on the front
My Birthday Notes Card

Hello Crafty Friends! Laurie here again! I am sharing My Birthday Notes Card using the Nature’s Sweetness Suite Collection which includes the Notes of Nature Bundle, the Lovely & Sweet Bundle, the Nature’s Sweetness 12” x 12” Specialty Designer Series Paper and the Adhesive-Backed Cork Rounds all by Stampin’ Up! As I was exploring this gorgeous Suite, I ended up making 2 cards. I used one card for a swap, and this is the second card that I created. I will include a link to the other card at the end of this post. Some of these items are retiring! So, make sure you shop before they are gone!

The Details of My Birthday Notes Card

Like the other card, I thought it would be fun to continue the distressed field journal idea for my card front. 

First, I stamped the Field Notes in Pecan Pie and added some distressing with the grunge stamp in Pebbled Path on the Basic White “page”. I added a Pecan Pie tab at the top and the die cut holes like a spiral notebook. To add a worn look to the “page”, I spritzed it with water and crumpled it. Then, by placing dimensionals in strategic locations on my unraveled “page”, I was able to keep a lot of dimension in it.

The sentiment was stamped in Pecan Pie, and I used a Pebbled Path label to make it pop from the “page”.

For this card, I decided to use the cross hatch and the text pieces of the DSP to create a booklet look behind my journal. To match the gold accents on the DSP I added a strip of gold foil on my base and die cut leaves on the Field Notes “page”.

The finishing touch was a scattering of Adhesive-Backed Cork Rounds that come in the Nature’s Sweetness Suite Collection.

Close Up of Field Journal Page
Close Up of Focal Point

Supplies:

Stamps/Bundles/Dies: Notes of Nature Bundle (162640), Lovely & Sweet Bundle (162627)

Inks: Pecan Pie (161665), Pebbled Path (161648)

Paper: Pebbled Path (161722), Basic White (159276), Pecan Pie (161717), Gold Foil Sheets (132622), Nature’s Sweetness Specialty Designer Series Paper (162616)

Accessories: Adhesive-Backed Cork Rounds (162643), Stampin’ Spritzer (126185), Bone Folder (102300), Stampin’ Dimensionals (104430), Stampin’ Seal (152813), Mini Glue Dots (103683), water

Measurements: 

  • Pecan Pie
    • 8 ½” x 5 ½” scored at 4 ¼”
    • Scrap for Tab
  • Basic White (2 pieces):
    • 3” x 4”
    • Scrap for Sentiment
  • Pebbled Path
    • Scrap for Label
  • Gold Foil Sheets:
    • ¼” x 5 ¼”
    • Scrap for Leaves
  • Nature’s Sweetness Specialty Designer Series Paper (2 pieces):
    • 1” x 5 ¼”
    • 3” x 5 ¼”

More Information on My Birthday Notes Card

To find out more about my other card using the Nature’s Sweetness Suite Collection, please click here or on the photo.

My Field Notes Card - a birthday card
My Field Notes Card

For more of my Stampin’ Up! cards, please click here.

You will find the items listed above in my online store.

Mother’s Day Birdhouse Card

Mother’s Day Birdhouse Card - a Mother;s Day card with a little girl holding a banner of 4 birdhouses
Mother’s Day Birdhouse Card

Hello Crafty Friends! It’s Laurie here! Mother’s Day is only a few weeks away! So, I am sharing my Mother’s Day Birdhouse Card as my Design Team Inspiration Card for Paper Nest Dolls using Avery with Birdhouse Banner

The Details of My Mother’s Day Birdhouse Card

I just love this sweet image with her birdhouse banner! Perfect for a Mother’s Day gift from a little girl! I coloured Avery with my Copic markers in soft purples and pinks to match my Spring Echo Park paper.

For my card, I decided to add a cute die cut birdhouse using the Echo Park papers to match my colouring and Avery’s birdhouse banner. And I couldn’t resist placing a momma bird inside the house by using the Bird Ballet DSP especially since this was a Mother’s Day card!

Next, I added a banner using the different papers that match my colour scheme. This overlayed the stamped Highland Heather sentiment that was die cut with the Scallop Contours Dies. All this was layered onto a larger scalloped Petal Pink piece to complete my focal point.

Finally, for embellishments, I added some Brass Butterflies to match the butterflies on the paper, as well as, added Star Dust Stickles to the hearts on Avery’s outfit.

————————–

Copic Markers

Skin: E04/E11/E21/E00/E000/R20
Hair: E25/YR24/Y36/Y21
Pinks: R02/RV42/R01 
Blues: BG75/BG72/BG70
Purples: V15/V12/V01
Browns: E35/E33/E31/E30

Close Up of little girl
Close Up of Avery

————————–

Card Recipe for My Mother’s Day Birdhouse Card

Avery with Birdhouse Banner, Paper Nest Dolls
Paper Basics – Stamper’s Select White Cardstock, Papertrey Ink
It’s Spring Time 12” x 12” Collection Kit, Echo Park Paper Co.
Bird Ballard Designer Series Paper, Stampin’ Up!
Build-A-Birdhouse Dies, Lawn Fawn
Fishtail Banner Borders Dies, Lawn Fawn
Scallop Contours Dies, Stampin’ Up!
Celebrate You Stamp Set, Stampin’ Up!
Highland Heather Classic Ink, Stampin’ Up!
Brushed Brass Butterflies, Stampin’ Up!
Star Dust Stickles, Ranger
Petal Pink and Pecan Pie Card Stock, Stampin’ Up!

Finished card size: 5 ½” x 4 ¼”

Stamp Size: 4”

————————–

To view my other Paper Nest Dolls cards, please click here.

Hope you like my Design Team Inspiration Card using Avery with Birdhouse Banner by Paper Nest Dolls!

Thank you for stopping by!

Hugs,
Laurie

My Lavender Birthday Card

My Lavender Birthday Card - a birthday card with a Provençal theme of lavender fields scene
My Lavender Birthday Card

Hello Crafty Friends! Laurie here again! I am sharing My Lavender Birthday Card using the Hills of Tuscany Stamp Set by Stampin’ Up! I had so much fun creating the lavender fields in Provence for another card that I also made this mini slimline tri-fold window card! A link to the other card is included at the end of this post.

The Details of My Lavender Birthday Card

For my mini slimline card, I decided I wanted to create a three-panel card with the Provence scene peeking through the window on the front of my card.

Close Up of Scene
Close Up of Scene

First, I stamped the fields in Highland Heather followed by Gorgeous Grape to add interest to make it look like lavender. Next, I stamped Shaded Spruce trees on the opposite side of the springs of lavender on the front of the card to add balance. For the house, I used Crumb Cake for the walls and Copper Clay for the roof. I stamped the sky in Balmy Blue.

Inside of card with the scene
Second Panel of Card

Once the stamping was done, I die cut the stamped piece out with the largest stitched rectangle from the Stylish Shapes Dies. I also used the same die for the front of the card’s window. Tip: adhere down the piece of DSP to the front before die cutting to get placement. Run the die through the Stampin’ Cut & Emboss Machine multiple times to cut both DSP and card stock.

Next, I stamped butterflies in Gorgeous Grape on the inside panel to add some interest to that panel.

Third Panel of Card
Third Panel of Card

To complete my Provencal theme, I die cut a bouquet of lavender with Highland Heather, Gorgeous Grape and Shaded Spruce which was tied with Linen Thread and placed beneath the sentiment on the front. The sentiment from the Throughout the Year Stamp Set was stamped in Gorgeous Grape and die cut out using a Perennial Postage Die. 

The finishing touch was a scattering of Purple Fine Shimmer Gems to match my colour scheme.

Supplies:

Stamps/Bundles/Dies: Hills of Tuscany (162682), Throughout the Year Stamp Set (162312), Stylish Shapes Dies (159183), Perennial Postage Dies (162607), Painted Lavender Dies (162596), Painted Lavender Stamp Set (162594)

Inks: Gorgeous Grape (147099), Crumb Cake (147116), Highland Heather (147103), Copper Clay (161647), Shaded Spruce (147088), Balmy Blue (147105)

Paper: Highland Heather (146986), Basic White (159276), Gorgeous Grape (146987), Shaded Spruce (146981), Perennial Lavender 12” x 12” Designer Series Paper (162593)

Accessories: Linen Thread (104199), Purple Fine Shimmer Gems (162611), Paper Snips (103579), Bone Folder (102300), Stampin’ Dimensionals (104430), Stampin’ Seal (152813), Mini Glue Dots (103683)

Close Up of Stamped Scene

Measurements: 

  • Highland Heather
    • 6” x 10-3/8” scored at 3 ½”, 7”
  • Basic White (3 pieces):
    • 3 ¼”x 5 ¾”
    • 2 ½” x 1 ¼”
    • 3” x 3”
  • Gorgeous Grape:
    • Scrap for Lavender
  • Highland Heather:
    • Scrap for Lavender
  • Shaded Spruce:
    • Scrap for Lavender
  • Perennial Lavender 12” x 12” Designer Series Paper (2 pieces):
    • 3-3/8” x 5-7/8”
    • 3 ¼”x 5-7/8”

More Information on My Lavender Birthday Card

Here is my other card using the Hills of Tuscany, but with a Provence theme. For more information on it, please click here.

My Lavender Fields Card - A birthday card with a landscape scene
My Lavender Fields Card

For more of my Stampin’ Up! cards, please click here.

You will find the items listed above in my online store.

Fancy Fold Step Card 

Fancy Fold Step Card - a birthday card that has lots of folds
Fancy Fold Step Card

Hello Crafty Friends! Laurie here again! I am sharing my alternative Fancy Fold Step Card using the March 2024 Memorable Meadows Paper Pumpkin. I have made this fun fold several times for different recipients, and it’s always Wowed them!

This Kit makes 9 cards of which I made three. I always like to make one set of the cards in the kit and then play with it to see what alternatives I can design.

Three cards made by a Kit
Cards from March 2024 Memorable Meadows Paper Pumpkin Kit

I made a total of nine cards with six being alternatives. I had a lot of fun playing with this kit! My alternatives included a bridge card, a faux-centre step card, a z-fold card, a fancy fold step card and two others.

My Other Alternative Cards

The Details of My Fancy Fold Step Card

For this fun-fold card, I used 3 card bases front and back from the Paper Pumpkin Kit. I loved that the card bases were printed with a continual scene from front to back! With some careful measuring, this made it easy to create my card.

Front of Card

To decorate the front of my card, I used the arch from the Garden Meadow Dies and one of the sheets from the Meandering Meadows 6” x 6” Designer Series Paper that had some Daffodil Delight on it. I knew I wanted to use the daffodil die from The Love of Spring Dies to decorate my inside. So, I wanted to bring this colour throughout my card. The Radiating Stitches Die was a perfect backdrop for my arched focal point!

Front of My Card
Front of My Card

I used the Adhesive-backed iridescent embellishments, the wooden tree, and some Adhesive-Backed Dragonflies & Birds to decorate my card front.

Inside of card

For the larger panels, I used the same card base for the panels that when folded are side by side. For example, I used the larger tree card base for the two front panels that are shown when the card is close. Then, I used the smaller panoramic card base for the two large inside panels. I trimmed the left and right card base sides at 2 ½” wide making sure I used the matching panels when they were adhered. I saved the scored pieces for the large squares. Luckily, the decorations hid the score lines well.

First Opening of Inside of Card

Next, I used the daisy card base for six of the small squares. I did not mat these since the squares are already so small. Again, I made sure to cut them so that they matched when laid down in a row. The centre square was left over from the scraps.

Second Opening of Inside of Card

To decorate my card, I stamped the sentiments in Garden Green on the different precut pieces with gold foil. I layered the leaves and daffodils behind the two inside my card using the vellum pieces that come in the kit to accent them.

Third Opening of Inside of Card

More adhesive-backed iridescent embellishments, Adhesive-Backed Dragonflies & Birds and two Paper Butterfly Accents were used to decorate the inside.

Card Fully Opened
Card Fully Opened

Supplies:

Stamps/Dies/Bundles: March 2024 Memorable Meadows Paper Pumpkin, The Love of Spring Dies (164396), Garden Meadow Dies (162740), Radiating Stitches Dies (161595)

Inks: Garden Green Spot (In Kit)

Paper: Gorgeous Grape (146987), Fresh Freesia (155613), Basic White (159276), Old Olive (100702), Mossy Meadow (133676), Daffodil Delight (119683), Meandering Meadows 6” x 6” Designer Series Paper (162735)

Accessories: Adhesive-backed iridescent embellishments (in Kit), Pressed wood embellishments (in Kit), Adhesive-Backed Dragonflies & Birds (162743), Paper Butterfly Accents (162612), Bone Folder (102300), Stampin’ Dimensionals (In Kit), Stampin’ Seal (152813), Mini Glue Dots (In Kit)

Top View of Card
Top View of Card

Measurements: 

  • Gorgeous Grape cut/scored according to template below (3 pieces):
    • 7 ¾” x 6” (2 pieces)
    • 10” x 6”
  • Fresh Freesia: (6 pieces)
    • 2 ¾” x 5 ¾” (4 pieces)
    • 3 ¾” x 3 ¾” (2 pieces)
  • Basic White:
    • 4” x 5 ½”
  • Old Olive:
    • Scraps for leaves (2 pieces)
  • Mossy Meadow:
    • Scraps for leaves (2 pieces)
  • Daffodil Delight:
    • Scraps for flowers (2 pieces)
  • Meandering Meadows 6″ x 6″ Designer Series Paper:
    • 3” x 4 ½” (for arch on front of card)
  • Memorable Meadows Paper Pumpkin:
    • 2 ½” x 5 ½” (4 pieces)
    • 3 ½” x 3 ½” (2 pieces)
    • 1 ¾” x 1 ¾” (7 pieces)
Collage of Different Layers

More Information on My Fancy Fold Step Card

Here is a video of my card in action.

Fancy Fold Step Card Instructions & Template

To download a PDF of the Fancy Fold Step Card Instructions & Template, please click here or on the picture.

Fancy Fold Step Card Instructions & Template

Finished card size: 6” x 6”

For more of my Stampin’ Up! cards, please click here.

You will find the items listed above in my online store.

You Light the Way Card 

Light the Way Card - a card with a lantern and fireflies on it
Light the Way Card

Hello Crafty Friends! Laurie here again! I am sharing my Light the Way Card using the Lighting the Way Stamp Set and the Lighting the Way Dies by Stampin’ Up! These are both set to retire end of this month. So, get yours while you can!

The Details of My Light the Way Card

This card was created for a swap, and I thought a split panel card with the lantern connecting the two pieces would be fun! I used a Window Sheet for the transparent window to give added stability.

For my card, I went with the Stargazing Designer Series Paper for the top half for the sky and the Countryside Inn Designer Series Paper for the bottom half for the ground. I die cut the fireflies in White Glimmer Specialty Paper and brushes some Crushed Curry to their tails to make them glow. Next, I embossed a trail of lights in the wake of the firefly on the Stargazing Designer Series Paper.

The lantern was die cut twice. Once in the Holographic Paper for the front and again in Basic Black for the back to give the lantern a finished look from inside. I added some vellum to the inside of the lantern on which I stamped the fire glow in Crushed Curry. A bow of Linen Thread added to the top of the lantern finished it off.

Tip: for the sentiment, adhere the Basic White piece inside and then using the Night of Navy card base pieces for placement, stamp the sentiment before decorating them.

Finally, to add a bit more magical shimmer, I used the Iridescent Rhinestone Basic Jewels scattered around my lantern. These are also retiring. So, make sure you get them before they are gone.

Close Up of Lantern on Card
Close Up of Lantern

Supplies:

Stamps/Bundles/Dies: Lighting the Way Stamp Set (160868), Lighting the Way Dies (160496)

Inks: Night of Navy (147110), VersaMark Ink Pad (102283), Crushed Curry (147087)

Paper: Night of Navy (100867), Basic White (159229), Basic Black (121045), Vellum (101856), White Glimmer Specialty Paper (163769), Holographic Trio Specialty Paper (161744), Window Sheets (142314), Stargazing Designer Series Paper (161175), Countryside Inn Designer Series Paper (161467)

Accessories: Linen Thread (104199), Iridescent Rhinestone Basic Jewels (158130), Basics Embossing Powder (155554), Heat Tool (129053), Blending Brushes (153611), Paper Snips (103579), Bone Folder (102300), Stampin’ Dimensionals (104430), Stampin’ Seal (152813), Mini Glue Dots (103683)

Measurements: 

  • Night of Navy:
    • 4 ¼” x 9 ½” scored a 5 ½”, fold and trim one side at 2”. Taking the separate piece, trim 2” off keeping this for the bottom panel.
  • Basic White:
    • 5 ¼” x 4” (inside of card)
  • Window Sheet:
    • 5 ¼” x 4”
  • Holographic Trio Specialty Paper (Lantern):
    • 3 ½” x 2”
  • Basic Black (Lantern):
    • 3 ½” x 2”
  • Vellum:
    • Scrap
  • White Glimmer Specialty Paper:
    • Scrap
  • Stargazing DSP:
    • 4” x 1 ¾”
  • Countryside Inn DSP:
    • 4” x 1 ¾”

More Information on My Light the Way Card

For more of my Stampin’ Up! cards, please click here.

You will find the items listed above in my online store

My Field Notes Journal 

My Field Notes Journal - a birthday card that looks like a book
My Field Notes Journal

Hello Crafty Friends! Laurie here again! I am sharing My Field Notes Journal using the Nature’s Sweetness Suite Collection which includes the Notes of Nature Bundle, the Lovely & Sweet Bundle, the Nature’s Sweetness 12” x 12” Specialty Designer Series Paper and the Adhesive-Backed Cork Rounds all by Stampin’ Up! As I was exploring this gorgeous Suite, I ended up making 2 cards. I used this card for a swap, and I plan to share the other card at another time.

The Details of My Field Notes Journal

For my card, I thought it would be fun to create a distressed field journal of sorts for my card front with one of the pages “ripped out” filled with notes using the Notes of Nature Stamp Set. I even added a Pecan Pie tab at the top and the die cut holes like a spiral notebook.

First, I stamped the Field Notes in Pecan Pie and added some distressing with the grunge stamp in Pebbled Path on the Basic White “page”. To add a worn look to the “page”, I used a Blending Brush to brush some Pecan Pie ink along the edges.

Next, I stamped the crosshatch stamp in Pebbled Path in opposite corners on the card base for a tone-on-tone look. I thought that the Pecan Pie mat looked like the back of a leather covered notebook.

The sentiment was stamped in Pecan Pie, and I used a Pebbled Path label to make it pop from the “page”. The Basic White piece was also brushed with Pecan Pie ink for that worn look.

I love the beautiful Nature’s Sweetness Specialty Designer Series Paper with its gold accents. So, I decided to use different strips with the gold on my base. To match these strips, I die cut leaves in gold foil to give it unexpected shimmer to the Field Notes “pages”.

The finishing touch was a scattering of Adhesive-Backed Cork Rounds that come in the Nature’s Sweetness Suite Collection.

Close Up of the Focal Point

Supplies:

Stamps/Bundles/Dies: Notes of Nature Bundle (162640), Lovely & Sweet Bundle (162627)

Inks: Pecan Pie (161665), Pebbled Path (161648)

Paper: Pebbled Path (161722), Basic White (159276), Pecan Pie (161717), Gold Foil Sheets (132622), Nature’s Sweetness Specialty Designer Series Paper (162616)

Accessories: Adhesive-Backed Cork Rounds (162643), Blending Brushes (153611), Paper Snips (103579), Bone Folder (102300), Stampin’ Dimensionals (104430), Stampin’ Seal (152813), Mini Glue Dots (103683)

Measurements: 

  • Pebbled Path
    • 8 ½” x 5 ½” scored at 4 ¼”
  • Basic White (2 pieces):
    • 3” x 4”
    • Scrap for Sentiment
  • Pecan Pie (2 pieces):
    • 3 ¼” x 4 ¼”
    • Scrap for Tab
  • Gold Foil Sheets:
    • Scrap for Leaves
  • Nature’s Sweetness Specialty Designer Series Paper (3 pieces):
    • ¾” x 4 ¼”

More Information on My Field Notes Journal

For more of my Stampin’ Up! cards, please click here.

You will find the items listed above in my online store.

My Favorite Song Card 

My Favorite Song Card - a card with a girl in roller skates listening to a walkman.
My Favorite Song Card

Hello Crafty Friends! It’s Laurie here! I am sharing My Favorite Song Card as my Design Team Inspiration Card for Paper Nest Dolls using Decade Collection Roller Skating Ellie. There are ten dolls in the Decade Collection that come in both rubber and digital stamps. You can find all the digital versions here.

Decade Doll Collection by Paper Nest Dolls

The Details of My Favorite Song Card

I had coloured this stamp with my Copic markers a while back…in fact, since I liked her so much, I coloured her twice at the time! Lol! So, I decided to finally get this one onto a card especially since I bought the perfect Walkman dies by My Favorite Things!

For my card, I thought that the Walkman would make a fun shaker. So, I built my Walkman using the dies and even added four layers to the red foam ear pieces to give them some dimension! I used a Window Sheet for where my shaker sequins would go. Once that was built, I added Foam Adhesive Strips between the top and the cassette paper to enclose my sequins. I thought that the cassette paper was a great backing for my Walkman! The skates and disco ball paper behind my focal point was perfect for my theme!

The sentiment was from a retired Stampin’ Up! Stamp Set, but you could easily type this out on your computer and printing it. It was stamped in black ink and die cut out using the Stitched Rectangles.

To add some sparkle to the card, I used Stickles on Ellie’s pompoms on her skates. For the musical notes, I used holographic paper to give them an iridescent look! Very hip for the 80’s. Lol! The final touch was adding Glossy Accents to her Walkman case.

————————–

Copic Markers

Skin: E04/E11/E21/E00/E000/R20
Hair: Y21/Y26/YR24/E25
Shirt: B99/B97/B95/B93/B91
Shorts: R29/R24/R22/C3/C1/0
Tummy Sack: G99/G94/G21
Black on Skates: C7/C6/C4
White on Skates: C3/C1/0
Red on Skates: R29/R24/R22
Headphones: C7/C6/C4/R29/R24/R22
Walkman: C7/C6/C4/B91/B95/Glossy Accents
Socks: R29/R24/R22/G99/G94/G21/Y38/Y35/Y32/YR09/YR07/YR02

Close Up of girl on roller skates
Close Up of Roller Skating Ellie

————————–

Card Recipe for My Favorite Song Card

Decade Collection Roller Skating Ellie, Paper Nest Dolls
Paper Basics – Stamper’s Select White Cardstock, Papertrey Ink
Seventies 6” x 6” Paper Pad, Ciao Bella
Portable Jams Dies, My Favourite Things
Violin and Music Notes Dies, Cottage Cutz
Holographic Trio Specialty Paper, Stampin’ Up!
Galvanized Metallic Paper, Stampin’ Up!
Window Sheet, Stampin’ Up!
Stitched Rectangle Dies, Stampin’ Up!
For the Record Stamp Set, Stampin’ Up!
Versafine Black Ink, Tsukineko
Glossy Accents, Ranger
Star Dust Stickles, Ranger
Peaceful Poppies Sequins, Stamin’ Up!
Foam Adhesive Strips, Stampin’ Up!
Real Red, Basic Black, Basic Gray, 
and Basic White Card Stock, Stampin’ Up!

Finished card size: 5 ½” x 4 ¼”

Stamp Size: 4”

————————–

To view my other Paper Nest Dolls cards, please click here.

My Other Card Using Roller Skating Ellie

For more information on my card, please click here or on the photo.

Grad with a girl in roller skates on it
Roller Disco Babe

Hope you like my Design Team Inspiration Card using
Decade Collection Roller Skating Ellie by Paper Nest Dolls!

Thank you for stopping by!

Hugs,
Laurie

My Purr-Fect Day Card 

My Purr-Fect Day Card - a birthday card with a cat holding balloons as he floats up
My Purr-Fect Day Card

Hello Crafty Friends! It’s Laurie here! I am sharing My Purr-Fect Day Card as my Design Team Inspiration Card for Conie Fong Art & Design using the new release Cat With Balloons. Isn’t he just the cutest floating with his balloons!

The Details of My Purr-Fect Day Card

For my card, I decided to create a slimline slider card so that the cat looked like he was floating up as the mechanism was pulled!

So, I created a scene with the slimline clouds die from Whimsy and the stitched sun from the Spring Showers Dies. Next, I layered the Sunny Days Designer Series Paper behind it to add more clouds. Once that was done, I added a house that I fussy cut from the P13 paper and layered a few stitched hills in front.

To keep my card simple since I didn’t want to detract from the slider, I added a sentiment die cut with a stitched rectangle.

Now that the front of the card was done, it was time to create the mechanism for the slider using the Slimline Pull Tab Dies by Heffy Doodle. Tip: I used the Foam Adhesive Strips by Stampin’ Up! to create enough dimension between the front of the card and the card base to help the slider mechanism to move smoothly.

————————–

Copic Markers:

Cat: YR18/YR14/YR12/Y17/R22/R22/C3/C1/C0/0
Pink Balloon: RV66/RV55/RV63/RV52
Blue Balloon: BG13/BG11/BG10
Purple Balloon: V17/V15/V12/V01

Close Up of Cat With Balloons

————————–

Card Recipe for My Purr-Fect Day Card:

Cat With Balloons, Conie Fong Art & Design
Paper Basics – Stamper’s Select White Cardstock, Papertrey Ink
Sunny Days Designer Series Paper, Stampin’ Up!
Hello Summer 6” x 6” Paper Pad, P13
Clouds Slimline Die Set, Whimsy Stamps
Slimline Pull Tab Dies, Heffy Doodle
Slimline Stitched Hillside Borders Dies, Lawn Fawn
Stitched Rectangle Dies Stampin’ Up!
Spring Showers Dies, Lawn Fawn
Paper Snips, Stampin’ Up!
Foam Adhesive Strips, Stampin’ Up!

Old Olive, Pool Party, Daffodil Delight and Thick Basic White Card Stock, Stampin’ Up!

Finished card size: 8 ½” x 3 ½”

————————–

To view my other Conie Fong Art & Design projects, please click here.

Hope you like my Design Team Inspiration Card using Cat With Balloons for Conie Fong Art & Design!

Thank you for stopping by!

Hugs,
Laurie

My Kitty Love Card 

My Kitty Love Card - a Valentine Card with a cat beside a mailbox filled with letters
My Kitty Love Card

Hello Crafty Friends! It’s Laurie here! I am sharing My Kitty Love Card as my Design Team Inspiration Card for Paper Nest Dolls using the New Release Kitty Love with the Snow Globe Bundle!

The Details of My Kitty Love Card

For my card, I decided to combine the Snow Globe Bundle with the Kitty Love stamp since the kitty fits so perfectly in the snow globe! I used Microsoft Word to size and insert the kitty into the globe. In addition, I used Word to add Happy Valentine’s Day to the plaque on the base.

I haven’t coloured a snow globe before and wanted to challenge myself. So, I used the 3.0 Mini Class Bundle from Kit and Clowder as a reference and used my Copic markers to colour the image. It was a lot of fun getting the shine on the glass! Once it was coloured, I added Glossy Accents to the plaque on the globe base and Stickles to all the hearts.

I decided to use the French Kiss Doodlebug Paper since it had hearts, envelopes, and happy mail on it. Perfect for my card! To ground the snow globe, I used a solid piece of red paper that was already embossed with hearts to add to my Valentine theme.

Next, I added some die cut hearts in opposite corners for balance. A die cut glassine envelope with die cut hearts inside and an adhesive-backed heart to seal it was added to mirror the letters in the mailbox.  

For embellishments, I used a piece of white lace trim and white resin hearts.

————————–

Copic Markers

Cat: W3/W2/W1/W0/R20
Scarf: R29/R27/R24/R22/R85/R83/R81
Mailbox: C3/C2/C1/C0/R29/R27/R24/R85/R81
Post: E49/E47/E44/E43
Letters: E41/E40/R29/R27/R24
Globe Base: E49/E47/E44/E43/C3/C2/C1
Box: E44/E43/E42/E41/E40/R29/R27/R24
Glass: B91/B00/BG10/0
Snow: BG60/BG000/0

Close Up of Kitty
Close Up of Kitty

————————–

Card Recipe for My Kitty Love Card

Kitty Love and Snow Globe Bundle, Paper Nest Dolls
Paper Basics – Stamper’s Select White Cardstock, Papertrey Ink
French Kiss 6” x 6” Paper Pad, Doodlebug Designs Inc.
Valentine’s Day 5” x 7” Paper Pad, Recollections, Michaels Arts & Crafts
Sending Love Glassine Sheets, Stampin’ Up!
Sending Love Dies, Stampin’ Up!
Candy Hearts Dies, Lawn Fawn
Two of Hearts Dies, Cheery Lynn Designs
Resin Hearts Embellishments, Stampin’ Up!
Adhesive-Backed Hearts & Flowers, Stampin’ Up!
1 ½” Lace Ribbon, Celebrate It, Michaels Arts & Crafts
White Gelly Roll Pen, 
Glossy Accents, Ranger
Star Dust Stickles, Ranger
Basic White, Real Red and Polished Pink Card Stock, Stampin’ Up!

Finished card size: 5 ½” x 5 ½”

Stamp Size: 3 ¾”

————————–

To view my other Paper Nest Dolls cards, please click here.

Hope you like my Kitty Love Card using Kitty Love and Snow Globe Bundle by Paper Nest Dolls!

Thank you for stopping by!

Hugs,
Laurie

My Classic Greetings Card 

My Classic Greetings Card - a Season's Greetings Christmas card with holly and music
My Classic Greetings Card

Hello Crafty Friends! Laurie here again! Season’s Greetings! One last Christmas card for me! I am sharing My Classic Greetings Card using the Christmas Classics Bundle by Stampin’ Up! which includes the Christmas Classics Stamp Set and the Christmas Classics Dies.

The Details of My Classic Greetings Card

For my card, I decided to create a music theme with the Joyful Specialty Designer Series Paper, the Merry Melody Embossing Folder, and the Loose Holly Gems & Sequins. Since I used the gold music notes for my embellishments, I went with the gold Simply Elegant Trim and gold embossing for the sentiment to match.

I love the holly dies that come in the Bundle and wanted to make them the focal point with the DSP die cut with the Nested Essentials Dies layered behind it. I was so happy with how all these elements came together!

Season’s Greetings, Merry Christmas, Happy Holidays, Feliz Navidad, Joyeux Noël, Happy Hanukkah, Happy Kwanzaa, Yuletide Greetings! However, you say it, I hope your holiday season is full of good cheer!

Supplies:

Stamps/Bundles/Dies: Christmas Classics Bundle (161977), Nested Essentials Dies (161597)

Inks: VersaMark Ink (102283)

Paper: Cherry Cobbler (119685), Basic White (159276), Shaded Spruce (146981), Joy of Christmas Designer Series Paper (161958), Joyful Specialty Designer Series Paper (161980)

Accessories: Merry Melody 3D Embossing Folder (156392), Simply Elegant Trim (155766), Metallics Embossing Powder (155555), Embossing Additions Tool Kit (159971), Heat Tool (129053), Loose Holly Gems & Sequins (161981), Bone Folder (102300), Stampin’ Dimensionals (104430), Stampin’ Seal (152813), Mini Glue Dots (103683), Mulitpurpose Liquid Glue (110755)

Close Up of Sentiment

Measurements: 

  • Cherry Cobbler: (2 pieces)
    • 8 ½” x 5 ½” scored at 4 ¼”
    • 2 ¾” x 5”
  • Basic White: (2 pieces)
    • 5 ¼” x 4”
    • 1” x 3 ¾” (Sentiment)
  • Crumb Cake:
    • 4” x 5 ¼”
  • Shaded Spruce:
    • 4” x 4”
  • Joy of Christmas Designer Series Paper:
    • 4 ½” x 2 ½””

More Information on My Classic Greetings Card:

For more of my Stampin’ Up! cards, please click here.

You will find the items listed above in my online store.

Birthday Shopping Card

Birthday Shopping Card - a birthday card with a street scene of an art supply store.
Birthday Shopping Card

Hello Crafty Friends! Laurie here again! I am sharing my Birthday Shopping Card using the Les Shoppes Suite Collection by Stampin’ Up! It’s a friend’s birthday this week and she is very artistic. So, I thought a birthday card shopping for art supplies would be perfect for her!

The Details of My Birthday Shopping Card

For my card, I decided to create a shopping scene. So, I fussy cut with my paper snips the building with the art supplies, but you could use any of the buildings in the Designer Series Paper. Next, I stamped the awning stamp randomly on the Calypso Coral card base in Calypso Coral for a slight tone-on-tone. The Basic White piece was die cut by the 3rd largest Deckled Rectangles Dies and embossed with the Exposed Brick 3D Embossing Folder to add some interest.

Since I was creating a street scene, I thought the die cut lamppost and bench would be fun accents beside the shop. A strip of the cobbled DSP created the perfect grounding for my scene.

The sentiment was stamped in Versamark and heat embossed in white on Misty Moonlight card stock and then die cut out. 

The finishing touch was a scattering of Loose Silver Sequins that are included in the Collection.

Close Up of the street scene on the birthday card

Close Up of Card

Supplies:

Stamps/Bundles/Dies: Les Shoppes Suite Collection (161337), Deckled Rectangles Dies (159173)

Inks: VersaMark Ink (102283), Calypso Coral (147101)

Paper: Calypso Coral (122925), Basic White (159276), Misty Moonlight (153118), Pecan Pie (161717), Les Shoppes 12″ x 12″ Designer Series Paper (in Collection)

Accessories: Exposed Brick 3D Embossing Folder (161600), Basics Embossing Powder (155554), Heat Tool (129053), Loose Silver Sequins (in Collection), Paper Snips (103579), Bone Folder (102300), Stampin’ Dimensionals (104430), Stampin’ Seal (152813), Mini Glue Dots (103683)

Measurements: 

  • Calypso Coral”
    • 8 ½” x 5 ½” scored at 4 ¼”
  • Basic White:
    • 3 ¼” x 4 ½”
  • Pecan Pie:
    • Scrap for Bench
  • Misty Moonlight (2 pieces):
    • Scrap for Sentiment
    • Scrap for Light Post
  • Les Shoppes 12″ x 12″ Designer Series Paper (2 pieces):
    • 4” x 1”
    • The Art Shop or another building

More Information on My Birthday Shopping Card

I have made another card using this Suite. It was a fun z-fold card. If you wish to learn more about it, please click here or on the photo.

Open card displaying the boulevard
Open Z Fold Displayed

For more of my Stampin’ Up! cards, please click here.

You will find the items listed above in my online store.

My Pumpkin Patch Card 

My Pumpkin Patch Card - an autumn card with a little girl in a witch costume picking out a pumpkin
My Pumpkin Patch Card

Hello Crafty Friends! It’s Laurie here! I am sharing My Pumpkin Patch Card using the new release Pumpkin Emily by Conie Fong Art & Design as my Design Team Inspiration Card. Doesn’t she make the most perfect autumnal card, but she could also be used for Halloween or Thanksgiving!

The Details of My Pumpkin Patch Card

For my card, I decided to create an autumnal card with fall like colours with a pumpkin patch theme since she is picking out her pumpkin. I had so much fun colouring Pumpkin Emily with my Copic Markers in oranges, blue/greens and blacks to match my paper. Once she was coloured, I added Clear Wink of Stella to the ribbon on her hat. For the cat, I decided to make it a tabby cat, but it could also be a black cat for Halloween. I used my black 0.3 Copic multi liner to add the stripes after I had coloured it with my Copic markers.

Next, I die cut her out with a 4” stitched circle die and placed a number of die cut leaves and a pumpkin in one corner to match my theme. The “Hello Pumpkin” sentiment was a sticker that came in the Carta Bella Welcome Fall Kit. In the other corner, I used another sticker of a Pumpkin Patch sign. Perfect for my Pumpkin Patch theme! The leaves falling around her were also from the same sticker set.

Finally, the finishing touch was a scattering of Enamel Dots that matched my colour scheme.

————————–

Copic Markers:

Skin: E000/E00/E21/E11/E04/R20
Hair: E18/E08/YR18/YR14
Greens: BG90/BG93/BG96/BG99
Blacks: C9/C6/C4
Pumpkins: E15/YR18/YR15/YR14/YR12
Cat: E47/E44/E43/E42/E41/R20/0.3 Copic Multi liner
Sky: B00/B000/0

Close Up of girl holding a pumpkin
Close Up of Pumpkin Emily

————————–

Card Recipe for My Pumpkin Patch Card:

Pumpkin Emily, Conie Fong Art & Design
Paper Basics – Stamper’s Select White Cardstock, Papertrey Ink
Welcome Fall Collection Kit, Carta Bella paper Co.
Layering Stitched Circle Dies, Memory Box
Gather Together Dies, Stampin’ Up!
Patterned Pumpkins Thinlits Dies, Stampin’ Up!
La Petites Stickers, The Paper Studio, Hobby Lobby
Welcome Fall Enamel Dots, Carta Bella paper Co.
0.3 Multi Liner Black, Copic
Clear Wink of Stella, Stampin’ Up!

Mossy Meadow, Crushed Curry and Pumpkin Pie Card Stock, Stampin’ Up!

Finished card size: 5 ½” x 5 ½”

————————–

To view my other Conie Fong Art & Design projects, please click here.

Hope you like my Design Team Inspiration Card using Pumpkin Emily for Conie Fong Art & Design!

Thank you for stopping by!

Hugs,
Laurie