Welcome Spring Card

My Design Team Card
Welcome Spring Card

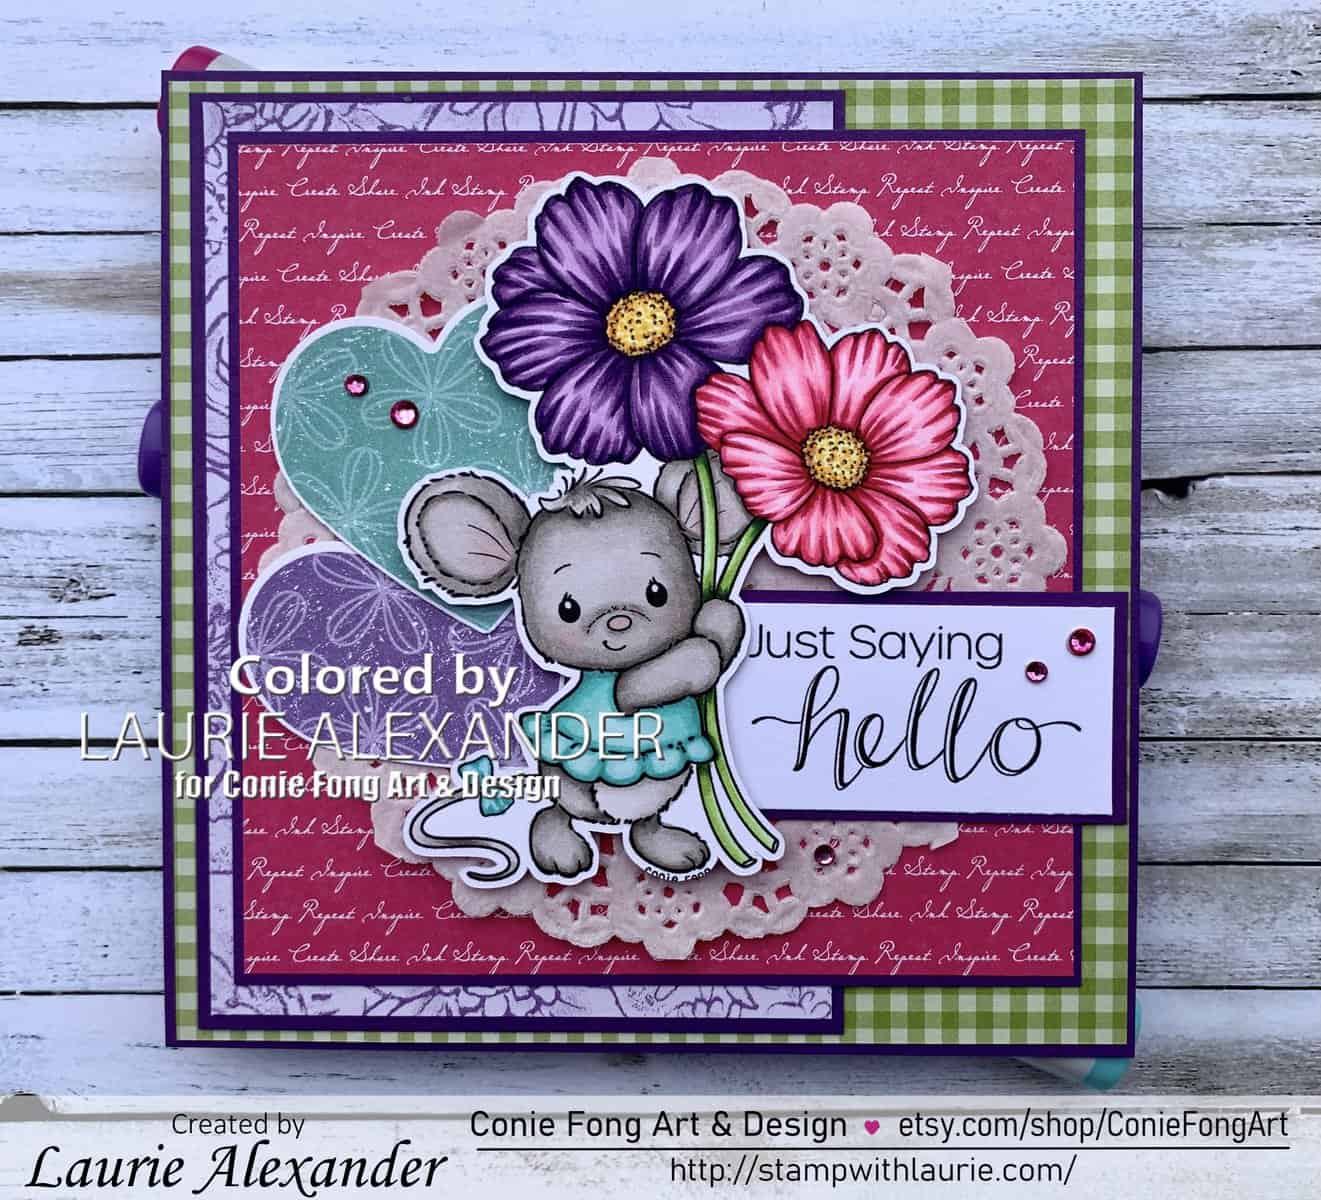
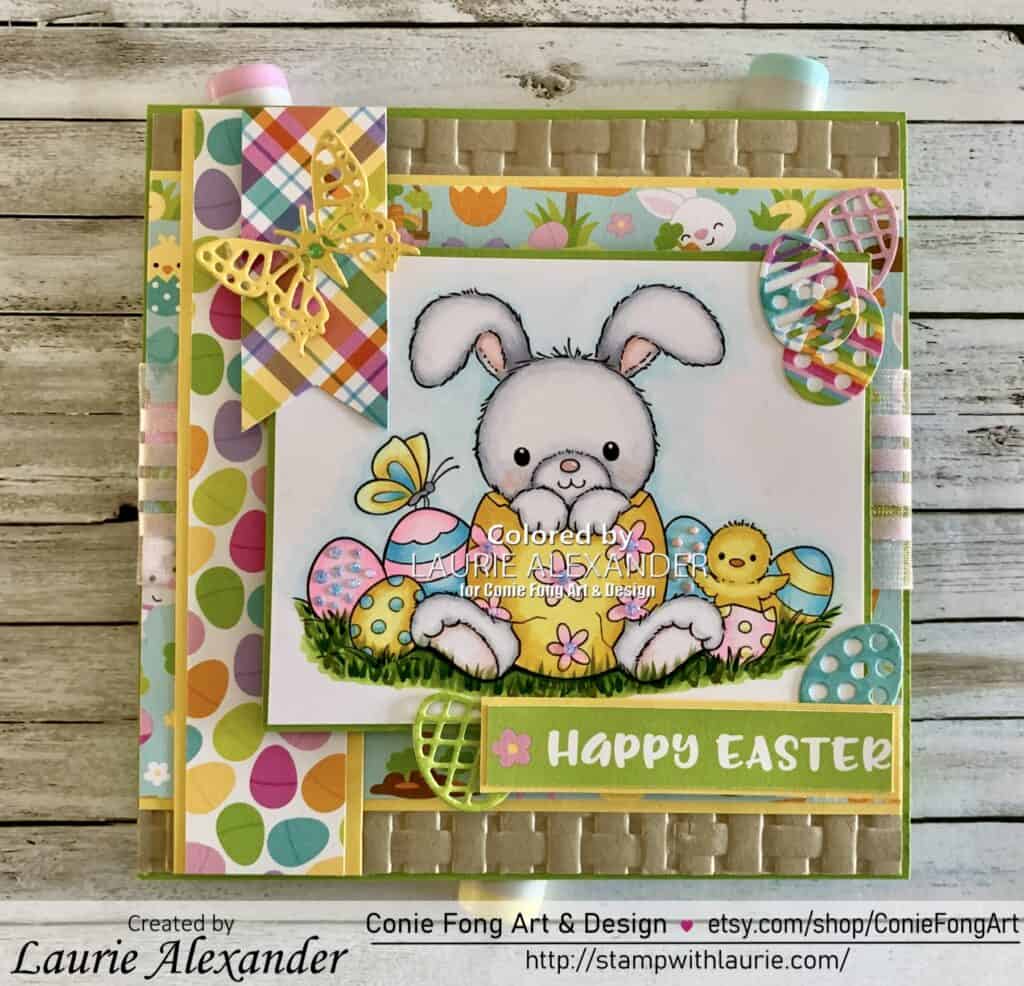
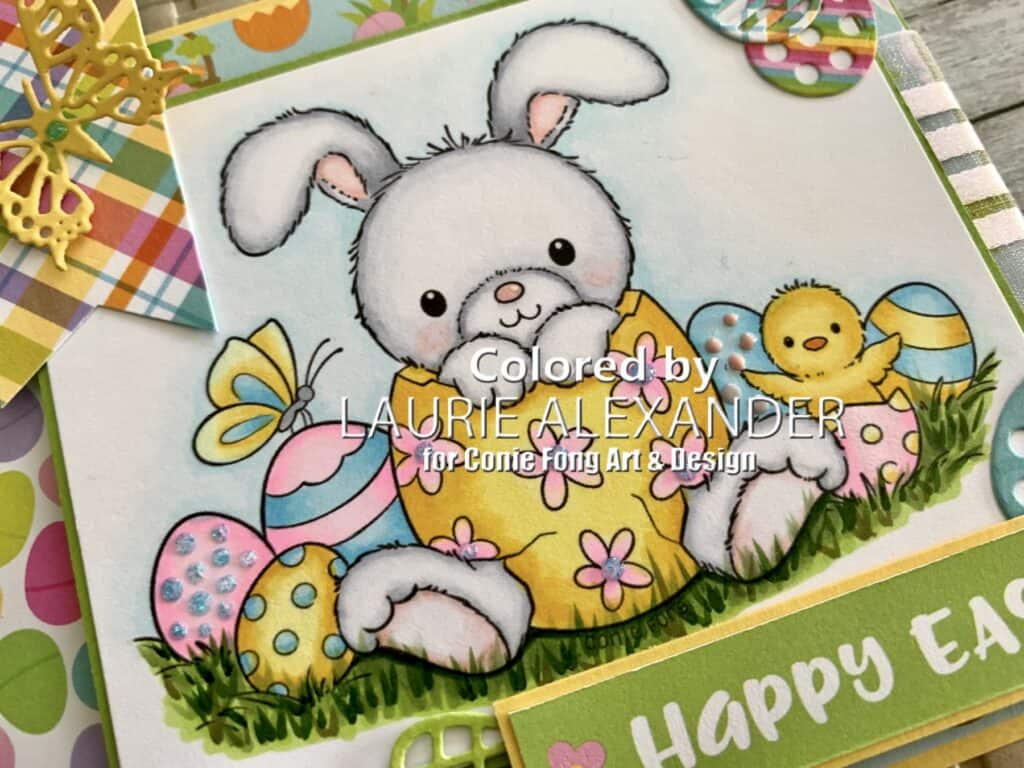
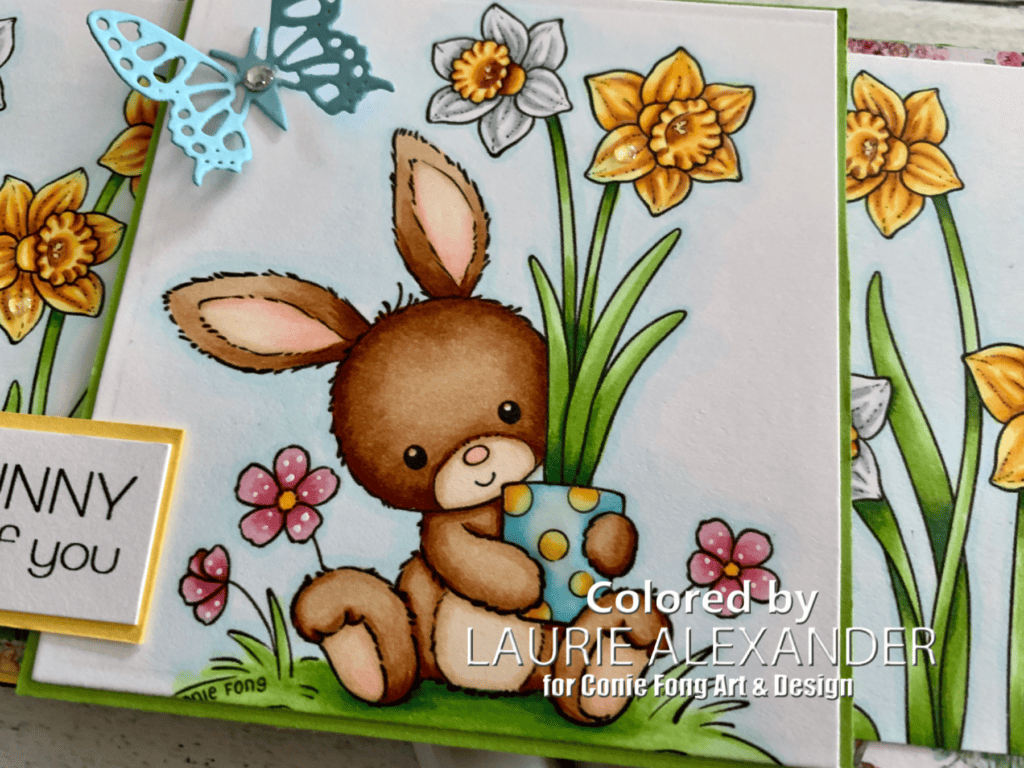
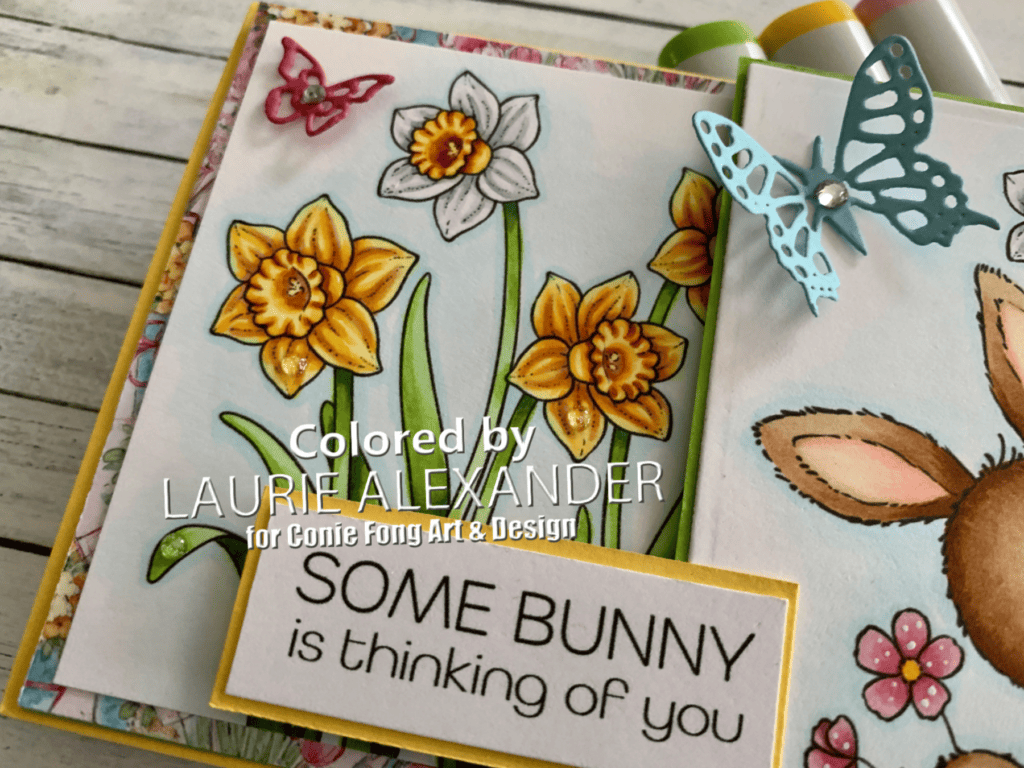
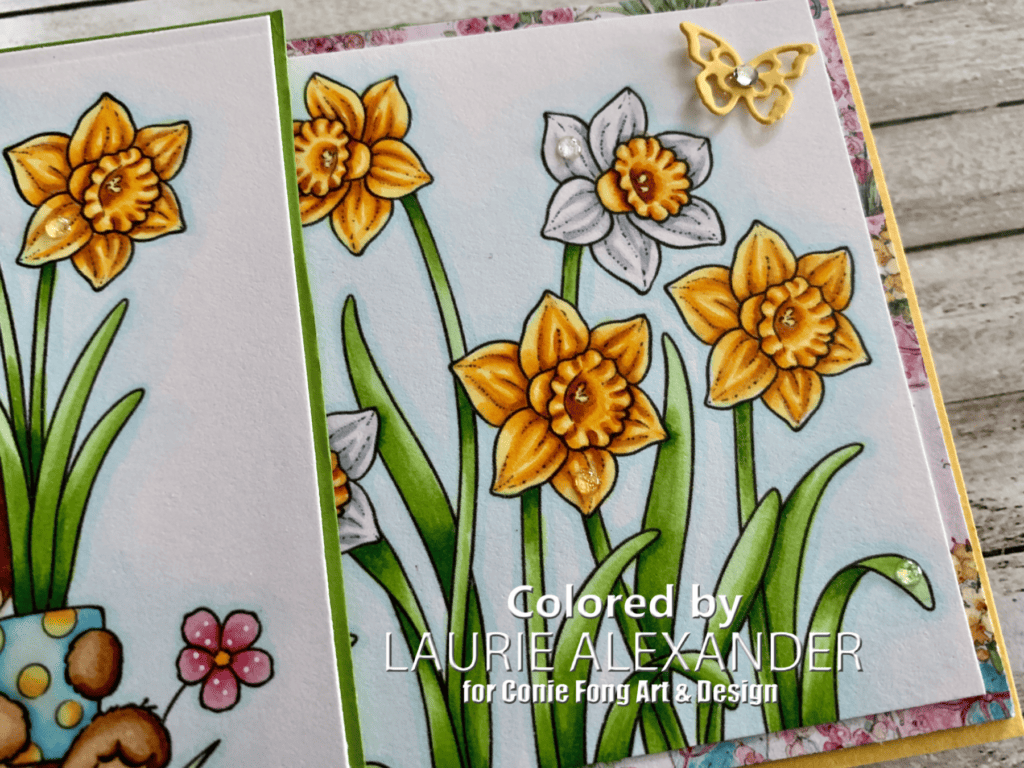
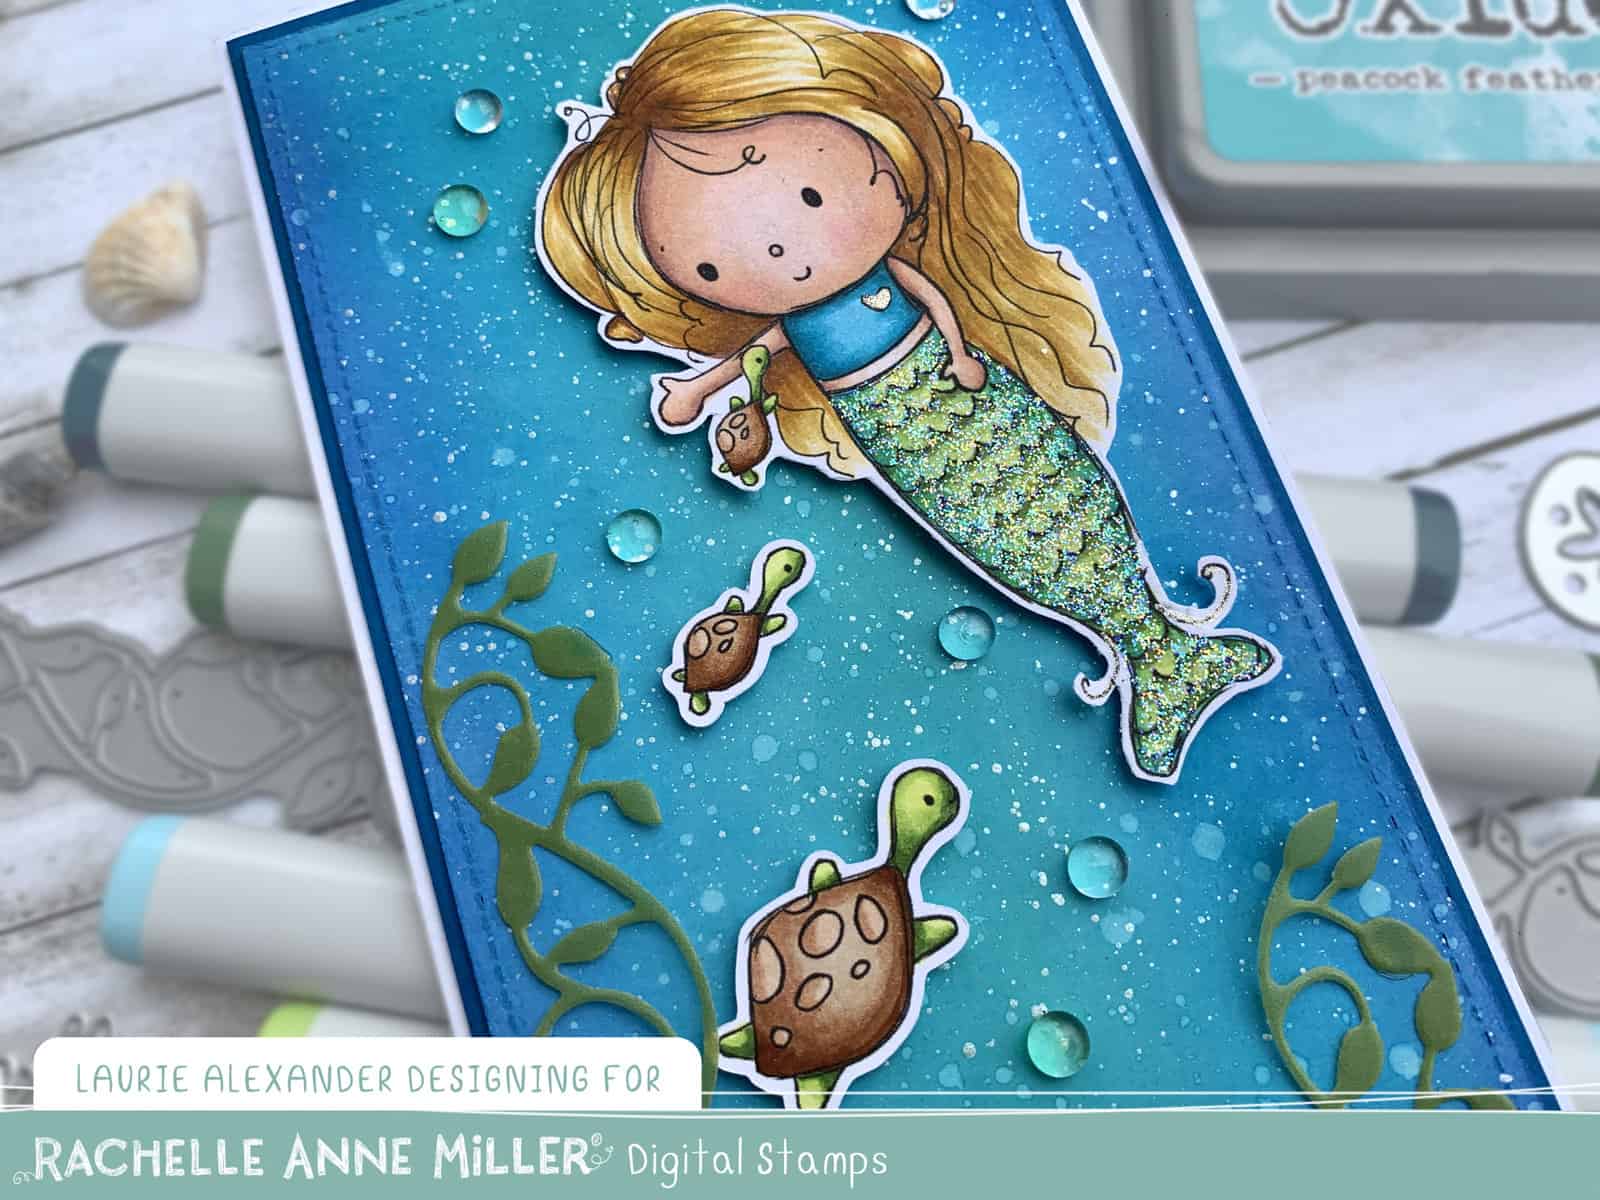
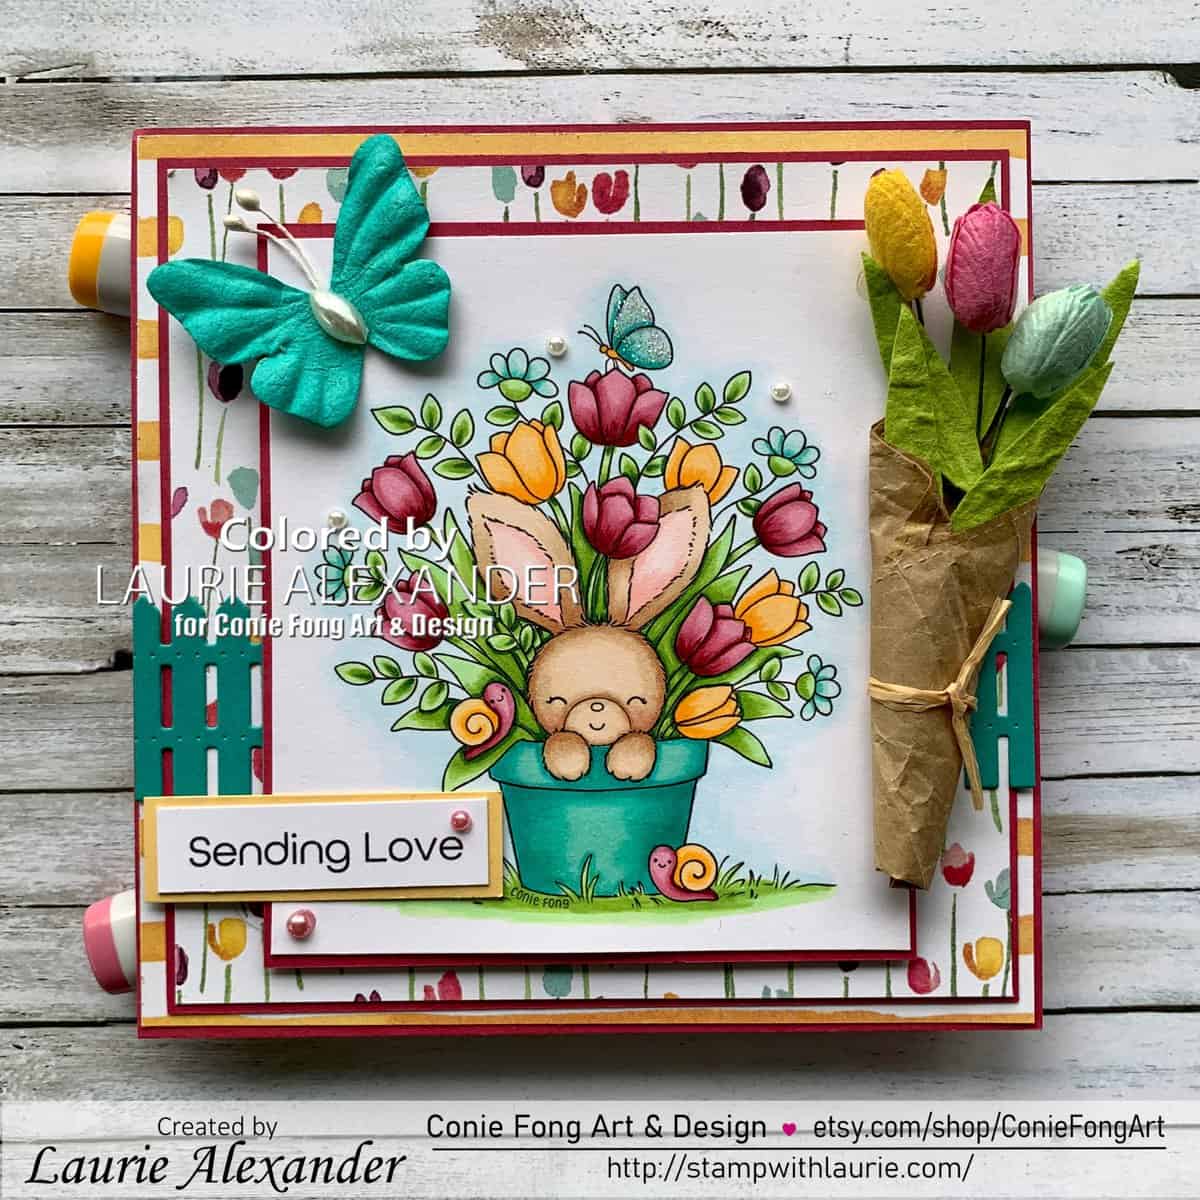
Hello Crafty Friends! It’s Laurie here! I am sharing my Welcome Spring Card as my Design Team Card for Conie Fong Art & Design. This digital stamp is called Bunny Tulips and comes with the bunny in the flower pot and two sentiments.

Spring has finally arrived in my part of the world! The tulips and daffodils are blooming, and the birds are singing. I love Spring and the renewal of life that it brings!

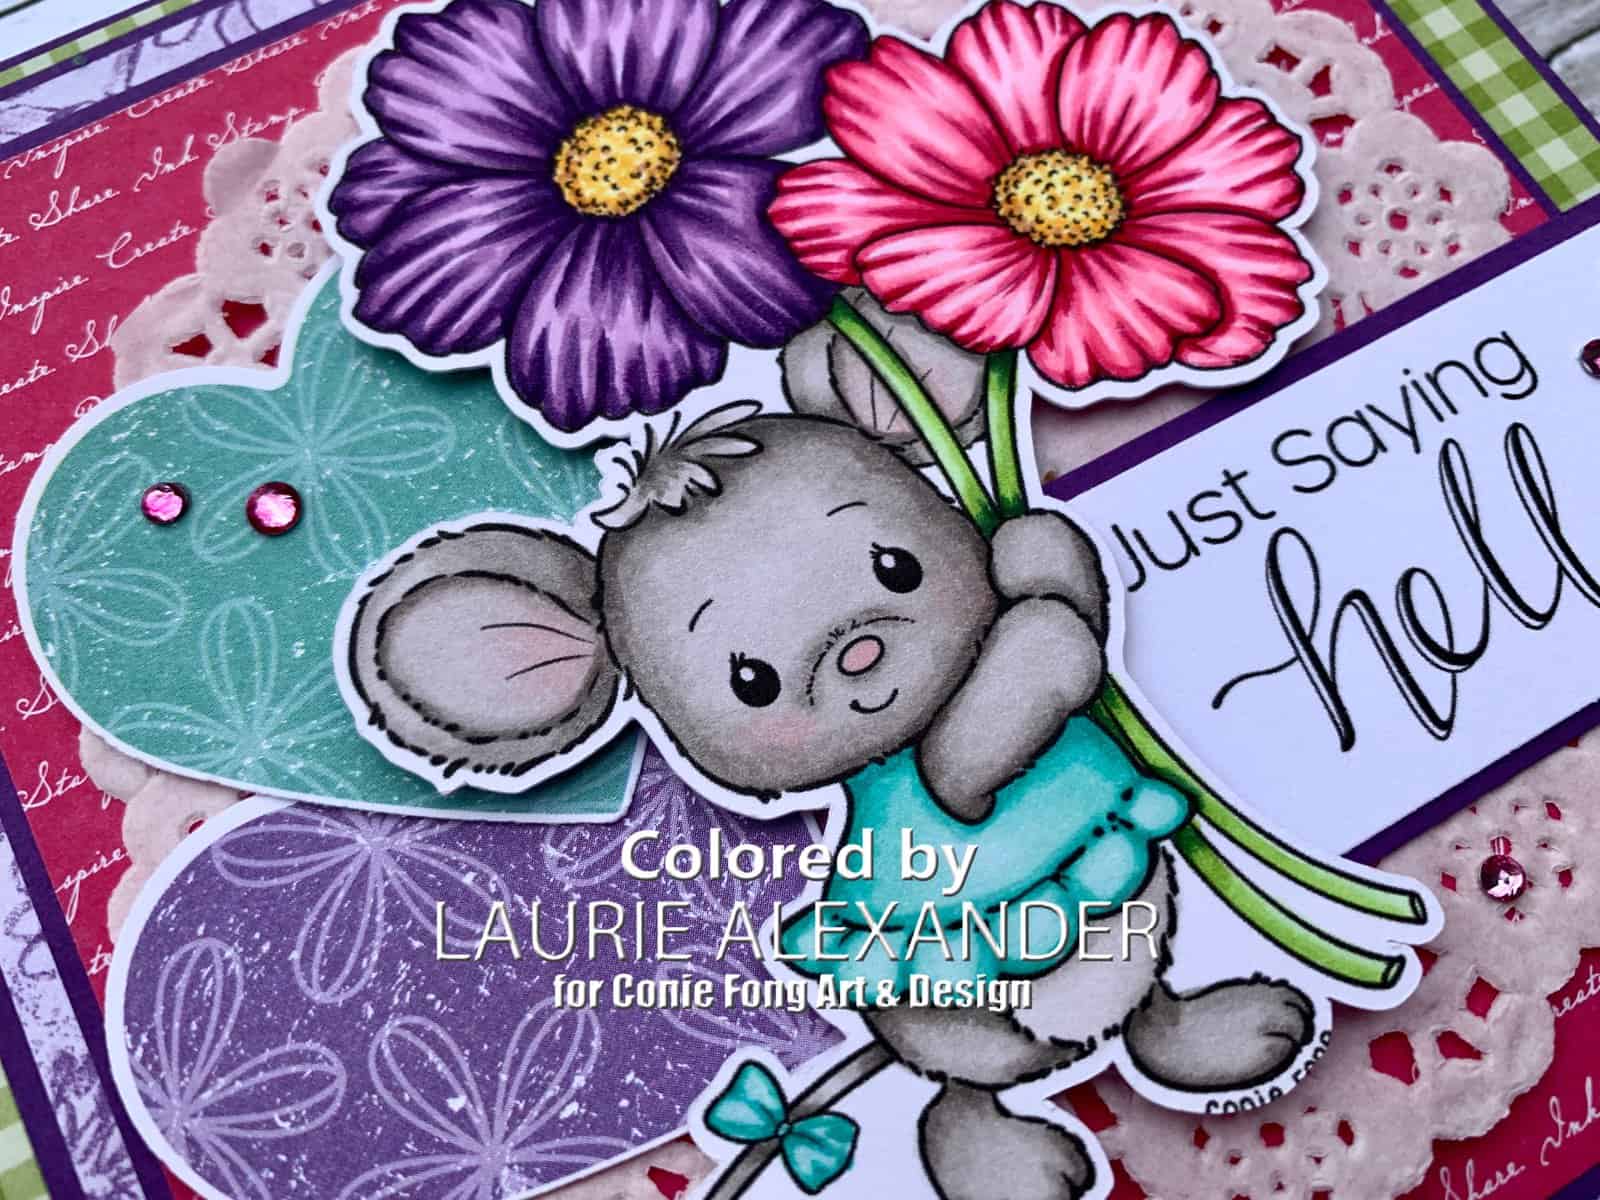
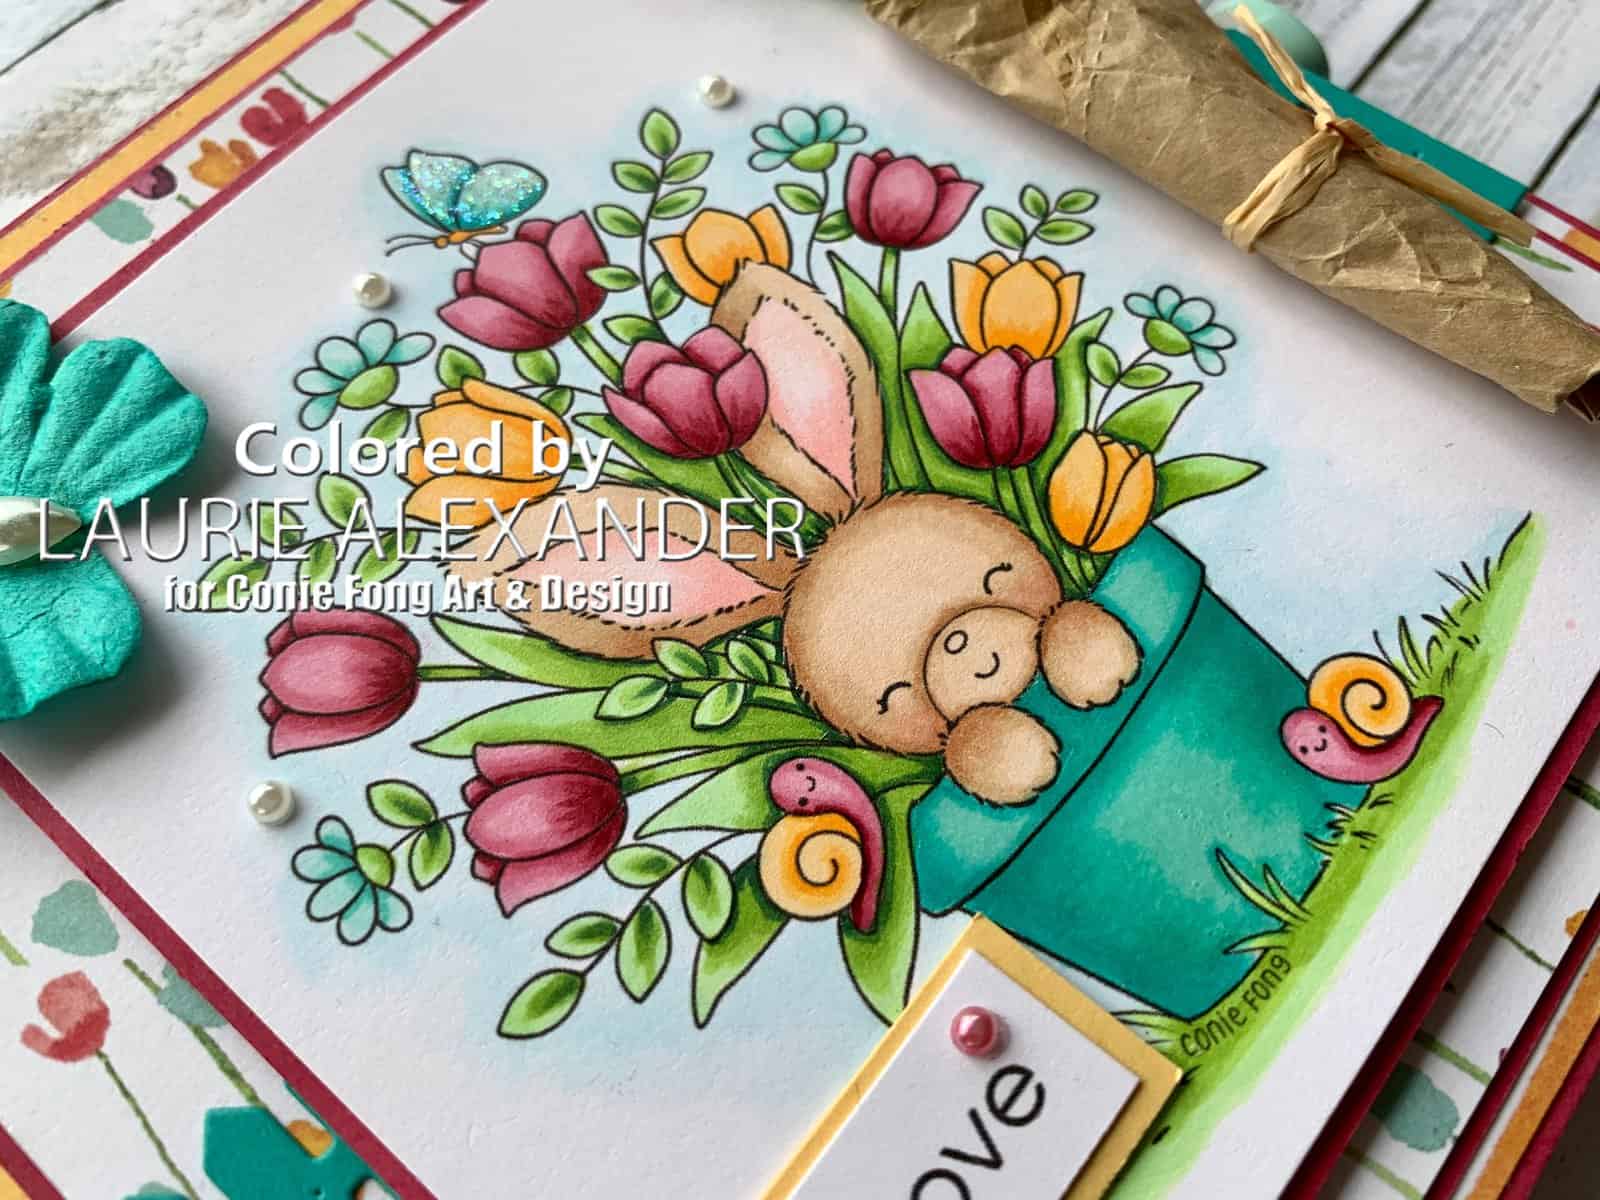
For my card, I coloured this sweet stamp with my Copic markers in Spring like colours of pink, yellow and blue. Did you know that you can have pink and yellow snails! Lol! I love how the bunny is peeking out of the flower pot! I used Glossy Accents on the pot to give it a shine and Stickles on the butterfly to make her sparkle!

For my embellishments, I had some paper tulips that were very long. So, I sniped them down and wrapped them like a bouquet you get in the store. I used some paper ribbon that I die cut into a square for the wrap. A piece of raffia tied around the bundle finishes this lovely bouquet off. I added a paper butterfly that matches the fence which was die cut using the Picket Fence Die-namics. I coloured a few of the pearls to match my card and added a few uncoloured ones to match the paper butterfly.

————————–

Copic Markers:

Bunny: E33/E31/E30/R20/R00
Pinks: R89/R85/R83/R81
Yellows: Y38/Y35/Y32
Blues: BG15/BG11/BG10
Grass: YG11/YG23/YG25/G28
Sky: BG0000/BG000
Pearls: R85

Close Up of My Design Team Card

————————–

Card Recipe for My Welcome Spring Card:

Bunny Tulips, Conie Fong Art & Design
Paper Basics – Stamper’s Select White Cardstock, Papertrey Ink
Painted Blooms Designer Series Paper, Stampin’ Up!
Paper Butterflies, Spring, A Charmed Life, Michael’s Arts & Crafts
Picket Fence Die-namics, My Favorite Things
Stitched Shapes Dies, Stampin Up!
Paper Tulips, Thai Paper Flower
Raffia, My Stash
Paper Ribbon, My Stash
Pearl Basic Jewels, Stampin’ Up!
Glossy Accents, Ranger
Star Dust Stickles, Ranger
Rose Red Card Stock, Stampin’ Up!

Finished card size: 5.5” x 5.5”

————————–

To view my other Conie Fong Art & Design cards, please click here.

Hope you like my Design Team card using Bunny Tulips for Conie Fong Art & Design!

Thank you for stopping by!

Hugs,
Laurie

My Sweet Maisy Card

My Design Team Card
My Sweet Maisy Card

Hello Crafty Friends! It’s Laurie here! I am sharing My Sweet Maisy Card as my Design Team Card for Conie Fong Art & Design. This digital stamp bundle is called Maisy and Cory Mice Bundle and comes with six images including two mice and 4 sentiments.

I just coloured Maisy with my Copic markers for my card thinking it would make a sweet Mother’s Day card. My cosmos flowers came out vibrant and bright to create a nice cheery card. I used Granny Apple Green and Melon Mambo Designer Series paper from the Brights Collection by Stampin’ Up! to match my bright and cheery colours. The doily I found loose in my stash and thought it created a perfect backdrop for Maisy. The hearts were punched out from the Please as Punch Designer Series Paper to be layered behind Maisy. I love the sentiments that come with the bundle and thought that “Just saying hello” could be used for so many different occasions. To add some bling to my card, I wanted to use some rhinestones but tie in the pink. So, I coloured them with my RV 19 Copic marker. Voila! Instant matching embellishments!

————————–

Copic Markers:

Maisy’s Fur: W5/W3/W1/0/R20
Maisy’s Dress: BG15/BG13/BG11/BG10
Purple Cosmo Flower: V09/V17/V15/V12
Pink Cosmo Flower: RV29/RV25/RV23/RV21
Flower Centers: E13/Y15/Y11/Y22
Stems: YG11/YG23/YG25/G28
Rhinestones: RV19

Close Up of My Design Team Card

————————–

Card Recipe for My Sweet Maisy Card:

Maisy and Cory Mice Bundle, Conie Fong Art & Design
Paper Basics – Stamper’s Select White Cardstock, Papertrey Ink
Brights 6” x 6” Designer Series Paper, Stampin’ Up!
Pleased as Punch Designer Series Paper, Stampin’ Up!
Botanical Butterfly Designer Series Paper, Stampin’ Up!
4.5” Doily, from my Stash
Heart Punch Pack, Stampin Up!
Rhinestone Basic Jewels, Stampin’ Up!
Clear Wink of Stella, Stampin’ Up!
Gorgeous Grape Card Stock, Stampin’ Up!
Finished card size: 5.5” x 5.5”

————————–

To view my other Conie Fong Art & Design cards, please click here.

Hope you like my Design Team card using
Maisy and Cory Mice Bundle for Conie Fong Art & Design!

Thank you for stopping by!

Hugs,
Laurie

Soar Confidently Birthday Card

Birthday Card
Soar Confidently Birthday Card

Today is I am sharing my Soar Confidently Birthday Card that I made for my father-in-law’s birthday that was yesterday using the Soar Confidently Stamp Set. My father-in-law loves planes, and I knew that a card with the plane from this set would be perfect for him! I just happened to decide to use all the images, as well as the plane.

The Details of My Card

Since the images look vintage, I decided to create an old world feel to my card. So, once I stamped my images on Very Vanilla card stock, I used my Blender Pen to “colour” the stamped images in certain areas where the line art was the strongest. I then fussy cut the stamped images out with my Paper Snips. To give my card more of a vintage feel I sponged ink along the edges. I usually don’t mix Very Vanilla and Basic White but thought the vintage look I was going for allowed it to work.

I decided to use the World of Good Designer Series Paper since it is perfect for a masculine card! Specifically, the one with the compasses on the Misty Moonlight background which reminded me of a blue sky. This paper is retiring and is currently on sale!

For my card, I wanted all the different flying machines to be in the air. So, I need some clouds which is where the Mountain Air Bundle came into effect. I stamped them in Misty Moonlight, but stamped off twice before stamping them on the Basic White card stock to give them a soft fluffy look.

I stamped the sentiment in a Stitched Rectangle, add a couple of banners with one in copper foil to match the copper stars from the Star Designer Elements.

Supplies:

Stamps/Bundles/Dies: Soar Confidently Stamp Set (154531), Mountain Air Bundle (153820), Stitched Rectangles Dies (151820), Tasteful Labels Dies (152886)

Inks: Misty Moonlight Classic Stampin’ Pad (153118), Early Espresso Classic Stampin’ Pad (147114)

Paper: Early Espresso (119686), Very Vanilla (101650), Basic White (159276), World of Good Designer Series Paper (152491), Copper Foil Sheets (142020)

Accessories: Star Designer Elements (150430), Blender Pens (102845), Stamping Sponges (141337), Paper Snips (103579), Bone Folder (102300), Stampin’ Dimensionals (104430), Stampin’ Seal (152813), Glue Dots (103683)

Close Up of my Card
Close Up of My Soar Confidently Birthday Card

Measurements: 

  • Early Espresso: 5 ½” x 8 ½” scored at 4 ¼”
    • ½” x 2 3/16” (banner)
  • World of Good Designer Series Paper: 5 ¼” x 4”
  • Basic White: 5 ¼” x 4” (inside piece)
    • 3 pieces: 1 7/8” x 5/8” (for clouds)
    • 1” x 2 3/8” (sentiment)
  • Very Vanilla: 3 ½” x 4 ½”
  • Copper Foil Sheets: ½” x 2 3/16” (banner)

For Further Info:

Hope you like my Soaring Confidently Birthday Card.

For more of my Stampin’ Up! cards, please click here.

You will find the items listed above in my online store.

Happy Easter Card

My Happy Easter Card

Happy Easter Everyone! Today I am sharing my Happy Easter Card that I made using a combination of two stamp sets by Stampin’ Up!, Springtime Joy and Arrange a Wreath. I love how these two sets go so well together and make a perfect Easter card!

Isn’t the lamb and bunny from the Springtime Joy Stamp Set so sweet! Perfect for this time of year!

The Arrange a Wreath Bundle is so versatile and has so many card possibilities such as Easter, Christmas, Thanksgiving, Valentines, Spring and Birthday. I love all the dies that come with it so that you can decorate your wreath for each occasion!

The Hydrangea Hill Designer Series Paper has the perfect colours for an Easter card! I was spoiled for choices but went with the Highland Heather piece!

Supplies:

Stamps/Bundles/Dies: Springtime Joy Stamp Set (154403), Arrange a Wreath Bundle (154109), Stitched Nested Labels Dies (149638), Stitched So Sweetly Dies (151690)

Inks: Old Olive Classic Stampin’ Pad (147090), Daffodil Delight Classic Stampin’ Pad (147094), Highland Heather Classic Stampin’ Pad (147103), Petal Pink Classic Stampin’ Pad (147108), Tuxedo Black Memento Ink Pad (132708)

Paper: Highland Heather (146986), Daffodil Delight (119683), Old Olive (100702), Petal Pink (146985), Basic White (159276), Basic White Thick (159229), Hydrangea Hill Designer Series Paper (154570)

Accessories: Highland Heather Stampin’ Blends Combo Pack (154887), Daffodil Delight Stampin’ Blends Combo Pack (154883), Old Olive Stampin’ Blends Combo Pack (154892), Petal Pink Stampin’ Blends Combo Pack (154893), Smoky Slate Stampin’ Blends Combo Pack (154904), Stampin’ Blends Color Lifter (144608), Subtle 3D Embossing Folder (151775), Wink of Stella Glitter Bruch (141897), Pearl Basic Jewels (144219), Gorgeous Grape 3/8″ Sheer Ribbon (154572), Paper Snips (103579), Bone Folder (102300), Stampin’ Dimensionals (104430), Stampin’ Seal (152813), Glue Dots (103683)

Close Up of My Happy Easter Card

Measurements: 

  • Basic White Thick: 5 ½” x 8 ½” scored at 4 ¼”
  • Hydrangea Hill Designer Series Paper: 5 ¼” x 4”
  • Daffodil Delight: 2 15/16” x 4 1/8”
    • Scraps
  • Petal Pink: 3 7/16” x 3 5/8”
    • Scraps
  • Old Olive: 3 ½” x 3 ½”
  • Highland Heather: Scraps
  • Basic White: 2 3/8” x 1 ¼” (Sentiment)
    • Scraps
  • Gorgeous Grape 3/8″ Sheer Ribbon: 5”

For Further Info:

Hope you like my Happy Easter Card using the Springtime Joy Stamp Set and Arrange A Wreath Bundle.

You will find the items listed above in my online store.

My Happy Easter Card

My Happy Easter Card
My Happy Easter Design Team Card

Hello Crafty Friends! It’s Laurie here! I am sharing My Happy Easter Card using the digital stamp Easter Bunny Eggs by Conie Fong Art & Design.

Don’t you just love this sweet stamp! Perfect for Easter! I coloured this cutie and his friend in pastel Easter colours with my Copic markers. The paper from Doodlebug was perfect for my Easter theme! I even die cut the eggs from it. The sentiment is also from the paper. The Basket Weave embossing folder reminded me of the baskets that I used when I was little to gather my eggs. I added Nuvo Drops to some of the coloured eggs and to the die cut butterfly to give them added dimension.

————————–

Copic Markers:

Bunny: C3/C1/C0/0/R20
Chick: YR04/Y00/Y15/Y19
Pinks: RV000/RV00/RV02
Blues: B000/B00/B01/B02
Yellows: Y11/Y15/Y19
Grass: YG03/YG63/YG67/G99
Sky: B000/B0000/0

Close Up of My Design Team Card

————————–

Card Recipe for My Happy Easter Card:

Easter Bunny Eggs, Conie Fong Art & Design
Paper Basics – Stamper’s Select White Cardstock, Papertrey Ink
Hoppy Easter 12” x 12” Paper, Doodlebug Design Inc.
Springtime 6” x 6” Paper Pack, Doodlebug Design Inc.
Butterfly Beauty Dies, Stampin’ Up!
Basket Builder Framelits Dies, Stampin’ Up!
Basket Weave Embossing Folder, Stampin’ Up!
1.5” Pink Striped Sheer Ribbon, From my Stash
Bubblegum Blush, Nuvo Crystal Drops
Blue Lagoon, Nuvo Glitter Drops
White Gelly Roll Pen, Sakura
Clear Wink of Stella, Stampin’ Up!
Daffodil Delight, Granny Apple Green
and Crumb Cake Card Stock, Stampin’ Up!

Finished card size: 5.5” x 5.5”

————————–

To view my other Conie Fong Art & Design cards, please click here.

Hope you like my Design Team card using
Easter Bunny Eggs for Conie Fong Art & Design!

Thank you for stopping by!

Hugs,
Laurie

My Some Bunny Card

My Design Team Card
My Some Bunny Card

Hello Crafty Friends! It’s Laurie here! I am sharing My Some Bunny Card as my Design Team Card for Conie Fong Art & Design. This card uses 3 different digital stamps including Bunny Daffodil Bundle which includes 9 stamps and Daffodil Flowers Bundle which includes 7 stamps.

I thought it would be cute to create a slimline card and use the Fields of Daffodils with the sweet Bunny Daffodil in front almost like he has picked those flowers just for you!

Sweet Bunny from Bunny Daffodil Digital Stamp

I decided to colour my daffodils in both yellows and white/yellows to give a variation to my field of daffodils. Daffodils can come in many different colours, but these are the colours that I have in my garden. My favourite is the white with yellow centres! To fit my field onto the slim line base, I cut it in half so that there is a slight gap which you can’t see behind the bunny. So, it looks like a continual field of daffodils! I did the same thing with the 6” pretty paper that you can just see peeking out as a border around the daffodils. This saves paper and you can’t see the gap hidden behind the bunny. A win-win situation! A couple of die cut butterflies with rhinestones and some epoxy water drops is all the embellishments that this card needed.

————————–

Copic Markers:

Bunny: E37/E35/E34/E31/E31/R20
Yellow Daffodils (Outside Petals): E13/Y17/Y15/Y11
Yellow Daffodils (Inside Petals): E15/YR16/Y17/Y15/Y11
White Daffodils (Outside Petals): C3/C1/C0/
White Daffodils (Inside Petals): E18/YR18/YR16/Y15/Y11
Leaves: YG11/YG23/YG25/G28
Pot: B02/B01/B000/B0000/Y17/Y15/Y11/Glossy Accents
Pink Flowers: R56/R85/R81/R81/Y17/White Gelly Roll Pen
Sky: B000/B0000/0

Left Side of my Field of Daffodils Panel

————————–

Card Recipe for My Some Bunny Card:

Bunny Daffodil Bundle and Daffodil Flowers Bundle, Conie Fong Art & Design
Paper Basics – Stamper’s Select White Cardstock, Papertrey Ink
Annabelle’s Garden 6” x 6” Paper Pack, Wild Rose Studios
Butterfly Beauty Dies, Stampin’ Up!
Glitter and Clear Epoxy Shapes, Stampin Up!
Rhinestone Basic Jewels, Stampin’ Up!
White Gelly Roll Pen, Sakura
Glossy Accents, Ranger
Daffodil Delight, Granny Apple Green, Balmy Blue
and Rose Red Card Stock, Stampin’ Up!

Finished card size: 8.5” x 3.5”

Right Side of my Field of Daffodils Panel

————————–

To view my other Conie Fong Art & Design cards, please click here.
To view my other Slim Line Cards, please click here.

Hope you like my Design Team card using
Bunny Daffodil Bundle and Daffodil Flowers Bundle for Conie Fong Art & Design!

Thank you for stopping by!

Hugs,
Laurie

Hydrangea Thank You Card

My Hydrangea Thank You Card

Today is I am sharing my Hydrangea Thank You Card that I made for a swap using the beautiful Hydrangea Haven Bundle by Stampin Up! I love how the watercolour hydrangea pops out of the DSP and the Stitched Nested frame!

I swooned over the Hydrangea Hill Designer Series Paper when I saw it! All my favourite colours are in it like Gorgeous Grape, Highland Heather and Mossy Meadow to name just a few! So, I decide that I wanted to use some of the colours in the DSP for my hydrangea flower head and leaves.

The Process of the Watercolour Technique

Prepare to get all inky! For my card, I pulled out my Stampin’ Up! Ink Refills of Gorgeous Grape, Highland Heather, Misty Moonlight and Seaside Spray to use on my watercolour paper. I drop a couple of drips of each colour onto my work space and added a few spritzes of the Frost White Shimmer Paint (that was premixed with rubbing alcohol) and then a few spritzes of water. I then dragged my watercolour paper through the ink picking up the colours.

The Process of the Hydrangea Watercolour Technique
The Process of the Watercolour Technique

Once the ink was dried on the flower heads, I used my Blending Brush to add a bit more Gorgeous Grape to the raised petals to give it a bit more dimension.

I did the same steps for the stem and leaves using Old Olive and Mossy Meadow.

Here is a video that I presented to fellow demonstrators showing this technique:

Video Demonstrating The Watercolour Technique

I love this look since you can get different variations in the flowers. Here is an example of both light and dark flower heads.

Two Versions of the Hydrangea Watercolour Technique

A scattering of the pretty Pastel Pearls and the Misty Moonlight/silver Baker’s Twine are all the embellishments this card need. 

Supplies:

Stamps/Bundles/Dies: Hydrangea Haven Bundle (156251), Stitched Nested Labels Dies (149638)

Inks: Gorgeous Grape Classic Stampin’ Pad (147099)

Paper: Highland Heather (146986), Gorgeous Grape (146987), Basic White (159276), Mossy Meadow (133676), Hydrangea Hill Designer Series Paper (154570), Fluid 100 Watercolour Paper (149612)

Accessories: Gorgeous Grape Classic Stampin’ Ink Refill (147164), Highland Heather Classic Stampin’ Ink Refill (147167), Misty Moonlight Classic Stampin’ Ink Refill (153124), Seaside Spray Classic Stampin’ Ink Refill (150092), Old Olive Classic Stampin’ Ink Refill (100531), Mossy Meadow Classic Stampin’ Ink Refill (133651), Frost White Shimmer Paint (147046), Stampin’ Spritzer (126185), Pastel Pearls (154571), Flowers For Every Season Ribbon Combo Pack (153620), Blending Brushes (153611), Bone Folder (102300), Stampin’ Dimensionals (104430), Stampin’ Seal (152813), Glue Dots (103683), Rubbing Alcohol, Water

Close Up of My Hydrangea Thank You Card

Measurements: 

  • Highland Heather: 5 ½” x 8 ½” scored at 4 ¼”
  • Gorgeous Grape: 5 ¼” x 4”
  • Basic White: 1” x ¾”
  • Hydrangea Hill Designer Series Paper: 2 ¾” x 4 ¾”
  • Watercolour Paper: 2 pieces:
    • 1 7/8” x 2” (flower head)
    • 2 ¾” x 3”
  • Misty Moonlight/Silver Baker’s Twine: 5”

For Further Info:

Hope you like my Hydrangea Thank You Card.

For more of my Stampin’ Up! cards, please click here.

You will find the items listed above in my online store.

Thinking of You Card

My Thinking of You Card

Today is I am sharing my Thinking of You Card using the Simply Succulents Bundle by Stampin’ Up! A good friend and I love succulents. And as you know, I love to colour! Double whammy! So, when I saw this bundle, I knew that I would be getting it!

For my card, I used my Stampin’ Blends to colour using the tip-to-tip technique for the flowers and the smooth colouring technique for the pot. I have added links to my colouring techniques videos from a presentation at the end of this post if you wish to learn more. This card was easy to put together since the images were a quick colour.

I thought that the die cut of the succulents that spans a whole card front is so beautiful. So, I decided to use that for my background with a Rococo Rose card base. Rococo is one of the 2019-2021 In Colors that I am going to miss the most! It will be retiring with the new Catalogue in May. So, make sure you get all your favourite retired items before they are gone!

I created a focal point with the largest Stitched Circle Die where I added my bouquet and sentiment. A scattering of Rhinestone Basic Jewels of which I coloured a few with my Rococo Rose Dark Blend and Rococo Rose Scalloped Linen Ribbon are all the embellishments this card needed.

Supplies:

Stamps/Bundles/Dies: Simply Succulents Bundle (156264)
Inks: Tuxedo Black Memento Ink Pad (132708)
Paper: Rococo Rose (150882), Crumb Cake (120953), Basic White (159276), Old Olive (100702)
Accessories: Stitched Shapes Dies (152323), Rococo Rose 1/2″ Scalloped Linen Ribbon (149704), Old Olive Stampin’ Blends Combo Pack (154892), Crumb Cake Stampin’ Blends Combo Pack (154882), Rococo Rose Stampin’ Blends Combo Pack (154900), Rhinestone Basic Jewels (144220), Bone Folder (102300), Stampin’ Dimensionals (104430), Stampin’ Seal (152813), Glue Dots (103683)

Close Up of My My Thinking of You Card

Measurements: 

  • Rococo Rose: 5 ½” x 8 ½” scored at 4 ¼”
  • Basic White (5 pieces):
    • Background ½” x 8 ½”
    • Sentiment: 2 5/8” x ½”
    • Larger Flower: 1 3/8”
    • Smaller Flower: 1”
    • Pot: 1 ¼” x 1 5/8”
  • Old Olive: 2” x 2 1/8”
  • Crumb Cake: 2 7/8”
  • Rococo Rose Scalloped Linen Ribbon: 2”

For Further Information:

Hope you like my Thinking of You Card.

For more information on my colouring, here are some videos of my colouring techniques:
1 – PartWhiskey Business Card using Blending Different Colours Technique
Video Tutorial: Blending Different Colours Together
2 – PartCountry Harvest Card using Light to Dark Technique
Video Tutorial: Light to Dark/Dark to Light Colouring
3 – PartBeautiful Poppy Birthday Card using Smooth Colouring Technique
Video Tutorial: Smooth Colouring
4 – PartLet’s Gather Together Card using Tip to Tip Blending Technique
Video Tutorial: Tip to Tip Colouring
5 – PartSo Grateful Cardinal Card using Flicking Colouring Technique
Video Tutorial: Flicking Colouring
6 – PartLet’s Celebrate You Card using Flicking of Different Colours Technique
Video Tutorial: Flicking of Different Colours Technique

My Colouring Notes:
https://stampwithlaurie.com/wp-content/uploads/2020/08/Stampin-Up-Blends-2020.pdf

For more of my Stampin’ Up! cards, please click here.

You will find the items listed above in my online store

My Puppy Love Card

My Puppy Love Card
My Puppy Love Design Team Card

Hello Crafty Friends! It’s Laurie here! I am sharing My Puppy Love Card as my first official Design Team Card for Conie Fong Art & Design. I am so excited that I have been asked to become a permanent Design Team Member! Yippee!

For my card, I used the sweet Puppy Cuddles and coloured with my Copic markers her hair colour to match her puppy’s fur. You know what they say…you look like your dog. Lol! 

Since it is still snowy here is Canada, I thought I would create one last winter card as a mini slim line card. I have been having so much fun with slim line cards and thought it would be fun to create my first mini card for her! The birch trees were the perfect size for my slim line card with a couple of snow banks to fill in the space at the bottom. I decided that the Friend die would be neat die cut from the snow bank. I added the white embossed “Best” on Early Espresso to match the colour of her dog and to complete my Best Friend sentiment since all dogs are Man’s Best Friend!

————————–

Copic Markers:

Skin: E000/E00/E21/E11/E04/R20
Hair: E49/E43/E42/E41
Eyes: E47/E44/E43
Blues: B91/B93/B95/B97
Browns: E44/E43/E42/E41
Pom Pom on Hat: E43/E42/E41/Star Dust Stickles
Boots: E44/E43/E42/E41
Soles of Boots: E49/E47/E42
Puppy: E47/E44/E43/E42/R20

Close Up of My Design Team Card
Close Up of My Design Team Card for Conie Fong Art & Design

————————–

Card Recipe for My Puppy Love Card:

Puppy Cuddles, Conie Fong Art & Design
Paper Basics – Stamper’s Select White Cardstock, Papertrey Ink
Warm & Cozy 6” x 6” Paper, Echo Park
Woodland Collection Birch Tree Forest, Sue Wilson
Friend Saying, CC Designs
Freezin’ Friends Dies, Stampin Up!
Snowfall Thinlits Dies, Stampin’ Up!
Art Gallery Stamp Set, Stampin’ Up!
Rhinestone Basic Jewels, Stampin’ Up!
VersaMark Ink Pad, Stampin’ Up!
White Stampin’ Emboss Powder, Stampin’ Up!
Foam Adhesive Strips, Stampin’ Up!
White Gelly Roll Pen, Sakura
Clear Gelly Roll Pen, Sakura
Star Dust Stickles, Ranger
Misty Moonlight, Early Espresso and
Whisper White Card Stock, Stampin’ Up!

Finished card size: 6” x 3.5”

————————–

To view my other Conie Fong Art & Design cards, please click here.

To view my other Slim Line cards, please click here.

Hope you like my first Design Team card using
Puppy Cuddles for Conie Fong Art & Design!

Thank you for stopping by!

Hugs,
Laurie

Always Be A Mermaid Card

My Always Be A Mermaid Card
My Always Be A Mermaid Design Team Card

Hello Crafty Friends! It’s Laurie here with my Always Be A Mermaid Card using the stamp called ‘Mermaid’ Digital Stamp by Rachelle Anne Miller Creative Studios. I love this sweet mermaid and her little friends!

For my card, I knew that I wanted to create a slim line card for her with a pretty watery background! I coloured her with my Copic markers. I especially had fun with her tail and used two different colour combinations to give it a mermaid look. And then, I added Stickles since you know mermaids have sparkly tails! Once I coloured her and her friends, I fussy cut them out.

My Watery Background Technique

For my water, I pulled out my Distress Oxides and worked from light in the centre (Peacock Feathers and Mermaid Lagoon) where I wanted to highlight her to the darkest at the edges (Salty Ocean and Broken China). Once I did that, I splattered water on the panel and removed the water droplets with a paper towel to give some dimension. Next, I splattered the panel with the Frost White shimmer paint and let everything dry.

Some dies from my stash, a scattering of clear dew drops, and real shells are added to finish my watery scene.

————————–

Copic Markers:

Skin: E000/00/21/11/04/R20
Hair: E25/YR24/Y26/Y21
Top: BG01/BG05/BG09/R20
Tail: YG00/YG23/YG67/BG01/BG09
Turtles: YG00/YG23/YG67/E37/E35/E33/E31/E30

Close Up of My Card
Close Up of My Design Team Card

————————–

Card Recipe for My
Always Be A Mermaid Card:

‘Mermaid’ Digital Stamp, Rachelle Anne Miller Creative
Paper Basics – Stamper’s Select White Cardstock, Papertrey Ink
Perennial Essence 12” x 12” Vellum Cardstock, Stampin’ Up!
Large Slimline with Sliders Dies, Lawn Fawn
Memory Box Delicate Vine Border Die!
Breaking Waves Border Dies, Heffy Doodle
Under the Sea Framelits, Stampin’ Up!
Subtle 3D Embossing Folder, Stampin’ Up
Crumb Cake Classic Ink, Stampin’ Up!
Stamping Sponges, Stampin’ Up!
Spring Bloom Dew Drops, The Robin’s Nest
Clear Gelly Roll Pen
Star Dust Stickles, Ranger
Shells from Dollar Store

For the Water:
Hot Press 140 lbs Watercolor Paper, Fabriano
Peacock Feathers Distressed Oxide, Ranger
Mermaid Lagoon Distressed Oxide, Ranger
Salty Ocean Distressed Distressed Oxide, Ranger
Broken China Distress Oxide Ink, Ranger
Ranger Mini Ink Blending Tool
Tim Holtz Distress Splatter Brush, Ranger
Splashes of water and paper towel to remove water droplets
Frost White Shimmer Paint, Stampin’ Up!

Pacific Point, Whisper White and Crumb Cake Card Stock, Stampin’ Up!

Finished card size: 8.75” x 3.75”

————————–

To view my other Rachelle Anne Miller Creative Studios cards, please click here.

Hope you like my Always Be A Mermaid Card using ‘Mermaid’ Digital Stamp by Rachelle Anne Miller Creative Studios!

Thank you for stopping by!

Hugs,
Laurie

Fine Art Birthday Card

My Fine Art Birthday Card

Today is I am sharing my Fine Art Birthday Card using the Fine Art Floral Suite Collection by Stampin’ Up! I love this collection with the lovely flowers and textures on a modern take on classic impasto paintings. Rich textures, lovely florals, gold leafing, and more all work together for a fine art experience that is sure to yield beautiful and elegant results.

The Art Gallery Photopolymer Stamp Set is so pretty with lots of lovely sentiments for all kinds of cards! And you can’t go wrong with the matching Floral Gallery Dies.

How to Use Gilded Leafing Embellishment

When I saw the Gilded Leafing Embellishment in the new mini, I was so excited! It was on the top of my list to buy. I have used similar products and just loved them. So, I knew I would love the Stampin’ Up! version.

For my card, I took the VersaMark Ink Pad and rubbed it on opposite corners of the DSP and the Mossy Meadow card stock (which was embossed first with the Painted Texture 3D Embossing Folder). I then sprinkled Heat & Stick Powder to the ink and set it with my heat tool. It will melt like embossing powder but leaves a sticky residue behind to which you can adhere the Gold Gilding. I then burnished with my fingers the Gold Gilding removing the excess.

Imagine an artist, delicately painting individual canvases in a classic impasto style. It’s beautiful, isn’t it? That’s exactly what this paper is! A Stampin’ Up! artist hand-paint canvases with beautiful florals and textures in classic Stampin’ Up! colors. They then took those canvases, photographed them, and made them into this unique designer series paper. Your heart will grow wild when you get this paper in your hands. The pack includes florals, patterns, colour variance, and all the touches of professional paintings.

To finish my card, I added a strip of the gorgeous Golden Garden Designer Specialty Acetate behind the Fine Art Ribbon and the sentiment. A scattering of Gold Glitter Enamel Dots tie in the golden theme.

Supplies:

Stamps/Bundles/Dies: Art Gallery Bundle (156227)

Inks: Bumblebee Classic Stampin’ Pad (153116), Mossy Meadow Classic Stampin’ Pad (147111), VersaMark Ink Pad (102283

Paper: Bumblebee (153077), Mossy Meadow (133676), Basic White (159276), Golden Garden Designer Specialty Acetate (154557), Fine Art Floral Designer Series Paper (154558)

Accessories: Painted Texture 3D Embossing Folder (154317), 3/8″ Fine Art Ribbon (154561), Heat & Stick Powder (156110), Gilded Leafing Embellishment (154560), Gold Glitter Enamel Dots (152155), Heat Tool (129053 ), Bone Folder (102300), Stampin’ Dimensionals (104430), Stampin’ Seal (152813), Glue Dots (103683)

Close Up of My Fine Art Birthday Card

Measurements: 

  • Bumblebee: 5 ½” x 8 ½” scored at 4 ¼”
  • Mossy Meadow: 3 ¼” x 4 ½”
  • Basic White: ½” x 2 ¾”
  • Fine Art Floral Designer Series Paper: 3” x 4 ¼”
  • Golden Garden Designer Specialty Acetate: 1” and 3 ¾”
  • Fine Art Ribbon: 3 ½”

For Further Info:

Hope you like my Fine Art Birthday Card.

For more of my Stampin’ Up! cards, please click here.

You will find the items listed above in my online store.

My Sweet Birthday Card

My Sweet Birthday Card

Today is I am sharing My Sweet Birthday Card that I made for a swap using the Sweet Strawberry Bundle and the Sale-a-Bration Berry Bliss Bundle. There is only a few more day left of the Jan-Feb 2021 Sale-a-Bration and you can get the Berry Bliss Bundle for free with a qualifying $120 order.

I love how these two bundles coordinate with their berry sweet theme! The Berry Delightful Designer Series Paper is so pretty with its fresh and juicy paper designs. Both stamp sets are Distinktive and consist of two-step stamping to give you texture and dimension to your images.

Who doesn’t love a coordinating punch and what is better than the Strawberry Builder Punch! I even punched out a coordinating Granny Apple Green stem to top my strawberry.

I wanted to create a country theme by using the Pinewood Planks 3D Embossing Folder and the Denim Ribbon. The Stitched Oval also adds to my theme. The plaid DSP reminded me of a table cloth that has been laid on the ground to enjoy your picnic of berries. A couple of Red Rhinestones are the finishing touch and add a bit of sparkle to the card.

I had so much fun with my card that I ended up making 3 versions all with different sentiments.

Three Variations of my Card

Supplies:

Stamps/Bundles/Dies: Sweet Strawberry Bundle (156214), Berry Blessings Bundle (157613)

Inks: Crumb Cake Classic Stampin’ Pad (147116), Poppy Parade Classic Stampin’ Pad (147050), Pacific Point Classic Stampin’ Pad (147098), Granny Apple Green Classic Stampin’ Pad (147095)

Paper: Poppy Parade (119793), Crumb Cake (120953), Basic White (159276), Granny Apple Green (146990), Berry Delightful Designer Series Paper (157613)

Accessories: Pinewood Planks 3D Embossing Folder (152320), 3/8″ Denim Ribbon (149590), Stitched Shapes Dies (152323), Red Rhinestone Basic Jewels (146924), Bone Folder (102300), Stampin’ Dimensionals (104430), Stampin’ Seal (152813), Glue Dots (103683)

Close Up of One of My Cards

Measurements: 

  • Poppy Parade: 5 ½” x 8 ½” scored at 4 ¼”
  • Crumb Cake: 5 ¼” x 4”
  • Basic White: 5 ¼” x 1 ½”
  • Granny Apple Green: 5 ¼” x 1 5/8” and scrap
  • Berry Delightful Designer Series Paper: 5 ¼” x 2 5/16”
  • Denim Ribbon: 2 pieces at 6” and 4”

For Further Info:

Hope you like My Sweet Birthday Card.

For more of my Stampin’ Up! cards, please click here.

You will find the items listed above in my online store.

Dance for Joy Card

My Dance for Joy Card
Dance for Joy Card

Hello Crafty Friends! It’s Laurie here with my Dance for Joy Card using the digital PNG stamp called ‘Ballerina Princess’ Digital Stamp by Rachelle Anne Miller Creative Studios as my Design Team Inspiration. Don’t you love this sweet little girl who just loves to dance!

For my card, I knew that I wanted to create a really girly card with soft pinks, blues and yellows. So, the 5thAvenue Paper was perfect for my card! Once I coloured her with my Copic markers, I added glitter to her top, flowers in her hair and the star on her wand with a Clear Gelly Roll Pen.

I created a frame for my little Ballerina like she was hung on a wall in a place of honour. I used the Hydrangea Punch to build my flowers to match my colours and added a pearl in the centre since pearls are very girly! The flag banner was die cut from the 5th Avenue Paper Pad and flanked by my flowers. Of course you have to have pink ballerina shoes for a ballerina! The sentiment sums up my card perfectly!

————————–

Copic Markers:

Skin: E000/00/21/11/04/R20
Hair: E18/E17/E15/E12/E11
Pinks: R00/R20/R21
Blues: BG10/BG11/BG13
Yellows: Y11/Y15/Y19
GrassYG03/YG63/YG67

Close Up of My Card
Close Up of My Card

————————–

Card Recipe for My Dance for Joy Card:

‘Ballerina Princess’ Digital Stamp, Rachelle Anne Miller Creative
Paper Basics – Stamper’s Select White Cardstock, Papertrey Ink
Melissa Frances, 5th Avenue 6” x 6” Paper Pad
Marvelous Squares Dies, Spellbinders Nestabilities
Little Happiness Ballet Shoes, Joy Crafts
Tasteful Labels Dies, Stampin’ Up!
Flag Banner Dies, From my Stash
HYDRANGEA Punch 3 in 1 Flowers Trio Flower, Martha Stewart EK Success
Pink Pirouette 1.25” Grosgrain Ribbon, Stampin’ Up!
Pearl Basic Jewels, Stampin’ Up!
Pool Party Classic Stampin’ Pad, Stampin’ Up!
Clear Star Gelly Roll Pen
Pink Pirouette, So Saffron and Pool Party Card Stock, Stampin’ Up!

Finished card size: 6” x 6”

————————–

To view my other Rachelle Anne Miller Creative Studios cards, please click here.

Hope you like my Dance for Joy Card using ‘Ballerina Princess’ Digital Stamp by Rachelle Anne Miller Creative Studios!
Thank you for stopping by!

Hugs,
Laurie

Peony Thank You Card

My Peony Thank You Card

Today is I am sharing my Peony Thank You Card that I made for a swap using the beautiful Peony Garden Suite Collection. I love peonies and when I saw this collection, I knew that I had to buy it! It is getting lots of love! So far, I have made 4 cards with it! I am sharing two of those cards here.

For my card, I pulled out my Stampin’ Up! Blends in Petal Pink and Old Olive to colour this gorgeous flower. I love how you can use the matching dies to cut out the blooms, but there are also dies that build a 3D peony bloom as well! I made the card below for my Mom’s 75th birthday using the 3D bloom and it was gorgeous!

Birthday Card with the 3D Peony Bloom
My Mom’s Birthday Card with the 3D Peony Bloom

I love the softness of the Peony Garden Designer Series Paper and that was from where I pulled my colour scheme of Petal Pink and Gray Granite with a touch of Old Olive.

I used the pretty Dainty Diamonds 3D Embossing Folder on the Petal Pink card stock. For embellishments, I used the Gray Granite Ribbon, a Square Vellum Doily and a scattering of Elegant Faceted Gems.

Supplies:

Stamps/Bundles/Dies: Prized Peony Bundle (154056), Stitched Rectangles Dies (151820)

Inks: Tuxedo Black Memento Ink Pad (132708), Old Olive Classic Stampin’ Pad (147090)

Paper: Gray Granite (146983), Petal Pink (146985), Basic White (159276), Peony Garden Designer Series Paper (152483)

Accessories: Dainty Diamonds 3D Embossing Folder (152702), Old Olive Stampin’ Blends Combo Pack (154892), Petal Pink Stampin’ Blends Combo Pack (154893), Gray Granite Ribbon (152463), Elegant Faceted Gems (152464), Square Vellum Doilies (152484), Bone Folder (102300), Stampin’ Dimensionals (104430), Stampin’ Seal (152813), Glue Dots (103683)

Measurements: 

  • Gray Granite: 5 ½” x 8 ½” scored at 4 ¼”
  • Petal Pink: 5 ¼” x 4”
  • Basic White: 2 pieces
    • 2 3/8” x 1” (sentiment)
    • 2 ¾” x 3 ½”
  • Peony Garden Designer Series Paper: 3 pieces at 3 ¼” x 1 ¼”
  • Gray Granite Ribbon: 2”
Close Up of My Peony Thank You Card

For Further Info:

Hope you like my Peony Thank You Card.

For more information on my colouring, here are some videos of my colouring techniques:

1 – PartWhiskey Business Card using Blending Different Colours Technique
Video Tutorial: Blending Different Colours Together

2 – PartCountry Harvest Card using Light to Dark Technique
Video Tutorial: Light to Dark/Dark to Light Colouring

3 – PartBeautiful Poppy Birthday Card using Smooth Colouring Technique
Video Tutorial: Smooth Colouring

4 – PartLet’s Gather Together Card using Tip to Tip Blending Technique
Video Tutorial: Tip to Tip Colouring

5 – PartSo Grateful Cardinal Card using Flicking Colouring Technique
Video Tutorial: Flicking Colouring

6 – PartLet’s Celebrate You Card using Flicking of Different Colours Technique
Video Tutorial: Flicking of Different Colours Technique

My Colouring Notes:
https://stampwithlaurie.com/wp-content/uploads/2020/08/Stampin-Up-Blends-2020.pdf

You will find the items listed above in my online store.

My True Love Card

My True Love Card

Hello Crafty Friends! It’s Laurie here with My True Love Card for Rachelle Anne Miller Creative Studios using the sweet ‘Flowers for You’ Digital Stamp. This stamp is perfect for that special someone on Valentine’s Day!

I love it when I receive flowers from my Hubby and this stamp reminds me of those wonderful moments! So, I coloured with my Copic Markers the couple to look like us. I created a bouquet that mimics the bouquet that the boy is giving the girl, but I added some ribbon, linen thread and a heart trinket all mounted on a filigree die cut heart. For the Detailed Hearts Die cut, I cut it in half and then offset it in opposite corners. A heart paper clip and red rhinestones along with Clear Gelly Roll Pen on the hearts and Clear Wink of Stella on the large heart add a bit of sparkle and whimsy. I angled my coloured focal point so that you could see the paper beneath that says My True Love. That is what my card is all about.

————————–

Copic Markers:

Skin: E000/E00/E21/E11/E04/R20
My Hair: E30/E31/E33/E35/E37
Hubby’s Hair: E57/E42/E53
Blues: B91/B93/B95/B97/B99
Reds: R22/R24/R27/R29
Pinks: R81/R83/R85
Shoes: E31/E35/E37
Leaves: YG03/YG63/YG67
Yellow: Y38

Close Up of My True Love Design Team Card

————————–

Card Recipe for My True Love Card:

‘Flowers for You’ Digital Stamp, Rachelle Anne Miller Creative
Paper Basics – Stamper’s Select White Cardstock, Papertrey Ink
Smitten 6” x 6” Paper Pad, Authentique
Detailed Hearts Die, Stampin’ Up!
Be Mine Stitched Dies, Stampin’ Up!
Love Notes Framelits Dies, Stampin’ Up!
Linen Thread, Stampin’ Up!
Marina Mist Taffeta Ribbon, Stampin’ Up!
Paper Flowers, Recollections
Heart Trinkets Embellishments, Stampin’ Up!
Heart Clip Embellishment, Stampin’ Up!
Red Rhinestone Basic Jewels, Stampin’ Up!
Clear Gelly Roll Pen
Clear Wink of Stella, Stampin’ Up!
Real Red and Rose Red Card Stock, Stampin’ Up!

Finished card size: 6” x 6”

Close Up of the Paper Flower Bouquet

————————–

To view my other Rachelle Anne Miller Creative Studios cards, please click here.

Hope you like My True Love Card using ‘Flowers for You’ Digital Stamp by Rachelle Anne Miller Creative Studios!

Thank you for stopping by!

Hugs,
Laurie