My Birthday Treat Card

My Birthday Treat Card - Birthday card with a girl and dog on it
My Birthday Treat Card

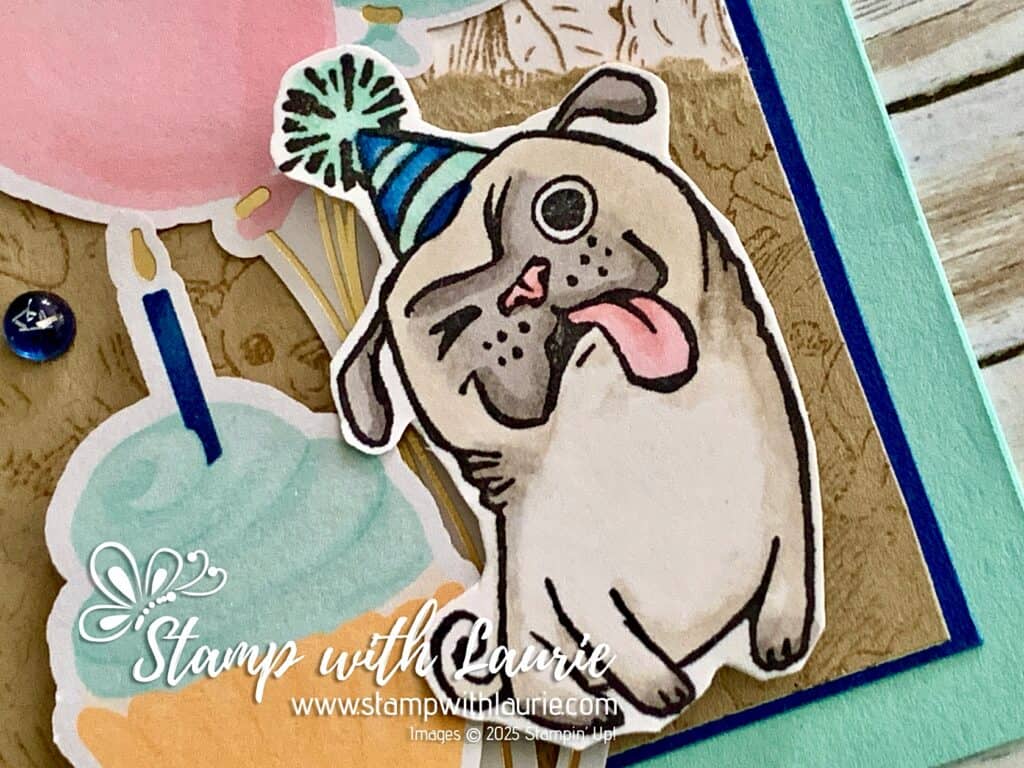
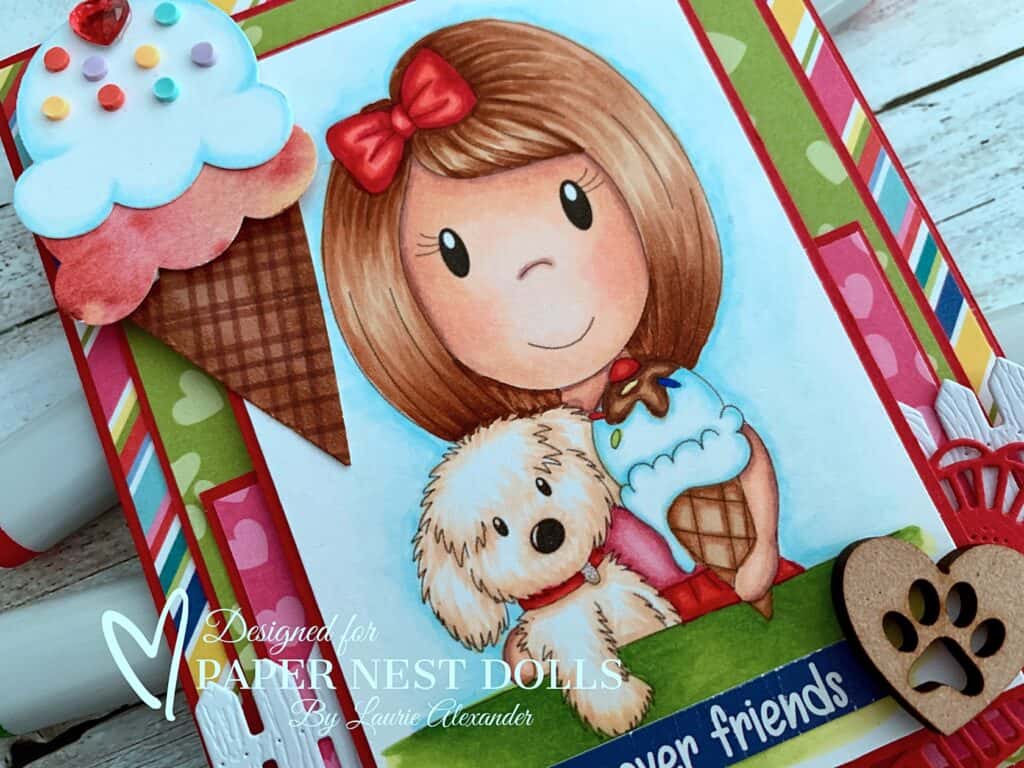
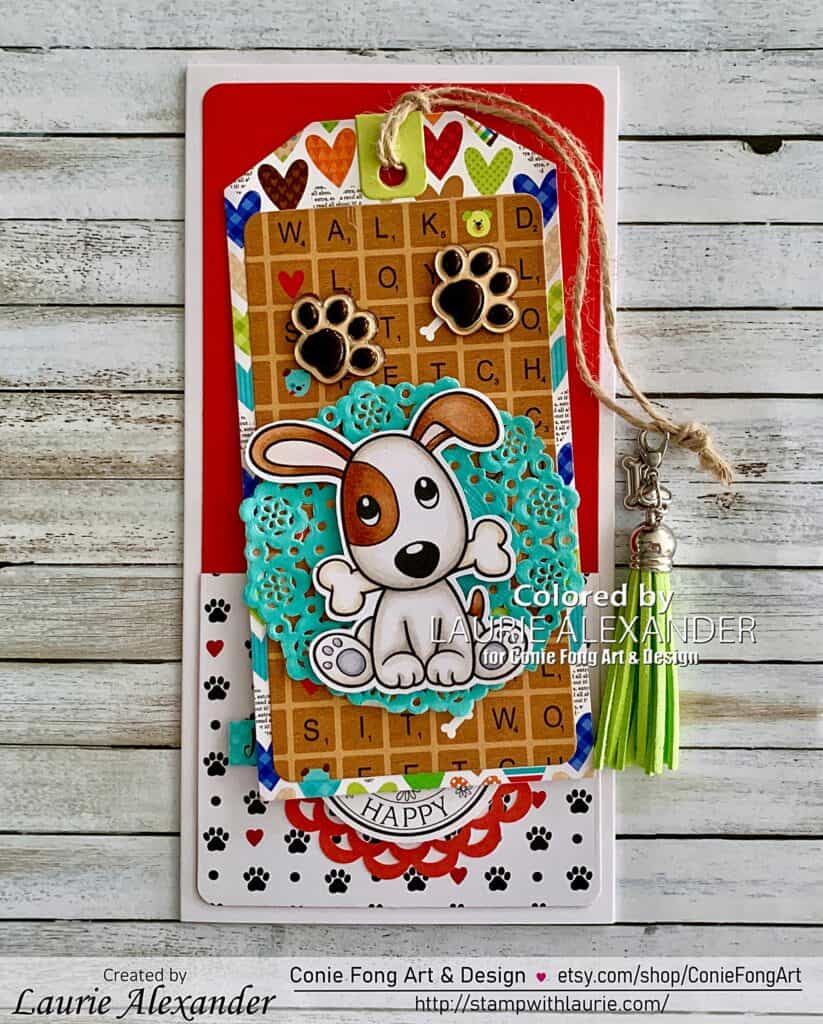
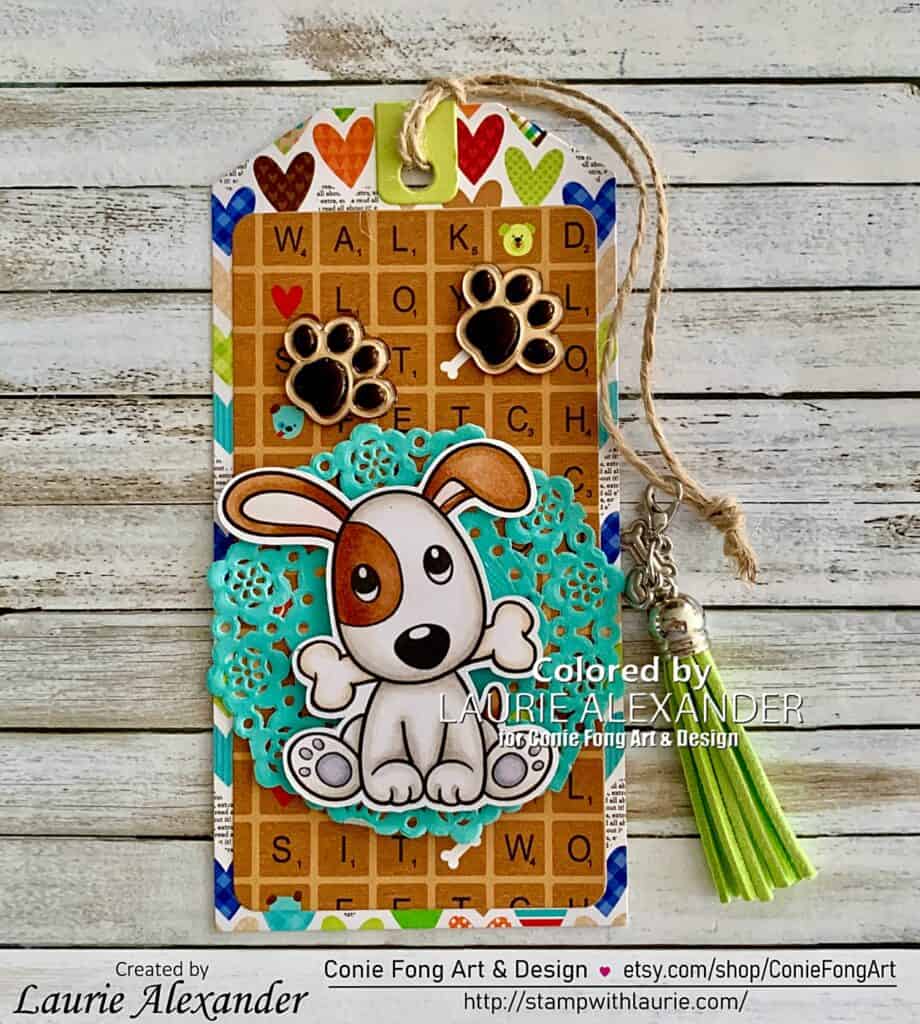
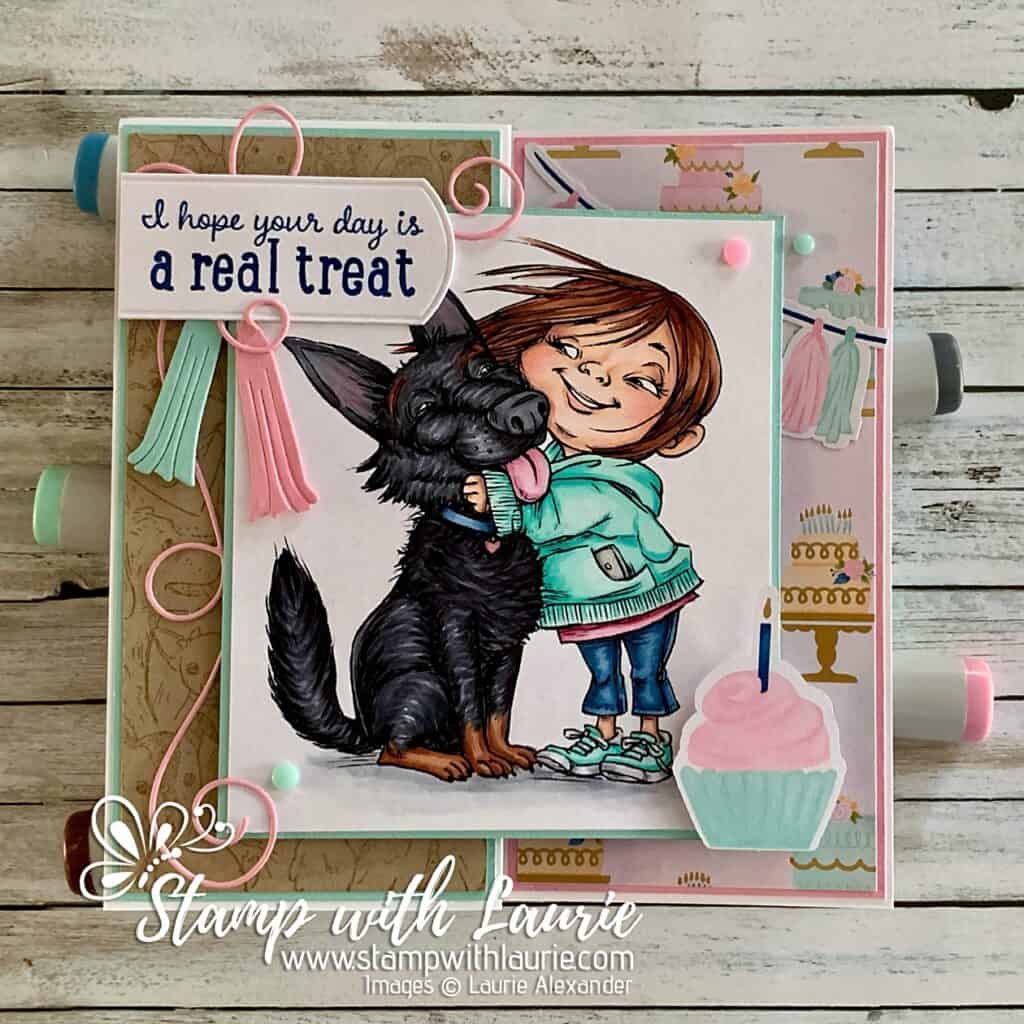
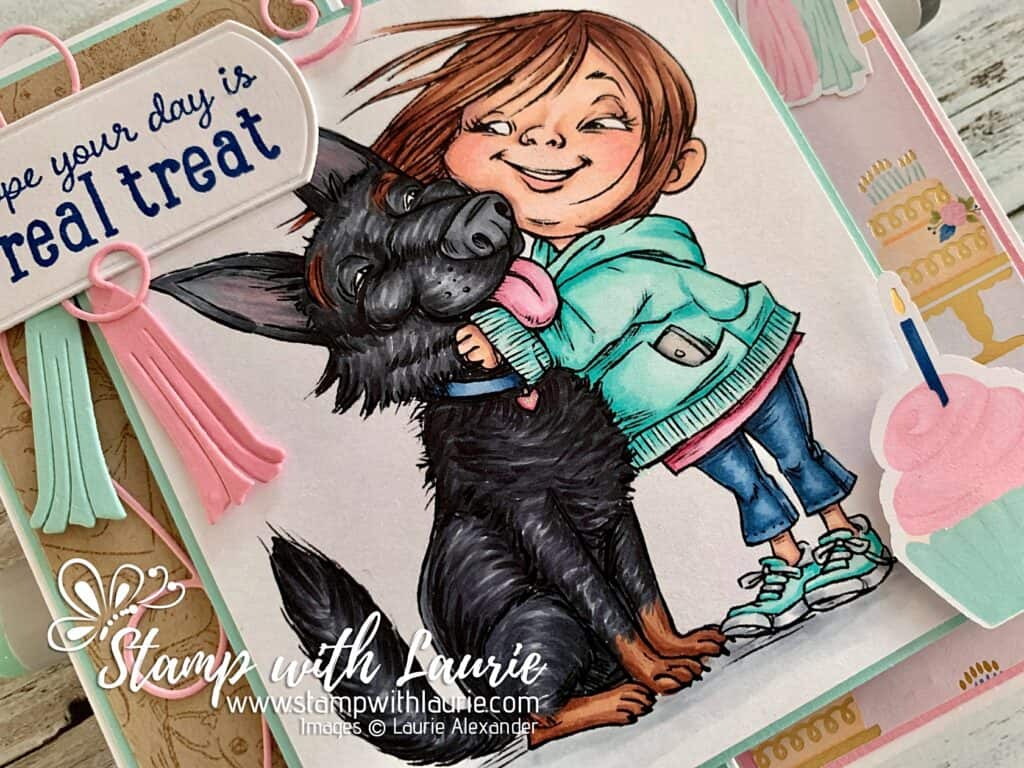
Hello Crafty Friends! It’s Laurie here! I am sharing My Birthday Treat Card using the sweet Daisy and Me by Mo’s Digital Pencil. I have a birthday twin whose birthday is the same day as mine! She loves her dogs and when I saw this new digital stamp, I knew it was perfect for her birthday card!

The Details of My Birthday Treat Card

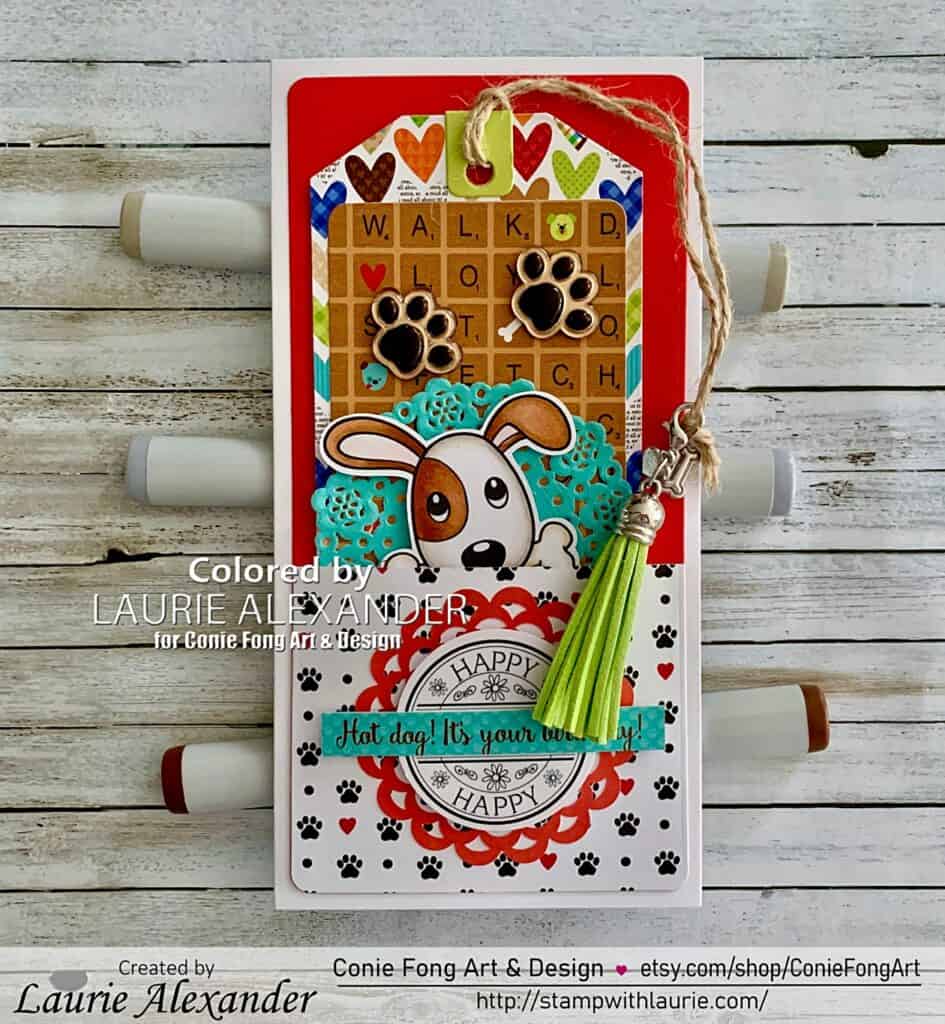
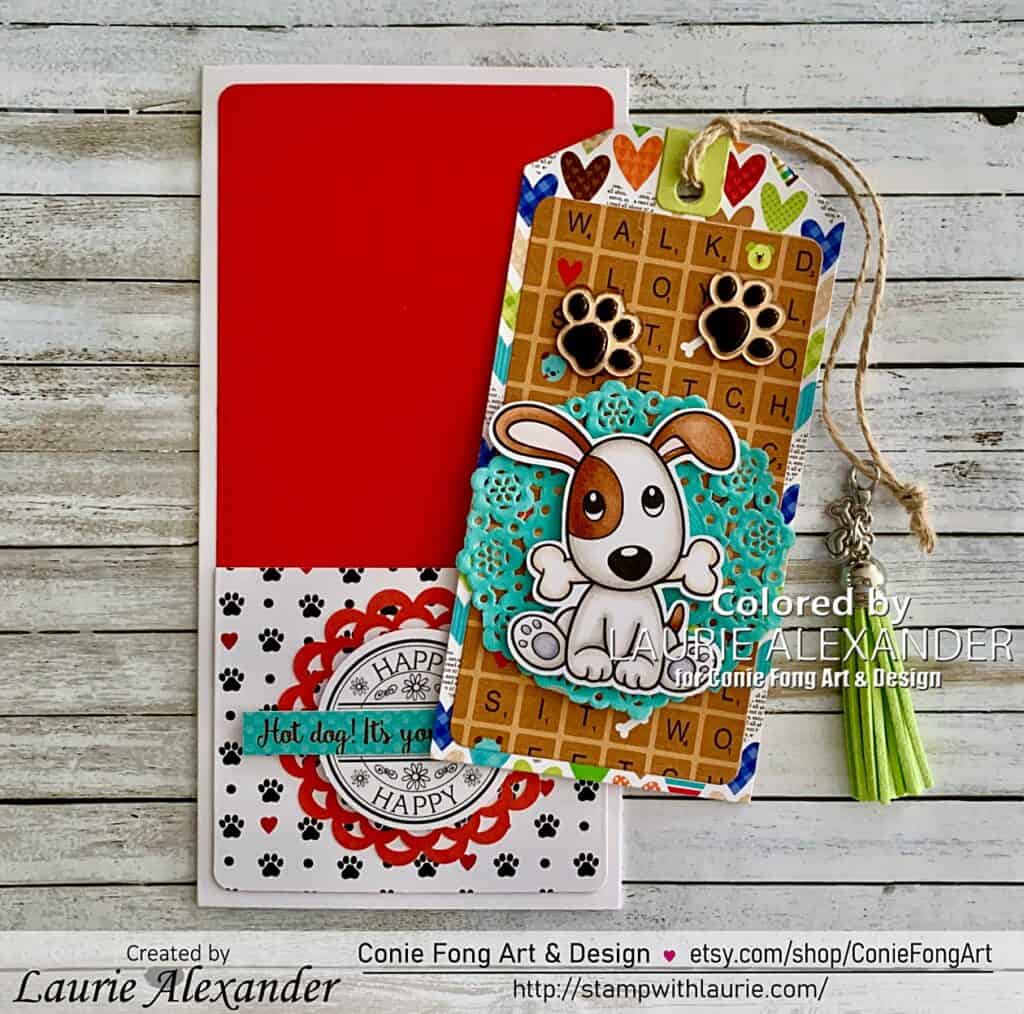
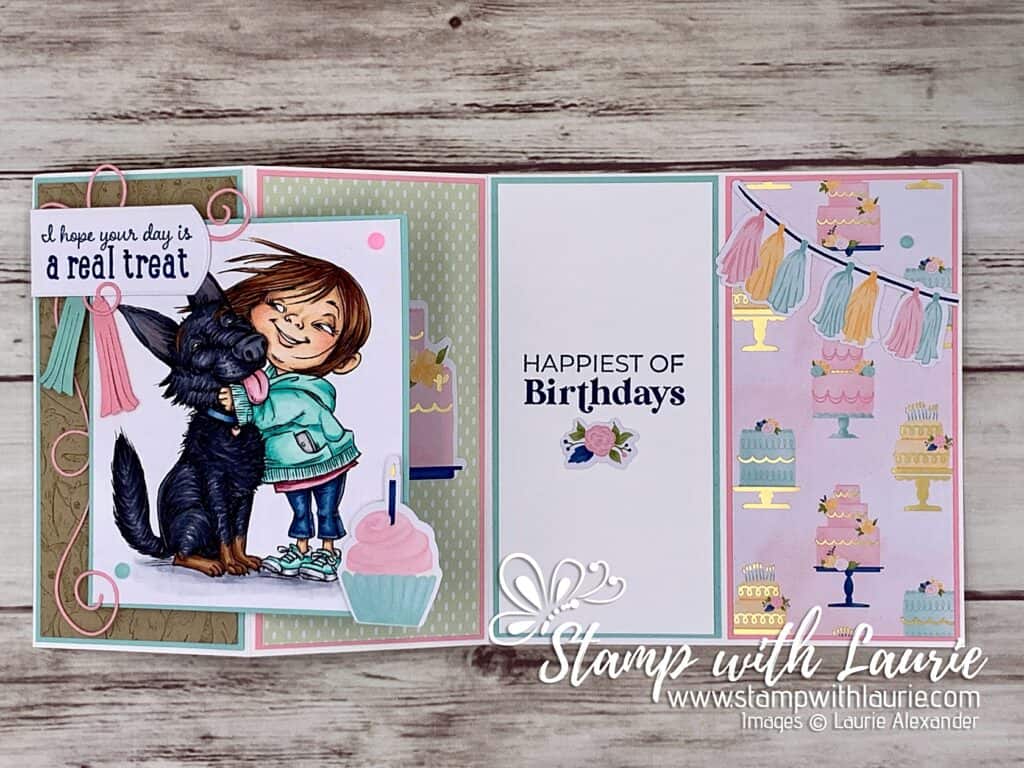
For my card, I decided to create a Z-fold card so that I could decorate all the panels with the gorgeous Wildflower Birthday Specialty Designer Series Paper by Stampin’ Up! The ready-to-use die cuts that are included in the DSP were perfect for my birthday theme!

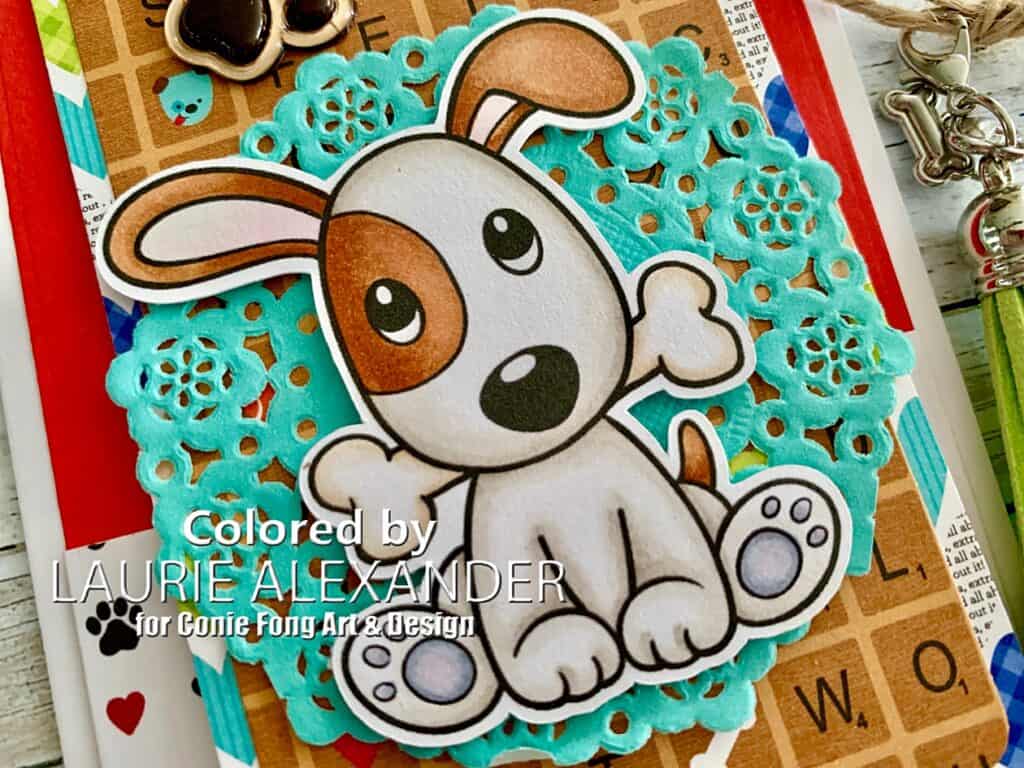
But first, I coloured with my Copic markers the dog and girl to look like my friend and her dog, Rocky! He has very distinctive marking including eyebrows! Lol. I added Glossy Accents to her phone and Clear Star Gelly Roll Pen to the heart tag on Rocky’s collar.

All Panels of the Card Showing
Z-Fold

To add to the birthday celebrations, I used the Birthday Celebration Dies by Stampin’ Up!, as well as, a bow Corner Die from Memory Box on the front panel of the card. The cupcake was from the DSP ready-to-use die cuts and matched my colour scheme perfectly!

The sentiment was from the retired Pampered Pets Stamp Set and stamped in Blueberry Bushel before die cutting it with one of the Unbounded Love Dies.

Inside Panels of Card

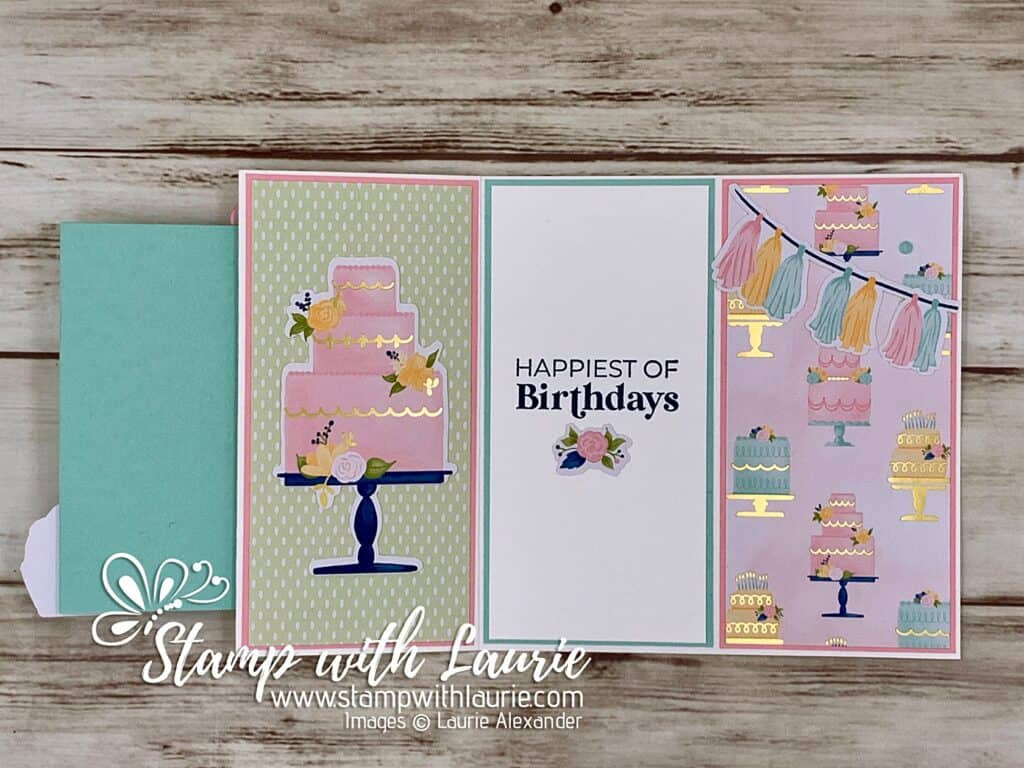
For the inside, I decorated the panels with the DSP and die-cuts. Don’t you love that cake and banner! So festive! The inside sentiment was from the Throughout the Year Stamp Set by Stampin’ Up! and stamped in Blueberry Bushel as well. A floral die cut was the finishing touch to the sentiment panel.

For embellishments, I added some Party Dots on the front to matched my colour scheme.

————————–

Copic Markers:

Skin: E000/E00/E21/E11/E04/R20
Hair: E27/E25/E23
Hoodie: BG13/BG11/BG10
T-Shirt: R85/R83/R81
Jeans: B99/B97/B95/B93/B91
Shoes: BG13/BG11/BG10/C3/C1/0
Phone: C3/C1/0/Glossy Accents
Dog: C9/C7/C5/E27/E25/E23/C3/R20
Dog’s Tongue: R85/R83/R81
Dog’s Collar: B97/B95/B91/R85/R81/Clear Star Gelly Roll Pen
Ground: C3/C1/0

Close up of Dog and Girl
Close up of Rocky and Sheina

————————–

Card Recipe for My Birthday Treat Card:

Daisy and Me, Mo’s Digital Pencil
Paper Basics – Stamper’s Select White Cardstock, Papertrey Ink
Wildflower Birthday Specialty Designer Series Paper, Stampin’ Up!
Corner Bow Die, Memory Box
Unbounded Love Dies, Stampin’ Up!
Birthday Celebration Dies, Stampin’ Up!
Doggone Friendly Stamp Set, Stampin’ Up!
Throughout the Year Stamp Set, Stampin’ Up!
Pampered Pets Stamp Set, Stampin’ Up!
Blueberry Bushel Classic Ink Pad, Stampin’ Up!
Crumb Cake Classic Ink Pad, Stampin’ Up!
Party Dots, Stampin’ Up!
Glossy Accents, Ranger
Clear Star Gelly Roll Pen, Sakura

Pretty in Pink, Pool Party and Crumb Cake Card Stock, Stampin’ Up!

Finished card size: 5 ½” x 5 ½”

————————–

To view my other Mo’s Digital Pencil cards, please click here.

Hope you like My Birthday Treat Card using Daisy and Me by Mo’s Digital Pencil!

Thank you for stopping by!

Hugs,
Laurie

My Otterly Amazing Card

My Otterly Amazing Card - a card with otters on it
My Otterly Amazing Card

Hello Crafty Friends! Laurie here again! I am sharing My Otterly Amazing Card using the Otterly Amazing Bundle which includes the Otterly Amazing Stamp Set and the Otterly Amazing Dies by Stampin’ Up!

The Details of My Otterly Amazing Card

I received a fun puzzle card in a swap back in October and thought this fun fold would work well with the Otterly Adorable Designer Series Paper, especially the pages with the scene. But this card was for a swap, and I didn’t have enough papers with the scene. So, I used other playful aquatic scenes as well to complete my swaps.

Two of my Cards with Different Scenes

For my card, I took a 11” x 4 ¼” Pretty Peacock piece and scored it according to the instructions below. Then, I cut a to 5 ½” x 4 ¼” piece to the measurements below. Tip: once the base is folded, adhere the smaller piece to the front when it is closed so that everything lines up.

Next, I added my DSP to the appropriate squares to create my scene. I love that the dies cut out several otters from the DSP. So, instead of colouring them (I know gasp! Lol!), I die cut one for each card.

To add to my scene, I die cut some seaweed from Old Olive card stock and added it to the left side of card, overlapping the sentiment.

For the sentiment, I white embossed it on a piece of Balmy Blue and die cut it out with the smallest rectangle from the Something Fancy Dies.

View of Card from Top

For the inside, I added a piece of Basic White with the fish and sentiment stamped in Lost Lagoon.

As a finishing touch to the front of my card, I added a scattering of Riverside Irregular Pearls.

Supplies:

Stamps/Bundles/Dies: Otterly Amazing Bundle (164933), Something Fancy Dies (160424)

Inks: VersaMark Ink (102283), Lost Lagoon Classic Stampin’ Pad (161678)

Paper: Pretty Peacock (150880), Basic White (159276), Balmy Blue (146982), Old Olive (100702), Otterly Adorable 12” x 12” Designer Series Paper (164183)

Accessories: Basics Embossing Powder (165679), Riverside Irregular Pearls (164937), Heat Tool (129053), Embossing Additions Tool Kit (159971), Stampin’ Paper Trimmer (152392), Bone Folder (102300), Stampin’ Dimensionals (104430), Mini Stampin’ Dimensionals (144108), Stampin’ Seal (152813), Multipurpose Liquid Glue (110755)

Close Up of Otter
Close Up of Otter

Measurements: 

  • Pretty Peacock:
    • 11” x 4 ¼” scored at 1”, 2 ¾”, 8 ¼”, 10”
    • 5 ½” x 4 ¼” – cut horizontally at 2-1/8” and then the 2 pieces vertically at 3 ½”
  • Basic White (for inside):
    • 5 ¼” x 4”
  • Balmy Blue:
    • Scrap
  • Old Olive:
    • Scraps
  • Otterly Adorable Designer Series Paper:
    • 5 ¼” x 4” – cut horizontally at 2” and then vertically cut top piece at 3-3/8” and bottom piece at 1-7/8”
    • One of the otters from the DSP

More Information on My Otterly Adorable Card

Here is the other card that I made using the same using Pretty Peacock card stock and the other playful aquatic scenes.

My Other Card
My Other Card

For more of my Stampin’ Up! cards, please click here.

You will find the items listed above in my online store.

My Doggone Birthday Card

My Doggone Birthday Card - - birthday card with a dog with balloons and a cupcake
My Doggone Birthday Card

Hello Crafty Friends! Laurie here again! I am sharing My Doggone Birthday Card using the One More Year Stamp Set and the Doggone Friendly Stamp Set by Stampin’ Up!

My younger brother’s birthday is next week and the pug from the One More Year Stamp Set reminded me of my older brother’s dog, Bruiser. He was such a character and well loved by the family! My younger brother was the dog sitter for when my older brother and his wife traveled. So, they both would know who the dog is on the card.

The Details of My Doggone Birthday Card

For my card, I thought combining the two stamp sets with the ready-to-use die cuts from the Wildflower Birthday Specialty Designer Series Paper would work well together to create a birthday card.

The first thing I did was colour with my Stampin’ Blends the pug to look like Bruiser. Since he had a dark face, paws and ears, I used the dark Gray Granite Stampin’ Blend for them and the Crumb Cake Stampin’ Blends Combo Pack for the rest of his body. To soften the edges where his darker fur met his white tummy, I used the Color Lifter. Once that was done, I used my Paper Snips to fussy cut him out.

Next, I stamped in Crumb Cake the Doggone Friendly Stamp Set twice. Once on Crumb Cake for a tone-on-tone look and again on Basic White. Then, I ripped the Crumb Cake piece on an angle and matched the images up on the Basic White piece. Since I made sure that they were both larger than what I needed, I was able to match them up and then trim them down to the size I wanted.

For the sentiment, I stamped Blueberry Bushel on Basic White. I die cut it out with the largest flag from the Stylish Shapes Dies and then trimmed off one end with my Paper Snips.

The balloon and cupcake ready-to-use die cuts from the Wildflower Birthday Specialty Designer Series Paper were the perfect accents for my birthday theme!

As a finishing touch to my card, I added some Blueberry Bushel gems to match my colour scheme and Wink of Stella on the pug’s hat and the cupcake icing. 

Supplies:

Stamps/Bundles/Dies: One More Year Stamp Set (164777), Doggone Friendly Stamp Set (162729), Stylish Shapes Dies (159183)

Inks: Blueberry Bushel Classic Stampin’ Pad (147138), Tuxedo Black Memento Ink Pad (132708), Crumb Cake (147116)

Paper: Pool Party (122924), Basic White (159276), Blueberry Bushel (146968), Crumb Cake (120953), Wildflower Birthday 12” x 12” Specialty Designer Series Paper (164591)

Accessories: Crumb Cake Stampin’ Blends Combo Pack (154882), Pool Party Stampin’ Blends Combo Pack (154894), Blueberry Bushel Stampin’ Blends Combo Pack (161679), Pretty in Pink Stampin’ Blends Combo Pack (163824), Gray Granite Stampin’ Blends Combo Pack (154886), Stampin’ Blends Color Lifter (144608), Tinsel Gems Four-Pack (161623), Wink of Stella Glitter Brush (141897), Paper Snips (103579), Stampin’ Paper Trimmer (152392), Bone Folder (102300), Stampin’ Dimensionals (104430), Mini Stampin’ Dimensionals (144108), Stampin’ Seal (152813), Mini Glue Dots (103683), Multipurpose Liquid Glue (110755)

Close Up of Dog
Close Up of Pug

Measurements: 

  • Pool Party:
    • 8 ½” x 5 ½” scored at 4 ¼”
  • Basic White (3 pieces):
    • 5 ¼” x 4” trimmed down to 4-7/8” x 3-5/8”
    • Scrap for Pug
    • Scrap for Sentiment
  • Blueberry Bushel:
    • 5” x 3 ¾”
  • Crumb Cake:
    • 5 ¼” x 4” trimmed down to 4-7/8” x 3-5/8”
  • Sentimental Christmas Designer Series Paper:
    • Balloons and Cupcake

More Information on My Doggone Birthday Card

For more of my Stampin’ Up! cards, please click here.

For more of my Stampin’ Blends cards, please click here.

You will find the items listed above in my online store.

My Colouring Notes:

For more information on my colouring, here are some videos of my colouring techniques:

1 – Part: Whiskey Business Card using Blending Different Colours Technique
Video Tutorial: Blending Different Colours Together

2 – Part: Country Harvest Card using Light to Dark Technique
Video Tutorial: Light to Dark/Dark to Light Colouring

3 – Part: Beautiful Poppy Birthday Card using Smooth Colouring Technique
Video Tutorial: Smooth Colouring

4 – Part: Let’s Gather Together Card using Tip to Tip Blending Technique
Video Tutorial: Tip to Tip Colouring

5 – Part: So Grateful Cardinal Card using Flicking Colouring Technique
Video Tutorial: Flicking Colouring

6 – Part: Let’s Celebrate You Card using Flicking of Different Colours Technique
Video Tutorial: Flicking of Different Colours Technique

No-Lines Technique CardsMy Cardinal Anniversary Card and My Cardinal Card

How to Create a Scene Video: https://youtu.be/6w4fkxgA9rg

Notes: https://stampwithlaurie.com/wp-content/uploads/2020/08/Stampin-Up-Blends-2020.pdf

Christmas Nests Alternative Cards

Christmas Nests Alternative Cards - Christmas cards with birds on them
Christmas Nests Alternative Cards

Hello Crafty Friends! Laurie here again! I am sharing my Christmas Nests Alternative Cards using the Nests of Christmas October 2024 Paper Pumpkin Kit by Stampin’ Up! I had a lot of fun playing with this kit and came up with 4 alternative cards with one being a fun shaker card.

But, first, here are the two three panel cards that the kit makes. Perfect for this time of year!

Nests of Christmas October 2024 Paper Pumpkin Kit - the two cards that the kit makes with birds on them
Nests of Christmas October 2024 Paper Pumpkin Kit

The Details of My Christmas Nests Alternative Cards

My Black Capped Chickadees: Card 1

For my first alternative card, I decided to use the leftover punched out arch insert…don’t want to waste anything! Lol! I used a Costal Cabana card base with a Basic White mat that I embossed with the Snowflake Sky 3D Embossing Folder to add interest.

My Black Capped Chickadees: Card 1

Next, I die cut “merry” with the add on Merry Tags & More Dies. This was adhered to the stamped sentiment. I cut one of the ribbons in half and added it to one side of the sentiment.

Everything was adhered to the arch with a scattering of White Loose Snowflakes on the background.

My Cardinal Card: Card 1

For my second alternative card using the Nests of Christmas October 2024 Paper Pumpkin Kit, I again used another leftover insert piece for the background of my cardinal.

My Cardinal Card: Card 1

I added a Real Red card base with a Basic White mat that I again embossed with the Snowflake Sky 3D Embossing Folder to add interest.

For embellishments, I added the other half of the cut ribbon and more White Loose Snowflakes on the background.

My Black Capped Chickadees: Card 2

For my next alternative card, I cut down one of the beautiful envelopes that come in the kit. Then, I embossed it with the Snowflake Sky 3D Embossing Folder. I added the die cut “merry” to it.

My Black Capped Chickadees: Card 2

For embellishments, I again cut one of the ribbons in half and added it to the birds. A scattering of red rhinestones around the sentiment tie in the colours.

My Cardinal Card: Card 2

For my final alternative card, I decided to make a fun shaker card by trimming off one of the panels and used that to add a Window Sheet in the opening! 

My Cardinal Card: Card 2

For my shaker bits, I used White Loose Snowflakes and some retired Loose Silver Sequins. 

Next, I added “merry” and the other half of the ribbon to the stamped sentiment.

More Information on My Christmas Nest Alternative Cards

For more of my Stampin’ Up! Paper Pumpkin Alternative cards, please click here.

You will find the items listed above in my online store.

My Reindeer Fun Card 

My Reindeer Fun Card - a Christmas card with reindeers on it
My Reindeer Fun Card

Hello Crafty Friends! Laurie here again! I am sharing My Reindeer Fun Card using The Reindeer Days Suite Collection by Stampin’ Up!

The Details of My Reindeer Fun Card

For my card, I love the DSP and thought it would make a great background for a diorama card. These cards were for a swap, and I used two different background DSPs. One was green and the other blue. So, you could make a lot of these cards out of one pack of DSP. Perfect for those mass-produced cards you need for Christmas, but sure to wow!

Two cards with different reindeer scenes
Two Different DSP

The first thing I did was score the front and back of the Granny Apple Green pieces. This helped with placement of the DSP on the back piece and the die cut opening on the front piece. The die with the opening just fitted on the centre panel of my card. So, I used a sticky note to hold it in place while I die cut.

Once those two pieces were glued together, I decorated the front with gold foil bells and the reindeer. I love that you can build your reindeer in whatever colours you want to match your project.  I matched mine to the colours on the DSP.

View from Top of Card

The sentiment was stamped in Real Red and die cut with the long thin die from the Friends for Life Dies. This was tucked beneath my reindeer

As a finishing touch to my card, I added some Real Red & White Adhesive-Backed Peppermints and a bow of Real Red & White Baker’s Twine.

Supplies:

Stamps/Bundles/Dies: The Reindeer Fun Bundle (164044), Friends for Life Dies (163364)

Inks: Real Red Classic Stampin’ Pad (147084) 

Paper: Granny Apple Green (146990), Basic White (159276), Pecan Pie (161717), Garden Green (102584), Early Espresso (119686), Gold Foil Sheets (132622), Reindeer Days 12” x 12” Designer Series Paper (164166)

Accessories: Real Red & White Adhesive-Backed Peppermints (164050), Real Red & White Baker’s Twine(164051), Stampin’ Paper Trimmer (152392), Bone Folder (102300), Stampin’ Dimensionals (104430), Mini Stampin’ Dimensionals (144108), Stampin’ Seal (152813), Mini Glue Dots (103683), Multipurpose Liquid Glue (110755)

Close Up of Reindeer Wreath

Measurements: 

  • Granny Apple Green (2 pieces):
    • 5 ½” x 4 ¼” scored at ½”, 1″, 4 ½” and 5
  • Pecan Pie:
    • Scraps
  • Early Espresso:
    • Scraps
  • Basic White:
    • Scraps
  • Garden Green:
    • Scraps
  • Gold Foil Sheets:
    • Scraps
  • Reindeer Days Designer Series Paper:
    • 4” x 4”

More Information on My Reindeer Fun Card

For more of my Stampin’ Up! cards, please click here.

You will find the items listed above in my online store.

My Happy Bee-Day Card 

My Happy Bee-Day Card - a little girl in a bee outfit with a large honey pot beside her.
My Happy Bee-Day Card

Hello Crafty Friends! It’s Laurie here! I am sharing My Happy Bee-Day Card as my Design Team Inspiration Card for Paper Nest Dolls using Lil Bee Amara! Isn’t she a cutie in her bee outfit with her little bee friend!

The Details of My Happy Bee-Day Card

For my card, I decided to use the Let It Bee Paper by Graphic 45. It was perfect for my bee theme with sunflowers and bees on it! Plus, all the words about bees made it a must!

Next, I coloured Amara and her sunflowers with my Copic markers. I had a lot of fun colouring her beautiful skin tone and her hair with all those curls!

I knew that I wanted to use the honey pot die with her. So, I die cut the honeycomb paper for the jar and decided to keep the top as Cherry Cobbler card stock so that her bee friend would show up well. The bee crystal sticker was from my stash and had been waiting for the perfect card. It fit perfectly on the honey pot letting everyone know it had honey in it.

For my card base, I used the Honeycomb Quilt Top Dies by Concord & 9th to add interest. I also tucked in some Honeycomb Clusters behind the honey pot.

The sentiment was heat embossed in white on Basic Black card stock and die cut out.

Finally, I added a scattering of red rhinestones and a paper sunflower to mirror my colour scheme and theme. I used Star Dust Stickles on the sunflower centres and her Bee Antenna-Headband and Clear Wink of Stella on her wings.

————————–

Copic Markers

Skin: E15/E13/E11/E00/E000/R20
Hair: C9/C7/C6/C4
Bee Outfit: Y38/Y35/Y32/C9/C7/C6/C4
Sunflowers: Y38/Y35/Y32/E79/E77/E74/E71
Sunflower Stems: YG67/YG63/YG03
Wings: B00/B000/B0000
Little Bee: Y38/Y35/Y32

Close Up of girl in Bee Outfit
Close Up of Lil Bee Amara

————————–

Card Recipe for My Happy Bee-Day Card

Lil Bee Amara, Paper Nest Dolls
Paper Basics – Stamper’s Select White Cardstock, Papertrey Ink
Let It Bee Papercrafting Paper, Graphic 45
Honey Pot Fancy Dies, Hero Arts
Honeycomb Cluster Die, Taylored Expressions
Honeycomb Quilt Top Dies, Concord & 9th
Mini Strips – Bee Mine Stamp, Taylored Expressions
Mini Strips Flag Die, Taylored Expressions
Versamark Ink, Stampin’ Up!
White Embossing Powder, Stampin’ Up!
Heat Tools, Stampin’ Up!
Sunflower Paper Flower, The Paper Studio
Bee Crystal Sticker, Michaels Arts & Crafts, Mark Richards Enterprises Inc.
Red Rhinestone Basic Jewels, Stampin’ Up!
Star Dust Stickles, Ranger
Clear Wink of Stella, Stampin’ Up!

Finished card size: 5 ½” x 4 ¼”

Stamp Size: 4”

————————–

To view my other Paper Nest Dolls cards, please click here.

Hope you like my Design Team Inspiration Card using Lil Bee Amara by Paper Nest Dolls!

Thank you for stopping by!

Hugs,
Laurie

Just Me and My Puppy

Just Me and My Puppy - a card with a girl holding a puppy and and ice cream cone
Just Me and My Puppy

Hello Crafty Friends! It’s Laurie here! It is starting to feel like summer! So, I am sharing Just Me and My Puppy as my Design Team Inspiration Card for Paper Nest Dolls using Emmas Sweet Friend enjoying an ice cream cone together! 

The Details of Just Me and My Puppy

I just love this sweet digital stamp which reminded me of my puppy So, I coloured him with my Copic markers to look like my Jesse Pup. To match Jesse, I coloured Emma to look like me so that my card looked like my puppy and me! So fun!

For my card, I decided to use the Pampered Pooch Collection by Photo Play with its bright colours and puppy theme. Even the sentiment “furrever friends” is a sticker from that collection.

Next, I added a die cut white wooden fence using the Wood Textured Specialty Paper to add some interest to the background and balance out my card.

Since they are sharing an ice cream cone, I thought I would build a double scooped one with sprinkles and a heart rhinestone that I coloured red with my Copic marker. I even coloured the punched-out ice cream with my Copic markers to give it definition.

To balance out the ice cream cone, I added a MDF heart with a paw print inside which I placed beside my sentiment and layered a die cut heart beneath it.

Finally, for embellishments, I added a scattering of red rhinestones and used Clear Star Gelly Roll Pen for the dog tag.

————————–

Copic Markers

Skin: E04/E11/E21/E00/E000/R20
Hair: E37/E35/E33/E31
Pinks: R85/R83/R81 
Reds: R29/R27/R24
Puppy: E53/E51/E50
Greens: YG17/YG25/YG23/YG21
Sprinkles: B28/R27/Y13/YG25
Ice Cream/Sky: B00/B000/B000
Heart Rhinestone: R27

Close Up of the girl with her puppy
Close Up of Emma and her Friend

————————–

Card Recipe for Just Me and My Puppy

Emmas Sweet Friend, Paper Nest Dolls
Paper Basics – Stamper’s Select White Cardstock, Papertrey Ink
Pampered Pooch 12” x 12” Collection Pack, Photo Play
Ice Cream Corner Designer Series Paper, Stampin’ Up!
Wood Textured Specialty Paper, Stampin’ Up!
Picket Fence Die-namics, My Favorite Things
Heart MDF Shape, Hunkydory
Two of Hearts Dies, Cheery Lynn Designs
Ice Cream Cone Builder Punch, Stampin’ Up!
Ice Cream Corner Sprinkles, Stampin’ Up!
Red Rhinestone Basic Jewels, Stampin’ Up!
Heart Rhinestone, From my Stash
Clear Star Gelly Roll Pen, Sakura

Finished card size: 5 ½” x 4 ¼”

Stamp Size: 4”

————————–

To view my other Paper Nest Dolls cards, please click here.

Hope you like my Design Team Inspiration Card using Emmas Sweet Friend by Paper Nest Dolls!

Thank you for stopping by!

Hugs,
Laurie

My Shellabrate Birthday Card 

My Shellabrate Birthday Card - a birthday card with a mermaid holding a seahorse on it
My Shellabrate Birthday Card

Hello Crafty Friends! It’s Laurie here! One final mermaid card for MerMay from me! I am sharing My Shellabrate Birthday Card as my Design Team Inspiration Card for Paper Nest Dolls using Mermaid Ellie with Seahorse

The Details of My Shellabrate Birthday Card

For my card, I decided to use the Mermaid Tales Collection Kit by Echo Park since it was perfect for my Mermaid theme! The Kit came with paper and stickers. So, I used the “Sparkle & Shine” sticker as well as the paper on my card. The Shellabrate flag was from the Mermaid Dreams Frames & Tags also by Echo Park.

Once I picked my papers, I used the colours from it to colour Ellie with my Copic markers. I used Clear Wink of Stella on her tail and on the fins of the seahorse to add some sparkle just like the sticker said!

Next, I added an angel fish die cut to match the fish in the paper, as well as a shell and seaweed beside the sticker to help ground her.

Finally, for embellishments, I added three dew drops that look like air bubbles to mirror the air bubble paper. I also added a black rhinestone for the fish’s eye.

————————–

Copic Markers

Skin: E04/E11/E21/E00/E000/R20
Hair: E49/E47/E44/E43
Purples: V17/V25/V22/V20 
Blues: BG53/BG57/BG78
Greens: YG67/YG63/YG03

Close Up of Mermaid with Seahorse
Close Up of Mermaid Ellie with Seahorse

————————–

Card Recipe for My Shellabrate Birthday Card

Mermaid Ellie with Seahorse, Paper Nest Dolls
Paper Basics – Stamper’s Select White Cardstock, Papertrey Ink
Mermaid Tales Collection Kit, Echo Park Paper Co.
Mermaid Dreams Frames & Tags, Echo Park Paper Co.
Perennial Essence Vellum Cardstock, Stampin’ Up!
Build-an-Ocean Die Set, Whimsy Stamps
Angel Fish Die Set, Frantic Stamper Inc.
Crumb Cake Classic Ink, Stampin’ Up!
Blending Brush, Stampin’ Up!
Spring Blooms Dew Drops, The Robin’s Nest
Black Rhinestone Basic Jewels, Stampin’ Up!
Clear Wink of Stella, Stampin’ Up!

Finished card size: 5 ½” x 4 ¼”

Stamp Size: 4”

————————–

To view my other Paper Nest Dolls cards, please click here.

Hope you like my Design Team Inspiration Card using Mermaid Ellie with Seahorse by Paper Nest Dolls!

Thank you for stopping by!

Hugs,
Laurie

Welcome Little One Card

Welcome Little One Card - a baby card with a girl holding a bird nest with a baby bird in it
Welcome Little One Card

Hello Crafty Friends! It’s Laurie here! I am sharing my Welcome Little One Card as my Design Team Inspiration Card for Paper Nest Dolls using Avery with Bird Nest. We discovered a bird nest with some robin eggs on one of our outdoor lights. So, I couldn’t resist creating a card around this miracle! I even used a photo of the eggs in the nest on my card!

The Details of My Welcome Little One Card

For my card, I decided to colour with my Copic markers Avery in similar colours to the eggs and nest but went with a bright red hair for all those gorgeous curls!

Next, I die cut the printed photo with a stitched circle die. I used this same die for all three layers of my “nest” so they would line up when layered. The top two offset layers consisted of leaves in two different greens to add dimension. I also added a few sprigs of leaves emanating from my nest.

I used the border leaf die on the darker DSP behind Avery to tie in my theme and make her stand out from the other DSP.

The sentiment was stamped in Balmy Blue, and one end was cut at an angle with my Paper Snips.

Finally, for embellishments, I added three birds from the Adhesive-Backed Dragonflies & Birds for a bit of sparkle.

————————–

Copic Markers

Skin: E04/E11/E21/E00/E000/R20
Hair: R08/YR07/YR14/YR21
Blues: BG02/BG01/BG000
Greens: YG67/YG63/YG03
Browns: E35/E33/E31/E30
Bird: BG02/BG01/BG000/W3/W1/W00

Close Up of girl holding bird nest
Close Up of Avery

————————–

Card Recipe for My Welcome Little One Card

Avery with Bird Nest, Paper Nest Dolls
Paper Basics – Stamper’s Select White Cardstock, Papertrey Ink
Spring Garden 12” x 12” Paper Collection, Paper Rose
Flight & Airy 12” x 12” Designer Series Paper, Stampin’ Up!
Stitched Layering Circle Dies, Memory Box
Birds & More Dies, Stampin’ Up!
Cradled in Love Stamp Set, Stampin’ Up!
Balmy Blue Ink Pad, Stampin’ Up!
Adhesive-Backed Dragonflies & Birds, Stampin’ Up!
Paper Snips, Stampin’ Up!
Computer and Printer
Calypso Coral, Granny Apple Green, and Garden Green Card Stock, Stampin’ Up!

Finished card size: 5 ½” x 4 ¼”

Stamp Size: 4”

————————–

To view my other Paper Nest Dolls cards, please click here.

Hope you like my Design Team Inspiration Card using Avery with Bird Nest by Paper Nest Dolls!


Thank you for stopping by!

Hugs,
Laurie

Happiness is Homegrown Card 

Happiness is Homegrown Card - a Spring card with a girl holding a chick
Happiness is Homegrown Card

Hello Crafty Friends! It’s Laurie here! Spring has finally arrived here! So, I am sharing my Happiness is Homegrown Card as my Design Team Inspiration Card for Paper Nest Dolls using Little Chick Emma

The Details of My Happiness is Homegrown Card

Don’t you just love Emma in her patchwork dress! So, sweet! I coloured this cutie with my Copic markers in Spring colours to match my papers.

For my card, I decided to use the Simple Stories paper since it had a farm theme, and I loved the soft colours! I had some scraps with chickens left over from a previous project, but not a lot. So, I created two squares and placed them in opposite corners on the blue/green polka dotted card base. Great way to use scraps!

Next, I added a die cut white fence to add some interest to the background.

The sentiment and banner were from the matching Simple Stories Bits & Pieces. The needlepoint look was perfect for Emma with her patchwork dress! An adhesive-backed pink heart on the banner mirrored the pinks in Emma’s dress.

Finally, for embellishments, I added more adhesive-backed hearts and flowers in addition to Star Dust Stickles to the hearts on Emma’s dress.

————————–

Copic Markers

Skin: E04/E11/E21/E00/E000/R20
Hair: E18/E15/YR23/Y21
Pinks: R22/R21/R11/R00 
Blues: BG13/BG11/BG10
Greens: YG63/YG61/YG03
Yellows: Y38/Y35/Y18 
Chicks/Polka Dot Patches: Y38/Y35/Y18/Y15/YR09/YR04
Flowers: R22/R11/Y18
Sky: BG10/0

Close up of Girl holding Chick
Close up of Little Chick Emma

————————–

Card Recipe for My Happiness is Homegrown Card

Little Chick Emma, Paper Nest Dolls
Paper Basics – Stamper’s Select White Cardstock, Papertrey Ink
Homegrown 6” x 8” Paper Pad, Simple Stories
Homegrown Bits & Pieces, Simple Stories
Picket Fence Die-namics, My Favorite Things
Adhesive-Backed Hearts & Flowers, Stampin’ Up!
Star Dust Stickles, Ranger

Finished card size: 5 ½” x 4 ¼”

Stamp Size: 4”

————————–

To view my other Paper Nest Dolls cards, please click here.

Hope you like my Design Team Inspiration Card using Little Chick Emma by Paper Nest Dolls!

Thank you for stopping by!

Hugs,
Laurie

My Ruby Bookmark Card 

My Ruby Bookmark Card - a card with a pocket holding a bookmark with a dog on it
My Ruby Bookmark Card

Hello Crafty Friends! It’s Laurie here! I am sharing My Ruby Bookmark Card as my Design Team Inspiration Card for Conie Fong Art & Design using Dog with Bone and Candy Cane Bundle. This Bundle is so versatile! I used the Candy Cane Dog for a Christmas tag and now I’m using Dog with Bone for a bookmark! I will include a photo of my Christmas tag at the end of this post.

This Bundle includes 4 images:

  • Title 1 and 2: Candy Cane Dog (PNG/JPG Format)
  • Title 3 and 4: Dog with Bone (PNG/JPG Format)

The Details of My Ruby Bookmark Card

I made this bookmark card for a friend’s birthday who has a dog called Ruby. So, I coloured this cutie with my Copic markers to look like her dog.

Bookmark with Dog holding a Bone
My Ruby Bookmark

I thought it would be fun to give my friend a bookmark that she could use, but still wanted to create a card. So, I created a mini slimline card with a pocket on the front in which to slip the bookmark. I love how the puppy is peeking out of the pocket! Once I coloured this cutie, I had a lot of fun decorating my card and bookmark.

Bookmark in Pocket
Bookmark in Pocket

For my card, I used the Slimline Tag dies from Marianne Design to create a pocket on the front. I decorated it with the puppy paws and hearts DSP. The sentiment was printed on my computer, punched out and placed with a doily behind it. I get a hoot out of the “Hot dog! It’s your birthday” from the Puppy Love paper! So, I placed it over the birthday part of the circular sentiment. 

Bookmark Pulled Out of pocket
Bookmark Pulled Out

For my bookmark, I used the smaller Slimline Tags dies with the words and hearts from the Puppy Love paper. The doily gave a perfect backdrop to focus on my puppy! The puppy paws adhesive Gems added some fun bling. The tassel was from Christmas, but I thought that pop of colour was perfect for my colour scheme. So, I remove the Christmas charm and add some dog appropriate charms instead and tied it to my bookmark with some twine from my stash.

————————–

Copic Markers:

White Fur: W3/W1/W09/0
Brown Fur: E39/E37/E35/E33
Paws: C3/C1/C0
Ears: R20/RV000
Bone: E40/E41/0

Close Up of Dog on Bookmark
Close Up of Ruby

————————–

Card Recipe for My Ruby Bookmark Card:

Dog with Bone and Candy Cane Bundle, Conie Fong Art & Design
Paper Basics – Stamper’s Select White Cardstock, Papertrey Ink
Playful Pets Designer Series Paper, Stampin’ Up!
Puppy Love 6” x 6” Paper Pad, Doodlebug Design Inc.
Mini Paper Doilies, Doodlebug Design Inc.
Slimline Tags Craftables Dies, Marianne Design
Pampered Pets Stamp Set, Stampin’ Up!
Digital Happy Circular Sentiments, Lily of the Valley
1 ¼” Circle Punch, Stampin’ Up!
2015-2017 In Color Doilies, Stampin’ Up!
Sugarplum Wishes Tassels with Charms, Paige Evans
Playful Pets Trinkets, Stampin Up!
Paw Adhesive Gems, The Paper Studio
Twine, From my Stash
Biggest Wish Stamp Set, Stampin’ Up!
Costal Cabana Ink, Stampin’ Up!
Real Red Ink, Stampin’ Up!
Versafine Ink, Tsukineko

Finished card size: 3 ¾” x 6 ¾”
Tag size: 3 ½” x 6 ½”

————————–

Here is my Christmas Tag using the Candy Cane Dog from the Bundle.

A Christmas tag with a dog holding a candy cane
Christmas Tag using Candy Cane Dog

Copic Markers:

Light Brown Fur: E42/E41/E40
Dark Brown Fur: E39/E37/E35/E33
Paws/Ears: R20/RV00
Candy Cane: C3/C1/0/R27/R24/R22

————————–

To view my other Conie Fong Art & Design projects, please click here.

Hope you like my Design Team Inspiration Card using Dog with Bone and Candy Cane Bundle for Conie Fong Art & Design!

Thank you for stopping by!

Hugs,
Laurie

My Purr-Fect Day Card 

My Purr-Fect Day Card - a birthday card with a cat holding balloons as he floats up
My Purr-Fect Day Card

Hello Crafty Friends! It’s Laurie here! I am sharing My Purr-Fect Day Card as my Design Team Inspiration Card for Conie Fong Art & Design using the new release Cat With Balloons. Isn’t he just the cutest floating with his balloons!

The Details of My Purr-Fect Day Card

For my card, I decided to create a slimline slider card so that the cat looked like he was floating up as the mechanism was pulled!

So, I created a scene with the slimline clouds die from Whimsy and the stitched sun from the Spring Showers Dies. Next, I layered the Sunny Days Designer Series Paper behind it to add more clouds. Once that was done, I added a house that I fussy cut from the P13 paper and layered a few stitched hills in front.

To keep my card simple since I didn’t want to detract from the slider, I added a sentiment die cut with a stitched rectangle.

Now that the front of the card was done, it was time to create the mechanism for the slider using the Slimline Pull Tab Dies by Heffy Doodle. Tip: I used the Foam Adhesive Strips by Stampin’ Up! to create enough dimension between the front of the card and the card base to help the slider mechanism to move smoothly.

————————–

Copic Markers:

Cat: YR18/YR14/YR12/Y17/R22/R22/C3/C1/C0/0
Pink Balloon: RV66/RV55/RV63/RV52
Blue Balloon: BG13/BG11/BG10
Purple Balloon: V17/V15/V12/V01

Close Up of Cat With Balloons

————————–

Card Recipe for My Purr-Fect Day Card:

Cat With Balloons, Conie Fong Art & Design
Paper Basics – Stamper’s Select White Cardstock, Papertrey Ink
Sunny Days Designer Series Paper, Stampin’ Up!
Hello Summer 6” x 6” Paper Pad, P13
Clouds Slimline Die Set, Whimsy Stamps
Slimline Pull Tab Dies, Heffy Doodle
Slimline Stitched Hillside Borders Dies, Lawn Fawn
Stitched Rectangle Dies Stampin’ Up!
Spring Showers Dies, Lawn Fawn
Paper Snips, Stampin’ Up!
Foam Adhesive Strips, Stampin’ Up!

Old Olive, Pool Party, Daffodil Delight and Thick Basic White Card Stock, Stampin’ Up!

Finished card size: 8 ½” x 3 ½”

————————–

To view my other Conie Fong Art & Design projects, please click here.

Hope you like my Design Team Inspiration Card using Cat With Balloons for Conie Fong Art & Design!

Thank you for stopping by!

Hugs,
Laurie

My Puppy Valentine Card

My Puppy Valentine Card - A Valentine Card with two puppies enjoying spaghetti
My Puppy Valentine Card

Hello Crafty Friends! It’s Laurie here! Happy Valentine’s Day! I am sharing My Puppy Valentine Card using Puppy Love Stamp Set by Kindred Stamps that I used for my Hubby’s Valentine card! We love Disney and the Lady and the Tramp movie is a favourite of ours! So, when I saw this stamp set, I knew I would use it for his card.

The Details of My Puppy Valentine Card

For my card, I decided to make a mini slimline card to match my Falling Hearts Etched Metal Die by Photo Play. So, I used the Flirty Flamingo hearts paper from the Most Adored Specialty Designer Series Paper by Stampin’ Up! with this die. This DSP is free during Sale-a-Bration 2024 and is perfect for those Valentine cards with its hearts and gold accents! I also used a solid Real Red plaid piece from this DSP as a base peeking through the hearts and extended it beyond the die cut Falling Hearts to create a mat.

Since I had the Candy Hearts Dies out already out from my other cards, I decided to use them again! Two hearts were clustered around the sentiment from Conie Fong Art & Design and the other two hearts with a heart doily above the puppies.

The only embellishments that I added were some Red Rhinestones scattered to add sparkle.

Copic Markers:

Boy Dog: E47/E44/E43/E42/E41
Girl Dog: E18/E17/E15/E13E11E00/B28/C3
Spaghetti: E42/E41

Close Up of Puppies
Close Up of Puppies

————————–

Card Recipe for My Puppy Valentine Card:

Puppy Love, Kindred Stamps
Paper Basics – Stamper’s Select White Cardstock, Papertrey Ink
Bella and Benji Kiss, Conie Fong Art & Design (Sentiment)
Most Adored Specialty Designer Series Paper, Stampin Up!
Falling Hearts Etched Metal Die, Photo Play
Candy Hearts Dies, Lawn Fawn
Heart Doilies, Stampin’ Up!
Red Rhinestone Basic Jewels, Stampin’ Up!
Silver Gelly Roll Pen, Sakura
Black Gelly Roll Pen, Sakura
Real Red, Flirty Flamingo and Basic White Card Stock, Stampin’ Up!

Finished card size: 6 5/8” x 3 7/8”

————————–

To view my other Kindred Stamps projects, please click here.

Hope you like My Puppy Valentine Card using Puppy Love by Kindred Stamps!

Thank you for stopping by!

Hugs,
Laurie

My Kitty Love Card 

My Kitty Love Card - a Valentine Card with a cat beside a mailbox filled with letters
My Kitty Love Card

Hello Crafty Friends! It’s Laurie here! I am sharing My Kitty Love Card as my Design Team Inspiration Card for Paper Nest Dolls using the New Release Kitty Love with the Snow Globe Bundle!

The Details of My Kitty Love Card

For my card, I decided to combine the Snow Globe Bundle with the Kitty Love stamp since the kitty fits so perfectly in the snow globe! I used Microsoft Word to size and insert the kitty into the globe. In addition, I used Word to add Happy Valentine’s Day to the plaque on the base.

I haven’t coloured a snow globe before and wanted to challenge myself. So, I used the 3.0 Mini Class Bundle from Kit and Clowder as a reference and used my Copic markers to colour the image. It was a lot of fun getting the shine on the glass! Once it was coloured, I added Glossy Accents to the plaque on the globe base and Stickles to all the hearts.

I decided to use the French Kiss Doodlebug Paper since it had hearts, envelopes, and happy mail on it. Perfect for my card! To ground the snow globe, I used a solid piece of red paper that was already embossed with hearts to add to my Valentine theme.

Next, I added some die cut hearts in opposite corners for balance. A die cut glassine envelope with die cut hearts inside and an adhesive-backed heart to seal it was added to mirror the letters in the mailbox.  

For embellishments, I used a piece of white lace trim and white resin hearts.

————————–

Copic Markers

Cat: W3/W2/W1/W0/R20
Scarf: R29/R27/R24/R22/R85/R83/R81
Mailbox: C3/C2/C1/C0/R29/R27/R24/R85/R81
Post: E49/E47/E44/E43
Letters: E41/E40/R29/R27/R24
Globe Base: E49/E47/E44/E43/C3/C2/C1
Box: E44/E43/E42/E41/E40/R29/R27/R24
Glass: B91/B00/BG10/0
Snow: BG60/BG000/0

Close Up of Kitty
Close Up of Kitty

————————–

Card Recipe for My Kitty Love Card

Kitty Love and Snow Globe Bundle, Paper Nest Dolls
Paper Basics – Stamper’s Select White Cardstock, Papertrey Ink
French Kiss 6” x 6” Paper Pad, Doodlebug Designs Inc.
Valentine’s Day 5” x 7” Paper Pad, Recollections, Michaels Arts & Crafts
Sending Love Glassine Sheets, Stampin’ Up!
Sending Love Dies, Stampin’ Up!
Candy Hearts Dies, Lawn Fawn
Two of Hearts Dies, Cheery Lynn Designs
Resin Hearts Embellishments, Stampin’ Up!
Adhesive-Backed Hearts & Flowers, Stampin’ Up!
1 ½” Lace Ribbon, Celebrate It, Michaels Arts & Crafts
White Gelly Roll Pen, 
Glossy Accents, Ranger
Star Dust Stickles, Ranger
Basic White, Real Red and Polished Pink Card Stock, Stampin’ Up!

Finished card size: 5 ½” x 5 ½”

Stamp Size: 3 ¾”

————————–

To view my other Paper Nest Dolls cards, please click here.

Hope you like my Kitty Love Card using Kitty Love and Snow Globe Bundle by Paper Nest Dolls!

Thank you for stopping by!

Hugs,
Laurie

Season to be Freezin’ Card 

Season to be Freezin’ Card - a winter card with a Yeti holding a tree
Season to be Freezin’ Card

Hello Crafty Friends! It’s Laurie here! I am sharing my Season to be Freezin’ Card as my Design Team Inspiration Card for Paper Nest Dolls using Yeti with Tree. Paper Nest Dolls has several Yeti stamps to the point you could have a whole Yeti family! I just love these cuties so much that I made another card with the Yeti Father and Son for Christmas and have included a link at the end of this post to it.

The Details of My Season to be Freezin’ Card

For my Yeti, I had coloured him with my Copic markers before Christmas but didn’t get a chance to get him onto a card. So, I decided to create a winter themed card for him. I coloured his fur texture with individual strokes in the shadows and left the highlights white. The tree was also coloured with individual strokes to create lots of texture.

The Doodlebug paper that I used, had Yetis on it, but I went with more neutral papers to create my wintery scene. The sentiment was from the matching Chit Chat and was perfect for my wintery theme.

Next, I added a birch tree die cut for my wintery scene and, to add interest, I used a Stitched Hillside Die to complete my scene.

For embellishments, I used some wooden snowflakes that I had in my stash for that rustic look.

————————–

Copic Markers

Fur: W3/W1/W0/0
Face: E43/E42/E41/E40/RV00/0
Horns/Nails/Tree Trunk: E44/E43/E42/E41
Tree: G29/YG63/YG03

Close Up of Yeti carrying a Tree
Close Up of Yeti with Tree

————————–

Card Recipe for My Season to be
Freezin’ Card

Yeti with Tree, Paper Nest Dolls
Paper Basics – Stamper’s Select White Cardstock, Papertrey Ink
Winter Wonderland 6” x 6” Paper Pad, Doodlebug Designs Inc.
Winter Wonderland Chit Chat, Doodlebug Designs Inc.
Slimline Stitched Hillside Border Dies, Lawn Fawn
Woodland Collection Birch Tree Forest, Sue Wilson
Wooden Snowflake Embellishments, Stampin’ Up!
Shaded Spruce Card Stock, Stampin’ Up!

Finished card size: 5 ½” x 4 ¼”

Stamp Size: 3”

————————–

To view my other Paper Nest Dolls cards, please click here.

My Yeti for the Holidays?

For more information on my card, please click here or on the photo.

Yeti for the Holidays Card - A Christmas Card with a Yeti Father and Son getting a Christmas Tree.
Yeti for the Holidays Card

Hope you like my Season to be Freezin’ Card using
Yeti with Tree by Paper Nest Dolls!

Thank you for stopping by!

Hugs,
Laurie