My Hello Fall Card

A Fall card with a pumpkin, witches' hat and cat on it
My Hello Fall Card

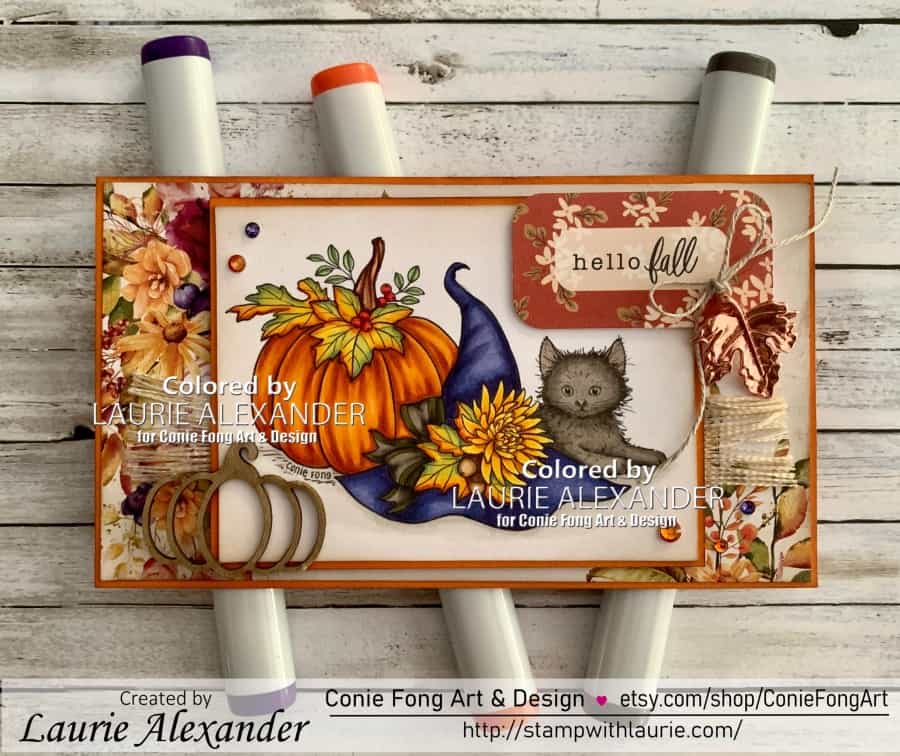
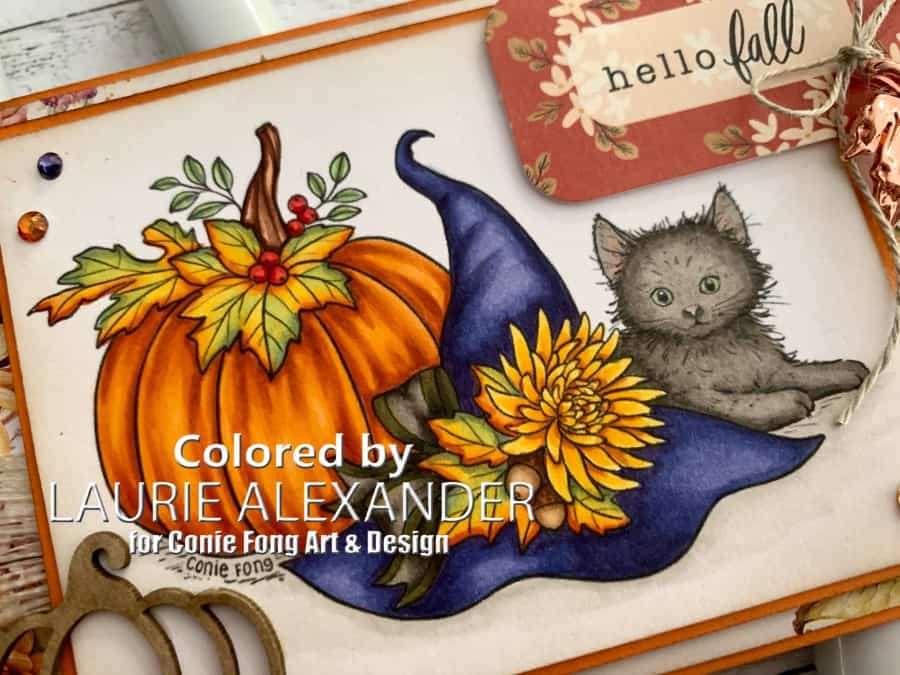
Hello Crafty Friends! It’s Laurie here! I am sharing My Hello Fall Card as my Design Team Inspiration Card for Conie Fong Art & Design using Sweet Autumn Kitty. This stamp is the quintessential Fall stamp with the pumpkin, fall leaves, acorns, a witch hat, and cat!

The Details of My Card

For my mini slimline card, I used this beautiful paper by P13 called The Four Seasons – Autumn and decided to colour the stamp to match. I couldn’t resist giving the leaves a fall colour using several Copic markers to get the variations in their colour. I have discovered that I love colouring pumpkins and getting such rich colour depth in them! The hat was coloured in a blue/violet tone to match some of the smaller berries on the paper and to give it an unexpected pop of colour. I went with a black cat since all witches should have a black cat! Lol!

Since the paper had a rustic feel to it, I blended some Walnut Stain to all the edges of the papers including the stamped piece. To add to the rustic charm, I added a frayed natural ribbon beneath my focal point. The sentiment is from an ephemera tag pack and summed up my theme perfectly! The metal leaf embellishment tied with linen thread, as well as the pumpkin chipboard, added to the Fall theme.

To further tie in my colour scheme, I coloured some rhinestones with my Copic markers and added them to opposite corners.

————————–

Copic Markers:

Cat: W7/W5/W4/R20/G21
Witch Hat: BV02/BV04/BV08
Hat Flower: E15/Y38/Y17/Y15
Hat Ribbon: W9/W8/W6/YG13/W7/W5/W4
Acorns: E59/E57/E55/E53
Leaves: YR18/YR15/YR12/Y15/G85/G21/YG13
Pumpkin: E15/YR18/YR14/YR15/YR12
Pumpkin Stems: E29/E25/E21
Berries: R29/R27/R24
Ground: W3/W1/0
Rhinestones: BV08/YR18

Close Up of coloured stamp with pumpkin, witches' hat and cat
Close Up of Sweet Autumn Kitty

————————–

Card Recipe for My Hello Fall Card:

Sweet Autumn Kitty, Conie Fong Art & Design
Paper Basics – Stamper’s Select White Cardstock, Papertrey Ink
The Four Seasons – Autumn 6” x 6” Paper Pad, P13
Hello Autumn Frames & Tags, Carta Bella Paper Co.
Pumpkin & Spice Metal Embellishments, Prima Marketing
Halloween Chipboard, Kraftin’ Kimmie Stamps
Natural Finish Ribbon, Stampin’ Up!
Linen Thread, Stampin’ Up!
Rhinestone Basic Jewels, Stampin’ Up!
Walnut Stain Distress Ink, Ranger
Mini Blending Tool, Ranger
Pumpkin Pie Card Stock, Stampin’ Up!

Finished card size: 6-1/8”” x 3.5”

————————–

To view my other Conie Fong Art & Design projects, please click here.

Hope you like my Design Team Inspiration Card using
Sweet Autumn Kitty for Conie Fong Art & Design!

Thank you for stopping by!

Hugs,
Laurie

Mini Slimline Rose Card

A birthday card with a rose on it
Mini Slimline Rose Card

Hello Crafty Friends! Laurie here again! I was honoured to be asked to present my colouring with Stampin’ Blends at a Playdate during World Card Making Day for fellow Stampin’ Up! demonstrators. I am sharing my Mini Slimline Rose Card from the WCMD using products from the Abigail Rose Suite Collection by Stampin’ Up!

The Details of My Card

For my card, I decided to use the Cottage Rose Stamp Set since the artist has indicated where the shadows are with their line art. I thought it would be a good image for beginners. It also has two different areas that I could demonstrate the techniques of light-to-dark on the petals and dark-to-light on the leaves. I have included links to some videos at the end of this post that cover these techniques and more.

The Split Card Textures Dies were top of my list to buy when I saw them in the catty. I have seen a lot of cards made with them using the regular A2 (4 ¼” x 5 ½”) card base, but I thought a mini slimline card would be a fun alternative!

Mini slimline cards can come is different sizes to match your design/products. For instance, a 3” x 6” mini slimline is perfect for 6” x 6” paper packs. They also come in 3 ½” x 6” or 3 ½” x 6 ½”. They fit in No. 8 envelope (3-5/8” x 6 ½”) which you can pick up at any dollar store. For my card I choose 3 ½” x 6” since this size fitted the Split Card Textures Die well.

I love how the Split Card Textures Die allows the beautiful Abigail Rose Designer Series Paper to show through on one half of the card while allowing the rose to fit perfectly in the other corner! Some Petal Pink die cut flowers extend the focal point into the card. The Natural Finish Ribbon adds a nice backdrop for the sentiment. And a scattering of gems, one on the flower and two in the top right corner, tie in the colour scheme.

Supplies:

Stamps/Bundles/Dies: Abigail Rose Suite Collection (159052), Cottage Rose Bundle (159048) (Included in Collection), Split Card Textures Dies (159162), Stylish Shapes Dies (159183)

Inks: Tuxedo Black Memento Ink Pad (132708)

Paper: Very Vanilla Thick (144237), Petal Pink (146985), Old Olive (100702), Very Vanilla (101650), Abigail Rose Designer Series Paper (159037) (Included in Collection)

Accessories: Petal Pink Stampin’ Blends Combo Pack (154893), Old Olive Stampin’ Blends Combo Pack (154892), Stampin’ Blends Color Lifter (144608), Elegant Faceted Gems (152464), Natural Finish Ribbon (159051) (Included the Collection), Bone Folder (102300), Stampin’ Dimensionals (104430), Stampin’ Seal (152813), Mini Glue Dots (103683)

Measurements: 

  • Very Vanilla Thick: 
    • 7” x 6” scored at 3 ½” on 7” side
  • Petal Pink:
    • 3-3/8” x 6-7/8”
    • Scrap for flower die
  • Old Olive:
    • 3 ¼” x 5 ¾”
  • Very Vanilla:
    • 3” x 3”
    • Scrap for sentiment
  • Abigail Rose Designer Series Paper:
    • 3 ¼” x 5 ¾”
Close Up Colouring of Rose

More Information on My Mini Slimline Rose Card:

How to Use Stampin’ Blends
Stampin-Up-Blends-2020.pdf

Part 1Whiskey Business Card using Blending Different Colours Technique
Video Tutorial: Blending Different Colours Together

Part 2Country Harvest Card using Light to Dark Technique
Video Tutorial: Light to Dark/Dark to Light Colouring

Part 3Beautiful Poppy Birthday Card using Smooth Colouring Technique
Video Tutorial: Smooth Colouring

Part 4Let’s Gather Together Card using Tip to Tip Blending Technique
Video Tutorial: Tip to Tip Colouring

Part 5So Grateful Cardinal Card using Flicking Colouring Technique
Video Tutorial: Flicking Colouring

Part 6Let’s Celebrate You Card using Flicking of Different Colours Technique
Video Tutorial: Flicking of Different Colours Technique

No-Lines Technique CardsMy Cardinal Anniversary Card and My Cardinal Card

How to Create a Scene: https://youtu.be/6w4fkxgA9rg

For more of my Stampin’ Blends cards, please click here.

For more of my Stampin’ Up! cards, please click here.

For more of my cards, please join my Facebook Group or my Instagram.

You will find the items listed above in my online store.

Hues of Happiness Birthday Card

Two cards with flowers on them.
Hues of Happiness Birthday Card

Hello Crafty Friends! Laurie here again! I am sharing my Hues of Happiness Birthday Card using the Hues of Happiness Suite Collection by Stampin’ Up!

The Details of My Card

This card was for a swap using products from the new Annual Catty. I love the bright and happy colours of the Hues of Happiness DSP! I also love that the dies die cut the flowers from the DSP!

Video of Die Cutting Flowers from the DSP

For my card, I thought a fun split panel card would work with the spiral notebook die as the panel joining the other 2 panels. I can see this spiral die working for so many cards, especially school cards! The two flowers and leaves were die cut from the DSP and matched the DSP colours on the panels.

One of the cards with pink and purple flowers on it
Version One of the Card

Since there are so many flowers that I could die cut, I decided to create different colour cards in the same layout. These two cards are only some of the colour combinations that I used.

A card with Blue and yellow flowers on it.
Second Version of the Card

Tip: to adhere the two card panels, I lined up the bottom panel with the bottom of the card base. Then, I added glue only to the top and bottom of the Basic White piece, careful not to add it too close to the centre. I made sure to leave enough room on the bottom panel to add my ribbon.

The sentiment was stamped onto ½” scrap and then snipped the edges on the angle. The Fresh Freesia was a 5/8” scrap and trimmed to match the Basic White piece.

The ribbon was wrapped around the bottom panel and tied in a bow. A scattering of matching Glossy Dots that come in the Suite added some shimmer.

Close Up of Version One Card

Supplies:

Stamps/Bundles/Dies: Hues of Happiness Suite Collection (158828)

Inks: Granny Apple Green (147095)

Paper: Fresh Freesia (155613), Basic White (159229)

Accessories: Whisper White Crinkled Seam Binding Ribbon (151326), Glossy Dots Assortment (included in Suite), Bone Folder (102300), Dimensionals (104430), Mini Stampin’ Dimensionals (144108), Stampin’ Seal (152813), Mini Glue Dots (103683), Paper Snips Scissors (103579)

Close Up of Version Two Card

Measurements: 

  • Fresh Freesia: 
    • 4 ¼” x 9 ½” scored a 5 ½”, fold and trim one side at 2”. Taking the separate piece, trim 2” off keeping this for the bottom panel.
    • Scrap for sentiment
  • Basic White:
    • 5 ¼” x 4” (inside of card)
    • 3 ½” x 2 ¾”
    • Scrap for sentiment
  • Hues of Happiness DSP:
    • 4” x 1 ¾” (2 pieces)
    • 2 die cut flowers and leaves

More Information on My Hues of Happiness Birthday Card:

Get to know the Hues of Happiness Suite with a burst of colorful florals! Check out this suite to use on your next paper-crafting projects and spread happiness. To find out more about this beautiful Suite, checkout this Stampin’ Up! video: https://www.youtube.com/watch?v=N9ac4l3EOPs

For more of my Stampin’ Up! cards, please click here.

You will find the other items listed above in my online store.

Hello Ladybug Card

Card with a ladybug and daisies on it.
Hello Ladybug Card

Hello Crafty Friends! Laurie here again! I am sharing my Hello Ladybug Card using the Hello Ladybug Stamp Set and matching Ladybug Builder Punch.

The Details of My Card

This card was for a swap, but the Annual Catty was retiring. We couldn’t use any retiring product on the card. So, my solution was lots of punches and embellishments that I knew would carry over!

For my card, I decided to use the Picture This Dies again since it reminded me of the dots on the ladybug’s wings. These dies are so versatile, and I have used them for several cards! I used the circles die for this card and thought it would be neat having the daisies popping out of the holes!

Before adhering with dimensionals the die cut Real Red piece to the Basic Black mat, I wrapped white Baker’s twine around one of the holes and tied it in a bow.

After lots of punching and layering 2 sets of petals on top of each other followed by the flower centre from the Poppy Moments Dies, I had 3 sets of flowers for the holes.

Next came the ladybug. But first, I heat embossed in black the spots before I punch the wings out of Real Red cardstock. Then I punched out the body in Basic Black and assembled the ladybug.

Since the stamp set is photopolymer and I could line up my stamp easily, I die cut the smallest circle out of the Circles Die and then stamped the hello in black. Tip: only use the part of the die you want, not the whole thing to save paper. Another tip is use Multipurpose Liquid Glue to allow you time to slide the sentiment piece in place.

A scattering of black Classic Dots and Red Rhinestones tied in my ladybug theme.

Supplies:

Stamps/Bundles/Dies: Hello Ladybug Stamp Set (157693), Picture This Dies (155559), Poppy Moments Dies (151594)

Inks: Tuxedo Black Memento Ink Pad (132708), VersaMark ink (102283)

Paper: Basic White Thick (159229), Basic Black (121045), Basic White (159229) (159276), Real Red (102482), Crushed Curry (131199)

Accessories: Ladybug Builder Punch (157698), Medium Daisy Punch (149517), Baker’s Twine Essentials Pack (155475), Red Rhinestone Basic Jewels (146924), Classic Matte Dots (158146), Basics Embossing Powder (155554), Heat Tool (129053), Bone Folder (102300), Multipurpose Liquid Glue (110755Stampin’ Dimensionals (104430), Mini Stampin’ Dimensionals (144108), Stampin’ Seal (152813), Mini Glue Dots (103683)

Close Up of Card
Close Up of Card

Measurements: 

  • Basic White Thick: 
    • 5 ½” x 8 ½” scored a 4 ¼”
  • Basic Black:
    • 5 ¼” x 4”
    • Scrap for Ladybug body
  • Real Red:
    • 5” x 3 ¾”
    • Scrap for wings
  • Basic White:
    • 1 ¾” strip, enough to punch 6 flowers
    • Hello: 1” x 1”
  • Crushed Curry
    • Scrap for flower centers x 3

More Information on My Hello Ladybug Card:

For more of my Stampin’ Up! cards, please click here.

You will find the other items listed above in my online store.

My Orchid Beauty Birthday Wishes

Birthday Card with a Girl with Orchids in her hair
My Orchid Beauty Birthday Wishes

Hello Crafty Friends! It’s Laurie here! I am sharing My Orchid Beauty Birthday Wishes as my Design Team Inspiration Card for Conie Fong Art & Design using the beautiful Alanna. Don’t you just love that serene look she has!

The Details of My Card

For my card, I decided to use some pretty papers with pastel colours from The Paper Boutique. So, I coloured with my Copic markers Alanna to match them. That blue is so pretty that I had to give her eyeshadow to match her dress!

I went with several die cuts like the leafy vine, the delicate pink frame, and the butterflies to decorate my card. The sentiment is from a matching paper pad and went perfectly with my colours. A scattering of gems and a gem in the centre of each butterfly added some sparkle. A finishing touch was Wink of Stella on the orchids. Such a beautiful image!

————————–

Copic Markers:

Skin: E04/E11/E21/E00/E000/R20
Hair: E29/E27/E25/E23/E21
Flowers/Lips: R32/R30/R000
Dress: B66/B63/B60/R32/R30/R000
Eyeshadow: B60

Close Up of girl on card
Close Up of Alanna

————————–

Card Recipe for My Orchid Beauty Birthday Wishes:

Alanna, Conie Fong Art & Design
Paper Basics – Stamper’s Select White Cardstock, Papertrey Ink
A4 Spring Whispers Coloured Card Collection, The Paper Boutique
Spring Whispers 8” x 8” Paper Pad, The Paper Boutique
Spring Whispers 8” x 8” Embellishment Pad, The Paper Boutique
In Bloom 6” x 6” Paper Pad, My Mind’s Eye
Fanciful Flourish, Cheery Lynn Designs
Fancy Frames Dies, Stampin’ Up!
Butterfly Beauty Thinlits Dies, Stampin’ Up!
Brilliant Wings Dies, Stampin’ Up!
Scallop Contours Dies, Stampin’ Up!
Elegant Faceted Gems, Stampin’ Up!
Clear Wink of Stella, Stampin’ Up!

Finished card size: 5.5” x 5.5”

————————–

To view my other Conie Fong Art & Design projects, please click here.

Hope you like my Design Team Inspiration Card using
Alanna for Conie Fong Art & Design!

Thank you for stopping by!

Hugs,
Laurie

My Flowers for You Card

A card with a dragon holding a bouquet of flowers
My Flowers for You Card

Hello Crafty Friends! It’s Laurie here! I am sharing My Flowers For You Card as my Design Team Inspiration Card for Conie Fong Art & Design using the Dragon Bouquet and Sentiment Bundle. This stamp is so versatile and can be used for so many occasions! It includes 6 images and comes in PNG or JPG:

  • Dragon Bouquet
  • Thinking Of You Sentiment
  • Have A Beautiful Day
  • Hello Friend
  • Just Because
  • Flowers For You Sentiment

The Details of My Card

For my card, I decided on the MME paper since I love the rustic wood texture and the collage on the paper! There is a sentiment on it under his feet, “start every day with a smile”. I thought this was such a sweet sentiment and would bring a smile to the recipient

From there, I picked out my Copic marker colours from the paper to colour my cute dragon and the bouquet. I also coloured some extra flowers that you get in the bundle in the colours I used for my bouquet. The sentiment from the bundle was die cut into a banner and layered with the coloured flowers and another banner below.

For embellishments, I used brass butterflies, clear epoxy dew drops and Clear Wink of Stella on the flowers.

————————–

Copic Markers:

Blue/Greens: BG49/BG15/BG13/BG32/BG11
Greens: YG67/YG63/YG03
Reds: R27/R24/R22
Yellows: Y26/Y28/Y21
Paper Bag: E44/E43/E42/E41
Sunflower: Y26/Y28/Y21/E42/E44/E43
Dragon’s Nails: E43/E41

Close Up of Dragon Holding a Bouquets of Flowers

————————–

Card Recipe for My Flowers for You Card:

Dragon Bouquet and Sentiment Bundle, Conie Fong Art & Design
Paper Basics – Stamper’s Select White Cardstock, Papertrey Ink
Dolled Up 6” x 6” Paper Pad, My Mind’s Eye
Stylish Shapes Dies, Stampin’ Up!
Silver & Clear Epoxy Essentials, Stampin’ Up!
Brushed Brass Butterflies, Stampin’ Up!
Clear Wink of Stella, Stampin’ Up!

Finished card size: 5.5” x 4.25”

————————–

To view my other Conie Fong Art & Design projects, please click here.

Hope you like my Design Team Inspiration Card using
Dragon Bouquet and Sentiment Bundle for Conie Fong Art & Design!

Thank you for stopping by!

Hugs,
Laurie

My Welcome Spring! Card

Card with girl holding a daffodil
My Welcome Spring! Card

Hello Crafty Friends! It’s Laurie here! I was so excited to present My Welcome Spring! Card at the Paper Nest Dolls Spring Coloring Retreat (Online) recently using Lulu with Daffodil!

The Details of My Card

For my card, I thought a fun fold card would be something different than a regular card. So, I created a side easel card base! I love how it folds up to display part of the card front!

We had a lot of fun colouring Lulu with our Copic markers at the Retreat. The attendees learned how to add texture to the daffodil to make it pop!

The beautiful papers from the Paper Boutique were perfect for the theme since they had daffodil and tulips on them!

I couldn’t resist using the Daffodil Dies from Stampin’ Up! in the background  to set off Lulu!

Side View of Card
Side View of Card

If you haven’t been to a Paper Nest Dolls Retreat, you are missing out! You learn so much from other designers (even I learn things!) and there is always fun and games going on, not to mention the swag bags!

————————–

Copic Markers

Skin: E04/E11/E21/E00/E000/R20
Hair: E29/E27/E25/E23/E21
Pinks: R89/R85/R83/R81
Greens: YG17/YG13/YG03
Daffodil: Y02/Y15/Y17/E15
Stamen: YR18/YR14

Front of Open Card
Card Displaying Side Easel

————————–

Card Recipe for My Welcome Spring!

Lulu with Daffodil, Paper Nest Dolls
Paper Basics – Stamper’s Select White Cardstock, Papertrey Ink
Spring Whispers 8” x 8” Paper Pad, The Paper Boutique
Daffodil Dies, Stampin’ Up!
Daffodil Daydream Stamp Set, Stampin’ Up!
Genial Gems, Stampin’ Up!
Tattered Rose Distress Ink, Ranger Ink
Stitched Nested Label Dies, Stampin’ Up!
Highland Heather Ribbon, Stampin’ Up!
Adhesive Sheets, Stampin Up!
Liquid Glue
Highland Heather, Pear Pizzazz, Daffodil Delight,
Very Vanilla and Basic White Card Stock, Stampin’ Up!

Finished card size: 5 ½” x 4 ¼”

————————–

To view my other Paper Nest Dolls cards, please click here.

Hope you like my Presentation Card using
Lulu with Daffodil by Paper Nest Dolls!

Thank you for stopping by!

Hugs,
Laurie

My Happy Mother’s Day Card

A Mother's Day Card with tulips in rain boots
My Happy Mother’s Day Card

Hello Crafty Friends! Laurie here again! I am sharing My Happy Mother’s Day Card using the Flowering Rain Boots Bundle by Stampin’ Up! 

The Details of My Card

For my card, I thought the Flowering Fields Designer Series Paper and the Flowering Rain Boots Bundle would be a perfect match! And I couldn’t resist using the tulip border die that comes in the Flowering Tulips Bundle!

I pulled my colour scheme of Highland Heather, Fresh Freesia and Evening Evergreen from the DSP. I love that the coordinating dies cut out the stamped pieces! By adding a piece of vellum under the boots, a focal point was created, but still allowed the die cut tulip border to show through. The sentiment was heat embossed with white on Highland Heather and then die cut with one of the All Dressed Up Dies. A scattering of the sweet Brass Butterflies finished the card off nicely.

Supplies:

Stamps/Bundles/Dies: Flowering Rain Boots Bundle (157691), Flowering Tulips Bundle (157678), All Dressed Up Dies (151665), Stitched Rectangles Dies (151820)

Inks: Highland Heather Classic Stampin’ Pad (147103), Evening Evergreen Classic Stampin’ Pad (155576), Fresh Freesia Classic Stampin’ Pad (155611), VersaMark Ink (102283)

Paper: Highland Heather (146986), Basic White (159276), Vellum (101856), Flowering Fields Designer Series Paper (157670)

Accessories: Basics Embossing Powder (155554), Brushed Brass Butterflies (158136), Heat Tool (129053), Bone Folder (102300), Stampin’ Dimensionals (104430), Mini Stampin’ Dimensionals (144108), Stampin’ Seal (152813), Mini Glue Dots (103683)

Close Up of Rain Boots

Measurements: 

  • Highland Heather: (2 pieces)
    • 5 ½” x 8 ½” scored a 4 ¼”
    • 2 ½” x ½” (sentiment)
  • Basic White:
    • 5 ¼” x 4”
    • Scraps for Boots, tulips, and leaves
  • Vellum:
    • 4” x 2-5/8”
  • Flowering Fields Designer Series Paper
    • 3” x 3-7/8”

More Information on My Happy Mother’s Day Card:

For more of my Stampin’ Up! cards, please click here.

You will find the other items listed above in my online store.

My Give Peace a Chance Card

Card with a Hippie Girl
My Give Peace a Chance Card Closed

Hello Crafty Friends! It’s Laurie here! I am sharing My Give Peace a Chance Card as my Design Team Inspiration Card for Paper Nest Dolls using the new release Decade Collection Hippie Ellie. With everything going on in the world right now, I thought this was a very appropriate card for the times!

The Details of My Card

I had a lot of fun colouring Hippie Ellie with my Copic markers! Don’t you just love her jeans with the patches and her suede fringe vest! She is such a groovy hipster!

For my card, I found this perfect paper that had a Seventies theme! I loved it so much that I wanted to use a whole sheet for my card front! So, I used a fun fold called a Z-Fold Card for the card base, but I reversed it into a backwards Z. I wanted the love bug to show on the front with Ellie when the card is closed. This type of card folds up to a regular A2 card but allows for lots of room to decorate! It also is neat how you open it, and the paper continually keeps going! 

Card Laid Flat
Full Card Laid Flat

Since the paper was so detailed, I only used a few dies to dress it up such as the Love, Peace, daisies, and peace sign. They were from the Retro Bus by Elizabeth Craft Designs. I bought this set planning to use them for the Decade Dolls and they were perfect for Hippie Ellie! A couple of sequins and glimmery dots for the flower centres was all the embellishments this card needed.

Card Open
Card Showing Fold Standing Up

Measurements

Card Base:  5 ½” x 8 ½”, score at 4 ¼” and 2 1/8”.  Cut the Seventies 6” x 6” paper to 5 ¼” tall, then cut at 2” and 4:”. You could leave the last panel for your sentiment, but I decided to add a fourth panel using a 2” piece of floral rice paper as a background for my coloured stamp.

————————–

Copic Markers

Skin: E04/E11/E21/E00/E000/R20
Hair: E39/E37/E35/E33
Jeans: B99/B97/B95/B93/B91
Top: R29/R27/R24/R22
Vest: E29/E27/E25/E23/E21
Shoes: E29/E27/E25/E23
Green: G99/G94/G21
Flowers: R29/R24/R22/Y38

Close Up of Hippie Stamp
Close Up of Hippie Ellie

————————–

Card Recipe for My Give Peace a Chance Card

Decade Collection Hippie Ellie, Paper Nest Dolls
Paper Basics – Stamper’s Select White Cardstock, Papertrey Ink
Seventies 6” x 6” Paper Pad, Ciao Bella
1928: Retro Bus Dies, Elizabeth Craft Designs
Rice Paper A4 Love Peace Joy, Ciao Bella
Artistry Blooms Adhesive-Backed Sequins, Stampin’ Up!
Glittery Enamel Dots, Stampin’ Up!
Real Red and Basic White Card Stock, Stampin’ Up!

Finished card size: 5 ½” x 4 ¼”

Card Standing Up
Card Standing Up

————————–

To view my other Paper Nest Dolls cards, please click here.

My Other Cards in the Decade Collection

For more information on my cards, please click the photos.

Card with 50s greaser and girl with poodle skirt
My Grease Lightning Card
Card with a Girl from Seventies and a retro bus on it
My Road Trip Card

Hope you like my Design Team Inspiration Card using
Decade Collection Hippie Ellie by Paper Nest Dolls!

Thank you for stopping by!

Hugs,
Laurie

My Happy Mother’s Day Card

Card with a bear holding a rose
My Happy Mother’s Day Card

Hello Crafty Friends! It’s Laurie here! I am sharing My Happy Mother’s Day Card as my Design Team Inspiration Card for Conie Fong Art & Design using Bella With Rose.

The Details of My Card

For my card, I thought Bella With Rose would make a perfect Mother’s Day Card! She is such a cutie and Mother’s Day is only a few weeks away!

I decided to go with soft pastel colours to match the beautiful Spring papers from The Paper Boutique. The Stitched with Love Paper Pad matched this colour scheme well and it had purple roses that I used for inspiration to colour my rose.

To me nothing says Mother’s Day like a beautiful doily and this one had roses on it. Perfect for my rose theme and to center my focal point!

I have been wanting to use the beautiful rose die from Paper Roses for a while and thought this was ideal for my card!

A scattering of pink pearls and butterflies to match my paper completed my card. 

————————–

Copic Markers:

Fur: E37/E35/E33/E31/R20
Rose: BV04/BV02/BV00
Pinks: RV34/RV32/RV00
Stem: YG67/YG63/YG03

Close Up of bear holding rose
Close Up of Bella With Rose

————————–

Card Recipe for My Happy Mother’s Day Card:

Bella With Rose, Conie Fong Art & Design
Paper Basics – Stamper’s Select White Cardstock, Papertrey Ink
Spring Whispers Coloured Card Collection A4, The Paper Boutique
Spring Whispers 8” x 8” Paper Pack, The Paper Boutique
Stitched with Love 6” x 6” Paper Pad, P13
Rose Bloom Die, Paper Roses
Stitched So Sweetly Dies, Stampin’ Up!
Celebrating You Stamp Set, Stampin’ Up!
Pear Pizzazz Classic Ink Pad, Stampin’ Up!
4.5” Fancy Doily, Color Fantastik
Pastel Pearls, Stampin’ Up!
Brushed Brass Butterflies, Stampin’ Up!
Clear Wink of Stella, Stampin’ Up!

Finished card size: 5.25” x 5.25”

————————–

To view my other Conie Fong Art & Design projects, please click here.

Hope you like my Design Team Inspiration Card using
Bella With Rose for Conie Fong Art & Design!

Thank you for stopping by!

Hugs,
Laurie

My Easter Blessings Card

Easter Card with Daffodils
My Easter Blessings Card

Hello Crafty Friends! Laurie here again! I am sharing My Easter Blessings Card using the Daffodil Daydream Bundle by Stampin’ Up! This bundle is perfect for those last-minute Easter cards that you need to make! 

Details of My Card

I love our yellow and white daffodils that sprout up each year in our garden! So, I decided to go with this colour scheme for my card!

Photo of daffodils
Daffodils in Our Garden

For my card, I wanted to create a soft look by using Soft Suede Ink to stamp my flowers. To go with this soft look, I used my Blender pens to pick up Old Olive and Bumblebee inks to colour my flowers. Guess what I used for my white petals? I used the White Stampin’ Chalk Marker! Perfect way to add that white!

Daffodil stamp being coloured
Colouring of Daffodils with Blender Pen

I stamped the dots in Crumb Cake around my flowers and added the border stamp in Old Olive ink at the base of my card. I carefully positioned the leaves from the Greenery Embossing Folder so that you could see the embossed leaves on either side of the centre piece. The Pansy Petals Designer Series Paper was the perfect accompaniment to my colouring as well as the gingham ribbon bringing out the Bumblebee colour. The sentiment used the Tailor Made Tags Dies. All this card needed was a Bumblebee Trinket flitting around the flowers!

Supplies:

Stamps/Bundles/Dies: Daffodil Daydream Bundle (157795), Stitched Rectangles Dies (151820), Scalloped Contours Dies (155560), Tailor Made Tags Dies (155563)

Inks: Soft Suede Classic Stampin’ Pad (147115), Old Olive Classic Stampin’ Pad (147090), Crumb Cake Classic Stampin’ Pad (147116), Bumblebee Classic Stampin’ Pad (153116)

Paper: Basic White Thick (159229), Soft Suede (115318), Basic White (159276), Old Olive (100702), Crumb Cake (120953), Pansy Petals Designer Series Paper (155807)

Accessories: Greenery Embossing Folders (152716), Bumblebee Gingham Ribbon (153658), Bumblebee Trinkets (155568), Blender Pens (102845), White Stampin’ Chalk Marker (132133), Bone Folder (102300), Stampin’ Dimensionals (104430), Stampin’ Seal (152813), Mini Glue Dots (103683)

Closer Up of Coloured Daffodils

Measurements: 

  • Basic White Thick: 
    • 5 ½” x 8 ½” scored a 4 ¼”
  • Soft Suede: (2 pieces)
    • 4” x 5 ¼”
    • Scrap for tag
  • Pansy Petals Designer Series Paper:
    • 3-7/8” x 5 1/8”
  • Old Olive:
    • 3-7/8” x 3”
  • Basic White: (2 pieces)     
    • 4 ½” x 3-1/8”
    • 2 ¼” x 7/8” (Tag)
  • Crumb Cake:
    • 4” x 2-5/8”

More Information on My Easter Blessings Card:

For more of my Stampin’ Up! cards, please click here.

For the Daffodil Daydream Bundle, please click here.

You will find the other items listed above in my online store.

Heartfelt Sunflower Wishes Card

A card with a Sunflower on it
Heartfelt Sunflower Wishes Card

Hello Crafty Friends! Laurie here again! I am sharing my Heartfelt Sunflower Wishes Card using the Celebrate Sunflowers Bundle by Stampin’ Up! This bundle is currently on sale for the March 2022 Savings Are in Bloom Sale. Check it out in my online store: https://www.stampinup.ca/products/celebrate-sunflowers-bundle-(english)?demoid=2103981.

The Details of My Card

For my card, I wanted to show my support for the Ukraine people. My heart bleeds for them and anyone who are affected by this war! So, I decided to create a sunflower card since it is their national flower. I also decided to use Bumblebee and Pacific Point as my card stock choices to reflect the colours of the Ukrainian flag. 

To highlight the sunflowers, I stamped in Pacific Point the sky stamp from the Oceanfront Stamp Set a couple of times on the Basic White card stock. I love how it peeks out from the top die cut sunflower! Once that was done, I layered my pieces. The sentiment was heat embossed with white embossing powder and punched out with the Lovely Labels Pick a Punch. A scattering of epoxy shapes represents the “tears of the people” in my mind.

I have created several cards with this bundle in the past. I will include links to the cards at the bottom of this post. There is even a quick video on YouTube explaining the advanced colouring technique I used on the sunflower.

Colouring Video of Sunflower

Supplies:

Stamps/Bundles/Dies: Celebrate Sunflowers Bundle (154065), Oceanfront Stamp Set (157862), Lovely You Stamp Set (152525)

Inks: Tuxedo Black Memento Ink Pad (132708), VersaMark Ink (102283), Pacific Point Classic Stampin’ Pad (147098)

Paper: Pacific Point (111350), Bumblebee (153077), Basic White (159276), Old Olive (100702)

Accessories: Lovely Labels Pick a Punch (152883), Silver & Clear Epoxy Essentials (155567), Basics Embossing Powder (155554), Mango Melody Stampin’ Blends Combo Pack, Calypso Coral Stampin’ Blends Combo Pack (154881), Soft Suede Stampin’ Blends Combo Pack (154906), Stampin’ Blends Color Lifter (144608), Heat Tool (129053), Bone Folder (102300), Stampin’ Dimensionals (104430), Stampin’ Seal (152813), Mini Glue Dots (103683)

Close Up of the Coloured Sunflower on the card
Close Up of Coloured Sunflower on Card

Measurements: 

  • Pacific Point: (2 pieces)
    • 5 ½” x 8 ½” scored a 4 ¼”
    • Scrap (sentiment)
  • Bumblebee: (2 pieces)
    • 5 1/8” x 3 7/8”
    • 3 5/16” x 3 ¼” (sunflower)
  • Old Olive: (3 pieces)
    • Scraps (leaves – 3 pieces)
  • Basic White: (2 pieces)     
    • 3 ¾” x 5”
    • 3 5/16” x 3 ¼” (sunflower)

More Information on my Heartfelt Sunflower Wishes Card:

For more of my Stampin’ Up! cards, please click here.

For the other items on sale, please click here.

For the Celebrate Sunflowers Bundle, please click here.

You will find the items listed above in my online store.

Let’s Celebrate You Card

Link to post: https://stampwithlaurie.com/lets-celebrate-you-card/

Video Tutorial: Flicking of Different Colours Technique

Let's Celebrate You Card
Let’s Celebrate You Card

My Congratulations Card

Link to post: https://stampwithlaurie.com/my-congratulations-card/

My Sunflower Congratulation Card

I’m sharing my card at the following challenges:

Color Hues-Special Double Challenge: Blue and Yellow
The Flower Challenge #66 Use Scraps

Flowering Fields Birthday Wishes Card

A Card with a Windmill on it
Flowering Fields Birthday Wishes Card

Hello Crafty Friends! Laurie here again! I am sharing my Flowering Fields Birthday Wishes Card using the Flowering Fields Stamp Set and the Windmill Fields Dies by Stampin’ Up!

The Details of My Card

For my card, I thought it would be fun to create a Centre-Step Card, so it looks like the windmill is popping out of the tulip fields. Of course, if you have a windmill, wouldn’t it be fun to make it interactive! So, I added one of the round brads through the blades and into the windmill base.

Tip – to keep the brad from showing from behind the windmill on the card, folded down the arms at angle.

Position of Brads on Back of Windmill

The windmill was popped up with dimensionals to allow the back of the brad to have room. 

I love the beautiful Flowering Fields DSP and used it for the grass/sky piece behind the windmill and the tulip fields! I pulled the colours from the DSP for my sentiment and for the ribbon. A couple of the sweet butterflies balanced out the ribbon on the sentiment.

Supplies:

Stamps/Bundles/Dies: Flowering Tulips Stamp Set (157672), Windmill Fields Dies (157683)

Inks: Highland Heather Classic Stampin’ Pad (147103)

Paper: Pear Pizzazz (131201), Basic White (159276), Crumb Cake (120953), Soft Suede (115318), Flowering Fields 12″ x 12″ Designer Series Paper (157670)

Accessories: Brushed Brass Butterflies (158136), Fresh Freesia Open Weave Ribbon (155615), Round & Square Brads (155570), Bone Folder (102300), Stampin’ Dimensionals (104430), Stampin’ Seal (152813), Mini Glue Dots (103683)

Close of Up the Windmill

Measurements: 

  • Pear Pizzazz: 11” x 4 ¼” (see template)
  • Soft Suede: 2 ½” x 1 7/8”
  • Crumb Cake: 2 ½” x 1 7/8”
  • Basic White: 
    • 4” x 3” (Windmill Blades)
    • 4” x 7/8” (Sentiment)
    • Scraps (Clouds)
  • Flowering Fields Designer Series Paper:
    • 2 pieces: 4 ¼” x ¾”
    • 2” x 4 ½”
Side View of Centre-Step card
Side View of Centre-Step Card

More Information on my Flowering Fields Birthday Wishes Card:

For more of my Stampin’ Up! cards, please click here.

To download a PDF of the Centre-Step Template, please click here or on the picture.

Centre-Step Card Template

For a Stampin’ Up! video on the Flowering Fields Suite, please click here.

You will find the items listed above in my online store.

My Peachy Keen Birthday Card

A Birthday Card with Peaches on it.
Peachy Keen Birthday Card

Hello Crafty Friends! Laurie here again! I am sharing My Peachy Keen Birthday Card using the Sweet As a Peach Bundle which includes the Sweet As a Peach Stamp Set and the matching Peach Dies.

The Details of My Card

For my card, I love the colours of the pretty You’re a Peach Designer Series Paper and decided that I wanted to pair it with the Picture This Dies.

For the sentiment, I positioned the die cut Calypsol Coral piece, without adhering it, on the card base and stamped the sentiment directly onto the Thick Basic White card base. Next, I popped up the Calypso Coral card stock with dimensionals onto the card base. I then used liquid adhesive on the DSP shifting them into place to allow them to peek through the two of the openings. For the Balmy Blue sentiment, I white embossed it with my heat gun to make it pop.

I decide that I wanted the Pear Pizzazz leaves to be exploding from the Picture This Dies frame onto the sentiment with the stamped peaches layered on top.

For the peaches, I used a technique where you use a sponge dauber to add a second colour to your stamps and create dimension. I stamped the peaches from the Sweet as a Peach stamp set twice. The top three are in Pale Papaya. The bottom three are Pale Papaya with Calypso Coral daubed on the edges after inking them with the Pale Papaya. What a difference it makes!

Technique to add second colour to the peaches.
Sponge Dauber Technique to Add Second Colour to Stamp

A couple of Calypso Coral Artistry Blooms Sequins tie in the colour scheme and add a bit of sparkle.

Supplies:

Stamps/Bundles/Dies: Sweet As a Peach Bundle (155823), Picture This Dies (155559)

Inks: Calypso Coral Classic Stampin’ Pad (147101), Pale Papaya Classic Stampin’ Pad (155670), Balmy Blue Classic Stampin’ Pad (147105), Pear Pizzazz Classic Stampin’ Pad (147104), VersaMark Ink (102283)

Paper: Calypso Coral (122925), Thick Basic White (159229), Basic White (159276), Balmy Blue (146982), You’re a Peach Designer Series Paper (155686)

Accessories: Basics Embossing Powder (155554), Sponge Daubers (133773), Artistry Blooms Sequins (152477), Bone Folder (102300), Stampin’ Dimensionals (104430), Stampin’ Seal (152813), Mini Glue Dots (103683), Multipurpose Liquid Glue (110755), Heat Tool (129053)

Close Up of My Card with Peaches on it
Close Up of My Card

Measurements: 

  • Thick Basic White: 5 ½” x 8 ½” scored at 4 ¼”
  • Calypso Coral: 5 ¼” x 4”
  • Basic White (2 pieces):
    • 1 ¾” x 1 ½” (Peaches)
    • 2 ¾” x 2 ¼” (Leaves)
  • You’re a Peach Designer Series Paper (2 pieces): 2 11/16” x 1 5/16”
  • Balmy Blue: 1 3/16” x ¼”

More Information on My Peachy Keen Birthday Card:

For more of my Stampin’ Up! cards, please click here.

You will find the items listed above in my online store.

My Happy Thanksgiving Card

A Thanksgiving Card with Leaves on It
My Happy Thanksgiving Card

Happy Thanksgiving to my Canadian Crafty Friends! Laurie here again! I am sharing My Happy Thanksgiving Card using several dies, including Tailor Made Tags Dies, Giving Gifts Dies, Picture This Dies and Word Wishes Dies to create my festive card.

For my card, I wanted to create a very Autumnal card for this time of year. So, I pulled out Cherry Cobbler, Cajun Craze, Bumblebee and Old Olive to create my Fall wonderland card. I stamped each leaf off before stamping it onto my tag. I wanted a subtle background for my die cut word and leaves. The HAPPY was white embossed onto a scrap of Cherry Cobbler and layered onto a pile of leaves. I added to the tag, the Gingham Ribbon, and the Linen Twine which I frayed to create a rustic look.

The Beauty of the Earth Designer Series Paper has the perfect Fall paper in it that was destined for my card. I thought that the Picture This Dies would be a great way to have this DSP poking out. A scattering of die cut leaves and rhinestones make this card feel like there is movement to the falling leaves.

Supplies:

Stamps/Bundles/Dies: Tailor Made Tags Dies (155563), Giving Gifts Dies (156563), Picture This Dies (155559), Word Wishes Dies (149629), A Wish for Everything Stamp Set (149320)

Inks: VersaMark Ink Pad (102283), Cherry Cobbler Classic Stampin’ Pad (147083), Cajun Craze Classic Stampin’ Pad (147085), Bumblebee Classic Stampin’ Pad (153116), Old Olive Classic Stampin’ Pad (147090)

Paper: Cajun Craze (119684), Cherry Cobbler (119685), Basic White (159276), Bumblebee (153077), Old Olive (100702), Beauty of the Earth Designer Series Paper (155841)

Accessories: Basics Embossing Powder (155554), Bumblebee Gingham Ribbon (153658), Holiday Rhinestone Basic Jewels (150457), Linen Thread (104199), Bone Folder (102300), Stampin’ Dimensionals (104430), Stampin’ Seal (152813), Mini Glue Dots (103683), Heat Tool (129053)

Close Up of my Card
Close Up of My Thanksgiving Card

Measurements: 

  • Cajun Craze: 3 pieces
    • 5 ½” x 8 ½” scored at 4 ¼”
    • 3 ½” x 1” (Sentiment)
    • Scraps for leaves
  • Beauty of the Earth Designer Series Paper: 4 1/8” x 5 3/8”
  • Cherry Cobbler: 4” x 5 ¼”
    • Scraps for leaves
  • Basic White: 3 7/8” x 1 13/16”
  • Bumblebee: Scraps
  • Old Olive: Scraps

More Information on My Happy Thanksgiving Card:

For more of my Stampin’ Up! cards, please click here.

You will find the items listed above in my online store.