Colour Your World

A card with a Girl holding art supplies saying Fill your life with colors.
Colour Your World

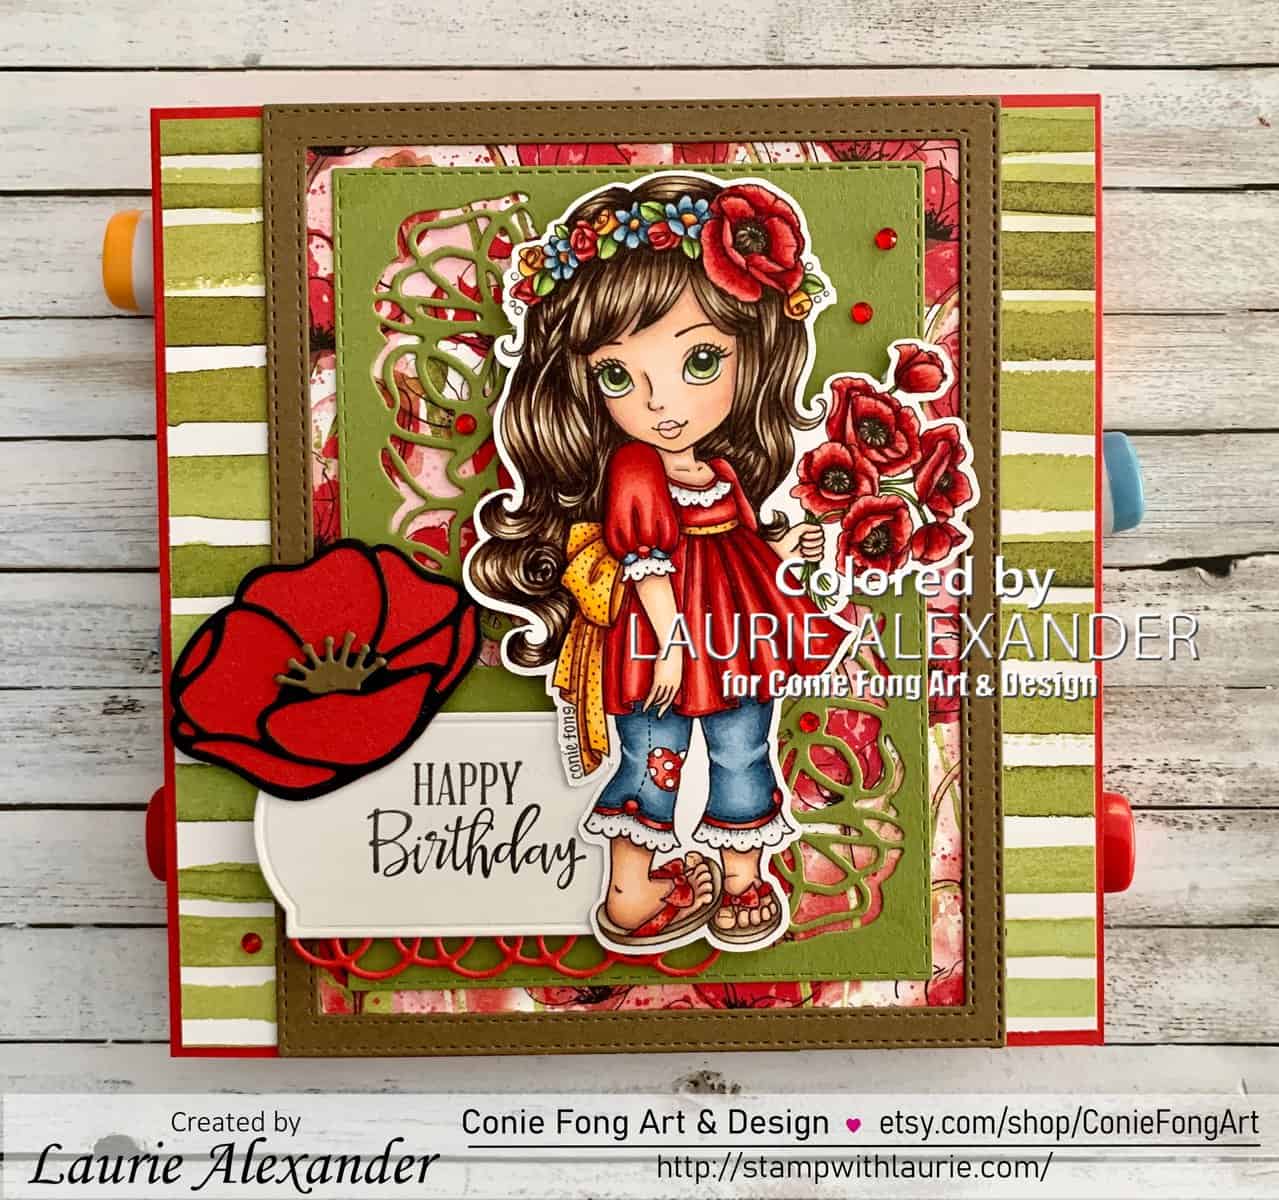
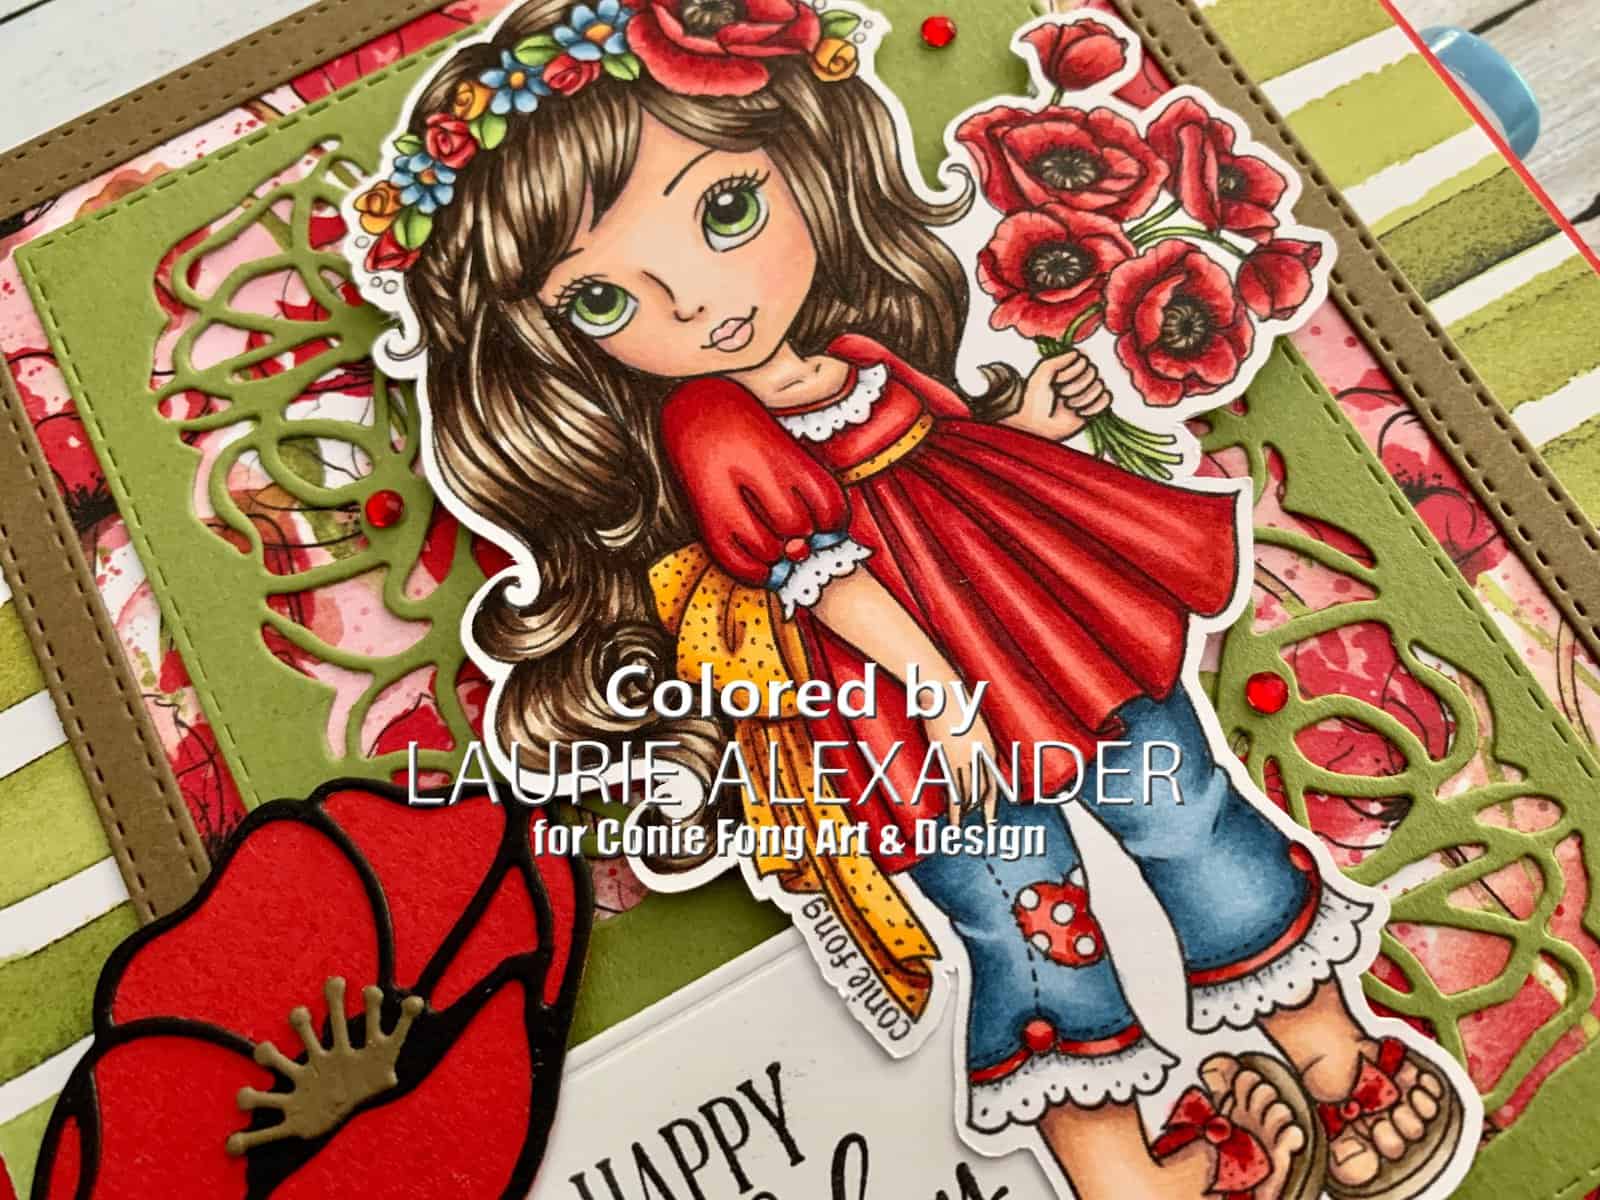
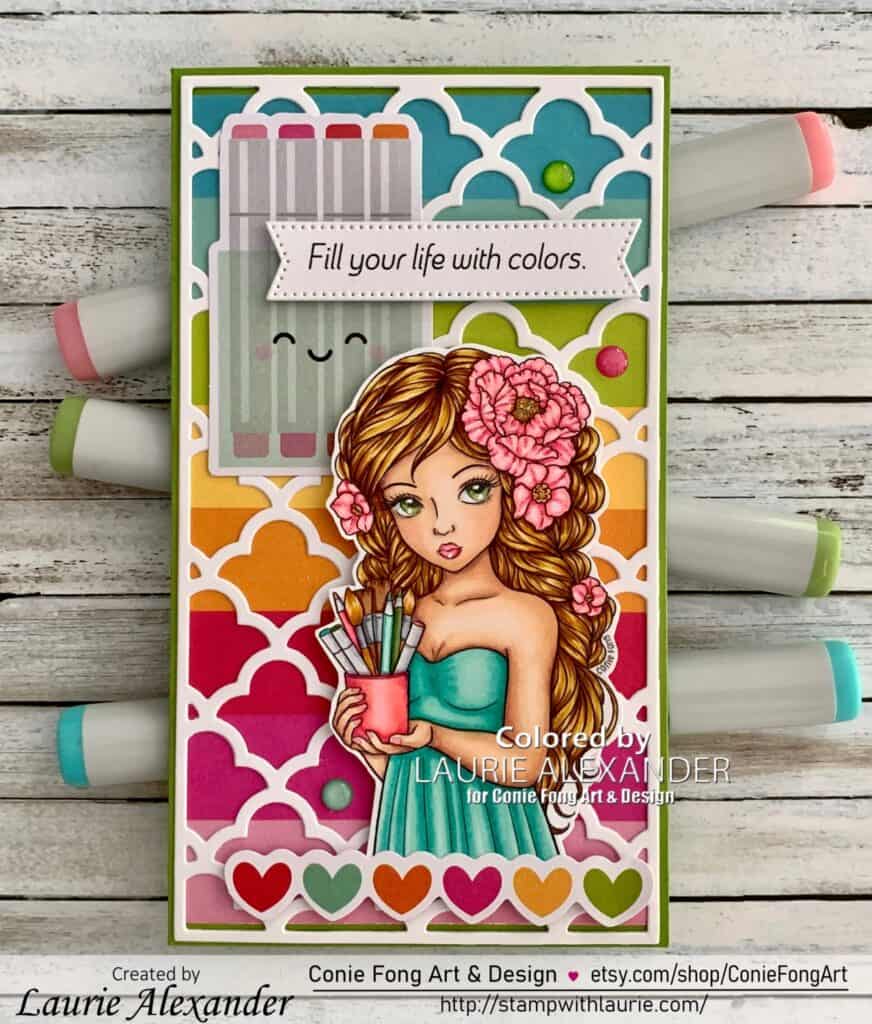
Hello Crafty Friends! It’s Laurie here! I am sharing my Colour Your World as my Design Team Inspiration Card for Conie Fong Art & Design using the beautiful Artistic Leilani. She comes with 9 stamps including:

  • Artistic Leilani Left 
  • Artistic Leilani Right
  • Artistic Leilani Left – Short Dress
  • Artistic Leilani Right – Short Dress
  • Sentiment: You Color My World
  • Sentiment: You Colour My World
  • Sentiment: Happy Birthday To An Amazing Friend
  • Sentiment: I am not a hoarder. I am an artist.
  • Sentiment: Art comes from the heart

The Details of My Card

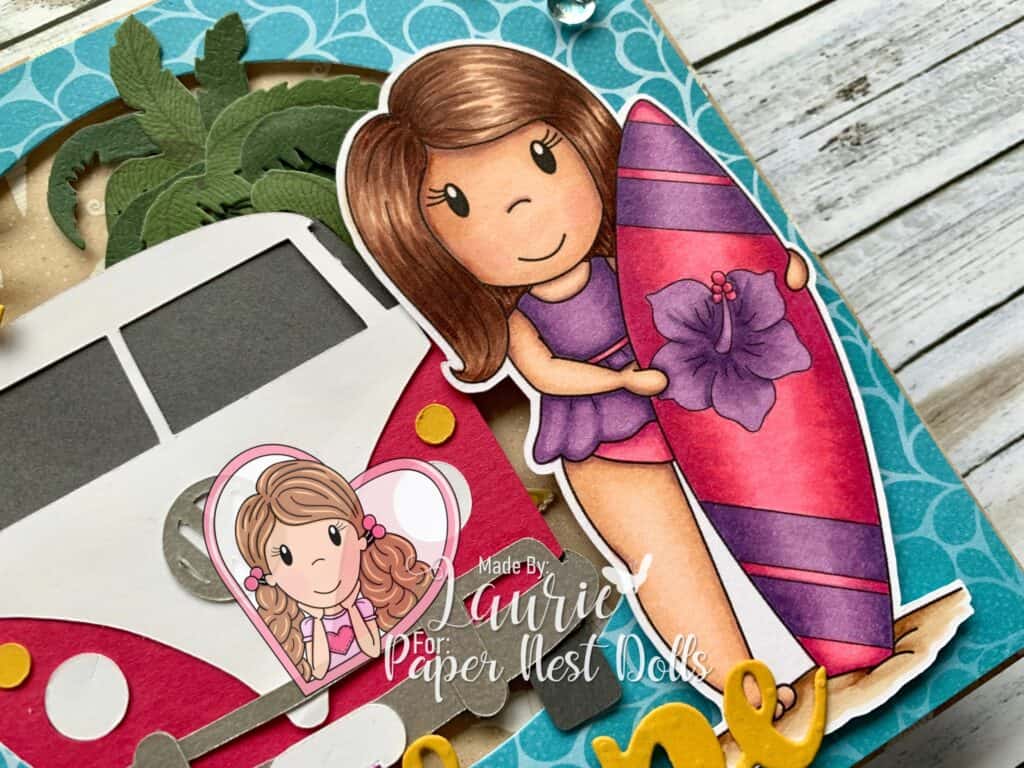
A good friend of mine retired recently and she loves to colour. In fact, she was the one who got me into making cards and colouring! So, I thought that Artistic Leilani would be perfect for her retirement card!

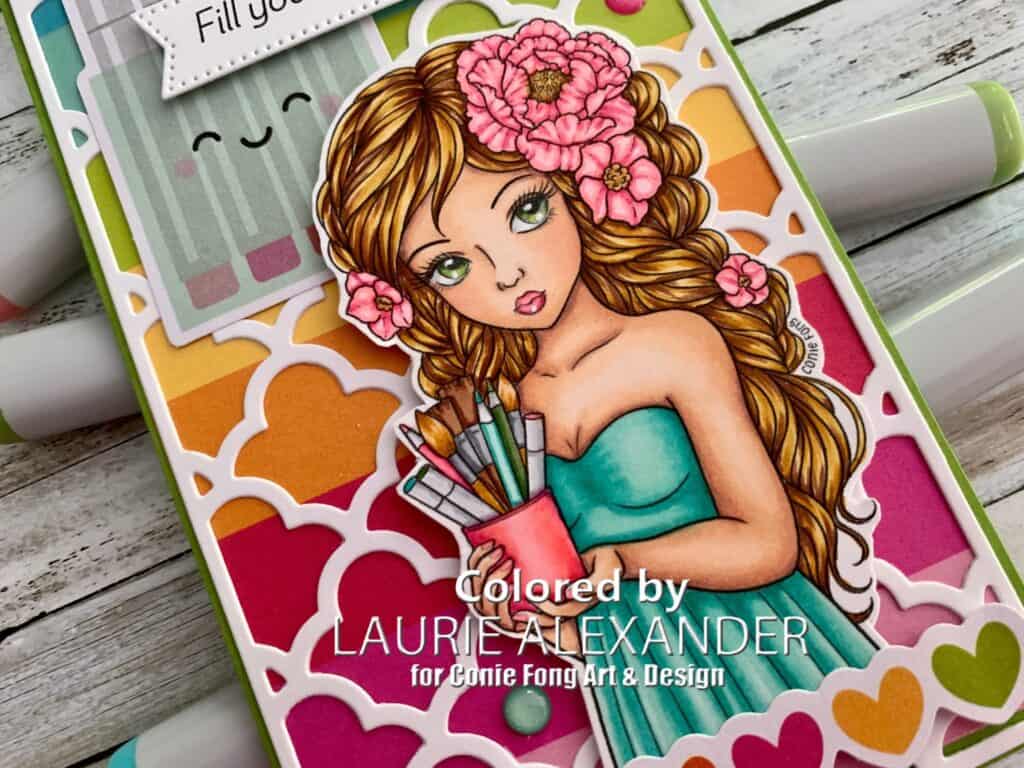
For my mini slimline card, I coloured Leilani with my Copic markers using the colour scheme of the Cute & Crafty Paper Pad with its bright colours. It was idea for my crafty colouring theme.

I used the piece of designer paper that had the bands of rainbow colours and layered it beneath my quatrefoil die cut. Isn’t it neat how the different bands of colour peek through the white die cut!

I love the cute Copic marker die cut piece from the Odds and Ends that I layered beneath my sentiment. A row of rainbow-coloured hearts is the other die cut piece that I pulled from the Chit Chat. You must have hearts when it comes to what you love to do!

I used Wink of Stella on the flowers in her hair and Glossy Accents on her pink jar. The finishing touch was some glittery sprinkles that matched my colour scheme.

————————–

Copic Markers:

Skin: E04/E11/E21/E00/E000/R20
Hair: E25/YR24/Y26/Y21
Pinks: RV25/RV23/RV10
Yellows: Y21/YR23/E25
Dress: BG15/BG13/BG11/BG10
Eyes: YG03/YG63/YG67
Copic Markers: C3/C0/YG67/RV23/BG15
Pencils: YG63/YG67/BG13/BG11/RV25/RV23
Paint Brushes: C5/C3/E25/E23/YR24/E21

Close Up of Girl holding art supplies
Close up of Artistic Leilani

————————–

Card Recipe for My Colour Your World:

Artistic Leilani, Conie Fong Art & Design
Paper Basics – Stamper’s Select White Cardstock, Papertrey Ink
Cute & Crafty 6” x 6” Paper Pad, Doodlebug Designs Inc.
#6 Quatrefoil Coverplate Etched Die, Photo Play
Stylish Shapes Dies, Stampin’ Up!
Cute & Crafty Odds & Ends, Doodlebug Designs Inc.
Cute & Crafty Chit Chat, Doodlebug Designs Inc.
Bright Glitter Assortment Sprinkles, Doodlebug Designs Inc.
White Gelly Roll Pen, Sakura
Glossy Accents, Ranger
Clear Wink of Stella, Stampin’ Up!
Granny Apple Green Card Stock, Stampin’ Up!

Finished card size: 6.5” x 3.5”

————————–

To view my other Conie Fong Art & Design projects, please click here.

Hope you like my Design Team Inspiration Card using
Artistic Leilani for Conie Fong Art & Design!

I am entering this card in the following challenges:
613 Avenue Create – ATG (1 of 2)
World Wide Open Design Team Challenge Blog – ATG (1 of 3)
Polkadoodles Craft Challenge – ATG

Thank you for stopping by!

Hugs,
Laurie

Stayin Alive Disco Card

A card with a Disco Dancer on it
Stayin Alive Disco Card

Hello Crafty Friends! It’s Laurie here! I am sharing my Stayin Alive Disco Card as my Design Team Inspiration Card for Paper Nest Dolls using Decade Collection Disco Amara. There are ten dolls in the Decade Collection that come in both rubber and digital stamps. You can find all the digital versions here.

Decade Doll Collection by Paper Nest Dolls

The Details of My Card

For my card, I used the Seventies Ciao Bella Paper again to create my mini slimline card. This piece of paper is the left-over piece from my Roller Disco Babe card! So, I was able to get 2 cards made using one sheet of the paper! I love the disco ball and the “Stayin Alive” words under her feet!! The “Funky” sentiment was snipped from the paper as well. Perfect for Disco Amara!

To match the glitz of a disco ball, I added stars in Gold Metallic Paper. I even added a star flourish behind Amara. Love the way the curls and swirls of the flourish mimic movement…almost like Amara is dancing off the card! The only other things the card needed was a scattering of rhinestones and Gold Gelly Roll Pen on her earrings.

————————–

Copic Markers

Skin: E15/E13/E11/E00/E000/R20
Hair: C9/C7/C5/C3
Outfit: V17/V15/V12
Boots: C9/C7/C5/E25/E23

Close Up of Disco Girl
Close Up of Disco Amara

————————–

Card Recipe for My Stayin Alive Disco Card

Decade Collection Disco Amara, Paper Nest Dolls
Paper Basics – Stamper’s Select White Cardstock, Papertrey Ink
Seventies 6” x 6” Paper Pad, Ciao Bella
Gold Metallic Specialty Paper, Stampin’ Up!
Rhinestone Basic Jewels, Stampin’ Up!
Stitched Stars Dies, Stampin’ Up!
Gold Gelly Roll Pen, Sakura
Gorgeous Grape Card Stock, Stampin’ Up!

Finished card size: 6” x 3 ½”

Stamp Size: 4”

————————–

To view my other Paper Nest Dolls cards, please click here.

My Other Cards in the Decade Collection

For more information on my cards, please click the photos.

Hippie Girl on a card
My Groovy Love Card
Grad with a girl in roller skates on it
Roller Disco Babe
Card with 50s greaser and girl with poodle skirt
My Grease Lightning Card
Card with a Girl from Seventies and a retro bus on it
My Road Trip Card
Card with a Hippie Girl
Peace Not War Card

Hope you like my Design Team Inspiration Card using
Decade Collection Disco Amara by Paper Nest Dolls!

Thank you for stopping by!

Hugs,
Laurie

My Let’s Go A-Viking Card

A card with a Viking on it.
My Let’s Go a Viking Card

Hello Crafty Friends! It’s Laurie here! I was so excited to have been asked to present at the Paper Nest Dolls’ New Year’s Day Party this past weekend! So, I am sharing My Let’s Go A-Viking Card that I coloured and created for this event! It is using the stamp created exclusively by Paper Nest Dolls for the event and is called Viking Tina after our very own Tina Day Goodwin from the PND Design Team! 

Details of my Card

I had so much fun colouring with my Copic markers this cutie in what my Hubby called “Viking colours”! Lol!

For my card, I decided that I wanted to create a Norwegian fjord vignette as a backdrop for my Viking Tina. So, I pulled out my Distressed Oxide Inks and Blending tools to create the Aurora Borealis night sky. I love the “wooden” Viking ship by Stamp AnnieThing poking out of the green frame! A couple of mountains and a water die completed my vignette. Going on a cruise to see the fjords and the aurora borealis are on my bucket list.

Distress Inks for Aurora Borealis Night Sky

The P13 paper was perfect for my Norwegian theme and matched my Viking colour scheme! To add to the rustic feel, I added some recycled carboard, a rustic star and small wooden stars. A scattering of red rhinestones tied in the red of Viking Tina’s dress.

————————–

Viking Tina:

Skin: E04/E11/E21/E00/E000/R20
Hair: E49/E47/E44/E43/E42
Brass: E18/E15/E11
Horns on Helmet: E42/E41/E40/0
Steel: C7/C5/C3
Dress: R39/R37/R35/R32
Cape: YG99/YG97/YG95/YG93/YG91
Cape Button: E15
Fur/Trim on Cape/Dress: C7/C5/C3
Boots: E49/E47/E44/C7/C5
Laces: C3
Necklace: E44/E43/E42/E41

Close Up of Viking Tina by Paper Nest Dolls
Close Up of Viking Tina

————————–

Supplies for My Let’s Go A-Viking Card:

Viking Tina, Paper Nest Dolls
Paper Basics – Stamper’s Select White Cardstock, Papertrey Ink
140 lbs Hot Press Watercolor Paper, Fabriano
Cozy Winter 12” x 12” Designer Paper Pack, P13
In Good Taste Designer Series Paper, Stampin’ Up!
4” and 3 5/8” Stitched Layering Circle Dies, Memory Box
Build a Viking Ship Dies, Stamp AnnieThing
Stitched Mountain Borders, Lawn Fawn
Breaking Waves Border Dies, Heffy Doodle
Christmas Trimming Dies, Stampin’ Up!
Peeled Paint Distress Oxide Ink, Ranger Ink
Mermaid Lagoon Distress Oxide Ink, Ranger Ink
Blueprint Sketch Distress Oxide Ink, Ranger Ink
Mini Ink Blending Tool, Ranger Ink
White Gelly Roll Pen
Ripped Cardboard 5” x 2 ½”
Wooden Star Shapes, From my Stash
Red Rhinestone Basic Jewels, Stampin’ Up!
Black Rhinestone for eye of boat
Mossy Meadow, Gray Granite, Night of Navy,
Soft Suede and White Card Stock

Finished card size: 5 ½” x 5 ½”

————————–

To view my other Paper Nest Dolls cards, please click here.

Hope you like My Let’s Go A-Viking Card using
Viking Tina by Paper Nest Dolls!

Thank you for stopping by!

Hugs,
Laurie

Nature is an Adventure Card

A Cabin in the forest on a card
Nature is an Adventure Card

Hello Crafty Friends! Laurie here again! I am sharing my Nature is an Adventure Card using the Reflected in Nature Stamp Set by Stampin’ Up!

The Details of My Card

The inspiration for my card is the prints that you see which have one pop of red in amongst a black/white scene. To create this, I pulled out my Blender Pen once I had stamped the image. I took the pen and dipped it into my Real Red 

Ink Pad to pick up some ink. I started in the shadow areas, like under the roof line, and moved out from there. As you use the pen, the ink gets lighter and lighter until there is no more ink on it. I love this softer look that suited the stamped image! As the ink runs out, you get lots of dimension with the shadows, mid-tones, and highlights. I haven’t done this technique in a long time.

To match my rustic cottage in the woods theme, I distressed the edges of my stamped image and the Real Red mat with my Paper Snips. The Peaceful Place Designer Series Paper is gorgeous with its unexpected silver accents and perfect for my theme! I thought that adding a flag of the Cork Paper behind my focal point would add a bit of colour and interest. To match the silver accents on the DSP, I added a Silver Foil die cut tree from the Cabin Dies. For embellishments, I used Linen Thread wrapped around my sentiment and a scattering of Red Rhinestones to add some colour.

Supplies:

Stamps/Bundles/Dies: Reflected in Nature Stamp Set (156437), Cabin Dies (156404)

Inks: Real Red Classic Stampin’ Pad (147084), Smoky Slate Classic Stampin’ Pad (131202)

Paper: Real Red (102482), Basic White (159276), Cork 12″ x 12″ Specialty Paper (156393), Peaceful Place Designer Series Paper (156394), Silver Foil 12″ x 12″ Specialty Pack (156457)

Accessories: Blender Pens (102845), Linen Thread (104199), Red Rhinestone Basic Jewels (146924), Paper Snips (103579), Bone Folder (102300), Stampin’ Dimensionals (104430), Stampin’ Seal (152813), Mini Glue Dots (103683)

Close Up of the Cabin on my card
Close Up of the Cottage on My Card

Measurements: 

  • Real Red: 3 pieces
    • 5 ½” x 8 ½” scored at 4 ¼”
    • 3 ½” x 3 ¼”
    • 3 ½” x 5/8” (Sentiment)
  • Peaceful Place Designer Series Paper: 4” x 5 ¼”
  • Basic White: 2 pieces:
    • 3 ¼” x 3”
    • 3 ¼” x ½” (Sentiment)
  • Cork Specialty Paper: 2 7/8” x 4 ½”
  • Silver Foil Specialty Pack: scrap

More Information on My Nature is an Adventure Card:

For more of my Stampin’ Up! cards, please click here.

Here is a video on the Peaceful Place Suite:
https://youtu.be/bYaJWfSgoEQ

You will find the items listed above in my online store.

My Pansy Hello Card

My Stampin' Up! Card Using the Pansy Petals Suite
My Pansy Hello Card

Hello Crafty Friends! Laurie here again! I am sharing My Pansy Hello Card using the Pansy Petals Suite which includes the Pansy Patch Stamp Set, Pansy Dies, Pansy Petals Designer Series Paper and Bumblebee Trinkets by Stampin’ Up! Don’t you just love the details of that layered 3D pansy!

Close Up of the 3D Pansy Die

For my card, I knew that I wanted to use the Basic Border Dies with the beautiful DSP! So, I created an envelope liner look that allowed me to wrap the Bumblebee Gingham Ribbon around it. I pulled my colours from the DSP to create my gorgeous pansy. There are so many different colour combinations that you can create with the dies. There is even a die that can cut out some of the pansies in the DSP. I embossed the sentiment in white on a strip of Bumblebee card stock that I had left over from another project. I always save them just in case I can use them. What do you do with these scraps? The finishing touch was the sweet Bumblebee Trinket!

Supplies:

Stamps/Bundles/Dies: Pansy Petals Bundle (155674), Basic Borders Dies (155558)

Inks: VersaMark Ink (102283)

Paper: Fresh Freesia (155613), Basic White (159276), Blackberry Bliss (133675), Bumblebee (153077), Pansy Petals Designer Series Paper (155807)

Accessories: Basics Embossing Powder (155554), Bumblebee Trinkets (155568), Bumblebee Gingham Ribbon (153658), Heat Tool (129053), Bone Folder (102300), Stampin’ Dimensionals (104430), Stampin’ Seal (152813), Mini Glue Dots (103683), Paper Snips (103579)

Close Up of My Card
Close Up of My Card

Measurements: 

  • Fresh Freesia: 2 pieces
    • 5 ½” x 8 ½” scored at 4 ¼”
    • Scrap for pansy
  • Basic White: 2 pieces
    • 4” x 5 ¼”
    • Scrap for pansy
  • Blackberry Bliss: Scrap for pansy
  • Bumblebee: 2 pieces
    • 3 ½” x ½”
    • Scrap for pansy
  • Pansy Petals Designer Series Paper: 5 ½” x 2 ¼”
  • Bumblebee Gingham Ribbon: 6” and 4”

More Information on My Pansy Hello Card:

For more of my Stampin’ Up! cards, please click here.

Here is a video showing the Pansy Petals Suite: https://www.youtube.com/watch?v=dUT3h4xOCnY

You will find the items listed above in my online store.

Lazy Days of Summer Card

My Design Team Card
My Lazy Days of Summer Card

Hello Crafty Friends! It’s Laurie here! I am sharing my Lazy Days of Summer Card as my Design Team Inspiration Card for Paper Nest Dolls using the digital stamp Surfer Emma. When you buy her, you get 2 digital stamps for the price of 1! Surfer Emma with and without sunglasses.

I can’t believe that summer is almost over! Emma and I are going to miss those lazy days of summer sunshine!

For my card, I had fun colouring Emma with my Copic markers. I created a summer vignette for my cutie with the surfer van and a palm tree sticker poking out from the circle. The surfer van was a svg file that I downloaded and cut out on my Silhouette Cameo machine. The svg file comes as a box card, but I only wanted the van. Easy enough to separate the file into the pieces that I needed. It was so fun creating the van to match my coloured image with the hot pink. Who wouldn’t love to drive a hot pink surfer van!

Since it’s a beach card, of course, I needed water, sand, and sun! So, my paper was perfect for two of those elements! The sun and sunshine die cuts completed the other element. I love the sentiment “The lazy days of summer” which sum up my card perfectly and matches the purple colour of her bathing suit!

————————–

Copic Markers:

Skin: E04/E11/E21/E00/E000/R20
Hair: E29/E27/E25/E21
Pinks: RV13/RV14/RV17
Purples: V12/V15/V17
Sand: E31/E33/E35

Close Up of my Card
Close Up of My Design Team Card

Card Recipe for My Lazy Days of Summer Card:

Surfer Emma, Paper Nest Dolls
Paper Basics – Stamper’s Select White Cardstock, Papertrey Ink
Make a Splash 6” x 6” Paper Pad, Bo Bunny
Galvanized Metallic Sheet, Stampin’ Up!
Box Card Surfing Van SVG, Silhouette Design Store
Silhouette Cameo Machine
4” Circle Die, In my Stash
Spring Showers Dies, Lawn Fawn
Sunshine Wishes Thinlits Dies, Stampin’ Up!
Coconut Palms, Jolee’s Boutique, Michael’s Arts & Crafts
Lunar, Shimmerz Embellishments, Buttons Galore & More
Wishes You Way Stamp Set, Stampin’ Up!
Melon Mambo, Basic Gray and
Crushed Curry Card Stock, Stampin’ Up!

Finished card size: 5.5” x 5.5”

————————–

To view my other Paper Nest Dolls cards, please click here.

Here are two other cards that I created using this same digital stamp.
For more information on these cards, please click the photos. 

My Design Team Card
My Fun in the Sun Card
My Summer of Sun Card

Hope you like my Design Team card using Surfer Emma by Paper Nest Dolls!

Thank you for stopping by!

Hugs,
Laurie

My Great Escape Card

My Stampin' Up! Card
My Great Escape Card

Hello Crafty Friends! Laurie here again! I am sharing My Great Escape Card using the Counting Sheep Stamp Set and matching Sheep Dies by Stampin’ Up! You can get both for free with a qualifying order during Sale-A-Bration. I am a big fan of Shaun the Sheep and love watching all the antic that he gets up to with the other sheep at the farm! The ewe on the right reminds me of him as she orchestrates a breakout from the farmer’s field. Lol!

Close up sheep on of my card
Close Up of Ewe Orchestrating Escape

My Colouring Techniques

For my card, I used several techniques to colour my sheep so that they looked fluffy. I stamped the sheep in Smokey Slate Classic Ink on Basic White card stock. This allowed me to colour with the no-line technique which created a softer finished image without the harsh black lines with Memento Ink. Once the colouring was finished, the lines would fade in with the dots.

The second techniques I used was dots for their wool. I used the Dark Smokey Slate Stampin’ Blend in the shadows. So, along the edges where the stamped Smokey Slate ink was, where the artist indicated fluffiness in the wool and anywhere I thought a shadow would show up.

Next, I used the Light Smokey Slate Stampin’ Blend to add to the shadow areas and extend my dots further into the image from the shadows. I added a few random dots to break up the white areas in the centre of the wool.

Finally, I used my Stampin’ Blends Color Lifter and lightly brushed over all the dots to soften them a little bit. For the face and legs, I used the Smooth colouring technique. For more information on these techniques and others, I have included links on how to use your Stampin’ Blends at the end of this post.

Close Up of Sheep on Left Side

The Details of my Card

I decided that I needed a slimline card to fit my scene so that I could include all three sheep in the great escape. Since the Basic Border Dies that I used were not long enough for a slimline card, I had to create layers to fill my scene. With lots of dimensionals, I was able to create a hilly pastureland with a cloud filled sky. For my pastureland I used two different card stocks, Pear Pizzaz and Old Olive, to add dimension to my scene. I added an 8 ½” strip of Old Olive at the base of my card on top of all the hills to hide all the uneven pieces. The In Good Taste DSP was perfect for my wooden fences.

Supplies:

Stamps/Bundles/Dies: Counting Sheep Stamp Set (156591), Sheep Dies (156600), Basic Borders Dies (155558)

Inks: Smoky Slate Classic Stampin’ Pad (147113)

Paper: Smoky Slate (131202), Balmy Blue (146982), Pear Pizzazz (131201), Old Olive (100702), Basic White (159276), So Saffron (105118), In Good Taste Designer Series Paper (152494)

Accessories: Smoky Slate Stampin’ Blends Combo Pack (154904), Basic Black Stampin’ Blends Combo Pack (154843), Petal Pink Stampin’ Blends Combo Pack (154893), Stampin’ Blends Color Lifter (144608), Bone Folder (102300), Stampin’ Dimensionals (104430), Stampin’ Seal (152813)

Close Up of Jumping Sheep
Close Up of Escaping Sheep

Measurements: 

  • Smoky Slate: 7” x 8 ½” scored at 3 ½” – finished card 3 ½” x 8 ½”
  • Balmy Blue: 8 ¼” x 3 ¼”
  • Old Olive: 1 ½” x 5” (hill in distance)
    • 1” x 8 ¼” (flat band at bottom of hills)
  • Pear Pizzazz: 1 ½” x 5” (left hill)
    • 1 ½” x 3” (right hill)
  • Basic White: 5 ¾” x 1 1/8” (right cloud)
    • 3 ¼” 1 ¼” (left cloud)
    • 2 ¼” x1 ½” (Sheep – 3 pieces)
  • So Saffron: scraps
  • In Good Taste Designer Series Paper: 3” x 1 ½” (3 pieces)

More Information on My Great Escape Card:

Hope you like My Great Escape Card!

How to Use Stampin’ Blends
https://stampwithlaurie.com/wp-content/uploads/2020/08/Stampin-Up-Blends-2020.pdf

Part 1Whiskey Business Card using Blending Different Colours Technique
Video Tutorial: Blending Different Colours Together

Part 2Country Harvest Card using Light to Dark Technique
Video Tutorial: Light to Dark/Dark to Light Colouring

Part 3Beautiful Poppy Birthday Card using Smooth Colouring Technique
Video Tutorial: Smooth Colouring

Part 4Let’s Gather Together Card using Tip to Tip Blending Technique
Video Tutorial: Tip to Tip Colouring

Part 5So Grateful Cardinal Card using Flicking Colouring Technique
Video Tutorial: Flicking Colouring

Part 6Let’s Celebrate You Card using Flicking of Different Colours Technique
Video Tutorial: Flicking of Different Colours Technique

No-Lines Technique CardsMy Cardinal Anniversary Card and My Cardinal Card

For more of my Stampin’ Blends cards, please click here.

For more of my Stampin’ Up! cards, please click here.

You will find the items listed above in my online store.

Penelope Poppy Birthday Card

My Design Team card
My Penelope Poppy Birthday Card

Hello Crafty Friends! It’s Laurie here! I am sharing my second Design Team Inspiration Card for June using the cute Penelope Poppy by Conie Fong Art & Design.

My mom’s birthday is coming up and I thought that Penelope would make a pretty birthday card! I had fun colouring her with my Copic markers in bright reds to match her poppies. I pulled out all my poppy crafting supplies to make my card. Stampin’ Up! has several poppy dies and I couldn’t resist creating a poppy to set off the sentiment. Even the paper behind the die cut that she is layered on has poppies. I decided to create a Soft Suede frame to focus on her and the sentiment. A scattering of red rhinestones adds to the red poppy theme!

————————–

Copic Markers:

Skin: E000/E00/E21/E11/E04/R20
Hair: E49/E47/E44/E43/E42
Eyes: YG69/YG67/YG03/C3/C1/0
Top: R29/R27/R24/R22/C5
Jeans: B91/B93/B95/B97/B99/R29/R27/R24/R22
Yellow Flowers/Belt: Y35/Y38/E15/E18
Poppies: R29/R27/R24/R22/C5/E43/E44/E47
Leaves/Stems: YG03/YG63/YG96/G99
Sandals: E42/E43/E44
Lace: C3/C1/C0

Close Up of My Penelope Poppy Birthday Card
Close Up of My Design Team Card

————————–

Card Recipe for My Penelope Poppy Birthday Card:

Penelope Poppy, Conie Fong Art & Design
Paper Basics – Stamper’s Select White Cardstock, Papertrey Ink
Peaceful Poppies Designer Series Paper, Stampin’ Up!
Stitched Rectangle Dies, Stampin’ Up!
Poppy Moments Dies, Stampin’ Up!
Painted Labels Dies, Stampin’ Up!
Peaceful Moments Stamp Set, Stampin’ Up!
Woodland Metal Builders Die, Stamp AnnieThing
Red Rhinestone Basic Jewels, Stampin’ Up!
White Gelly Roll Pen
Clear Star Gelly Roll Pen
Poppy Parade, Soft Suede, Old Olive, Basic Black
and Basic White, Stampin’ Up!

Finished card size: 5.5” x 5.5”

————————–

To view my other Conie Fong Art & Design cards, please click here.

Hope you like my Design Team card using
Penelope Poppy for Conie Fong Art & Design!

Thank you for stopping by!

Hugs,
Laurie

Fun in the Sun Card

Happy Summer Crafty Friends! It’s Laurie here! I am sharing my Fun in the Sun Card as my Design Team Inspiration Card for Paper Nest Dolls using the digital stamp Surfer Emma.

First day of Summer was yesterday which inspired my card! This card came about because I just bought the Slimline Waves Die by Whimsy Stamps and couldn’t wait to play with it. I debated about a shaker card but decided that a scene using the waves as separators between the sand, water and sky would be fun.

I had this cool birthday paper in my stash that looks like waterdrops. Perfect for the fun colours of my image which I coloured with my Copic markers! I added a couple of “water drops” with my acrylic dew drops on some of the Bermuda Bay swirls around my stamp. For my sand and sky, I used a couple of embossing folders to add texture. Then I lightly brushed ink over the raised parts and edges to give those areas more dimension. Another fun accent was that the cloud and “sunshine” word were die cut from white felt to make them seem fluffy. Some shells from the dollar store add to my beachy theme.

————————–

Copic Markers:

Skin: E04/E11/E21/E00/E000/R20
Hair: E29/E27/E25/E21
Bathing Suit: YR02/YR04/YR07/YR09/Y19/Y17/Y15
Surfboard: BG53/BG45/BG57/C3/C1/C0/0
YR02/YR04/YR07/YR09/Y19/Y17/Y15/Clear Wink of Stella on the flower
Sand: E31/E33/E35

Close up of My Fun in the Sun card
Close Up of My Design Team Card for Paper Nest Dolls

————————–

Card Recipe for Fun in the Sun Card:

Surfer Emma, Paper Nest Dolls
Paper Basics – Stamper’s Select White Cardstock, Papertrey Ink
Birthday Bash Designer Series Paper, Stampin’ Up!
Festive Felt Sheet Combo Pack, Stampin’ Up!
Large Slimline with Sliders Dies, Lawn Fawn
Slimline Waves Die, Whimsy Stamps
Spring Showers Dies, Lawn Fawn
Sunshine Wishes Thinlits Dies, Stampin’ Up!
Wishes You Way Stamp Set, Stampin’ Up!
Subtle Dynamic Textured Impressions Embossing Folder, Stampin’ Up!
Cloudy Day Textured Impressions Embossing Folder, Stampin’ Up!
Spring Bloom Dew Drops by The Robin’s Nest
Shells from Dollar Store
Crumb Cake Classic Stampin’ Pad
Whisper White Craft Stampin’ Pad 
Sponge, Stampin’ Up!
Clear Wink of Stella, Stampin’ Up!
Tangerine Tango, Bermuda Bay, Crumb Cake
and Crushed Curry Card Stock, Stampin’ Up!

Finished card size: 3.5” x 8.5”

————————–

To view my other Paper Nest Dolls cards, please click here.

Here is another card that I created using this same digital stamp but with sunglasses. You get both digital stamps with your order. To read about how I made this card, please click here.

My Design Team Card Using Surfer Emma
My Summer of Sun Card Using Surfer Emma

Hope you like my Design Team card using
Surfer Emma by Paper Nest Dolls!

Thank you for stopping by!

Hugs,
Laurie

My Angel Messenger Card

My Design Team Inspiration Card
My Angel Messenger Card

Hello Crafty Friends! It’s Laurie here! I am sharing my first Design Team Inspiration Card for June using the sweet digital stamp Angel Messenger by Conie Fong Art & Design. This is such a pretty image and can be used for so many occasions like Birthday, Sympathy, Get Well, Thinking of You and so on.

For my card, I had some leftover paper from the Kraftin’ Kimmie Stamps 2021 Spring Mini Retreat Weekend that I really loved with soft pinks, greens and purples. So, I used that to pull out my colours for my Copic markers. Once I coloured her wings, I used Star Dust Stickles to make them sparkle. Of course, all Angels have radiant wings! I love this paper so much that I used it for all my dies cut pieces including the bird and branches. The paper pad even has beautiful tags. I couldn’t resist fussy cutting one out and adding it with a pretty bow. A perfect setting for my die cut bird! A scattering of rhinestones and sequins were the only embellishments that my card needed.

————————–

Copic Markers:

Skin: E000/E00/E21/E11/E04/R20
Hair: E25/YR24/Y26/Y21
Wings: C3/C1/C0/Star Dust Stickles
Pinks: RV66/RV63/RV52
Purples: V000/V01/V12/V15
Yellows: Y32/Y38
Greens: G40/G43/G46
Doves: C3/C1/C0
Cloud: C1/C0/0
Sky: B000/B0000/0

Close Up of My Design Team Inspiration Card

————————–

Card Recipe for My Angel Messenger Card:

Angel Messenger, Conie Fong Art & Design
Paper Basics – Stamper’s Select White Cardstock, Papertrey Ink
The Four Seasons, Spring 12” x 12” Paper Pad, P13
Birds & More Dies, Stampin’ Up!
Berry Burst Seam Binding Ribbon, Stampin’ Up!
Rhinestone Basic Jewels, Stampin’ Up!
Baby Cup Sequins, Craft Medley
Star Dust Stickles, Ranger
Berry Burst Card Stock, Stampin’ Up!

Finished card size: 5.5” x 5.5”

————————–

To view my other Conie Fong Art & Design cards, please click here.

Hope you like my Design Team Inspiration Card using
Angel Messenger for Conie Fong Art & Design!

Thank you for stopping by!

Hugs,
Laurie

My Santorini Window Card

My Welcoming Window Card
My Santorini Window Card

Today I am sharing my Santorini Window Card using the Welcoming Window Bundle by Stampin’ Up! I love that you can make different cards depending on which sentiment you use. This one is a birthday card, but I also made a Mother’s Day card for my mom too.

When I saw this bundle, I immediately thought of creating a window that shows the inside of the card. I went with bright colours that were inspired by a photo from our Greece trip to Santorini with the bright pink bougainvillea flowers against a white building. 

Santorini
Pink Bougainvillea Flowers in Santorini

I stamped directly onto the In Good Taste Designer Series Paper that carried over to the new Annual Catalogue. The white stucco sheet of DSP was perfect for my card. The shutters and window frame just had to be in Pacific Point since that colour reminds me of Santorini! To create my window, I used a piece of wind sheet between the window panes. I even used the part of the DSP that I cut of the window on the inside of my card. Then you would not see the glue that I used to adhere the Pacific Point frame on the front.

Inside of my Birthday Card

For the inside, I stamped my images centred on the page so that I can be seen through the window.

Inside of My Card
Inside of My Mother’s Day Card

Supplies:

Stamps/Bundles/Dies: Welcoming Window Bundle (159529)

Inks: Melon Mambo Classic Stampin’ Pad (147051), Pacific Point Classic Stampin’ Pad (147098), Pear Pizzazz Classic Stampin’ Pad (147104)

Paper: Melon Mambo (115320), Pacific Point (111350), Pear Pizzazz (131201), Basic White (159276), In Good Taste Designer Series Paper (152494)

Accessories: Window Sheets (142314), Bone Folder (102300), Stampin’ Dimensionals (104430), Stampin’ Seal (152813), Multipurpose Liquid Glue (110755)

Close Up of My Welcoming Window Card

Measurements: 

  • Melon Mambo: 5 ½” x 8 ½” scored at 4 ¼”
  • In Good Taste Designer Series Paper: 4” x 5 ¼”
  • Basic White: 4” x 5 ¼” (inside of card)
    • 1 1/8” x 1 ½” (for flowers)
    • Scraps (for hinges)
  • Pacific Point: 1 5/8” x 2 3/8” (window)
    • 1 9/16” x 2 3/8” (shutters)
  • Pear Pizzazz: 5/8” and 2 ¼”
  • Window Sheets: 2” x 3”

For Further Info:

For more of my Stampin’ Up! cards, please click here.

You will find the items listed above in my online store.

Soar Confidently Birthday Card

Birthday Card
Soar Confidently Birthday Card

Today is I am sharing my Soar Confidently Birthday Card that I made for my father-in-law’s birthday that was yesterday using the Soar Confidently Stamp Set. My father-in-law loves planes, and I knew that a card with the plane from this set would be perfect for him! I just happened to decide to use all the images, as well as the plane.

The Details of My Card

Since the images look vintage, I decided to create an old world feel to my card. So, once I stamped my images on Very Vanilla card stock, I used my Blender Pen to “colour” the stamped images in certain areas where the line art was the strongest. I then fussy cut the stamped images out with my Paper Snips. To give my card more of a vintage feel I sponged ink along the edges. I usually don’t mix Very Vanilla and Basic White but thought the vintage look I was going for allowed it to work.

I decided to use the World of Good Designer Series Paper since it is perfect for a masculine card! Specifically, the one with the compasses on the Misty Moonlight background which reminded me of a blue sky. This paper is retiring and is currently on sale!

For my card, I wanted all the different flying machines to be in the air. So, I need some clouds which is where the Mountain Air Bundle came into effect. I stamped them in Misty Moonlight, but stamped off twice before stamping them on the Basic White card stock to give them a soft fluffy look.

I stamped the sentiment in a Stitched Rectangle, add a couple of banners with one in copper foil to match the copper stars from the Star Designer Elements.

Supplies:

Stamps/Bundles/Dies: Soar Confidently Stamp Set (154531), Mountain Air Bundle (153820), Stitched Rectangles Dies (151820), Tasteful Labels Dies (152886)

Inks: Misty Moonlight Classic Stampin’ Pad (153118), Early Espresso Classic Stampin’ Pad (147114)

Paper: Early Espresso (119686), Very Vanilla (101650), Basic White (159276), World of Good Designer Series Paper (152491), Copper Foil Sheets (142020)

Accessories: Star Designer Elements (150430), Blender Pens (102845), Stamping Sponges (141337), Paper Snips (103579), Bone Folder (102300), Stampin’ Dimensionals (104430), Stampin’ Seal (152813), Glue Dots (103683)

Close Up of my Card
Close Up of My Soar Confidently Birthday Card

Measurements: 

  • Early Espresso: 5 ½” x 8 ½” scored at 4 ¼”
    • ½” x 2 3/16” (banner)
  • World of Good Designer Series Paper: 5 ¼” x 4”
  • Basic White: 5 ¼” x 4” (inside piece)
    • 3 pieces: 1 7/8” x 5/8” (for clouds)
    • 1” x 2 3/8” (sentiment)
  • Very Vanilla: 3 ½” x 4 ½”
  • Copper Foil Sheets: ½” x 2 3/16” (banner)

For Further Info:

Hope you like my Soaring Confidently Birthday Card.

For more of my Stampin’ Up! cards, please click here.

You will find the items listed above in my online store.

My Whiskey Business Card

My Whiskey Business Card

I was honoured to be asked to virtually demonstrate in a Facebook Live my Blends Colouring Techniques to some fellow demonstrators. So, I thought I would share for Technique Tuesdays some of my colouring techniques from the live video each week highlighting a card that I presented. The first card that I am highlighting this week is my Whiskey Business Card. I hope you will check back each week and maybe learn something new!

This card is perfect for that man in your life who loves his whiskey! This can be a Father’s Day card, a birthday card, a congratulations card…so many options. For this card, I wanted to create an old-world library kind of feel with the whiskey on a brass platter waiting for someone to help themselves. The World of Good Designer Series Paper with the wood image lends itself very well to that feel. The Early Espresso Faux Suede Ribbon and the buckle from the Antiqued Corners & Slides Elements both add to this feel as well.

Close Up of My Colouring for My Whiskey Business Card

Supplies:

Stamps: Whiskey Business Stamp Set (154091)

Inks: Tuxedo Black Memento Ink Pad (132708)

Paper: Whisper White Thick (140272 ), Early Espresso (119686), Whisper White (100730), Brass Foil Sheets (153057), World of Good Designer Series Paper (152491)

Accessories: Stitched Shapes Dies (152323), Tasteful Labels Dies (152886), Tasteful Textile 3D Embossing Folder (152718), Antiqued Corners & Slides Elements (152471), Early Espresso Faux Suede Ribbon (152472), Cinnamon Cider Stampin’ Blends Combo Pack (153105), Mango Melody Stampin’ Blends Combo Pack (154888), Balmy Blue Stampin’ Blends Combo Pack (148544), Stampin’ Blends Color Lifter (144608 ), Paper Snips (103579), Bone Folder (102300), Adhesive Sheets (152334 ), Multipurpose Liquid Glue (110755 ), Mini Glue Dots (103683), Stampin’ Seal (152813), Stampin’ Dimensionals (104430)

Measurements: 

  • Whisper White Thick: 8 ½” x 5 ½”; scored at 4 ¼” 
  • Early Espresso: 2 pieces
    • 1/8” x 5 3/8” (for mat)
    • 3 ¼” x 3 ¼” (for circle)
  • World of Good Designer Series Paper: 4” x 5 ¼”
  • Brass Foil Sheets: 3 ¾” x 2”
  • Whisper White – 2 pieces: 3 ¼” x ½” (sentiment)
    • Scrap large enough to stamp glasses and tumbler
  • Early Espresso Faux Suede Ribbon: 6”

Instructions:

  1. Fold the Whisper White Thick card stock in half to create the card base.
  2. Stamp the whiskey decanter and glasses in Tuxedo Black Memento Ink Pad on the scrap of Whisper White
  3. Die cut the Early Espresso card stock with the largest Stitched Circle Die
  4. Emboss the stitched circle with the Tasteful Textile 3D Embossing Folder
  5. Die cut the Brass Foil piece with the appropriate Tasteful Labels Dies
  6. Colour the whiskey decanter and glasses with Cinnamon Cider and Dark Mango Melody for the liquid and Light Balmy Blue and Color Lifter for the glass according to the video:
Whiskey Business Colouring Tutorial Video
  1. Fussy cut the decanter and glasses out
  2. Stamp the sentiment in Tuxedo Black Memento Ink Pad on the Whisper White piece. Trim one end on an angle
  3. Adhere the World of Good Designer Series Paper to the Early Espresso mat
  4. Thread the buckle onto the Early Espresso Faux Suede Ribbon and affix the ribbon to the card
  5. Adhere this piece to the card base with Stampin’ Seal
  6. Slip the embossed stitched circle under the ribbon and adhere with Multipurpose Liquid Glue
  7. Using dimensionals, adhere the brass “platter so that it straddles the ribbon
  8. Adhere the decanter and one glass using Stampin’ Seal on the “platter”
  9. Use dimensionals for the remaining glass
  10. Affix the sentiment under the raised glass with a glue dot and a dimensional at the other end of sentiment

For Further Info:

Hope you like my Whiskey Business Card!

My Colouring Notes from my presentation:
https://stampwithlaurie.com/wp-content/uploads/2020/08/Stampin-Up-Blends-2020.pdf

Part 1: Whiskey Business Card using Blending Different Colours Technique
Video Tutorial: Blending Different Colours Together

Part 2: Country Harvest Card using Light to Dark Technique
Video Tutorial: Light to Dark/Dark to Light 

Part 3Beautiful Poppy Birthday Card using Smooth Colouring Technique
Video Tutorial: Smooth Colouring

Part 4: Let’s Gather Together Card using Tip to Tip Blending Technique
Video Tutorial: Tip to Tip Colouring

Part 5So Grateful Cardinal Card using Flicking Colouring Technique
Video Tutorial: Flicking Colouring

Part 6: Let’s Celebrate You Card using Flicking of Different Colours Technique
Video Tutorial: Flicking of Different Colours Technique

You will find the items listed above in my online store.

Life Is A Beautiful Journey

A Beautiful Journey Card using the World of Good Suite
Life is A Beautiful Journey Card using the World of Good Suite

Today I am sharing My Life Is A Beautiful Journey Card that I created for a swap that uses products from the new Stampin’ Up! Annual Catalogue and the World of Good Suite. This card is a perfect masculine card especially for a retirement or a graduation!

I love how the pops of Misty Moonlight ink and the World of Good Designer Series Paper add a nice touch of colour to this very neutral card. I used Gold Foil Sheets instead of the Brass Foil Sheets only because they were on backorder at the time. The Brass ones would look just as nice! I wanted to add a bit of an old paper look by sponging Crumb Cake around the sentiment’s edges and on the DSP after it was embossed with the Old World Paper 3D Embossing Folder. I was so happy to find out that the Metallic Pearls had carried over and I used them as the perfect accent to finish the card.

A Beautiful Journey Alternative Card using the World of Good Suite
Life is A Beautiful Journey Alternative Card using the World of Good Suite

I had so much fun playing with this Suite that I created another card using the feather stamp as the background. Which one do you like best?

Supplies for My Life Is A Beautiful Journey Card:

Stamps: Beautiful World Bundle (154091)

Inks: Tuxedo Black Memento Ink Pad (132708), Early Espresso Classic Stampin’ Pad (147114), Crumb Cake Classic Stampin’ Pad (147116), Misty Moonlight Classic Stampin’ Pad (153118)

Paper: Whisper White Thick (140272 ), Early Espresso (119686), Whisper White (100730), Basic Black (121045), Gold Foil Sheets (132622), World of Good Designer Series Paper (152491), 2020–2022 In Color 6″ x 6″ Designer Series Paper (153070)

Accessories: World Map Dies (152712), Old World Paper 3D Embossing Folder (153200), Painted Label Dies (151605), Stitched Shapes Dies (152323 ), Metallic Pearls (146282), Stamping Sponges (141337), Bone Folder (102300), Adhesive Sheets (152334 ), Multipurpose Liquid Glue (110755 ), Mini Glue Dots (103683), Stampin’ Seal (152813), Stampin’ Dimensionals (104430)

Measurements for My Life is a Beautiful Journey Card: 

  • Whisper White Thick: 8 ½” x 5 ½”; scored at 4 ¼” 
  • Early Espresso: 3 7/8” x 5 ½”
  • World of Good Designer Series Paper – 2 pieces
    • 5 ½” x 1” (for border)
    • 3 ½” 2 ½” (for stitched Oval)
  • 2020–2022 In Color 6″ x 6″ Designer Series Paper: 2” x 2”
  • Gold Foil Sheets – 2 pieces: 5 ½” x ½” (for border)
    • 2” x 2” (for world)
  • Basic Black : 3” x 2 ¼”
  • Whisper White – 2 pieces: 2 ¾” x 1 ½” (sentiment)
    • Scrap for feather

Instructions for My Life Is A Beautiful Journey Card:

  1. Fold the Whisper White Thick card stock in half to create the card base.
  2. Stamp the compass image in Early Espresso randomly on the Early Espresso card stock
  3. Die cut the border die from the World Map Dies on the right side of the Early Espresso card stock
  4. Die cut the piece of the World of Good Designer Series Paper that looks like old paper with the largest Stitched Oval Die
  5. Emboss the stitched oval with the Old World Paper 3D Embossing Folder
  6. Sponge Crumb Cake Ink over the embossed oval and around the edges to make it look older
  7. Stamp the sentiment in Tuxedo Black Memento Ink Pad on the Whisper White card stock and die cut it with the appropriate Painted Label Die
  8. Sponge Crumb Cake Ink around the edges of the sentiment piece to make it look older
  9. Using Adhesive Sheets, adhere the Gold Foil Sheet to it and then die cut the world from the World Map Dies
  10. Die cut the 2020–2022 In Color 6″ x 6″ Designer Series Paper using the circle from the World Map Dies
  11. Peel off the Adhesive Sheets and adhere the world to this circle
  12. Die cut the Basic Black card stock with the pedestal from the World Map Dies
  13. Using glue dots, adhere the globe to the pedestal
  14. Using Stampin’ Seal, adhere the Gold Foil strip to the card base
  15. Adhere the World of Good Designer Series Paper to the card base with Stampin’ Seal allowing the Gold Foil to show
  16. Adhere the Early Espresso piece to the card base with Stampin’ Seal
  17. Using Stampin’ Seal, adhere the Stitched Oval to the card base on the lower right
  18. Using dimensionals, adhere the sentiment, globe and feather
  19. Randomly add 3 Metallic Pearls

For Further Info:

Hope you like My Life Is A Beautiful Journey Card!

Check out the Stampin’ Up! video on the World of Good Suite:
https://www.youtube.com/watch?v=ukzbjrCgmvo&feature=youtu.be

Amazing how beautiful and packed full of coordinating products the WORLD OF GOOD SUITE in the Stampin’ Up! Annual Catalog is. The Beautiful World cling stamp set has globe imagery and sentiments that have to do with adventure. The sentiments are designed to work on the outside and the inside of your card project. The World Map dies cut out the imagery from the stamp set. The World of Good Specialty DSP has a 16th Century map style feel with gold foiling. The star maps on the DSP represent both Northern and Southern Hemispheres. Get the perfect weathered looking paper with the Old World Paper 3D embossing folder. Using this embossing folder will make it faster and easier to get an aged look on your paper, without the unwanted tearing.

To add to the travel and adventure theme Stampin’ Up! has included the Old World Memories and more card pack. When adding the final touches to your project you will love the antiqued brushed embellishments and the Early Espresso ribbon.

You will find the items listed above in my online store at: https://www.stampinup.ca/products/in-good-taste-suite-collection-(english)?demoid=2103981

My Surf’s Up! Card

It’s Laurie here with My Surf’s Up! Card using Surfer Owen for the Design Team at Paper Nest Dolls! Now that Summer is officially here, it’s time to go surfing with this sweetie! I had a lot of fun colouring him with my Copic Markers and creating this fun card using all things beachy from my stash.

Close Up of My Surf's Up! Card with Surfer Owen from Paper Nest Dolls
Close Up of My Surf’s Up! Card with Surfer Owen from Paper Nest Dolls

————————–

Copic Markers:

Skin: E04/11/21/00/000
Hair: E57/43/53/50
Yellows: Y11/21/35
Blues: B12/14/39
Necklace: E35/31/21 (string) and E40/42 (shark tooth)
Sand: E30/31/33/35

————————–

Card Recipe for My Surf’s Up! Card:

Surfer Owen Digi Stamp
Sweet Sentiment Premium Coloring Paper
Bo Bunny Barefoot and Bliss Collection 6 x 6 paper pack
Lawn Fawn Spring Showers Dies
Marianne Design Craftables Sea Shells
Sea Shells from Dollar Store
Stampin’ Up!:
Under the Sea Framelits
In The Woods Framelits
Subtle 3D Embossing Folder
Tropical Oasis Memories and More Card Pack
Pacific Point, Crumb Cake, Daffodil Delight and
Thick Whisper White Card Stock

————————–

Measurements:

Thick Whisper White Card Base: 5 ½ x 5 ½
Pacific Point card stock: 5 3/8” x 5 3/8
Bo Bunny Barefoot and Bliss Collection: 5 ¼” x 5 ¼”
Crumb Cake for sand dunes x 2: 5 ¼” x 2”
Scraps of Daffodil Delight for sun and starfish
Whisper White for clouds and sand dollars

————————–

Surf’s Up! Let’s go to the Beach!

To view my other Copic Marker cards, please click here.

Hope you like My Surf’s Up! Card with Surfer Owen by Paper Nest Dolls! Thank you for stopping by!

Hugs,
Laurie