My Perfectly Wicked Interactive Card

Perfectly Wicked Sentiment
My Perfectly Wicked Interactive Card

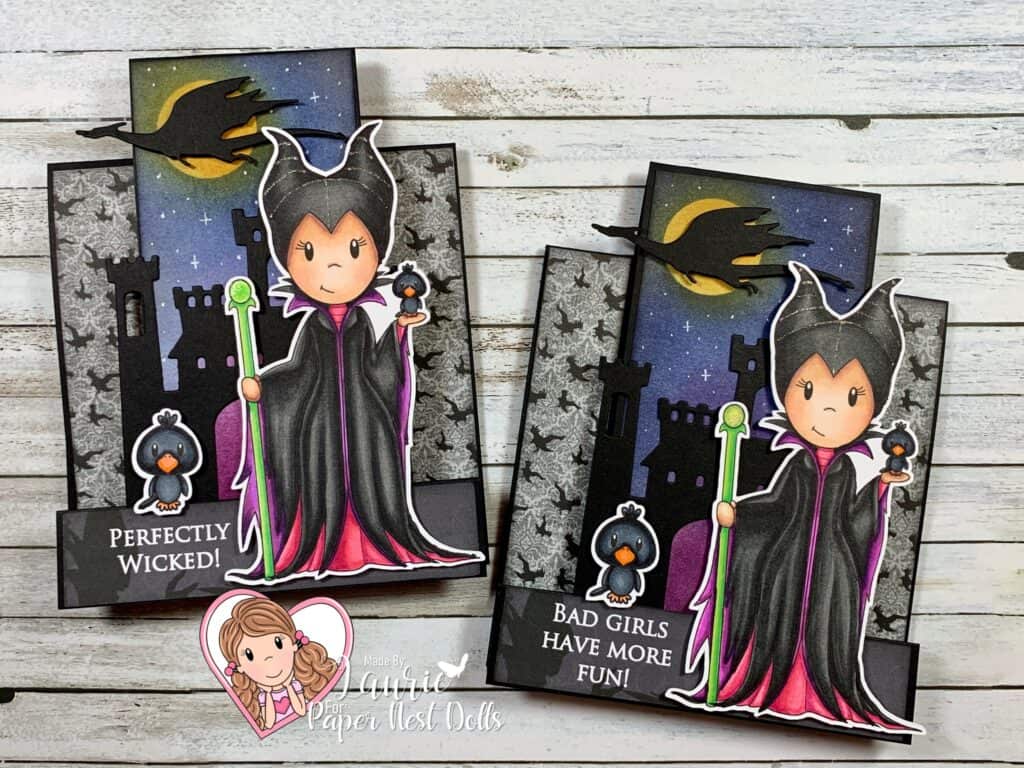
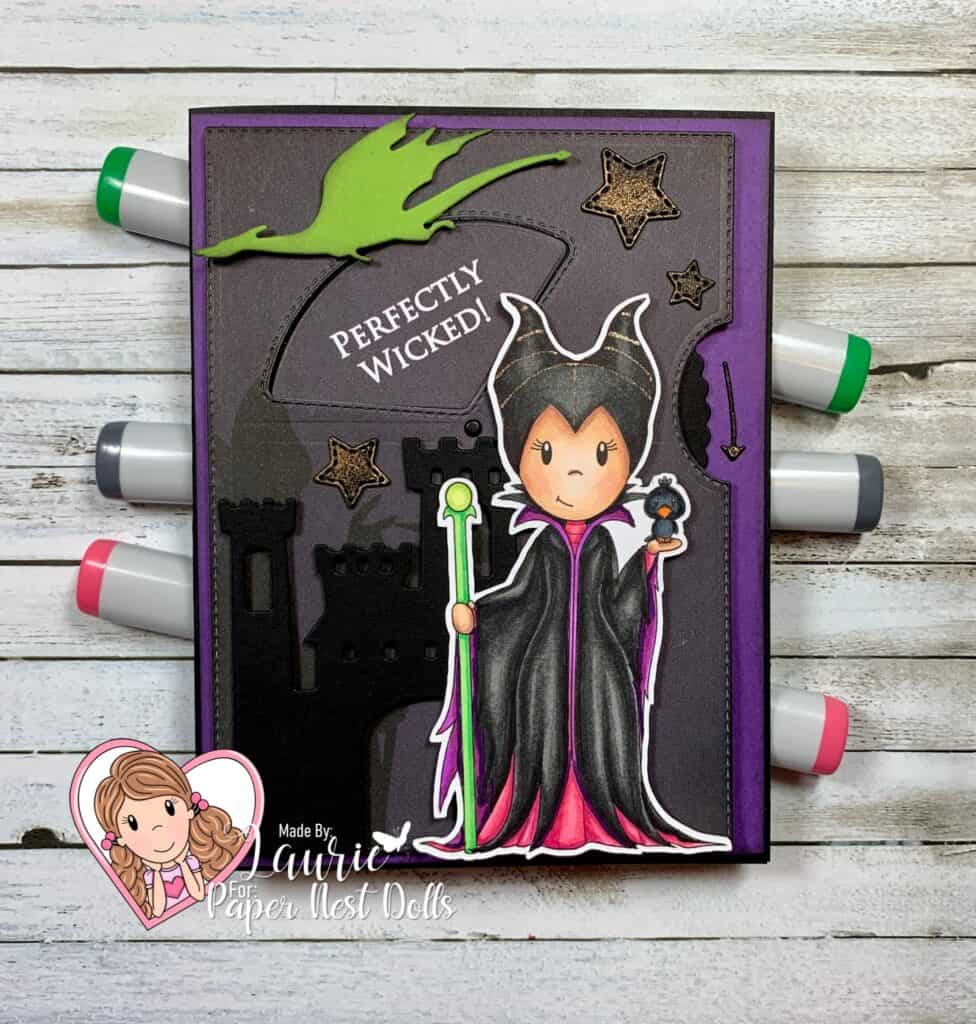
Hello Crafty Friends! It’s Laurie here! Today I am sharing My Perfectly Wicked Interactive Card as my Design Team Inspiration Card for Paper Nest Dolls using the Evil Fairy.

I was honoured to have been asked to present at the Paper Nest Dolls’ Party with the Villains Virtual Weekend Retreat that was this past weekend. I had so much fun creating my cards for the event that I made an extra one that I thought I would share with you today. The other cards that I presented at the Retreat will be posted at the end of this post.

To get in the mood and for inspiration, I just had to watch the movies both the live action and the cartoon! Any excuse to watch Disney is a good excuse in my books! Lol!

Video of my Card in Action

Movie of My Perfectly Wicked Interactive Card

For this card, I coloured the Evil Fairy with my Copic Markers to match the Disney cartoon. I have been wanting to use the Give a Whirl Dies from Stampin’ Up! and thought it would be perfect for my card! It is so fun to spin that little dial and see all the fun sentiments! These sentiments… “Perfectly Wicked!” and “Bad Girls Have More Fun!” …were created in Word. I added one of the digital papers behind them to blend in with the paper that I used on my card base. Since the Evil Fairy turns into a dragon at the end of the movie, I couldn’t resist adding a bright green dragon with a dusting of Black Soot on its edges. A castle and a few stars that were brushed with the Aged Brass were the only other elements that I added to my card.
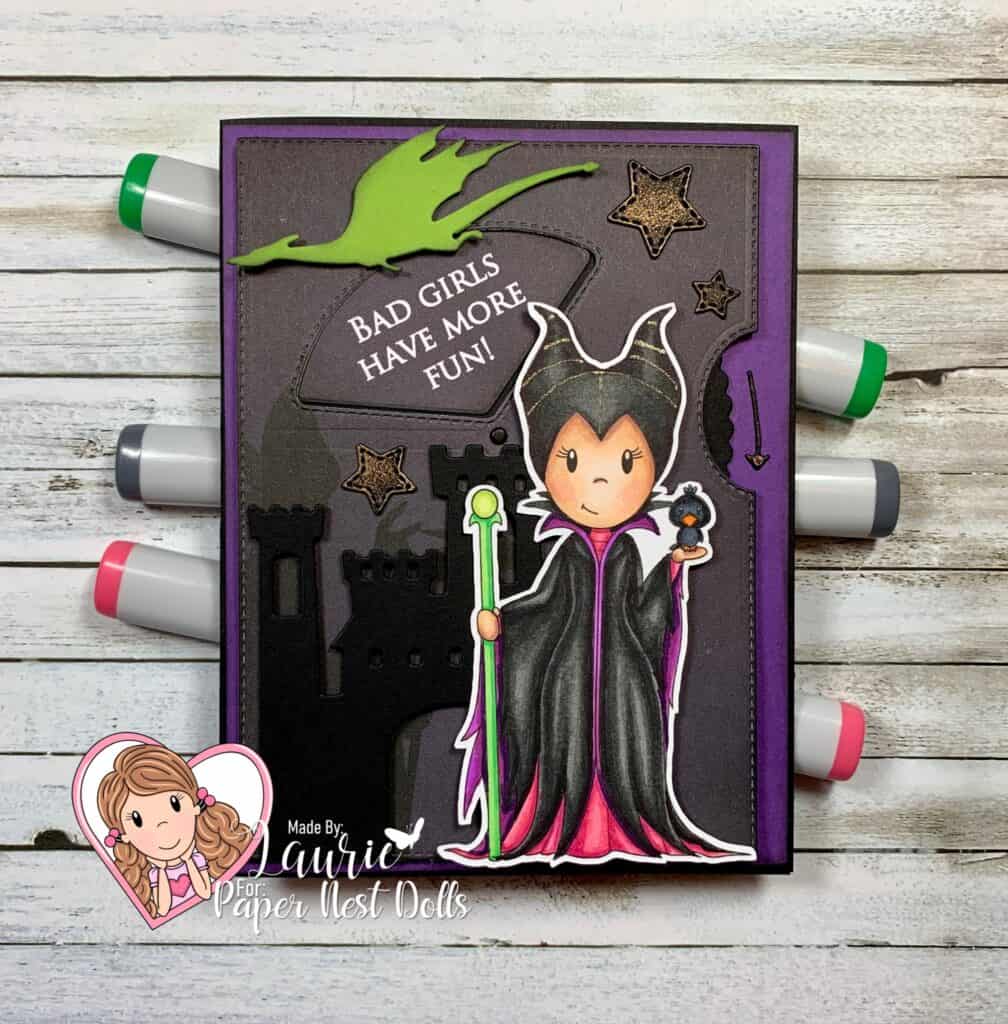
Bad Girls Have More Fun! Sentiment

————————–

Copic Markers:

Skin: E04/E11/E21/E00/E000/R20
Blacks: T10/T8/T7/T6/T5
Purple: V09/V06/V04
Dress: RV17/RV14/RV13
Staff: YG09/YG06/YG03/YG00
Crows: C9/C7/C6/C5/YR04/YR02
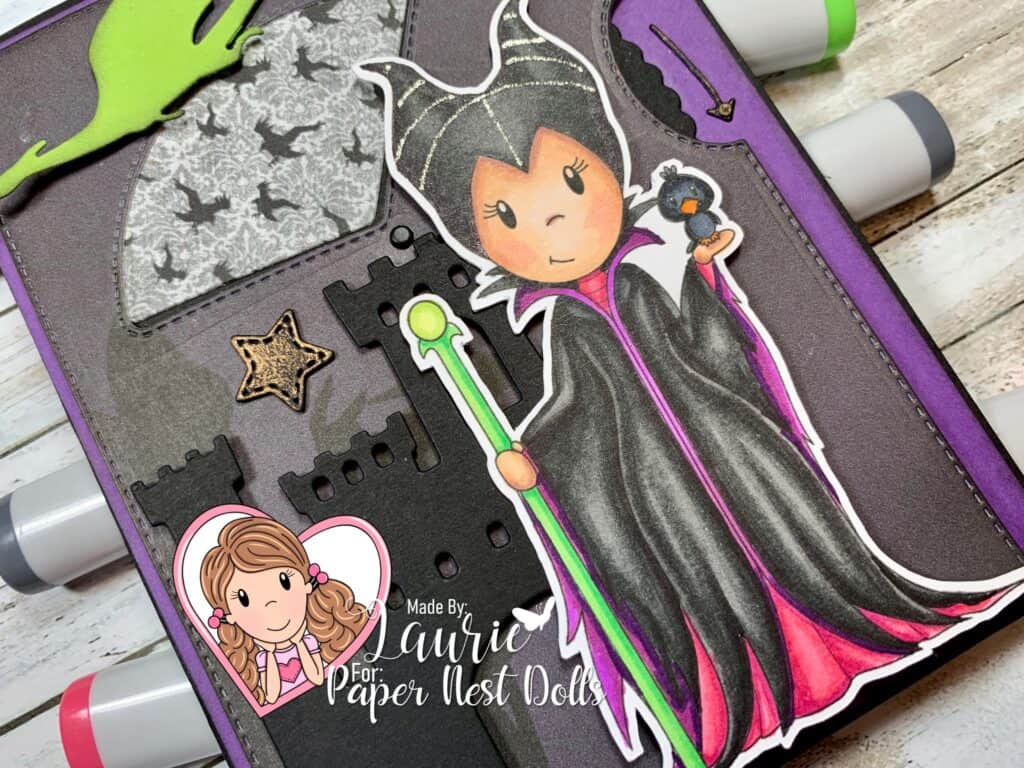
Close Up of The Stamp on My Card
Close Up of The Evil Fairy on My Card

————————–

Card Recipe for
My Perfectly Wicked Interactive Card:

Evil Fairy, Paper Nest Dolls
Maleficent Inspired 8.5×11 Digital Paper Pack, Monbonbon, Etsy
Build a Castle Dies, Whimsey Stamps
Give It A Whirl Dies, Stampin’ Up!
Black Soot Distress Ink, Ranger Ink
Mini Ink Blending Tool, Ranger Ink
Art Alchemy-Metallique Wax-Aged Brass, Prima Marketing
Clear Star Gelly Roll Pen
Gorgeous Grape, Granny Apple Green and Black Card Stock

Finished card size: 4.25” x 5.5”
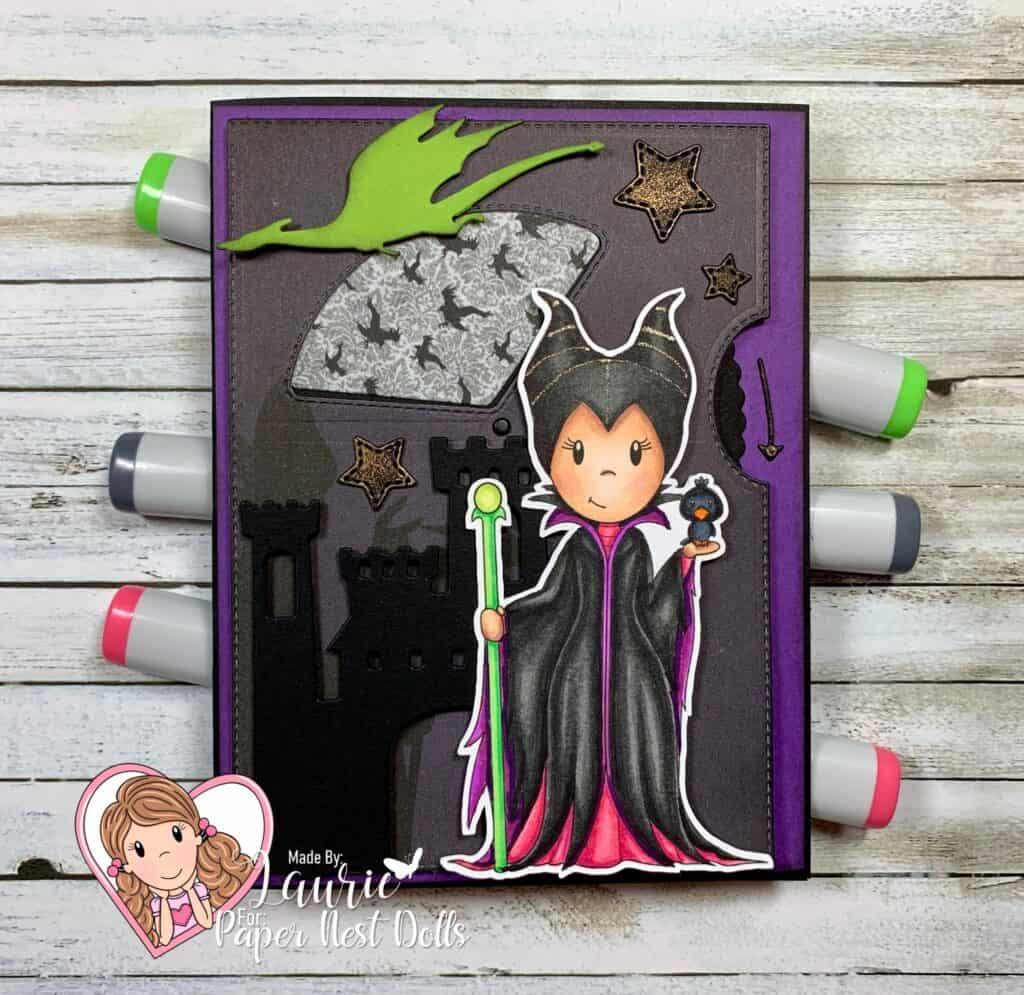
My Design Team Card
My Perfectly Wicked Interactive Card

————————–

Cards from the Party with
The Villains Retreat Weekend
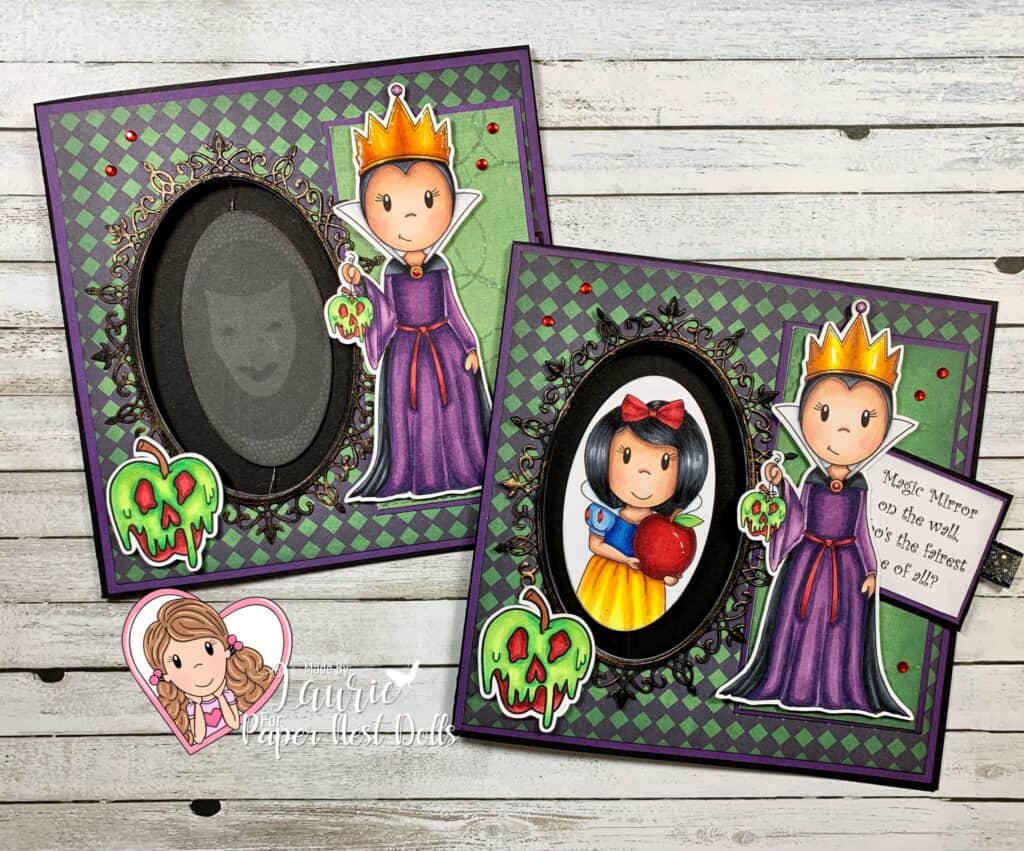
Spinner Card
Spinner Card Using Evil Queen and Princess with Apple by Paper Nest Dolls
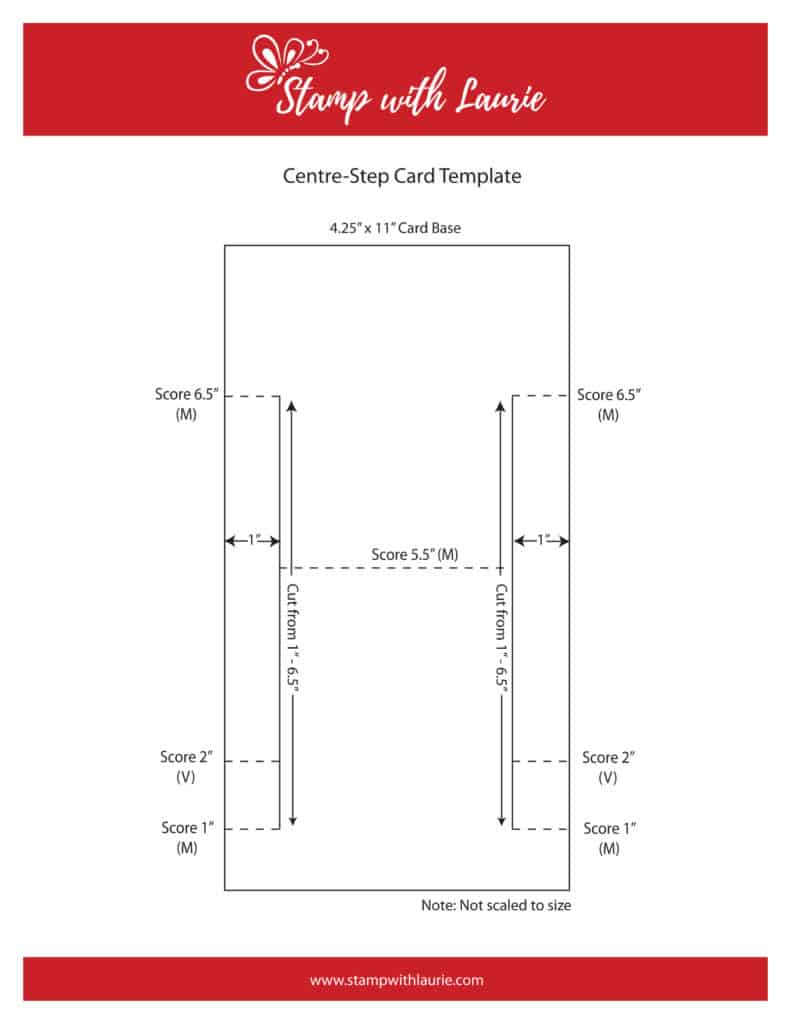
Centre-Step Card
Centre-Step Card with Evil Fairy by Paper Nest Dolls

Downloadable Centre-Step Template
(Click Image)

Centre-Step Card Template

To view my other Paper Nest Dolls cards, please click here.

To view my other interactive cards, please click here.

Hope you like my Design Team card using
Evil Fairy by Paper Nest Dolls!

Thank you for stopping by!

Hugs,
Laurie

My Welcome Fall Card

My Welcome Fall Card

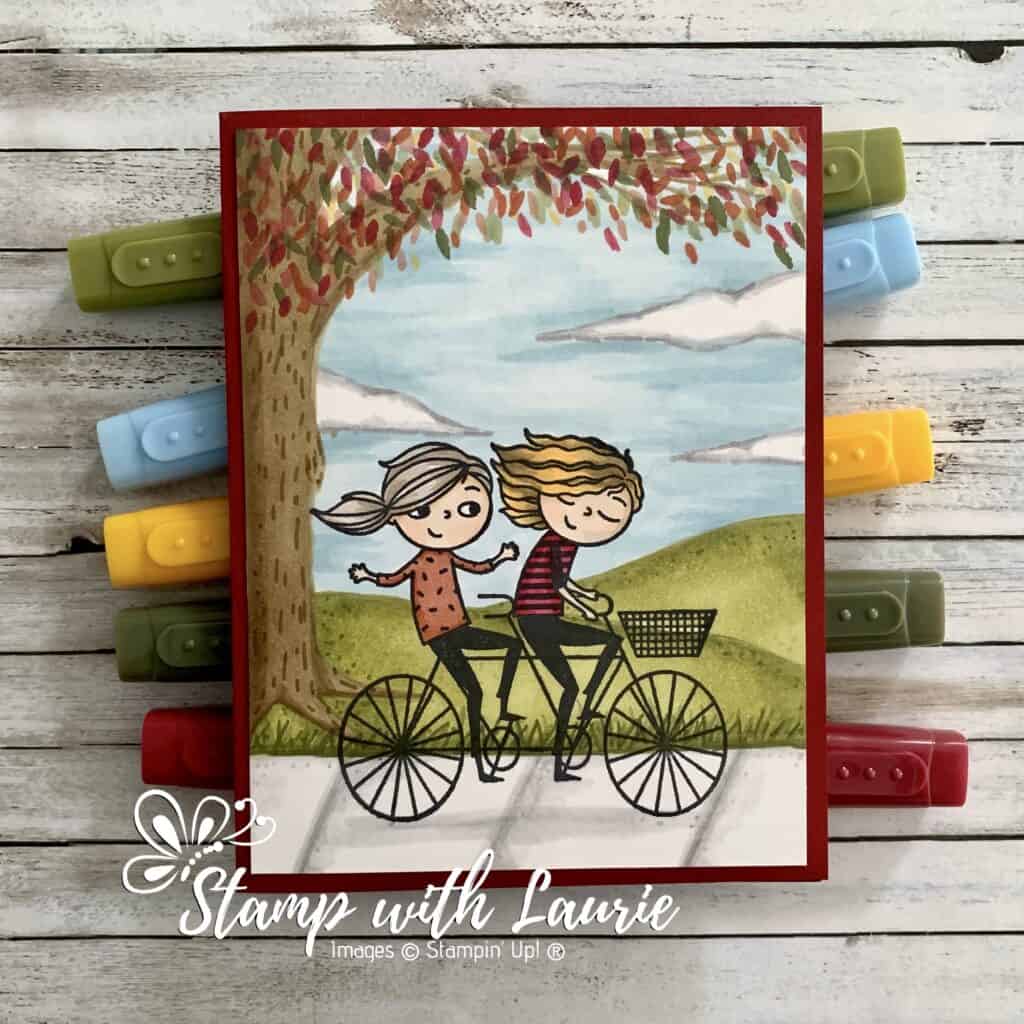
Welcome Fall! Hello Crafty Friends! Laurie here again! I was honoured to have been asked to present my colouring using Stampin’ Blends at a playdate this past weekend for fellow Stampin’ Up! demonstrators. So, I thought I would share my card and first YouTube video with you on the First Day of Fall. For My Welcome Fall Card, I used the Right Behind You Stamp Set and a ton of Stampin’ Blends including the Color Lifter which I used a lot in this video!

I mentioned another video and notes in my presentation. I have included those notes and several videos from that presentation at the end of this post for your reference.

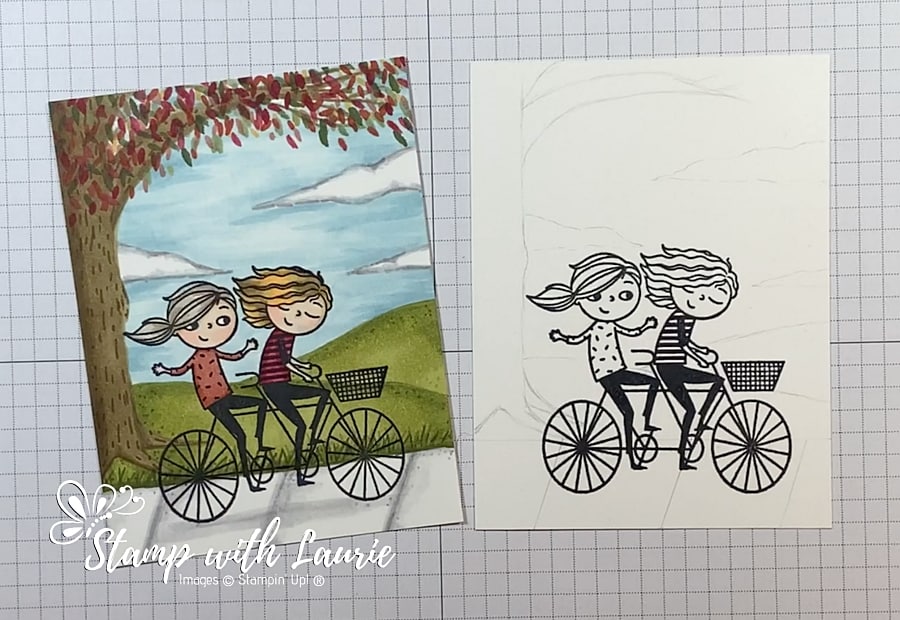
Pencil Sketch of Scene

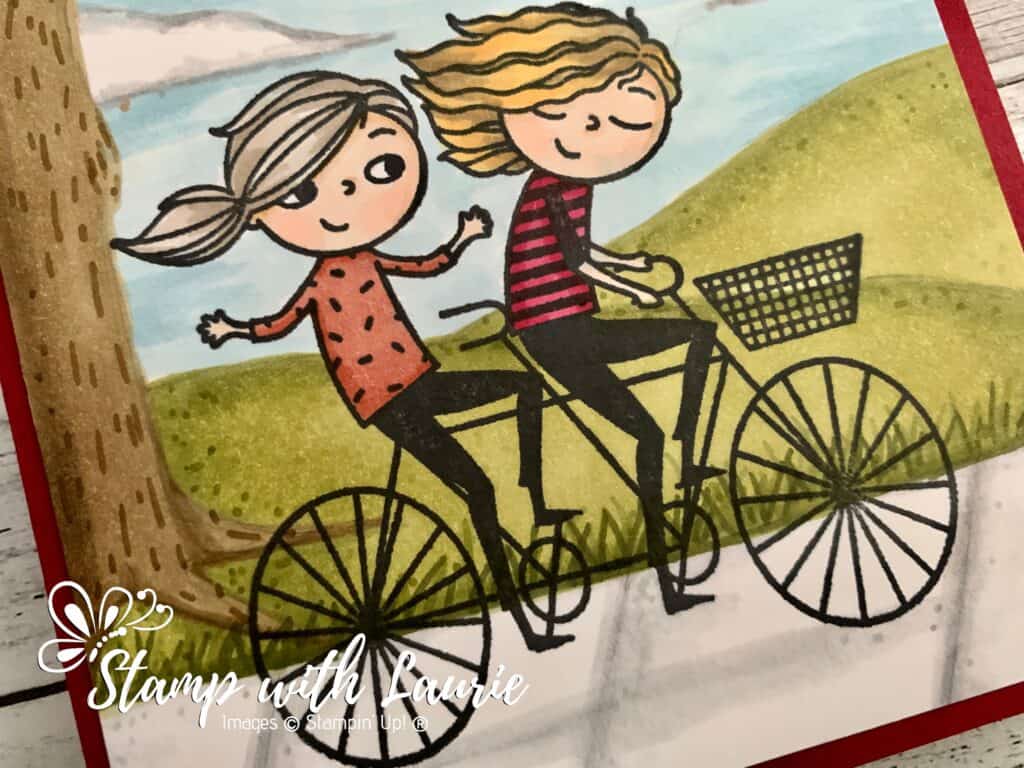
For my card, I stamp multiple times the girls riding the bicycle in Tuxedo Black Memento Ink on my Stamparatus to get a good coverage of ink on their pants. Next, I lightly drew in as a guide a simple scene with a sidewalk, a tree, some hills, and clouds. Once I did that, I started my colouring. Here is my very first YouTube video so that you can follow along:

YouTube Video
YouTube Video of How to Create a Scene With Stampin’ Blends

Stampin’ Blends:

Skin: Ivory/Petal Pink Dark
Ponytail Girl’s Hair: Crumb Cake Light/Dark
Sweater: Cajun Craze Light/Dark
Second Girl’s Hair: Soft Suede Light/Dark/Mango Melody Dark
Shirt: Cherry Cobbler Light/ Dark
Sidewalk/Clouds: Gray Granite Light/Dark/Color Lifter
Sky: Balmy Blue Light/Dark/Color Lifter
Grass: Old Olive Light/Dark/ Mossy Meadow Light/Dark
Tree Trunk: Soft Suede Light/Dark
Leaves: Cherry Cobbler Light/Dark
Cajun Craze Light/Dark
Old Olive Light/Dark
Mossy Meadow Light/Dark
Mango Melody Dark

Supplies:

Stamp: Right Behind You Cling Stamp Set (155790

Ink: Tuxedo Black Memento Ink Pad (132708)

Paper: Basic White (159276), Cherry Cobbler (119685)

Accessories: Stamparatus (146276), Stampin’ Blends Color Lifter (144608), Bronze & Ivory Stampin’ Blends Combo Pack (154922), Petal Pink Stampin’ Blends Combo Pack (154893), Crumb Cake Stampin’ Blends Combo Pack (154882), Old Olive Stampin’ Blends Combo Pack (154892), Balmy Blue Stampin’Blends Combo Pack (154830), Soft Suede Stampin’ Blends Combo Pack (154906), Gray Granite Stampin’ Blends Combo Pack (154886), Cherry Cobbler Stampin’ Blends Combo Pack (154880), Cajun Craze Stampin’ Blends Combo Pack (154879), Mossy Meadow Stampin’ Blends Combo Pack (154890), Bone Folder (102300), Stampin’ Dimensionals (104430), Stampin’ Seal (152813)

Measurements: 

  • Cherry Cobbler: 5 ½” x 8 ½” scored at 4 ¼”
  • Basic White: 4” x 5 ¼”
Close Up of my Card
Close Up of The Stamped Girls on my Card

More Information on My Welcome Fall Card:

To watch my YouTube video of my presentation on how to create a scene with Stampin’ Blends:
https://youtu.be/6w4fkxgA9rg

How to Use Stampin’ Blends
https://stampwithlaurie.com/wp-content/uploads/2020/08/Stampin-Up-Blends-2020.pdf

Part 1Whiskey Business Card using Blending Different Colours Technique
Video Tutorial: Blending Different Colours Together

Part 2Country Harvest Card using Light to Dark Technique
Video Tutorial: Light to Dark/Dark to Light Colouring

Part 3Beautiful Poppy Birthday Card using Smooth Colouring Technique
Video Tutorial: Smooth Colouring

Part 4Let’s Gather Together Card using Tip to Tip Blending Technique
Video Tutorial: Tip to Tip Colouring

Part 5So Grateful Cardinal Card using Flicking Colouring Technique
Video Tutorial: Flicking Colouring

Part 6Let’s Celebrate You Card using Flicking of Different Colours Technique
Video Tutorial: Flicking of Different Colours Technique

No-Lines Technique CardsMy Cardinal Anniversary Card and My Cardinal Card

For more of my Stampin’ Blends cards, please click here.

For more of my Stampin’ Up! cards, please click here.

You will find the items listed above in my online store

My Mandalorian Card

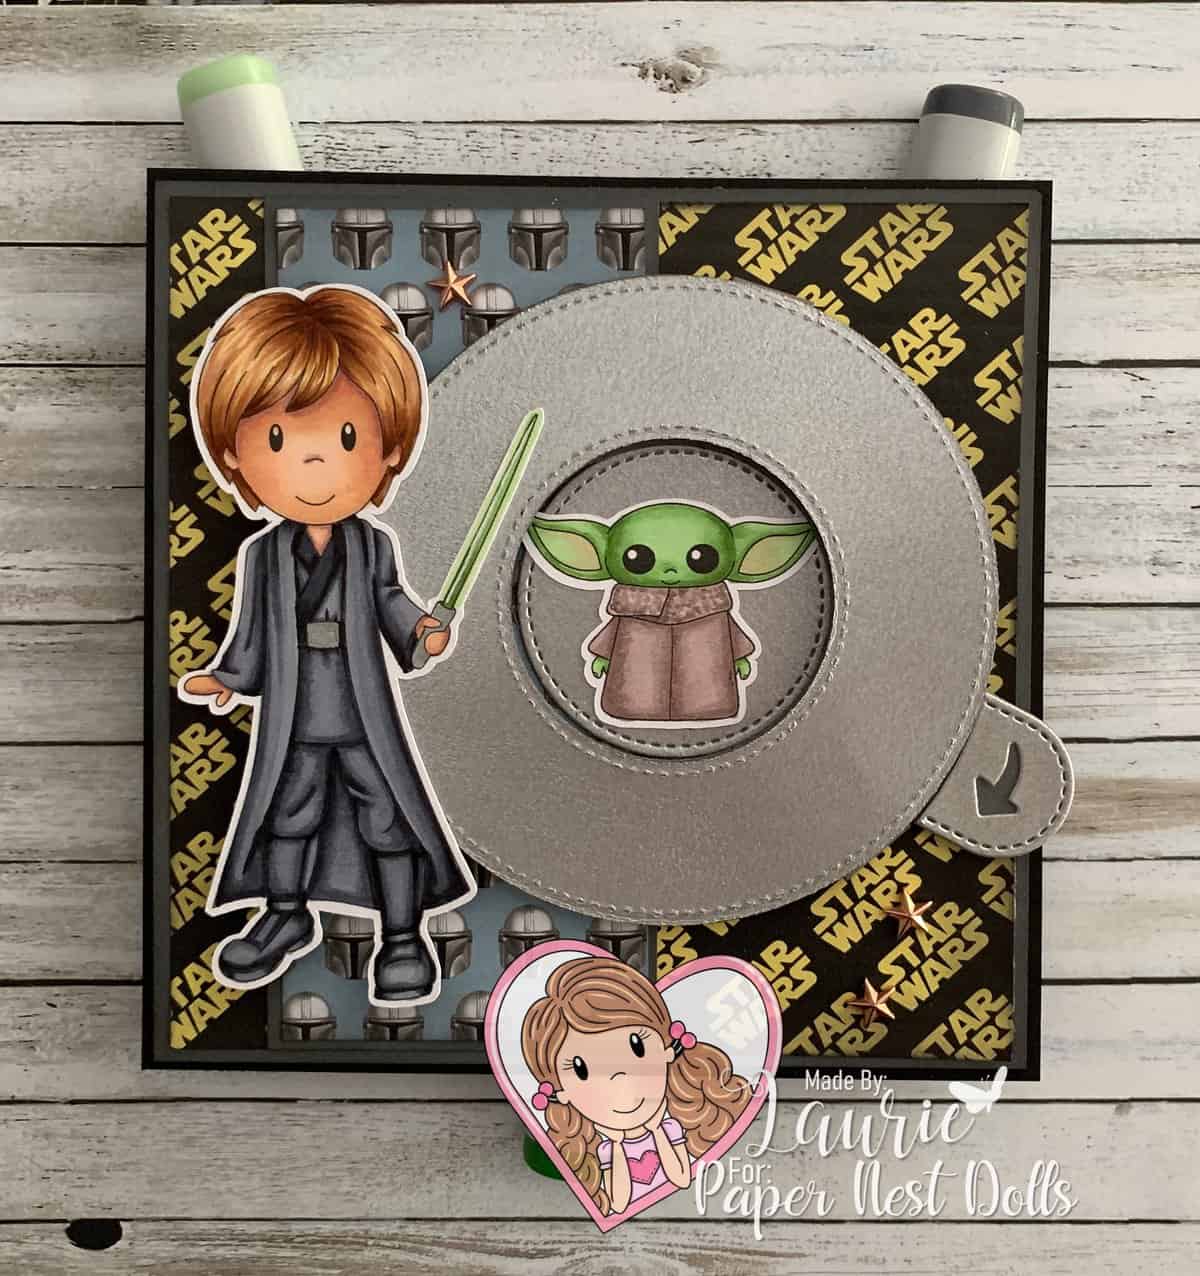
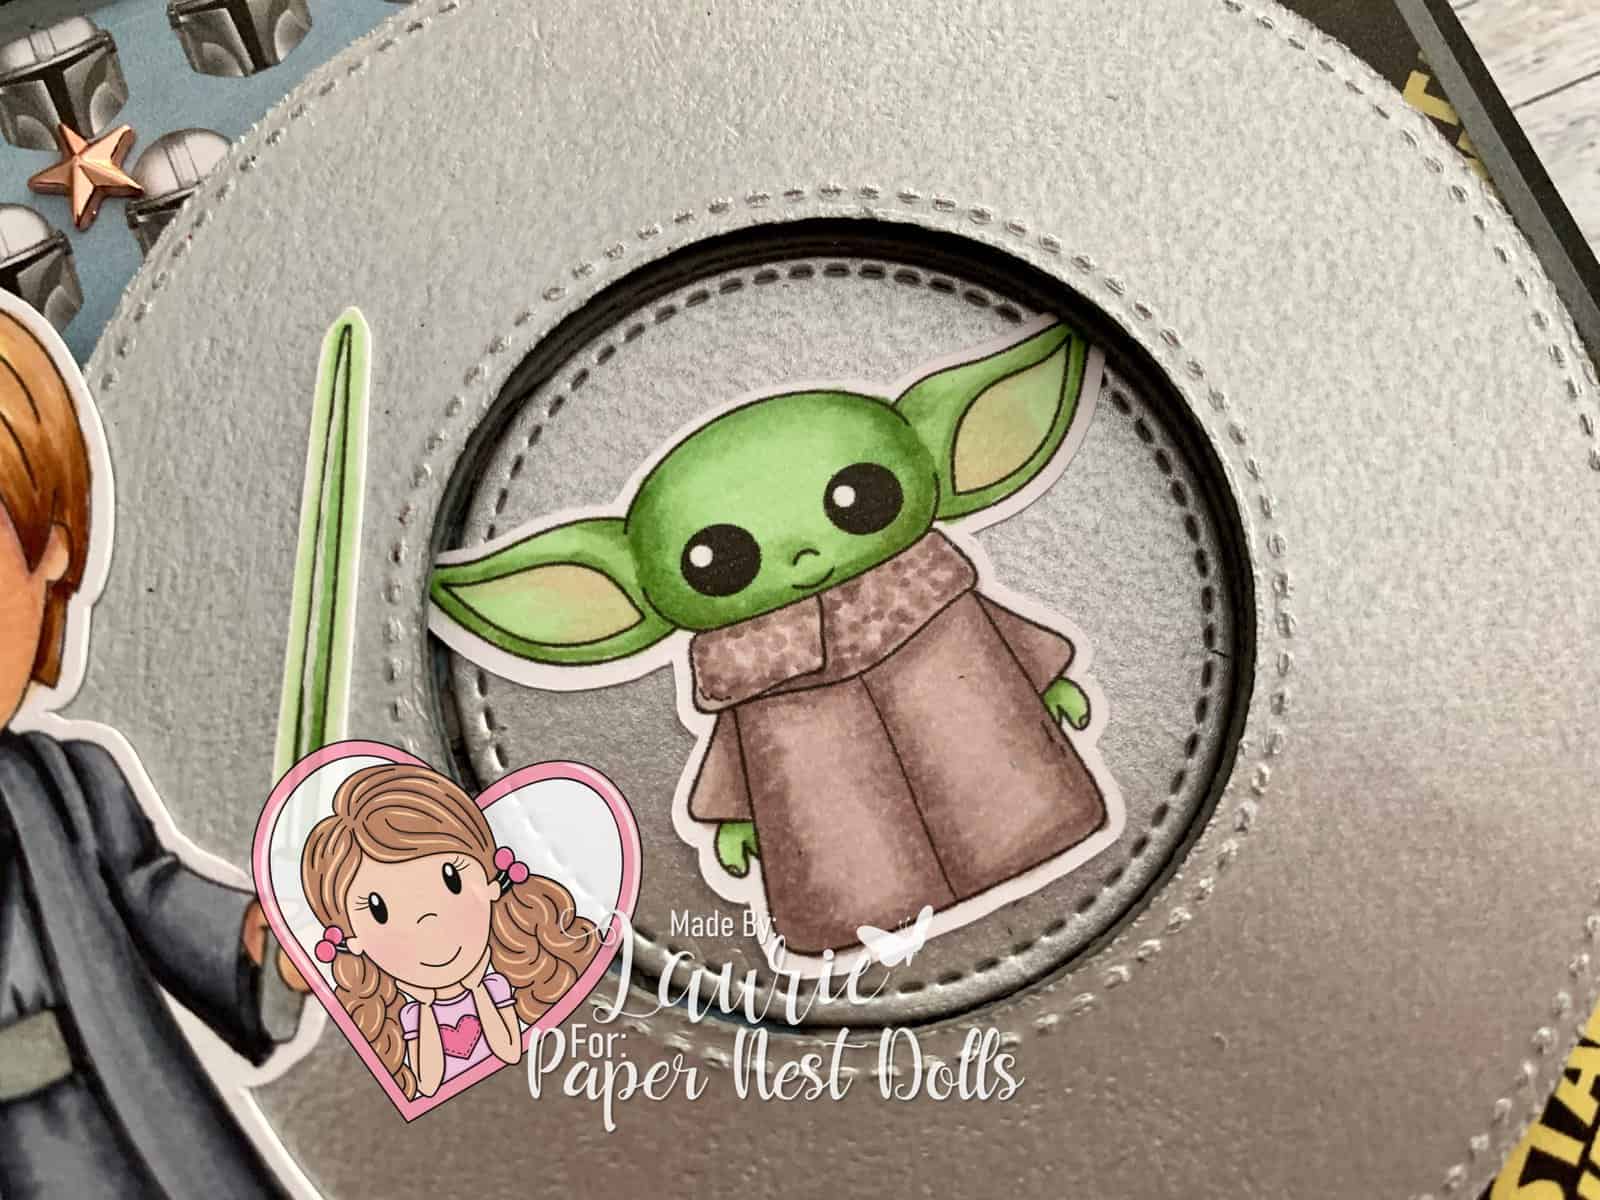
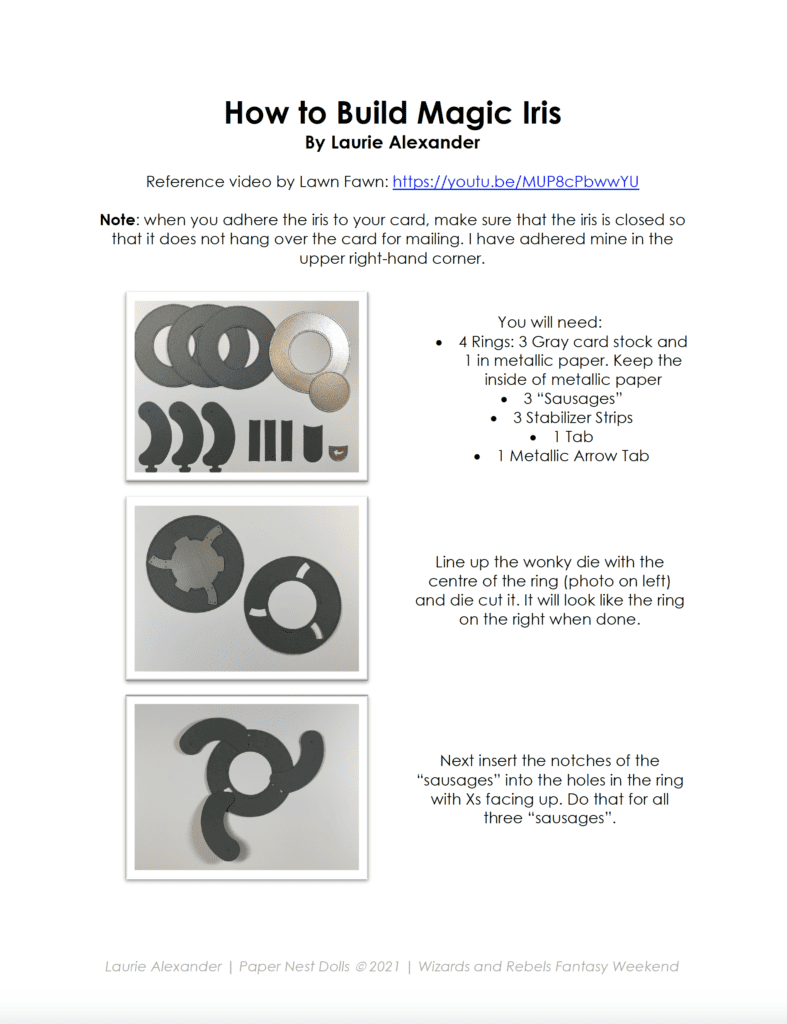
Hello Crafty Friends! It’s Laurie here! I was honoured to have been asked to present this card and my colouring for it at the Rebels and Wizards Online Event for Paper Nest Dolls that was this past weekend. My Mandalorian Card is using Rebel Hero and the new release Rebel Baby by Paper Nest Dolls and the Magic Iris Dies by Lawn Fawn. I have included a PDF with step by step instructions on how to build the Magic Iris at the end of this post.

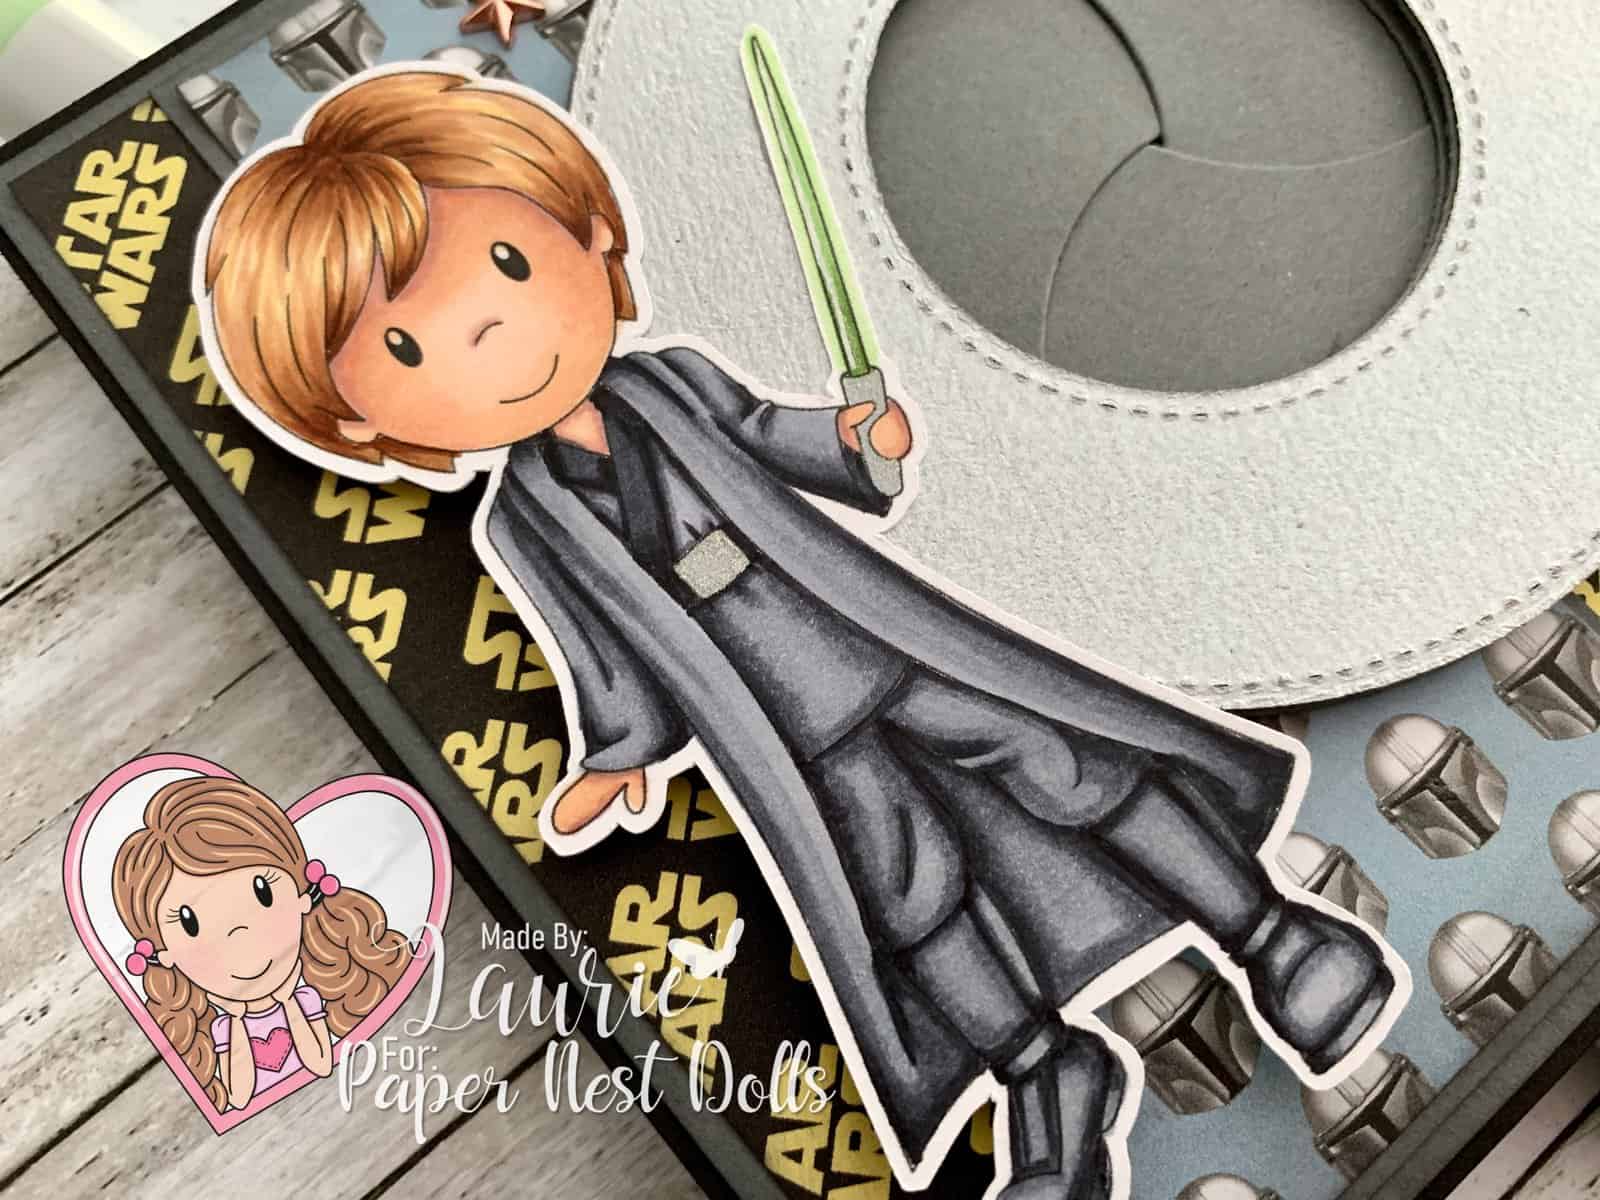
I just love Baby Yoda in the Mandalorian TV series. He is soooo cute! I even have a Baby Yoda stuffy that gets into all kinds of mischief. Lol! So, when I saw the new Rebel Baby digital stamp, I just had to make a card with him! My card was inspired by the last episode of season two where Luke comes to rescue Baby Yoda and his friends. I coloured Luke in dark clothes with a green light saver (or life saver as my Baby Yoda calls it! Lol!) as he appeared in this episode. The Rebel Baby is hidden behind the “door” and is revealed by the Magic Iris mechanism when the Jedi Hero opens it.

Magic Iris Opened
Magic Iris Door Open to Reveal Rebel Baby

Don’t you just love the digital paper that I used with the Mandalorian helmets and the original Star Wars logo! They were perfect for my card and were free from HaleGrafix. I sponged some Black Soot to the edges of it to give my card a gritty feel. I couple of star embellishments was all this card needed to finish it off.

————————–

Copic Markers:

Rebel Hero
Skin: E04/E11/E21/E00/E000/R20
Hair: YR31/E33/E35/E37
Robes: C9/C7/C6/C5/C3
Belt: C9/C7/C6/Silver Gelly Roll Pen
Light Saber: YG11/YG13/YG17/White, Silver and Clear Star Gelly Roll Pens

Close Up of Stamp
Close Up of Rebel Hero

Rebel Baby
Skin: YG11/YG13/YG17
Robes: E70/E71/E74

Close Up Jedi Baby on Card
Close Up of Rebel Baby

————————–

Measurements:

Black Card Base: 5.25” x 10 ½” scored at 5.25”
Gray Mat: 5 1/8” x 5 1/8”
Star Wars Paper: 4 7/8” x 4 7/8”
Gray Mat for Mando Helmets: 5” x 2 ¼”
Mando Helmets: 4 7/8” x 2 1/8”
Rebel Hero: 4” tall
Rebel Baby: 1 ¾” wide

Finished card sizes: 5.25” x 5.25”

————————–

Card Recipe for My Mandalorian Card:

Rebel Hero and Rebel Baby , Paper Nest Dolls
Paper Basics – Stamper’s Select White Cardstock, Papertrey Ink
FREE Printable Star Wars Digital Paper Pack, HaleGrafix
FREE Printable Star Wars Mandalorian Digital Paper Pack, HaleGrafix
Galvanized Metallic Sheet, Stampin’ Up!
Magic Iris Dies, Lawn Fawn
Star Designer Elements, Stampin’ Up!
Black Soot Distress Ink, Ranger
Mini Ink Blending Tool, Ranger
White Gelly Roll Pen
Silver Gelly Roll Pen
Clear Star Gelly Roll Pen
Basic Black and Basic Gray Card Stock, Stampin’ Up!

Movie of My Mandalorian Card in Action

————————–

Magic Iris Instructions Download

To view my other Paper Nest Dolls cards, please click here.

My presentation went so well, that I have been asked to present at
the Party with The Villains (Online) Event October 2nd and 3rd.
https://www.papernestdolls.com/product/online-party-with-the-villains-event/

Hope you like my card using Rebel Hero and Rebel Baby by Paper Nest Dolls!

Thank you for stopping by!

Hugs,
Laurie
My Christmas Besties Card

My Design Team Card
My Christmas Besties Design Team Card

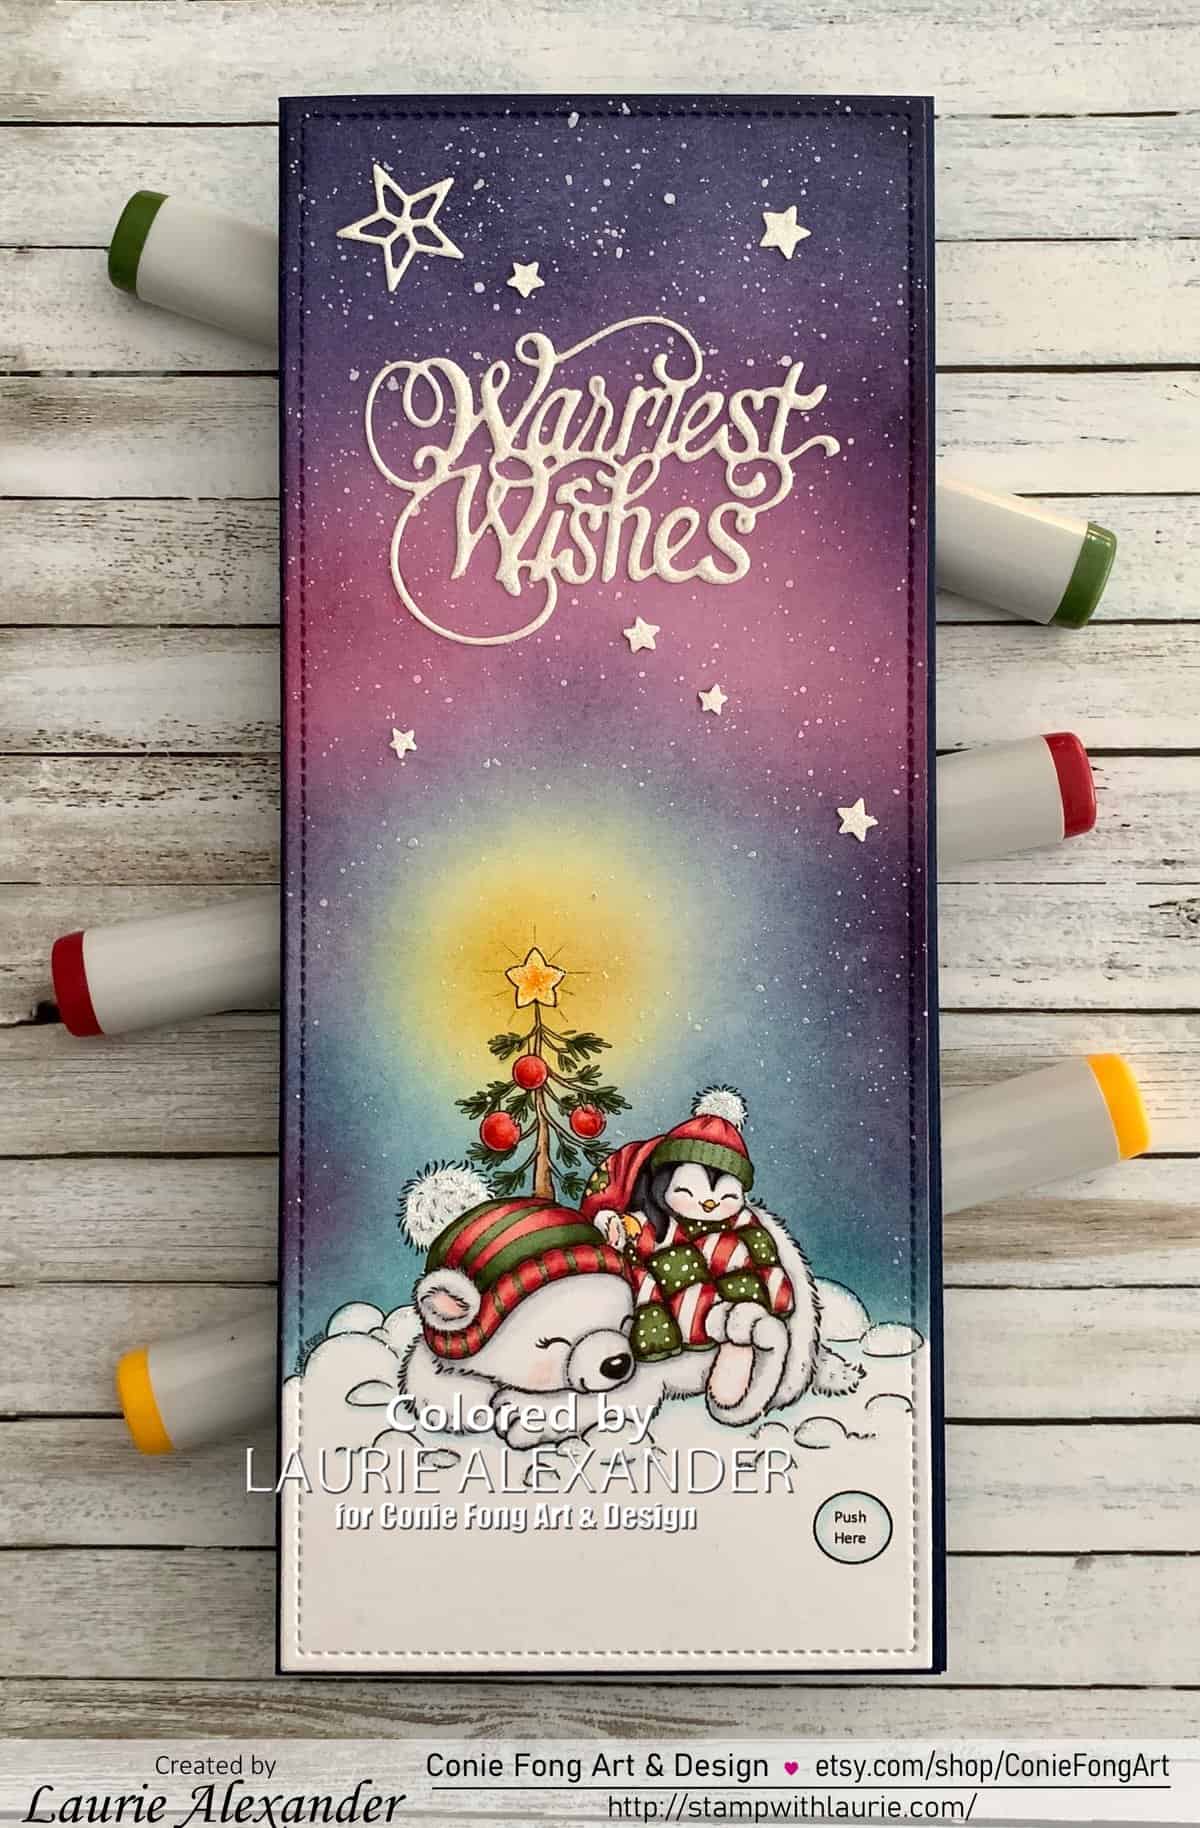
Hello Crafty Friends! It’s Laurie here! One last Christmas in July card before July is over! I am sharing my Slimline Interactive Christmas Besties Card as my Design Team Card for Conie Fong Art & Design. My card is using Christmas Besties digital stamp which comes with 3 stamps including Snowy the Penguin – Christmas Besties with tree, without tree and without background. I used Snowy the Penguin – Christmas Besties with tree for my card.

Details of My Card

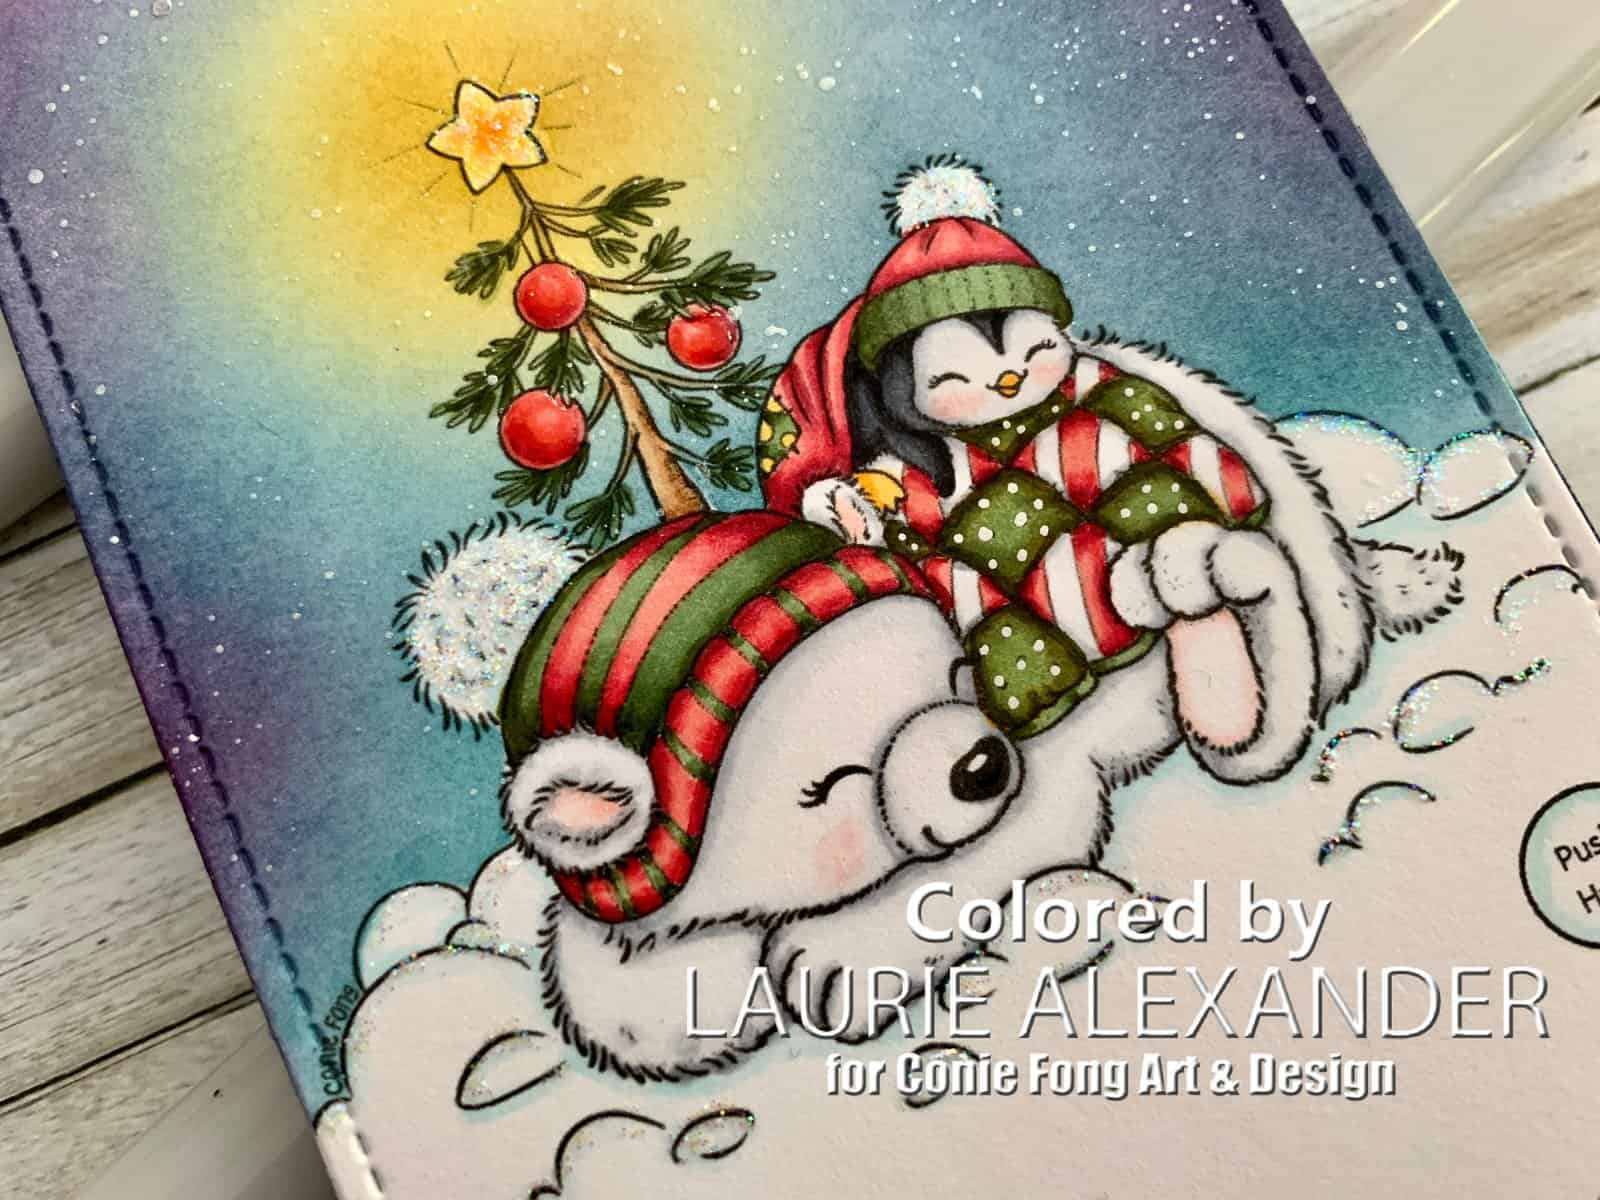
For my card, I coloured Snowy Penguin and his sweet friend with my Copic markers. I knew that I wanted to create a slimline card with the aurora borealis filling the night sky above these cuties. One of these days, I hope to see the aurora borealis in person! It is on my Bucket List of things to do.

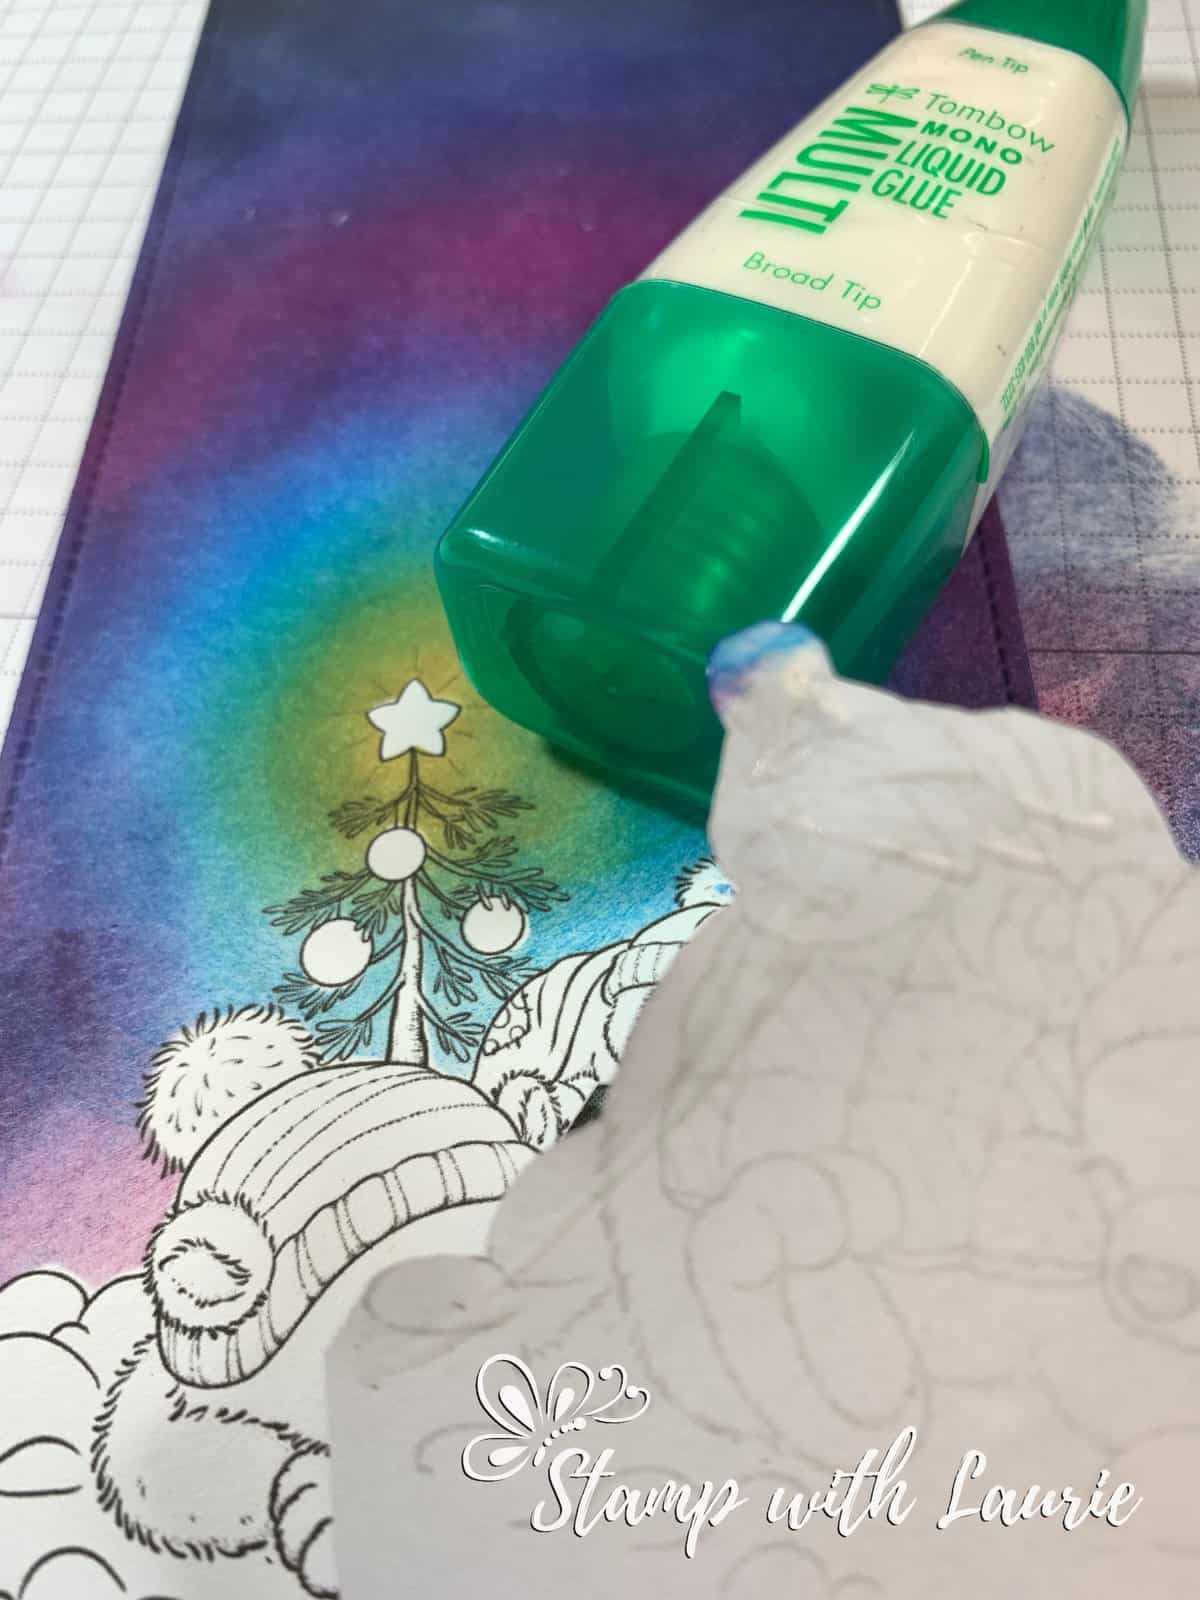
For my aurora borealis, I created a mask to go over my colouring using Tombow Liquid Glue. I printed out an extra image on copy paper. Once I fussy cut out the image including the star and the Christmas baubles, I applied Tombow to the back of them and let it dry.

Creating a Mask with Tombow Liquid Glue

How to Create the Sky

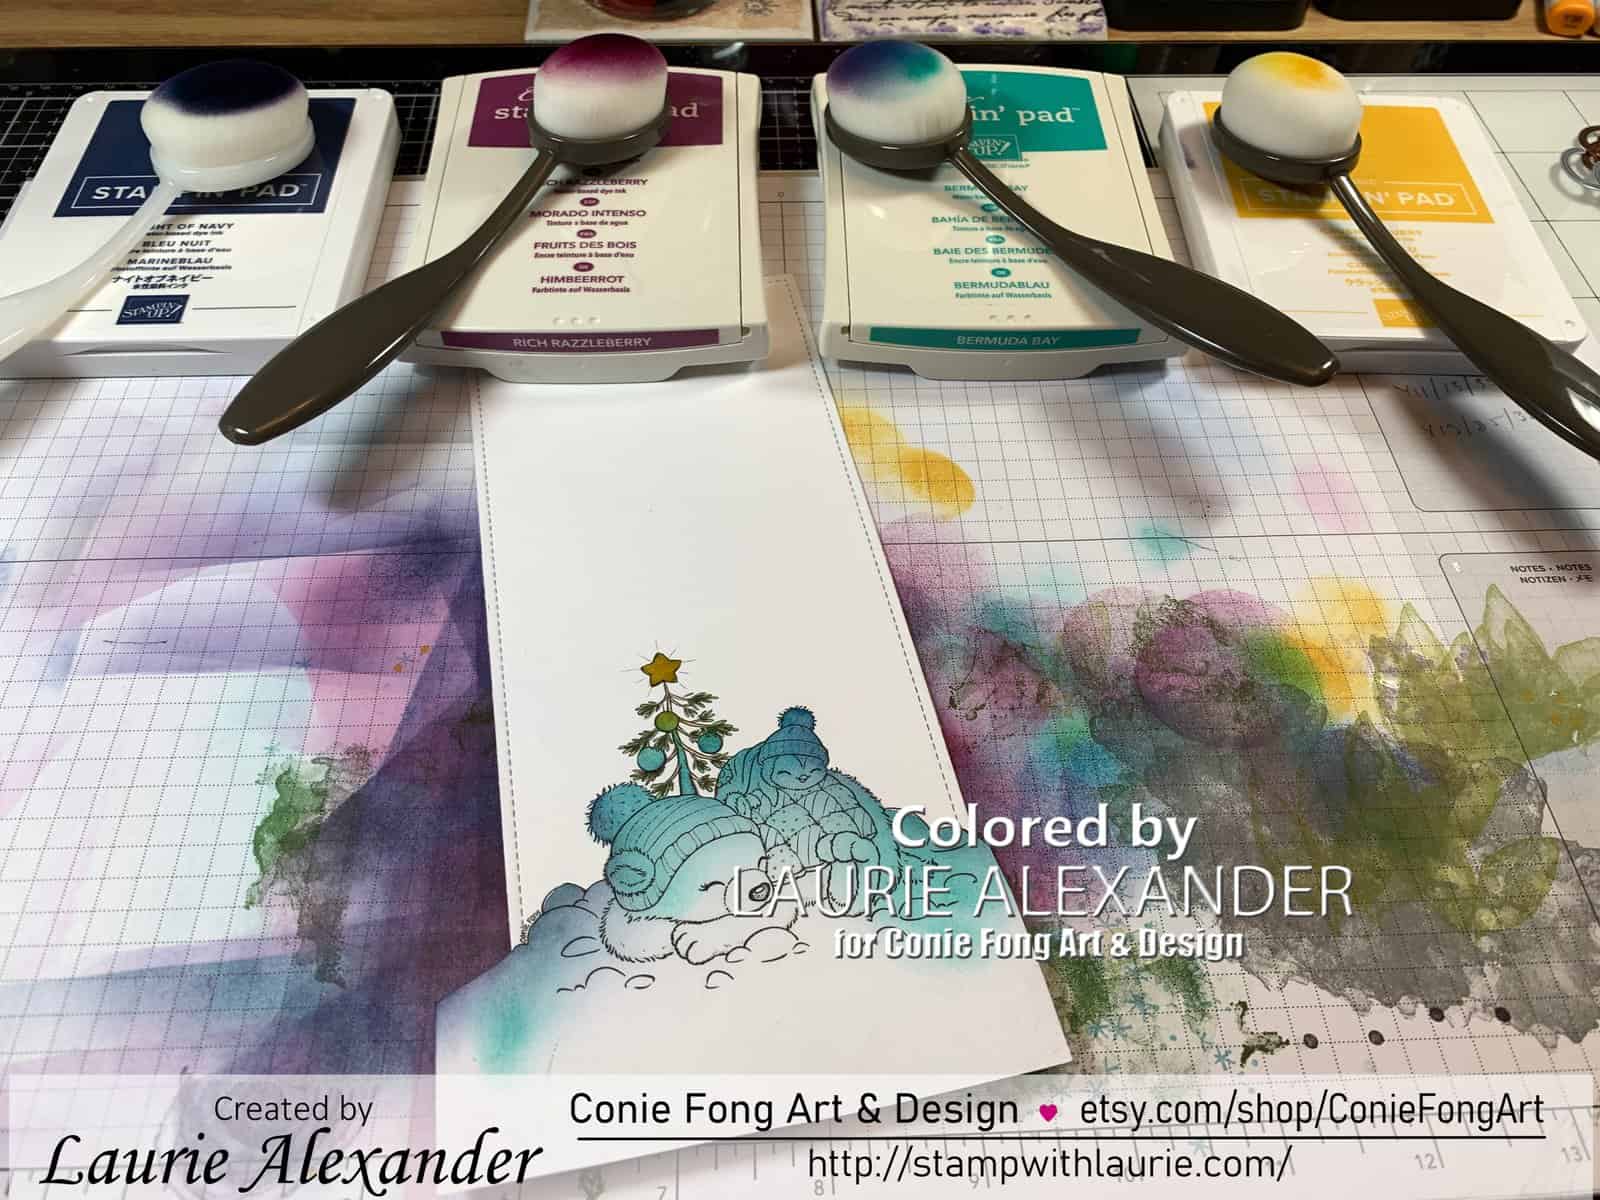
For my colours of the aurora borealis, I used my Blending Brushes and the Stampin’ Up! Inks of Bermuda Bay, Rich Razzleberry and Night of Navy with Crushed Curry for the glow of the star on their tree. While the mask was still in place, I splattered Frost White All-Purpose Ink with my Splatter Brush all over the panel.

Getting Ready to Create Aurora Borealis Sky

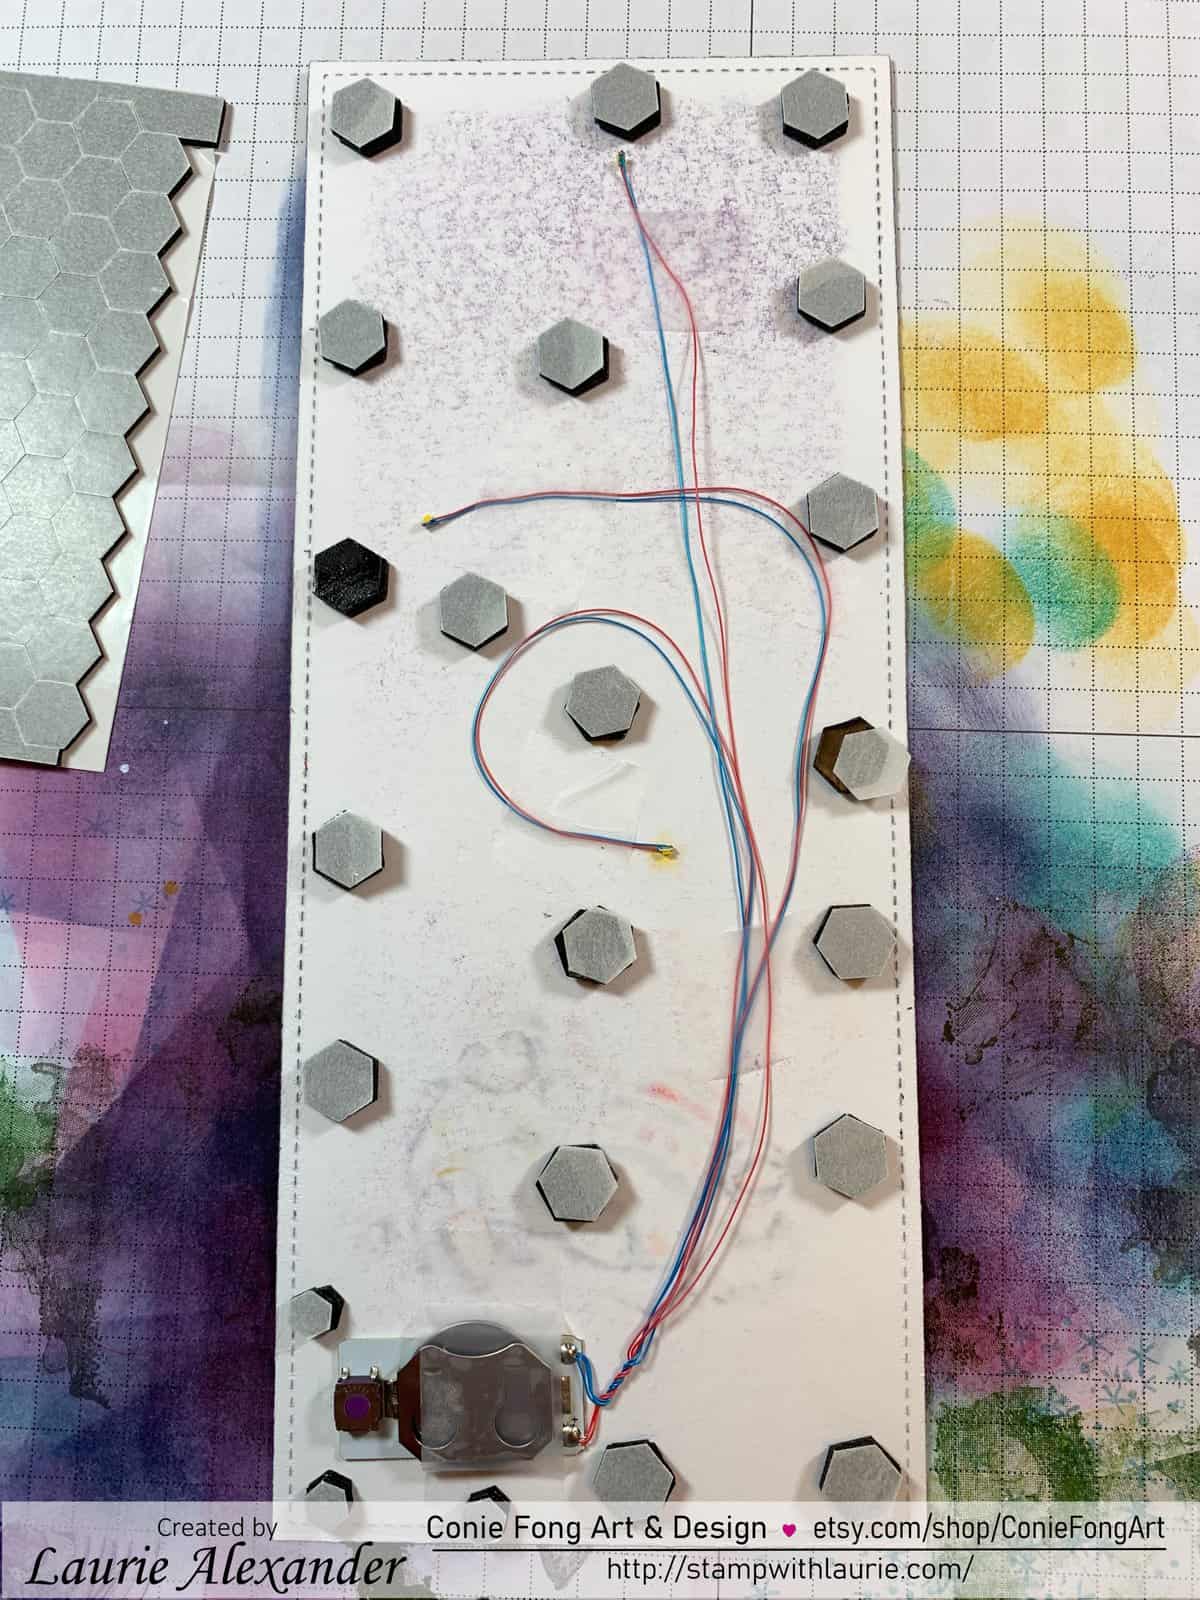
Another reason why I went with a slimline card is that I wanted to make it interactive and add lights. The Ez-Lights from Pear Blossom Press come with 3 lights and the mechanism to make them work. I adhered with scotch tape one behind the star and the other two on either side of the sentiment. Then I used a ton of black dimensionals that were doubled high so that they cleared the mechanism.

Light Placement on Back of Card

To finish off my card, my sentiment was die cut from Dazzling Diamonds Glimmer paper along with the die cut star and punched stars. I used Glossy Accents on the Christmas Baubles and Star Dust Stickles on the star, pompoms, and snow.

————————–

Copic Markers:

Snowy: C9/C7/C6/C5 and C3/C00/0/R20
Snowy’s Beak: Y35/Y38
Polar Bear: C3/C00/0/R20
Greens: G21/G94/G99
Reds: R32/R35/R37/R39
White on Quilt: C3/C00/0
Star: Y13/Y35/Y38
Tree Branches: E35/E33/E31
Snow/Pompoms: B0000/B000/Star Dust Stickles

Close Up of My Design Team Card

————————–

Card Recipe for My Christmas Besties Card:

Christmas Besties, Conie Fong Art & Design
Paper Basics – Stamper’s Select White Cardstock, Papertrey Ink
Dazzling Diamonds Glimmer Paper, Stampin’ Up!
EZ-Light, Pear Blossom Press
Large Slimline with Sliders Dies, Lawn Fawn
Sue Wilson Festive Warmest Wishes Craft Die, Creative Expressions
Stitched Stars Dies, Stampin’ Up!
Confetti Stars Border Punch, Stampin’ Up!
Blending Brushes, Stampin’ Up!
Bermuda Bay Classic Stampin’ Pad, Stampin’ Up!
Rich Razzleberry Classic Stampin’ Pad, Stampin’ Up!
Night of Navy Classic Stampin’ Pad, Stampin’ Up!
Crushed Curry Classic Stampin’ Pad, Stampin’ Up!
Tim Holtz Distress Splatter Brush, Ranger
Frost White All-Purpose Ink, Stampin’ Up!
White Gelly Roll Pen, Sakura
Black Gelly Roll Pen, Sakura
Star Dust Stickles, Ranger
Glossy Accents, Ranger
Scotch Tape
Copy Paper
Tombow Multipurpose Liquid Glue, Stampin’ Up!
Night of Navy Card Stock, Stampin’ Up!

Finished card size: 3.5” x 8.5”

Video of My Christmas Besties Card All Lit Up

————————–

To view my other Conie Fong Art & Design cards, please click here.

Hope you like my Design Team Inspiration Card using
Christmas Besties for Conie Fong Art & Design!


Thank you for stopping by!

Hugs,
Laurie
My Mythical Birthday Card

Birthday Card
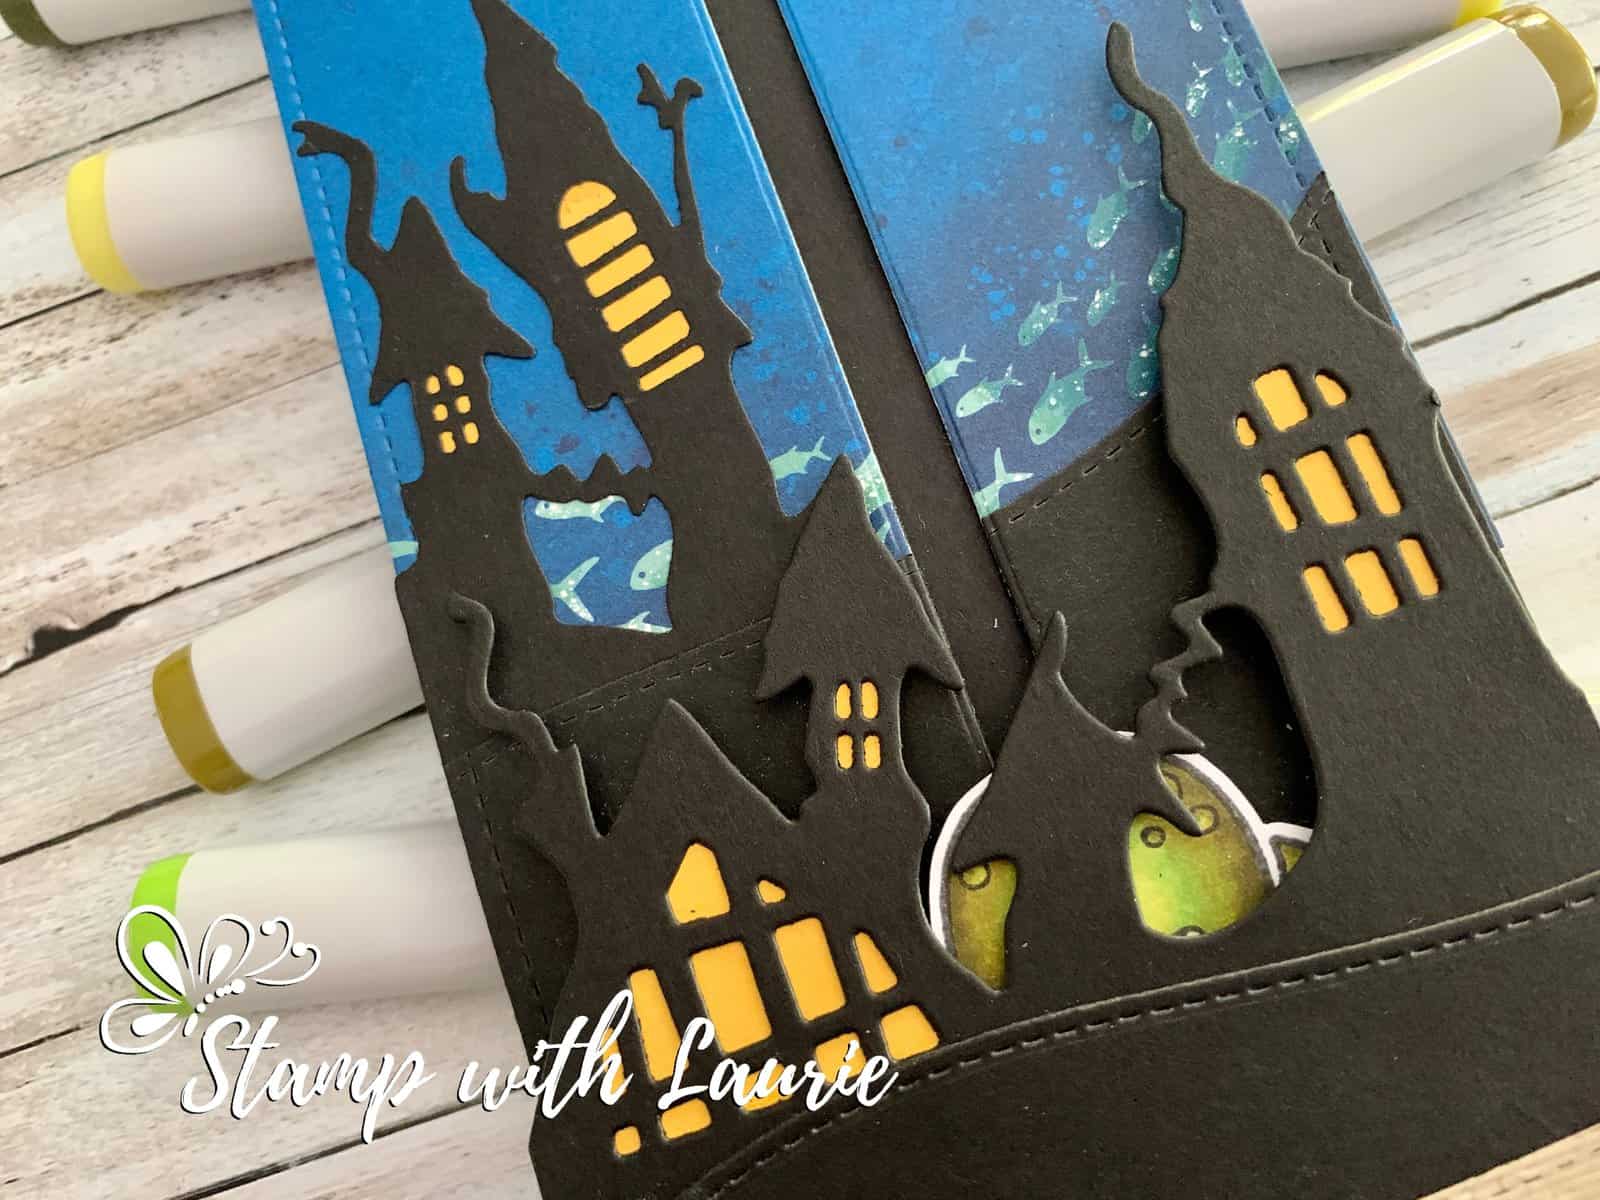
My Mythical Birthday Card

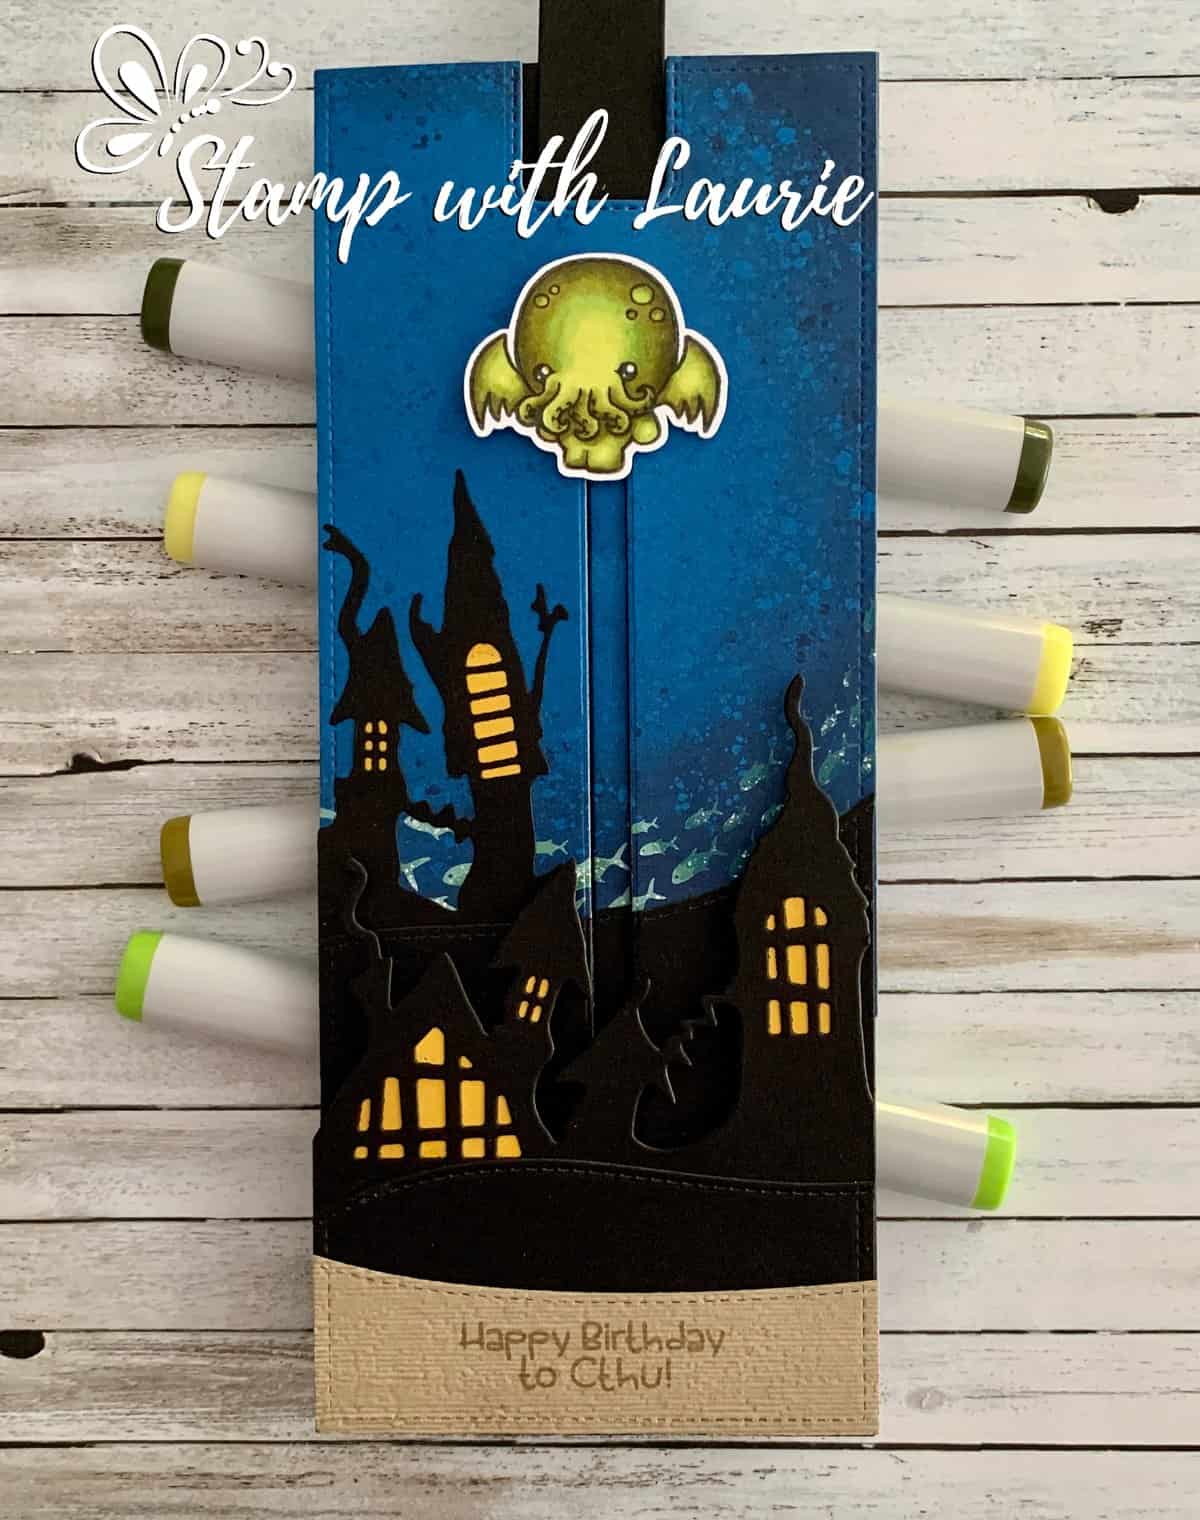
Hello Crafty Friends! It’s Laurie here to share my Mythical Birthday Card using the Mythical Cthulu Stamp Set by Kindred Stamps! This card was delivered to a little boy whose birthday is today. He loves anything mythical and especially Cthulhu which is a fictional cosmic entity created by writer H. P. Lovecraft.

Close Up of R'lyeh
Close Up of R’lyeh

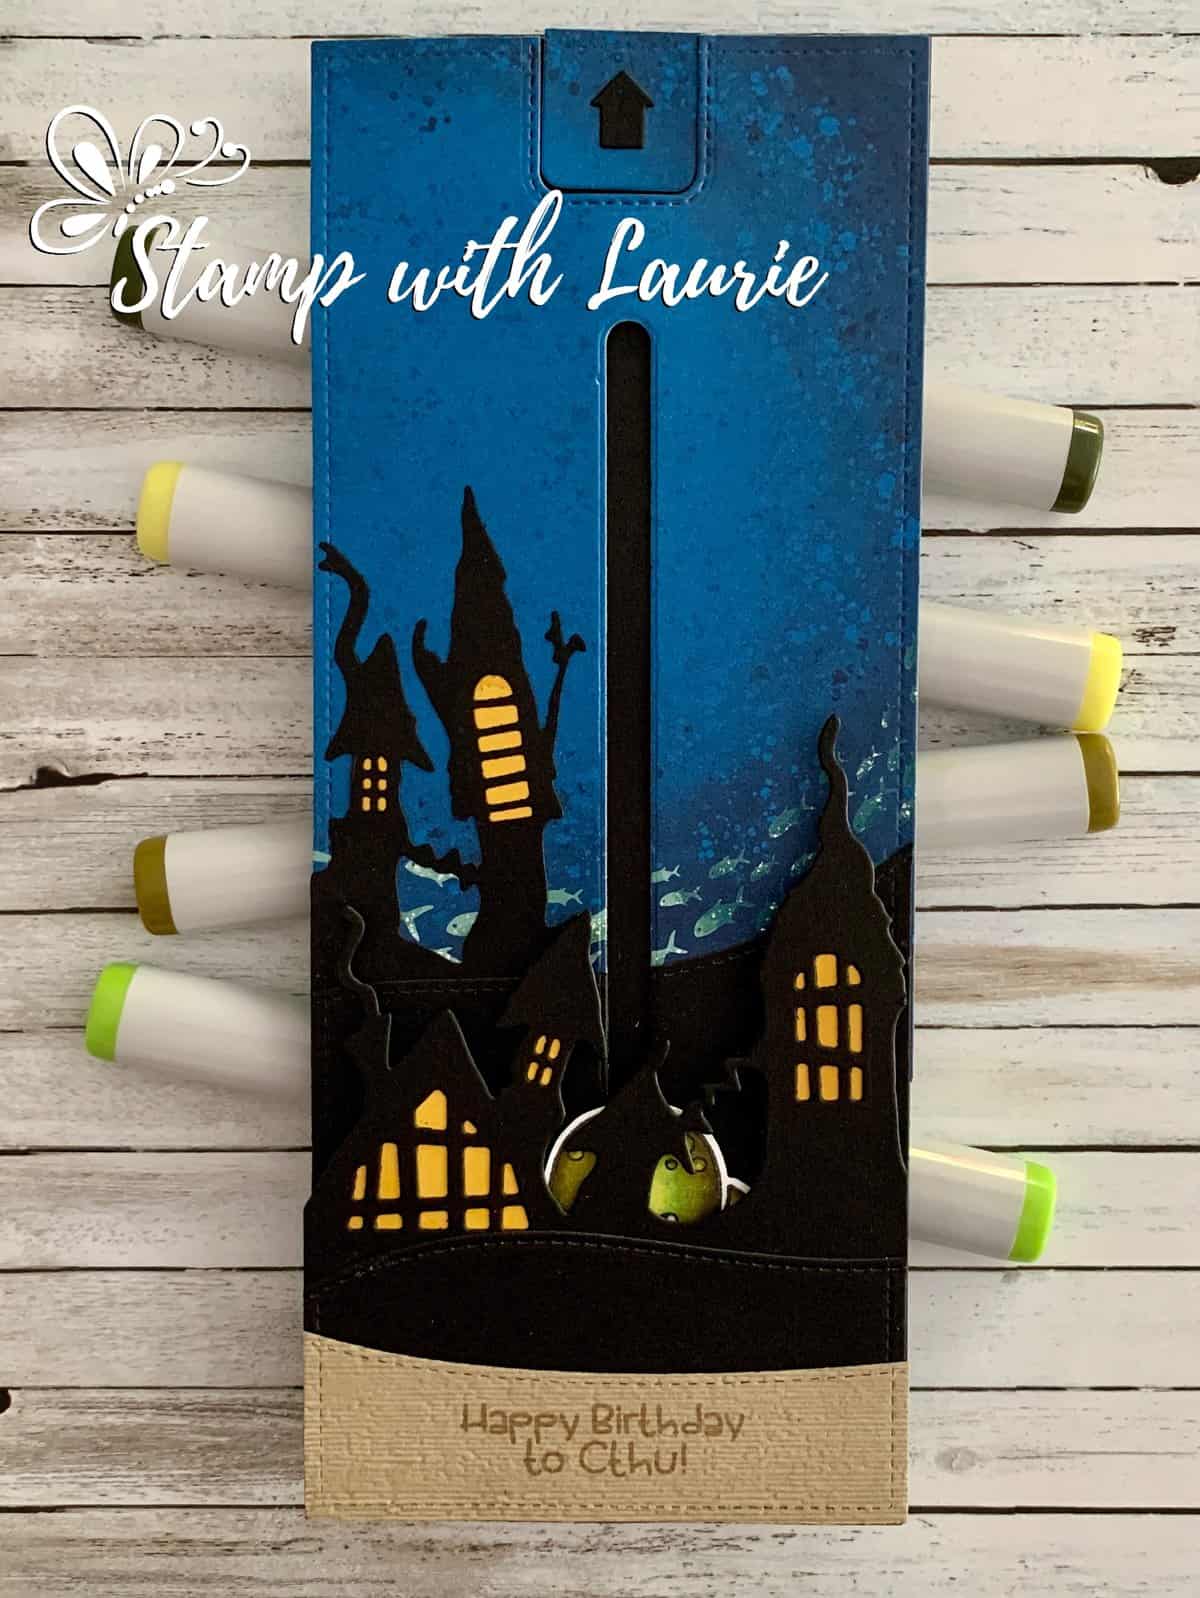
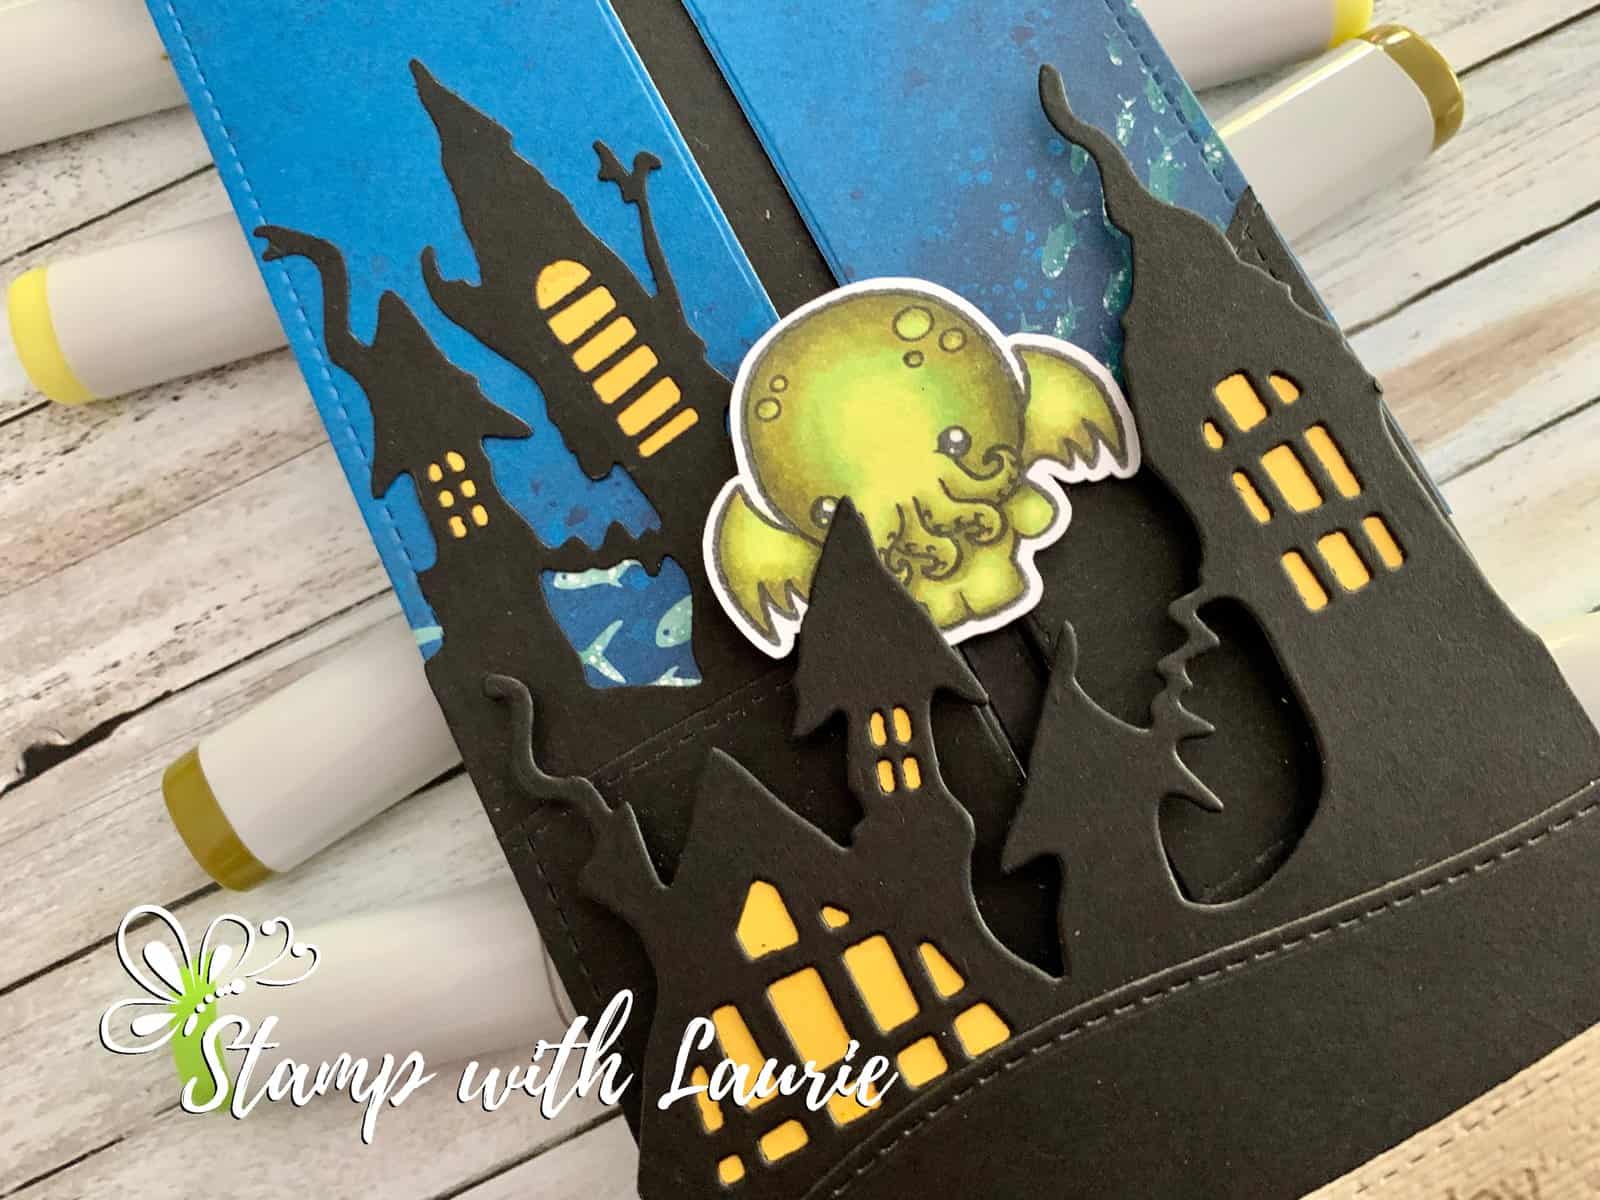
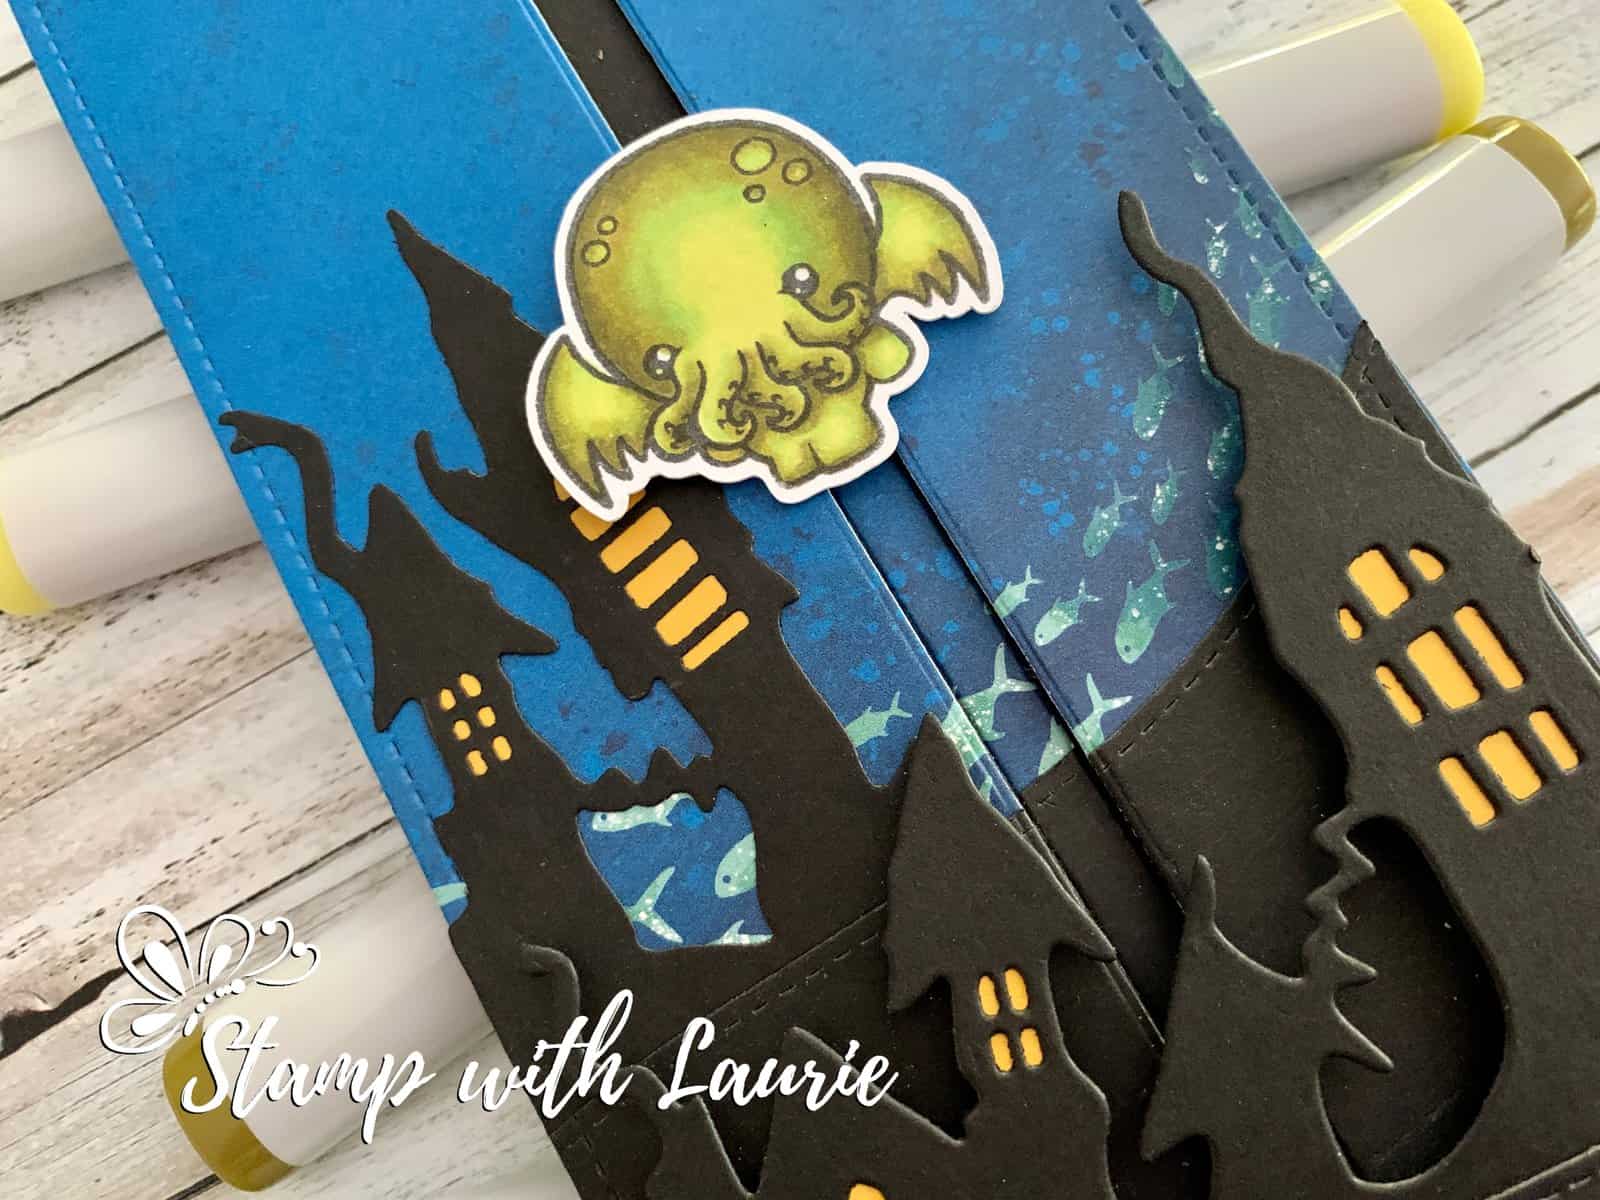
For my card, I decided that a slimline slider card would be so cool with Cthulhu rising from the watery depths of the ruined city of R’lyeh (some Cthulhu Mythos for you)! I always create interactive cards for the little boy’s and his brother’s birthdays and get the best reactions from them! His reaction to this card was “Laurie’s cards are always good, but this is the best card ever!”. This just made my day!

Cthulhu Rising From R'lyeh
Cthulhu Rising From R’lyeh

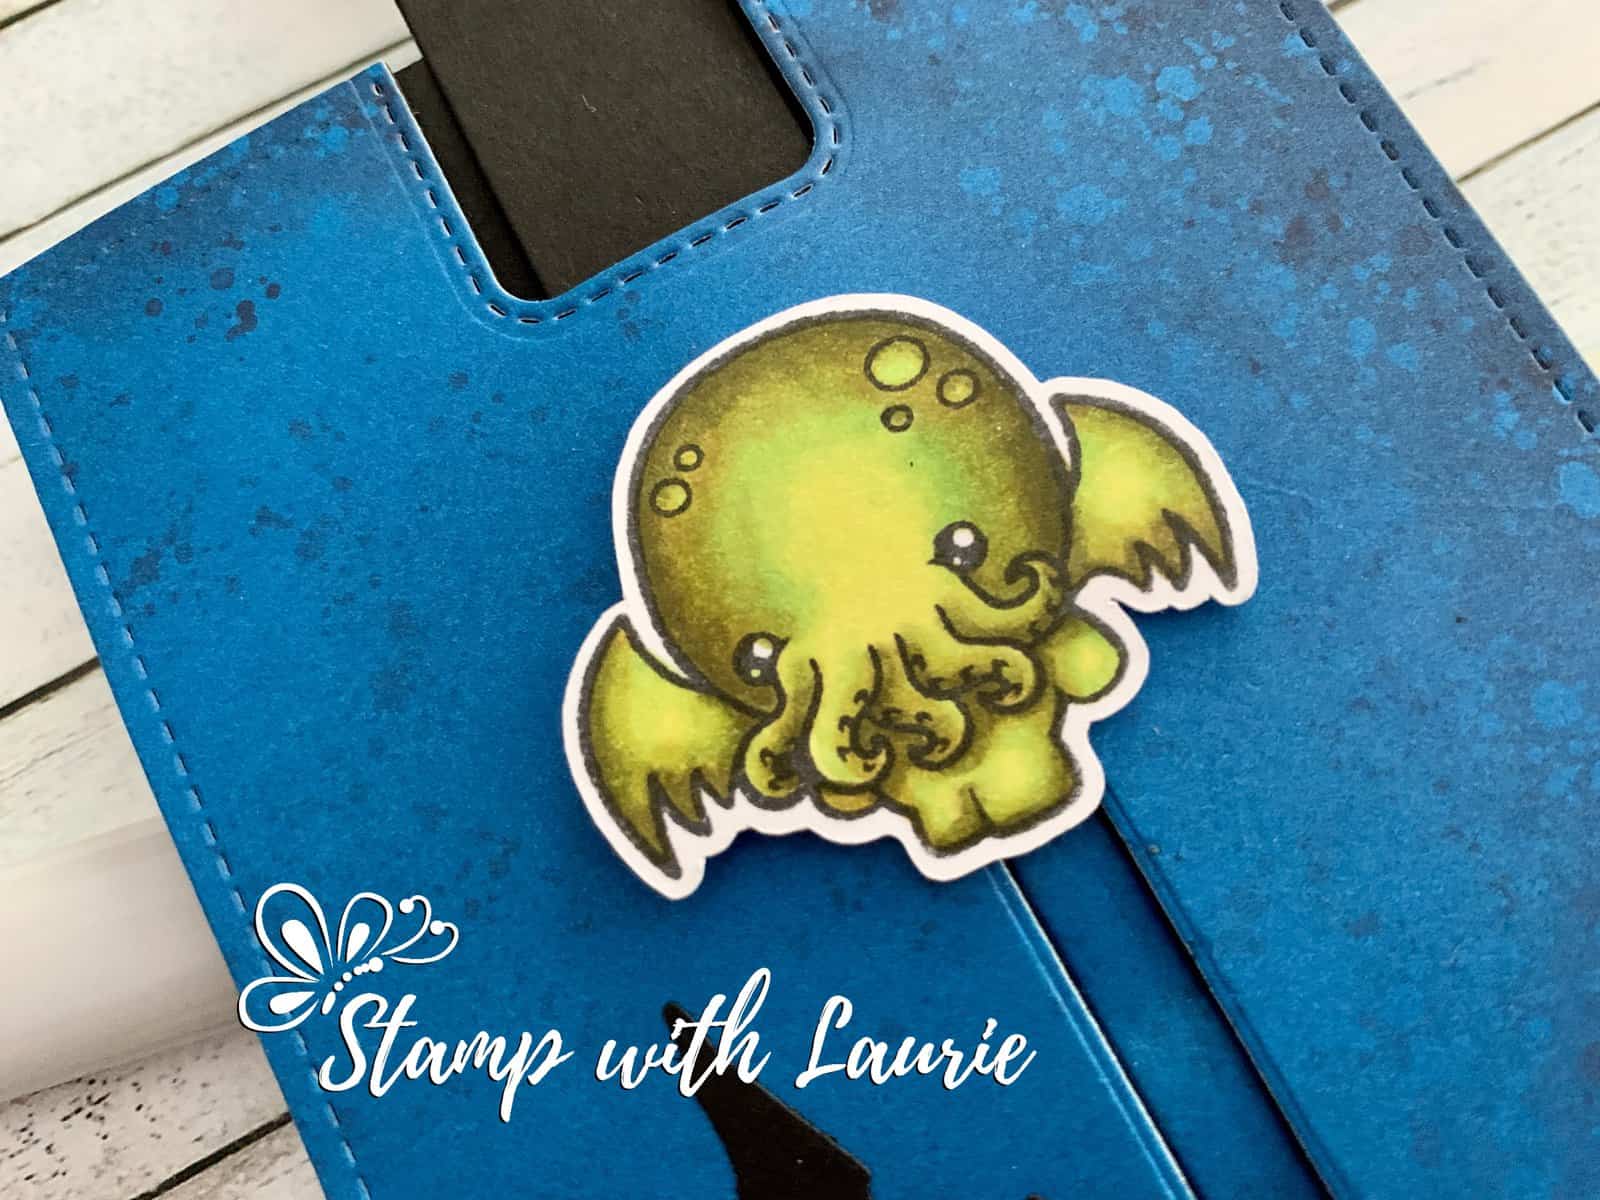
I only used four Copic markers to colour Cthulhu. To make the Scary Town Die fit my slimline shape, I cut it in two. I then added some stitched hills to create my multi-level town. Since this was supposed to be at the bottom of the Pacific Ocean, I added some sand with Crumb Cake Card Stock and use the embossing folder to give it texture. What better place to stamp the sentiment that came with the stamp set: “Happy Birthday to Cthu!”.

I had debated about using my Distress Inks to create my water background, but I found this DSP that was perfect for my scene. It even had fish!

Close Up of Cthulhu Rising From R'lyeh
Close Up of Cthulhu Rising From R’lyeh

To make my slider mechanism work, I used a ton of dimensionals, especially the Foam Adhesive Strips by Stampin’ Up! I even created a video with the slider card in action.

Video of Slider Card in Action.

————————–

Copic Markers:

Cthulhu: YG21/YG23/YG95/YG99

Close Up of Cthulhu
Close Up of Cthulhu

————————–

Card Recipe for My Mythical Birthday Card:

Mythical Cthulu, Kindred Stamps
Paper Basics – Stamper’s Select White Cardstock, Papertrey Ink
Whale of a Time 6” x 6” Designer Series Paper, Stampin’ Up!
Slimline Pull Tabs Dies, Heffy Doodle
Large Slimline with Sliders Dies, Lawn Fawn
Scary Town Die, Stamp AnnieThing
Slimline Stitched Hillside Border Dies, Lawn Fawn
Subtle 3D Embossing Folder, Stampin’ Up!
Crumb Cake Ink Pad, Stampin’ Up!
Foam Adhesive Strips, Stampin’ Up!
Black Stampin’ Dimensionals, Stampin’ Up!
Basic Black, Crumb Cake and Crushed Curry Card Stock, Stampin’ Up!

Finished card size: 3.5” x 8.5”

Cthulhu At The Top of Slider

————————–

For more of my Copic cards, please click here.

Hope you like My Mythical Birthday Card using the
Mythical Cthulu Stamp Set by Kindred Stamps!

Thank you for stopping by!

Hugs,
Laurie
My Super Birthday Cards

My Super Birthday Cards

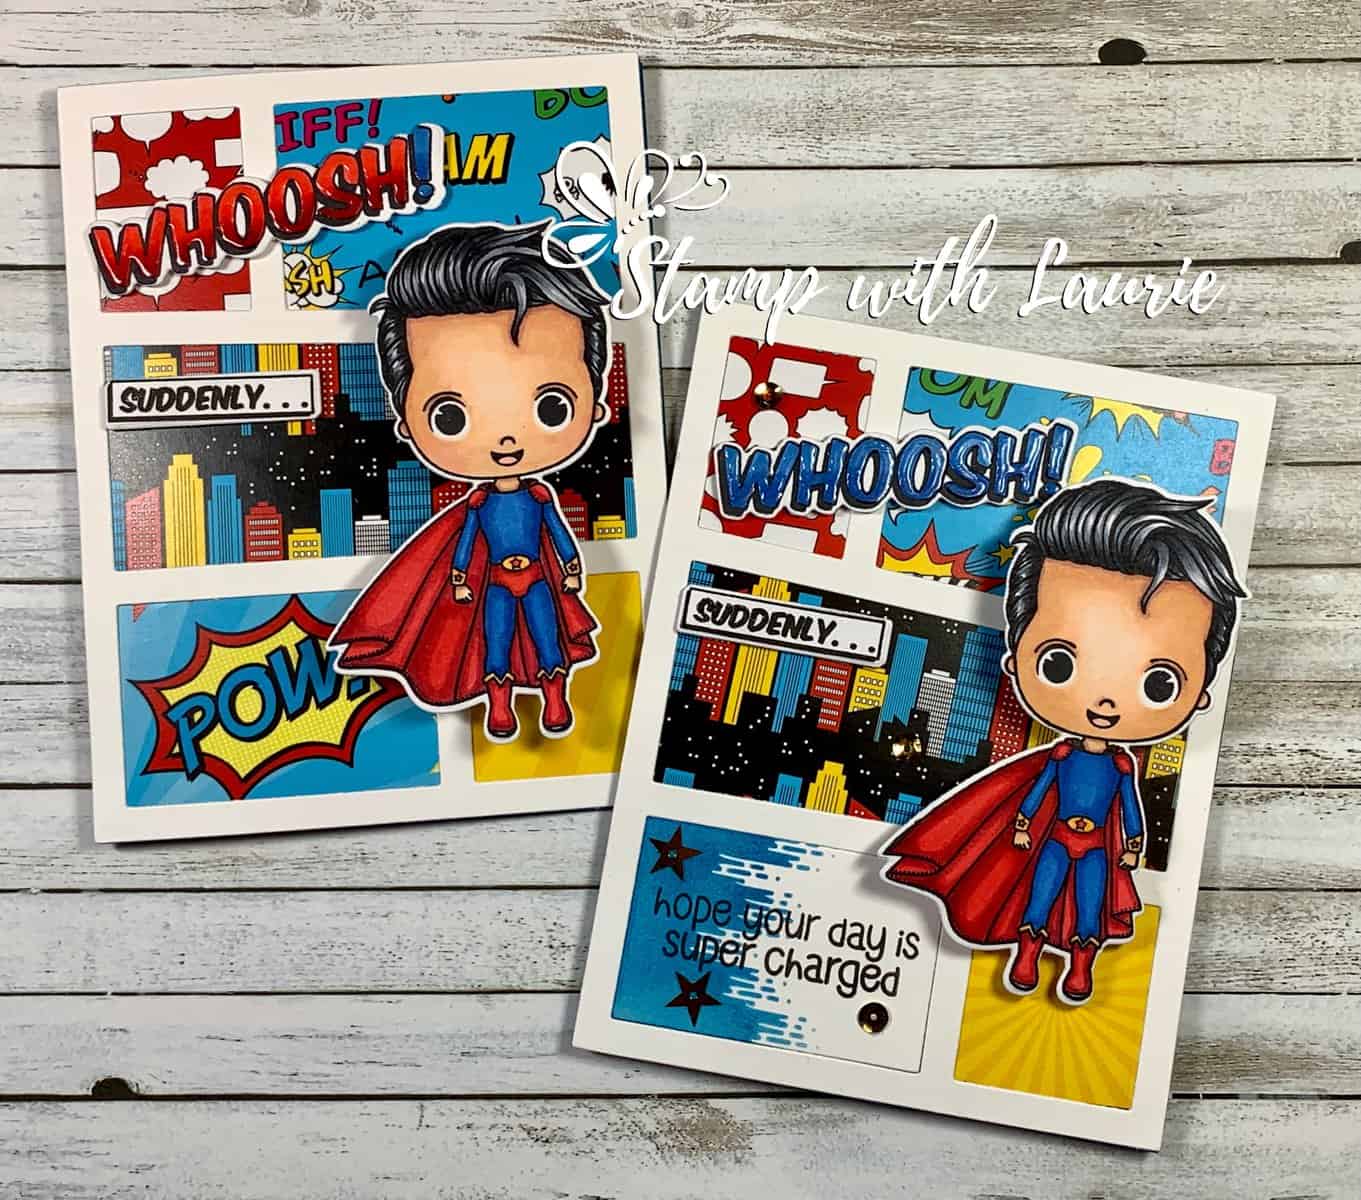
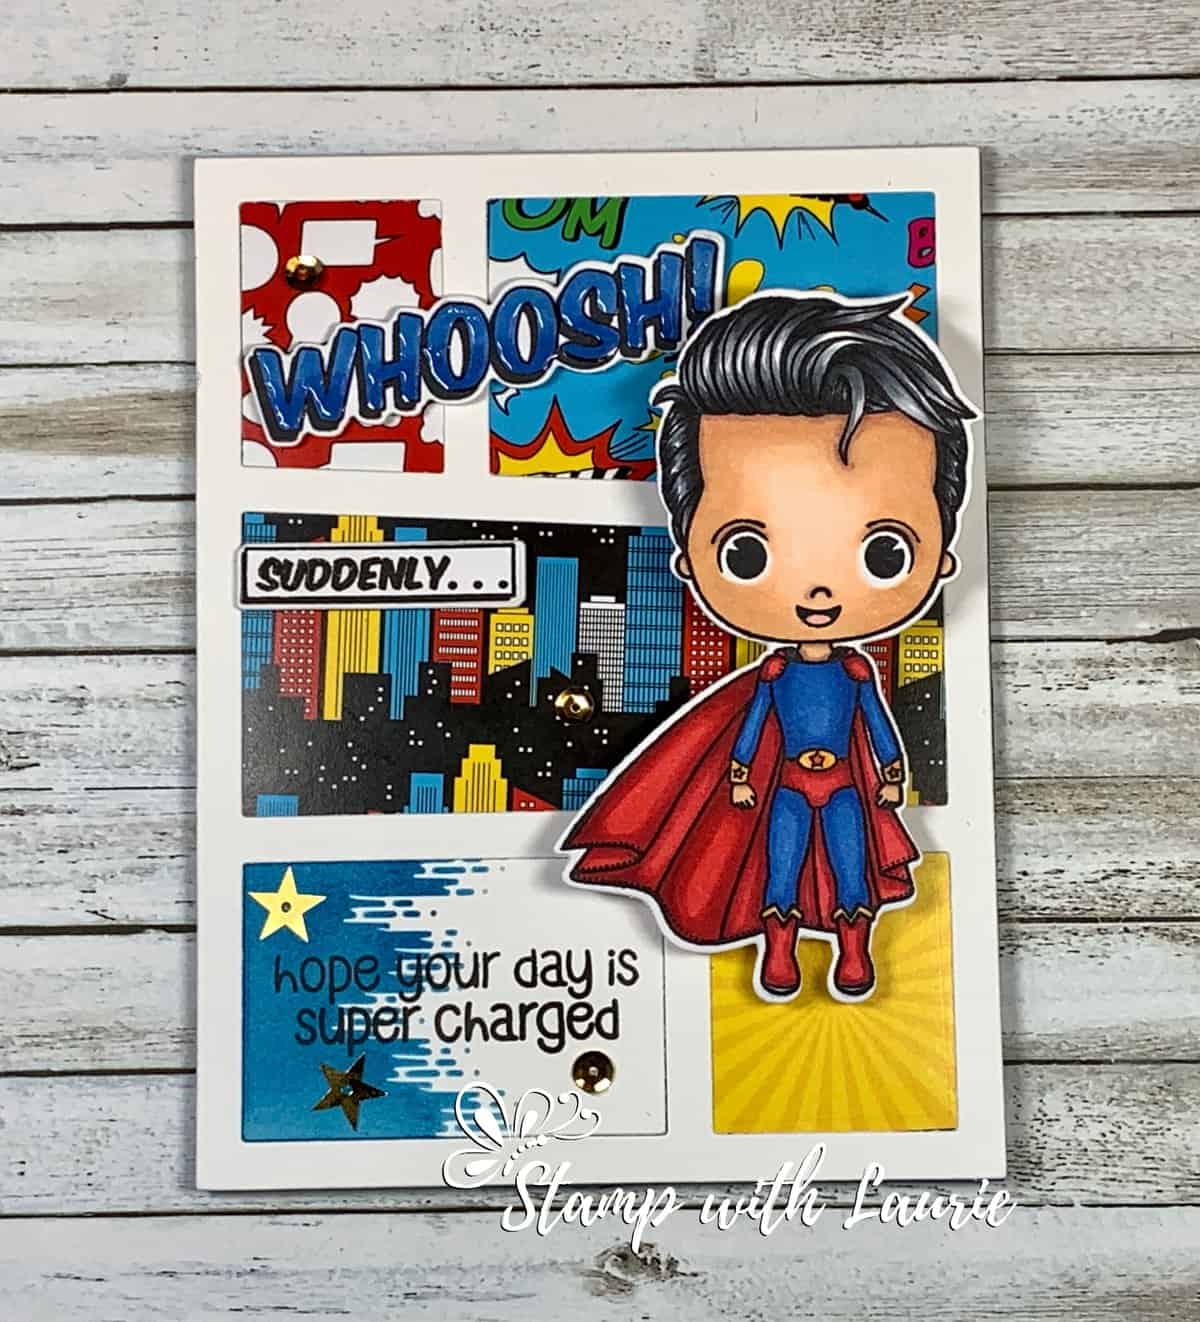
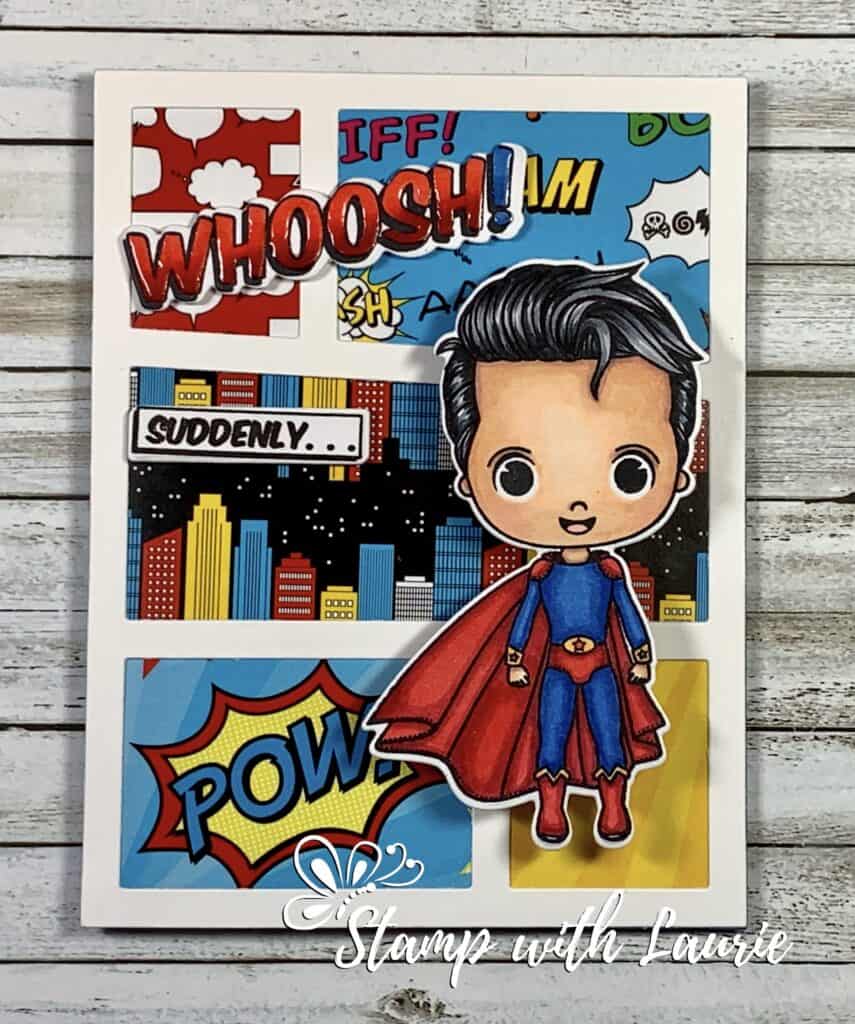
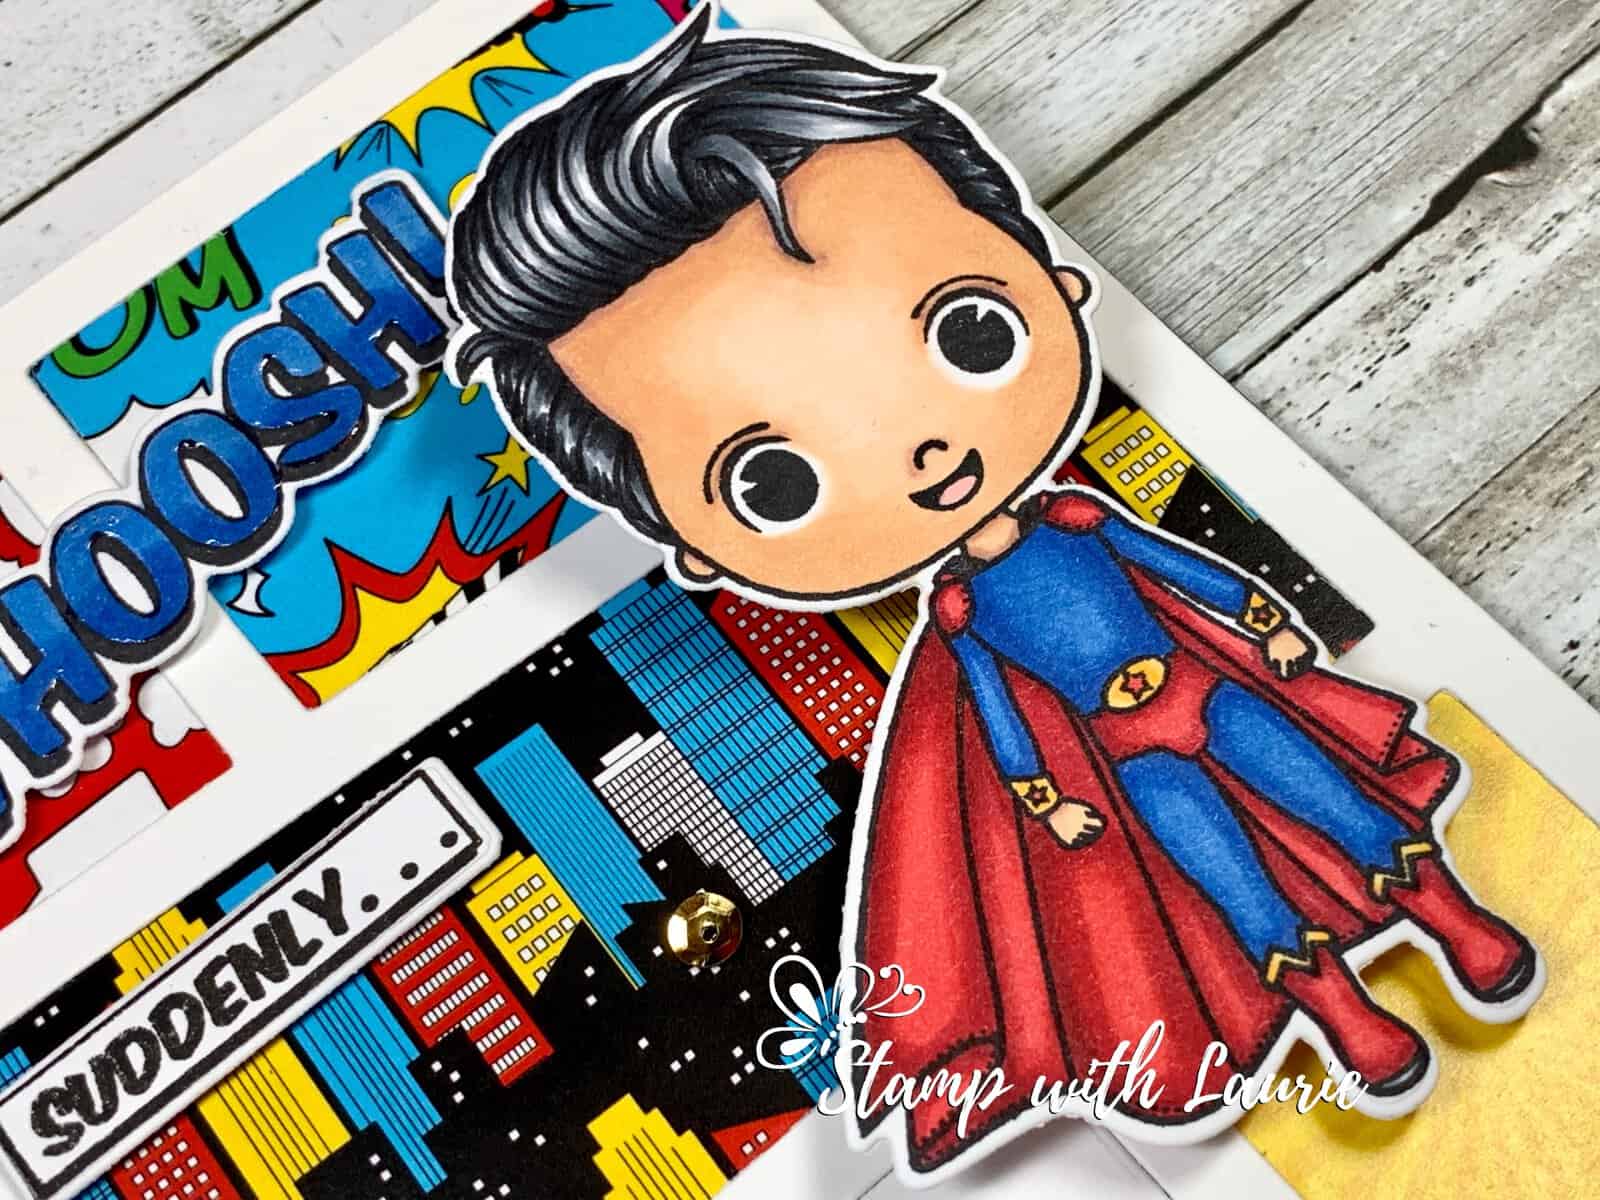
Hello Crafty Friends! Yesterday was a little boy’s birthday and a few weeks ago was a big boy’s birthday. The big boy collects comics especially Superman and the little boy sent me a card with a Superman stamp on the envelope. So, I pulled out my Save The Day Grab and Go Box by Stamp Anniething to make My Super Birthday Cards.

The Details of My Cards

I love that this Grab and Go Box has everything you need to make your card including paper, adhesive, card bases and more! I stamped my super heroes twice and used my Copic Markers to colour them. Then I die cut them out using the matching die included in the box.

My Super Birthday Card - Version 1
My Super Birthday Card – Version 1

My cards were quick ones to make since I mainly used the Save the Day paper sheets and the Comic Mat Die that come with the box. For one card, I pulled out the Background Scene Stencil and did some inking directly onto the white panel that was cut out from the Comic Mat Die. Next, I stamped the sentiment in black and just placed it back into the empty slot on the mat. The other panels were filled with different papers. I love the “Suddenly” just like in the old comics! I stamped the Whoosh!, coloured them with my Copic markers and then added Glossy Accents to make them pop. A few sequins add to the sparkle of the card.

My Super Birthday Card - Version 2
My Super Birthday Card – Version 2

For my other card, I decided to use the “POW” from the paper since the big birthday boy would get a kick out of it from the old TV shows that we use to watch.

One final piece was that I put my super heroes onto Action Wobbles. How fun is that! The recipient can have them wobble on the card! Check it out!

Video of Wobble in Action

————————–

Copic Markers:

Skin: E000/E00/E21/E11/E04/R20
Hair: C9/C7/C5/C3
Blues: B18/B26/B24
Reds: R39/R37/R35
Yellows: Y32/Y38

Close Up of My Card
Close Up of My Card

————————–

Card Recipe for My Super Birthday Cards:

Save The Day Grab and Go Box, Stamp Anniething
Paper Basics – Stamper’s Select White Cardstock, Papertrey Ink
#1 Stamp, Save The Day Grab and Go Box, Stamp Anniething
#7 Stamp, Save The Day Grab and Go Box, Stamp Anniething
#8 Stamp, Save The Day Grab and Go Box, Stamp Anniething
Metal Die Outlines, Save The Day Grab and Go Box, Stamp Anniething
6” x 6” Paper Sheets, Save The Day Grab and Go Box, Stamp Anniething
Comic Mat Die, Save The Day Grab and Go Box, Stamp Anniething
Background Scene Stencil, Save The Day Grab and Go Box, Stamp Anniething
Tuxedo Black Memento Ink Pad, Stampin’ Up!
Pacific Point, Stampin’ Up!
Blending Brushed, Stampin’ Up!
Action Wobbles, My Stash
Metallic Sequin Assortments, Stampin’ Up!
Glossy Accents, Ranger
Thick Whisper White Card Stock, Stampin’ Up!

Finished card size: 5.5” x 5.5”

————————–

To view my Copic cards, please click here.

Hope you like My Super Birthday Cards using the
Save The Day Grab and Go Box from Stamp Anniething!

Thank you for stopping by!

Hugs,
Laurie

Let’s Celebrate You Card

My Let's Celebrate You Card
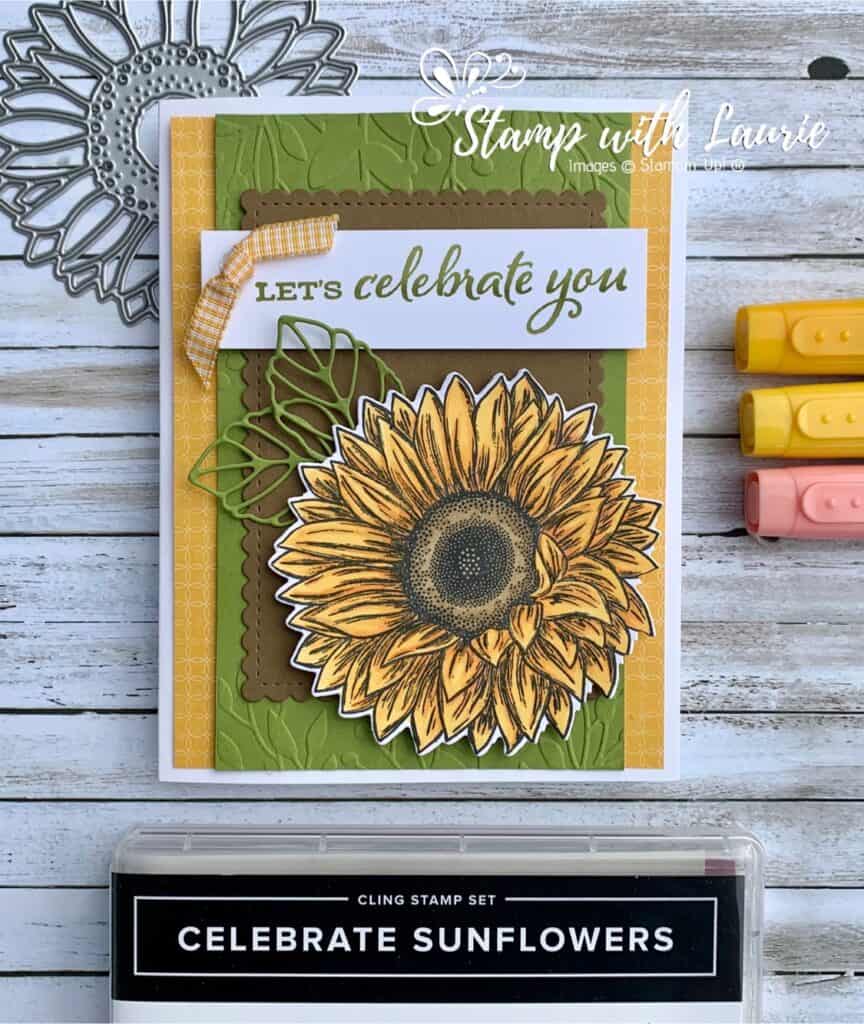
My Let’s Celebrate You Card

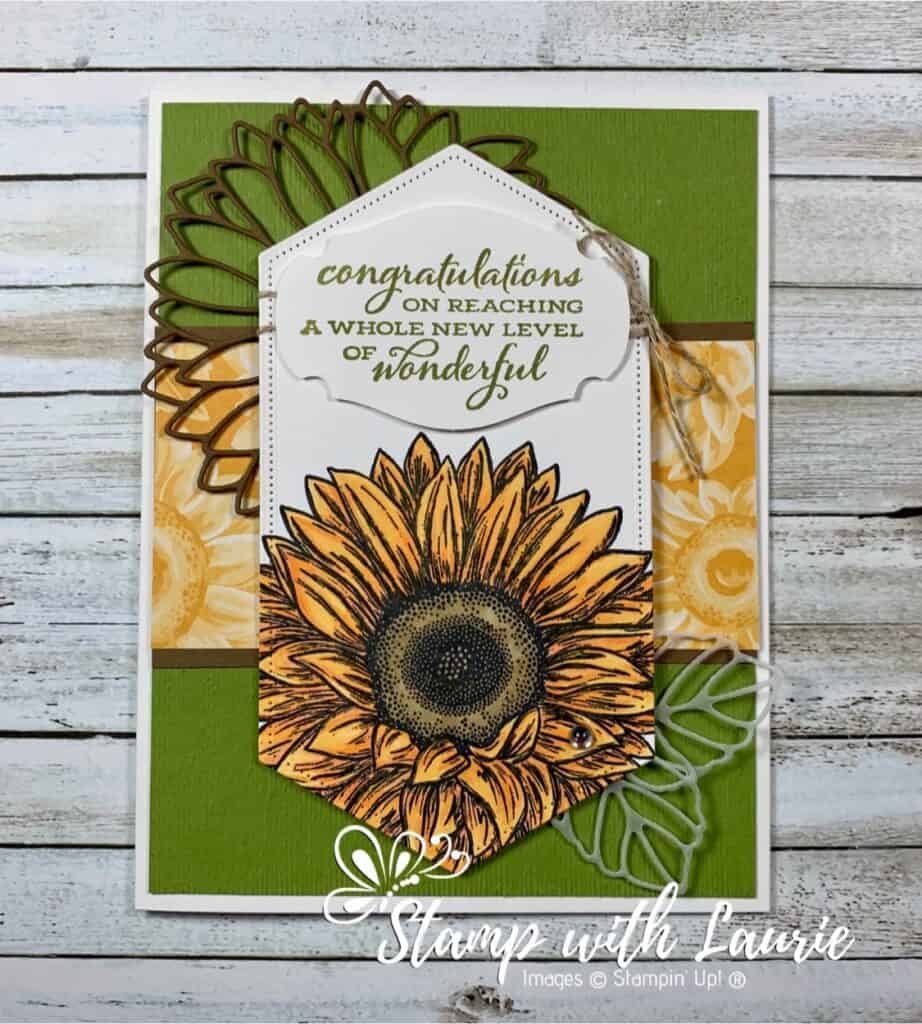
For Technique Tuesday, I am sharing my Let’s Celebrate You Card that is demonstrated in my last colouring video from my presentation to fellow demonstrators. I love this big bold sunflower image with the matching dies from the Celebrate Sunflowers Bundle! I created another card using this set in an earlier post and used the same technique. Just in case you wanted to check it out, I added a link to it at the end of this post.

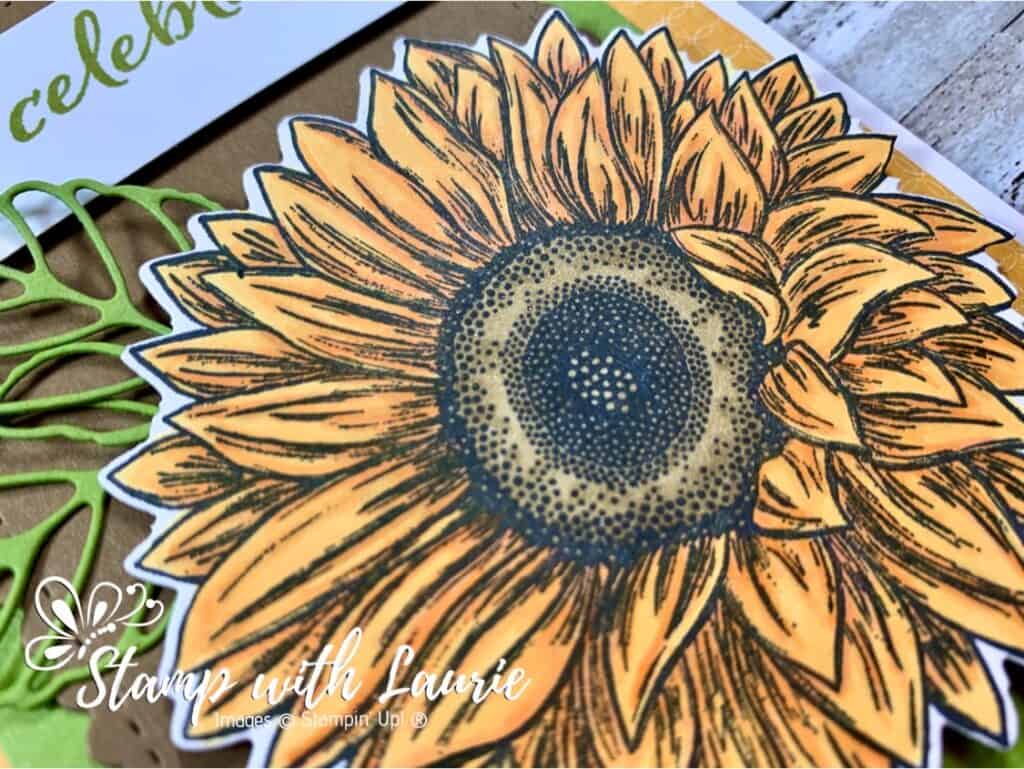
This advanced colouring technique uses 3 colours to creates more dimension and texture to what you are colouring. For the sunflower, I used three markers, Mango Melody Light and Dark and Calypso Coral Light, for the petals. I used the Calypso Coral in the darkest of shadows that are indicated by the artist drawn lines. For the flower centre, I use Soft Suede Light and Dark, but for the Dark Suede, I dotted the marker to create texture that the artist has indicated with their dots. In this video, I demonstrate this colouring technique:

My Video Demonstrating the Flicking of Different Colours Technique

Supplies:

Stamps/Bundle: Celebrate Sunflowers Bundle (154065)

Inks: Tuxedo Black Memento Ink Pad (132708), Old Olive Classic Stampin’ Pad (147090)

Paper: Whisper White Thick (140272 ), Old Olive (100702), Soft Suede (115318), Whisper White (100730), Flowers For Every Season 6″ X 6″ Designer Series Paper (152486)

Accessories: Stitched So Sweetly Dies (151690), Greenery Embossing Folders (152716), Bumblebee ¼” Gingham Ribbon (153658), Mango Melody Stampin’ Blends Combo Pack (154888), Calypso Coral Stampin’ Blends Combo Pack (154881), Old Olive Stampin’ Blends Combo Pack (154892), Soft Suede Stampin’ Blends Combo Pack (154906), Stampin’ Blends Color Lifter (144608 ), Paper Snips (103579), Bone Folder (102300), Mini Glue Dots (103683), Stampin’ Seal (152813), Stampin’ Dimensionals (104430)

Measurements: 

  • Whisper White Thick: 8 ½” x 5 ½”; scored at 4 ¼”
  • Old Olive – 3 pieces:
    • 3 ¼” x 5 ¼”
    • Scraps for leaves
  • Soft Suede: 4 ¼” x 3”
  • Whisper White – 3 pieces:
    • 1” x 3 ½” (sentiment)
    • 3 ½” x 3 ½” (sunflower)
  • Flowers For Every Season Designer Series Paper: 5 ¼” x ¾”
  • Bumblebee Gingham Ribbon: 4”
Close Up of My Let's Celebrate You Card
Close Up of My Let’s Celebrate You Card

Instructions for Let’s Celebrate You Card: 

  1. Fold the Whisper White Thick card stock in half to create the card base.
  2. Emboss the Old Olive card stock with the leaves from the Greenery Embossing Folders.
  3. Stamp the large sunflower image in Tuxedo Black Memento Ink Pad on the Whisper White piece.
  4. Colour the petals with the Stampin’ Blends listed above using the Flicking of Different Colours Technique that is used in the video
  5. Die cut the sunflower with the corresponding Celebrate Sunflowers Bundle.
  6. Die cut the leaves from the scraps of Old Olive using the Celebrate Sunflowers Bundle.
  7. Stamp with sentiment in Old Olive on the Whisper White piece.
  8. Die cut the Soft Suede with the largest scalloped rectangle from the Stitched So Sweetly Dies.
  9. Using Stampin’ Seal, adhere the Flowers For Every Season DSP on to the card base.
  10. Adhere with Stampin’ Seal, the embossed piece in the centre of the Whisper White card base overlapping the Flowers For Every Season DSP.
  11. Using Stampin’ Seal, adhere the scalloped rectangle in the center of the embossed piece.
  12. Affix the leaves to the back of the sunflower using glue dots.
  13. Using dimensionals, add the sentiment to the card.
  14. Using dimensionals, add the sunflower to the card.
  15. Tie the Bumblebee Gingham Ribbon in a knot and adhere it using a glue dot.

Here is the other card in which I used the same technique:

My Sunflower Congratulation Card

For more details, you can find the post here: https://stampwithlaurie.com/my-congratulations-card/

For Further Info:

Hope you like my Let’s Celebrate You Card!

My Colouring Notes from my presentation:
https://stampwithlaurie.com/wp-content/uploads/2020/08/Stampin-Up-Blends-2020.pdf

Part 1Whiskey Business Card using Blending Different Colours Technique
Video Tutorial: Blending Different Colours Together

Part 2Country Harvest Card using Light to Dark Technique
Video Tutorial: Light to Dark/Dark to Light Colouring

Part 3Beautiful Poppy Birthday Card using Smooth Colouring Technique
Video Tutorial: Smooth Colouring

Part 4Let’s Gather Together Card using Tip to Tip Blending Technique
Video Tutorial: Tip to Tip Colouring

Part 5So Grateful Cardinal Card using Flicking Colouring Technique
Video Tutorial: Flicking Colouring

Part 6: Let’s Celebrate You Card using Flicking of Different Colours Technique
Video Tutorial: Flicking of Different Colours Technique

You will find the items listed above in my online store.

So Grateful Cardinal Card

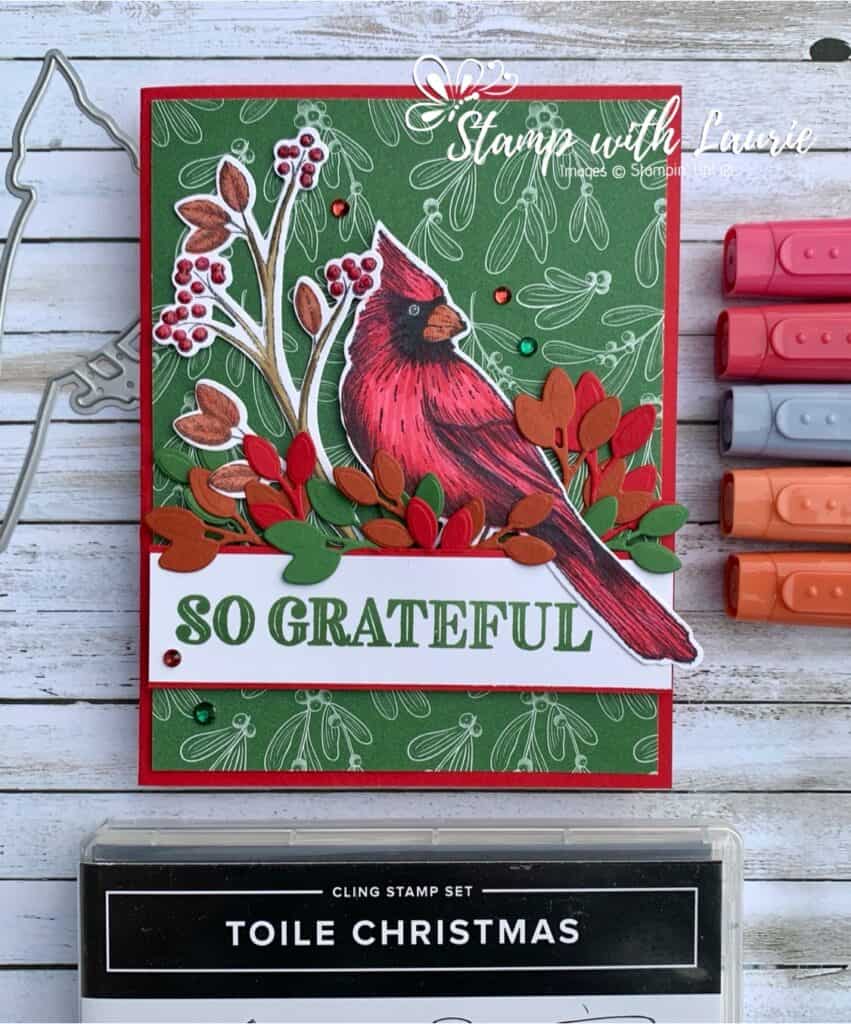
My So Grateful Cardinal Card

Yesterday was the First Day of Autumn! So I decided to welcome it with my So Grateful Cardinal Card from the Toile Christmas Stamp Set. This stamp set is perfect for Christmas but can also be used for a beautiful fall or Thanksgiving card! I love this time of year with all the beautiful colours as the leaves change!

For part 5 of my colouring videos with Stampin’ Blends, I am demonstrating the flicking colouring technique. The other parts are listed below at the end of this document along with my Notes from a presentation that I did on using Stampin’ Blends.

Flicking Technique

This technique is achieved by applying ink in quick, single strokes. The key to this inking technique is to flick the marker tip across the page to create a single stroke that goes from dark to light.

  1. Holding the marker loosely, start a downward movement towards the paper
  2. As the marker tip touches the paper, quickly move across the paper, bringing our hand up and away from the paper. This will apply more ink at the beginning of the stroke and less at the end.
  3. You may need to turn the paper to accommodate the angle that is most comfortable for you.

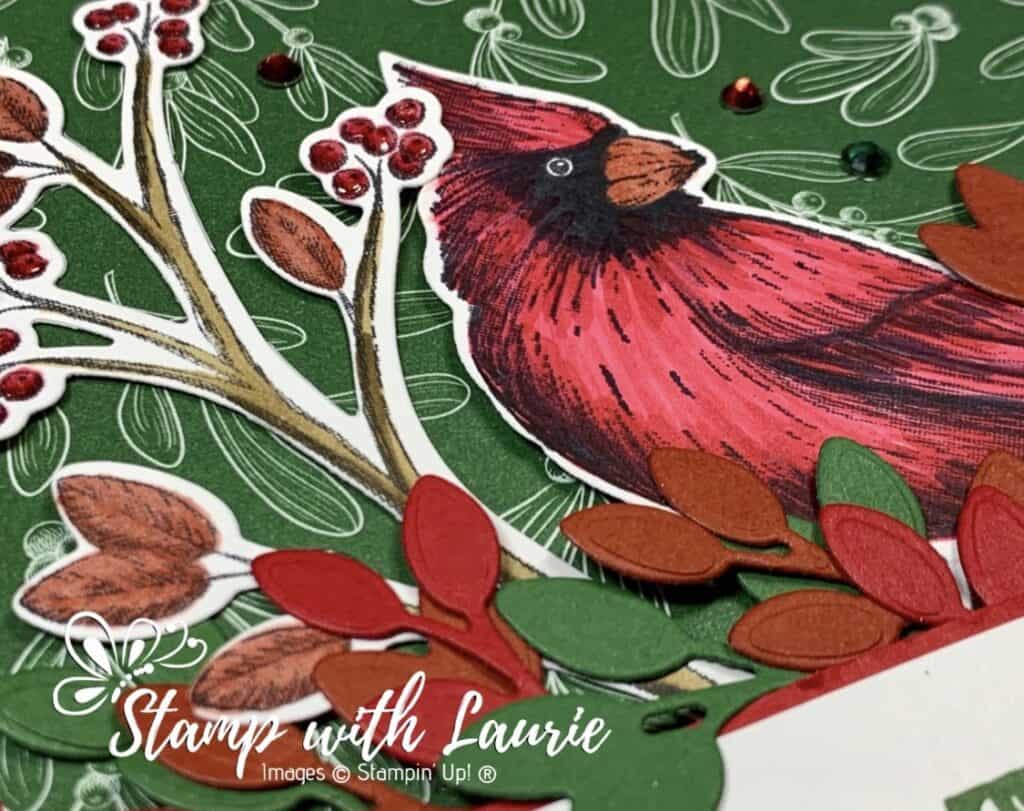
Flicks can be left unblended to create texture such as for hair or feathers (like the cardinal). Or, they can be blended out to create smooth shading.

Video of My So Grateful Cardinal Card

For further demonstration of the flicking technique, please view:
Part 2Country Harvest Card using Light to Dark Technique
Video Tutorial: Light to Dark/Dark to Light Colouring

Supplies:

Stamps: Toile Christmas (cling 150469), Ornate Thanks (Photopolymer 149471)

Inks: Tuxedo Black Memento Ink Pad (132708), Garden Green Classic Stampin’ Pad (147089)

Paper: Real Red (102482), Garden Green (102584), Whisper White (100730), Cajun Craze (119684), ‘Tis the Season 6″ x 6″ Designer Series Paper (153489)

Accessories: Toile Christmas Bundle (cling 152367), Real Red Combo Pack Stampin’ Blends (147935), Basic Black Combo Pack Stampin’ Blends (147942), Cajun Craze Combo Pack Stampin’ Blends (147931), Soft Suede Combo Pack Stampin’ Blends (154906), Shimmery Crystal Effects (150892), Holiday Rhinestone Basic Jewels (150457), Bone Folder (102300), Stampin’ Seal (152813), Stampin’ Dimensionals (104430), Mini Glue Dots (103683)

Close Up of My So Grateful Cardinal Card

Measurements: 

  • Real Red: 8 ½” x 5 ½”; scored at 4 ¼” 
  • ‘Tis the Season Designer Series Paper: 5 ¼” x 4”
  • Whisper White: 3 pieces
    • 1” x 4” (sentiment)
    • 2 ¼” x 4 ½” (cardinal)
    •  2 1/8” x 4” (branch) 
  • Real Red: 1 ¼” x 4”
  • Scraps of Real Red, Garden Green and Cajun Craze for leaves

Instructions:

  1. Stamp the cardinal in Tuxedo Black Memento on Whisper White.
  2. Using the Blends colour the cardinal in a flicking motion described in the video.
  3. Die cut the cardinal using the matching cardinal die from the Toile Christmas Bundle.
  4. Use the third largest nested die to cut the Real Red CS.
  5. Stamp the sentiment in Garden Green on the Whisper White card stock.
  6. Using the scraps, die cut 3 branches of each colour.
  7. Fold the piece of Real Red card stock in half to form the card base.
  8. Attach the ‘Tis the Season Designer Series Paper to the front of the card base.
  9. Using glue dots, adhere the branches to the back of the Real Red CS.
  10. Attach the sentiment to the Real Red piece.
  11. Attach the sentiment piece with dimensionals to the front of the card.
  12. Tuck in cardinal and branch and adhere with dimensionals.
  13. Add 5 Holiday Rhinestone Basic Jewels in various colours scattered on the front.

For Further Info:

Hope you like my So Grateful Cardinal Card!

My Colouring Notes from my presentation:
https://stampwithlaurie.com/wp-content/uploads/2020/08/Stampin-Up-Blends-2020.pdf

Part 1Whiskey Business Card using Blending Different Colours Technique
Video Tutorial: Blending Different Colours Together

Part 2Country Harvest Card using Light to Dark Technique
Video Tutorial: Light to Dark/Dark to Light Colouring

Part 3Beautiful Poppy Birthday Card using Smooth Colouring Technique
Video Tutorial: Smooth Colouring

Part 4Let’s Gather Together Card using Tip to Tip Blending Technique
Video Tutorial: Tip to Tip Colouring

Part 5: So Grateful Cardinal Card using Flicking Colouring Technique
Video Tutorial: Flicking Colouring

Part 6: Let’s Celebrate You Card using Flicking of Different Colours Technique
Video Tutorial: Flicking of Different Colours Technique

You will find the items listed above in my online store.

Let’s Gather Together Card

My Let's Gather Together Card
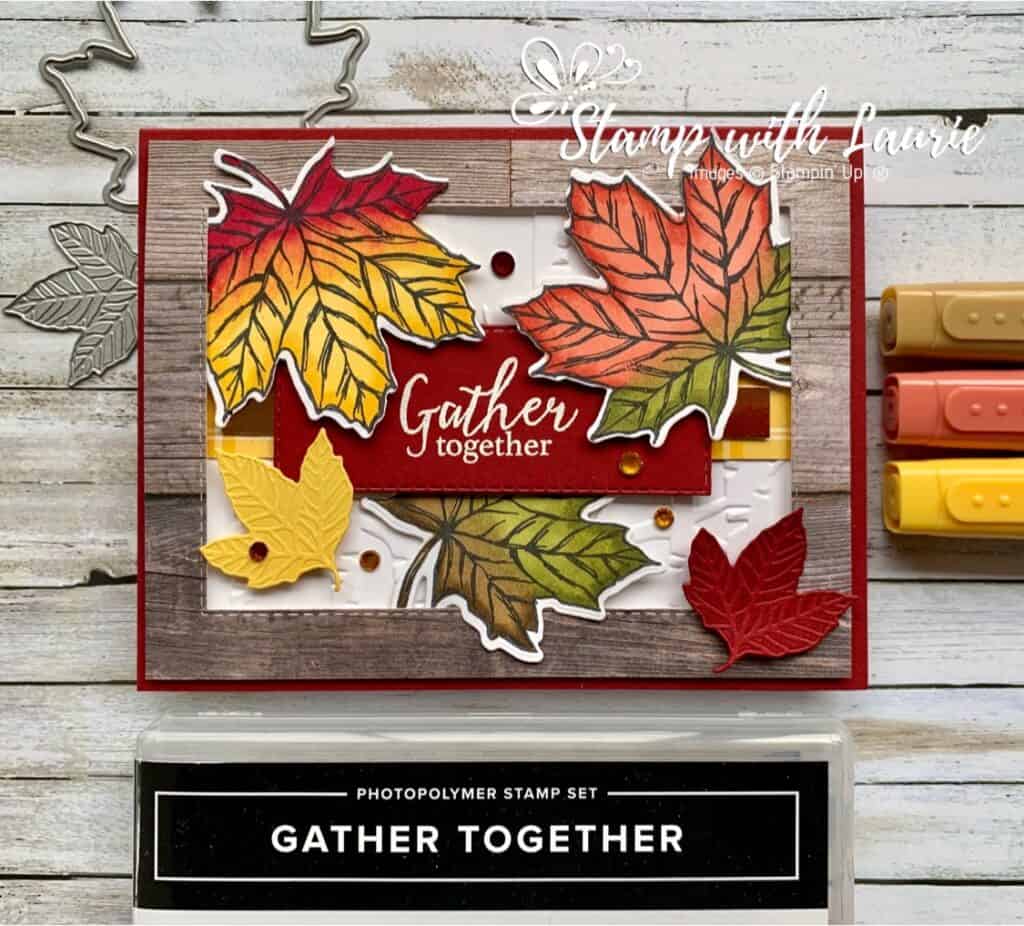
My Let’s Gather Together Card

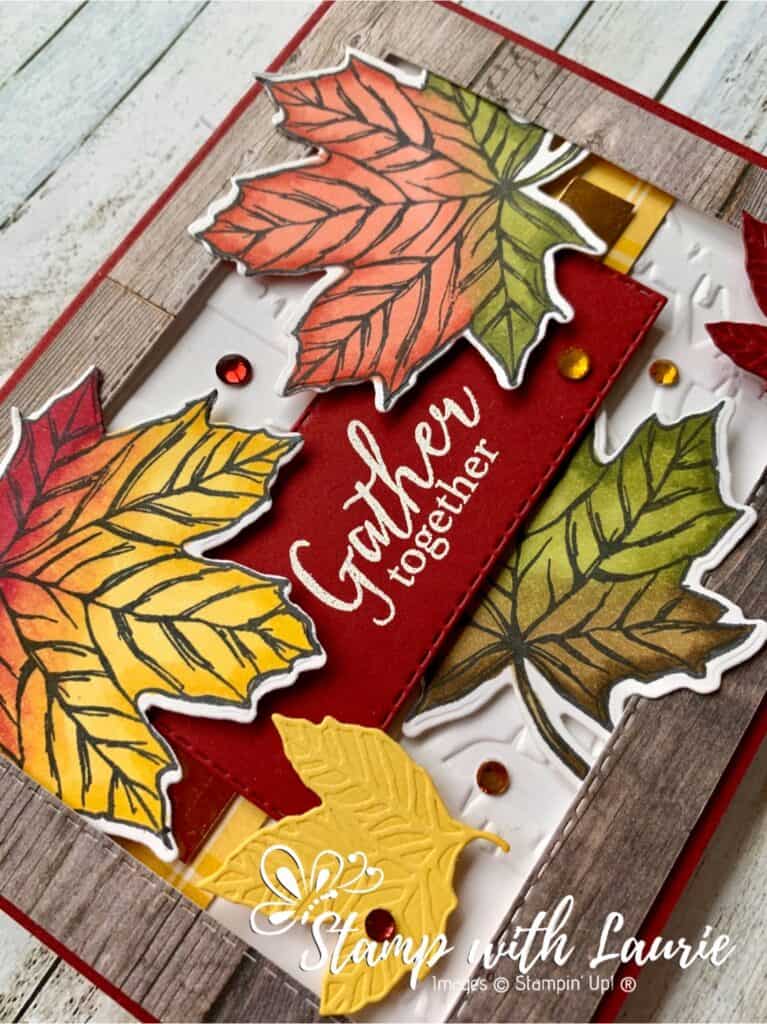
For Technique Tuesday, I am sharing the Tip to Tip Blending Technique for my Let’s Gather Together Card using the Gather Together Bundle by Stampin’ Up! I love Fall and all the colours of the leaves that it brings! So, I thought the Tip to Tip would be perfect to showcase those colours! For my card, I create a frame using a Stitched Rectangle and the In Good Taste Designer Series Paper with the leaves “exploding” out of it. I used the Woodlands Embossing Folder as my base behind all the leaves “falling” from the trees. To tie in the Daffodil Delight colour, I used a strip of the Plaid Tidings Designer Series Paper and one of the leaves die cut and embossed. A strip of Copper Foil Paper and a scattering of Holiday Rhinestones Basic Jewels add a bit of shimmer to my card.

For part 4 of my colouring videos with Stampin’ Blends from my presentation, I am demonstrating the Tip to Tip Blending Technique. The other 3 parts are listed below at the end of this document.

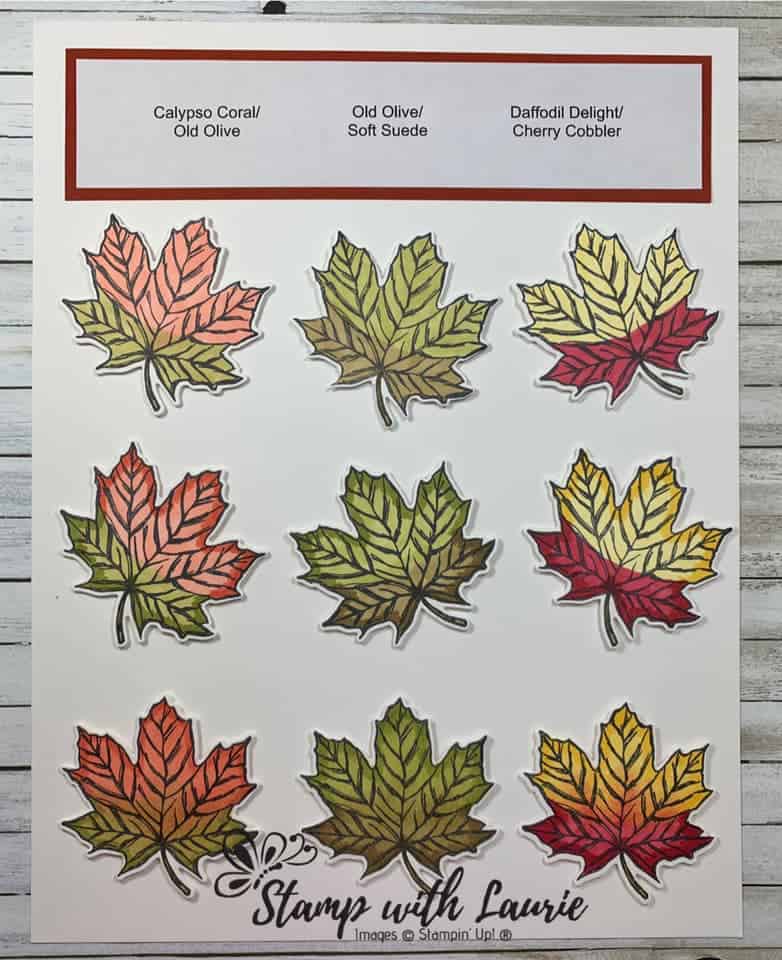
Tip to Tip Blending Technique Chart

Tip to Tip Blending Technique

To combine two different coloured blends on an image, try the Tip to Tip Blending Technique. This gives you a smooth transition of colors and doesn’t end up looking all blotchy where the colors meet. I’ve chosen Calypso Coral and Old Olive Stampin’ Blends for my first leaf.

  1. Stamp the image with Memento Ink.
  2. Apply the Light Calypso Coral and Light Old Olive Stampin’ Blends to the image. Meet somewhere in the middle with the colors – it doesn’t have to be neat.
  3. With the Dark Calypso Coral and Dark Old Olive Stampin’ Blends, add a layer of color around the edge of the image.
  4. Brush the tip of the Light Calypso Coral Stampin’ Blends over the tip of the Light Old Olive Stampin’ Blends to pick up some color. The Calypso Coral Stampin’ Blends marker then acts as your brush to apply a mix of both colors to the center of the leaf. I kept working these blends together until I was happy with the transition where the colors meet.

To demonstrate that this Tip to Tip Technique can work with other colors, I’ve created leaves using Old Olive with Soft Suede and Daffodil Delight with Cherry Cobbler. Don’t worry about your markers being contaminated—all you need to do is run them over some scrap paper a few times and the nibs will clean themselves.

Tip to Tip Blending Technique Tutorial Video

Supplies:

Stamps/Bundle: Gather Together Bundle (153036)

Inks: Tuxedo Black Memento Ink Pad (132708), VersaMark Ink (102283)

Paper: Cherry Cobbler (119685), Whisper White (100730), Daffodil Delight (119683), In Good Taste Designer Series Paper (152494), Copper Foil Sheets (142020), Plaid Tidings 6″ x 6″ Designer Series Paper (153527)

Accessories: Stitched Rectangles Dies (151820), Woodland Embossing Folder (152881), White Stampin’ Embossing Powder (109132), Holiday Rhinestone Basic Jewels (150457), Cherry Cobbler Stampin’ Blends Combo Pack (154880), Daffodil Delight Stampin’ Blends Combo Pack (154883), Calypso Coral Stampin’ Blends Combo Pack (154881), Old Olive Stampin’ Blends Combo Pack (154892), Soft Suede Stampin’ Blends Combo Pack (154906), Stampin’ Blends Color Lifter (144608 ), Paper Snips (103579), Bone Folder (102300), Mini Glue Dots (103683), Stampin’ Seal (152813), Stampin’ Dimensionals (104430)

Measurements: 

  • Cherry Cobbler: 8 ½” x 5 ½”; scored at 4 ¼”
    • Small leaf die:1 ½”x 1 ½”
    • Sentiment: 3 ½” x 1 ½”
  • Whisper White: 5” x 3 ½”
    • 3 pieces: 2 ½” x 2 ½” (for larger leaves)
  • Daffodil Delight: 1 ½”x 1 ½”
  • In Good Taste Designer Series Paper: 5 ¼” x 4”
  • Plaid Tidings 6″ x 6″ Designer Series Paper: 1” x 5”
  • Copper Foil Sheets: 3/8” x 4 1/8” (scrap)
Close Up of my Let's Gather Together Card
Close Up of my Let’s GatherTogether Card

Instructions for My Let’s Gather Together Card: 

  1. Fold the Cherry Cobbler card stock in half to create the card base.
  2. Stamp the leaves in Tuxedo Black Memento Ink on the 3 pieces of Whisper White
  3. Colour the leaves with the Stampin’ Blends listed above using the video for reference when colouring them
  4. Die cut the leaves with the corresponding dies from the Gather Together Bundle
  5. Using the Gather Together Bundle, die cut the smallest leaves in Daffodil Delight and Cherry Cobbler
  6. Die cut with the third largest Stitched Rectangle a frame from the In Good Taste Designer Series Paper
  7. Emboss the Whisper White card stock with the Woodland Embossing Folder
  8. Stamp the sentiment in VersaMark Ink on the Cherry Cobbler piece and heat emboss it with White Stampin’ Embossing Powder
  9. Die cut the sentiment out with the fourth smallest Stitched Rectangle
  10. Using Stampin’ Seal, adhere the embossed Whisper White piece in the center of the Cherry Cobbler base
  11. Adhere with Stampin’ Seal the Plaid Tidings piece in the centre of the Whisper White piece and adhere the Gold Foil piece centered on top
  12. Position two of the largest leaves where you want them at the top of the frame and adhere them with glue dots
  13. Position part of the third leave under the sentiment and adhere with glue dots.
  14. Add dimensionals to the leaves where they may need to have extra support
  15. Using dimensionals, pop up the sentiment in the centre of the card base
  16. Using dimensionals, pop up the frame making sure that some parts of the larger leaves are tucked under the frame and some parts are on top to create the “exploding” look
  17. Adhere the Daffodil Delight and Cherry Cobbler leaves to the Whisper White piece with dimensionals
  18. Add a scattering of the Holiday Rhinestones wherever needed to fill in space.

For Further Info:

Hope you like my Let’s Gather Together Card!

My Colouring Notes from my presentation:
https://stampwithlaurie.com/wp-content/uploads/2020/08/Stampin-Up-Blends-2020.pdf

Part 1Whiskey Business Card using Blending Different Colours Technique
Video Tutorial: Blending Different Colours Together

Part 2: Country Harvest Card using Light to Dark Technique
Video Tutorial: Light to Dark/Dark to Light Colouring

Part 3: Beautiful Poppy Birthday Card using Smooth Colouring Technique
Video Tutorial: Smooth Colouring

Part 4: Let’s Gather Together Card using Tip to Tip Blending Technique
Video Tutorial: Tip to Tip Colouring

Part 5So Grateful Cardinal Card using Flicking Colouring Technique
Video Tutorial: Flicking Colouring

Part 6: Let’s Celebrate You Card using Flicking of Different Colours Technique
Video Tutorial: Flicking of Different Colours Technique

You will find the items listed above in my online store.

My Beautiful Poppy Birthday Card

My Poppy Birthday Card
My Beautiful Poppy Birthday Card

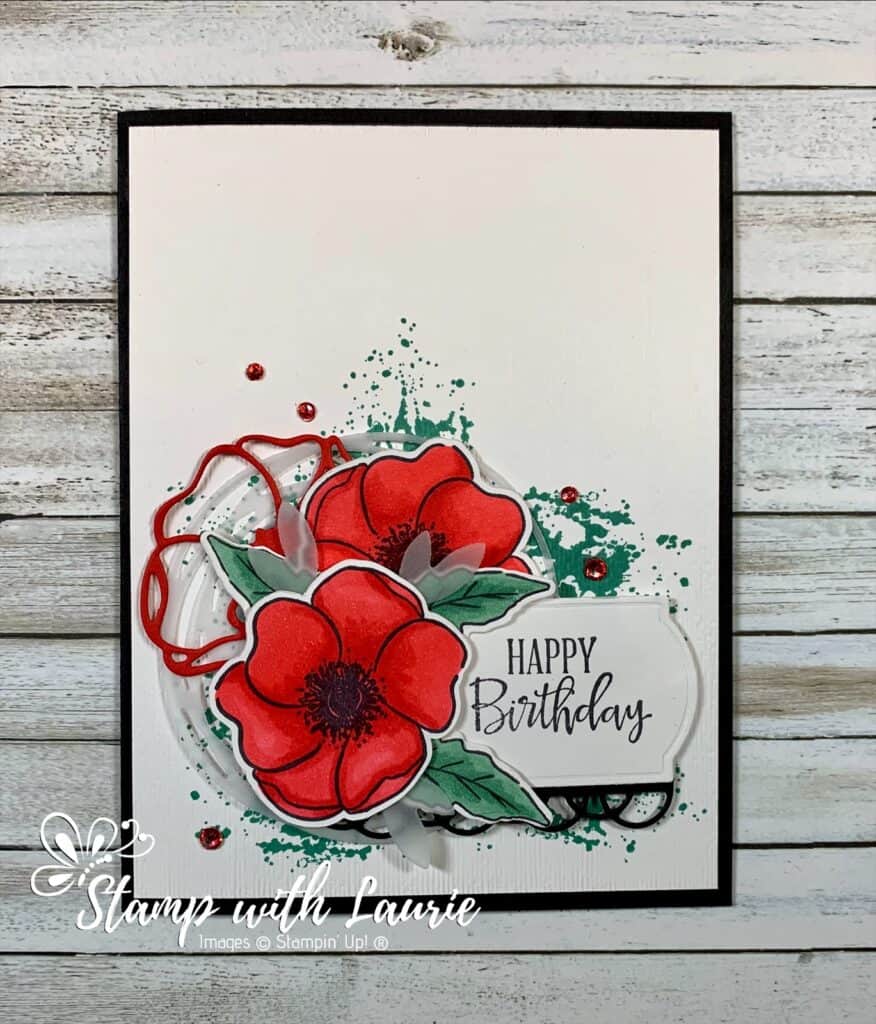
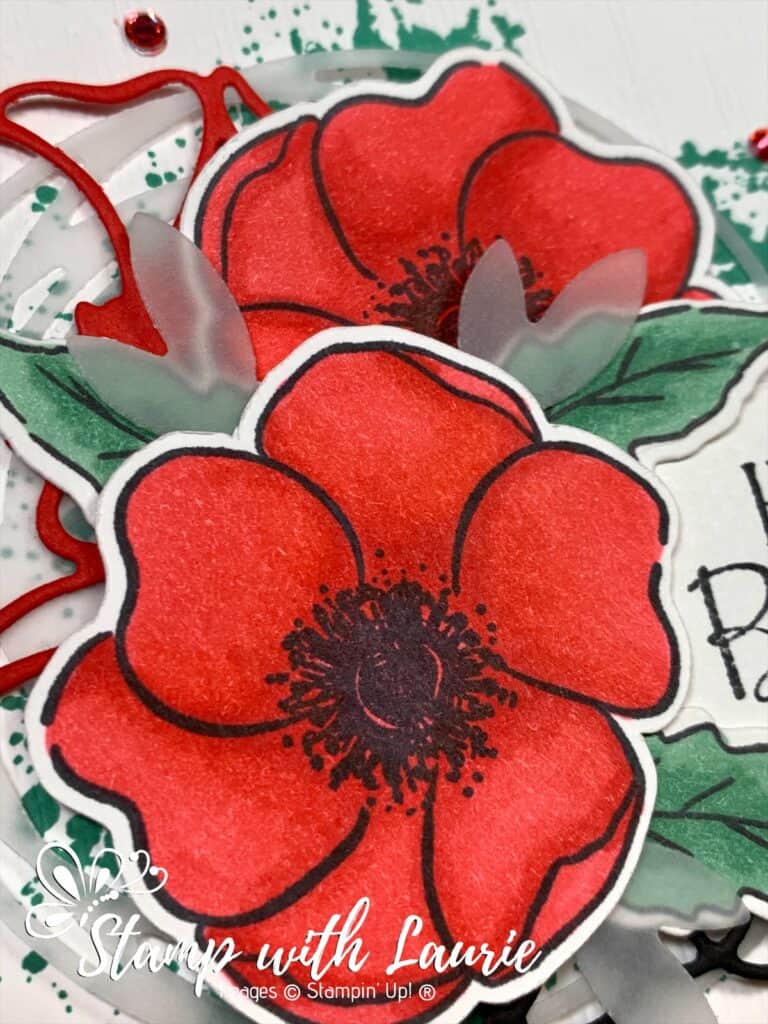
For Technique Tuesday, I am sharing my smooth colouring technique for my beautiful Poppy Birthday Card using the Painted Poppies Bundle. I used both this bundle and the Poppy Moment Dies for this stunning card. They compliment each other so well! Of course, I had to use Poppy Parade Stampin’ Blends to colour my poppies! I wanted to make the colouring the main focal point, but couldn’t resist using the Subtle 3D Embossing Folder on the Whisper White card stock once I stamped the Just Jade splotches. To add a bit of subtle dimension, I used Vellum for some of the leaves and the circular accent that grounds the piece. The Basic Rhinestones were coloured with the Dark Poppy Parade Stampin’ Blend to match my card.

For part 3 of my colouring videos with Stampin’ Blends, I am demonstrating the smooth colouring technique. The other 2 parts are listed below at the end of this document. One of the most exciting things about Blends, as the name suggests, is their blending capabilities. 

Smooth Colouring Technique

  • Apply a smooth layer in small circles of the lightest colour to your image. If you have a large area to cover, work in sections to keep the ink moist. This wet ink will help with the blending.
  • Add the dark colour where the shadows will be using a flicking motion to help with the blending process and reduce the amount of ink needed for a smooth blend.
  • Use the light colour to blend along the area where the dark and the light colours meet
  • You may need to go over it a few times to get it blended how you like.
  • Blends have the ability to lay down smooth, even colour without streaks
  • Colour in small circles keeping the leading edge wet and allow the ink to blend to create a seamless look
  • Make sure you saturate the entire area so that you eliminate any light or mottled areas
  • Check the back of your paper to make sure that the ink is saturating evenly
My Poppy Birthday Card Colouring Tutorial

Supplies:

Stamps: Painted Poppies Bundle (153827)

Inks: Tuxedo Black Memento Ink Pad (132708), Just Jade Classic Stampin’ Pad (153115)

Paper: Basic Black (121045), Whisper White (100730), Poppy Parade (119793), Vellum (101856)

Accessories: Poppy Moments Dies (151594), Subtle 3D Embossing Folder (151775 ), Rhinestone Basic Jewels (144220), Poppy Parade Stampin’ Blends Combo Pack (154958), Just Jade Stampin’ Blends Combo Pack (153107), Stampin’ Blends Color Lifter (144608 ), Paper Snips (103579), Bone Folder (102300), Mini Glue Dots (103683), Stampin’ Seal (152813), Stampin’ Dimensionals (104430)

Measurements: 

  • Basic Black: 8 ½” x 5 ½”; scored at 4 ¼”
    • Scraps for scallop die
  • Whisper White: 4” x 5 ¼”
    • 1 ½” x 2 ¾” (sentiment)
    • 2 pieces: 2” x 2” (for poppies)
    • Scraps for 3 leaves
  • Poppy Parade: 2 ¼” x 1 ½”
  • Vellum: 3” x 3” (circular accent)
    • Scraps for 3 leaves
Close Up of My Beautiful Poppy Birthday Card

Instructions for My Poppy Birthday Card: 

  1. Fold the Basic Black card stock in half to create the card base.
  2. Stamp the poppies and leaves in Tuxedo Black Memento Ink on Whisper White
  3. Colour the poppies and leaves with the Stampin’ Blends listed above using the video for reference when colouring the poppies
  4. Die cut the poppies and leaves with the corresponding dies from the Painted Labels Dies
  5. Using the Poppy Moments Dies, die cut the poppy outline in Poppy Parade
  6. Die cut a scrap of Basic Black card stock with the scallop border dies from the Painted Labels Dies
  7. Die cut a scrap of Vellum with the small leaves with the stem from the Poppy Moments Dies
  8. Using the Painted Labels Dies, die cut the circular accent in Vellum
  9. Stamp the sentiment in Tuxedo Black Memento Ink on Whisper White and die cut it out with the appropriate Painted Labels Dies
  10. Stamp the splotch in Just Jade in the bottom half of the Whisper White piece
  11. Emboss this piece with the Subtle Embossing Folder and adhere to the card base
  12. Using glue dots, adhere the Vellum circle to the card base
  13. Adhere the Basic Black scallop border to the sentiment and attach to the card base with dimensionals
  14. Using glue dots, adhere the Basic Black poppy center to the poppy frame and adhere to the Vellum circle with glue dots.
  15. Slip one of the poppies behind the sentiment and adhere with glue dots
  16. Adhere with glue dots, the leaves to the other poppy and place on card base with dimensionals
  17. Colour the Basic Rhinestones with the Dark Poppy Parade Stampin’ Blend and add to the card

For Further Info:

Hope you like my Poppy Birthday Card!

My Colouring Notes from my presentation:
https://stampwithlaurie.com/wp-content/uploads/2020/08/Stampin-Up-Blends-2020.pdf

Part 1: Whiskey Business Card using Blending Different Colours Technique
Video Tutorial: Blending Different Colours Together

Part 2: Country Harvest Card using Light to Dark Technique
Video Tutorial: Light to Dark/Dark to Light

Part 3: Beautiful Poppy Birthday Card using Smooth Colouring Technique
Video Tutorial: Smooth Colouring

Part 4: Let’s Gather Together Card using Tip to Tip Blending Technique
Video Tutorial: Tip to Tip Colouring

Part 5So Grateful Cardinal Card using Flicking Colouring Technique
Video Tutorial: Flicking Colouring

Part 6: Let’s Celebrate You Card using Flicking of Different Colours Technique
Video Tutorial: Flicking of Different Colours Technique

You will find the items listed above in my online store.

My Country Harvest Card

My Country Home Card
My Country Harvest Card

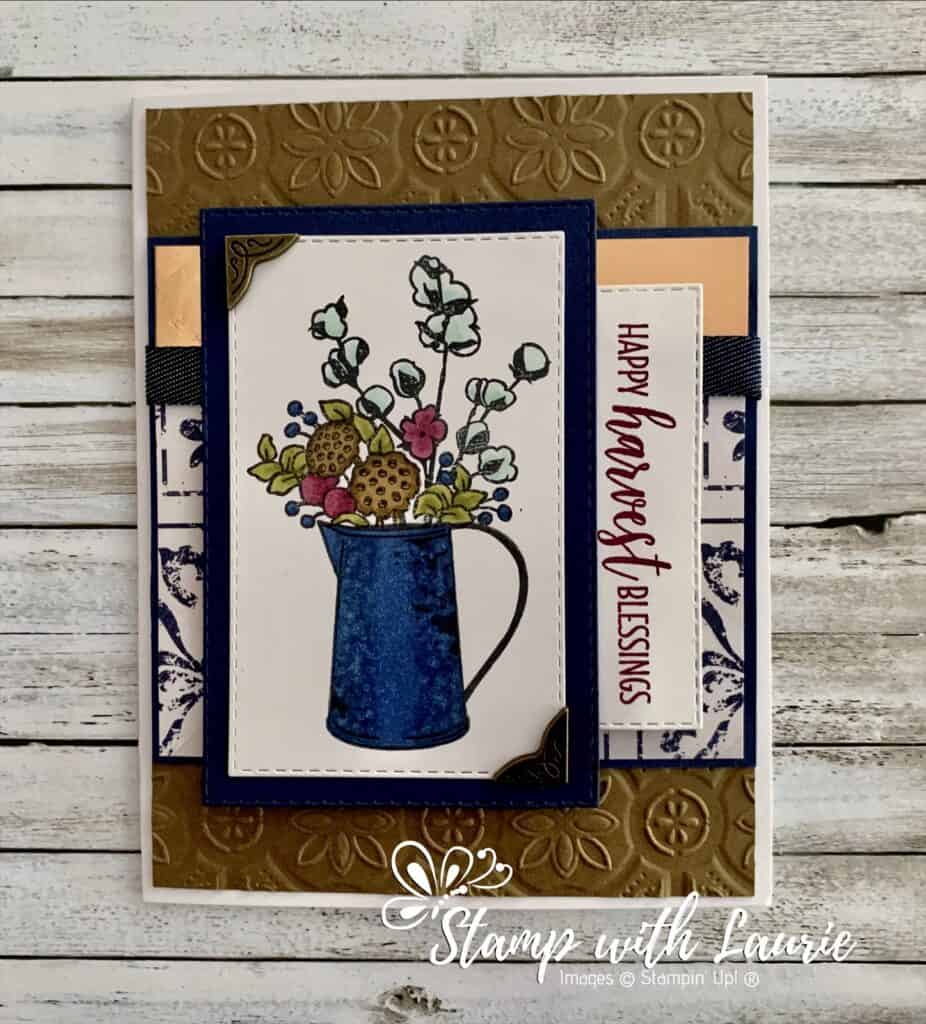
I am happy to share my Country Harvest Card that is using my colouring techniques that I recently presented to fellow demonstrators. For my card, I knew I wanted to use an oldie, but a goodie, the Tin Tile 3D Embossing Folder! The In Good Taste Designer Series Paper has a photographic image of tiles that I thought would tie in nicely with the embossing folder and the country theme of my card. To further the country theme, I used the Denim Ribbon to transition between the DSP and the Brass Foil piece. I used the Brass Foil as an accent, but you could use one of the new Brushed Metallic Cardstock instead. To finish the card, I used two Antiqued Corners to set off the coloured image.

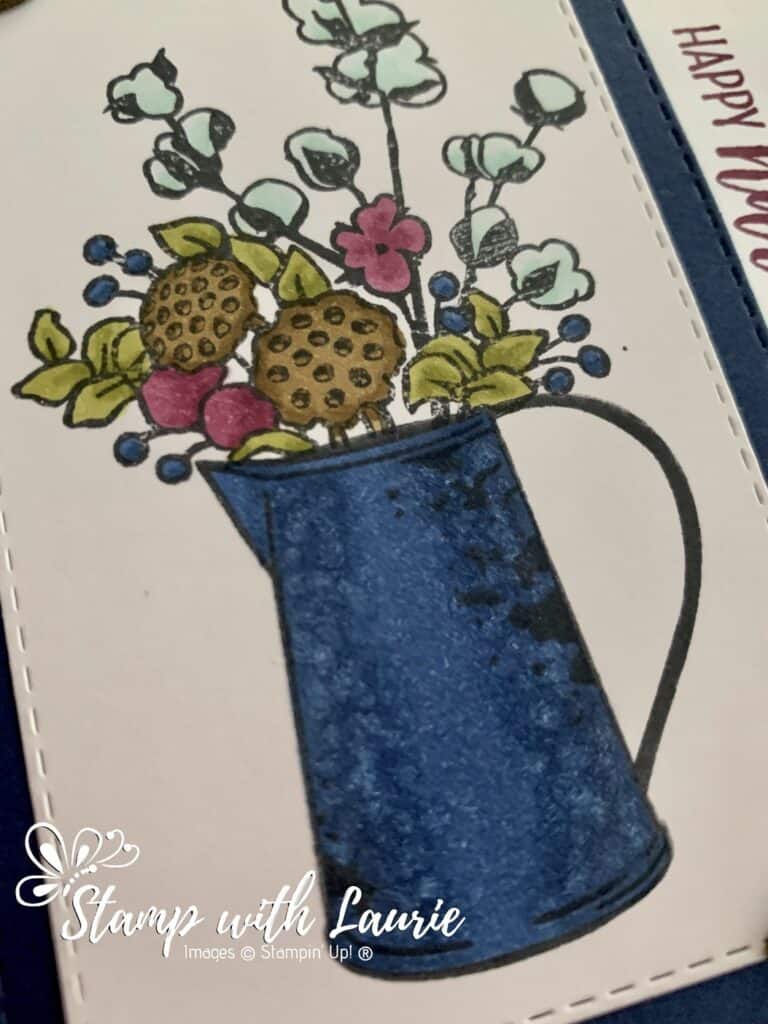
For Part 2 of my colouring with Stampin’ Blends from my presentation, I am showing the difference between colouring light to dark versus dark to light. For this demonstration, I used the jug from the Country Home Photopolymer Stamp Set. Some people prefer adding ink from light to dark creating a saturation of ink for easy blending. Others prefer to add ink from dark to light creating a lighter coloured image since you use less ink. The two most common ways to add ink are circling and flicking. Each technique produces a particular appearance and knowing how to use them will add depth and variation to your projects.

My Colouring Video Presentation Showing Light to Dark/Dark to Light Colouring

Supplies:

Stamps: Country Home Photopolymer Stamp Set (147678)

Inks: Tuxedo Black Memento Ink Pad (132708), Rich Razzleberry Classic Stampin’ Pad (147091)

Paper: Whisper White Thick (140272 ), Soft Suede (115318), Whisper White (100730), Night of Navy (100867 ), Brass Foil Sheets (153057), In Good Taste Designer Series Paper (152494)

Accessories: Stitched Rectangles Dies (151820), Tin Tile 3D Embossing Folder (151801), Antiqued Corners & Slides Elements (152471), Denim Ribbon (149590), Night of Navy Stampin’ Blends Combo Pack (144040), Rich Razzleberry Stampin’ Blends Combo Pack (144602), Soft Suede Stampin’ Blends Combo Pack (154906), Old Olive Stampin’ Blends Combo Pack (154892 ), Pool Party Stampin’ Blends Combo Pack (144605 ), Stampin’ Blends Color Lifter (144608 ), Paper Snips (103579), Bone Folder (102300), Mini Glue Dots (103683), Stampin’ Seal (152813), Stampin’ Dimensionals (104430)

Measurements: 

  • Whisper White Thick: 8 ½” x 5 ½”; scored at 4 ¼” 
  • Soft Suede: 4” x 5 ¼”
  • Night of Navy – 2 pieces: 3 ½” x 4”
    • 2 ¾” x 4” (stitched rectangle)
  • In Good Taste Designer Series Paper: 2 ½” x 3 7/8
  • Brass Foil Sheets: ¾” x 3 7/8
  • Whisper White – 2 pieces: 3” x 1 ¼” (sentiment)
    • 2 ½” x 3 ¾”
  • Denim Ribbon: 5”
Close Up of My Country Home Card
Close Up of My Country Harvest Card

Instructions:

  1. Fold the Whisper White Thick card stock in half to create the card base.
  2. Stamp the jug and flowers in Tuxedo Black Memento Ink on the larger piece of Whisper White
  3. Colour the flowers and jug with the Stampin’ Blends listed above using the video for reference when colouring the jug
  4. Die cut the jug and flowers with the fifth largest Stitched Rectangles Die
  5. Die cut the Night of Navy card stock with the fourth largest Stitched Rectangles Die
  6. Adhere this Night of Navy piece to the coloured image
  7. Emboss the Soft Suede with the Tin Tile 3D Embossing Folder
  8. Stamp the sentiment in Rich Razzleberry and die cut it out with the third smallest Stitched Rectangles Die
  9. Adhere the Soft Suede to the card base with Stampin’ Seal
  10. Adhere the Brass Foil piece and the In Good Taste Designer Series Paper to the larger Night of Navy piece with Stampin’ Seal
  11. Wrap the Denim Ribbon around the Night of Navy piece and adhere to back.
  12. Adhere this Night of Navy piece to the Soft Suede with Stampin’ Seal
  13. Using dimensionals, adhere the coloured image piece to the card base
  14. Tuck the sentiment to the side of this stitched piece and adhere it with dimensionals
  15. Affix the Antiqued Corners & Slides Elements with glue dots

For Further Info:

Hope you like my Country Harvest Card!

My Colouring Notes from my presentation:
https://stampwithlaurie.com/wp-content/uploads/2020/08/Stampin-Up-Blends-2020.pdf

Part 1Whiskey Business Card using Blending Different Colours Technique
Video Tutorial: Blending Different Colours Together

Part 2: Country Harvest Card using Light to Dark Technique
Video Tutorial: Light to Dark/Dark to Light 

Part 3Beautiful Poppy Birthday Card using Smooth Colouring Technique
Video Tutorial: Smooth Colouring

Part 4: Let’s Gather Together Card using Tip to Tip Blending Technique
Video Tutorial: Tip to Tip Colouring

Part 5So Grateful Cardinal Card using Flicking Colouring Technique
Video Tutorial: Flicking Colouring

Part 6: Let’s Celebrate You Card using Flicking of Different Colours Technique
Video Tutorial: Flicking of Different Colours Technique

You will find the items listed above in my online store.

My Whiskey Business Card

My Whiskey Business Card

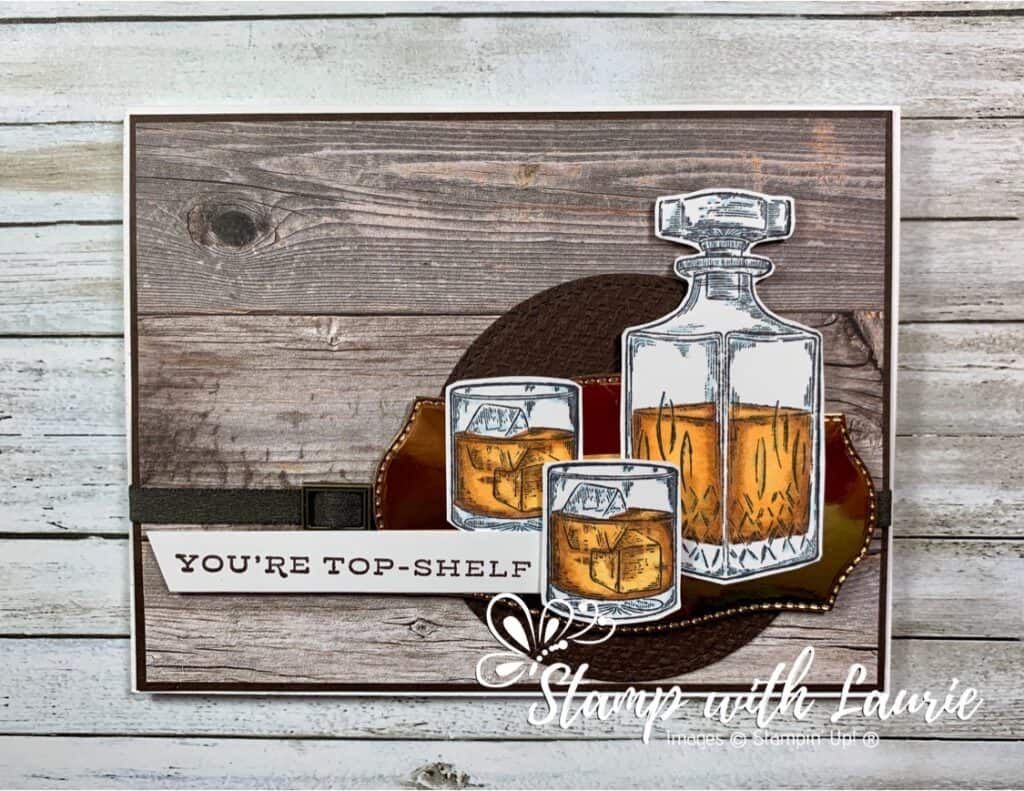
I was honoured to be asked to virtually demonstrate in a Facebook Live my Blends Colouring Techniques to some fellow demonstrators. So, I thought I would share for Technique Tuesdays some of my colouring techniques from the live video each week highlighting a card that I presented. The first card that I am highlighting this week is my Whiskey Business Card. I hope you will check back each week and maybe learn something new!

This card is perfect for that man in your life who loves his whiskey! This can be a Father’s Day card, a birthday card, a congratulations card…so many options. For this card, I wanted to create an old-world library kind of feel with the whiskey on a brass platter waiting for someone to help themselves. The World of Good Designer Series Paper with the wood image lends itself very well to that feel. The Early Espresso Faux Suede Ribbon and the buckle from the Antiqued Corners & Slides Elements both add to this feel as well.

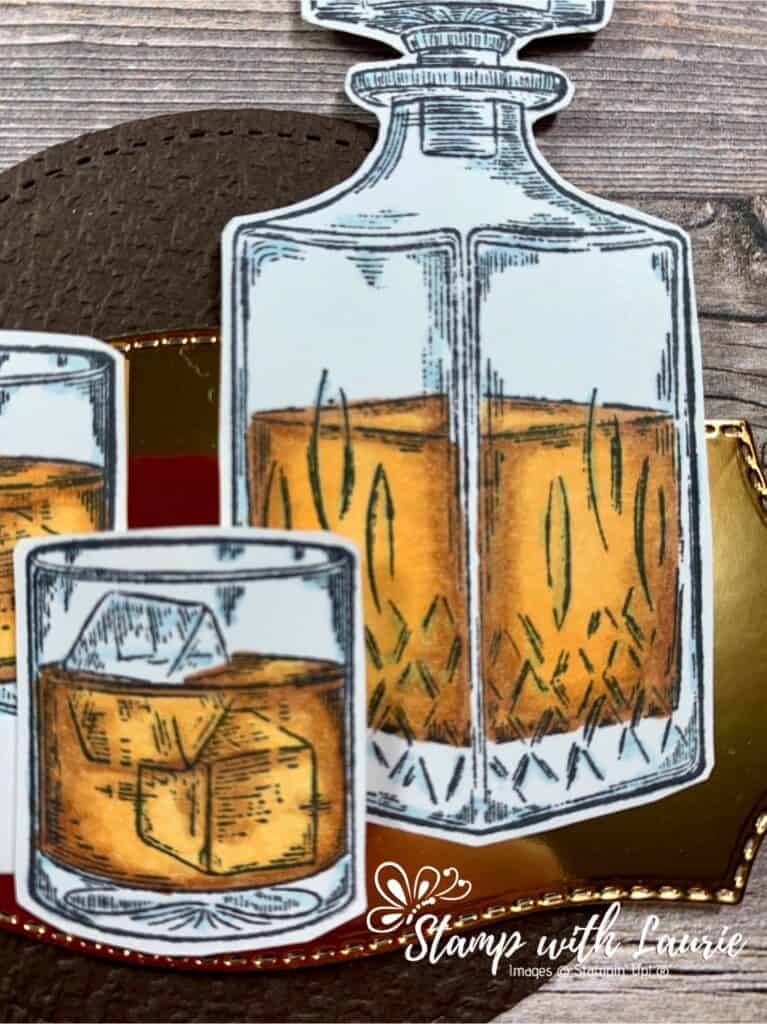
Close Up of My Colouring for My Whiskey Business Card

Supplies:

Stamps: Whiskey Business Stamp Set (154091)

Inks: Tuxedo Black Memento Ink Pad (132708)

Paper: Whisper White Thick (140272 ), Early Espresso (119686), Whisper White (100730), Brass Foil Sheets (153057), World of Good Designer Series Paper (152491)

Accessories: Stitched Shapes Dies (152323), Tasteful Labels Dies (152886), Tasteful Textile 3D Embossing Folder (152718), Antiqued Corners & Slides Elements (152471), Early Espresso Faux Suede Ribbon (152472), Cinnamon Cider Stampin’ Blends Combo Pack (153105), Mango Melody Stampin’ Blends Combo Pack (154888), Balmy Blue Stampin’ Blends Combo Pack (148544), Stampin’ Blends Color Lifter (144608 ), Paper Snips (103579), Bone Folder (102300), Adhesive Sheets (152334 ), Multipurpose Liquid Glue (110755 ), Mini Glue Dots (103683), Stampin’ Seal (152813), Stampin’ Dimensionals (104430)

Measurements: 

  • Whisper White Thick: 8 ½” x 5 ½”; scored at 4 ¼” 
  • Early Espresso: 2 pieces
    • 1/8” x 5 3/8” (for mat)
    • 3 ¼” x 3 ¼” (for circle)
  • World of Good Designer Series Paper: 4” x 5 ¼”
  • Brass Foil Sheets: 3 ¾” x 2”
  • Whisper White – 2 pieces: 3 ¼” x ½” (sentiment)
    • Scrap large enough to stamp glasses and tumbler
  • Early Espresso Faux Suede Ribbon: 6”

Instructions:

  1. Fold the Whisper White Thick card stock in half to create the card base.
  2. Stamp the whiskey decanter and glasses in Tuxedo Black Memento Ink Pad on the scrap of Whisper White
  3. Die cut the Early Espresso card stock with the largest Stitched Circle Die
  4. Emboss the stitched circle with the Tasteful Textile 3D Embossing Folder
  5. Die cut the Brass Foil piece with the appropriate Tasteful Labels Dies
  6. Colour the whiskey decanter and glasses with Cinnamon Cider and Dark Mango Melody for the liquid and Light Balmy Blue and Color Lifter for the glass according to the video:
Whiskey Business Colouring Tutorial Video
  1. Fussy cut the decanter and glasses out
  2. Stamp the sentiment in Tuxedo Black Memento Ink Pad on the Whisper White piece. Trim one end on an angle
  3. Adhere the World of Good Designer Series Paper to the Early Espresso mat
  4. Thread the buckle onto the Early Espresso Faux Suede Ribbon and affix the ribbon to the card
  5. Adhere this piece to the card base with Stampin’ Seal
  6. Slip the embossed stitched circle under the ribbon and adhere with Multipurpose Liquid Glue
  7. Using dimensionals, adhere the brass “platter so that it straddles the ribbon
  8. Adhere the decanter and one glass using Stampin’ Seal on the “platter”
  9. Use dimensionals for the remaining glass
  10. Affix the sentiment under the raised glass with a glue dot and a dimensional at the other end of sentiment

For Further Info:

Hope you like my Whiskey Business Card!

My Colouring Notes from my presentation:
https://stampwithlaurie.com/wp-content/uploads/2020/08/Stampin-Up-Blends-2020.pdf

Part 1: Whiskey Business Card using Blending Different Colours Technique
Video Tutorial: Blending Different Colours Together

Part 2: Country Harvest Card using Light to Dark Technique
Video Tutorial: Light to Dark/Dark to Light 

Part 3Beautiful Poppy Birthday Card using Smooth Colouring Technique
Video Tutorial: Smooth Colouring

Part 4: Let’s Gather Together Card using Tip to Tip Blending Technique
Video Tutorial: Tip to Tip Colouring

Part 5So Grateful Cardinal Card using Flicking Colouring Technique
Video Tutorial: Flicking Colouring

Part 6: Let’s Celebrate You Card using Flicking of Different Colours Technique
Video Tutorial: Flicking of Different Colours Technique

You will find the items listed above in my online store.